

Samsung 460, HG32NB460, HG39NB460 Installation Manual
LED TV
Installation manual
imagine the possibilities
Thank you for purchasing this Samsung product.
To receive more complete service, please register
your product at
www.samsung.com/register
Model Serial No.
Figures and illustrations in this User Manual are provided for reference only and may differ from actual product appearance.
Product design and specifications may be changed without notice.
Introduction
This TV B2B (Business to Business) model is designed for hotels or the other hospitality businesses, supports a variety of special functions,
and lets you limit some user (guest) controls.
Operational Modes
This TV only supports Standalone mode.
• Stand-alone mode : In this mode, this TV works alone without an external SBB or the STB.
The TV has a Hotel (Hospitality) Menu that lets you easily set its various hospitality functions. Please see pages 17 to 21.
The Menu also lets you activate or de-activate some TV and hospitality functions so you can create your optimal hospitality configuration.
Still image warning
Avoid displaying still images (such as jpeg picture files) or still image elements (such as TV channel logos, panorama or 4:3 format images,
stock or news bars or crawls) on the screen. Displaying still pictures continually can cause uneven screen wear, which will affect image
quality. To reduce the chance that this effect will occur, please follow the recommendations below:
• Avoid displaying the same TV channel for long periods.
• Always try to display a full screen image.
• Reduce brightness and contrast to help to prevent the occurrence of after-images.
• Frequently use all TV features designed to reduce image retention and screen burn-in. Refer to the proper user manual section for
details.
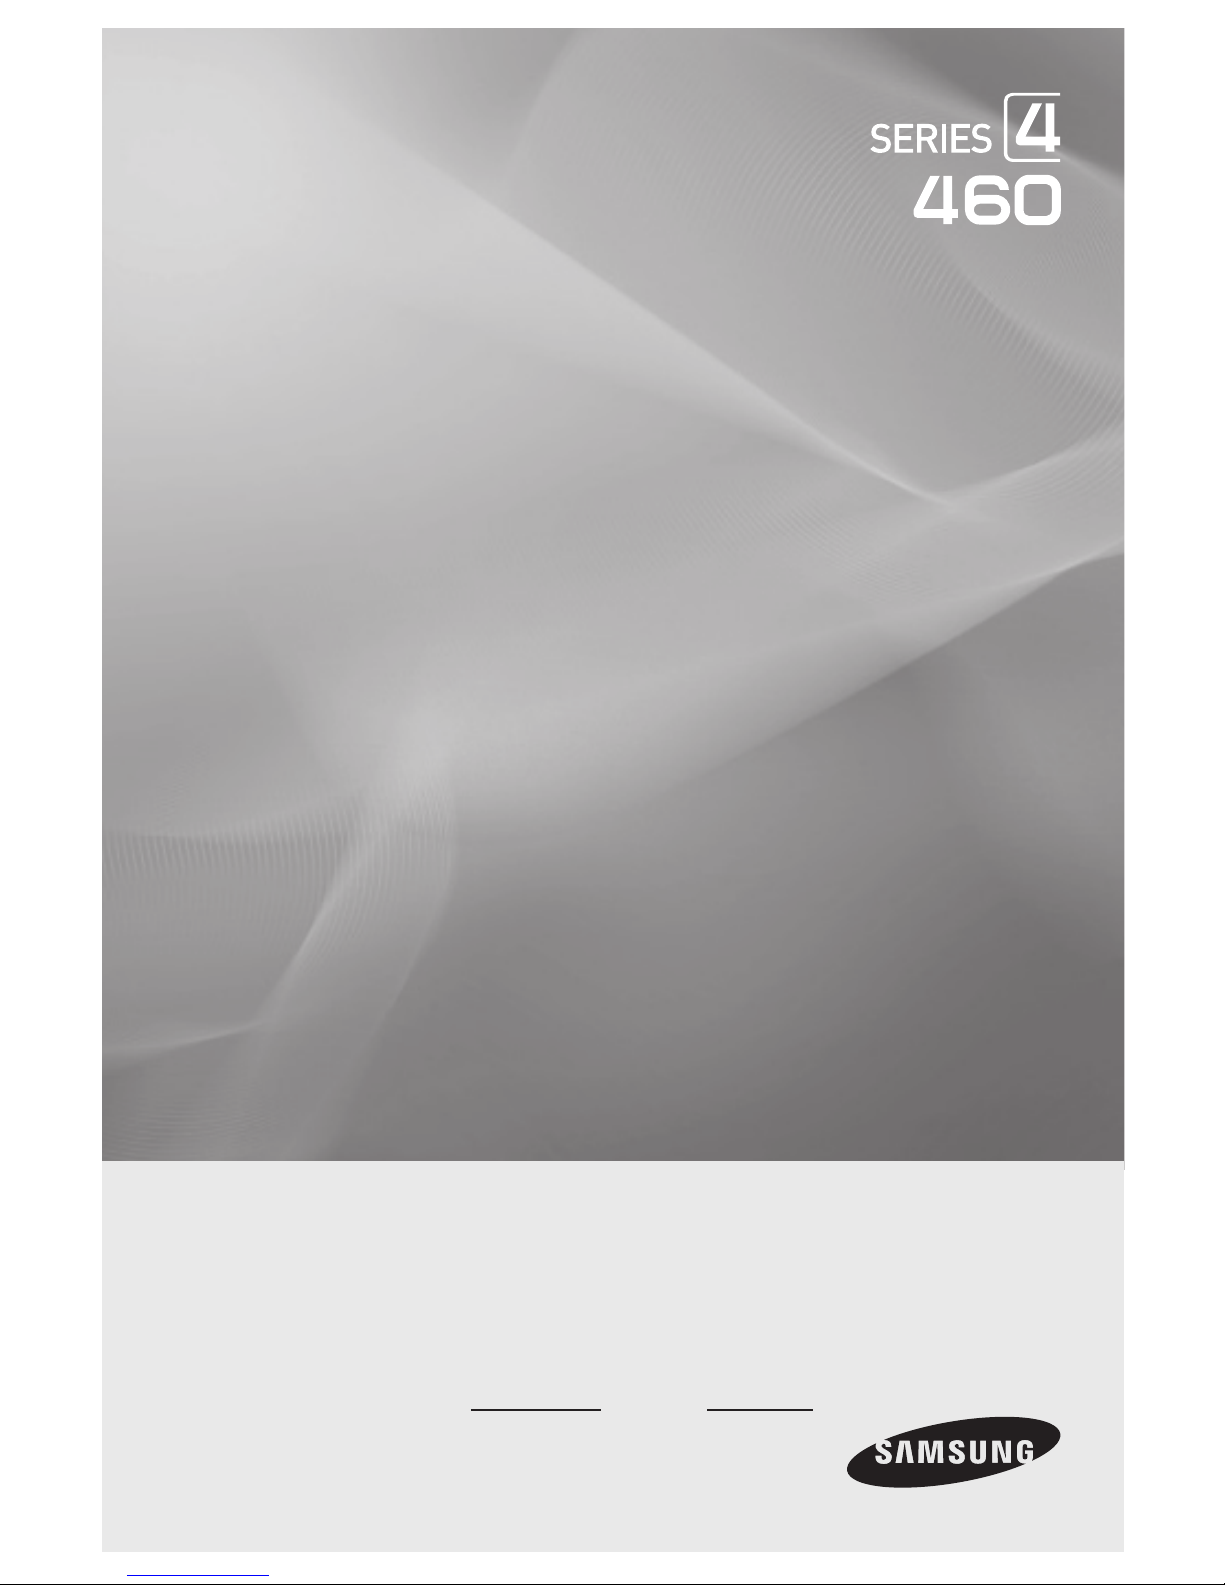
Ensuring Proper Ventilation
When you install the TV, maintain a distances of at least 4 inches between the TV and other object (walls, cabinet sides, etc.) to ensure
proper ventilation.
Failing to maintain proper ventilation may result in a fire or problems with the product caused by an increase in its internal temperature.
✎
When using a stand or wall-mount, use parts provided by Samsung Electronics only.
✎
Using parts provided by another manufacturer may cause difficulties with the product or result in injury caused by the product falling.
Installation with a stand. Installation with a wall-mount.
4 inches4 inches
4 inches
4 inches4 inches
4 inches
4 inches
Additional Information
✎
The appearance of the TV and its accessories may differ from the illustrations in this manual, depending on the TV.
✎
Be careful when the you touch the TV. Some parts can be hot.

3
Contents
English
y Introduction .............................................................................................................................................................. 2
y Operational Modes ................................................................................................................................................... 2
y Still image warning .................................................................................................................................................... 2
y Ensuring Proper Ventilation ....................................................................................................................................... 2
y Additional Information ............................................................................................................................................... 2
y Accessories .............................................................................................................................................................. 4
y Installing the LED TV Stand ....................................................................................................................................... 5
y Using the TV's Controller .......................................................................................................................................... 6
y The Connection Panel ............................................................................................................................................... 7
y Using the TV's Controller .......................................................................................................................................... 8
y Installing the Wall Mount ......................................................................................................................................... 28
y Securing the TV to the Wall ..................................................................................................................................... 29
y Caution of the cover-jack ........................................................................................................................................29
y Anti-theft Kensington Lock ...................................................................................................................................... 30
y Specifications ......................................................................................................................................................... 31
y Dimensions ............................................................................................................................................................. 32

4
English
Accessories
✎
Please make sure the following items are included with your LED TV. If any items are missing, contact your dealer.
✎
The items’ color and shape may vary, depending on the model.
✎
The parts for the stand are listed under Stand Components on the following page.
List of Parts
y Remote Control (AA59-00817A) &
Batteries (AAA x 2)
y Power Cord
y Safety Guide / Quick Setup Guide
(Not available in all locations)
y Holder-Wire stand
y Assembling the Holder Wire Stand
5
English
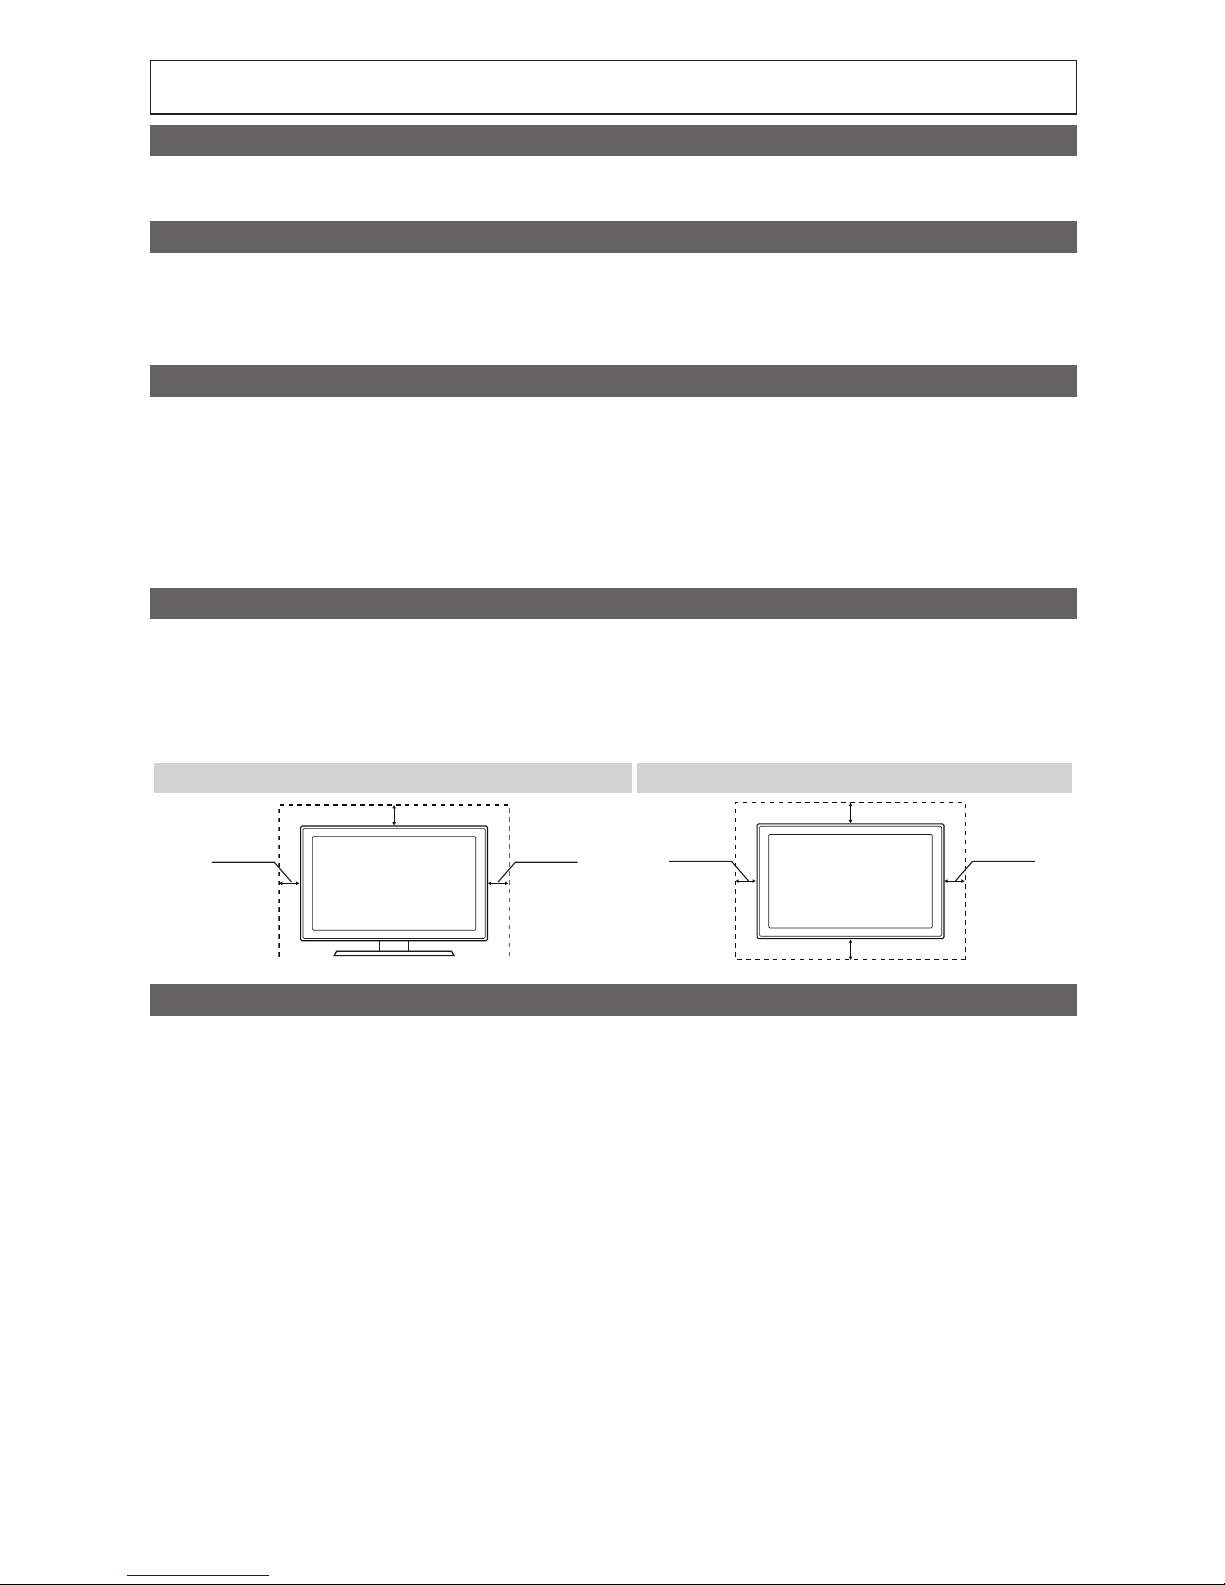
Installing the LED TV Stand
Components
When installing the stand, use the provided components and parts.
A
1 EA
B
1 EA
C
x7 (M4 X L12)
D
y Stand (differs depending
on the model)
y Guide Stand y Screws y Security Screws (3EA)
C
(M4 X L12)
x3
x3
(Security Screw)
D
or
✎
Place a soft cloth over a table to protect the TV, and
then place the TV on the cloth screen side down.
✎
Insert the Stand Guide into the slot on the bottom of
th e T V.
1 2
B
A
Front
3
DO NOT USE
CHEMICALS
DO NOT USE
GREASE
DO NOT USE
OIL
ATTENTION
C
(M4 X L12)
x4
Top View
Side
✎
NOTES
y Make sure to distinguish between the front and back of the Stand and Stand Guide when connecting them.
y Make sure that at least two people lift and move the LED TV.
y The number of screws may differ depending on the model.
or
6
English
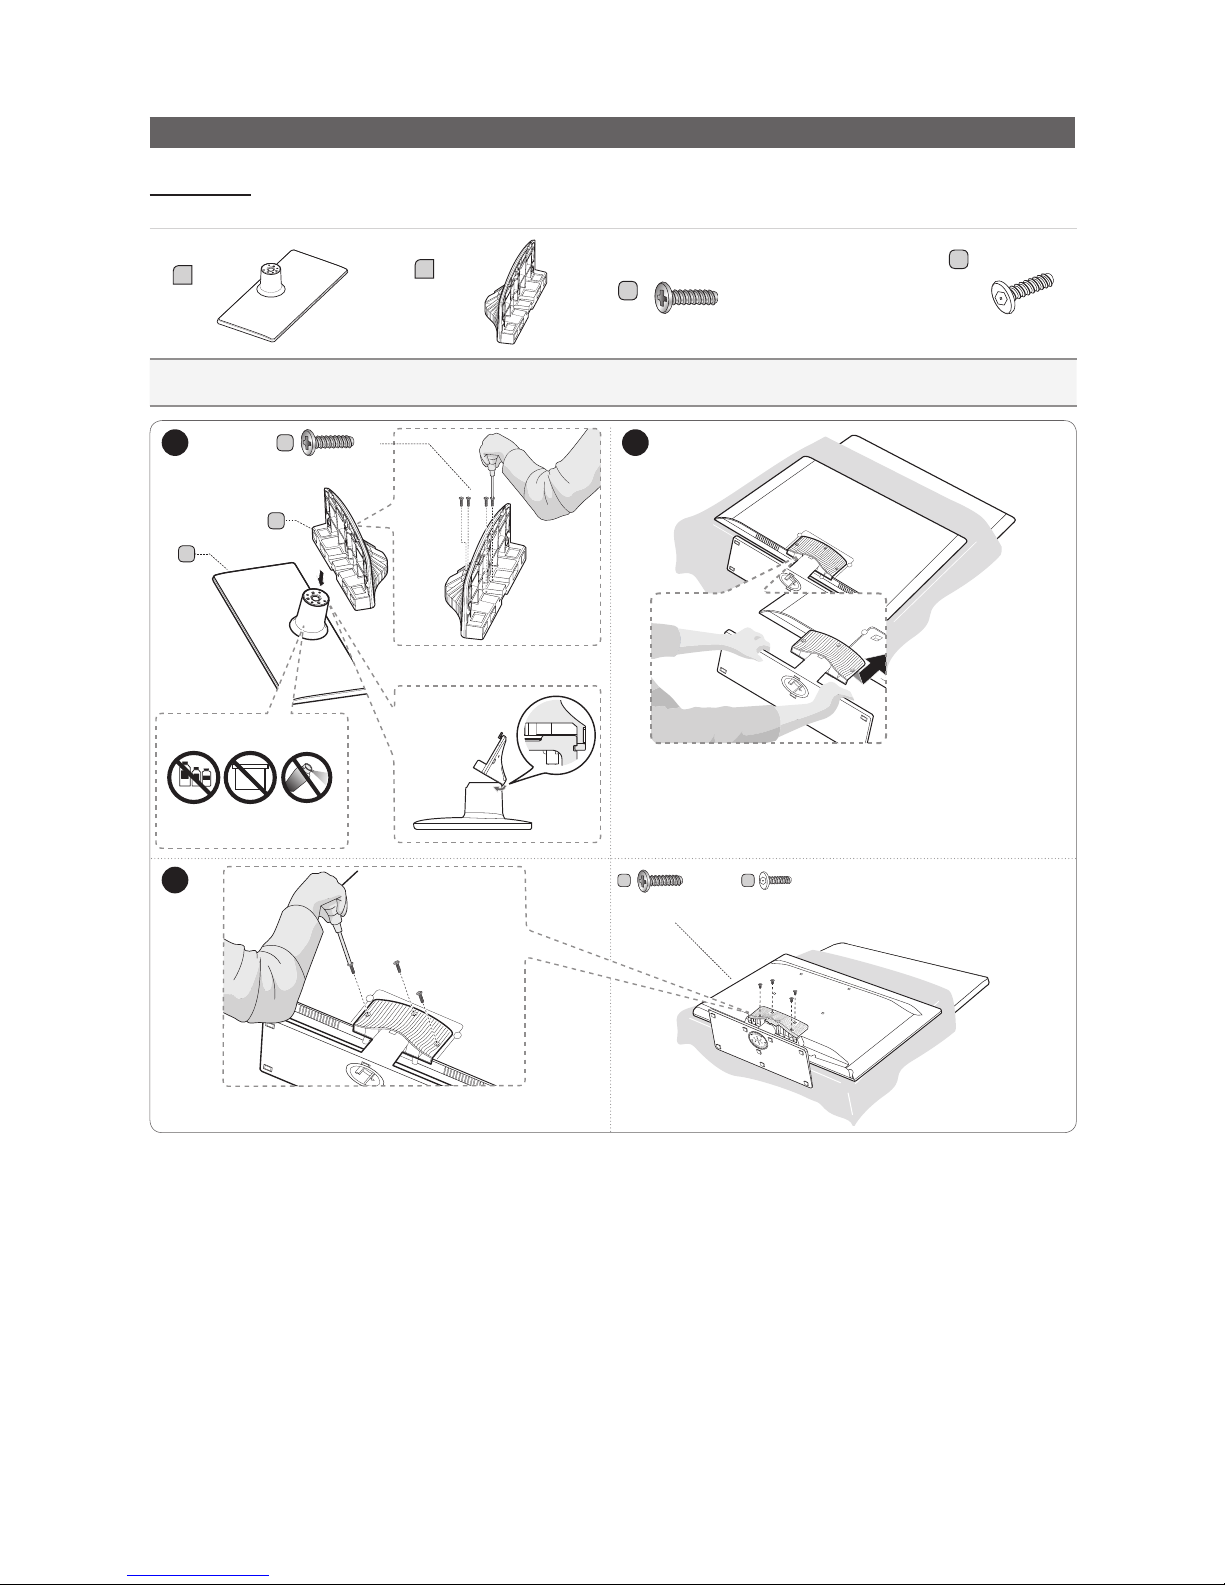
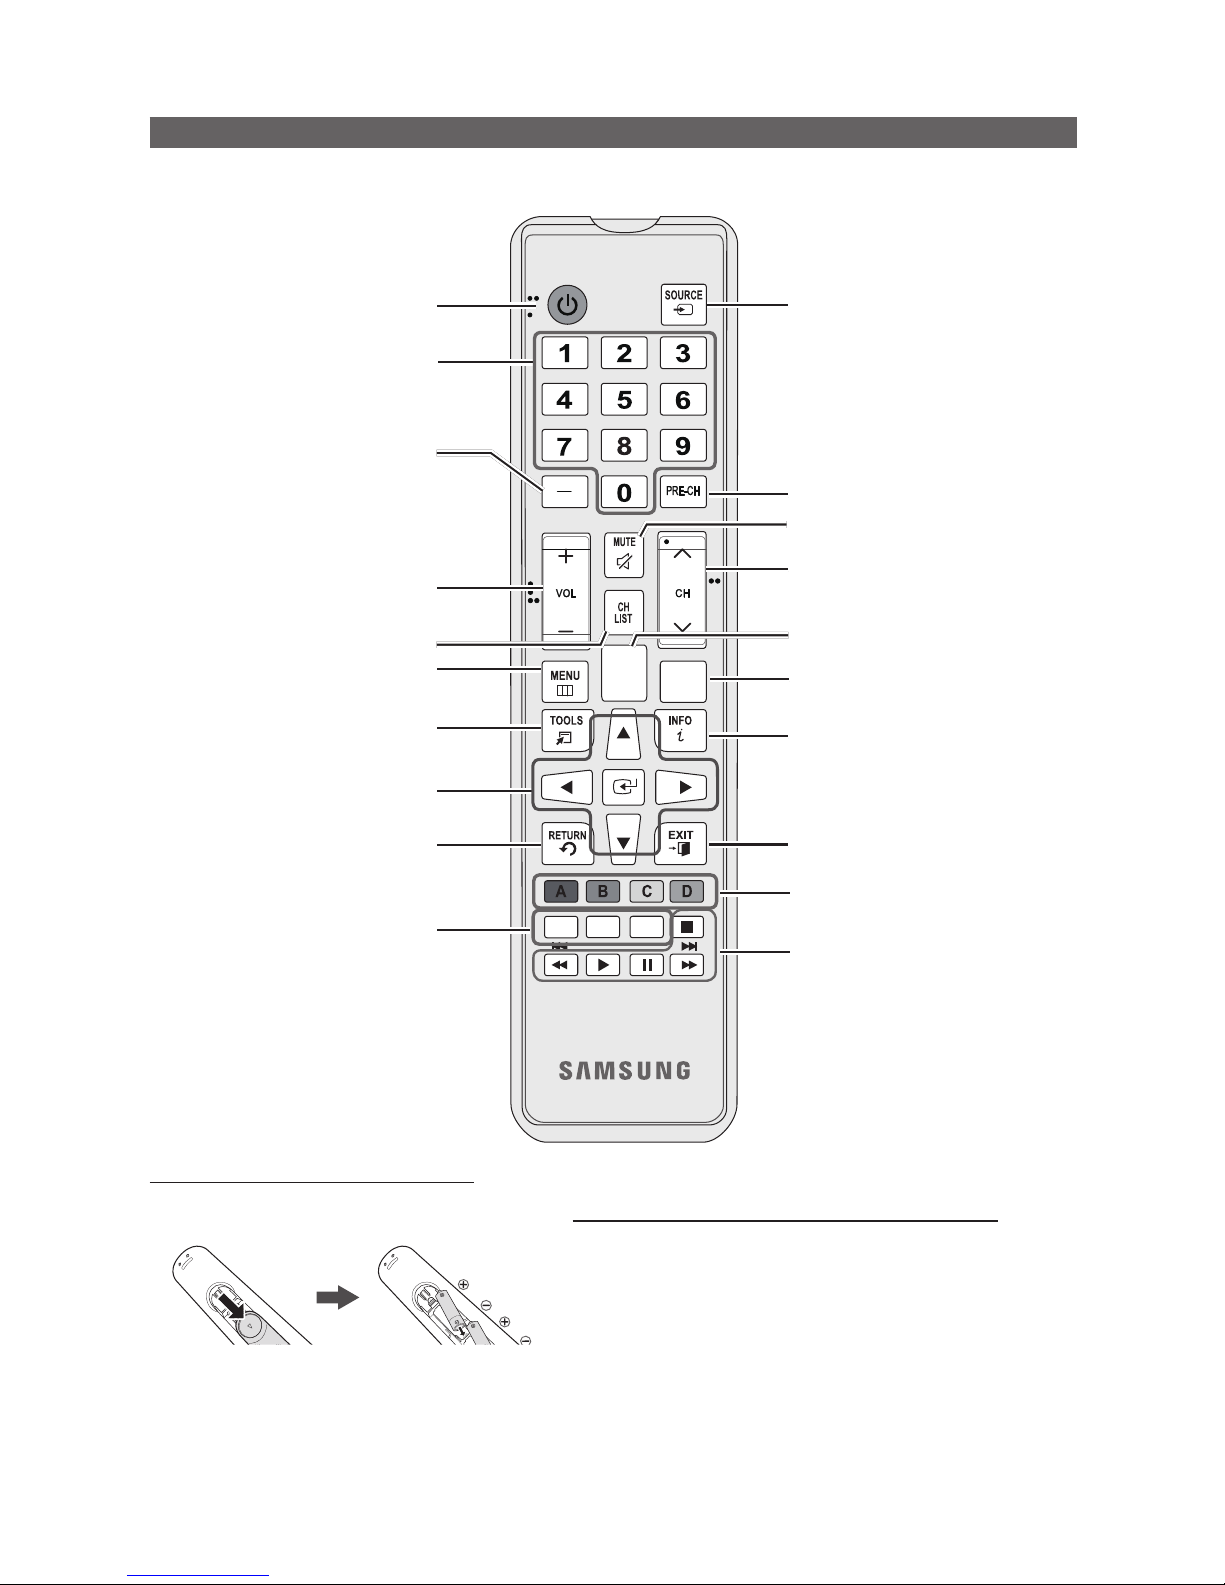
Using the TV's Controller
The TV’s Controller, a small joy stick like button on the rear right side of the TV, lets you control the TV without the remote
control.
Remote control sensor
TV Controller
The image is drawn
as if you are facing
the front side of
the TV.
Function menu
Return
Selecting the Media Play
Selecting a Source
Power off
Selecting the Menu
✎
The product color and shape may vary depending on the model.
✎
To exit the menu, press the Controller for more than 1 second.
✎
When selecting a function by moving the controller backwards/forwards/left/right, be sure not to press up on the
controller. If you press up first, it will not operate correctly.
Standby mode
Your TV enters Standby mode when you turn it off and continues to consume a small amount of electric power. To be safe
and to decrease power consumption, do not leave your TV in standby mode for long periods of time (when you are away on
vacation, for example). It is best to unplug the power cord.
7
English
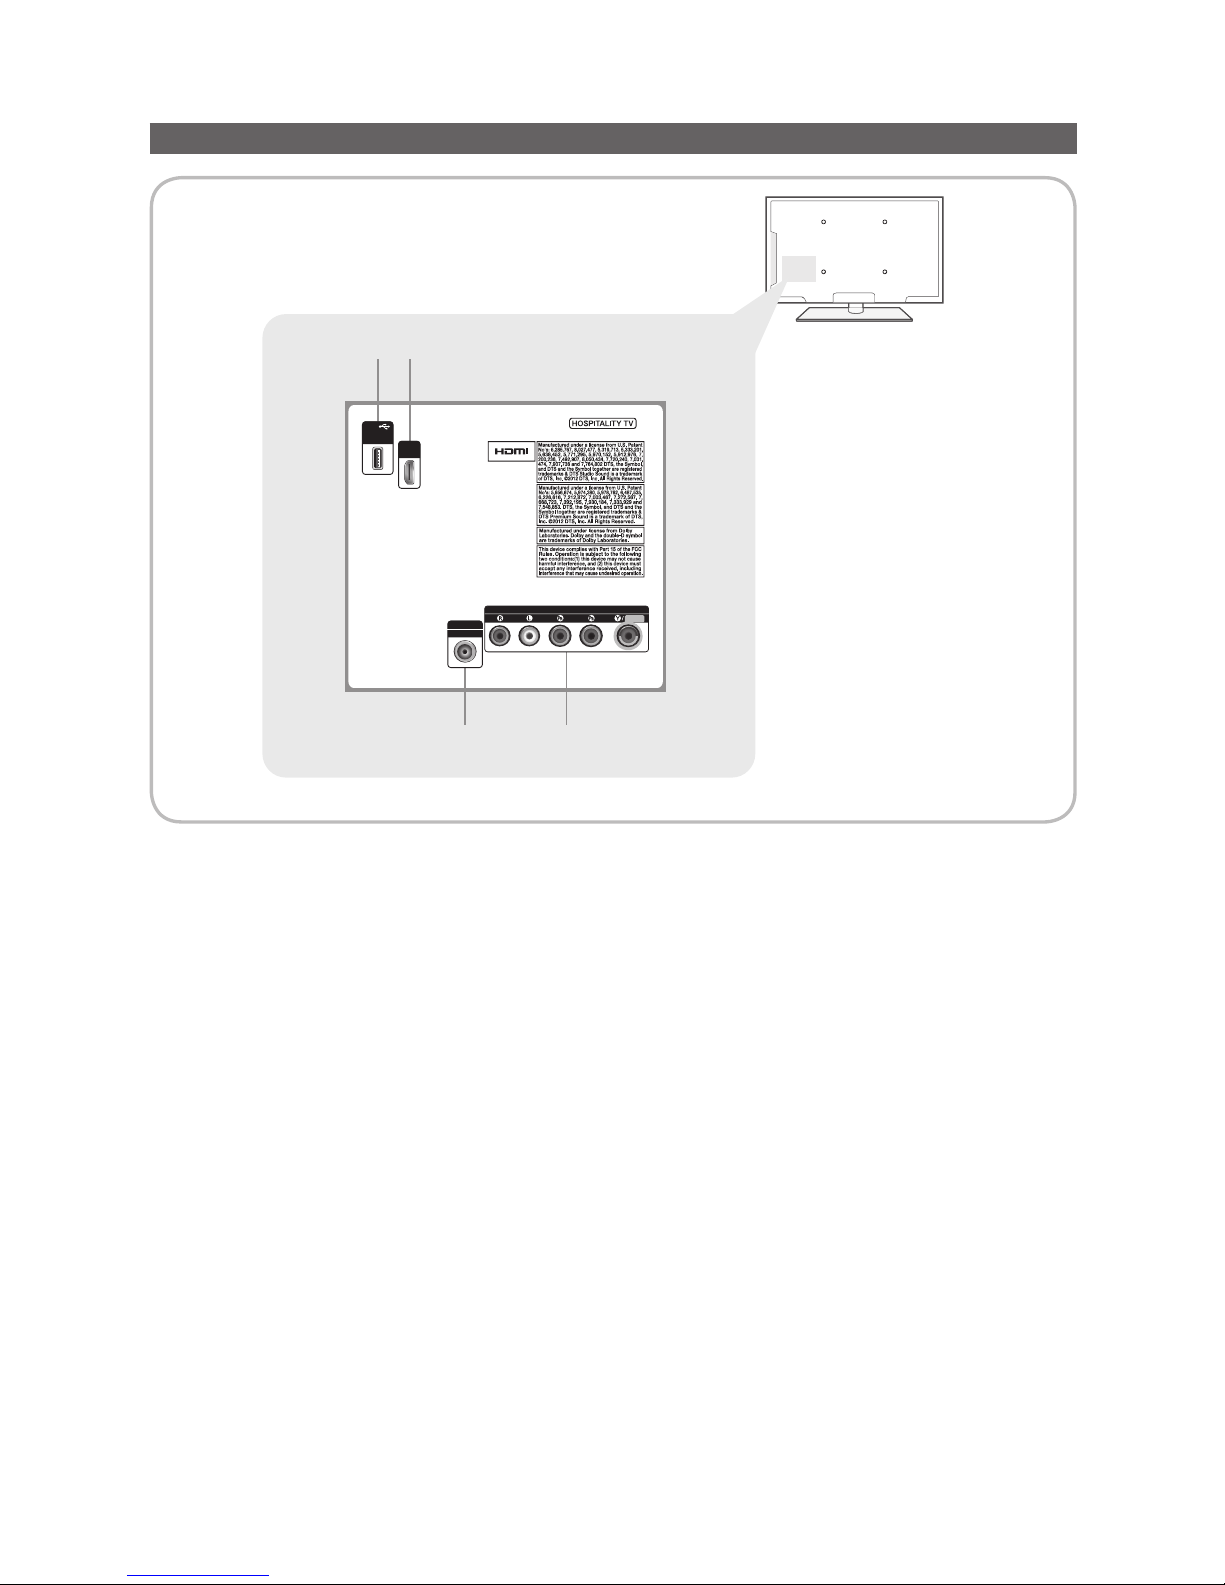
The Connection Panel
✎
Whenever you connect an external device to your TV, make sure that the TV and the device are turned off.
✎
When connecting an external device, match the color of the connection terminal to the cable.
1 HDMI / DVI IN: Connects to the HDMI jack of a device with an HDMI output.
✎
No sound connection is needed for an HDMI to HDMI connection.
✎
Use the HDMI / DVI IN jack for DVI connection to an external device.
✎
PC/DVI AUDIO IN input is not supported.
✎
If an HDMI to DVI cable is connected to the HDMI / DVI IN port, the audio does not work.
2 USB / CLONING
– Connector for software upgrades and Media Play, etc.
– Service connection.
3 ANT IN or AIR/CABLE
– To view television channels correctly, the TV must receive a signal from one of the following sources:
– An outdoor antenna / A cable television system / A satellite receiver.
4 COMPONENT / AV IN
– Connects Component video / audio.
– Connect component video cables (optional) to the component jacks ("P
R", "PB", "Y") on the rear of your TV and the other ends to
corresponding component video out jacks on the DVD.
– If you wish to connect both the Set-Top Box and DVD, you should connect the Set-Top Box to the DVD and connect the DVD to the
component jacks ("P
R", "PB", "Y") on your TV.
– The P
R, PB and Y jacks on your component devices (DVD) are sometimes labeled Y, B-Y and R-Y or Y, Cb and Cr.
– Connect RCA audio cables (optional) to [R - AUDIO - L] on the rear of the TV set and the other ends to corresponding audio out jacks on
the DVD.
ANT IN
AIR/CABLE
(5V 0.5A)
/ CLONING
USB
1
3
4
2
HDMI /
DVI IN
VIDEO
COMPONENT / AV IN
AUDIO
8
English
Using the TV's Controller
Installing the batteries (Battery size: AAA)
Rear of the Remote
✎
After you have installed the batteries, use a
screwdriver to screw in the screw that holds the
battery cover closed.
Installing Batteries into the Remote (battery size: AAA)
Match the polarity of the batteries to the symbol in the batter
compartment.
✎
Note
x
Use the remote control within 23~33 feet of the TV.
x
Bright light may affect the performance of the remote
control. Avoid using near fluorescent lights or neon signs.
x
The color and shape of the remote may vary depending on
the model.
SLEEP
CC
CONTENT
HOME
X
POWER
Turns the TV on and off.
Display and select the available video
sources.
Return to the previous channel.
Change channels.
Use these buttons in Contents Home.
Press to display channel and TV
information on the TV screen.
Exit the menu.
SLEEP: Sets the Sleep Timer.
X: Turns the 3D image on or off. (Not
available)
CC: Controls the caption decoder.
HOME: Display the REACH menu if
REACH has been downloaded to the TV.
Cut off the sound temporarily.
Press to access channels directly.
Adjust the volume.
Display the channel list on the screen.
Display the main on-screen menu.
Quickly select frequently used functions.
Return to the previous menu.
Use these buttons according to the
directions on screen (to perform a
function, display a screen, etc.).
Use these buttons in a specific feature.
Select on-screen menu items and
change menu values.
Press to select additional digital
channels being broadcast by the same
station. For example, to select channel
‘54-3’, press ‘54’, then press '-' and
‘3’.

9
English
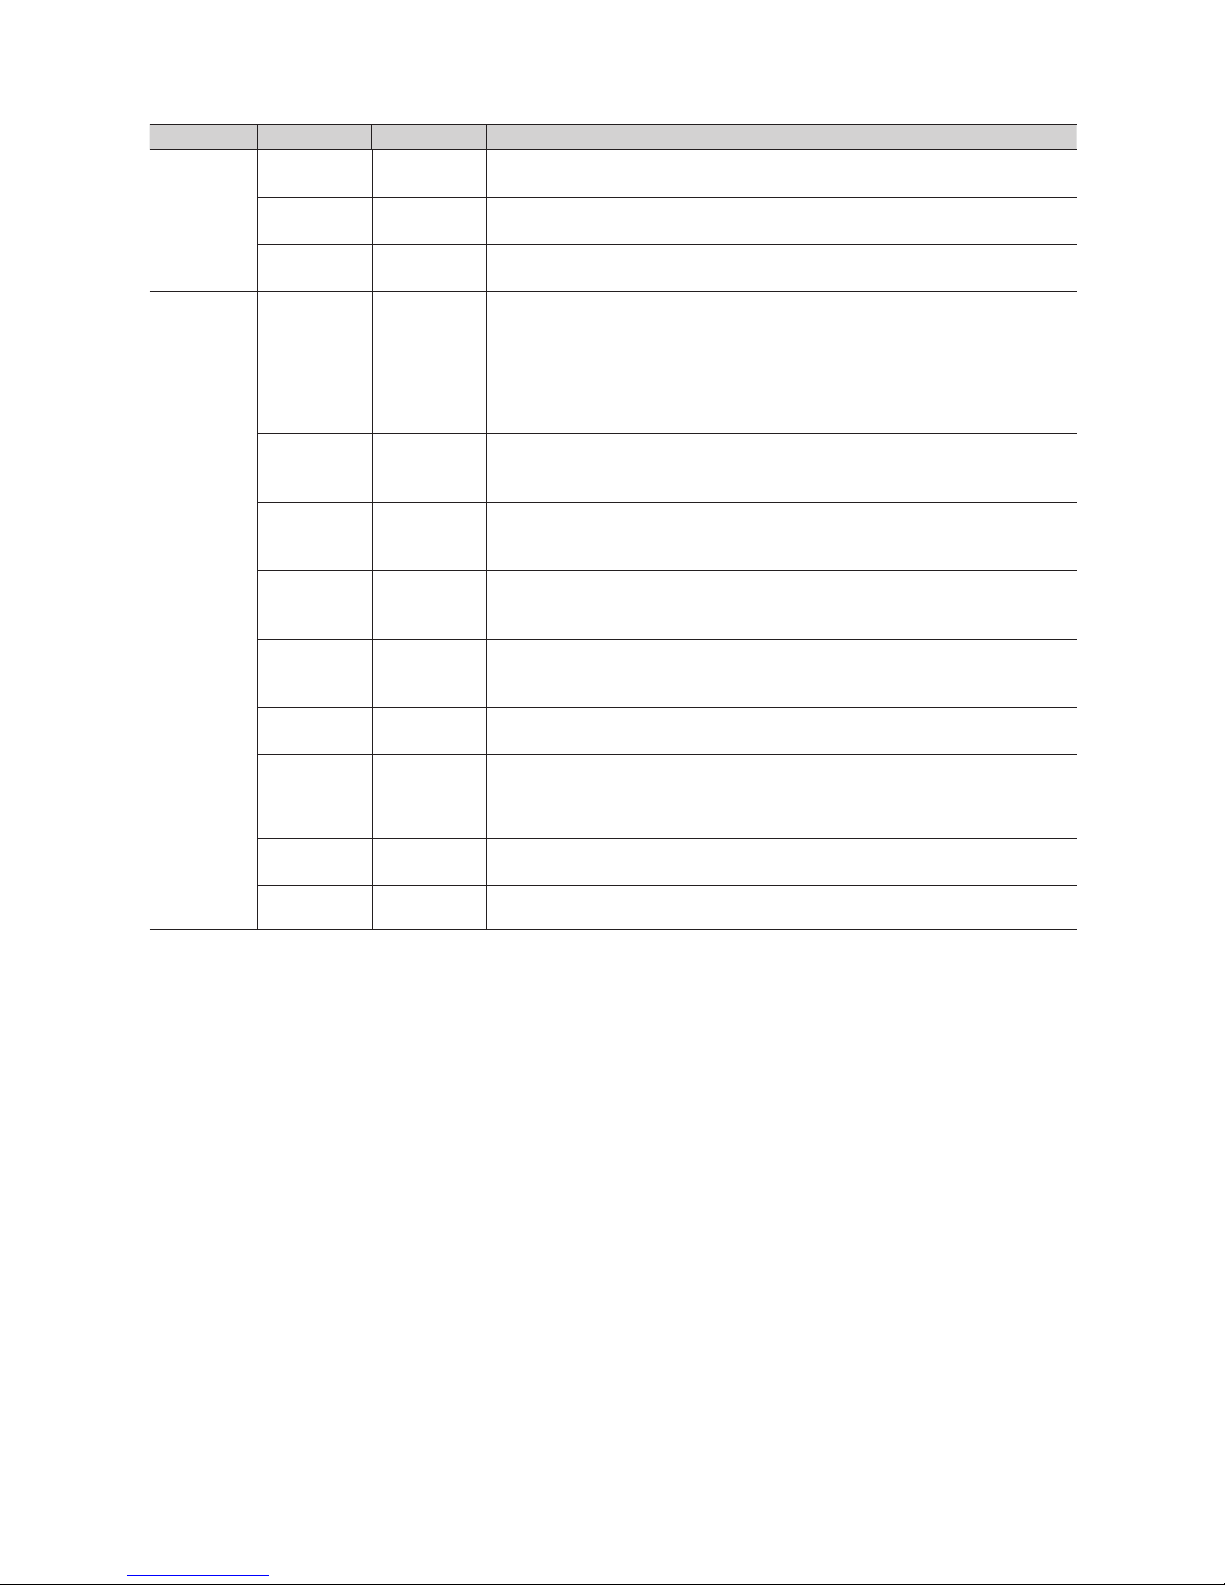
¦ Setting the Hotel Option Data
To Enter this menu: Press the MUTE → 1 → 1 → 9 → ENTERE buttons in order.
To exit from this menu : Power Off (or Power Off and unplug if you have changed SI Vendor), and then turn on again. Any
changes you made are saved.
Menu Item initial Value Description
Hospitality
Mode
Hospitality
Mode
Standalone
Select Hospitality mode.
y Stand-alone mode : TV works alone, without an SI STB or SBB.
SI Vendor SI Vendor Samsung
y Stand-alone mode : OFF / Smoovie
Power On
Power On
Channel EN
Last Saved
Set the default values that will be applied when the TV is turned on.
y User Defined : Lets you set Power On Channel and Channel Type manually. See Power
On Channel and Channel Type below.
y Last Saved : If you select this item, when the TV is turned on, it displays the channel it
was displaying when it was turned off.
Power On
Channel
3
When the TV is turned on, it switches automatically to this channel.
Channel Type ...
y Select channel band : AIR (analog air band), DTV (digital air band), CATV (analog cable
band), CDTV (digital cable band).
Power On
Volume EN
Last Saved
y User Defined : Lets you set the Power On Volume manually. See Power On Volume
below.
y Last Saved : When the TV is turned on, it returns to the volume that had been set when
the power had been turned off.
Power On
Volume
...
The TV turns on with this Volume Level in Stand Alone Hospitality mode.
Min Volume 0
The minimum Volume Level the user can set in Stand Alone Hospitality mode.
Max Volume 100
The maximum Volume Level the user in Stand Alone Hospitality mode.
Panel Button
Lock
Unlock
Turning the front panel (local key) operations on/off.
y Unlock : Unlocks all panel keys.
y Lock : Locks all panel keys.
y Power : Locks all panel buttons except Power.
y Menu/Source : Locks the Menu and Source.
Power On
Source
TV
Select the input source the TV displays when turns on.
Power On
Option
Last Option
Determines the TV's state when power returns after a power failure or after you have
unplugged the TV and then plugged it in again.
y LAST OPT : Returns to its last Power state. If it was in Stand-by, it returns to Stand-by.
If it was on, it turns on.
y Power On : When the power returns, the TV turns on.
y Standby : When the power returns, the TV enters the Standby mode.
Channel
Channel
Setup
Gives you direct, immediate access to some of the Channel menu functions on the
user Channel menu such as Auto Program, Antenna selection, etc.
Channel
Editor
The Channel Editor lets you edit the channels stored in the TV's memory. Using
Channel Editor you can:
y Change the channel numbers and names, and sort the channels in your desired
channel number order.
y Apply the video mute to channels you select. The video mute blanks out the video from
a channel and outputs only the sound while displaying a speaker icon on the screen.
The Channel Editor also lets you view information about each channel easily, without
your having to display each channel directly.
Channel
Bank Editor
If you set Hospitality Mode to Standalone and SI Vendor to Smoovie, this item is
displayed. Lets you edit the channel bank that works with the Smoovie Remote. Refer
to page 32.
Dynamic SI ON
y On : Check the DTV Program channel number. (If Dynamic SI is On, it is not availale to
edit DTV channels in Channel Editor.)
y Off : Does not check the DTV Program channel number. (If Dynamic SI is Off, it is
available to edit DTV channels in Channel Editor,but additional DTV channel program
number update is not supported.)
Menu OSD
Picture Menu
Lock
OFF
Enable or disable the Picture Menu.
Menu Display ON
y On : The Main Menu is displayed.
y Off : The Main Menu is not displayed.

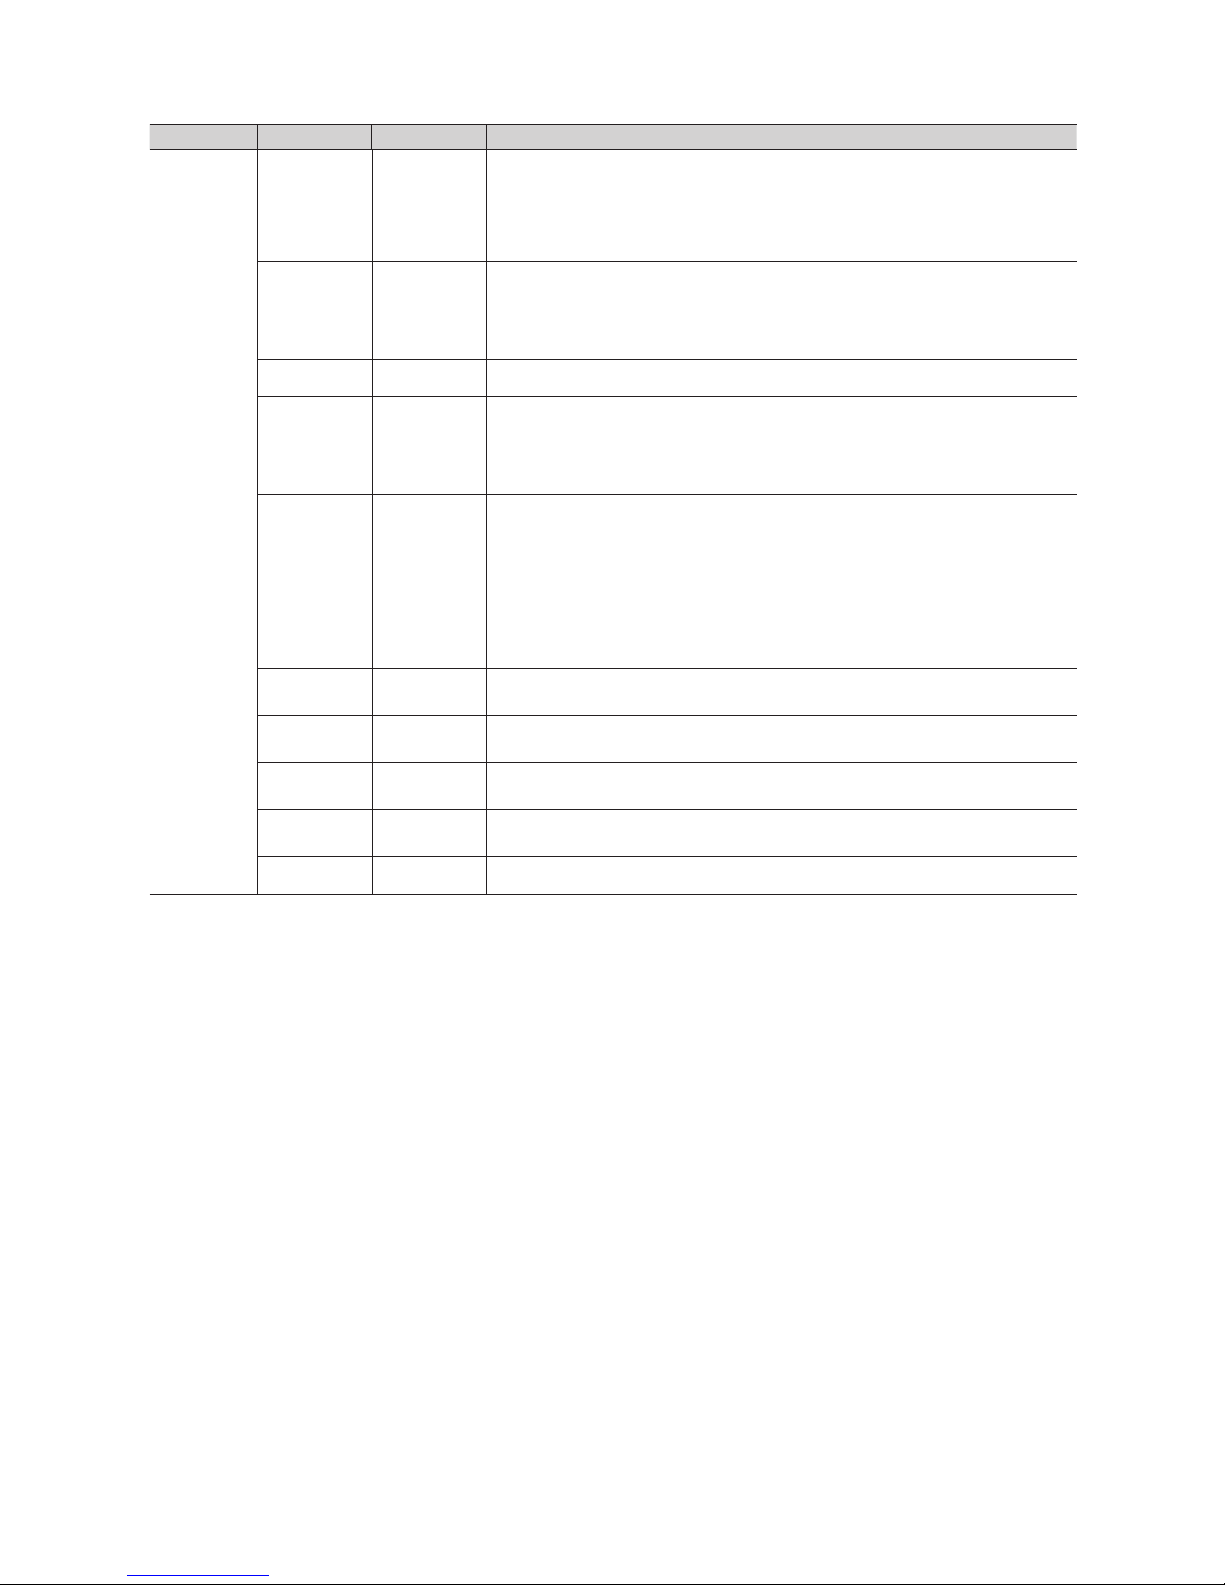
10
English
Menu Item initial Value Description
Operation
Panel Button
Lock
Unlock
Turning the front panel (local key) operations on/off.
y Unlock : Unlocks all panel keys.
y Lock : Locks all panel keys.
y OnlyPower : Locks all panel keys except the Power panel key.
y Menu/Source : Locks the Menu and Source panel keys.
Clock Local Time Manual
Select the way to update clock data.
Use clock data from a DTV channel to set the clock automatically or set the clock
manually when the TV is in stand-alone mode.
Music
Mode
Music Mode
AV
OFF
Allows music output from an mp3/audio player connected to an AV Input Source on
the TV. When on, you can hear sound from the player through the TV whether there is
a video signal or not. Also mutes the video so the TV does not display a picture when
a guest is playing music. The TV's backlight, however, remains on.
Music Mode
Backlight
OFF
When set to Off, the TV's backlight is turned off entirely when a guest uses the Music
mode. To save energy, set to Off.
External
Source
USB Media
Mode
Default
When a USB device is connected to the TV :
y Default : A popup window appears.
y Automatic : Opens the USB contents menu automatically.
y Disable : Neither the popup window nor the menu appears.
External
Source
Banner
ON
If set to On, the TV displays the External Source Banner (information) when you
change the TV source to another external input, press the Info key, or turn the TV on.
y On : The External Source information is displayed on the TV screen.
y Off : The External Source information is not displayed on the TV screen.
Auto Source OFF
y On : When an external input source is connected to the TV, the TV identifies the input
source, and then automatically switches to that input source.
y Off : Auto Source function is Off.
Anynet+
Return
Source
Power On
Src
Select the return TV source after stopping an Anynet+(HDMI-CEC) connection. (This
fuction is especially useful for the Guestlink RJP.)
Eco
Solution
Energy
Saving
OFF
Adjusts the brightness of the TV to reduce power consumption.
y Off : Turns off the energy saving function.
y Low : Sets the TV to low energy saving mode.
y Medium : Sets the TV to medium energy saving mode.
y High : Sets the TV to high energy saving mode.
Logo/
Message
Welcome
Message
OFF
Displays a the Welcome Message for 5 seconds when the TV turns On. See Page 22.
Edit Welcome
Message
Edits the Welcome Message.
Hospitality
Logo
OFF
Turns the Hospitality logo feature On or Off, If On, when the TV is turned on, the Logo
is displayed, before the signal from the initial source, for the amount of time set in
"Logo Display Time".
Hospitality
Logo DL
...
Downloads the Hospitality logo.
Hospitality logo file requirements:
y BMP or AVI files only.
y Max file size : BMP - 960 X 540. AVI - 30MB.
y The file can only be named samsung.bmp or samsung.avi.
Logo Display
Time
...
Hospitality Logo Display Time (3/5/7 seconds).
11
English
Menu Item initial Value Description
Cloning
Clone TV to
USB
Clone the current TV options to a USB memory device.
Clone USB
to TV
Clone the saved TV options on a USB memory device to the TV.
Setting Auto
Initialize
OFF
If you set Setting Auto Initialize to On, and the TV's power is turned off and on, the
guest side menu items are restored to their cloned values. See page 30.
REACH
Server
REACH
Server
update Time
1hour
Lets you set when data such as updated SW, cloning files, and S-LYNC REACH
contents is downloaded from the REACH server to the TV :
y 1hour : Every hour
y 2hour : Every 2 hours
y 12:00 am : every 12:00 a.m.
y 12:00 pm : every 12:00 p.m.
y 2:00 pm : every 2:00 p.m.
REACH
Update
Immediate
OFF
y On : Whenever the TV enters standby mode (the power cord is plugged in and the
power is off), the REACH data is updated on the TV.
y Off : The REACH data is only updated on the TV at the REACH server update time.
REACH
Server
Channel
87
Assign a DTV channel number to carry the update REACH data. This channel number
must be the same as the number set on the Reach server.
REACH
Server
Version
0
Displays the current REACH data version.
REACH
Server Group
ID
All
Select the group ID of the REACH server. (Refer to the REACH server manual for more
details)
S-LYNK
REACH
Off
On : The S-LYNK REACH menu is displayed.
Off : The S-LYNK REACH menu is not displayed.
S-LYNK
REACH
Volume
ON
On : The TV sound of the current TV source is continuously outputted even when the
S-LYNK REACH menu is displayed.
Off : The TV sound of the current TV source is stopped when the S-LYNK REACH
menu is displayed.
IPG Room
Type
Default
Selects the IPG room type of the REACH server. (Refer to the REACH server manual
for the more information.)
TICKER OFF
y On : The TICKER content is displayed.
y Off : The TICKER content is not displayed.
12
English
Menu Item initial Value Description
Service
CAS Pro:idiom
Configures CAS support. Applies to only the NB673, NB677, and NB678 models.
OFF : Turns off CAS support.
LYNK DRM : Select to turn on S-LYNK DRM CAS support only.
Pro:idiom : Select to turn on Pro:Idim CAS support only.
LYNK DRM,PI : Select to have the TV support S-LYNK DRM CAS and Pro:Idiom CAS.
Self
Diagnosis
Enter Self Diagnosis Menu.
y Picture Test: Use to check for picture problems. If the problem appears in the test
picture, select YES, and then follow the directions on the screen.
y Sound Test: Use the built-in melody to check for sound problems. If the problem occurs
during the test, select YES, and then follow the directions on the screen.
PI AES Data 0xD279
Displays the current state of Pro:Idion AES
Self
Diagnosis
for TV
Lets you check the state of the TV picture and sound.
y Picture Test : Use to check for picture problems. If the problem appears in the test
picture, select YES, and then follow the directions on the screen.
y Sound Test : Use to check for sound problems. If the problem occurs during the test,
select YES, and then follow the directions on the screen.
Self
Diagnosis for
HTV
Lets you check the state of Pro:Idiom and its communication with the SI STB
or SBB. If you have any problems with the Pro:idiom encryption channel or the
communications with the SI STB or SBB, use this diagnosis function. If Pro:Idiom
DTV Channel Key Loss appears to have failed and the Pro:Idim encryption channel
has failed to play content, first check the broadcasting systems related to Pro:Idiom
encryption. If your broadcasting system does not have a problem, contact Samsung
Service. If STB SI Vendor Setting appears to have failed and communication with the
SI STB or SBB has failed, first check your SI STB or SBB. If your SI STB or SBB does
not have a problem, contact to Samsung Service.
Upgrade
Now
Lets you upgrade the TV SW with a USB memory stick. See Page 31.
Service
Pattern
32GRAY
Lets you check the state of the TV picture by displaying picture test patterns. Press the
Menu button to turn off the test patterns and exit.
ATV Cable
AGC Gain
Default
Lets you control the AGC gain of the analog cable channels. Don't change the default
value unless problems occur.
DTV Cable
AGC Gain
Default
Lets you control the AGC gain of the digital cable channels. Don't change the default
value unless problems occur.
TV reset
Returns all settings on the TV to their factory defaults.
✎
REACH (Remote Enhanced Active Control for Hospitality) is a professional, interactive remote controller that lets you
deliver TV firmware updates, cloning data, channel mapping changes, S-LYNK REACH contents, and TICKER contents
through RF DTV to several hundred hospitality TVs simultaneously. The REACH functions are available only in standalone mode. The REACH Server is sold separately. Refer to the REACH server manual enclosed with the REACH server
product for more operating information.
 Loading...