

Samsung 4000 series, 4050 series, 5000 series, 5050 series, 4 SERIES Quick Start Manual
...
QUICK
START
Welcome
The
following
sure you have
instructions cover assembling, connecting, and setting
the
to
your
accessories listed below.
new
TV!
up
your new
TV.
Make
. GUIDE
1111111111111111111111111111111111111111111
BN68-05018A-OO
Included
I e<mo"
~
Make sure you have
and jacks are shown below.
HDMI'
USB
in
this
Remote Controls
"~"
Batteries
(AAAx
2)
the
Cable Plugs
'
correct cable before
box
Ports I Jacks
-
-
x3
Stand, Cables,
Stand
Mounting
Equipment
lY
Screws
~
plugging
it
in. Illustrations
~~
~~
Do
not
plug cables in upside
Be
sure
to
check
plug before
Warning
plugging
Power
AC/DC
of
common
the
Cord
Adapter
orientation
it in.
plugs
down.
of
the
Step 7 Attach the
TV
to the Stand
Lay
the
TV
side down.
protect
the
the
Holding
the
slide
back
of
the
on
a 'Soft surface, screen
Use
the
packing material
screen.
stand parallel
stand
into
the
TV.
to
the
notches
screen,
on
the
Insert 3 screws and secure
the
to
"~
~
Step 2 Install the batteries into the remote
..
TV.
..
the
stand
to
Step 3 Connect Devices
We
suggest using HDMI connections whenever possible
~
The
position
of
the port
may
differ depending
Best
Connection-
We
suggest using HDMI
whenever possible.
HOM I
and
HDMICable
~
Power Cable
for
on
the model.
the best possible picture quality.
is
the
default
HDMI1
for a cable/satellite set
box
(STB).
Use
the other ports
I Blu-ray, game consoles,
and other devices.
USB
Connections
You
can
connect
devices
to
and enjoy personal photos,
videos, and music.
the
Good
Connection-
Use
Component cable
to
devices
device's cables
port
top
for
OVO
USB
storage
USB
jacks
COMPONENT
your
to
TV.
Match the colors on your
to
the colors on
HDMI Port
-
connect Non-HDMI
the
jacks.
:.+E
;>~
Lowest Quality
Use
an
AudioNideo
HDMI devices
to
Connection-
cable
to
your
TV.
AV
connect Non-
!>
QT
+
~
:r:c-
Power
Input
(Using an AC/DC
Adapter)
Antenna
or
cable connections
Headphone
Connections
direct-to-TV
J
·1r
0
Step 4 Power on
When you
prompts will assist you in configuring the
a wall outlet, and then press
basic settings in
(!) Power
Search channels
service
1
2 Set
turn
the TV on
the
initial setup by following
on
to
begin
provider
your
local
time
and
for
the
first time, a sequence
the
POWER
the
guided
from
your
zone
button
setup.
TV
Congratulations on your
begin guided setup
of
TV's
basic settings. Plug the
the
screens and on-screen
to
turn
on the
TV.
instructions on your TV's screen.
Configure your TV's
~r
new
power
cord
Central
Western •
Eastern
G
Northen
Sou
then
TV!
?
J_..;
into
Troubleshooting
The stand is
Make sure the arrows on the stand are properly aligned.
The TV
Make sure all cables are fully inserted, and
My
The TV ships
stickers protective stickers have been removed.
I
don't
Devices
I have extra parts
The TV includes some optional parts
u
won't
remote
know
without
wobbly
or
crooked
turn
on
doesn't
work
with
protective stickers covering some
where
to
plug
in
<device>
HDMI may require the included
to
If you experience issues, please
back
call
us
warranty service. For
•
-
SAM
that
the
remote
of
AN
adapter.
help
with
wall
to
the
store.
us
at 1-800-SAMSUNG (1-800-726-7864)
at www.samsung.com/spsn for support and
SUNG
WORLDWIDE" in
has
batteries installed.
the sensors. Make sure all
mounting
and cable routing.
do
not
In
the
other
United States
countries, refer
the
take the
of
user guide.
of
America,
or
visit
to
"Contact
the
TV
1.
Accessones and Cables
Accessories
The
following
accessories
•
Remote
Control & Batteries
•
Owners
Guide
•
Quick
Start
Guide
•
ReQulatOIY
Guide
Input
Cables
(Sold
need
(Biu-ray
sure
one
you
Separately)
or
more
players,
have
You
will
devices
•Audio
•HDMI
•HDMI·DVI
~
Make
USB
Opllc:al
Do
Make
not
Lt
""'
included
r;v.A x
of
theses
DVD
players,
the
correct
plug a cable
sure
the
2)
cables
etc.)
cable
E-3
in
orientation
with
your
to
connect
before
plugging
~
upside
down.
of
the
lV:
plug
• Stand
•
•
your
lV
•
CooiPonent
•Composite
•
Coaxial
it
in.
is
correct
·1·
2.
CAUTION:
SHOCK,
ARE
•
ALL
• The slots
•
•
•
• MakeSlXB to pU! out
•
•
•
•
•
• Nwer
•
•
•
•
•
• Use only a property
•
•
•
•
•
• To
•
•
•
• There
•
••
Wire
Holder
(Not-
for
a1
Power
Cold
/>C/OC
Adapter
)for
19',
to
your
antenna
or
cable
(A\/)
J!l.FJ
.
Illustrations
of
common
~
Do
not
plug
m
before
in
coold
damage
plugging
it
in.
1111111111111111111111111111111111111111111
BN68·04802A·OO
22'
models)
outlet
plugs
opposite
the
1V
and
port.
and
or
ilches)
your
jacks
wrong
peripheral
are
below.
direction.
It
Important Safety Instructions
TO
REDUCE
THE
RISK
OF
DO
NOT
REMOVE
NO
USER
SERVICEABLE
SERVICING
TO
QUALIFIED
and
openi"lgs in
apparatus, <nd to protect ~ from overhooting,
-
Do
not
cover
the
-
-
Do
Do
Do
a swimming pool etc.).
This
the
Do
Power-supply
particular att!lf1tion
To protect t~ apparatus
and
Before
electrical
To
Make
not
If
this apparatus
cootactanauthorizedclealerorservicecenter.
Be
(espec:iatly
-
Be
~
damage
-
To
oo:::essibleataltinles.
Do
Storetheaccessories(batteries,etc.)nalocationsafelyoutofthereactlofchildren.
Do
Do
Do
appearance
Do
Oonotdisposeofbatteriesinafre.
Do
WARNING -TO
TIMES.
slots
Do
not
block
the slots
Do
not
place
this
apparatus
not
place this apparatus near or over a radiator or
not
place a vessel coota.fling water (vases etc.)
not
expose
this apparatus
If
the
apparatus
use
battenes.
envronment. Please
not
OYerk>ad
wall outlets, extension cords, or adaptors beyond their capacity, si"lce ltlisel:fi
COfds
shotJd
to
cords
disconnect
the
antenna or cable system. This
comecting
the
AC
supply. (depeoding
insert~
avoid
touch
SlXB
Accumulated
or
SlXB
All
tlrn
not
not
not
dem
not
not
not
metallic
electric shock.
SlXB
to plug
the
power cord in
the
power
cord with
does
not
to
pull the
power
when children, elderly
dust
can
cause
the
insulatiOn
to
cootact
an
authonzed
Slbstances or
to
your set.
grounded
improper
ground
off
the
apparatus
alow
dlildren to hang onto the prockJct.
instal the prockJct n
drop
or ~ a shock
the
product,ll"lplug
use
ant dlernicals such
or
erase
the
expose
the
apparatus
short
circ::Ut,
disassemble, or
is
a danger
of
explosion
PREVENT
ELECTRIC
COVER
(OR
BACK).
INSIDE.
and
in
the
these
with
a cloth
by
placing
or place
it
oomrriiJlily, there
lOCal
authorities for disposal
so
that tney
end,
where
storm,
to
the
DC
open parts
inside
ol
lXlt~
it
is
fm\ly inserted. Pul
hands.
the
outlet
if
disabled people
shock.
center, when
for
receptacle
electric
shock
you must pull the
location
If
cord
from
waK,
benzene,
the product
overheat:
the
the
Of
THERE
REFER
back
or
slots
or
this
such
heat
on
this
near
water
are
comected
or
when
.....-ill
prevent damage
adaptor
oft~
t~
apparatus. Only a qualified tect"nlcOO
the
1V
wil
an electric leakage,
24 hours a
or
equipment
such
as
the product
the
alcohol.
batteries.
batteries with
FIRE,
KEEP
PARTS
PERSONNEL.
the
cabinet
and
openings
and
openings
in
a confined space.
to
rain
this app&"atus accidentally gets
power
cord from the outlet before cleaning
u-.
yr::u:
contact
you
be routed
at
the plug
from a ligltrWlg
power cord
on
the m:xlel)
into
the
never
touch the
wet
operate normally - in particular, if there
plug out
of
or
cause
an electric
to
deteriorate.
service
where~
will operate
plug
and
may
cause
c<>rrplet~.
an
LfiStable
to
the product.
the
power
as
printing
on
to
dripping or splashing
if
you replace
THE
SPREAD
&
~
bottom
are provided
and
openings must
other
materials .
apparatus
on
a
bed,
as a t:lool«:ase
or
register.
or
.....tlere
appwatus,
as
this
(near a bathtub,
wet,
nitj1t
not likely
apparatus. Ooi"'g
is
be left alone
i1stalng
power
washtloY.-1,
lX"IpUg
~and
be
regulatiOns !hat require you to dispose
or~
to
be waDied
to
adaptors.
CWld
it
is left t.rl8ttended
to
the
outlet,
make
sure
the
so
on
the plug.
are
3lr"f
tn.JSUal
to
remain
I..OUSed
in
the
house).
or
your set in a location with
day
such
as
nan
damage.
power
plug out
of
a shaky self. a slanted
is
damaged,
discomect the
outlet
and
wipe the prockJct
thinners.
ilsectieide,
the
wrong
type
CANDI.£8
OR
. 2 .
This
symbol
indicates
that
high
present
inside.
of cootact
with
This
sym.
bol
indicates
concerning
operation
beerl1ncluded
with
for
necessary ventilatiOn.
l"ll3'Yee"
be
sofa,
rug
built-in cabinet, unless proper ventilatiOn is provided.
~
is exposed
can
resut in a risk
cootact
an authorized
informatiOn
on
or
pinched
at the pol"lt where they exillrom
and
ln.JSed for long periods
set
due
YOitage
may
create a danger
not
the
cord,
sounds
or
if
you
are
a fire
by
causing
airport, a train station, etc.
(Class I
Equipment
the
waD
floor,
a~r
of
battery. Replace
OTHER
OPEN
blocked
or
other
to
direct
kitchen sink, or
by
to
lightnilg
designation
should
when
or
sme1s
to
leave the
the
he<Ny
socket
Consequently,
or
a location
power
usng
freshener,
FlAMES
Toenstll3
or
covered.
similar surface
Sl.Jnlig1t.
of
lire or
ialn1'y
dealer
of
resuH
in
items placed
and
pcNI9f
of
the
of
electric
open this
removing the
coming from
house
power
dust.
tij1
only.)
exposed
cord
CWld
a soft cloth dipped in a
ltbricant
only
with
AWAY
voltage
tt
is
dangerous
to
any
internal
part
that
imjX)rtant
and
maintenance
this
product.
reliable
operatiOn
electric
shock.
tub, in a
.......at
immediately.
these batteries property
lire or
electric
sllock
~or
agailstthem.
the
apparatus.
of
tme,l.f"IPlJg
~from
line surges.
DC
adaptor
conesp:Jnds
shock.
appwatus.
power
cord
~
-
l.f"IPlJ9
for
an
extended period
COI"d
to
generate sparks
or
low
temperatures.l'igl
Failure
to
do
so
may
the
power
plug should be readily
to
vibration.
contact a serJ.ce center.
small
or
detergent. This
the
same
or
eqt.ivalent type.
FROM
THIS
make
of
basement, or near
from
~
PROOLJCT
•••
iS
any
kind
this
product.
literature
has
of
!his
to
protect
Pay
the
wall
outlet
to
the
lOCal
the
outlet.
Do
immediately
CWld
of
time
and
heat.
h..r"r"Mdity,
cause serious
amot11l
of
water.
may
damage
the
~
AT
ALL
3. Questions? Comments?
Contact
SAMSUNG
If
you
have
4.
Getting Started
Provide
When
you
etc.)
to
ensure
caused
by
~
When
~
Using
the
product
~
Be
careful
4inches:
~
WORLDWIDE
any
questions
or
comments
about
your
Samsung
lY,
please
contact
Ventilation
for
Your
install
your
proper
an
increase
using a stand
parts
provided
falling.
when
Installation
..
--------·--T4iriche5---·---.
D :
1 I 1 I
I 1 I I
I 1 I I
I I 1 I
I I 1 I
I I 1 I
: : :
1V
TV,
maintain a distance
ventilation.
in
its
internal
or
wall-mount,
by
another
you
contact
with
of
at
to
maintain
use
parts
manufacturer
lV
because
least 4 inches
proper
provided
may
cause
some
parts
Failing
temperature.
the
a stand. Installation
~4inches
between
Samsung
difficulties
can
be
the
may
result
Electronics
with
somewhat
ventilation
by
;--o·-------·
4inches:
D
~
____________
·3·
•••
the
SAMSUNG
customer
care
center.
Samsung
Electronics
America,
85
Challenger
Road
Inc.
'N'NW.samsung.com
•••
lV
and
other
objects
(walls,
result
in
with
injury
cabinet
the
product
caused
:4inches
;f----
in a fire
or a problem
only.
the
product
or
hot.
with
a wall-mount
4inchOS-------.
_L4~~~-------;
sides,
by
5.
The Remote Control
Learn
where
the
function
buttons
are
on
your
ENTER,
CH
UST,
RETURN,
~
This
remote
impaired
persons.
Press
P.SIZE: Lets
MTS:
Press
Separate
Audio
CC:
Installing
Batteries
Match the polarity of the batteries to the symbols
batter compartment .
...
NOTE
o
Use
the
remote
o
Bright
light
control.
Avoid
signs.
o
The
color
on
the
model.
control
to
access
you
to
choose
Program
Controls
may
and
choose
the caption
into
control
affect
use
shape
has
channels
the
stereo.
(SAP
the
when
and
Braille
picture
broadcast).
within
the
near
of
the
Remote
remote.
EXIT.
points
on
the
directly.
size.
c
,__.
mono
Of
I~
;:";:
decoder.
(Battery
23
feet
of
the
performance of the
fluorescent
remote
may
vary
Power,
··~
size:
TV.
lights
depending
Especially
Channel,
......
AAA)
in
the
remote
or
neon
.
•
note
POWER,
SOURCE,
VOL,
CH,
MENU,
and
Volume
buttons
and
can
be
used
Displays
information
on
the
buttons
screen.
according
in
a
specific
TV
to
the
screeo.
Exit
the
menu
Use
these
directions
•
on
··
Use
these
buttons
0
feature.
TOOLS,
by
visually
••
4.
6.
Making Connections
Connect
your
TV
to
an
antenna
or
cable
connection,
and
cord
box
cable
•
•
•
to
the
using
connection.
FOf
the
devices
If
you
an
older
work.
about
an
upgrade.
Be
sure
the
picture
occur.
TV,
and
then
HDMI,
Component,
best
picture
using
an
HDMI
connect
an
external
version
of
If
this
occurs,
the
HDMI
version
to
purchase a certified
may
not
connect
and
HDMI,
ask
display
the
or
Composite
audio
quality,
cable.
de~ce
the
video
the
manufacturer
and,
if
it
HDMI
or a connection
power
to
is
out
connect
the
and
cable.
1V
of
cord
to
connections,
digital
that
uses
audio
may
of
the
device
date,
request
Otherwise,
error
an
may
not
AC
then
UN19F4000 I UN22F5000 I UN28F4000 I UN28F4050
'
The
position
of
the
port
may
differ
depending
on
the
model.
1
HDMI
c:on~ec~
Set-top
box
I
playe</DVD
1!1
Blu-ray
(Using
PC
coonection
an
HDMI
Ill
(to
DVI)
Cable)
~
·------
connect
wall
outlet.
you
do
•
PC/DVI
•
To
use
•
For
cable
2
•
For
high~
IN 1 (STB)
AV
VCR I Blu-ray
••
your
If
you
not
need
AUDIO
connect
the
HDMIIN 2
PCs
to connect
(DVI)
jack
a Set-top
recommend
connection
peripherals.
are
to
an
with
on
jack.
player
connecting
connect
IN
HDMI
DVI
video
the
the
box
connection
I
input
(DVI)
TV.
you
the
to
out
DVI
Use
connect
TV
When
is
DVI
jack.
out
your
ANT
not
cable
jacks,
the
Rear
on
done,
TV
to a cable
IN
jack
supported.
to
the
use
the
PC
PC's
using
an
the
cable
Panel
connect
to
an
TV,
an
HDMI
to
the
speakers
HDMI
to
you
•••
the
power
or
satellite
antenna
or
a
must
to
DVI
HDMIIN
for
audio.
cable,
we
the
HDMI
UN32F4000 I UN32F4050 I UN32F5000 I UN32F5050
I
UN40F5000 I UN40F5050 I UN46F5000 I UN46F5050 I UN50F5000 I UN50F5050
~
The
position of the port
I
HOM I connection
Blu-rayplayeriDVDI
Set-top
box
1!1
may
differ depending
J
on
the
PC
connection
I\JOI1g
an
HDMI
(lo
DVI)
=
~
model.
Cablel
[
Audio
connection
Dig~al
Audio
Ill
(DigitaO
System
1V
t
I
Rear
Panel
[1
I
Component
connection
you
in
you
plug
the
button
on
the
box,
antenna or cable
refer
to
to
watch a movie
to
your
to
change
input
source.
are
to
an
input
TOOLS
button
the
name
to
make
your
(DVI)
port
in
Edit Name.
port
to
HDMI 2 in
(DVI)
DVI
to
HDMI2
Menu
that
let
you
in
the
Main
of
the
picture,
are
also
functions
configuration,
To
access
the
(liD)
button
move
Sound,
buttons,
the
menu
changes.
I
Ill
TV
make
·a.
Ill
of
the
input
with
with
Ill
control
menu
on
.
the
Edit
its
.
5.
To
select a menu
..,_
button
or
ENTER
[31
that
option.
select a value
<1111
button
to
10.
Us1ng
The
TV's
Controller, a small
rear
right
side
the
remote
backwards,
Select
IL_
Remote contrOl
~
To
close
press
the Controller
When
selecting a function
'
forwards,
up
on
the controller
you
press
the
forwards, backwards,
7.
the
ENTER
to
see
Usually,
or
retum
the
of
the
control.
left,
or
the
Menu
the
Menu, Media Play
backwards,
up
Blu-rayplayer/DVD
7.
Initial
Setup
\oVhen
you
turn
the
TV
on
for
the
first
of
screens
and
configuring
power
to
screen
'
'
Source
When
on
cable
Source.
1.
2.
.lV
'
How
Edit
source.
when
device
source
""
""
""
Your
many
you
brightness,
that
energy
main.
your
To
between
Channel,
main
on-screen
the
TV's
cord
into a wall
turn
on
the
TV.
to
configure
If
you
are
not
sure
you
have
connection
before
To
connect
the
Making Connections'.
8.
Changing
List
you
are
watching
your
DVD
player
box
or
STB
Press
the
SOURCE
Use
the
J;./'f
buttons to
I
AV
I Component I HDMI11
You
can
only
connected
to
are
highlighted.
inputs
to
Use
Ed~
Name
lets
you
To
access
the
Source List
connected
selection
If
you
connect a
an
HDMI
cable,
If
you
connect a
an
HDMI
to
DVI
Name.
If
you
connect
port with
an
HDMI
in
Edit
Name.
9.
Accessing
TV's
Main
menu
of
the
TV's
can
change
the
~s
contrast
let
you
control the
use,
and a host
on-screen
menu,
remote.
use
the
Main
menu,
the
main
etc.
Each
category
name
basic
Then,
the
using
connected the
power cord
the Input Source
or
satellite
choose external devices that
the
TV.
Name
associate a device
Edit
to
specific
easier.
PC
assign
PC
cable,
an
AV
and
contains
features.
size
option
time
on
prompts
settings.
outlet,
press
follow
the
instructions
TV's
basic
settings.
a cable
box
TV
you
turn
on
the
and
lV
and
you
Blu-ray
player
receiver,
you
button
on
your
select
an
In
the
Source List, connected
Name, press
is
displayed.
input
jacks
to
the
HDMIIN 2
PC
to
HDMI2
to
the
HOM
assign
DVI
device
to
the
to
DVI
cable,
Using
the
functions
For
example,
and
configuration
and
so
on.
There
TV's
sound,
of other
features.
press
the
MENU
press
the
li.
categories:
you
press
a
the
left
side
time, a sequence
will
assist
After
the
POWER
or
satellite
to
an
TV.
antenna,
want
or
switch
need
remote.
external
HDMI2/DVI
name
the
Select
IIN 2 (DVI)
PC
HDMIIN 2
assign
Main
channel
/T buttons to
Picture,
J;./'f
of the
~
~~
Cable
option
in
one
of
the
[!I
button.
the
you
choice.
to a previous
TV's
lv,
To
right.
Select
Function menu
_j
~e
on
the
Press
values
or
choices
would
then
press
Press
the
RETURN
screen
Controller
joy
stick
lets
you
control
use
the
controller,
To
make a selection,
Media
Play
l-10
nsor
J ;
for
more
than 1 second.
by
pushing
left,
right,
before
you
reach
controller,
it
left,
and
Cabo
VHF/UHF
Antenna
categories,
press
the
it
again
or
press
associated
with
ENTER
[!I
to
button or
or
(Panel
like
button
the
The
as
the
List,
be
sure
will
stop operating
right
the
selection.
Key)
Ill
on
the
TV
without
push
it
forwards,
press
up.
..
c;·~·~;roller
image
is
drawn
if
you
are
facing
front
of
the
1V
or
Source
List,
the controller
not
to
press
your selection.
directions.
If
in
11.
Warranty Information
SAMSUNG
LIMITED
PURCHASER
This
SAMSUNG
end
delivered
is
warraflled
workmanship
Commercial
Cat
LCDII.EDTV
Plasma[>spO,.
Project"'
IExcludi'\ILMll)
PICO&
LED
Pocket
Projector
''
180
Days
This
limited
warranty
only
on
products
warranty
service,
determination
performed
by a SAMSUNG
bl
of
sale
must
SAMSUNG
SAMSUNGwil
charge
as
stp.Jiated
found
to
be
oeplaced
parts
=~~~~.~~=~~s:the
Certan
products
To
receive
i"'
accessible
to
not
be
COIT'_IPieted,
prodt1.:1.
If
111-home
option:
to~
authorized
.S6fVK;e
~~~1011
;:rtyofthe~~
~
wa;~~~
expressly provided
Pf(XIuct,
am
damage
wtVch
and
uses
for
serial
no..mbers;
negiact,
fie,
equipment,
systems,
~lions,
~or~by~NGwhi?h~thiSproduct.or
result n
servce
~;
cust~
clearung,
~~~and
and
pr~.,
~!::!/~~~~;~~~~~~~mages.
=NGdoesnotwarrantlri'rt~tedoreour-freeoperationofthe
THERE
AAE
~~~&
IMPIJED
WARRANTIES
A
PARTICULAR
WARRANTY
BRAND
WARRANTY
b'and
new,
i"'
the
by
SAMSUNG
for
a
lirl
ited
Use
·es
1
1
2Yea< 2Yea<
.,
1
after
Pt.rchasilg and 600
begins
purchased and used
the
p.xcllaser
and service procedtxeS.
be
p-esented
or
SAMSUNG's
repair
or
herein,
defective
cMYlQ
and
prod..cts
are
eligble
·home
service,
service personnel.
it
may
serVICe
for
transportal~
center.
to
Mel
from
•.
m:Si"'
for
n
shal
not
apply
occurs
i"'
which
this
cosmetic
water,
igltning
utities, services,
ilstallations,
~;
adJUStments~
the
I'_'Struction
NO
EXPRESS
~~g~~r~NO
PURPOSE
PERIODS
TO
product,
as
supplied and
origi'lal
carton
to
agafist
mcn.lfactll'i'lg
wai'TMty
period
Parts
L.abo'
1
y,.,
Yea<
ard
1
y,.,
Yea<
Year
I
Yea<
Hours
on
the
original
il
the
must
cootact
'Warrat'lt'f
authorized
service
UJXlll
request
authorized
service
replace
!tis product,
will1
new
or
reconditioned
the
lirl~ed
warranty
become
lhe
for
In-home
servk::e
the
prrxluct
must
If
during
i"'·home
be~
to
IS
t.naVailable,
of
our
Otherwise,
and
the
SAMSUNG
.
normal,
~ex~ ~o.,
t~
statement,
noncommercial
to
the
folc:>wir9,
shipment;
deivery
product
was
not
i"'lended;
damage
or
exterior
or
other
acts
parts,
repairs,
ext~
incorrect
~ricalline
failure
envronmental
book;
~1011
WARRANTIES
OF
MERCHANTABILITY
SHALL
APPLY
STAl£D
ABOVE,
AND
the
of
ard
property
remove,
SAMSUNG
choic:?
for
authorized
of
wffig
~of~
ns~
OTl-lER
~.f:j=E{
ORIGINAL
onginal
00
Size
40"
LNg..-
37"
SmaiO<
All
All
All
of
Use
date
of
t.JrVted
SAMSUNG
center.
as
poof
center.
atOll'optionMdatno
atSa'nsung's
be
37
del
ilck.dir9.
and
ils
li'lishes;
nal\xe;
supplies,
AFTER
NO
I
Component
Blu-ray
.
6.
PRODUCTS
WARRANTY
CORPORATION
BINDING
.distributed
const.mer
defects
Days
Parts
Service
Carry-In
Cany-ln
Carry-In
Carry-In
Carry-In
Lamp
ptXchase,
States.
for
service can
The
original
of
p.xchase
parts
period
specified
ol
SAMSUNG
lX'IObstructed
service, repai carnot
repair
and
may
to
and
from
.
Mel~
serVICe
.
materialsWld
1
theextent
use
but
taRation;
ahered
product
accidents, abuse,
use
of
accessories,
or
~as
voltage,
.
fluc.tuat~
operat1ng
that
are~
~~diStortion
THAN
THOSE
OR
FITNESS
Tl-lE
EXPRESS
OTHER
LOSS
by
SAMSUNG
OR
p!XChaser,
CONSEQUENTIAL
i1
materials
and
INABIUTY
and
Labor
for
THEORY
HAS
SHALL
AMOUNT
or
In
SAMSUNG
Tl-lE
Home
FOR
PAOPERTY
OUT
orin
SOLD
Home
OF
TO
or
PRODUCT,
Pickup
REMEDY
or
Some
Pickup
or
above
on
Projector
you
and
is
valid
from
To
receive
at·
problem
only
be
dated
to
or
prodt1.:1s
if
above.
AI
and"'-"'
IMPORTANT
TELEVISION
discretion.
Standard
and
ratio
to
rettxn
the
The
elect,
atOll'
ratio
a
SAMSUNG
and
l~D
TV,
bars
center
IS
the
the
Widescreenformattelevisionswithaspectratiosof16:9{the
otherwise
rat~
of
this
to
not
nmited
to:
The
applications
16:9
or
this
and
products,
standard
to
not
Additionally,
market
and
computer
nstructiOnS,
above
the
that
teie~Jisi?'l
~=%!~~~~~~~t~!:~~ng
=~~~controls
~ER
Be
0
FOR
used
and
EXPRESS
your
·8·
connection
player
I
DVD
OR
GUARANTY
WITH
Qt.l
SAMSUNG.
Of
REVENUE
OR
OTHER
BENEF'TS,
DAMAGES
TO
USE
THIS
ON
\'VH!Oi
Tl-lE
BEEN
ADVISED
OF
RECOVERY
OF
THAN
11-E
PURCHASE
AND
CAUSING
FOREGOING,
PURCHASER
LOSS,
DAMAGE
AND
TO
OTHERS
OF
THE
USE,
MISUSE
BY
SAMSUNG
SM1SUNG.
THIS
UMITED
ANYONE
OTHER
THAN
IS
NONTRANSFERABLE
states
do
not
allow
the
excllsion
or
lfnilation
limitations
or
exck.Jsions
specific
legal
riglts,
state
to
state.
To
Samsung
Ridgefield
1-800-SAMSUNG
1-800-7
Important
WARRANTY
FORMAT
screen
format
of
the
screen
display
d~splay
no
width
standard
images
displayed
format
and be
constantly
images
on-screen,
(wide
screen
picttxeS),
total
television
viewing
of
the
~reen
width
w1~e
screen
·~
displayed
rabo
format,
or
expanded
feature,
and
constantly
images
on
screen,
format
t9evision
more
than
15%
viewing
other
cra'Nis,
video
graphics
and
for
all
televisions.
above
guidelines
leave
subtle,
but
~tlJ!B.
To
careful.
in
~he
selection
for
VIGWing.
Uneven
use,
as
well
as
Samsung
limited
••
I
AV
connection
VCRIBiu-rayplayer
GIVEN
BY
ANY
RESPECT
TO
THIS
SAMSUNG
SHALL
PROfiTS,
F.AJLURE
OR
ANY
OTHER
SPECIAL,
CAUSED
BY
PRODUCT,
REGI\RDLESS
CLAIM
IS
BASED,
Tl-lE
POSSIBILITY
ANY
KIND
AGAINST
PRICE
OF
THE
AllEGED
ASSUMES
OR
INJURY
TO
PURCHASER
AND
Tl-lEIR
OR
INABILITY
NOT
CAUSED
DIRECTLY
WAAIWITY
Tl-lE
ORIGINAL
AND
limitations
on
how
of
incidental
or
may
not
apply
and
you
may
also
obtain
warranty
service,
Electronics
America, Inc.
85
Challenger
Park,
NJ
07660-2112
(726
-7864)-
49-{1260:
Projectors
Warranty
lnfonnation
INFORMATION
VIEWING
televisions
with
to
screen
height)
fonnat
full-motion
on
them
should
primarily
moving.
Displaying
such
as
the
dar1<
should
be
limned
per
week.
to
screen
hei!1ht)
fonnat
full-mot~on
on
them
should
pnmanly
to
fill
the
moving.
Displaying
such
as
the
dar1<
video
and
programming,
of
the
total
television
stationary
images and
game
displays,
station
patterns.
should
Displaying
arry
can
permanent
avoid
other
stationary
cause
uneven
burned-in
this,
vary.theprogramming~
to
view
the
different
~d
duration
ag11'1Q
a~
B;
result
bumed-m
1mages,
warranty
.
I
••
PERSON,
FIRM
PRODUCT
DAMAGE.
PROPERTY
TO
SHALl.
STATES
consequential
have
Road
top
screen~
side-bars
be
agflg
OR
SHAU.
BE
NOT
BE
LIABLE
TO
THE
OF
SAMSUNG
AU.
PURCH..4SER
long
www.samSUilQ.com
video.
FOR
REAIJZE
SAVINGS
INCIDENTAL
OR
USE,
MISUSE
OR
Of
THE
LEG.A.L
AND
EVEN
IF
SAMSLING
SUCH
DAMAGES.
NOR
BE
GREATER
Tl-lE
PRODUCT
SOLD
BY
W1THOUT
UMmNG
RISK
AND
UABIUTY
AND
PURCH/I.SER'S
ARISING
USE
THIS
PRODIJCT
BY
THE
NEGLIGENCE
NOT
EXTEND
OF
THIS
YOUR
EXClUSNE
a-~
fnplied
waranty
damageS,
This
waranty
gves
rights wt"dl
vary
contact
SAMSUNG
only
REGARDING
ratios
of
4:3
primarily
designed
be
in
the
standard
stationary
graphics
bottom
letterbox
no
more
than
15%
designed
..
Wl
the
wide
screen
ycu
model
offers
graphics
on
non-expanded
should
be
lim~ed
per
week.
text
such
as
stock
web
sites
or
as
desaibed
images
that
exceed
LED
Display
Panels
images
in
the
images,
formats
as
a
fuH
forma~s
fonnat
select100
not
covered
so
(the
by
to
you.
other
please
Regarding
aspect
are
and
to
~primarily
~Ideo
be
stationary
viewing
logos,
lim~ed
of
ghost
of
television
O!
1s
IN
lasts,
the
4:3
1
of
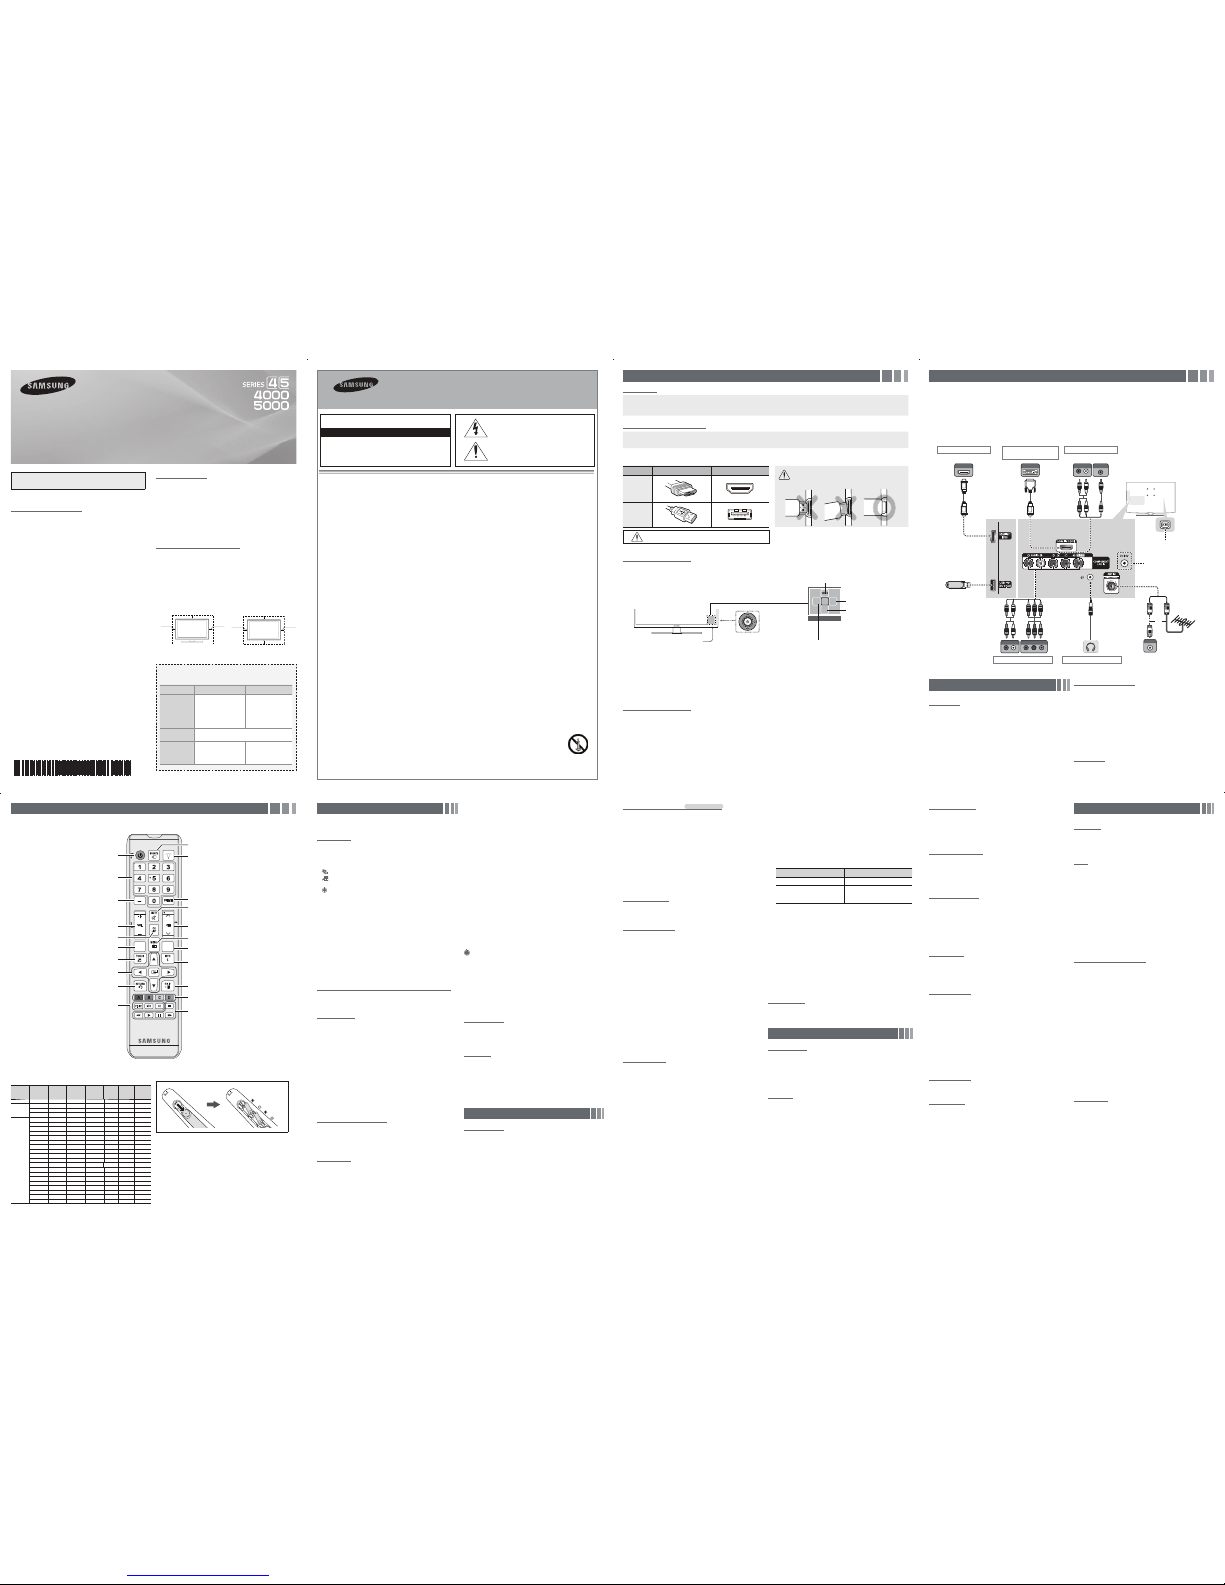
Connections
y For the best picture and audio quality, connect digital devices using
an HDMI cable.
y If you connect an external device to the TV that uses an older version
of HDMI, the video and audio may not work. If this occurs, ask the
manufacturer of the device about the HDMI version and, if it is out of
date, request an upgrade.
y Be sure to purchase a certified HDMI cable. Otherwise, the picture
may not display or a connection error may occur.
y PC/DVI AUDIO IN input is not supported.
y For an HDMI to DVI cable connection, you must use the
HDMI IN
2 (DVI)
port.
y Connecting through the HDMI cable may not be supported
depending on the PC.
y If an HDMI to DVI cable is connected to the
HDMI IN 2 (DVI) port,
the audio does not work.
y For Set-top box connection using HDMI cable, we highly
recommend you to connect the
HDMI IN 1 (STB) port.
Getting Started
Accessories
Input Cables (Sold Separately)
y Audio
y Composite (AV)
y Component
y Coaxial (RF)
y HDMI
y HDMI-DVI
✎
Make sure you have the correct cable before plugging it in. Illustrations of common plugs and jacks are shown below.
Cable Plugs Ports/Jacks Do not plug in opposite or wrong direction. It could
damage the TV port.
HDMI
USB
Do not plug cables in upside down. Be sure to check the orientation
of the plug before plugging it in.
TV Controller (Panel Key)
The TV’s Controller, a small joy stick like button on the rear left side of the TV, lets you control the TV without the remote control.
Remote control sensor
TV Controller
The image is drawn by facing
the front side of the TV.
Function menu
mRs
P
Return
Selecting the Media Play
Selecting a Source
Power Off
Selecting the Menu
✎
Exits the menu when pressing the controller more than 1 second.
✎
When selecting the function by moving the controller to the up/down/left/right directions, be sure not to press the controller. If you press it first,
you cannot operate it to move the up/down/left/right directions.
Plug & Play (Initial Setup)
When you turn the TV on for the first time, a sequence of screens and on-screen prompts will assist you in configuring the TV’s basic settings. Press
the
POWER button. Plug & Play is available only when the Input source is set to TV. Set the initial setup following instructions that the TV guides.
✎
Connecting the power cord and antenna. (refer to ‘Connections’)
Remote Control
✎
This remote control has Braille points on the Power, Channel, and Volume buttons and can be used by visually impaired persons.
Channel Menu
T Seeing Channels
Channel List
Add, delete or set Favorite channels and use the program guide for
digital broadcasts. Select a channel in the All Channels, Added
Channels, Favorite or Programmed screen by pressing the Ÿź
buttons, and pressing the
ENTERE button. Then you can watch the
selected channel.
■
All Channels: Shows all currently available channels.
■
Added Channels: Shows all added channels.
■ *
Favorite: Shows all favorite channels.
■
Programmed: Shows all currently reserved programs.
✎
Using the remote control buttons with the Channel List
x
Green (Zoom): Enlarges or shrinks a channel number.
x
Yellow (Select): Selects multiple channel lists. Select desired
channels and press the Yellow button to set all the selected
channels at the same time. The
c
mark appears to the left of
the selected channels.
x
T
(Tools): Displays the Channel List option menu. (The Options
menus may differ depending on the situation.)
Channel Status Display icons
yc: A channel selected.
y
*
: A channel set as a Favorite.
y
)
: A reserved program.
y
(
: A program currently being broadcast.
T Memorizing channels
Antenna (Switch to Cable / Switch to Air t)
Before your television can begin memorizing the available channels, you
must specify the type of signal source that is connected to the TV (i.e.
an Air or a Cable system).
Auto Program
✎
When selecting the Cable TV system: Selects the cable system.
STD, HRC and IRC identify various types of cable TV systems.
Contact your local cable company to identify the type of cable
system that exists in your particular area. At this point, the signal
source has been selected.
✎
After all the available channels are stored, it starts to remove
scrambled channels. The Auto Program menu then reappears.
✎
Press the ENTERE button to stop the channel store during Auto
Program.
How to Stop Auto Programming
1. Press the ENTERE button.
2. A message will ask Stop Auto Program?. Select Ye s by pressing
the Ż or Ź button.
3. Press the
ENTERE button.
T Other Features
Clear Scrambled Channel
This function filters out scrambled channels after Auto Program is
completed. This process may take up to 20~30 minutes.
✎
Press the ENTERE button to stop the Clear Scrambled
Channel.
✎
This function is only available in Cable mode.
Channel List
Channel List Option Menu
O Channel List ĺ
t
Set each channel using the Channel List menu options. Option menu
items may differ depending on the channel status.
■
Add / Delete: Delete or add a channel to display the channels you
want.
✎
All deleted channels will be shown on the All Channels menu.
✎
A gray-colored channel indicates the channel has been deleted.
✎
The Add menu only appears for deleted channels.
✎
Delete a channel from the Added Channels or Favorite menu in
the same manner.
■
Add to Favorite / Delete from Favorite t: Set channels you
watch frequently as Favorites.
■
Timer Viewing: You can set a desired channel to be displayed
automatically at the set time; even when you are watching another
channel. Set the current time first to use this function.
✎
Only memorized channels can be reserved.
✎
Reserved programs will be displayed in the Programmed menu.
✎
When a digital channel is selected, press the Ź (Next Program)
button to view the digital program. If you select the
ENTER
E
(Schedule) button on the next program, you can set Timer
Viewing directly.
■
Channel Name Edit: (analog channels only) Assign your own
channel name.
■
Select All: Select all the channels in the channel list.
■
Deselect All: Deselect all the selected channels.
✎
You can only select Deselect All when one or more channels
are selected.
■
Auto Program: Scans for a channel automatically and stores in the
TV.
Programmed
(in Channel List)
O Channel List ĺProgrammed ĺ
t
You can view, modify or delete a show you have reserved to watch.
■
Change Info: Change a show you have reserved to watch.
■
Cancel Schedules: Cancel a show you have reserved to watch.
■
Information: Display a show you have reserved to watch. (You can
also change the reservation Information.)
■
Select All / Deselect All: You can select or deselect all channels in
the channel list.
Channel Mode
Change the channel mode directly between Added Channels and
Favorite Channels.
✎
The Favorite Channels is enabled only when you set Add to
Favorite.
Fine Tune
(analog channels only)
If the reception is clear, you do not have to fine tune the channel, as
this is done automatically during the search and store operation. If the
signal is weak or distorted, fine tune the channel manually.
✎
Fine tuned channels that have been saved are marked with an
asterisk “*” on the right-hand side of the channel number in the
channel banner.
✎
To reset the fine-tuning, select Reset.
Picture Menu
Mode
t
Select your preferred picture type.
✎
When connecting a PC, you can only select Entertain and
Standard.
■
Dynamic: Suitable for a bright room.
■
Standard: Suitable for a normal environment.
■
Movie: Suitable for watching movies in a dark room.
■
Entertain: Suitable for watching movies and games.
✎
Only available when connecting a PC.
Samsung MagicAngle
for 19", 22" models
Adjust screen viewing Angle to optimize screen quality according to your
viewing position.
■
Samsung MagicAngle: When viewing the screen at an angle from
below or above by setting the appropriate mode for each position you
can obtain a similar picture quality as viewing the screen directly from
the front.
Off: Select when viewing from the front position.
Lean Back Mode: Select when viewing from a slightly lower position.
Standing Mode: Select when viewing from the upper position.
■
Mode: Adjust screen viewing angle.
✎
When Samsung MagicAngle is set to Lean Back Mode or
Standing Mode, Gamma is not available.
Backlight / Contrast / Brightness / Sharpness /
Color / Tint (G/R)
Your television has several setting options for picture quality control.
✎
When connecting a PC, you can only make changes to Backlight,
Contrast, Brightness and Sharpness.
Advanced Settings
(available in Standard / Movie mode)
Compared to previous models, new Samsung TVs have a more precise
picture.
✎
When connecting a PC, you can only make changes to Gamma and
White Balance.
■
Dynamic Contrast: Adjusts the screen contrast.
■
Black Tone: Selects the black level to adjust the screen depth.
■
Flesh Tone: Emphasize pink “flesh tone”.
■
Color Space: Adjusts the range of colors available to create the
image.
■
White Balance: Adjusts the color temperature for a more natural
picture.
R-Offset / G-Offset / B-Offset: Adjusts each color’s (red, green, blue)
darkness.
R-Gain / G-Gain / B-Gain: Adjusts each color’s (red, green, blue)
brightness.
Reset: Resets the White Balance to it’s default settings.
■
Gamma: Adjusts the primary color intensity.
■
Motion Lighting: Reduce power consumption by brightness control
adapted motion.
✎
Available in Standard mode only.
Picture Options
✎
When connecting a PC, you can only make changes to the Color
Tone, Size, and HDMI Black Level.
■
Color Tone
✎
Warm1 or Warm2 will be deactivated when the picture mode is
Dynamic.
■
Size: Your cable box/satellite receiver may have its own set of screen
sizes as well. However, we highly recommend you use 16:9 mode
most of the time.
16:9: Sets the picture to 16:9 wide mode.
Zoom1: Use for moderate magnification.
Zoom2: Use for a stronger magnification.
Wide Fit: Enlarges the aspect ratio of the picture to fit the entire
screen.
4:3: Sets the picture to basic (4:3) mode.
✎
Do not watch in 4:3 format for a long time. Traces of borders
displayed on the left, right and center of the screen may cause
image retention (screen burn) which are not covered by the
warranty.
Screen Fit: (DTV) Displays the full image without any cut-off when
HDMI (720p / 1080i / 1080p) or Component (1080i / 1080p) signals
are inputted.
✎
HD (High Definition): 16:9 - 1080i/1080p (1920x1080), 720p
(1280x720)
✎
Settings can be adjusted and stored for each external device you
have connected to an input on the TV.
✎
Picture Sizes available by Input Source:
Input Source Picture Size
ATV, AV, Component (480i, 480p) 16:9, Zoom1, Zoom2, 4:3
DTV(1080i, 1080p), Component
(1080i, 1080p), HDMI (720p, 1080i,
1080p)
16:9, Wide Fit, 4:3, Screen Fit
■
Digital Clean View: If the broadcast signal received by your TV is
weak, you can activate the Digital Clean View feature to reduce any
static and ghosting that may appear on the screen.
✎
When the signal is weak, try other options until the best picture
is displayed.
■
MPEG Noise Filter: Reduces MPEG noise to provide improved
picture quality.
■
HDMI Black Level: Selects the black level on the screen to adjust the
screen depth.
✎
Available only in HDMI mode (RGB signals).
■
Film Mode: Sets the TV to automatically sense and process film
signals from all sources and adjusts the picture for optimum quality.
✎
Available in ATV, DTV(interlace), AV, COMPONENT (480i / 1080i)
and HDMI (480i / 1080i).
■
LED Clear Motion: Removes drag from fast scenes with a lot of
movement to provide a clear picture.
Picture Reset
Resets your current picture mode to its default settings.
■
Reset Picture Mode: Returns all picture values in the currently
selected mode to the default settings.
Sound Menu
Mode
t
■
Standard: Selects the normal sound mode.
■
Music: Emphasizes music over voices.
■
Movie: Provides the best sound for movies.
■
Clear Voice: Emphasizes voices over other sounds.
■
Amplify: Increase the intensity of high-frequency sounds to allow a
better listening experience for the hearing impaired.
Equalizer
(standard sound mode only)
■
Balance L/R: Adjusts the balance between the right and left speaker.
■
100Hz / 300Hz / 1kHz / 3kHz / 10kHz (Bandwidth Adjustment):
Adjusts the level of specific bandwidth frequencies.
■
Reset: Resets the equalizer to its default settings.
DTS TruSurround
(standard sound mode only)
DTS TruSurround is a patented DTS technology that solves the problem
of playing 5.1 multichannel content over two speakers. TruSurround
delivers a compelling, virtual surround sound experience through any
two-speaker playback system, including internal television speakers. It is
fully compatible with all multichannel formats.
Preferred Language
(digital channels only)
Digital-TV broadcasts are capable of simultaneous transmission of many
audio tracks (for example, simultaneous translations of the program into
foreign languages).
✎
You can only select a language from among the ones being
broadcasted.
Multi-Track Sound
(analog channels only)
■
Mono: Choose for channels that are broadcasting in mono or if you
are having difficulty receiving a stereo signal.
■
Stereo: Choose for channels that are broadcasting in stereo.
■
SAP: Choose to listen to the Separate Audio Program, which is
usually a foreign-language translation.
✎
Depending on the program being broadcast, you can listen to
Mono, Stereo or SAP.
Auto Volume
Because each broadcasting station has its own signal conditions, the
volume may fluctuate each time channel is changed. This feature lets
you automatically adjust the volume of the desired channel by lowering
the sound output when the modulation signal is high or by raising the
sound output when the modulation signal is low.
Speaker Select
If you are listening to the sound track of a broadcast or movie through an
external receiver, you may hear a sound echo caused by the difference in
decoding speed between the TV’s speakers and the speakers attached
to your audio receiver. If this occurs, set the TV to External Speaker.
✎
When you set Speaker Select to External Speaker, the TV’s
speakers are turned off. You will hear sound through the external
speakers only. When you set Speaker Select to TV Speaker
both the TV’s speakers and the external speakers are on. You will
hear sound through both.
✎
When Speaker Select is set to External Speaker, the VOLUME
and
MUTE buttons will not operate and the sound settings will
be limited.
✎
If there is no video signal, both the TV’s speakers and the external
speakers will be mute.
Visual Impaired
(digital channels only)
Adds verbal description to the main audio to help the visually impaired.
Sound Reset
■
Reset All: Resets all sound settings to the factory defaults.
Setup Menu
Language
Set the menu language.
✎
Choose between English, Español, and Français.
T Setting the Time
Time
✎
The current time will appear every time you press the INFO button.
■
Clock: Setting the clock is for using various timer features of the TV.
✎
If you disconnect the power cord, you have to set the clock again.
Clock Mode: Set the current time manually or automatically.
Clock Set: Set the Month, Day, Year, Hour, Minute and am/pm.
✎
Available only when Clock Mode is set to Manual.
Time Zone: Select your time zone.
DST: (Daylight Saving Time) Switches the DST (Daylight Saving Time)
function on or off.
✎
DST and Time Zone function is only available when the Clock
Mode is set to Auto.
■
Sleep Timer
t
Automatically shuts off the TV after a preset period of time. (30, 60,
90, 120, 150 and 180 minutes).
✎
To cancel the Sleep Timer, select Off.
Timer 1 / Timer 2 / Timer 3
Three different on / off timer settings can be made. You must set the
clock first.
■
On Time / Off Time: Set the hour, minute, am/pm and Activate /
Inactivate. (To activate the timer with the setting you have chosen, set
to Activate.)
■
Volume: Set the desired volume level.
■
Contents: When the On Time is activated, you can turn on a specific
channel or play back contents such as photo or audio files.
í TV/USB: Select TV or USB. (Make sure that an USB device is
connected to your TV.)
í Antenna: Displays the current antenna source.
í Channel: Select the desired channel.
í Music/Photo: Select the folder containing MP3/JPEG files on the
USB device.
✎
The maximum displayed number of files, including sub folders, in
one folder of USB storage device is 2000.
✎
The media may not be playing smoothly when using the device
lower than USB 2.0.
■
Repeat: Select Once, Everyday, Mon~Fri, Mon~Sat, Sat~Sun or
Manual to set at you convenience. If you select Manual, you can set
up the day you want to activate the timer.
T Other Features
Game Mode
When connecting to a game console such as PlayStation™ or Xbox™,
you can enjoy a more realistic gaming experience by selecting the game
menu.
✎
Precautions and limitations for game mode
x
To disconnect the game console and connect another external
device, set Game Mode to Off in the setup menu.
x
If you display the TV menu in Game Mode, the screen shakes
slightly.
x
Game Mode is not available when the input source is set to TV.
x
After connecting the game console, set Game Mode to On.
Unfortunately, you may notice reduced picture quality.
LED TV
user manual
© 2013 Samsung Electronics Co., Ltd. All rights reserved.
y
The position of the port may differ
depending on the model.
HDMI OUT
AUDIO OUT
R-AUDIO-L
COMPONENT OUT
PR PB Y
DVI OUT
ANT OUT
W R BR
R W R BRG
R
G
AUDIO OUT
R-AUDIO-L
VIDEO OUT
Y
R
Y
WR
R W
or
Power Input
(for 19", 22" models)
TV Rear Panel
TV Side Panel
VHF/UHF Antenna
Cable
USB
Component connection
Headphones connection
PC connection
(Using an HDMI (to DVI) Cable)
HDMI connection
Set-top box / Blu-ray player / DVD
AV connection
VCR / Blu-ray player
Blu-ray player / DVD
Changing the Input Source
Source List
Use to select TV or an external input source such as a DVD player / Bluray player / cable box / STB satellite receiver.
1. Press the
SOURCE button.
2. Select a desired external input source.
■
TV / AV / Component / HDMI1 / HDMI2/DVI
✎
You can only choose external devices that are connected to the TV.
In the Source List, connected inputs will be highlighted.
How to use Edit Name
Edit Name lets you associate a device name to an input source. To
access Edit Name, press the
TOOLS button in Source List. Name the
device connected to the input jacks to make your input source selection
easier.
✎
When connecting a PC to the HDMI IN 2(DVI) port with HDMI cable,
you should set the TV to PC mode under Edit Name.
✎
When connecting a PC to the HDMI IN 2(DVI) port with HDMI
to DVI cable, you should set the TV to DVI PC mode under Edit
Name.
✎
When connecting an AV devices to the HDMI IN 2(DVI) port with
HDMI to DVI cable, you should set the TV to DVI mode under Edit
Name.
Information
You can see detailed information about the connected external device.
Display Modes (HDMI/DVI Input)
4 series:1366 x 768@60Hz / 5 series: 1920 x 1080@60Hz
Mode Resolution
Horizontal
Frequency
(KHz)
Vertical
Frequency
(Hz)
Pixel Clock
Frequency
(MHz)
Sync
Polarity
(H / V)
1366 x 768 1920 x 1080
IBM 720 x 400 31.469 70.087 28.322 -/+
cc
MAC
640 x 480 35 66.667 30.24 -/-
cc
832 x 624 49.726 74.551 57.284 -/-
cc
1152 x 870 68.681 75.062 100 -/-
c
VESA DMT
640 x 480 31.469 59.94 25.175 -/-
cc
640 x 480 37.861 72.809 31.5 -/-
cc
640 x 480 37.5 75 31.5 -/-
cc
800 x 600 37.879 60.317 40 +/+
cc
800 x 600 48.077 72.188 50 +/+
cc
800 x 600 46.875 75 49.5 +/+
cc
1024 x 768 48.363 60.004 65 -/-
cc
1024 x 768 56.476 70.069 75 -/-
cc
1024 x 768 60.023 75.029 78.75 +/+
cc
1152 x 864 67.5 75 108 +/+
c
1280 x 720 45 60 74.25 +/+
cc
1280 x 800 49.702 59.81 83.5 -/+
c
1280 x 1024 63.981 60.02 108 +/+
c
1280 x 1024 79.976 75.025 135 +/+
c
1366 x 768 47.712 59.79 85.5 +/+
cc
1440 x 900 55.935 59.887 106.5 -/+
c
1600 x 900RB 60 60 108 +/+
c
1680 x 1050 65.29 59.954 146.25 -/+
c
1920 x 1080 67.5 60 148.5 +/+
c
Installing batteries (Battery size: AAA)
✎
NOTE
t
Use the remote control within 23 feet from TV.
t
Bright light may affect the performance of the remote control.
Avoid use when nearby fluorescent lights or neon signs.
t
The Color and shape may vary depending on the model.
Press to select additional channels (digital) being
broadcasted by the same station. For example, to
select channel ‘54-3’, press ‘54’, then press ‘-’ and ‘3’.
Returns to the previous channel.
Press to directly access to channels.
Turns the TV on and off.
Displays and selects the available video
sources.
Use these buttons in a specific feature.
P.SIZE: Lets you choose the picture size.
MTS: Press to choose stereo, mono or Separate Audio
Program (SAP broadcast).
CC: Controls the caption decoder.
Cuts off the sound temporarily.
Automatically shuts off the TV at a preset time.
Displays the channel list on the screen.
Displays information on the TV screen.
Quickly select frequently used functions.
Selects the on-screen menu items and changes the
values seen on the menu.
Exit the menu.
Returns to the previous menu.
Turns the remote control light on or off. When
on, the buttons become illuminated for a
moment when pressed. (Using the remote
control with this button set to On will reduce the
battery usage time.)
Use these buttons according to the direction
on screen.
Changes channels.
Displays the main on-screen menu.
Views the Media Play.
Adjusts the volume.
MEDIA.P SLEEP
y The slots and openings in the cabinet and in the back or bottom are provided for necessary ventilation. To ensure reliable operation of this
apparatus, and to protect it from overheating, these slots and openings must never be blocked or covered.
- Do not cover the slots a nd openings with a c loth or other materi als.
- Do not block the slot s and openings by pl acing this appar atus on a bed, sofa, rug o r other similar sur face.
- Do not place this apparatus in a confined space, such as a bookcase or built-in cabinet, unless proper ventilation is provided.
y Do not place this apparatus near or over a radiator or heat register, or where it is exposed to direct sunlight.
y Do not place a vessel containing water (vases etc.) on this apparatus, as this can result in a risk of fire or electric shock.
y Do not expose this apparatus to rain or place it near water (near a bathtub, washbowl, kitchen sink, or laundry tub, in a wet basement, or near
a swimming pool etc.). If this apparatus accidentally gets wet, unplug it and contact an authorized dealer immediately.
y Make sure to pull out the power cord from the outlet before cleaning.
y This apparatus use batteries. In your community, there might be regulations that require you to dispose of these batteries properly to protect
the environment. Please contact your local authorities for disposal or recycling information.
y Do not overload wall outlets, extension cords, or adaptors beyond their capacity, since this can result in fire or electric shock.
y Power-supply cords should be routed so that they are not likely to be walked on or pinched by items placed upon or against them. Pay
particular attention to cords at the plug end, where connected to adaptors, and at the point where they exit from the apparatus.
y To protect this apparatus from a lightning storm, or when it is left unattended and unused for long periods of time, unplug it from the wall outlet
and disconnect the antenna or cable system. This will prevent damage to the set due to lightning and power line surges.
y Before connecting the AC power cord to the DC adaptor outlet, make sure the voltage designation of the DC adaptor corresponds to the local
electrical supply. (depending on the model)
y Never insert anything metallic into the open parts of this apparatus. Doing so may create a danger of electric shock.
y To avoid electric shock, never touch the inside of this apparatus. Only a qualified technician should open this apparatus.
y Make sure to plug the power cord in until it is firmly inserted. Pull on the plug, not the cord, when removing the power cord from the outlet. Do
not touch the power cord with wet hands.
y If this apparatus does not operate normally - in particular, if there are any unusual sounds or smells coming from it - unplug it immediately and
contact an authorized dealer or service center.
y Be sure to pull the power plug out of the outlet if the TV is to remain unused or if you are to leave the house for an extended period of time
(especially when children, elderly or disabled people will be left alone in the house).
- Accumulated dus t can cause an ele ctric shock, an el ectric leakag e, or a fire by causing th e power cord to gener ate sparks and heat,
or cause the insulation to deteriorate.
y Be sure to contact an authorized service center, when installing your set in a location with heavy dust, high or low temperatures, high humidity,
chemical substances or where it will operate for 24 hours a day such as in an airport, a train station, etc. Failure to do so may cause serious
damage to your set.
y Use only a properly grounded plug and receptacle.
- An improper ground may cause electric shock or equipment damage. (Class l Equipment only.)
y
To turn off the apparatus completely, you must pull the power plug out of the wall socket. Consequently, the power plug should be readily
accessible at all times.
y
Do not allow children to hang onto the product.
y
Store the accessories (batteries, etc.) in a location safely out of the reach of children.
y
Do not install the product in an unstable location such as a shaky self, a slanted floor, or a location exposed to vibration.
y
Do not drop or impart a shock to the product. If the product is damaged, disconnect the power cord and contact a service center.
y
To clean the product, unplug the power cord from the power outlet and wipe the product using a soft cloth dipped in a small amount of water.
Do not use any chemicals such as wax, benzene, alcohol, thinners, insecticide, air freshener, lubricant or detergent. This may damage the
appearance or erase the printing on the product.
y
Do not expose the apparatus to dripping or splashing.
y
Do not dispose of batteries in a fire.
y
Do not short circuit, disassemble, or overheat the batteries.
y
There is a danger of explosion if you replace the batteries with the wrong type of battery. Replace only with the same or equivalent type.
y
WARNING - TO PREVENT THE SPREAD OF FIRE, KEEP CANDLES OR OTHER OPEN FLAMES AWAY FROM THIS PRODUCT AT ALL
TIMES.
Warning! Important Safety Instructions
Please read the safety instructions below before installing and using the product.
CAUTION
CAUTION: TO REDUCE THE RISK OF ELECTRIC
SHOCK, DO NOT REMOVE COVER (OR BACK). THERE
ARE NO USER SERVICEABLE PARTS INSIDE. REFER
ALL SERVICING TO QUALIFIED PERSONNEL.
RISK OF ELECTRIC SHOCK. DO NOT OPEN.
This symbol indicates that high voltage is
present inside. It is dangerous to make any kind
of contact with any internal part of this product.
This symbol indicates that important literature
concerning operation and maintenance has
been included with this product.
Power Input
(for 28", 29" models)
Figures and illustrations in this User Manual are provided for reference only and
may differ from actual product appearance. Product design and specifications
may be changed without notice.
Important Warranty Information Regarding
Television Format Viewing
✎
Wide screen format LED Displays with aspect ratios of 16:9 (the ratio of the
screen width to screen h eight) are prima rily designed to d isplay wide scree n
format full-motion video. The images displayed on them should primarily be in
the wide screen 16:9 ratio form at, or expanded to fil l the screen if your mo del
offers this feature and the images are constantly moving. Displaying stationary
graphics and image s on screen, such as th e dark sidebars o n non- expanded
standard format television video and programming, should be limited to no
more than 5% of the total televis ion viewing per we ek. Additionall y, viewing
other stationary images and text such as stock market crawls, video game
displays, station logos, web sites or computer graphics and patterns, should
be limited as described above for all televisions. Displaying stationary images
that exceed the above guid elines can caus e uneven aging of LED Di splays
that leave subtle, but per manent burned -in ghost images in t he LED picture.
To avoid this, vary the progra mming and images, a nd primarily di splay full
screen moving image s, not stationary p atterns or dark ba rs. On LED models
that offer picture siz ing features, use th ese controls to vie w different form ats
as a full screen picture. Be careful in the selection and duration of television
formats you use for viewi ng. Uneven LED aging a s a result of format se lection
and use, as well as burned -in images, are not c overed by your Samsun g
limited warranty.
y SAMSUNG ELECTRONICS NORTH AMERICAN LIMITED WARRANTY
STATEMENT
Subject to the requirements, conditions, exclusions and limitations of the original
Limited Warranty supplied with Samsung Electronics (SAMSUNG) products, and the
requirements, conditions, exclusions and limitations contained herein, SAMSUNG
will additionally provide Warranty Repair Service in the United States on SAMSUNG
products purchased in Canada, and in Canada on SAMSUNG products purchased
in the United States, for the warranty period originally specified, and to the Original
Purchaser only.
The above described warranty repairs must be performed by a SAMSUNG Authorized
Service Center. Along with this Statement and the Original Limited Warranty
Statement, a dated Bill of Sale as Proof of Purchase must be presented to the Service
Center. Transportation to and from the Service Center is the responsibility of the
purchaser. Conditions covered are limited only to manufacturing defects in material or
workmanship, and only those encountered in normal use of the product. Exclusions
include, but are not limited to, any originally specified provisions for in-home or
on-site services, minimum or maximum repair times, exchanges or replacements,
accessories, options, upgrades, or consumables.
For the location of a SAMSUNG Authorized Service Center, please call toll-free:
– In the United States : 1-800-SAMSUNG (1-800-726-7864)
– In Canada : 1-800-SAMSUNG
Still image warning
Avoid displaying still images (such as jpeg picture files) or still image elements (such
as TV channel logos, panorama or 4:3 image format, stock or news bars at screen
bottom etc.) on the screen. Constant displaying of still pictures can cause ghosting of
LED screen, which will affect image quality. To reduce risk of this effect, please follow
below recommendations:
y Avoid displaying the same TV channel for long periods.
y Always try to display any image on full screen, use TV set picture format menu for
best possible match.
y Reduce brightness and contrast values to minimum required to achieve desired
picture quality, exceeded values may speed up the burnout process.
y Frequently use all TV features designed to reduce image retention and screen
burnout, refer to proper user manual section for details.
Securing the Installation Space
Keep the required distances between the product and other objects (e.g. walls) to
ensure proper ventilation.
Failing to do so may result in fire or a problem with the product due to an increase in
the internal temperature of the product.
✎
When using a stand or wall-mount, use parts provided by Samsung Electronics
only.
tIf you use parts provided by another manufacturer, it may result in a problem
with the product or an injury due to the product falling.
✎
The appearance may differ depending on the product.
✎
Be careful when you contact the TV because some parts can be somewhat hot.
Installation with a stand. Installation with a wall-mount.
4inches
4inches
4inches
4inches
4inches
4inches
4inches
BN68-04797F-01
Contact SAMSUNG WORLDWIDE
If you have any questions or comments relating to Samsung products, please
contact the SAMSUNG customer care center.
Country CANADA U.S.A
Address
Samsung Electronics
Canada Inc.,
Customer Service
55 Standish Court
Mississauga
Ontario L5R 4B2 Canada
Samsung Electronics
America, Inc.
85 Challenger Road
Ridgefield Park, NJ 07660
Customer Care
Center
1-800-SAMSUNG (726-7864)
Web Site
www.samsung.com/ca
(English)
www.samsung.com/ca_fr
(French)
www.samsung.com
y Remote Control (AA59-00600A) & Batteries (AAA x 2)
y Warranty Card / Regulatory Guide
y Owner’s Instructions
y Power Cord
y AC/DC Adapter (for 19", 22" models)
y Stand Wire Holder (BN61-08370A) (for 28", 29" models)
- 2 -- 1 -
- 6 -- 5 -
- 3 -
- 7 -
- 4 -
- 8 -
 Loading...