

Samsung 305PN50550 User Manual

Pasma
TV
user
manual
imagine
Thank you for purchasing this Samsung product.
To receive more complete service, please
register your product at
www.samsung.com/register
Model
the
possib~'
Serial
No.
----
I
Important
Wide
screen
format
screen
format
or
expandedtofill
graphics
programming,
and
imagesonscreen,
Warranty
PDP
Displays
full-motion
shouldbelimitedtono
video.
the
screenifyour
(16:9,
The
suchasthe
Information
the
aspect
images
displayedonthem
model
offers
dark
more
than5%of
Regarding
ratioofthe
this
feature
side-barsonnonexpanded
the
total
screen
should
and
the
television
Television
widthtoheight)
primarilybein
images
are
constantly
standard
viewing
per
Format
are
primarily
the
wide
screen
moving.
format television
week.
Viewing
designedtoview
16:9
ratio
format,
Displaying
video
stationary
and
wide
Additionally,
web
images that exceed the above guidelines can cause uneven aging
burned·in ghost images in the
full screen moving images, not stationary patterns
On
PDP
Be
carefulinthe
selection
U.S.A
The
In
5,539,829,5,606,618,
underUSPublished
This
commercial
unlicensed
unit.
or
11172-3orISOIIEC
Other countries
viewing
other stationary
sitesorcomputer
models
and
use,aswellasburned-in
Only
product
particular,
licenseislimitedtoprivate
The
license
ISOIIEC
graphics
that
offer
selection
unit
accompanying
this
productislicensed
Patent
use.
The
product
unitorprocess
only
13818-3.Norights
13818-3.
and
picture
and
duration
5,530,655,
Application
license
covers
images
and
text
suchasstock
patterns,
PDP
sizing
this
non-commercial
does
the
useofthis
are
shouldbelimitedasdescribed
picture.Toavoid this, vary the programming and images,
features,
of television
images,
user
manualislicensed
under
5,777,992,
No.
not
cover
conformingtoISOIIEC
granted
or
dark bars.
use
these
formats
are
not
coveredbyyour
the
followingUSpatents:
6,289,308,
2001-44713-A
usebyend-user
any
product
product
under
unittoencode
this
license
market
controlstoview
used
for
under
5,610,985,
1.
unit
other
11172-3orISOIIEC
for
reports,
video
game
above
for
all
televisions. Displaying stationary
of
PDP
Displays that leave subtle, but permanent
different
viewing.
Samsung
certain
5,991,715,5,740,317,4,972,484,
5,481,643, 5,544,247, 5,960,037,
consumers
than
this
andlor
product
featuresorfunctions
formatsasa
Uneven
limited
intellectual
for
licensed
product
13818-3
decode
PDP
agingasa
warranty.
property
contents.Norights
unit
and
usedorsoldincombination
audio
files
displays,
the
conformingtothe
station
and
primarily display
full
screen
picture.
resultofformat
rightsofcertain
5,214,678, 5,323,396,
6,023,490,
license
does
thatdonot
conformtothe
logos,
third
5,878,080,
are
granted
not
extendtoany
ISO/IEC
parties.
with
this
11172-3
ISOIIEC
and
for
product
The
product
unit
license
covers
13818-3.
accompanying
does
not
conformingtoISO/IEC
the
useofthis
are
granted
licenseislimitedtoprivate
use.
The
product
unitorprocess
license
only
13818-3.Norights
ISO/IEC
this
any
product
under
user
product
this
non-commercial
cover
manualislicensed
usebyend-user
unit
other
than
11172-3orISO/IEC
unittoencode
license
for
product
under
certain
consumers
this
product
13818-3
andlor
decode
featuresorfunctions
intellectual
for
licensed
unit
and
usedorsoldincombination
audio
property
contents.Norights
the
license
files
conformingtothe
thatdonot
does
rightsofcertain
conformtothe
are
not
extendtoany
with
ISO/IEC
third
parties.
granted
for
commercial
unlicensed
this
product
unit.
11172-3orISO/IEC
ISO/IEC
11172-3
This
The
or
©
2009
Samsung
Electronics
Co.,
Ltd.
All
rights
reserved.
I
User
Instructions
o Screen Image retention
Do
not
display a
screen
image
manualtoreduce
o
Altitudl~
The
PDP
can
still
image
retention.
the
degreeofbrightness
only
operate
(suchasonavideo
This
image
retentionisalso
normallyatheights
game)onthe
and
contrast of
under
plasma
knownas"screen
the
screen
6500ft.
display
panel
burn".Toavoid
when
displayingastill
for
more
such
than
image
image.
several
retention,
minutesasit
refertopage25of
can
cause
this
o Heat
011
the
The
top
sideofthe
partofthe
Thisisnormal
However,
product.
children
topofthe Plasma
product
and
does
shouldbeprevented
maybehot
not
indicate
TV
after
long
any
defectoroperation
from
touching
periodsofuseasheat
failureofthe
the
upper
partofthe
o The product is making a 'cracking' noise.
A 'cracking'
temperatureorhumidity.
o Cell Defects
The
produce.
product.
o Avoid c,perating the
PDP
However,
noise
may
usesapanel
there
occur
when
the
product
contractsorexpands
Thisisnormal
consistingof2,360,OOO(HD-level)to6,221
maybea
TV
at temperatures below41°F
and
few
brightordark
notadefectofthe
pixelsonthe
(SOC)
duetoa
unit.
,OOO(FHD-level)
screen.
o A still image displayed too long may cause permanentdamage to the
Watching
the
PlayingaDVDora
Damages
left,
right
the
PlasmaTVin
and
center of
game
causedbythe
4:3
the
console
above
format
screen
may
effect
foralong
causedbythe
cause
are
not
o After-images on the Screen.
Displaying
To
still
images
from
Video
games
andPCfor
prevent this effect, reduce the 'brightness'
longer
thanacertain
and
'contrast' when displaying still images for a long time.
dissipates
product.
product.
changeinthe
pixels
These
pixels
PDP
Panel.
periodoftime
difference
similar
effectstothe
coveredbythe
periodoftime
from
the
panel
through
surrounding
which
require
sophisticated
will
havenoimpactonthe
may
leave
tracesofborders
of light
emissiononthe
screen.
Warranty.
may
produce
partial
the
vent
environment
performanceofthe
after-images.
holeinthe
such
as
technology
displayed
screen.
upper
to
on
o Warranty
Warranty
Burn-inisnot coveredbythe warranty.
does
not
cover
any
damage
causedbyimage
retention.

I
Contents
Connecting
•
ListofFeatures
Checking
•
•
Viewing
•
Viewing
•
Remote
and
Preparing
Parts
the
Control
Panel
the
Connection Panel.................................... .8
Control
Connections
• Connecting
•
Connecting
•
ConnectingaDVD
receiver
• Connecting a
receiver
•
ConnectingaDVD
receiver
•
Connecting
•
ConnectingaVCR
• Connecting a Digital
• ConnectinganAmplifier I
•
ConnectingaPC
VHF
Cable
(Set-Top
DVD
(Set-Top
(Set-Top
a Camcorder
and
UHF
TV
I Blu-Ray Player
Box)
IBlu-Ray
Box)
I Blu-Ray Player
Box)
Audio
Operation
•
Turning
theTVOn
•
Changing
• Adjusting
•
Using
•
Using
•
Viewing
•
Viewing
•
Plug&Play
Channel
•
Storing
• Managing Channels
Channels
the
the
TOOLS
the
Remote
the
the
Control
Channels .
and
Volume
Button
Control
Disp!ay
Menus
Feature
Your
TV
Antennas
or
via
HDMI
PlayerorCable
via
DVI
or
via
Component cables.
System
DVD
Home
Off
Backlight
.........................................
..
.........................................
Cable
Cable
Theater
Buttons
Box
Box
Box
.
I Satellite
I Satellite
I Satellite
..
10
PC
Display
5
•
Using
YourTVas
5
• Display
6
• SettinguptheTVwith
Sound
9
•
Function
10
• Configuring
•
12
•
• Support
12
Media
13
•
13
•
14
•
15
•
15
Anynet+
16
• Connecting Anynet+
• Troubleshooting
17
Appendix
17
17
• Troubleshooting
18
• Preparation
18
•
18
• Securing
19
•
20
•
• Specifications
• Dimensions
21
• Dimensions (PN58B550T2F/PN58B560T5F).............
21
• Dimensions (PN63B550T2F) ...54
Modes
Cootrol
Changing
Description
Setting
the
Source
ListIEdit
Play
Using
the
Using
the
Using
the
Using
the
Howtoattach
Wall
Mount
Using
Holder
a Computer
the
Sound
Settings
the
Setup
Time
Name
Media
Play
PHOTO
MP3
Setup
theTVto
(JPEG)
List.........
Menu
Devices
for
Anynet+
before
installing
the
Stand-Base .48
the
Kit
Specifications
Wire
cable..............................................
(PN50B550T2F/PN50B560T5F)......
your
PC
Menu
Function
List
Wa!I
(PC)
the
Wall-Mount..
(VESA)
Display
27
27
28
29
30
34
35
35
37
..
38
..
41
..
42
43
46
47
48
49
.50
...51
..
51
...
52
..
53
Picture
•
Control
Changing
Symbol
the
Picture
Settings
Press
-
23
Note
One-Touch
Button
TOOLS
I
Connecting
List
of F
eatu
and
res
Preparing
Your
TV
• Adjustable picture settings that
• Automatic timertoturn
I
• Aspecial sleep
• V-Chip function.
• Excellent Digital Interface
With
a built-inHDdigital
needed.
•
You
can
• HDMIIDVI connection of your
•
SRS
TruSurroundHDprovides a virtual surround system.
timer.
listen to music files
the TVonand
canbestoredinthe TV's
off.
& Networking:
tuner,
non-subscriptionHDbroadcasts
and
view picturesonUSB
PCtothis
TV.
t--C_h_e_C_ki_n_g_p_a._rt_s
Please make sure the following items are included with
1·.
® The items' color
and
shape
may
vary dependingonthe model.
memory.
canbeviewed withnoCable Box/Satellite receiver
Mass
Storage Class
your
TV.Ifany items are missing, contact
(MSC)
devices.
your
dealer.
(Set-Top
Box)
_
Remote
(BN59-00852A)
AAA
(4301-000103)
Ferrite
Core
(3301-001305)
Holder-Wire
(BN61-05596A)
(Refertopage
~
Ferrite Core
The ferrite cores
When
plug.
Control
I
Batteries
for
Power
Cord
Cable
51)
are
usedtoshield the cables
connecting a cable, open the ferrite core
Power
(3903-000144
Ferrite
Core
(3301-001201
PN58B550T2FI
PN58B560T5F
Cord
for
)
Side-AV
)
only
Owner's
from
interference.
and
clip it around the cable near the
Instructions
Quick
Setup
Cover-Bottom
(Refertopage
Guide
48)
I
Holder-Ring
(Refertopage
Warranty
Safety
(Not
availableinall
(
(4ea)
48)
Card
Guide
Manual
Holder
(BN96-10788A)
(Refertopage
I
locations)
TVIScrew
49)
PN50B560T5F
o
Cleaning
Cloth
(BN63-01798B)
Screws
(4ea)
PN50B550T2FI
only
------------------
Power
.
Cord
__
:----AudioCabieiVideoCable----
:
(PN588550T2FI
:
__
~_~~~~~~!?~.~~I~l
_
Viewing
The
To
I
~
~
the
buttonsonthe
use
the
more
The
product
If
you
touch
Control
lower-right
advanced
color
and
the
front
shape
panel
Panel
panel
features,
may
buttons,
control
your
you
must
vary
dependingonthe
each
button
use
PN50B550T2F/PN58B550T2F/PN63B550T2F
TV's
the
will
basic
remote
model.
operated.
features,
control.
including
the
on-screen
menu.
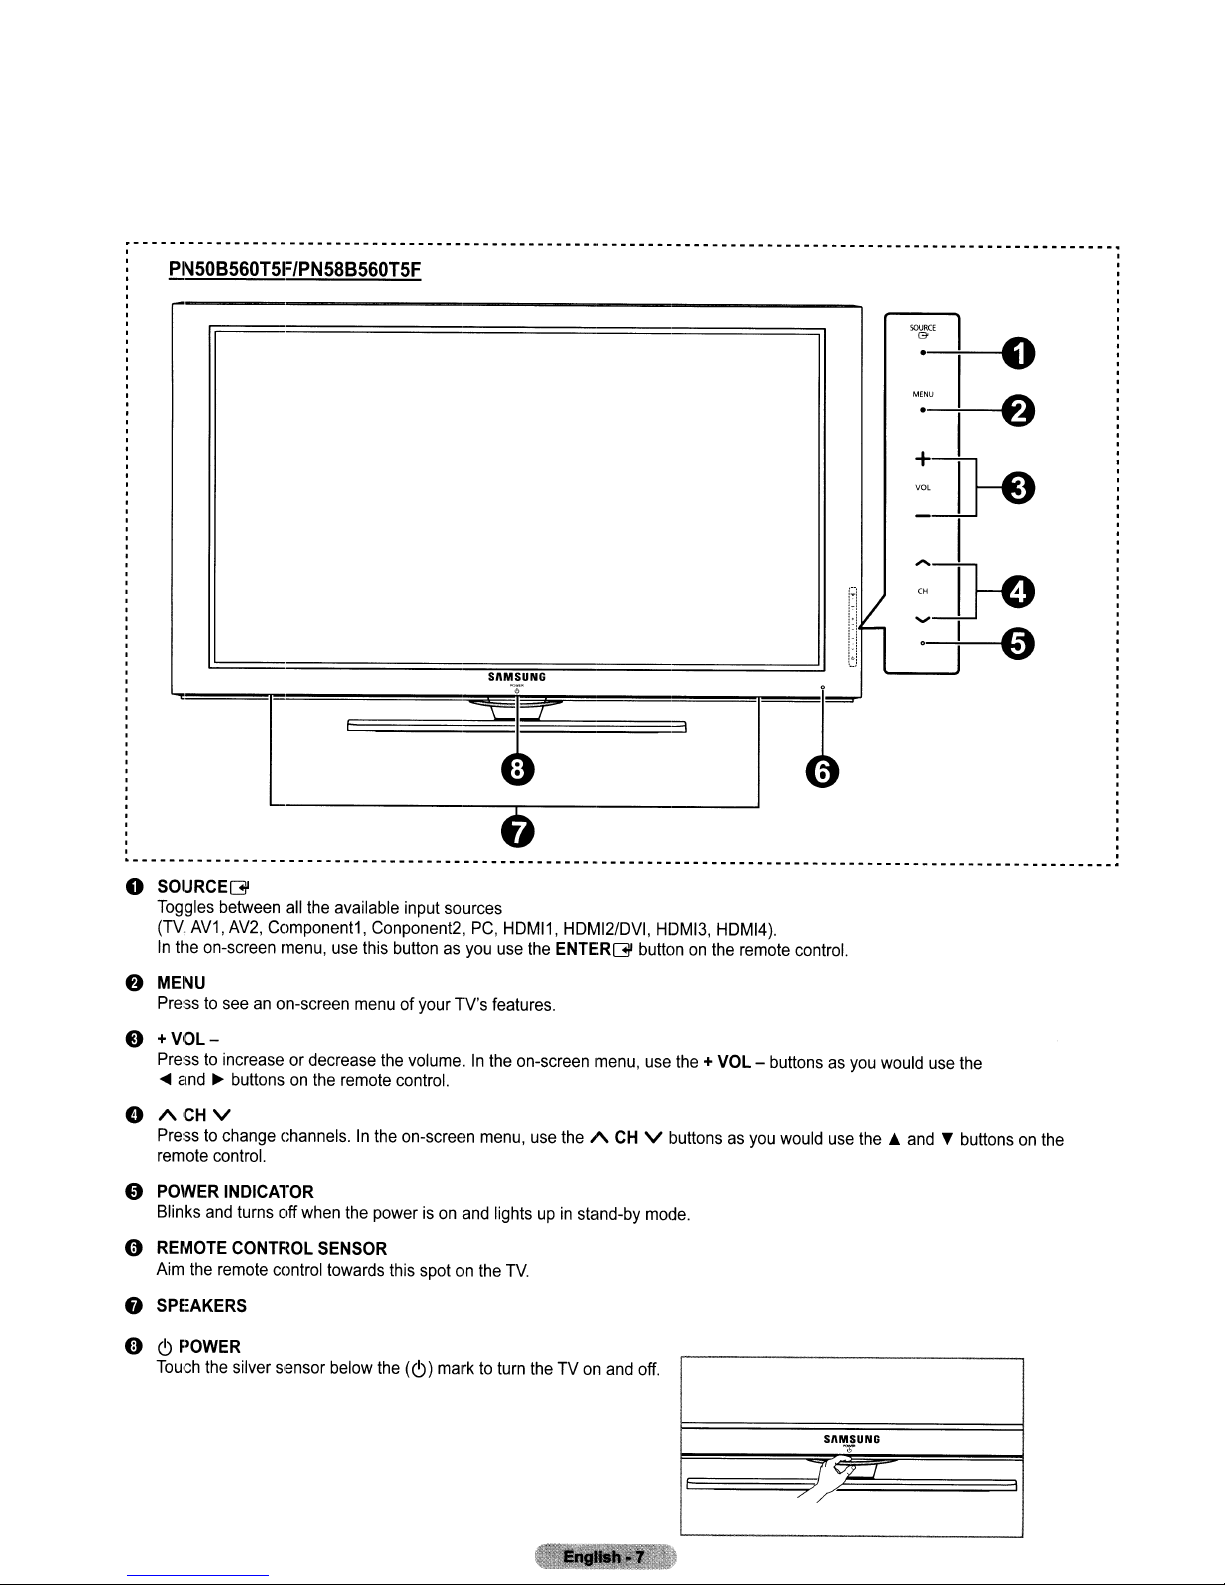
o SOURCEG
Toggles
(TV,
In
f)
MENU
Presstoseeanon-screen
e
+VOL-
o
9
o
between
AV1, AV2,
the
on-screen
Presstoincreaseordecrease
....
and~buttonsonthe
ACHV
Presstochange
remote
control.
POWER
Blinks
and
<9
(POWER)
Presstoturn
all
Component1,
menu,
channels.Inthe
INDICATOR
turns
off
theTVon
the
when
available
Conponent2,
use
this
menuofyour
the
remote
the
powerison
and
off.
input
sources
PC,
buttonasyou
TV's
volume.Inthe
control.
on-screen
and
SftMSUNG
HDMI1,
use
the
features.
on-screen
menu,
lightsupin
HDMI2IDVI,
ENTERG
use
the
menu,
A
CH
stand-by
HDMI3,
HDMI4).
buttononthe
use
the
+
VOL
V
buttonsasyou
mode.
remote
control.
-
buttonsasyou
would
use
would
use
the.
and~buttonsonthe
the
8
REMOTE
Aim
o
SPEAKERS
the
CONTROL
remote
control
SENSOR
towards
this
spotonthe
TV.
PN50B560T5F/PN58B560T5F
SOURCE
C3'
---+--<8
o SOURCE[3i
Toggles
(TV
In
f)
MENU
Presstoseeanon-screen
between
AV1. AV2.
the
on-screen
Component1.
all
the
menu.
available input
Conponent2.
use
this
buttonasyou
menuofyour
SIIMSUNG
sources
PC,
TV's
"
..
HDMI1,
use
the
features.
HDMI2/DVI,
ENTER[3i
HDMI3,
HDMI4).
buttononthe
remote
control.
-:-1
6
+ I
:~
~
I
CH]}-o
'V
I
. 0
e
+VOL-
Presstoincreaseordecrease
....
and~buttonsonthe
o
ACHV
Presstochange
remote
o
POWER
Blinks
o
REMOTE
Aim
the
control.
and
remote
channels.Inthe
INDICATOR
turns
off
CONTROL
control
when
remote
the
SENSOR
towards
the
control.
on-screen
powerison
this
8 SPEAKERS
o
c!)
POWER
Touch
the
silver sensor
below
the
(c!))
volume.Inthe
menu.
and
spotonthe
marktoturn
on-screen
use
lightsupin
TV.
theTVon
the
stand-by
menu,
A
CH
and
use
the+VOL-buttonsasyou
V
buttonsasyou
mode.
off.
would
use
the.
SIIMSUNG
T
would
use
the
andTbuttonsonthe
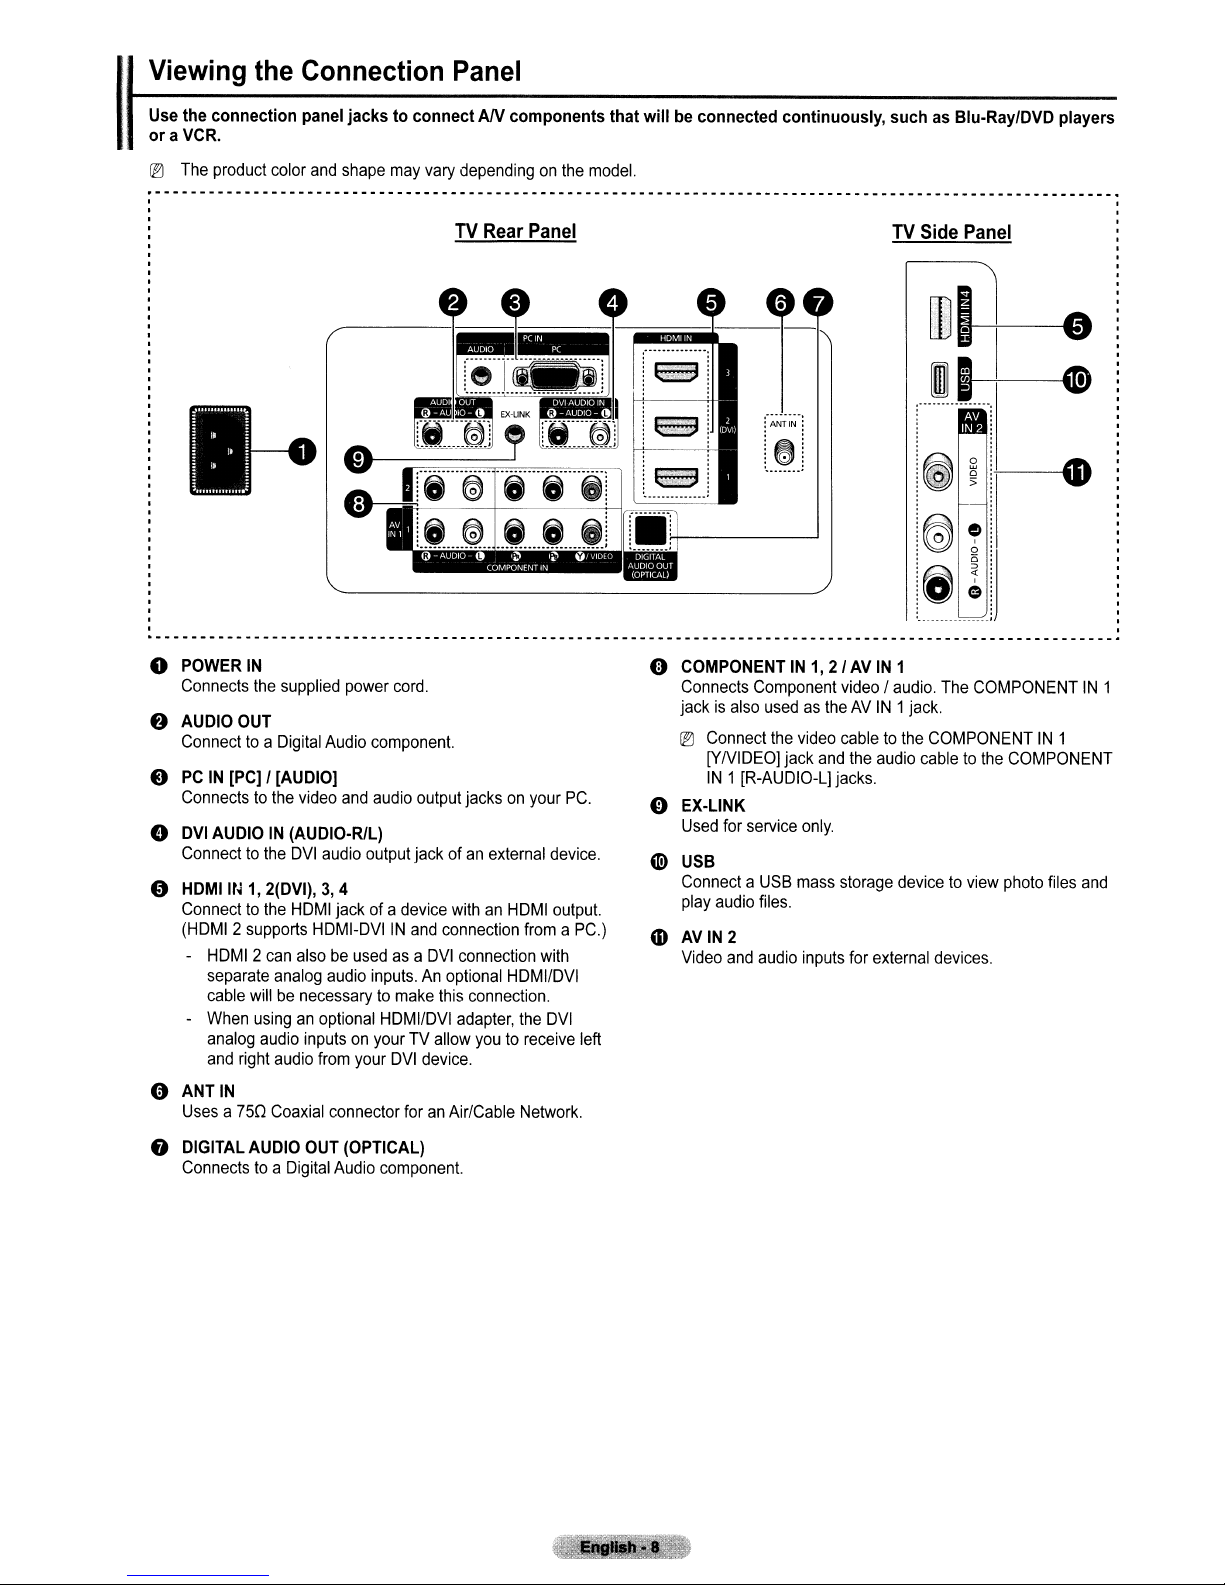
:t--V_ie_W_i_n_g_t_h_e_c_o_n_n_e_c_ti_o_n_p_a_n_e_1
Use the connection panel jackstoconnectANcomponents that will be connected continuously,
ora
1
VCR.
®
The
product
color
and
shape
may
vary
dependingonthe
TV
-----------------
model.
Rear
Panel
r·
8
i
6:3
···
such
as Blu-RayIDVD players
TV
Side
Panel
+---.
o POWERIN
Connects
f)
AUDIO OUT
Connecttoa
e
PCIN[PC] / [AUDIO]
Connectstothe
o
DVI
Connecttothe
o
HDMllfi1,2(DVI),3,4
Connecttothe
(HDMI2supports
-
o
ANTIN
Uses
f)
DIGITAL AUDIO OUT (OPTICAL)
Connectstoa
the
supplied
Digital
Audio
video
AUDIOIN(AUDIO-RlL)
DVI
audio
HDMI
jack of a
HDMI-DVIIN
HDMI2can
separate
cable
When
analog
and
a 750
alsobeusedasa
analog
willbenecessarytomake
usinganoptional
audio
right
audio
inputsonyourTVallow
audio
from
Coaxial
connector
Digital
Audio
power
cord.
component.
and
audio
output
output
jack ofanexternal
device
and
inputs.Anoptional
HDMIIDVI
your
DVI
device.
foranAir/Cable
component.
jacksonyour
withanHDMI
connection
DVI
connection
this
connection.
adapter,
youtoreceive
device.
output.
fromaPC.)
with
HDMIIDVI
the
DVI
Network.
PC.
left
o COMPONENT
Connects
jack
IEl
Component
is
also
usedastheAVIN1jack.
Connect
[YNiDEO] jack
IN1[R-AUDIO-L]
o EX-LINK
Used
for
service
«!>
USB
ConnectaUSB
play
audio
files.
mAVIN
Video
2
and
audio
IN1,2/AVIN
the
video
and
jacks.
only.
mass
inputs
1
video/audio.
cabletothe
the
audio
storage
devicetoview
for
external
The
COMPONENTIN1
COMPONENT
cabletothe
devices.
IN
1
COMPONENT
photo
files
and
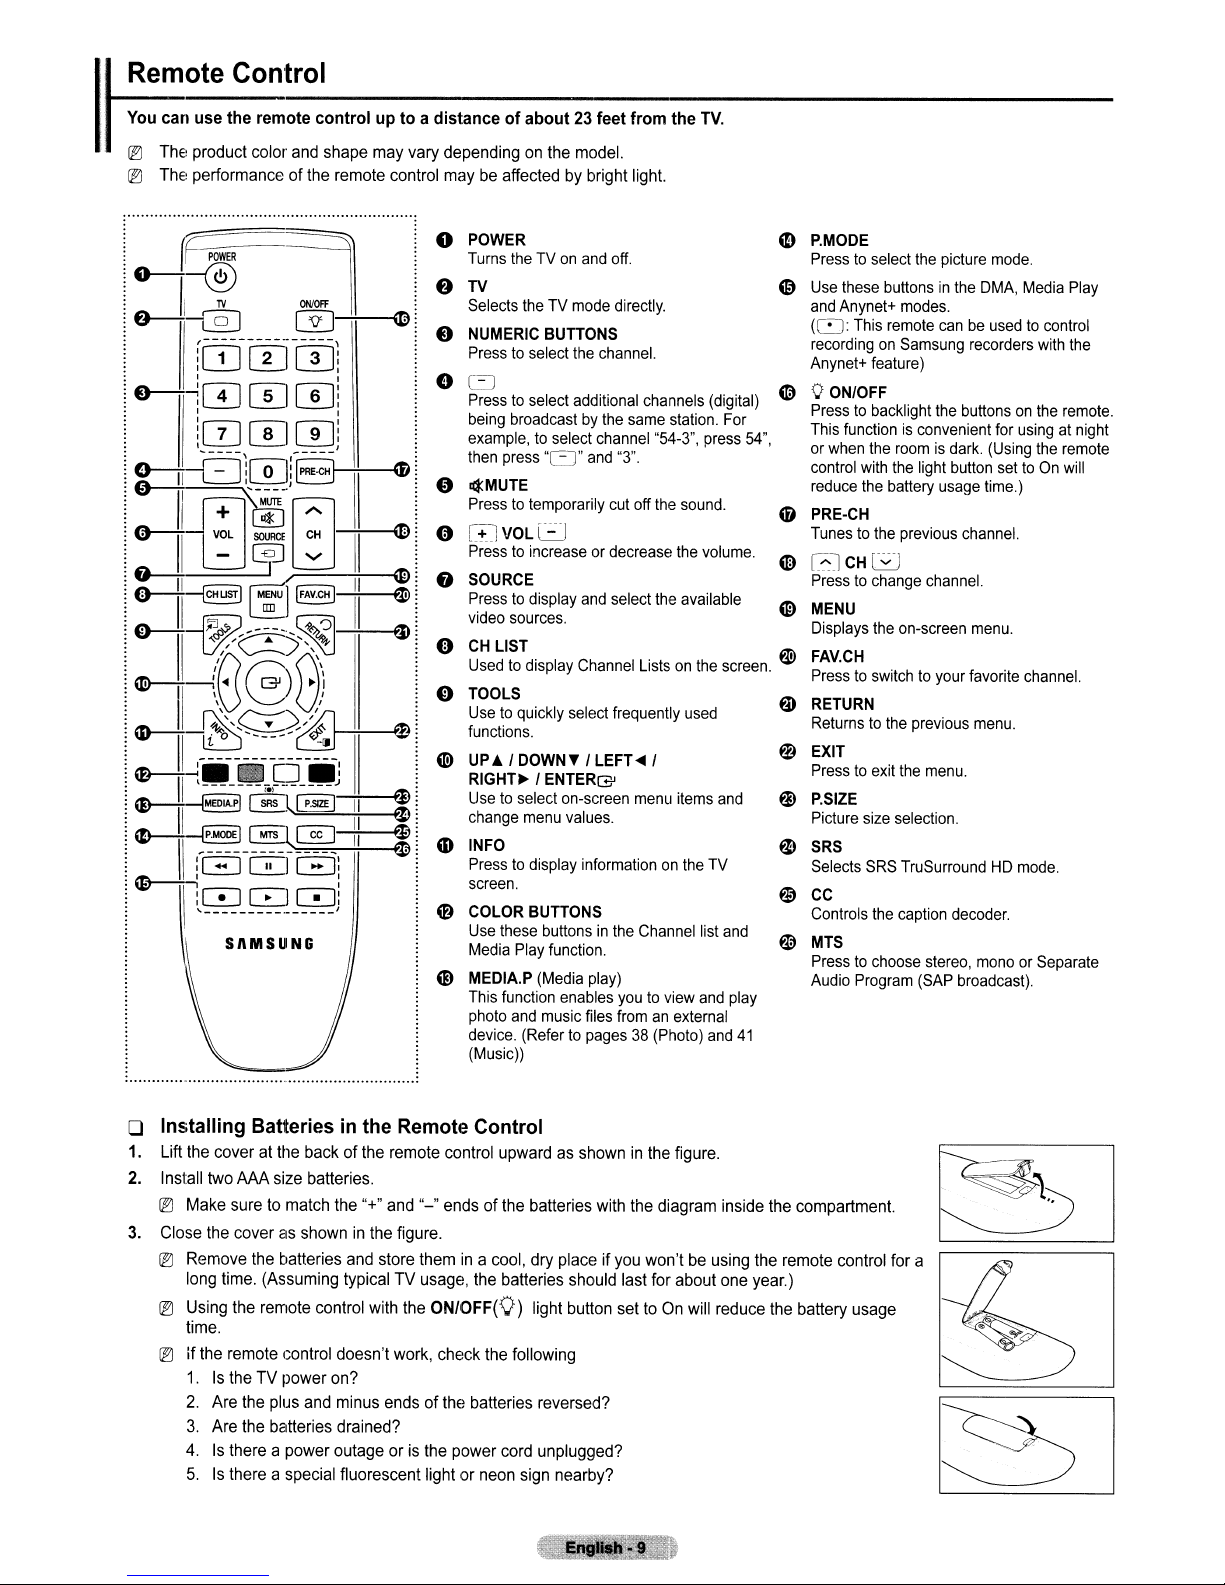
Remote
You
can use the remote control up to a distanceofabout23feet from the
I
® The product color
Control
and
shape may vary dependingonthe model.
® The performance of the remote control may
................................................................
be
affected by bright light.
POWER
0
Turns
theTVon
f)
TV
Selects
t)
NUMERIC
Presstoselect
e
~
Presstoselect
being
broadcastbythe
example,toselect
then
press
4MUTE
0
Presstotemporarily
[+JVOLL:J
0
Presstoincreaseordecrease
SOURCE
8
Presstodisplay
video
sources.
CH
LIST
0
Usedtodisplay
TOOLS
0
Usetoquickly
functions.
'1i)
UP.IDOWN
RIGHT~
Usetoselect
change
INFO
CD
Presstodisplay informationonthe
screen.
@
COLOR
Use
these
Media
Play
@
MEDIA.P
This
function
photo
and
device.
(Music))
and
off.
theTVmode
BUTTONS
"~"
I ENTERG'
menu
BUTTONS
buttonsinthe
function.
(Media
music
(Refertopages38(Photo)
the
channel.
additional
channel
and
cut
and
select
Channel
select
T /
LEFT
on-screen
values.
play)
enables
files
directly.
"3".
frequently
fromanexternal
channels
same
station.
"54-3",
off
the
the
the
Listsonthe
...
/
menu
items
Channel
youtoview
TV.
(digital)
press
sound.
volume.
available
used
and
TV
list
and
and
For
54",
screen.
and
play
41
P.MODE
CD
Presstoselect
Use
49
~
'i
~
0
~
fl)
~
@)
~
~
~
these
and
Anynet+
(~:
This
recordingonSamsung
Anynet+
o
Presstobacklight
This
or
control
reduce
PRE-CH
Tunestothe
~lCHG
Presstochange
MENU
Displays
FAV.CH
RETURN
feature)
ON/OFF
functionisconvenient
when
the
with
the
the
Presstoswitchtoyour
Returnstothe
EXIT
Presstoexit
P.SIZE
Picture
size
SRS
Selects
SRS
CC
Controls
MTS
Presstochoose
Audio
the
Program
the
picture
mode.
buttonsinthe
modes.
remote
roomisdark.
the
light
battery
previous
on-screen
previous
the
selection.
TruSurroundHDmode.
caption
(SAP
DMA,
canbeusedtocontrol
recorders
the
buttonsonthe
for
(Using
button
settoOn
usage
time.)
channel.
channel.
menu.
favorite
menu.
menu.
decoder.
stereo,
monoorSeparate
broadcast).
Media
Play
with
the
remote.
usingatnight
the
remote
will
channel.
o Installing Batteries in the Remote Control
1. Lift the coveratthe back of the remote control upward as showninthe figure.
2.
Install two
® Make sure
3.
Close the cover as showninthe figure.
® Remove the batteries and store them
® Using the remote control with the
® If the remote control doesn't work, check the fOllowing
AM
size batteries.
to
match the
long time. (Assuming typical TV usage, the batteries should last for about one year.)
time.
1.Isthe TV power on?
2.
Are the plus
3.
Are the batteries drained?
4.Isthere a power outage oristhe
5.Isthere a special fluorescent light or neon sign nearby?
"+"
and
and
minus ends of the batteries reversed?
"-"
ends of the batteries with the diagram inside the compartment.
in
a cool, dry place ifyou won'tbeusing the remote control for a
ON/OFF(O)
power cord unplugged?
light button settoOn
will reduce the battery usage

I
Connections
Connecting
r-;lf~y~O~Ur~a~n~te;'n~n~a~h~a;s~a~s~e~t
~w~_
I
Ifyourantenna has one lead that looks like this, see "Antennas with75Q Round Leads".
Ifyou have two antennas,
VHF
and
UHF
Antennas
o;f~l;'ea~d~s~t~ha;'t~lo~O~k~l~ik:e~t~hi;S~,
s~e~e-::"~A~nt;e~n~na~s~w:;ith;;-;30;0~Q;;-;F~la;t
~Tw~in:--r==~(~~~~~;;;;;;;==1
I (
see
"Separate
VHF
and
UHF
Antennas".
~~_omr_1
o Antennas with
Ifyou are usinganoff-air antenna (suchasa roof antennaorrabbit ears) that has
twin flat leads, follow the directions below.
1.
Place
the
Use
a screwdrivertotighten
2.
Plug
the
o Antennas with75nRound Leads
Plug
the
antenna
o Separate
If
you have two separate antennas for yourTV(one
combine the two antenna signals before connecting the antennas to the
procedure requires
1.
Connect
2.
Plug
the
wires
adaptor
lead
VHF
and
both
antenna
combiner
300
nFlat Twin Leads
from
the
twin
leads
under
the
screwsona
the
screws.
into
the
ANTINterminalonthe
into
the
ANTINterminalonthe
UHF
Antennas
an
optional combiner-adaptor (available at most electronics shops).
leadstothe
into
the
ANTINterminalonthe
combiner.
backofthe
300-750adapter
TV.
backofthe
VHF
and one
bottomofthe
TV.
UHF),
back
(not
you must
TV.
panel.
supplied).
This
300
Q
Connecting
To
connect to a cableTVsystem, follow the instructions below.
Cable
TV
I
o Cable
o Connecting
Plug
®
1.
2.
without
the
incoming
Because
channels.
Find
the
®
This
Connect
a Cable Box
cable
into
the
ANTINterminalonthe
thisTVis
cable
terminal
the
cable-ready,
to
a Cable Box that Descrambles All Channels
thatisconnectedtothe
mightbelabeled
other
endofthis
youdonot
ANT
"ANT
cabletothe
our,
backofthe
needacable
OUT
"VHF
ANTINterminalonthe
boxtoview
terminalonyour
OUT"orsimply,
TV.
unscrambled
cable
"OUT".
backofthe
box.
TV.
cable
~·l
ANT
IN
ANT OUT
l¥
..
!
Continued
...
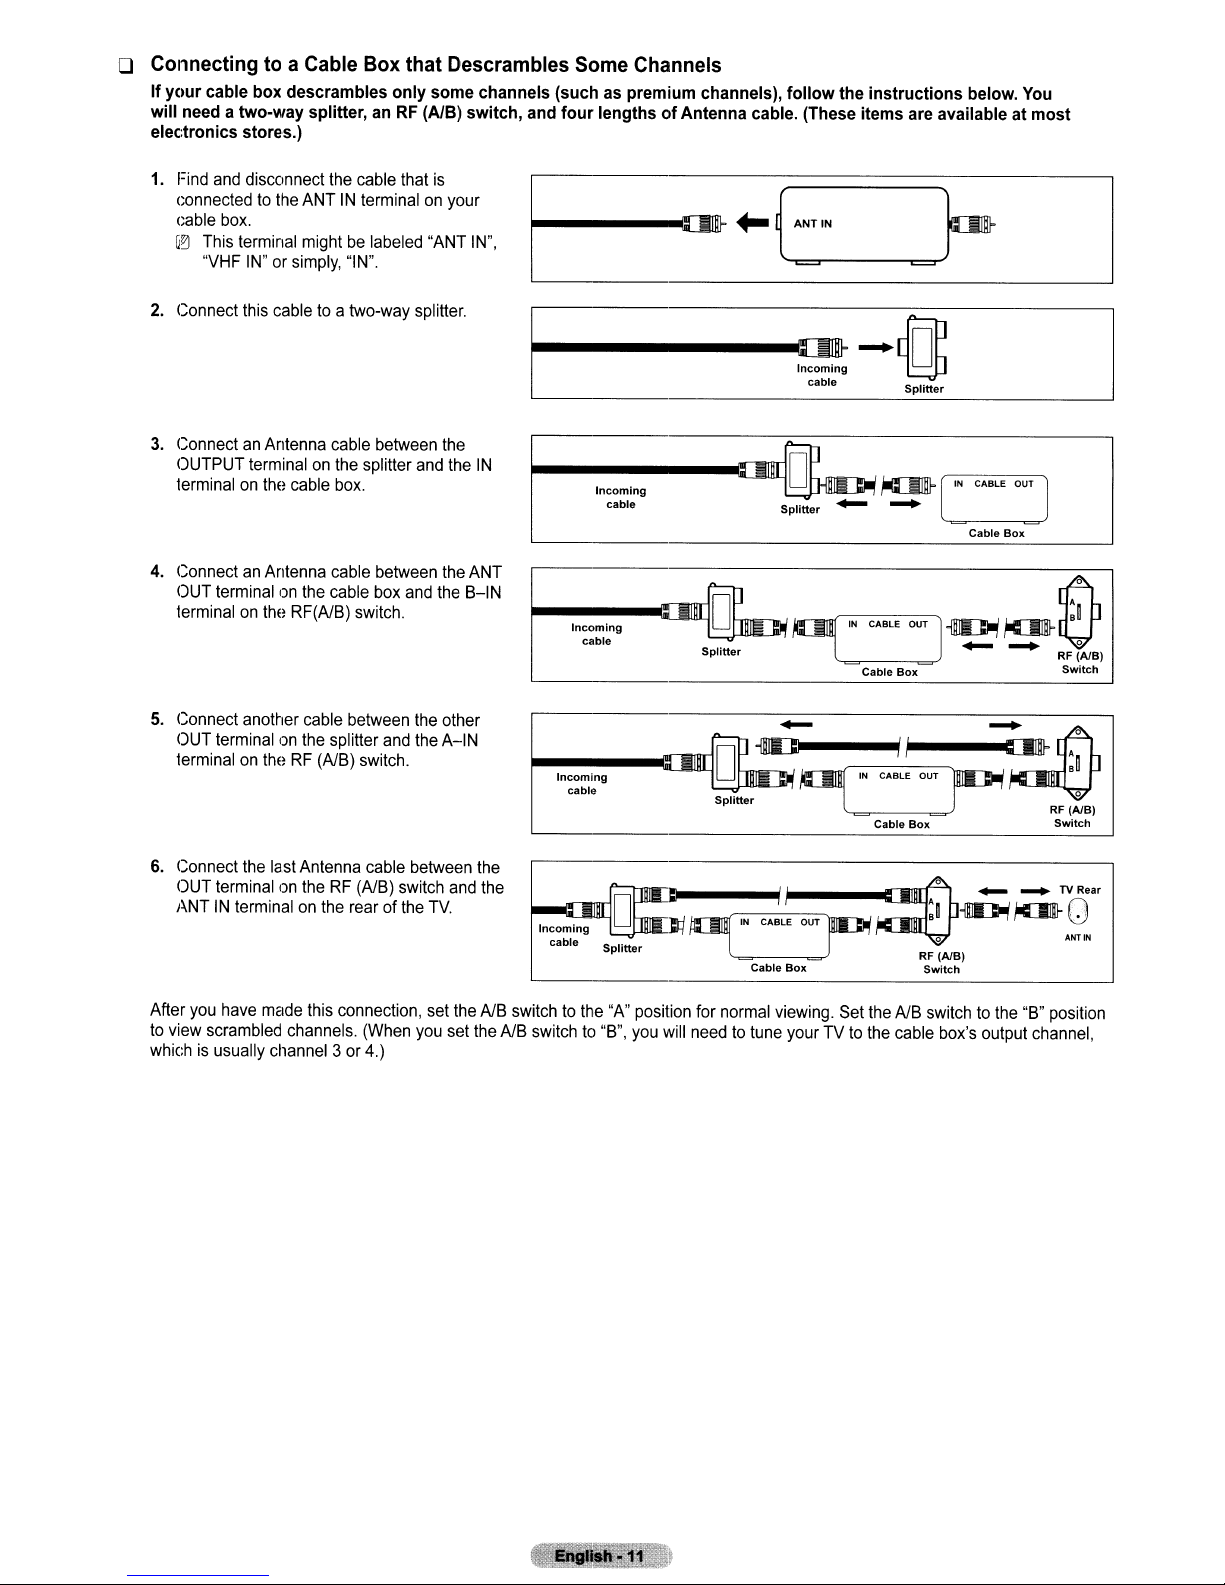
o Connecting to a Cable Box that Descrambles Some Channels
If your cable box descrambles only some channels (such as premium channels), follow the instructions below.
will need a two-way splitter, anRF(AlB) switch, and four lengthsofAntenna cable. (These items are available at most
electronics stores.)
1.
Find
and
connectedtothe
cable
box.
G~
This
"VHF
2.
Connect
disconnect
terminal
IN"orsimply,
this
the
cable
that
ANTINterminalonyour
mightbelabeled
"IN".
cabletoa
two-way
is
"ANT
splitter.
IN",
You
3.
ConnectanAntenna
OUTPUT
terminalonthe
4.
ConnectanAntenna
OUT
terminal
5.
Connect
OUT
terminalontheRF(AlB)
6.
Connect
OUT
ANTINterminalonthe
terminalonthe
terminalonthe
on
the
another
terminalonthe
the
last
terminalontheRF(AlB)
cable
cable
cable
RF(AlB)
cable
splitter
Antenna
splitter
box.
cable
switch.
between
switch.
cable
rearofthe
between
and
between
box
and
the
and
the
between
switch
the
TV.
the
the
the
other
A--IN
and
IN
ANT
B-IN
the
the
------IIIIIIj~
1
Incoming
cable
~-,·n~·~~·I~·ng-"UDJL..-.r""--"'.
Splitter
j
om~I-N-C-AB-lE-OU-T']
cable
l
-c
Splitter
Cable
Box
~
~
a
RF
(AlB)
Switch
....
Incoming
cable
Incoming
cable
L..-.po>--'"'lU
Splitter
Splitter
l J
omr,--<='N~CA_B_lE_O~U=T,...,~
~
IN
CABl~~~~AQN
Cable
Box
II~!--""'''~Ia
RF
(~Bl
Cable
Box
RF
Switch
__
(AlB)
Switch
TVRear
After
you
have
made
this
connection,
to
view
scrambled
whichisusually
channels.
channel3or
(When
4.)
you
set
set
the
the
AlB
AlB
switchtothe
switchto"B",
,..
"A"
,to
position
you
will
1
for
normal
needtotune
viewing.
yourTVto
Set
the
the
AlB
switchtothe
cable
box's
output
"B"
position
channel,
Ij
c::nectinga
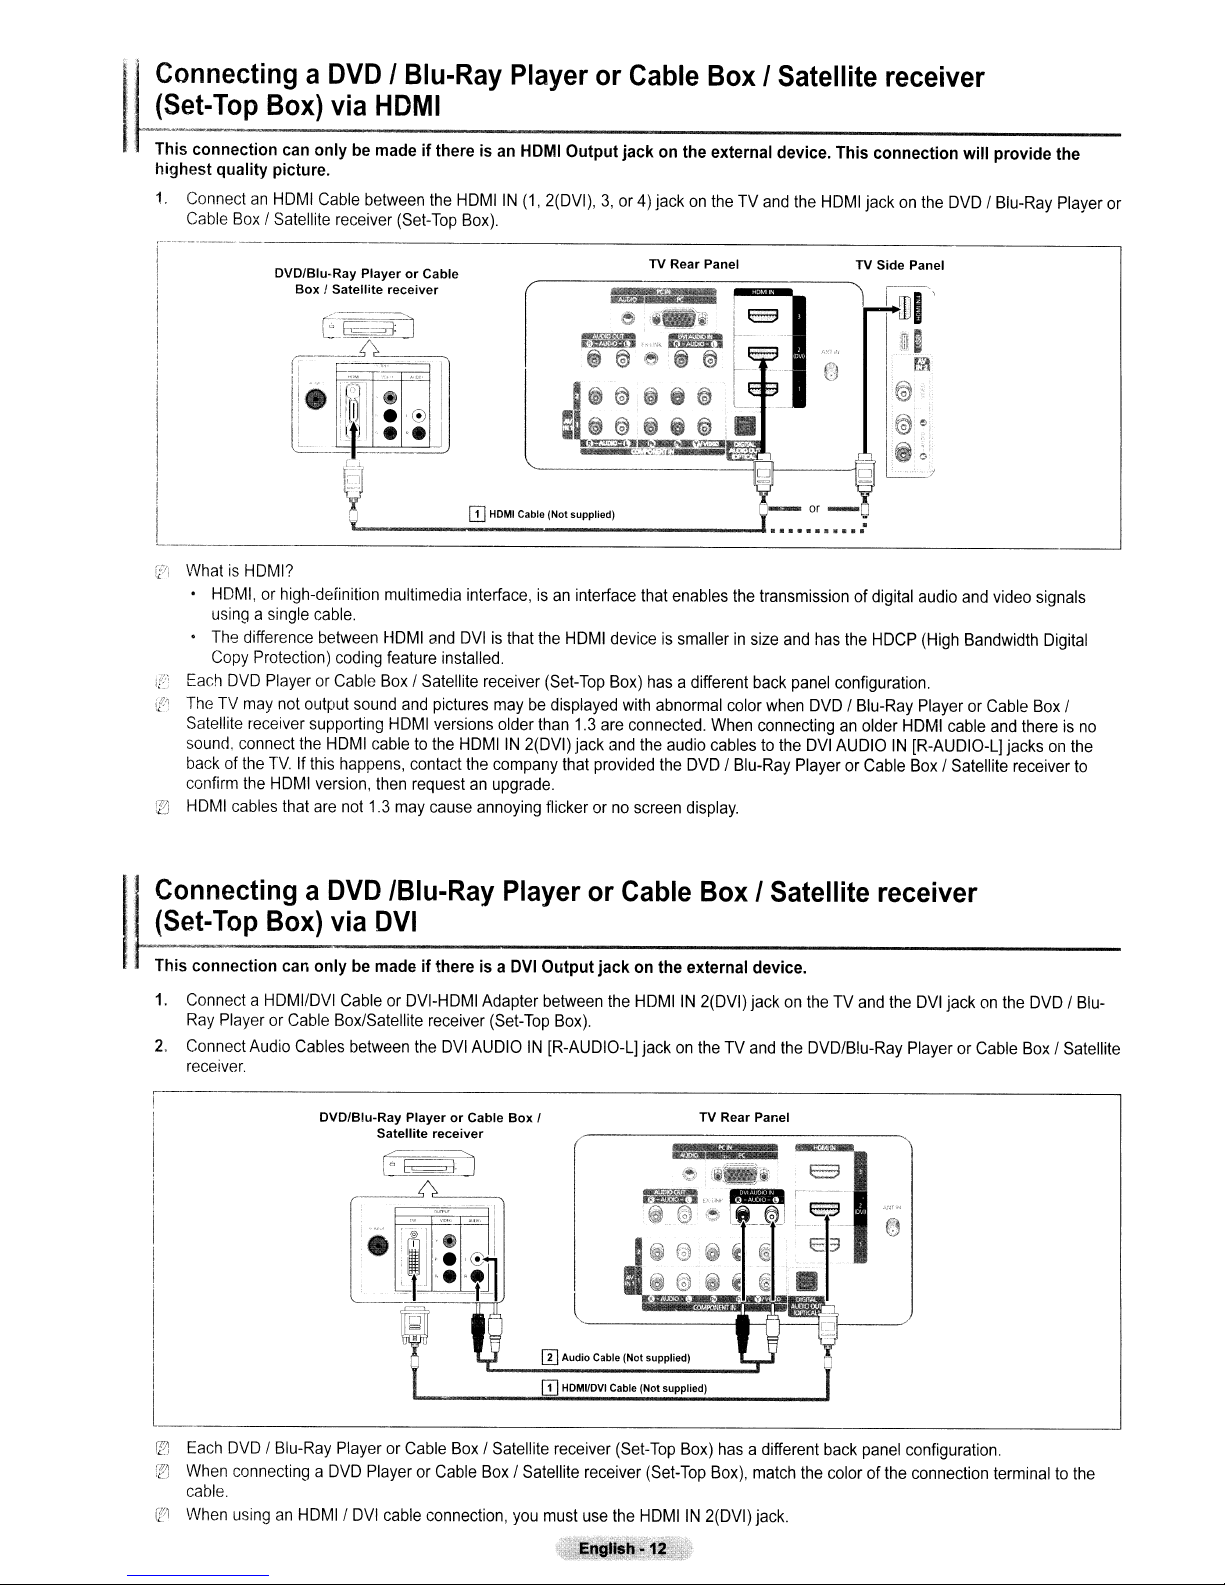
•
(Set-Top
I·
Thl,
'0-;;;''"0"""0""
highest quality picture.
1.
ConnectanHDMI
Cable
Box
Box)
/ Satellite
DVD
via
Cable
receiver
I Blu-Ray Player
HDMI
b.
m,d.
"
between
(Set-Top
th.,,;,
the
'"
HDMIIN
Box).
or
Cable Box I Satellite receiver
HOMI
a"""'i'"
(1,
2(DVI),3,or4)jackontheTVand
0"
tho
,,',,""'d..
the
'oo.
HDMI
Thl'
jackonthe
'o""octlo"
wm
,mvld.
DVD/Blu-Ray
'b.
Player
or
[,·-----------DVD/BIU-Ray
I
I
i
I
I
I
I
i
I
-------------------'
i;:IJ
WhatisHDMI?
HDMI,orhigh-definition
usingasingle
The
difference
Copy
Protection)
I;'~;
Each
DVD
PlayerorCable
i[1
TheTVmay
Satellite receiver
sounc1.
backofthe
confirm
'25
HDMI
connect
the
cables
not
TV.Ifthis
HDMI
that
Box!
Satellite
cable.
between
coding
output
supporting
the
HDMI
version,
are
PlayerorCable
receiver
multimedia
HDMI
feature
Box
sound
and
HDMI
cabletothe
happens,
then
not
1.3
may
Q]
HOMI
Cable (Nolsupplied)
interface,isan
and
DVIisthat
installed.
/ Satellite
contact
requestanupgrade.
pictures
versions
HDMIIN
the
cause
receiver
maybedisplayed
older
2(DVI)
company
annoying
interface
the
HDMI
(Set-Top
than
1.3
jack
that
provided
tlickerorno
TV Rear Panel
that
enables
the
deviceissmallerinsize
Box)
has
a different
with
are
connected.
and
screen
abnormal
the
audio
the
color
When
cablestothe
DVD/Blu-Ray
display.
TV Side Panel
transmissionofdigital
and
has
the
HDCP
back
panel
configuration.
when
DVD/Blu-Ray
connectinganolder
DVI
AUDIOIN[R-AUDIO-L]
PlayerorCable
.1
audio
and
(High
Bandwidth
PlayerorCable
HDMI
cable
Box
/ Satellite receiver
video
signals
Digital
Box
and
thereisno
jacksonthe
/
to
ConnectingaDVD
(Set-Top
This connection
1.
ConnectaHDMIIDVI
Ray
2.
Connect
receiver.
Box)
can
PlayerorCable
Audio
Cables
onlybemade if there is a
IBlu-Ray
via
DVI
CableorDVI-HDMI
Box/Satellite
between
I-
DVD/Blu-Ray
PlayerorCable
Satellite
I
i
I
I
I
I
1~
!Z'1
Each
DVD!
Blu-Ray
r~~
When
connectingaDVD
cable.
iPI
When
usinganHDMI!
PlayerorCable
PlayerorCable
DVI
cable
Player
Adapter
receiver
the
connection,
(Set-Top
DVI
AUDIOIN[R-AUDIO-L]
receiver
Box
/ Satellite receiver
Box
or
Cable
DVI
Outputjackonthe external device.
between
Box
I TV Rear Panel
[I]
Q]_H_O_MI_'ov_'_ca_ble_(N_O_IS_uP_Pli_ed_)
/ Satellite
you
must
the
HDMIIN
Box).
Audio Cable (Not supplied)
(Set-Top
receiver
use
the
English!12_.
Box
2(DVI)
jackontheTVand
Box)
has
(Set-Top
HDMIIN
Box),
2(DVI)
I Satellite receiver
jackontheTVand
the
DVD/B!u-Ray
a different
match
jack.
back
the
colorofthe
the
PlayerorCable
panel
configuration
DVI
jackonthe
connection
DVD/Blu-
Box
/ Satellite
terminaltothe
---'
Connecting a
I
;
(Set-Top
I
• The rear panel
to
your
1.
Connect Component Cable between the COMPONENTIN(1
jacks on the DVD I Blu-Ray Player or Cable Box / Satellite receiver(Set-Top Box).
2. ConnectAudio Cables between the COMPONENT
Blu-Ray Player or Cable Box / Satellite receiver (Set-Top Box).
Box)
TV.
DVD
jacksonyourTVmakeiteasytoconnect
DVD I
I Blu.Ray Player
via
Component
Blu-Ray
PlayerorCable
I
Satellite
receiver
or
cables
a DVD/Blu-Ray PlayerorCable
IN(1or 2) [R-AUDIO-L] jacksonthe TV and the AUDIO OUT jacks on the DVD I
Box
IT]
Audio Cable (Not supplied)
[!]
ComponentCable (Notsupplied)
Cable Box I Satellite receiver
Box
or 2)
[Y,
I Satellite
Ps,
PRJ
jacks on the TV and the COMPONENT
TV Rear Panel
receiver
(Set-Top
[Y,
Ps,
Box)
PRJ
® Component video separates the video into Y (Luminance (brightness)),
to match the component video and audio connections. For example, if connecting the video cable
the audio cable
® Each DVD / Blu-Ray Player or Cable Box / Satellite receiver (Set-Top Box) has a different back panel configuration.
® When connecting a DVD / Blu-Ray Player or Cable Box / Satellite receiver (Set-Top Box), match the color of the connection terminal
to
the cable.
to
COMPONENTIN1 also.
Ps
(Blue) andPR(Red) for enhanced video quality. Be sure
to
COMPONENTIN1,
ConnectingaCamcorder
The
side
and
rear panel
jacksonyour
TV makeiteasytoconnectacamcordertoyour
TV.
I
o Using an Video JAudio Cable
1. Connect a Video Cable between the AV IN 2 [VIDEO] jack on the TV and the VIDEO OUT jack on the camcorder.
2.
Connect Audio Cables between theAVIN
® Each Camcorder has a different back panel configuration.
c.,
.a,.m.c..ord,..er
-<:~.
~.:~~.'
Jr--.,.
''-l",
~
,~ooo'\!JT~-~
.w:oo,
~
2 [L-AUDIO-Rj jacks on the TV and the AUDIO OUT jacks on the Camcorder.
TV
Side
Panel
I
IT1~
1
I.
1m]
~
I
! • lij I
,',.rr..'
'~~:rr
~'LIClf-'IT]=2
OJ
C OlL,
Video Cable (Not supplied)
:-A_Ud_iO_C._ble_IN_ot._Su
...PP...
lie_d)
__
~-D
TIC
C
.]F:
~m
~'~~I
~I
I
.~Il
.011111
connect
lL.~
® When connecting a Camcorder, match the color of the connection terminal
l "
~
• -
to
the cable.
!_~-~/
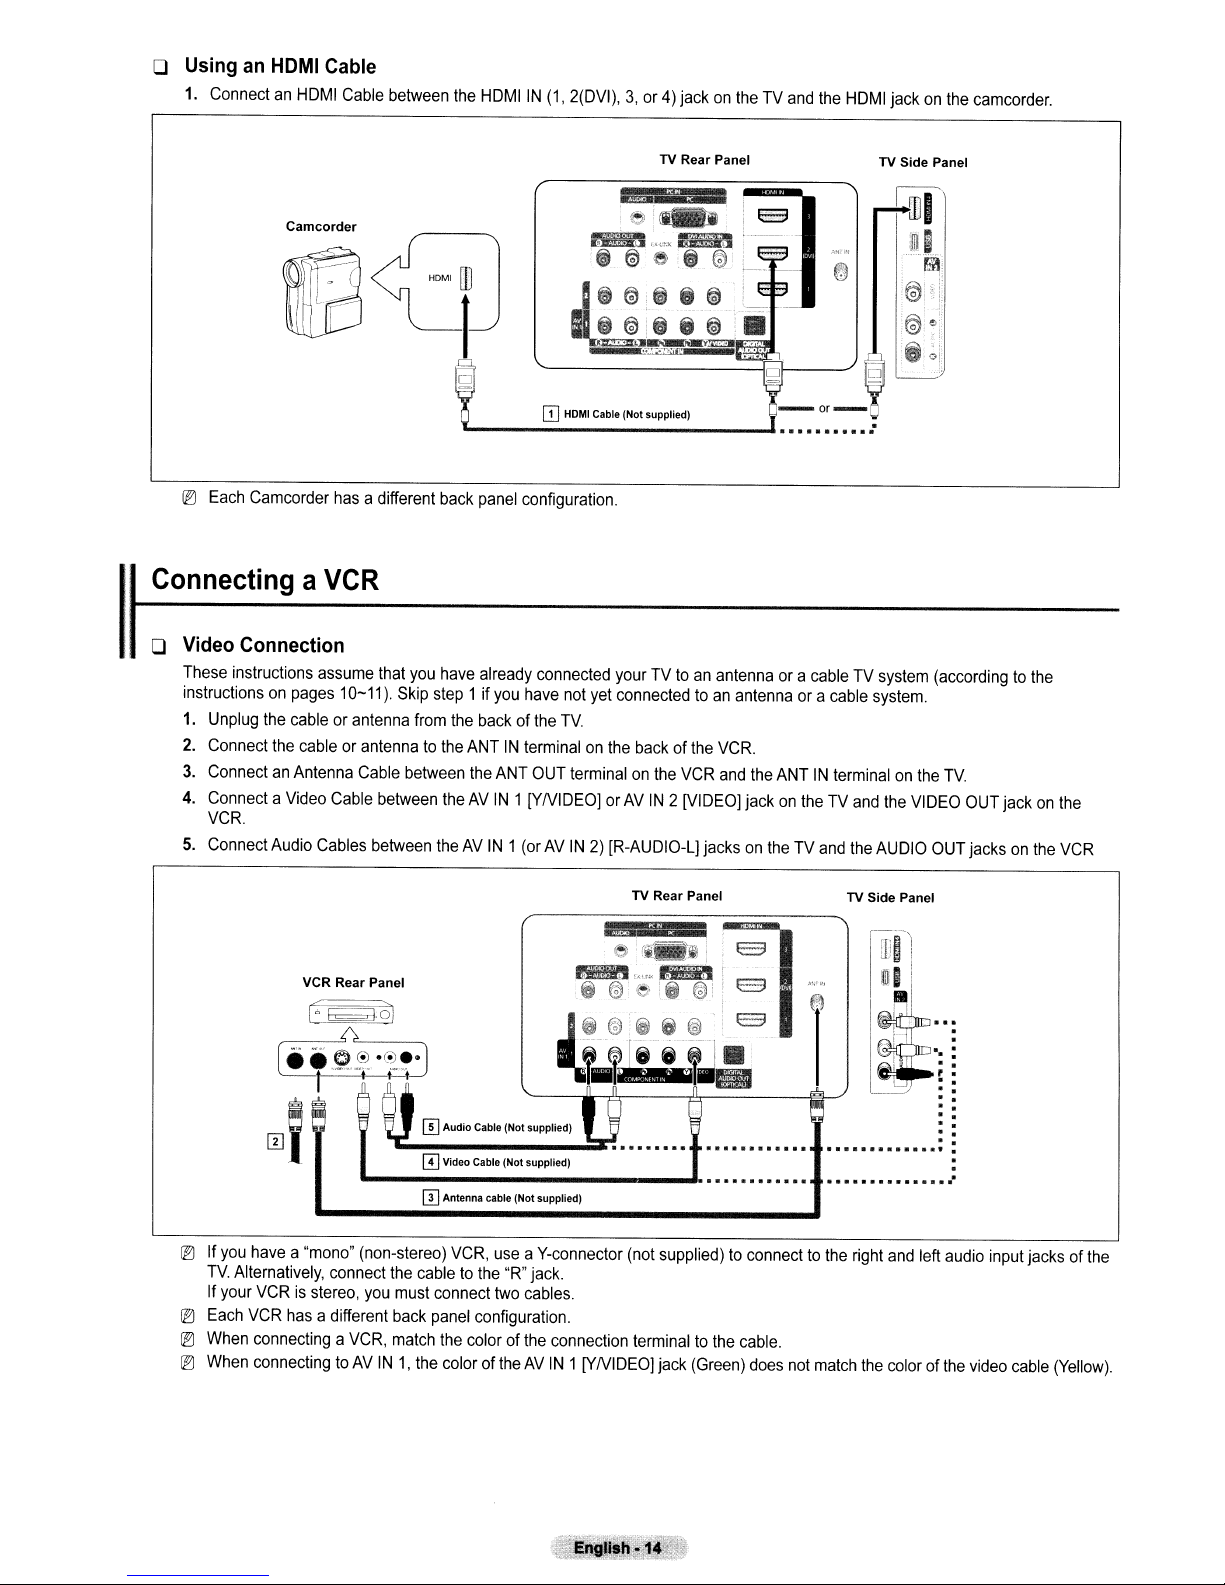
o
UsinganHOMI
1.
ConnectanHDMI
Cable
Cable
between
the
HDMIIN(1,
2(DVI),3,or4)jackontheTVand
the
HDMI
jackonthe
camcorder.
®
Each
connecting a
Video
O
II
These
instructions
instructionsonpages
1.
Unplug
2.
Connect
3.
ConnectanAntenna
4.
ConnectaVideo
VCR.
5.
Connect
Camcorder
VCR
Connection
assume
the
cableorantenna
the
cableorantennatothe
Audio
Cables
has
10-11).
Cable
Cable
adifferent
that
you
Skip
from
between
between
between
TV Rear Panel
CD
HDM!
Cable (Not supplied)
back
panel
configuration.
have
already
connected
step1if
you
have
the
backofthe
ANTINterminalonthe
the
ANT
OUT
theAVIN
theAVIN1(orAVIN2)[R-AUDIO-L)
1[YNlDEOjorAVIN2
yourTVtoanantennaora
not
yet
connectedtoan
TV.
backofthe
terminalonthe
antennaora
VCR.
VCR
and
the
ANTINterminalonthe
[VIDEO)
jackontheTVand
jacksontheTVand
TV Side Panel
cableTVsystem
cable
system.
the
VIDEO
the
AUDIO
(accordingtothe
TV.
OUT
jackonthe
OUT
jacksonthe
VCR
® If
®
®
®
VCR Rear Panel
~-~()."-------,
re
~t--t-t-;.-J
m;
you
havea"mono"
TV.
Alternatively,
If
your
VCRisstereo,
Each
VCR
has
When
connectingaVCR,
When
connectingtoAVIN1,
I-:~ol
•.
~.~
.~~:1
~------------_
(non-stereo)
connect
a different
you
the
must
back
match
I)]
Audio
Cable (Nolsupplied)
ill
Video Cable (Not supplied)
[II
Antenna
cable
VCR,
cabletothe
connect
panel
the
useaY-connector
two
configuration.
the
colorofthe
color of
theAVIN
(Not
"R"
supplied)
jack.
cables.
connection
TV Rear Panel
(not
terminaltothe
1 [YNiDEO)
.........
. .
.
supplied)toconnecttothe
cable.
jack
(Green)
does
not
match
TV Side Panel
ail
i
ul
~
!---jl
r,
I
I
~
-1
UI
~
~
...
right
and
the
colorofthe
left
...
••
••
-.
,.
••
..
·.
·.
·.
·.
·.
·.
..
:
.
.
audio
input
video
jacks of
cable
the
(Yellow)
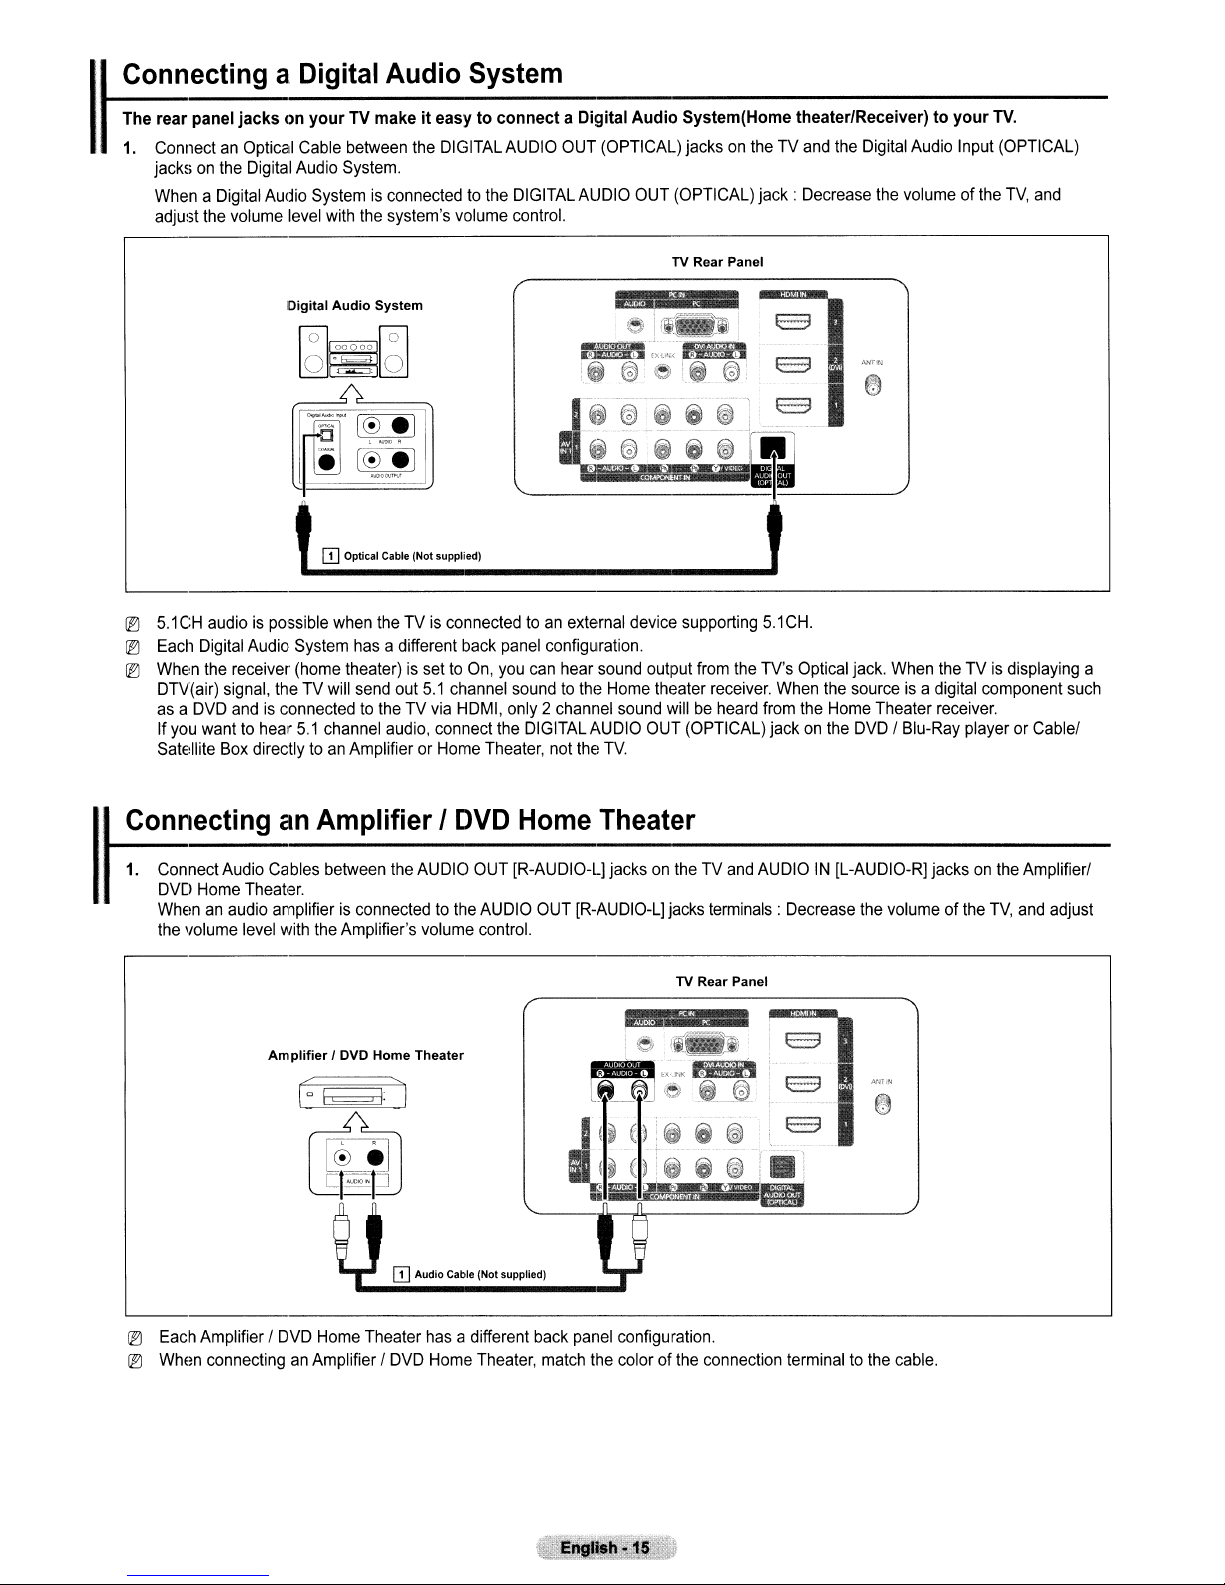
ConnectingaDigital
The
rear
panel
jacksonyourTVmakeiteasytoconnectaDigital
1.
I
ConnectanOptical
jacksonthe
WhenaDigital
adjust
IEl
5.1CHaudioispossible
IEl
Each
IEl
When
DTV(air)
asaDVD
If
you
Sat€!lIite
Digital
the
volume
Digital
Audio
the
receiver
signal,
andisconnectedtotheTVvia
wanttohear
Box
Audio
Digital
theTVwill
directlytoan
Audio
Cable
between
Audio
System.
Systemisconnectedtothe
level
with
the
system's
Audio
System
the
System
DIGITAL
volume
fOl~fOl
lQJ~lQJ
ITJ
Optical Cable (Not supplied)
when
System
(home
has
theater)issettoOn,
send
5.1
channel
AmplifierorHome
theTVis
a different
out
audio,
5.1
connectedtoan
back
channel
HDMI,
connect
AUDIO
DIGITAL
control.
panel
configuration.
you
can
soundtothe
only2channel
the
DIGITAL
Theater,
not
OUT
AUDIO
external
hear
AUDIO
the
Audio
(OPTICAL)
OUT
device
sound
output
Home
theater
sound
OUT
TV.
System(Home
jacksontheTVand
(OPTICAL)
TV
Rear Panel
supporting
from
willbeheard
(OPTICAL)
the
receiver.
jack:
5.1
TV's
from
jackonthe
theater/Receiver)toyour
the
Digital
Audio
Decrease
CH.
Optical
When
the
the
volumeofthe
jack.
When
the
sourceisa digital
Home
Theater
DVD!
Blu-Ray
TV.
Input
(OPTICAL)
TV,
theTVis
component
receiver.
playerorCable!
and
displaying a
such
Connecting
1.
Connect
I
DVD
Whenanaudio
the
IEl
Each
IEl
Whlln
an
Amplifier I
Audio
Cables
between
Home
Theater.
amplifierisconnectedtothe
volume
level
with
the
Amplifier
Amplifier!
connectinganAmplifier!
DVD
Home
the
AUDIO
Amplifier's
I DVD Home Theater
volume
ITJ
Audio Cable (Not supplied)
Theater
has
DVD
Home
DVD
OUT
AUDIO
control.
a different
Theater,
Home
[R-AUDIO-L]
OUT
[R-AUDIO-L]
back
panel
match
Theater
jacksontheTVand
jacks
TV Rear Panel
configuration.
the
colorofthe
connection
AUDIOIN[L-AUDIO-R]
terminals:
Decrease
terminaltothe
the
volumeofthe
cable.
jacksonthe
TV,
Amplifier/
and
adjust
1.
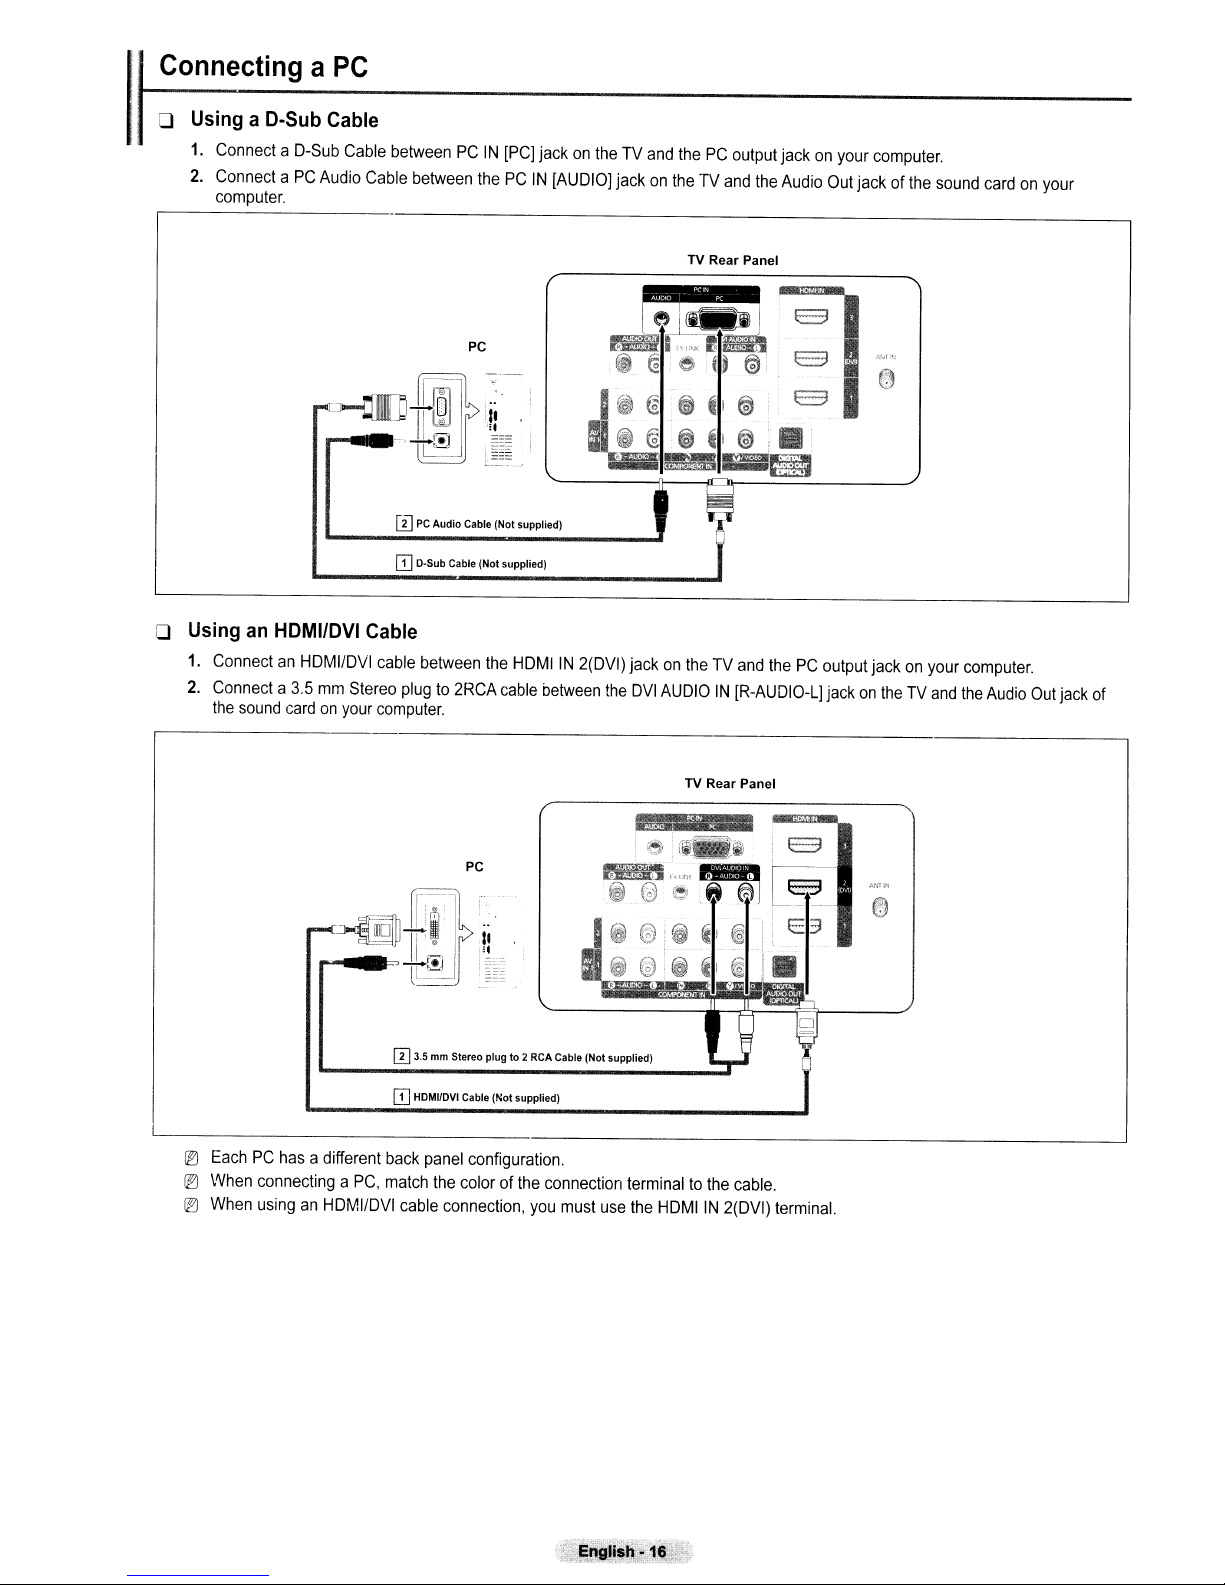
ConnectaD-Sub
2.
ConnectaPC
Cable
Audio
betweenPCIN
Cable
between
thePCIN
computer.
PC
[i]
PC
o
UsinganHDMI/DVI
1.
ConnectanHDMIIDVI
2.
Connecta3.5mmStereo
the
sound
cardonyour
CD
D·Sub Cable (Nol supplied)
Cable
cable
between
plugto2RCA
computer.
Audio Cable
INol
the
,-------------------------------------------------,
[PC)
jackontheTVand
[AUDIO)
supplied)
HDMIIN2(DVI)
cable
between
thePCoutput
jackontheTVand
TV Rear Panel
jackontheTVand
the
DVI
AUDIOIN[R-AUDIO-L)
jackonyour
the
Audio
thePCoutput
computer.
Out
jackofthe
sound
jackonyour
jackontheTVand
cardonyour
computer.
the
Audio
Out
jack
of
®
EachPChas
IE!
When
IE!
When
a different
connectingaPC,
usinganHDMI/DVI
PC
II
it
I
[I]3.5 mm Stereo plug to 2 RCA Cable (Not supplied)
CD
HDMIIDVI Cable (Nol supplied)
back
panel
configuration.
match
the
cable
colorofthe
connection,
connection
you
must
use
TV Rear Panel
terminaltothe
the
HDMIIN2(DVI)
cable.
terminal.
I
Oper,_lt_io_n
----J
Turning the
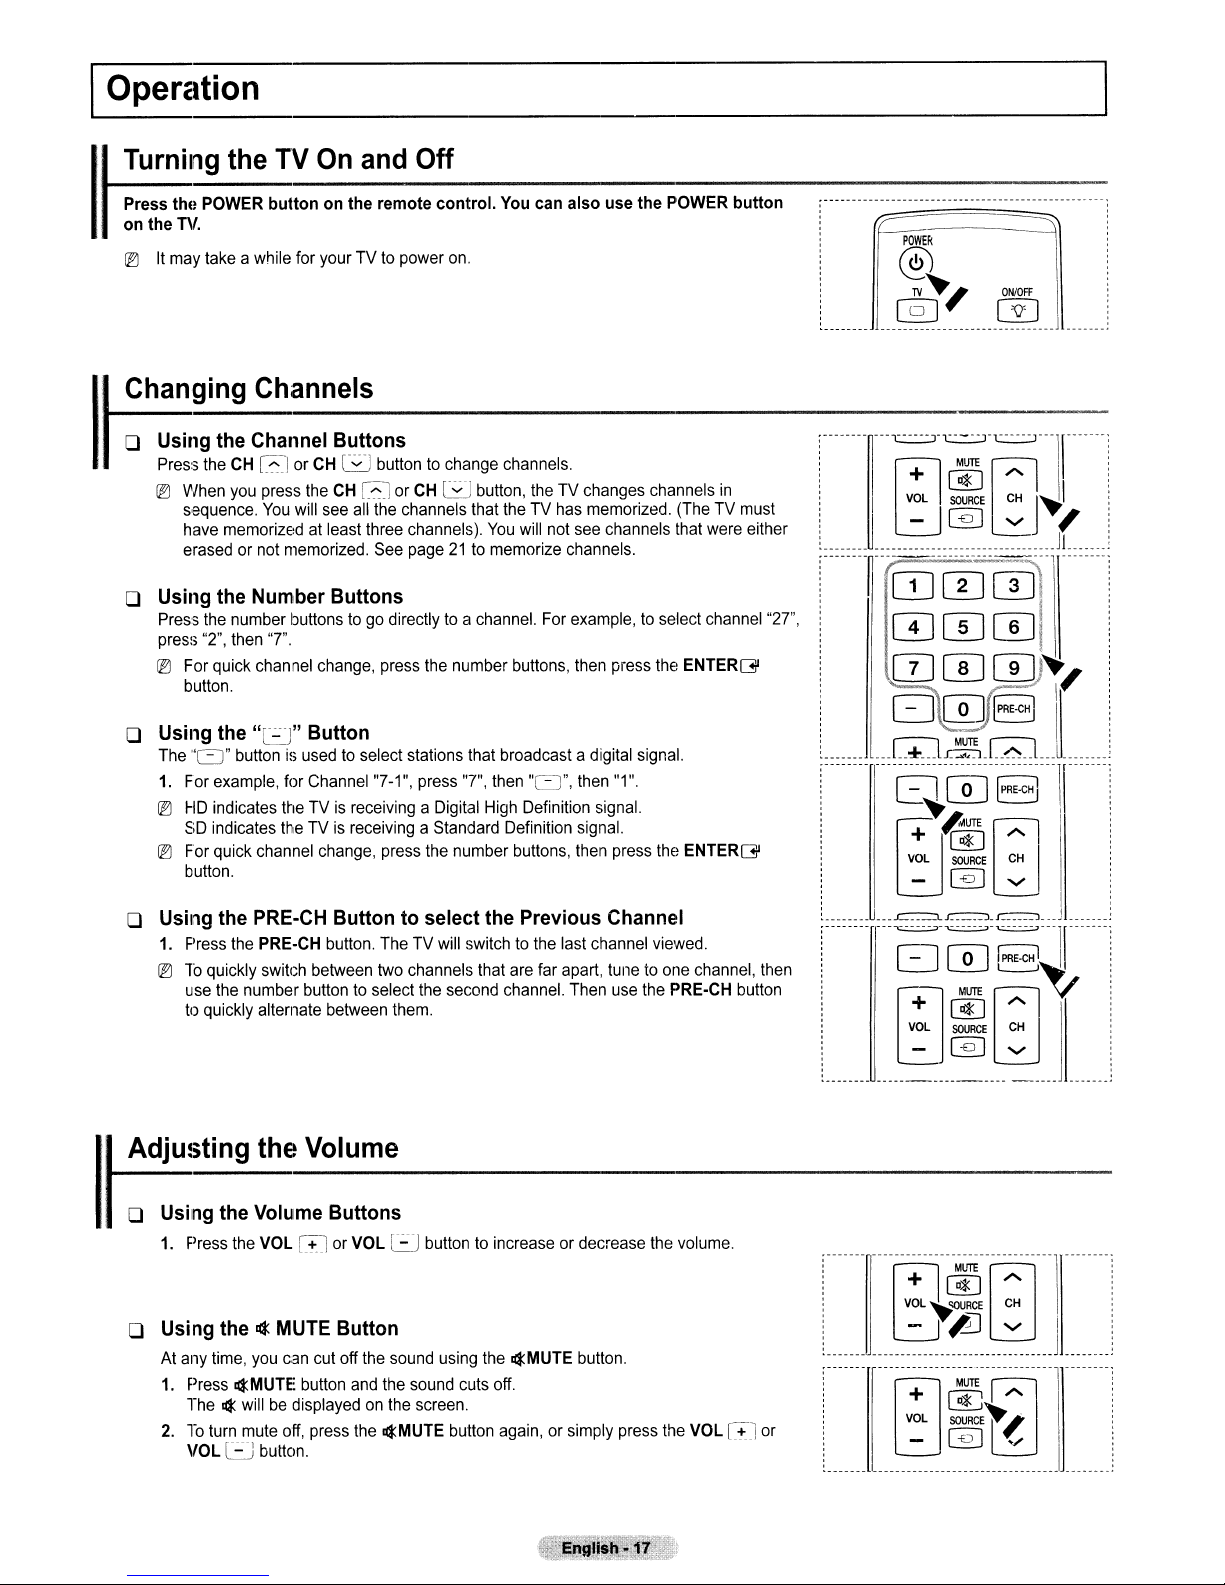
Press
thll
POWER
on
the
nf.
IEJ
It may take a while for your TV to power on.
TV
buttononthe
Changing Channels
o Using the Channel Buttons
I
Press the CH R or CH B button
IEJ
When you press the CH R or
sequence.
have memorized at least three channels).
erased or not memorized. See page
You
will see all the channels that the TV has memorized. (The TV must
o Using the Number Buttons
Press the number buttons to go directly to a channel. For example, to select channel "27",
press "2", then
IEJ
For quick channel change, press the number buttons, then press the
button.
o Using the
The
"0"
1. For example, for Channel "7-1", press "7", then
IEJ
HD indicates the TVisreceiving a Digital High Definition signal.
SO
IEJ
For quick channel change, press the number buttons, then press the
button.
o Using the
1.
Press the PRE·CH button. The TV will switch to the last channel viewed.
IEJ
10 qUickly switch between two channels that are far apart, tunetoone channel, then
use the number button
to quickly alternate between them.
''7''.
"[:J"
Button
buttonisused to select stations that broadcast a digital signal.
indicates the TV is receiving a Standard Definition signal.
PRE-CH
On
and
Off
remote
Button to select the Previous Channel
to
select the second channel. Then use the PRE·CH button
control.
to
CH
You can
change channels.
also
use
the
B button, the TV changes channels
You
will not see channels that were either
21tomemorize channels.
"0",
then "1".
POWER
ENTER[]l
ENTER[]l
button
in
POWEk
@
1V~'
@]
n - ---n
---
-c=:.JT:~rc.~~~:r
VOL
-
_______________________________________
-------n---------------.-----------:
~
IIOJ0CIJl
0001
CD
IT]
8~81
__
.L+_JL-",_LL~_L
-------
--------------------------------1
ON/OFF
@]
-\-
-----
@R
SO~RCE
I
CHJ
i~1
@]~
CD
, !
.JI.
i'if,
I~
-!
:
:
:
j
'
.
:
8[Q]8
~~lITE
+
VOL
-
n J U
-------
~
1'---=--=-=---11-------
8[Q]8~.
+ @ -
VOL
-
~
'r"*
SOURCE
@]
~
1 -
J_I.
CH
...,
J_..,
I
I
MUTE~IV
SOURCE
CH
@]
...,
I
Adjusting the Volume
o Using the Volume Buttons
I
1. Press the VOL GJ or
o Using the 4
At any time, you can cut off the sound using the
1.
Press
The 4 will
2.Toturn mute off, press the
VOL
MUTE
4MUTE
be
displayed on the screen.
c:J button.
VOL
L:J
Button
button and the sound cuts off.
4MUTE
button to increase or decrease the volume.
4MUTE
button again, or simply press the VOL
button.
IT]
-------
--------------------------------1--------
lj
---.---
--------------------------------
-------
----------------..·-------------1--------
or
______________________________________
~
MUTE
+ @ -
VOL~~RCE
-
+ @ -
VOL
-
~
CH
,7J
...,
j
MlITE~
SOURCE'"
I'.
(-8]
I
V
..I
--------
n
Using
the
TOOLS
Button
You can use the TOOLS
dependingonwhich
1. Press the TOOLS button. The Tools menu will appear :
2.
Press the
3.
Press the
For a more detailed description of each function, refertothe corresponding page.
1. Press the
lEI
lEI
lEI
./"f
./"f
• Anynet+ (HDMI-CEC), see page 44
• Sound Mode, see page 29
Sleep Timer, see page
• AddtoFavorite (or Delete from Favorite), see page 20
• Switch to Cable (or Air), see page
• Auto Adjustment, see page 28
ON/OFF(V)
When ON, the button backlightisturnedonfor a moment.
Pressing a remote control button when the remote controlison turns the button backlightonfor a moment.
If you touch or move the remote control and the motion
be
turned on for a moment.
The button backlight will notbeturnedonwhen the remote controlisturned
buttontoselect
external
button
1
<llI/~
input
to
select a menu, then press the ENTER[3Il button. i
IENTER[3Il buttonstodisplay, change, or use the selected items. :---- -------
34
light button
mode
your
you
21
frequently
are viewing.
used
functions
is
detected by the sensorofthe remote control, the button backlight will
quickly
and easily. The Tools
off.
menu
~
changes
~
uhm-u---T-=-T---mhm--
tr)
l~~0
---I-~-
"",_.
Anynet+ (HDMI-CEC)
Sound Mode Custom
Sleep Timer Off
Add
to
Favonte
SWitchtoCable
--- -------
Tools
ErM:r ElI:ll
Viewing
The
display
1. Press the INFO buttononthe remote control. The TV will display the channel, the type of
I
sound, and the status of certain picture and sound settings.
[bJ
Press the INFO button once more or wait approximately 10 seconds and it disappears
automatically.
the
identifies
Display
the
current
channel and
the
statusofcertain
audio-video
settings.
-------] -------v----h------v------- [-------
_u__u
~~~£l
L\.
.~.c::1
~
__
u uu_
Viewing
Before
1.
I
2.
3.
4.
5.
Using
the
Menus
using
the
TV,
follow
the
steps
belowtolearn
Press the MENU button.
The main menu
Application,
Press the A orl'button to select oneofthe icons.
Press
the'"
Press the A orl'button to move to itemsinthe menu.
Press the
Press the
Press the RETURN button to return to the previous menu.
Press the EXIT button to exit from the menu.
1the
remote control buttons
is
displayed on the screen. Its left side has the following icons: Picture,
Support.
or~button to access the icon's sub-menu.
ENTERG
All'
buttontoenter itemsinthe menu.
I"'/~
button to change the selected items.
howtonavigate
the
menuinordertoselect
Sound,
and
adjust
Channel,
different
Setup,
functions.
Input,
BUltton
MENU
RETURN
EXIT
Operations
o Example: Setting the TV's Brightness in the Picture Menu
II
Adjusting
1. Press the MENU button to display the menu.
2.
Press the
the
Brightnessto80
ENTERG
buttontoselect Picture.
Operations
Move the cursor and select an item.
Select the currently selected item.
Confirm the setting.
3.
Press the A orl'button to select Bri!Jhtness.
4. Press the
5.
Press
6. Press the
I~
ENTERG
the'"
or~button until the Brightness changesto80.
ENTERG
Press the EXIT button to exit from the menu.
button.
button.
,--------
If('~
Move Adjust Enter Return
~-I
Move Adjust Enter Return
---
,
P-1
t--
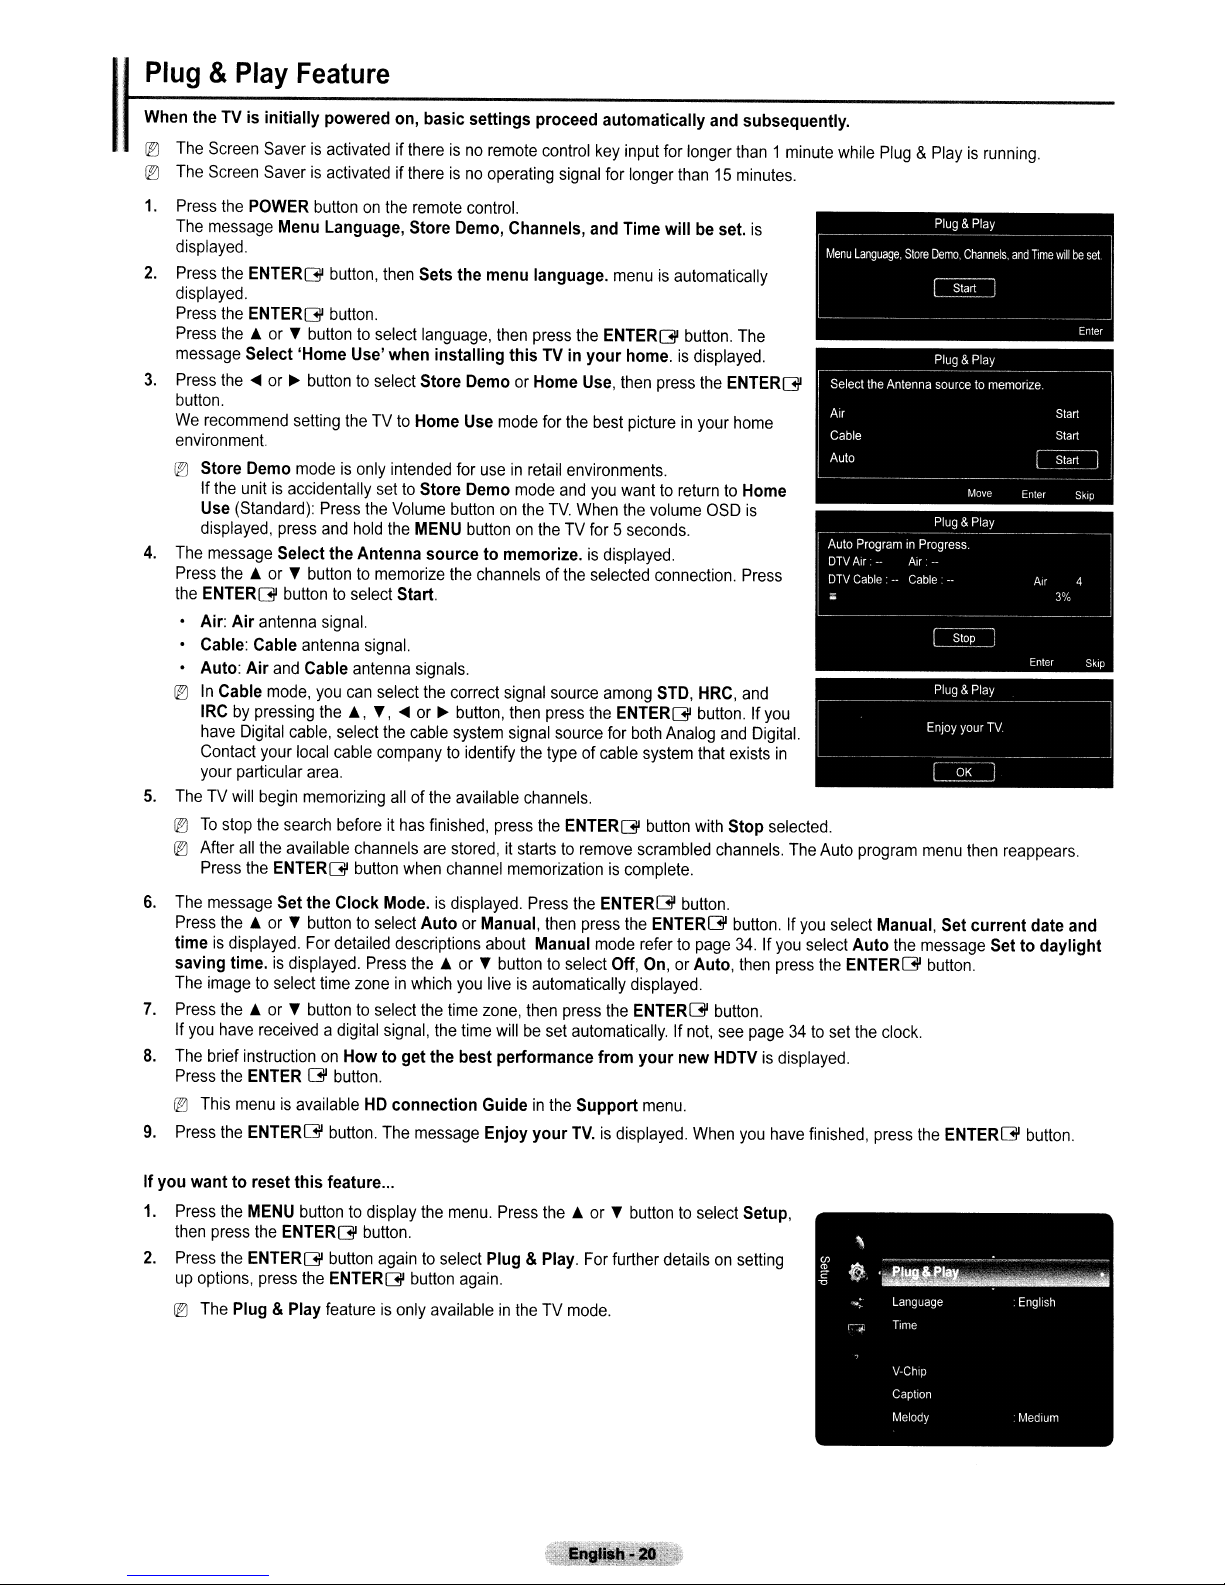
u_9_&_P_la_y_F_e_a_tu_r_e
_
When the TVisinitially
I
I!:J
The Screen Saverisactivated if thereisno
fE]
The Screen Saverisactivated if thereisno
1.
Press the POWER buttononthe remote control.
The message Menu Language, Store Demo, Channels, and Time
displayed.
2.
Press the ENTER[3l button, then Sets
displayed.
Press the ENTER[3l button.
the£.
Press
message Select 'Home Use'
3.
Press
the'"
button.
We
recommend setting the TVtoHome Use mode for the best pictureinyour home
environment.
fE]
Store Demo modeisonly intended for useinretail environments.
If the unit
Use (Standard): Press the Volume button
displayed, press and hold the MENU button on the TV for 5 seconds.
4.
The message Select the Antenna
the£.
Press
the ENTER[3l button
Air:
Air
Cable: Cable antenna signal.
• Auto:
I!:J
In
Cable mode,
IRC by pressing
have Digital cable, select the cable system signal source for both Analog and Digital.
Contact your local cable company
your particular area.
5.
The TV will begin memorizing all of the available channels.
I!:J
To
stop the search before it has finished, press the ENTER[3l button with
fE]
After
Press the ENTER[3l button when channel memorization
powered on, basic
or'fbuttontoselect language, then press the ENTER[3l button. The
when
or~buttontoselect Store Demo or Home Use, then press the ENTER[3l
is
accidentally settoStore Demo mode and you wanttoreturntoHome
or'fbuttontomemorize the channels of the selected connection. Press
to
select Start.
antenna signal.
Air
and Cable antenna signals.
you
can select the correct signal source among STD, HRC, and
the£.,
'f,
... or
settings
the
installing
sourcetomemorize. is displayed.
~
button, then press the ENTER[3l button. If you
to
identify the type of cable system that exists
proceed
remote control key input for longer than 1 minute while Plug &Playisrunning.
operating signal for longer than 15 minutes.
menu language. menuisautomatically
thisTVin
on
the
automatically
will
your
home.isdisplayed.
TV.
When the volume OSD
and subsequently.
be set.
is
is
in
--
Plug &Play
EnJOy
your
TV
~
Stop
selected.
all
the available channels are stored, it starts to remove scrambled channels. The Auto program menu then reappears.
is
complete.
---
I
6.
The message Set
the£.
Press
timeisdisplayed. For detailed descriptions about Manual mode refertopage
saving time.isdisplayed. Press
The image
7.
Press
the£.
If you have received a digital signal, the time will
8.
The brief instruction on
Press the ENTER
® This menu
9.
Press the ENTER[3l button. The message
If
you
wanttoreset
1.
Press the MENU buttontodisplay the menu. Press
then press the ENTER[3l button.
2.
Press the ENTER[3l button againtoselect Plug & Play. For further detailsonsetting
up
options, press the ENTER[3l button again.
I!:J
The Plug & Play featureisonly availableinthe TV mode.
the
Clock
Mode.isdisplayed. Press the ENTER[3l button.
or'fbuttontoselect
to
select time zoneinwhich you liveisautomatically displayed.
or'fbuttontoselect the time zone, then press the ENTER[3l button.
Howtoget
[3l
button.
is
available HD
this
feature
Auto
the£.
the
connection
...
or Manual, then press the ENTER[3l button. If you select Manual, Set
or'fbuttontoselect Off, On, or Auto, then press the ENTER[3l button.
be
set automatically. If not, see page34to
best
performance
Guideinthe
Enjoy
your
from
your
new
Support
TV.isdisplayed. When you have finished, press the ENTER[3l button.
the£.
menu.
or'fbuttontoselect Setup,
34.
If you select
set the clock.
HDTVisdisplayed.
current
Auto
the message Settodaylight
date and
I
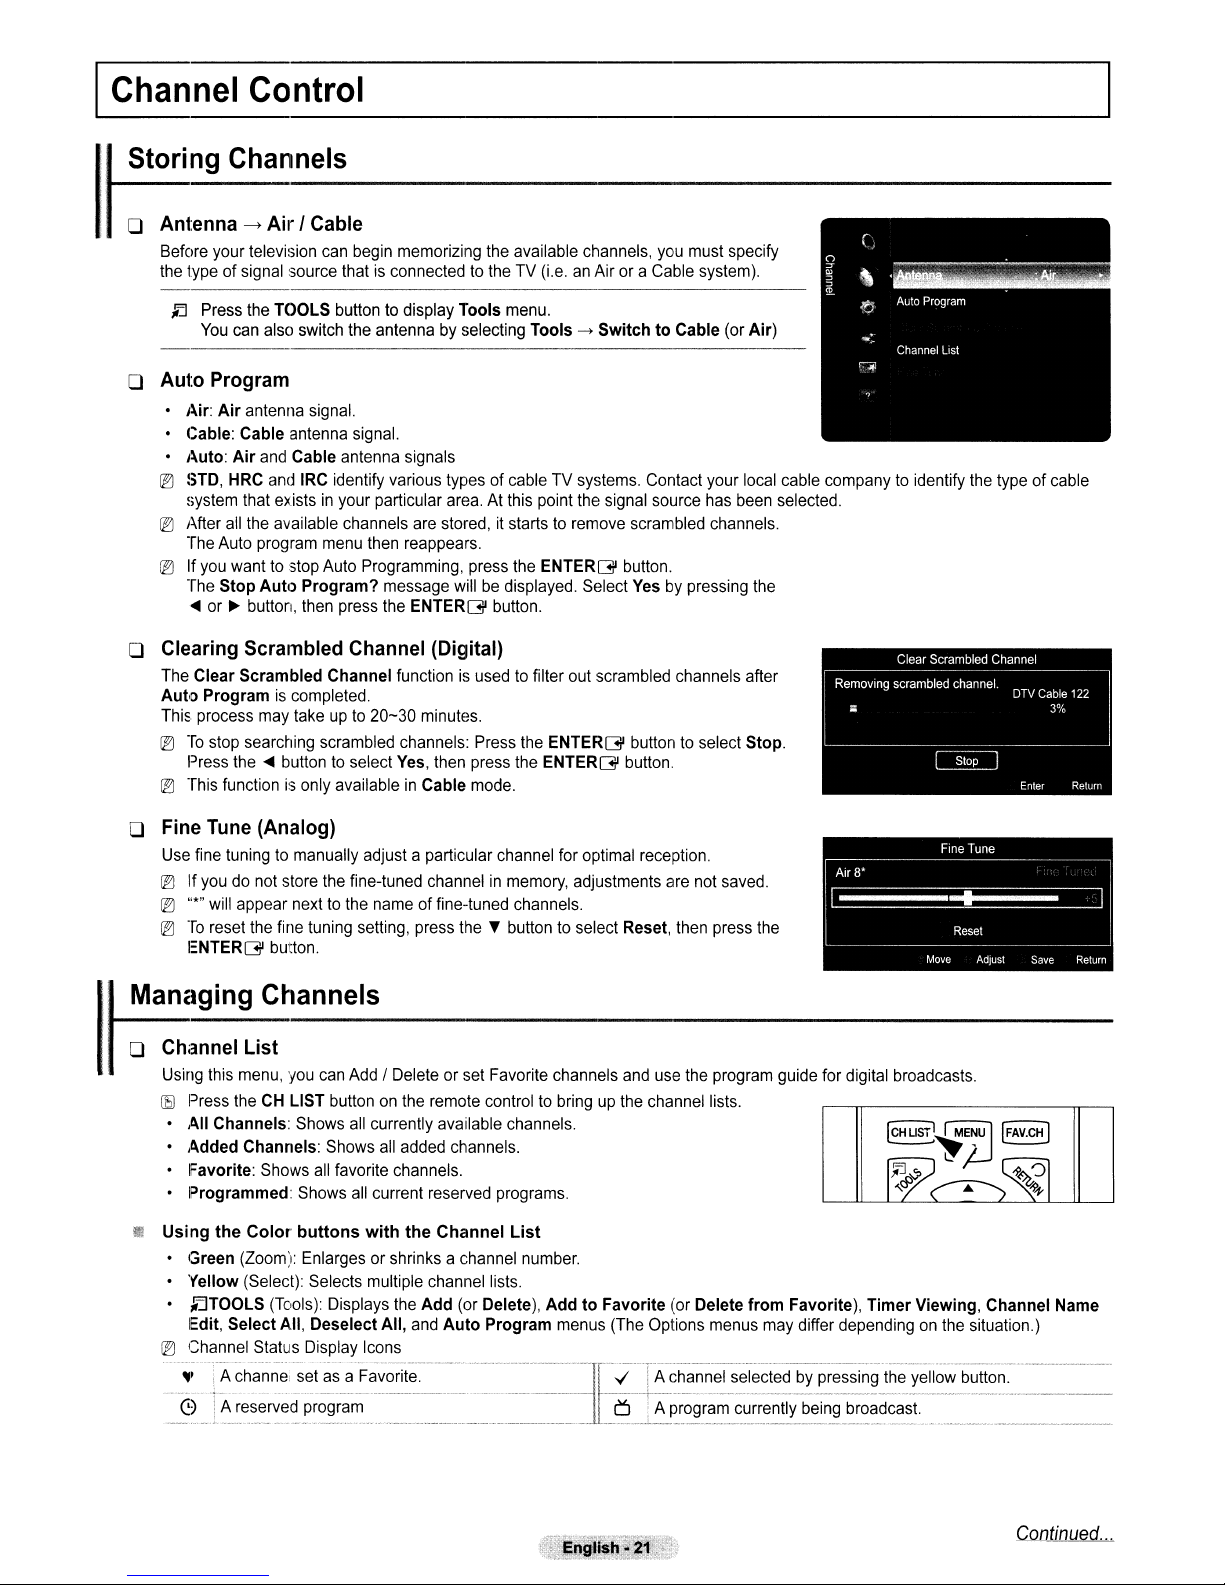
Channel
I
Storing Channels
Control
. 0 Antenna
I
Before your television can begin memorizing the available channels, you must specify
the type of signal
~
---->
Air
I Cable
::;ource
that is connectedtothe TV (i.e.anAir or a Cable system).
Press the TOOLS button to display
You
can also switch the antenna by selecting Tools->SwitchtoCable (or
o Auto Program
• Air:
Air
antenna signal.
• Gable: Cable antenna signal.
Air
• Auto:
lI"J
STD, HRC and IRC identify various types of cable TV systems. Contact your local cable companytoidentify the type ofcable
system that exists
lI"J
After all the available channels are stored, it startstoremove scrambled channels.
The Auto program menu then reappears.
lI"J
If you wantto::;top
The
....
and Cable antenna signals
in
your particular area. At this point the signal source has been selected.
Auto Programming, press the
Stop
Auto
or • button, then press the
Program?
message willbedisplayed. Select Yes by pressing the
ENTERG
o Clearing Scrambled Channel (Digital)
The Clear
Aut,o
This.
lI"J
lI"J
Scrambled
Programiscompleted.
process may takeupto
To
stop searching scrambled channels: Press the
Press the
This function is only availableinCable mode.
....
Channel functionisusedtofilter out scrambled channels after
20-30 minutes.
buttontoselect Yes, then press the
Tools
menu.
button.
ENTERG
ENTERG
ENTERG
Air)
button.
buttontoselect Stop.
button.
o Fine Tune (Analog)
Use fine tuningtomanually adjust a particular channel for optimal reception.
lI"J
If you do not store the fine-tuned channelinmemory, adjustments are not saved.
lI"J
"*,,
will appear next to the name of fine-tuned channels.
lI"J
To
reset the fine tuning setting, press the T buttontoselect Reset, then press the
I:NTERG
I
Managing Channels
o Chi:lnnel
I
• U""g lhl, me,,", 10"""Add
IE)
Press the CH LIST button on the remote controltobring up the channel lists.
•
All
•
Added
IFavorite: Shows all favorite channels.
• IProgrammed: Shows all current reserved programs.
Using
• Green (Zoom): Enlarges or shrinks a channel number.
• Yellow (Select): Selects multiple channel lists.
~TOOLS
•
IEdit, Select
lI"J
Channel Status Display Icons
'J' A channel set as a Favorite.
button.
List
Channels: Shows all currently available channels.
Channels: Shows all added channels.
the
ColoI'
buttons
(Tools): Displays the
A.1l,
Deselect
A reserved program
f Dele.e
with
All,
the
Add
and
oc
,et
Channel
(or Delete),
Auto
'a,mlte
List
Program
oha""e',
AddtoFavorite (or Delete
menus (The Options menus may differ depending on the situation.)
a"d"ethe
pcogcam
A channel selected by pressing the yellow button.
A program currently being broadcast.
from
g"'de
Favorite),
'oc
dlgllal
Timer
bcoad",t,.
Viewing, Channel Name
Continued
...
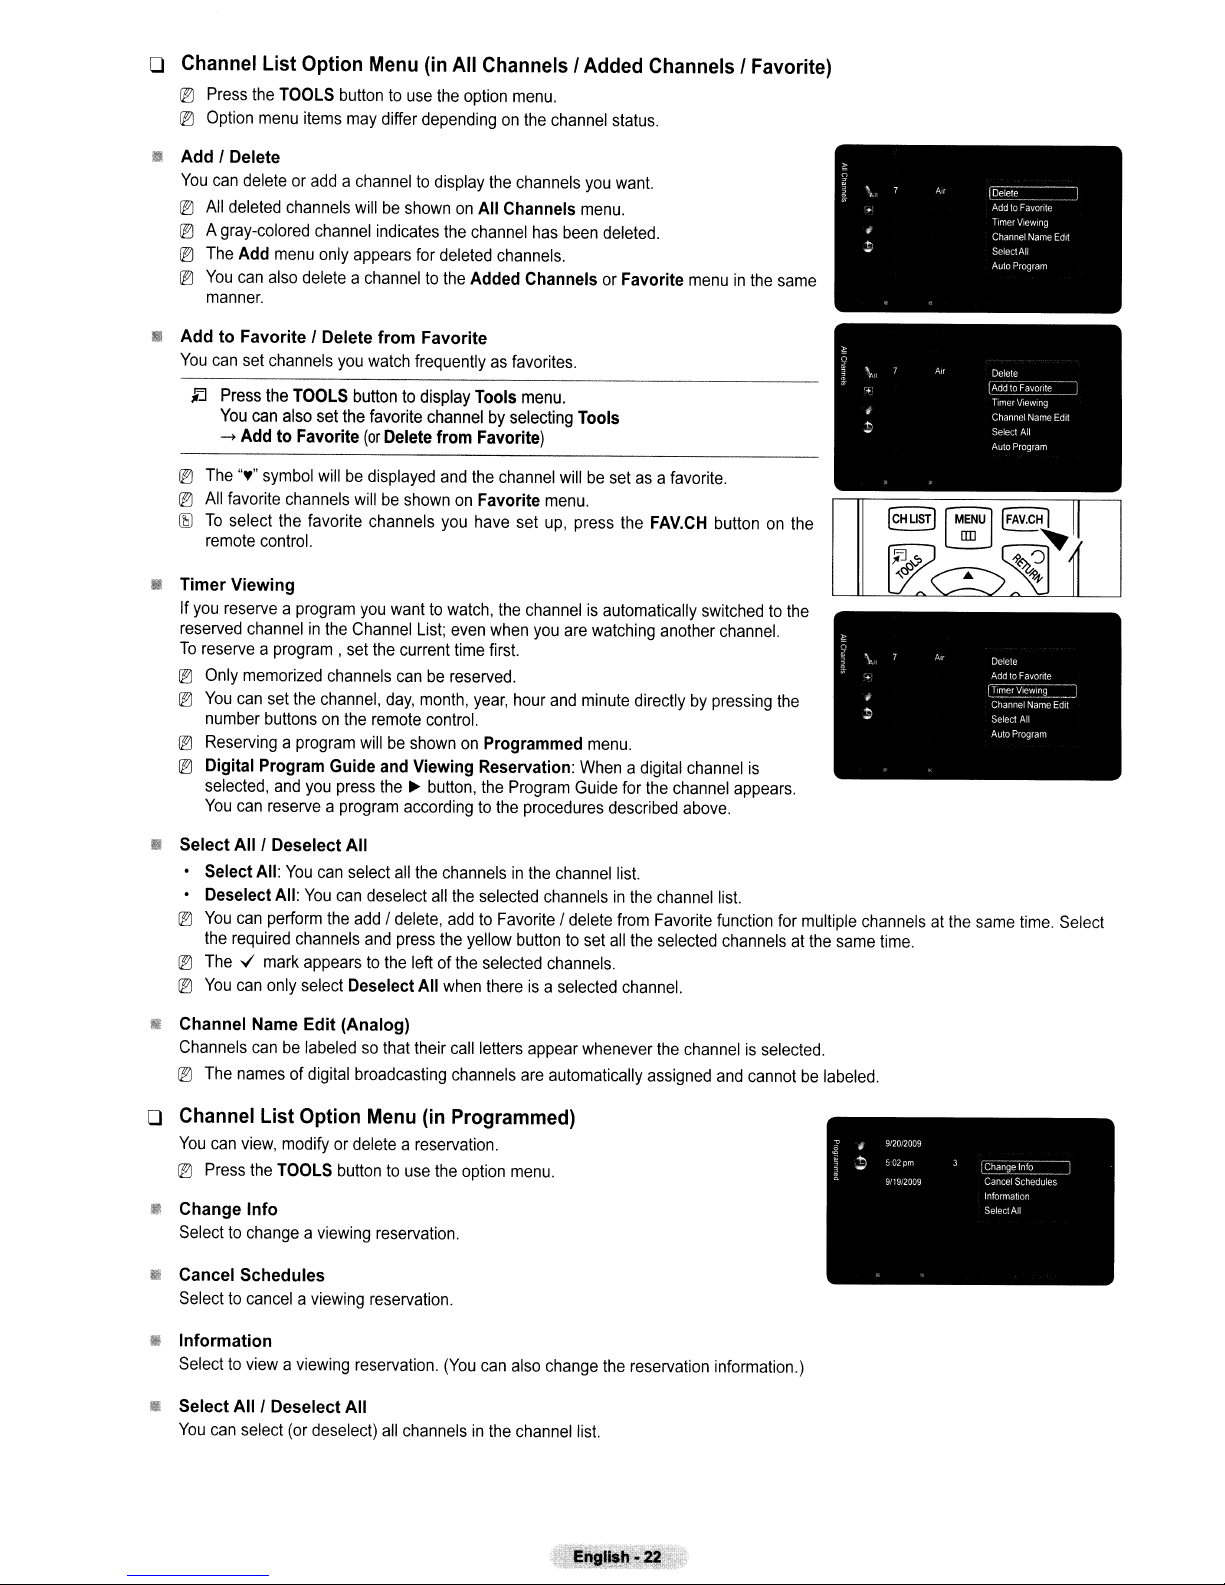
o
Channel
IEJ
IEJ
•
Add
You
IEJ
IEJ
IEJ
IEJ
III
AddtoFavorite I Delete
You
~
IEJ
IEJ
~
II
Timer Viewing
If
you
reserved
To
IEJ
IEJ
IEJ
IEJ
List
Press
the
TOOLS
Option
menu
I Delete
can
deleteoraddachanneltodisplay
All
deleted
channels
A
gray-colored
The
Add
menu
You
can
also
manner.
can
set
channels
Press
the
You
can
also
->
AddtoFavorite
The
"."
symbol
All
favorite
channels
To
select
the
remote
control.
reserveaprogram
channelinthe
reserve
a program,
Only
memorized
You
can
set
number
buttonsonthe
Reservingaprogram
Digital
Program
selected,
You
and
can
reserveaprogram
Option
items
deleteachanneltothe
TOOLS
the
Menu
buttontouse
may
differ
willbeshown
channel
favorite channels
you
indicates
only
appears
from
you
watch
frequentlyasfavorites.
buttontodisplay
set
the
favorite
(or
Delete
willbedisplayed
willbeshown
you
wanttowatch,
Channel
set
the
current
channels
channel,
Guide
day,
remote
willbeshown
and
press
the~button,
canbereserved.
accordingtothe
for
Viewing
(in
dependingonthe
Favorite
channelbyselecting
List;
month,
control.
All
ChannelsIAdded
the
option
menu.
the
channels
on
All
Channels
the
channel
deleted
Added
from
and
on
you
even
time
on
has
channels.
ChannelsorFavorite
Tools
menu.
Favorite)
the
channel
Favorite
have
set
the
channelisautomatically
when
you
first.
year,
hour
Programmed
Reservation:
the
Program
procedures
channel
menu.
up,
status.
you
want.
menu.
been
deleted.
Tools
willbesetasa
press
are
watching
and
minute
menu.
When
Guide
described
ChannelsIFavorite)
menuinthe
favorite.
the
FAV.CH
directlybypressing
a digital
for
the
switchedtothe
another
channel
channel
above.
buttononthe
channel.
is
appears.
same
the
It
Select
All
I Deselect
•
Select
All:
You
Deselect
IEJ
You
the
IEJ
The"';
IEJ
You
III Channel Name Edit (Analog)
Channels
IEJ
The
o
Channel
You
can
IEJ
Press
II!
Change
Selecttochangeaviewing
II
Cancel Schedules
Selecttocancelaviewing
II
Information
Selecttoviewaviewing
II
Select
You
can
All:
can
perform
required
mark
can
only
canbelabeledsothat
namesofdigital
List
view,
modifyordeleteareservation.
the
TOOLS
Info
All
I Deselect
select
All
can
select
You
can
deselect
the
addIdelete,
channels
appearstothe
select
and
Deselect
broadcasting
Option
buttontouse
reservation.
All
(or
deselect)
Menu
reservation.
reservation.
all
all
the
channelsinthe
all
the
selected
addtoFavoriteIdelete
press
the
yellow
leftofthe
All
their
channelsinthe
selected
when
thereisa
call
letters
channels
(in
Programmed)
the
option
(You
can
channel
channelsinthe
buttontoset
channels.
selected
appear
are
automatically
menu.
also
change
channel
list.
from
all
the
channel.
whenever
the
list.
channel
Favorite
selected
the
channelisselected.
assigned
reservation
list.
function
information.)
for
multiple
channelsatthe
and
cannotbelabeled.
channelsatthe
same
time.
same
time.
Select
I
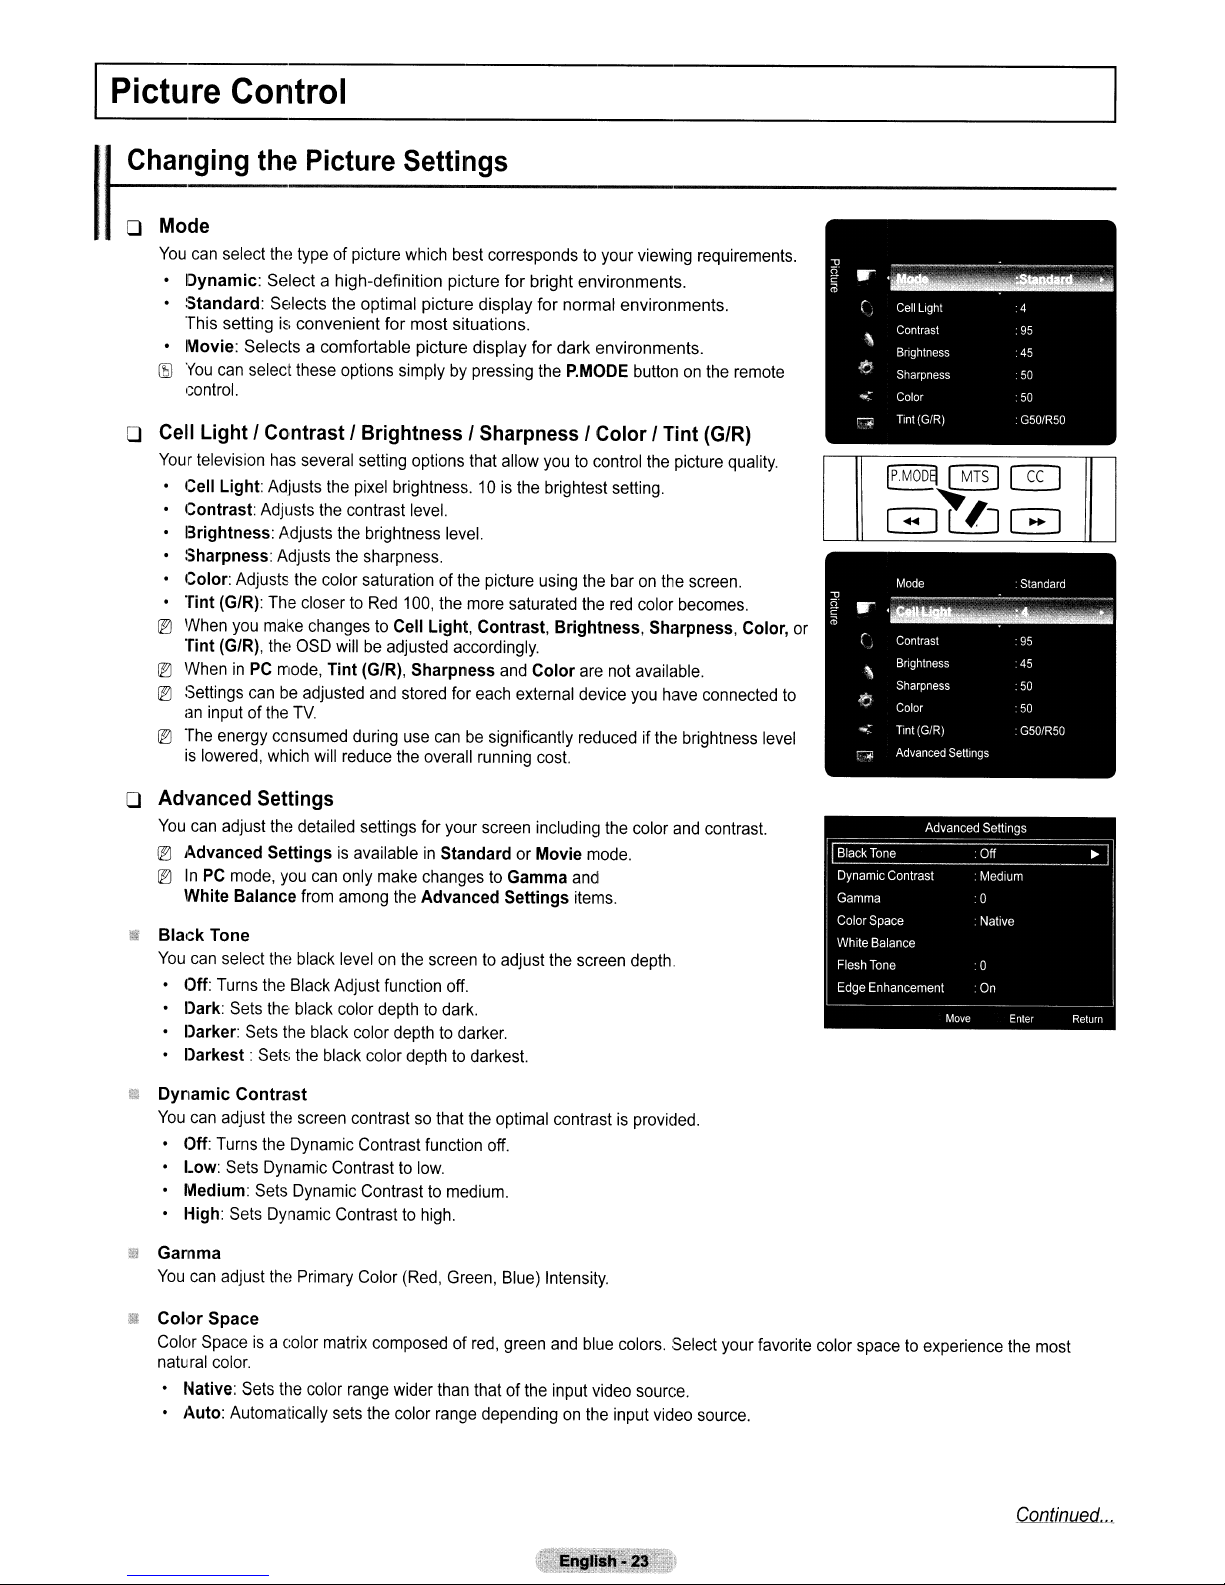
Picture
..
1Changing the Picture Settings
Control
o Mode
You
can select
Dynamic:
•
•
Standard:
This setting is convenient
Movie:
•
[EJ
You
control.
thE!
typeofpicture which best corresponds to your viewing requirements.
Select a high-definition picture
Selects the optimal picture display
Selects a comfortable picture display for
can select these options simply by pressing the P.MODE buttononthe remote
for
most
situations.
for
bright environments.
for
normal environments.
dark
environments.
o Cell Light I Contrast I Brightness I Sharpness I Color I Tint
Your television has several setting options that allow you to control the picture quality.
Light:
Cell
Contrast: Adjusts the contrast level.
Brightness:
Sharpness: Adjusts the sharpness.
Color: Adjusts the color saturation of the picture using the bar on the screen.
Tint
IB
When you make changes to Cell
Tint
IB
WheninPC
IB
Settings canbeadjusted and stored for each external device you have connected to
an input of the
IB
The energy consumed during use canbesignificantly reduced ifthe brightness level
is
lowered, which will reduce the overall running cost.
Adjusts the pixel brightness. 10isthe brightest setting.
A.djusts the brightness level.
(G/R):
The closer to Red 100, the more saturated the
Light,
(G/R),
the OSD willbeadjusted accordingly.
mode,
Tint
(G/R),
Sharpness
TV.
Contrast,
and
Brightness,
Color
red
color becomes.
Sharpness, Color, or
are not available.
o Advanced Settings
You
can adjust the detailed settings for your screen including the color and contrast.
IB
Advanced
IB
InPCmode, you can only make changes to Gamma and
White
!!J
Bla,:k
You
can select
• Off: Turns the Black Adjust function off.
• Dark: Sets
• Darker: Sets the black color depth
Darkest
SettingsisavailableinStandardorMovie
Balance from among the
Tone
thE!
black level on the screentoadjust the screen depth.
the-
black color depthtodark.
:
Set~;
the black color depthtodarkest.
Advanced
to
darker.
Settings
mode.
items.
(GIR)
~MOD~
~
GJLlJGJ
Mode Standard
"
....
~
.
;;;
------
.~
~
r
Contrast
Brightness
,
Sharpness
.115
Color
..;:
Tint (GIR)
Advanced Settings
~
Advanced
-----
DynamiC Contrast .
Gamma
Color
Space
White Balance
Flesh Tone
Edge
Enhancement
@D
Medium
o
Native
'0
On
Move
@]
Settings
95
45
50
50
G50lR50
Enter
__
~.-J
Return
iii
Dynamic
You
Contrast
can adjust
thE!
screen contrast so that the optimal contrastisprOVided.
• Off: Turns the Dynamic Contrast function off.
• Low: Sets Dynamic Contrast to low.
• Medium: Sets Dynamic Contrast
• High: Sets Dynamic Contrast to high.
Gamma
You
can adjust
B Cok>r
Space
Color Spaceisa color matrix composedofred, green and blue colors. Select your favorite color space to experience the most
natural color.
Native: Sets the color range wider than that
Auto:
•
thE!
Primary Color (Red, Green, Blue) Intensity.
Automatically sets the color range depending on the input video source.
to
medium.
of
the input video source.
Continued
...
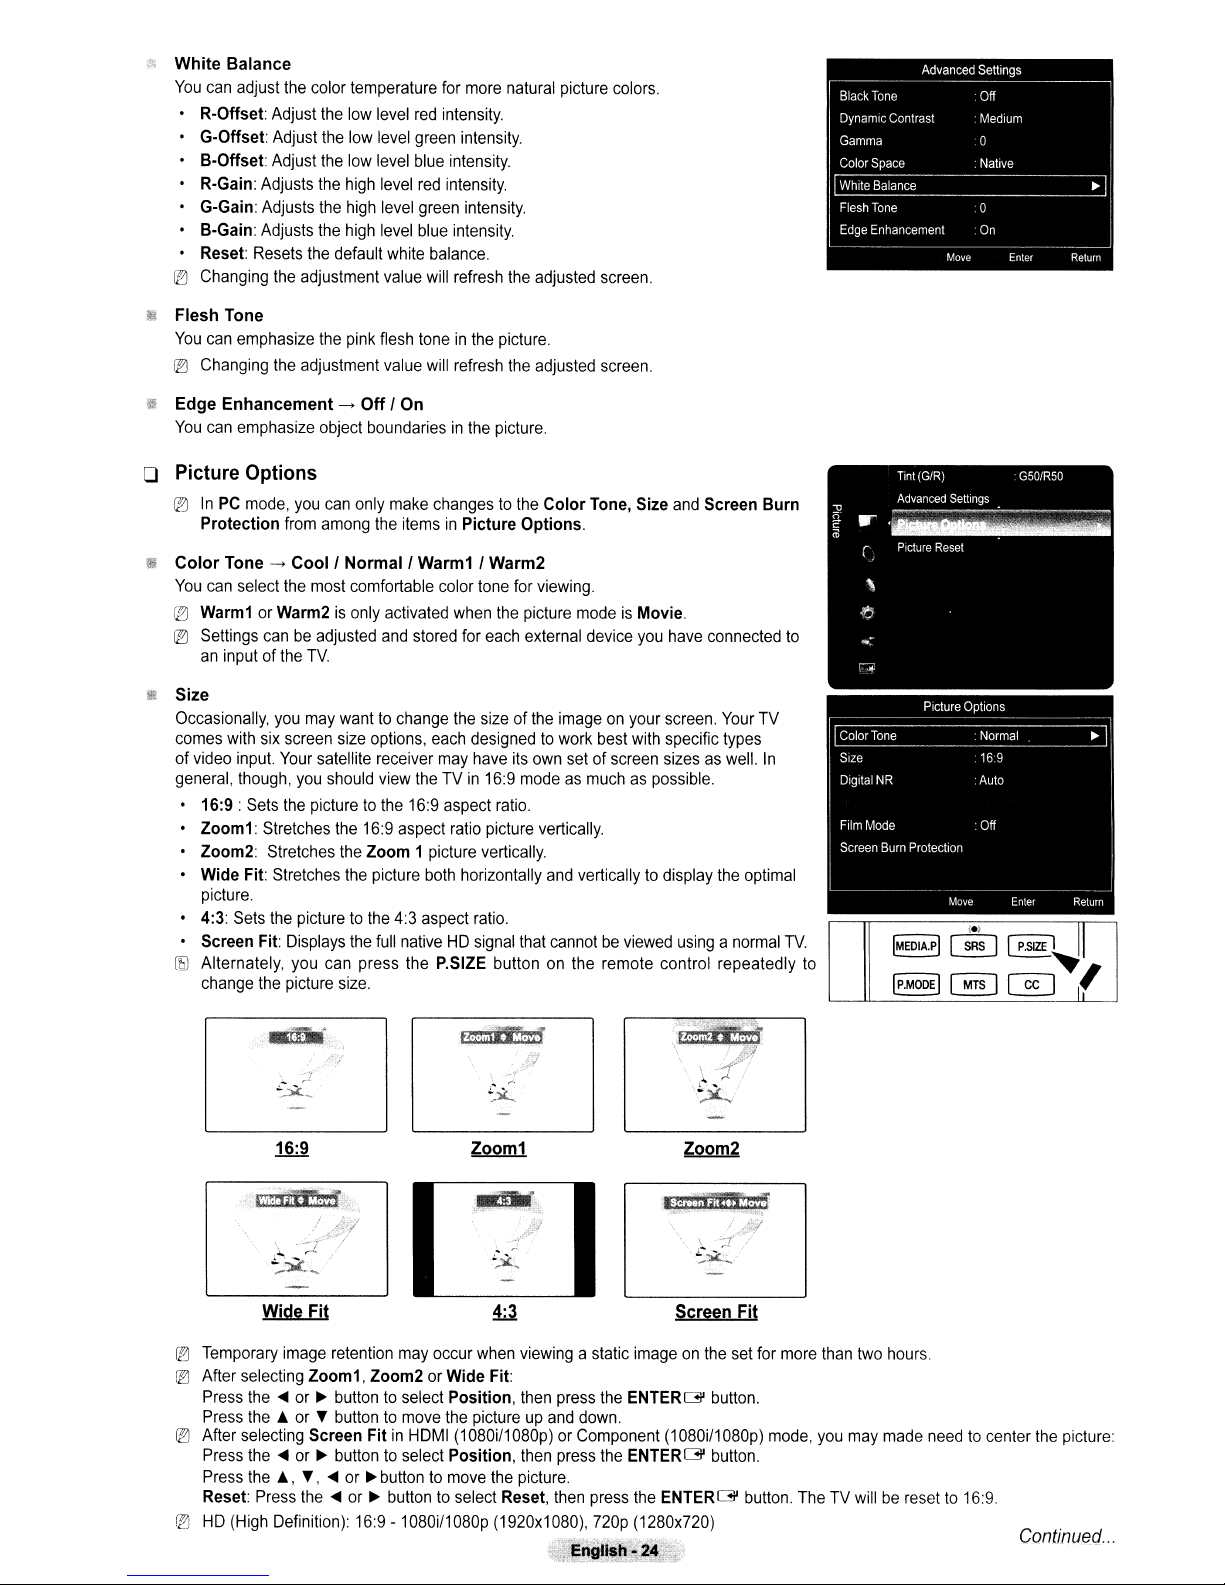
White Balance
You
can
adjust
R-Offset:
G·Offset:
B·Offset:
R-Gain:
G-Gain:
B·Gain:
Reset:
~
Changing
Flesh Tone
You
can
~
Changing
Adjust
Adjust
Adjust
Adjusts
Adjusts
Adjusts
Resets
the
emphasize
the
the
color
the
the
the
the
the
the
the
adjustment
the
adjustment
temperature
low
level
low
level
low
level
high
level
high
level
high
level
default
white
value
pink
flesh
value
for
more
red
intensity.
green
intensity.
blue
intensity.
red
intensity.
green
intensity.
blue
intensity.
balance.
will
refresh
toneinthe
will
refresh
natural
the
picture.
the
picture
adjusted
adjusted
colors.
screen.
screen.
Edge Enhancement
You
can
emphasize
o
Picture
I2J
Color Tone
You
I2J
~
Size
Occasionally,
comes
of
general,
• 16:9:
• Zoom1:
• Wide Fit:
•
• Screen
18
Options
InPCmode,
Protection
can
select
Warm1orWarm2isonly
Settings
an
inputofthe
with
video
input.
though,
Sets
Zoom2:
picture.
4:3:
Sets
Alternately,
change
---t
object
you
can
from
among
---t
Cool!
Normal!
the
most
canbeadjusted
TV.
you
may
screen
size
Your
satellite
you
should
the
picturetothe
the
picturetothe
Displays
you
can
picture
size.
wanttochange
the
the
six
Stretches
Stretches
Stretches
the
Fit:
the
Off ! On
boundariesinthe
only
make
changestothe
the
itemsinPicture Options.
Warm1 ! Warm2
comfortable
options,
receiver
view
16:9
Zoom 1
picture
the
full
press
color
activated
and
when
stored
for
the
each
may
theTVin
16:9
aspect
aspect
ratio
picture
both
horizontally
4:3
aspect
nativeHDsignal
the
P.SIZE
picture.
Color
Tone,
tone
for
viewing.
the
picture
modeisMovie.
each
external
sizeofthe
designedtowork
have
its
16:9
modeasmuchaspossible.
ratio.
picture
vertically.
ratio.
that
buttononthe
device
imageonyour
best
own
setofscreen
vertically.
and
verticallytodisplay
cannotbeviewed
Size
you
with
remote
control repeatedly
and
Screen Burn
have
connected
screen.
Your
specific
types
sizesaswell.
the
usinganormal
to
TV
In
optimal
TV.
to
Wide Fit
I2J
Temporary
~
After
Press
Press
~
After
Press
Press
Reset:
~
HD
image
retention
selecting
selecting
(High
Zoom1, Zoom2orWide Fit:
the
....
or~buttontoselect
theAor~buttontomove
Screen FitinHDMI(1080i/1080p)orComponent
the
....
or~buttontoselect
the
A,
Press
Definition):
~,or~
the
buttontomove
or~buttontoselect
16:9
may
-1080il1080p
occur
when
Position,
the
pictureupand
Position,
viewing
then
press
then
press
the
picture.
Reset,
then
(1920x1080),
a static
the
down.
the
press
nop
"j§~
..
~I:I''''P
"S~<'
Screen
imageonthe
ENTERG'
(1080i/1080p)
ENTERG'
the
ENTERG'
(1280xnO)
:/::7
~'?'
Fit
set
button.
button.
for
more
than
two
mode,
you
may
button.
TheTVwillberesetto16:9
hours.
made
needtocenter
the
picture:
Continued
...
 Loading...