


Sagem 926, 912, 920, 910, 919 User Manual
...
Couv. LU A6 tdpote 238204111 26/10/00 11:18 Page 1
910
912
916
919
920
922
926
929
ENGLISH

1
IN A FEW WORDS ...
Switch on
Open the flap (depending on the model) and press† .
Call
|
Dial the number then press |
|
. |
|
Answer
Press (or open thee flap depending on the model).
Lock the keyboard
Choose ACTIVE in the SECURITY/LOCK K. PAD menu or press then Ok.
Unlock the keyboard
Press then Ok.
Redial last number
Press .
.
Enter a number into the directory
Press Ok.
Hang up
Press (or close the flap depending on the model).
Switch off
Press (long press).
Hands free
|
To communicate, press |
|
. |
|
Make a call from the directory
By name: enter the first letters of the name,
press |
|
, scroll down the list to find your |
||
|
||||
correspondent then press |
|
to call. |
||
|
||||
By location in the directory: enter the number of the location then press # to call.
Briefly, the functions

2
MENUS
Enter using and
and  Navigate using
 and
and 
Validate using OK
Quit using C
DIRECTORY
MESSAGES
CALLS
RNG & BEEP
SETTINGS
SECURITY
ACCESSORY
Briefly, the menus

You have just bought a mobile phone and we congratulate you on your choice.
Your phone will allow you to use different international networks depending on the roaming agreements between the operators.
We would like to remind you that this phone is approved to European standards.
In order to use your phone effectively and in the best conditions, we advise you to read this manual written for your attention carefully.
WARNING
According to the configuration of the networks and associated subscriptions, certain functions may not be available (indicated by *).
If an incompatible SIM card is inserted, a message will be displayed when switching on your phone. For further information, contact your Operator.
Compatibility of your SIM card
Your phone is compatible with SIM 3V cards only.
The SAGEM logo and trademark are the property of SAGEM SA.
T9ô Text Input is a registered trademark of ©Tegic Communications Inc. T9 is licensed under one or more of the following U.S. Patents: 5,818,437, 5,953,541, 5,187,480, 5,945,928, 6,011,554 and additional patents are pending worldwide.
3
GLOSSARY
Outgoing call |
A call made from your phone. |
Incoming call |
A call received by your phone. |
SIM card |
The card containing your |
|
subscription and access rights to |
|
services. The detachable part is |
|
the ìmicro-SIMî. |
PIN |
The personal code linked to your |
|
SIM card. |
PIN2 |
The second personal code |
|
linked to your SIM card to |
|
access certain functions (*). |
Phone code |
The phone code is a secret code |
|
intended to protect the phone in |
|
case of theft. |
IMEI |
The identification number of your |
|
phone. |
SMS |
Short Message Service: for |
|
sending and receiving short text |
|
messages. |
|
|
|
|

1. |
Presentation of the phone ..................................... |
6 |
|
2. |
Getting started ....................................................... |
8 |
|
|
2.1 |
Information on the SIM card ................................ |
8 |
|
2.2 |
Installing the SIM card ........................................ |
9 |
|
2.3 |
Charging the battery ......................................... |
10 |
|
2.4 |
Switching on/switching off, starting up .............. |
10 |
|
2.5 |
Menu access .................................................... |
11 |
|
2.6 |
Deleting characters ........................................... |
11 |
3. |
Initial communication - Hands free mode ............ |
12 |
|
|
3.1 |
Making a call ..................................................... |
12 |
|
3.2 |
Receiving a call ................................................ |
12 |
|
3.3 |
Volume control .................................................. |
13 |
|
3.4 |
Hands free mode .............................................. |
13 |
|
3.5 |
Ending a call ..................................................... |
13 |
4. |
Menu list .............................................................. |
14 |
|
5. |
How to use the directory ...................................... |
15 |
|
|
5.1 |
Directory capacity and display .......................... |
15 |
|
5.2 |
Sorting .............................................................. |
15 |
|
5.3 |
Storing a number .............................................. |
16 |
|
5.4 |
Deleting a number ............................................ |
16 |
|
5.5 |
Making a call to a stored number ...................... |
16 |
|
5.6 |
Accessing services provided by the Operator ... |
17 |
|
5.7 |
Displaying your phone numbers ....................... |
17 |
|
5.8 |
Directory occupation ......................................... |
17 |
6. |
How to use the written message function ............ |
18 |
|
|
6.1 |
Creating new short messages using Easy |
|
|
|
Message T9TM ................................................... |
19 |
4
6.2 |
Receiving short messages ................................ |
21 |
6.3 |
Reading short messages .................................. |
21 |
6.4 |
Sending short messages .................................. |
21 |
6.5 |
Memory occupancy rate ................................... |
22 |
6.6 |
Clearing short messages .................................. |
22 |
6.7 |
Information distribution ..................................... |
22 |
7. How to use the call related features .................... |
23 |
|
7.1 |
Forwarding calls ............................................... |
23 |
7.2 |
Viewing the list of the last numbers used .......... |
24 |
7.3 |
Erase numbers ................................................. |
25 |
7.4 |
Caller identity .................................................... |
25 |
7.5 |
Auto redial ........................................................ |
26 |
7.6 |
Call waiting ....................................................... |
26 |
7.7 |
Call hold ........................................................... |
26 |
7.8 |
Multi-conference ............................................... |
27 |
7.9 |
Checking call duration ...................................... |
28 |
7.10 Charge-checking ............................................. |
28 |
|
7.11 Message centre ............................................... |
29 |
|
8. How to adjust the ringing tones and the |
|
|
vibrator................................................................. |
30 |
|
8.1 |
Selecting silent mode ........................................ |
30 |
8.2 |
Setting the vibrator ............................................ |
30 |
8.3 |
Selecting the volume and the type of |
|
|
ringing tone ....................................................... |
31 |
8.4 |
Setting the alarm ............................................... |
31 |
8.5 |
Setting the timer ................................................ |
32 |
8.6 |
Settings the beeps ............................................ |
32 |
8.7 |
Deleting DTMF tones ........................................ |
32 |
Summary

9. How to adjust your phone .................................... |
33 |
|
9.1 |
Programmine the ´One Touchª keys ................ |
33 |
9.2 |
Personalising the welcome screen ................... |
34 |
9.3 |
Selecting the display language ......................... |
34 |
9.4 |
Select the type of automatic response .............. |
34 |
9.5 |
Selecting the network ....................................... |
35 |
9.6 |
Setting the date and time .................................. |
36 |
9.7 |
Adjusting the contrast ....................................... |
36 |
9.8 |
Install energy saving mode ............................... |
36 |
9.9 |
Standard configuration ...................................... |
36 |
10. How to use the security features of |
|
|
your phone ........................................................... |
37 |
|
10.1 |
Locking the keyboard ...................................... |
37 |
10.2 |
Changing the PIN number ............................... |
37 |
10.3 |
Activating the PIN code ................................... |
38 |
10.4 |
Activating the phone code ............................... |
38 |
10.5 |
Changing the phone code ............................... |
38 |
10.6 |
Changing the PIN2 code ................................. |
39 |
10.7 |
Creating a fixed numbering phone book .......... |
39 |
10.8 |
Charge-checking ............................................. |
39 |
10.9 |
Call barring ...................................................... |
39 |
11. Other functions .................................................... |
41 |
|
11.1 |
Calculator ........................................................ |
41 |
11.2 |
Converter ........................................................ |
42 |
5
12. Available accessories ......................................... |
43 |
13. Upkeep ................................................................ |
44 |
14. Recommendations .............................................. |
45 |
Answers to your questions ........................................ |
48 |
Summary
6
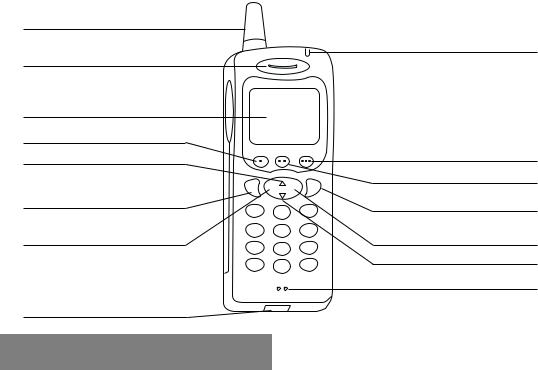
Antenna
Ear phone/speaker
Screen
One Touch 1
Scrolling arrow
C Ok
Stop/End call
Correction
Battery charging and accessories socket
Light indicator
One Touch 3
One Touch 2
Operate/Call Activation of hands free
Validate
Scrolling arrow
Microphone
1. Presentation of the phone

Function keys
Stop ñ Reject a call ñ Hang up
 Go ñ Call a number ñ Receive a call ñ Hands free mode
CShort press: Return to the previous menu ñ Delete a character
Long press: Exit menu mode ñ Complete deletion of the entry
Ok Validate
Programmable keys for direct access to the functions that you have selected ñ Control volume
 and
and  Entry and scrolling through the menus.
7
Display
Various icons provide information, for example:
Battery charge indicator (black if charged, clear if discharged)
Received signal strength indicator (maximum strength: 5 bars)
Hands-free loudspeaker
Alarm
Call in progress
Silent mode
Alphanumeric keyboard
Made up of 12 keys: 0 to 9, and #.
To obtain a letter, hold down the relevant key, the number and the letters will appear; stop pressing when the required letter appears.
Letters with accents are obtained by a long press on after entering the letter with no accent.
Punctuation marks and special symbols are obtained by a long press on the # key.
1. Presentation of the phone

2. Getting started
8
2.1 Information on the SIM card
To use your phone, you have a small card called a SIM card. This card contains all the information necessary for the network as well as other information that belongs to you and that you can modify:
ïsecret codes (PIN code(s) - Personal Identification Number),
ïdirectory,
ïmini-messages,
ïfunctioning of specific services.
SIM card
This card must be handled and stored with care in order to avoid excessive stresses or scratches that would damage it. If your SIM card is lost, contact your Operator or Service Provider immediately.
Note: Do not leave your SIM card within the reach of small children.
2. Getting started

PIN code
This is the personal code for your SIM card. This code could be requested of you when you switch on your phone.
 Enter the code of between 4 and 8 digits given to you by your operator. These digits will not be displayed on the screen for security reasons.
 Press # or Ok to validate.
PIN2 code (*)
This second code if it was given to you by your operator, provides security of access to certain functions.
|
9 |
Attention |
2.2 Installing the SIM card |
|
If the wrong PIN code is entered three times in a row, the card will be blocked. To unlock your card, call the organisation from which you obtained this card, they will guide you on the procedure to use.
If your SIM card is permanently locked, contact your Operator or your Service Provider to obtain a new card.
Switch off your phone; disconnect the charger.
The SIM card is inserted beneath the phoneís battery.
 Turn your phone over and remove the battery by pulling on the strip on the lower part of the phone: it lifts up and you can release it.
 Slide the card along the base beneath the retaining plate, with the gold coloured sections facing towards the phone and the cutoff corner lined up to match the drawing on the phone.
 Replace the battery by first positioning the upper section then pressing it until it locks.
2. Getting started
2.3 Charging the battery |
|
Attention |
||
|
|
|
|
|
Your phone is powered by a |
|
The battery does not |
||
rechargeable battery. A new battery |
|
contain any |
||
must be charged for at least 4 |
|
components that |
||
|
can be changed by |
|||
hours before it is used for the first |
|
|||
|
you. |
|||
time. It will reach its nominal |
|
|||
|
Do not attempt to |
|||
capacity after several usage cycles. |
|
open the battery |
||
When your battery has run down, |
|
case. |
||
|
Only use the |
|||
the phone displays it and cuts out. |
|
|||
|
appropriate chargers |
|||
|
|
|
||
To recharge your battery: |
|
and batteries as |
||
|
specified in the |
|||
|
Connect the charger to a mains |
|
||
|
|
manufacturerís |
||
|
||||
|
socket. |
|
catalogue. |
|
|
Connect the end of the charging |
|
Spent batteries must |
|
|
||||
|
|
be collected at the |
||
|
cable to the bottom of your |
|
||
|
|
appropriate sites. |
||
|
phone. |
|
||
|
|
|
||
|
The phone will start charging, the |
|
|
|
|
battery charging indicator |
|
|
|
|
indicates the level of charge. |
|
|
|
|
Charging stops by itself. |
|
|
|
|
Unplug the cable. |
|
|
|
|
|
|
||
|
|
|
||
It is possible that during charging, |
There is a risk of |
|||
the battery may heat up slightly; |
explosion if the |
|||
battery is incorrectly |
||||
this is normal. |
||||
replaced. |
||||
|
|
|||
|
|
|
|
|
10
2.4Switching on/switching off, starting up
To make your first call:
 Press
Press  to switch on your phone.
 If access to the SIM card is protected by a secret code, the phone will ask you to enter your PIN code.
Enter the code of between 4 and 8 digits given to you when you were given your SIM card. These digits will not be displayed on the screen for security reasons.
 Press # or Ok to validate.
Control of the PIN code
If your phone displays SIM MISSING, press  (long press) to switch off your phone and check that your SIM card is correctly positioned.
2. Getting started

|
|
|
|
|
11 |
Searching for a network |
Network |
|
|
2.5 Menu access |
|
|
|
||||
|
indicator |
|
|
|
|
|
|
|
|
|
|
The phone then searches for a network on which it can communicate:
 If it finds it, it displays the name of the network on the screen and the light indicator flashes green.
You are ready to make or receive a call.
 If it finds another network, only emergency services will be accessible (police, ambulance, fire brigade).
 If it cannot find a network, it will keep searching.
The indicator of the level of network signal received enables you to visualise the quality of reception. If it shows less than three bars, look for better reception to make your call in good conditions.
The menu functions permit you to verify or modify the various functions of your phone to adapt it to your requirements.
 Press the scrolling arrows
  or
or  to access the menus.
 Scroll through the menus using the scrolling arrows then press Ok to access the selected menu.
 Each time you want to validate an action, press Ok.
 To abandon an action, press C.
 To exit the menu mode, press and hold C.
Direct access to menus
To directly access a menu, press  then enter the number of the selected menu.
Switching off
 Hold down the
  key until the end message is displayed.
 Release the key, the phone switches off.
2.6 Deleting characters
You can cancel an entry error:
 Press quickly on C to delete the last character.
 If you press for longer on this key: you will delete the previous word.
2. Getting started

3.Initial communication Hands free mode
12
3.1 Making a call
The network is displayed.
 Dial the number with the area code (if necessary).
|
Press |
|
. |
|
During the call,  flashes on the screen and tones signal the establishment of communication.
 When the person you have called answers, speak.
 To call the international emergency service, dial 112 then press
  .
.
3.2 Receiving a call
When you receive a call:
 Press
Press  (or open the flap, depending on the model) then speak.
The callerís number is displayed when it is presented to the network. This number is automatically registered whether you answered the call or not.
International call
Press 0 (long press) to display + then dial the country code without waiting for a tone, then the number you require.
Emergency services
Depending on the operator, you can contact the emergency services with or without a SIM card or when the keyboard is locked. It is sufficient to be in a zone served by the network. Other emergency service numbers may exist, depending on the country.
3. Initial communication

|
13 |
3.3 Volume control |
3.5 Ending a call |
 Increase or decrease the volume during a conversation by pressing the
  or
or 

 keys.
keys.
3.4 Hands free mode
During a call, you can transfer from handset mode to hands free mode by simply pressing one key and the reverse to switch back.
 Press
Press  .
.
The screen displays  for handset mode and
  for ´†hands free†ª mode.
The ìHands freeî mode enables you to have a conversation with several people and be free to move, for example, to take notes during your conversation.
Before putting the phone to your ear, check the
!volume control settings as well as the selected listening method, especially if using integrated hands free mode, which could cause ear damage if used incorrectly.
 Press
Press  (or close the flap depending on the model).
The end of call message appears on the screen.
3. Initial communication

14
4. Menu list
According to your phone model, to the configuration of the networks and associated subscriptions, certain functions may not be available (indicated by *).
Directory
ALPHA SORT
POSITION
SERVICES (*)
MY NUMBER (*)
USE
Messages
READ
SEND
USE
CLEAR
CELL.INFO. (*)
CALLS
CALL FRW.
LAST
CLEAR
SEND No (*)
AUTO RDIAL
DBLE CALL (*)
DURATION
COST (*)
MSG CENTER
Rng & beep
SILENCE?
VIBRATOR
HANDSET
HANDSET
FREE HAND
ALARM
TIMER
BEEPS
SEND DTMF
Settings
PROG. KEY
GREETING
LANGUAGE
ANSWER
NETWORK
DATE/TIME
MISC
Security
LOCK K.PAD
PIN CODE
PIN CHECK.
PHONE CODE
PHONE CHCK
PIN2 CODE (*)
FIXED REP. (*)
COST (*)
LIMIT
Accessory
CALCULATOR (*)
EXCHANGE
4. Menus
 Loading...