


M C A - C 5 M U L T I Z O N E C O N T R O L L E R |
MCA-C5
8 Source Multizone Controller Amplifier
User and Installation Manual

SAFETY INSTRUCTIONS
WARNING: TO REDUCE THE RISK OF FIRE OR ELECTRIC SHOCK, DO NOT EXPOSE THIS APPLIANCE TO RAIN OR MOISTURE.
CAUTION: TO REDUCE THE RISK OF ELECTRIC SHOCK, DO NOT REMOVE THE COVER. NO USERSERVICEABLE PARTS INSIDE. REFER SERVICING TO QUALIFIED SERVICE PERSONNEL.
The lightning flash with arrowhead symbol, within an equilateral triangle, is intended to alert the user to the presence of uninsulated dangerous voltage within the product’s enclosure that may be of sufficient magnitude to constitute a risk of electric shock to persons.
The exclamation point within an equilateral triangle is intended to alert the user to the presence of important operating and maintenance (servicing) instructions in the literature accompanying the appliance.
Safety Instructions
1.Read Instructions - All the safety and operating instructions should be read before the appliance is operated.
2.Retain Instructions - The safety and operating instructions should be retained for future reference.
3.Heed Warnings - All warnings on the appliance in the operating instructions should be adhered to.
4.Follow Instructions - All operating and user instructions should be followed.
5.Water and Moisture - The appliance should not be used near water; for example, near a bathtub, washbowl, kitchen sink, laundry tub, in a wet basement, or near a swimming pool. The apparatus shall not be exposed to dripping or splashing liquids and no objects filled with liquids, such as vases, shall be placed on the apparatus.
6.Carts and Stands - The appliance should be used only with a cart or stand that is recommended by the
manufacturer. An appliance and cart combination should be moved with care. Quick stops, excessive force and uneven surfaces may cause the appliance and cart combination to overturn.
7.Wall or Ceiling Mounting - The appliance should be mounted to a wall or ceiling only as recommended by the manufacturer.
8.Ventilation - The appliance should be situated so that its location or position does not interfere with its proper ventilation. For example, the appliance should not be situated on a bed, sofa, rug, or similar surface that may block the ventilation openings, or placed in a built-in installation, such as a bookcase or cabinet that may impede the flow of air through the ventilation openings.
9.Heat - The appliance should be situated away from heat sources such as radiators, heat registers, stoves, or other appliances (including amplifiers) that produce heat.
10.Power Sources - The appliance should be connected to a power supply only of the type described in the operating instructions or as marked on the appliance.
11.Grounding or Polarization - Precaution should be taken so that the grounding or polarization means of an appliance is not defeated.
12.Power Cord Protection - Power supply cords should be routed so that they are not likely to be walked on or pinched by items placed upon or against them, paying particular attention to cords at plugs, receptacles, and the point where they exit from the appliance.
13.Cleaning - The appliance should be cleaned only as recommended by the manufacturer.
14.Non-Use Periods - The power cord of the appliance should be unplugged from the outlet when left unused for a long period of time. To remove all power (supply mains) from the appliance, remove the plug from the wall outlet.
15.Object and Liquid Entry - Care should be taken so that objects do not fall and liquids are not spilled into the enclosure through the openings.
16.Damage Requiring Service - The appliance should be serviced by qualified service personnel when:
A.The power supply cord or the plug has been damaged; or
B.Objects have fallen, liquid has been spilled into the appliance; or
C.The appliance has been exposed to rain; or
D.The appliance does not appear to operate normally; or
E.The appliance has been dropped or the enclosure is damaged.
17.Servicing - The user should not attempt to service the appliance beyond that described in the operating instructions. All other servicing should be referred to qualified service personnel.
Precautions:
1.Power – WARNING: BEFORE TURNING ON THE POWER FOR THE FIRST TIME, READ THE FOLLOWING SECTION CAREFULLY.
2.Do Not Touch The Unit With Wet Hands – Do not handle the unit or power cord when your hands are wet or damp. If water or any other liquid enters the cabinet, unplug the unit from power immediately and take it to a qualified service person for inspection.
3.Location of Unit – Place the unit in a well-ventilated location. Take special care to provide plenty of ventilation on all sides of the unit especially when it is placed in an audio rack. If ventilation is blocked, the unit may overheat and malfunction. Do not expose the unit to direct sun light or heating units as the unit internal components temperature may rise and shorten the life of the components. Avoid damp and dusty places.
4.Care – From time to time you should wipe off the front and side panels of the cabinet with a soft cloth. Do not use rough material, thinners, alcohol or other chemical solvents or cloths since this may damage the finish or remove the panel lettering.
2 |
Russound MCA-C5 User and Installation Manual |
Safety - Outdoor Antenna Connection
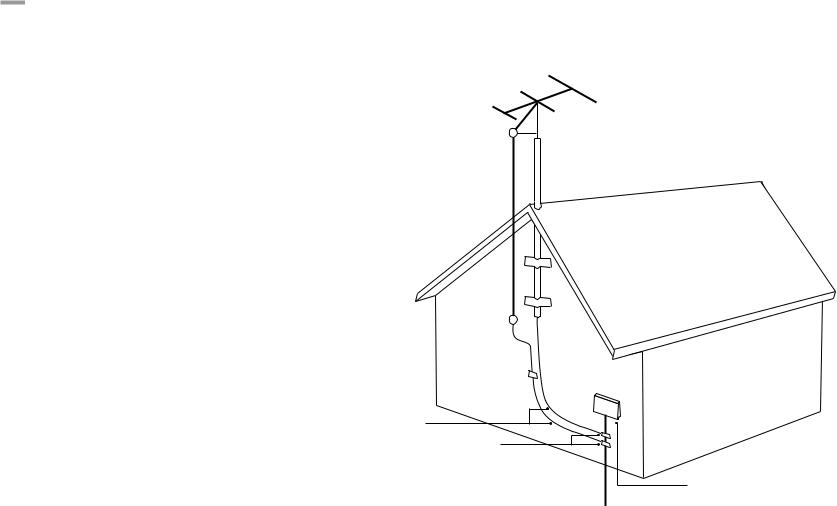
Grounding an Outdoor Antenna
If the AM/FM tuner is used with an outdoor antenna, the antenna must be grounded against static charges and voltage surges. Consult the instructions that came with the antenna or contact the antenna manufacturer for proper installation instructions. The diagram gives a general depiction of how an outdoor antenna should be grounded. For complete guidelines on antenna grounding procedures, please consult the National Electrical Code, Section 810, ANSI/NFPA No. 70-1984.
Antenna Lead-In Wire 
Grounding Conductors
Ground Clamps
Electric Service Equipment

 Power Service
Grounding Electrode System
Russound MCA-C5 User and Installation Manual |
3 |

TABLE OF CONTENTS |
|
Safety Instructions................................................................................................................... |
2 |
Product Overview.................................................................................................................... |
5 |
Controller Illustrations........................................................................................................... |
6 |
Keypad Features....................................................................................................................... |
8 |
Keypad Usage............................................................................................................................ |
9 |
Remote Control Illustration................................................................................................ |
11 |
Installation Overview .......................................................................................................... |
12 |
Installation Guide................................................................................................................... |
13 |
Keypad Rear Illustration...................................................................................................... |
14 |
Keypad IR Connection.......................................................................................................... |
15 |
Color Plate Conversion......................................................................................................... |
16 |
Controller / Keypad Connections..................................................................................... |
17 |
Speaker Connections............................................................................................................ |
18 |
Source Connections.............................................................................................................. |
19 |
IR Connections........................................................................................................................ |
20 |
Multiple Controller Installation......................................................................................... |
21 |
Trigger Connections............................................................................................................. |
22 |
Additional Ports and Antenna Connections................................................................ |
26 |
SCS-C5 Configuration Software........................................................................................ |
27 |
System Start Up...................................................................................................................... |
28 |
Remote Control Programming.......................................................................................... |
29 |
Remote Control Device Codes.......................................................................................... |
31 |
Technical specifications....................................................................................................... |
37 |
Warranty.................................................................................................................................... |
38 |
4 |
Russound MCA-C5 User and Installation Manual |

product OVERVIEW
Thank you for choosing the Russound MCA-C5 multizone controller amplifier to enhance your home with multiroom audio.
The MCA-C5 caters to homeowners who want control over their multiroom audio systems with such capabilities as infrared (IR) tools to manage the system from anywhere in the house. Eight source inputs, simplified programming, and user adjustable sound controls make listening to music throughout the home easier than ever.
Key features include:
•8 sources delivered to up to 8 zones for sharing music throughout the home
•Scalable to 48 zones by connecting up to six controllers
•A remote control with simplified programming and control via intelligent IR learning capabilities for quick setup
•A built-in AM/FM tuner with RDS support
•Line level outputs for each zone
•Eight zone specific 12VDC trigger outputs
•Twelve channels of digital amplification rated at 40 watts per channel for zones 1-6
•Incorporates RNET smart sources, transmitting metadata (song, artist and other information) for display on the keypads
•Routed IR source control outputs for each source (1/7 and 2/8 share a output), and one common IR output
•Party mode, Do Not Disturb, and source / zone linking options
•Alarm clock and sleep timer
•Audio paging with adjustable audio signal sensing and a DC voltage trigger input
•Source power management with line level auto-sensing
•Front panel USB port for programming ease
•Rear panel RS232 port for integration with other systems
•Configuration software for PC programming
•Supported keypads are the MDK-C5 and the UNO-TS2
Important Note: SCS-C5 software is necessary to program the MCA-C5 system. It can be downloaded from the Document Center at www.russound.com.
Russound MCA-C5 User and Installation Manual |
5 |
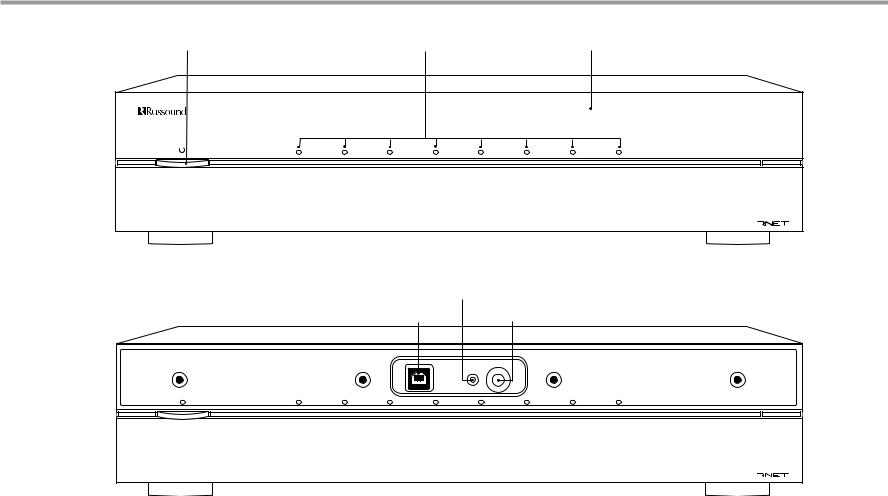
Controller front Panel
Power Switch |
Zone LED indicators visible |
Removable cover to access IR |
Red LED behind power indicator |
behind cover |
window and USB port |
M C A - C 5 M U L T I Z O N E C O N T R O L L E R |
Front Panel
Red IR LED (talk-back)
USB Port for Programming |
IR Receiver Window |
Programming Center |
IR In |
|
USB |
IR LED |
|
|
|
|
2.0/1.1 |
|
|
M C A - C 5 M U L T I Z O N E C O N T R O L L E R |
||
Front Panel with cover removed
6 |
Russound MCA-C5 User and Installation Manual |

Controller Rear Panel
RNET Link - Links multiple controllers and RNET sources
|
|
|
|
|
|
|
|
|
|
|
|
|
|
|
|
|
|
|
|
|
|
|
|
Zone 12V Triggers |
|
|
|
|
|
|
|
Home Theater 12 VDC Trigger |
|||||||||||||||
|
|
|
|
|
|
|
|
|
|
|
|
|
|
|
|
|
|
12VDC 100ma outputs ready when |
|
|
|
|
|
|
|
Activates source power management |
|||||||||||||||||||||
|
|
|
|
|
|
|
|
|
|
|
|
|
|
|
|
|
|
|
|
|
|
corresponding zone is active |
|
|
|
|
|
|
|
when sharing sources with home |
|||||||||||||||||
|
|
|
|
|
|
|
|
|
Controller ID Switch |
|
|
Serial Interface |
|
|
Page 12VDC Trigger |
theater |
|||||||||||||||||||||||||||||||
|
|
|
|
|
|
|
|
|
|
|
|
|
|
|
|
|
|
|
|
|
|
|
|
|
|||||||||||||||||||||||
|
|
|
|
|
|
Set ID for multiple controller |
|
|
RS232 ports for firmware |
|
|
|
|
|
|
|
|
|
|
|
|
|
|
||||||||||||||||||||||||
|
|
|
|
configurations or firmware updates |
|
|
updates and communication |
|
Accepts paging device input |
|
|
|
|
|
|
|
|
|
|
|
|
||||||||||||||||||||||||||
|
|
|
|
Keypad Ports - RJ-45 |
|
|
|
|
|
|
|
Ethernet Port |
|
IR Outputs |
|
|
|
|
|
|
AM/FM Antenna |
||||||||||||||||||||||||||
|
|
|
|
|
|
|
|
|
|
|
|
|
|
|
|
|
|
Antenna connections for |
|||||||||||||||||||||||||||||
|
|
|
|
Connections for zone keypads |
|
|
|
|
|
|
|
For future use |
|
6 routed, 1 common |
|
|
|
|
|
|
internal tuner |
||||||||||||||||||||||||||
|
|
|
|
|
|
|
|
|
|
|
|
|
|
|
|
|
|
|
|
|
|
|
|
|
|
|
|
|
|
|
|
|
|
|
|
|
|
|
|
|
|
|
|
|
|
|
|
|
|
|
|
|
|
|
|
|
|
|
|
|
|
|
|
|
|
|
|
|
|
|
|
|
|
|
|
|
|
|
|
|
|
|
|
|
|
|
|
|
|
|
|
|
|
|
|
|
|
|
|
|
|
|
|
|
|
|
|
|
|
|
|
|
|
|
|
|
|
|
|
|
|
|
|
|
|
|
|
|
|
|
|
|
|
|
|
|
|
|
|
|
|
|
|
|
|
|
|
|
|
|
|
|
|
|
|
|
|
|
|
|
|
|
|
|
|
|
|
|
|
|
|
|
|
|
|
|
|
|
|
|
|
|
|
|
|
|
|
|
|
|
|
|
|
|
|
|
|
|
|
|
|
|
|
|
|
|
|
|
|
|
|
|
|
|
|
|
|
|
|
|
|
|
|
|
|
|
|
|
|
|
|
|
|
|
|
|
|
|
|
|
|
|
|
|
|
|
|
|
|
|
|
|
|
|
|
|
|
|
|
|
|
|
|
|
|
|
|
|
|
|
|
|
|
|
|
|
|
|
|
|
|
|
|
|
|
|
|
|
|
|
|
|
|
|
|
|
|
|
|
|
|
|
|
|
|
|
|
|
|
|
|
|
|
|
|
|
|
|
|
|
|
|
|
|
|
|
|
|
|
|
|
|
|
|
|
|
|
|
|
|
|
|
|
|
|
|
|
|
|
|
|
|
|
|
|
|
|
|
|
|
|
|
|
|
|
|
|
|
|
|
|
|
|
|
|
|
|
|
|
|
|
|
|
|
|
|
|
|
|
|
|
|
|
|
|
|
|
|
|
|
|
|
|
|
|
|
|
|
|
|
|
|
|
|
|
|
|
|
|
|
|
|
|
|
|
|
|
|
|
|
|
|
|
|
|
|
|
|
|
|
|
|
|
|
|
|
|
|
|
|
|
|
|
|
|
|
|
|
|
|
|
|
|
|
|
|
|
|
|
|
|
|
|
|
|
|
|
|
|
|
|
|
|
|
|
|
|
|
|
|
|
|
|
|
|
|
|
|
|
|
|
|
|
|
|
|
|
|
|
|
|
|
|
|
|
|
|
|
|
|
|
|
|
|
|
|
|
|
|
|
|
|
|
|
|
|
|
|
|
|
|
|
|
|
|
|
|
|
|
|
|
|
|
|
|
|
|
|
|
|
|
|
|
|
|
|
|
|
|
|
|
|
|
|
|
|
|
|
|
|
|
|
|
|
|
|
Audio Source Connections |
|
AC 120/240V Input |
|
|
|
|
|
|
|
|
|
|
|
|
||
|
|
|
|
|
|
|
|
|
|
|
|
||
|
|
|
|
|
|
|
|
|
|
|
|
||
|
|
|
|
|
|
|
|
|
|
|
|
||
|
|
|
|
|
|
|
|
|
|
|
|
||
|
|
|
|
|
|
|
|
|
|
|
|
||
Speaker Outputs - Connect |
Line Level Outputs |
||||||||||||
4-8 Ohm speakers for each |
Signal sensing stereo line level |
Can be set fixed or variable |
Detachable grounded |
||||||||||
of the first six zones |
inputs and loop outputs |
(with software) for each zone |
power cord connection |
||||||||||
Paging Audio Gain |
Page Audio In/Loop Out |
AC Voltage Switch |
Fuse Holder |
Adjusts sensitivity |
(optional Source 8) |
Select appropriate voltage |
Holds replaceable fuse for |
|
|
|
AC input connection |
Rear Panel
Russound MCA-C5 User and Installation Manual |
7 |
Keypad Features
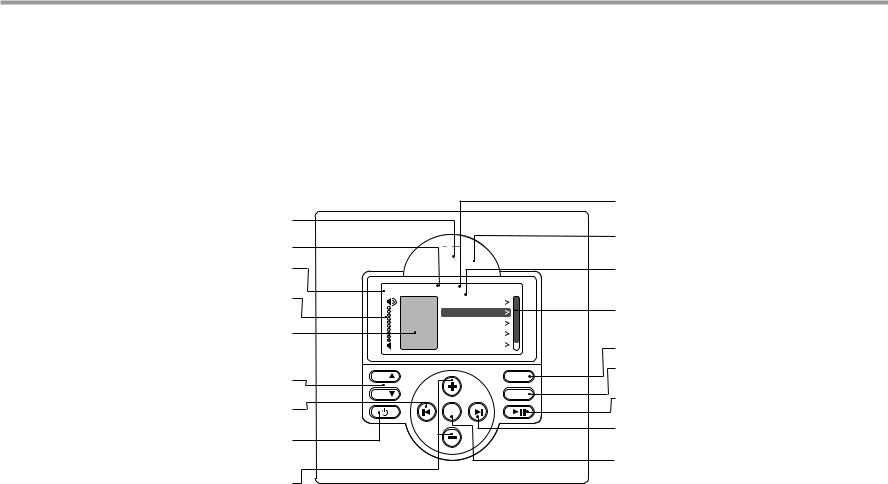
MDK-C5 Keypad
The MDK-C5's buttons and menus allow the user to easily find and control music sources and to make changes to system settings and room audio levels.
Six backlit oblong buttons access power on/off, music play/pause, volume up/down, and menu shortcuts. The OK button in the center activates a menu choice and the navigation buttons allow you to move through menus and lists. All music sources, audio adjustments and system settings are arranged in menus and lists. The navigation buttons also act as source controls to select next / previous song etc. depending upon the type of source being controlled.
The keypad’s home screen, buttons and navigation buttons are described below.
The main menu (Home) options include: Now Playing, Sources, Alarm, Sleep Timer, Party Mode, Do Not Disturb, and Settings. The Settings menu includes the audio, clock, display, and installer options. The audio settings include bass, treble, balance, loudness, and turn on volume.
IR Receiver - Receives IR signals from the remote control
Title bar - Current menu name
Source name - Shows you what source you are listening to
Volume Indicator - Shows volume level for the room or if Mute is on
Status box - Shows system status messages Party, Master, Shared (source), Do Not Disturb, etc.
Volume - Adjust the volume up or down
Previous - Navigate backwards through menus or play previous selection
Power - Turn keypad and zone off or on. Press and hold for system all on/off
Menu Navigation - Navigate through menus, press (slow) or press and hold (fast) to move up/down a menu list
AM/FM |
Home |
4:30 PM |
|
Now Playing |
|
Shared |
Sources |
|
|
Favorites |
|
|
Alarm |
|
|
Sleep Timer |
|
VOL |
|
HOME |
VOL |
|
MENU |
|
OK |
|
LCD Screen - Gray scale graphic screen shows source and system navigation screens
IR Talk-back LED - Lights red to indicate IR signal receipt
Menu - List of options to choose from, with
highlighted item selected
Scroll bar - Shows that more menu choices are available through scrolling
Home - Returns view to the home screen
Menu - Returns view to main menu (for current source)
Play / Pause - Press for Pause, or press and hold for Play
Forward - Press to forward through menu or play next selection
OK - Press to select highlighted item from the menu, or access source list from Now Playing
MDK-C5 Keypad Functions
8 |
Russound MCA-C5 User and Installation Manual |
Keypad usage
Basic Operation
Turn on the zone - Press the power button on the keypad or press power on the SRC-C5 remote control to turn on the zone and hear music. The zone will default to the last playing source before being turned off. Press and hold the power button (when ON) to turn on all the keypads.
Turn off the zone - Press the power button on the keypad or press the power button on the SRC-C5 remote control to turn off the keypad and music. Press and hold the power button (when OFF) to turn off all other keypads.
Volume adjustments - Press the Volume up/down buttons on the side of the keypad, or press the VOL +/- button on the SRC-C5 remote control.
Mute Audio - Press the Mute button on the SRC-C5.
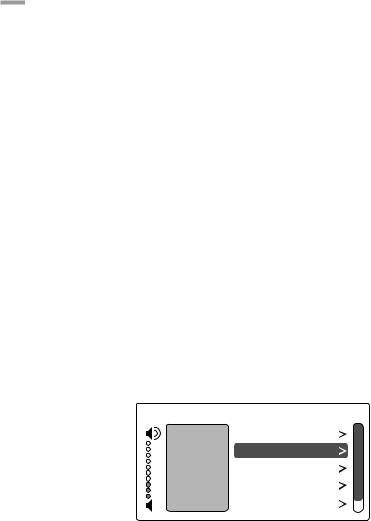
Main Menu - Sources
From the home screen, select "Sources." A list of available audio sources appears. Select a source, or press a numbered "Source" button on the SRC-C5 remote control.
Once selected, choose music from that source. Each source has its own menu and screens. Main menus list what is available: channels, genres, playlists, songs, or artists.
Shared - When you see "Shared" on the screen, what you are listening to is also playing in another room. If you change the selection (song, channel, playlist) on that source, the change will also happen in the other "Shared" room.
AM/FM |
Home |
4:30 PM |
|
Now Playing |
|
Shared |
Sources |
|
|
Favorites |
|
Alarm
Sleep Timer
Main Menu - Favorites
Favorites - Save a source or a radio station/channel as a favorite.
Add new - Tune to the music source you want to save as a favorite. From the Favorites menu, select "Add New." Name the favorite using the +/- buttons to move through the alphabet and the forward button to move to the next character. Press the OK button to save.
Edit name - Choose the favorite to rename and use the +/- buttons to scroll through the alphabet and the forward button to move to the next character.
Delete favorite - Choose the favorite to be deleted, press the OK button to delete.
Main Menu - Alarm
Set the keypad as an alarm clock and wake up to music. From the home screen menu, scroll to and select "Alarm" for the following options:
Alarm on/off - Activates alarm on or off. If an alarm is set a clock icon will appear on the keypad display.
Wake time - Set the time for the alarm to go off. Wake to - Choose the music source to wake to.
Choose days - Set the alarm to go off on weekdays, all days or just once.
Set snooze - Choose the interval (5 to 30 minutes) before the alarm goes off again.
Alarm level - Set the volume of the alarm.
How to:
Turn off active alarm - Press the power button on the keypad or SRC-C5 remote control.
Snooze - Press the pause button on the keypad or the SRC-C5 remote control.
Russound MCA-C5 User and Installation Manual |
9 |
Keypad usage
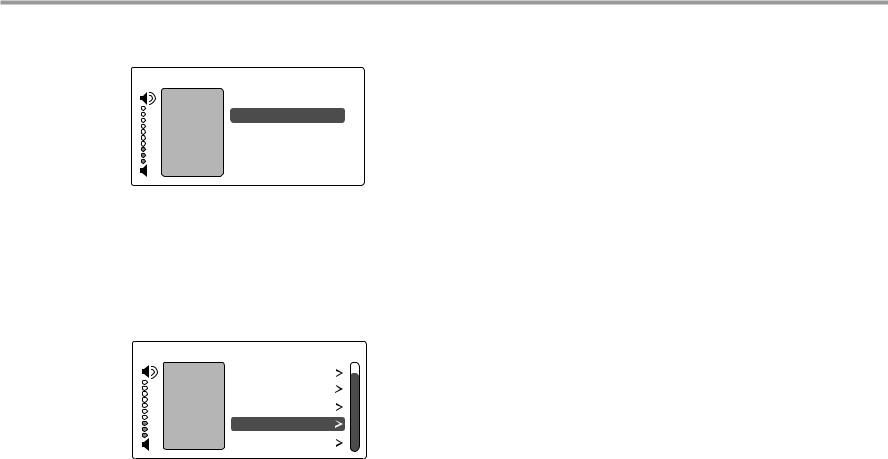
Main Menu - Sleep Timer
You can set the timer so the zone turns off in one of the following increments: 15, 30, 45, or 60 minutes.
AM/FM Sleep Timer 9:30 PM
After 15 minutes
After 30 minutes
After 45 minutes
After 60 minutes
Cancel
Main Menu - Set Party Mode or Do Not Disturb
Party and Master - The keypad that shows Master has started a "party" and keypads that show Party are "attending." All rooms are listening to the same music, and only the Master can change the music. Volume control remains independent.
Do Not Disturb - Someone in another room has chosen a source and locked out anyone else from changing it. That room also won’t be disturbed by paging or a doorbell chime.
AM/FM |
Home |
7:30 PM |
|
Alarm |
|
Shared |
Sleep Timer |
|
DND |
Party Mode |
|
|
Do Not Disturb |
|
|
Settings |
|
Main Menu - Settings
Audio - From the home screen, scroll to and select "settings," and choose "audio settings." You’ll see items to adjust, such as bass, treble and balance. Each selection has its own screen and shows levels for real-time adjustments.
Clock
Set Time - From the Clock menu, select "Set Time." Press the +/- buttons to move through numbers. Press the |< or >| buttons to move the cursor and press OK to save.
Set Date - From the Clock menu, select "Set Date." The date format is month/day/year. Press the +/- buttons to move through numbers. Press the |< or >| buttons to move the cursor, and press OK to save.
Clock Format - From the home menu, select "Settings," then "Clock." Choose "Clock Format," and select 12 hour (AM/PM) or 24 hour (1200) format.
Display - Set the contrast and brightness for the keypad display. Use the buttons to move the cursor to the desired level.
Installer Options
IR Enable/Disable - The default is Enabled. If an external IR receiver is used, the keypad IR receiver should be disabled. From the main menu, select "Settings," then "Installation," then IR Enable/Disable. Select "disable" and exit back to the menu.
Diagnostics - The MDK-C5 provides the portal to a support tunnel when an installer needs Russound’s help troubleshooting an MCA-C5 system. From the main menu, select "Settings," then "Installation." Choose "Authorize Support." On the Authorize support screen, select "On." A session number will be provided in the Session Number box. During the support tunnel process, the system is unavailable for use.
10 |
Russound MCA-C5 User and Installation Manual |
SRC-C5 Remote Control
LED - IR Indicator.
Set - Program sequences 

VID / DVD / TV - Use these keys to select a local device. 

 Power - Turn the selected source on or off.

 Russound Zone Control - Activates control of Russound system controller and keypads, and its connected sources.
 Numeric Keys - Directly enter channels (e.g. 09 or 31).
Input - Switch the TV’s, VCR’s, SAT’s or DVD’s input to view TV or video programs.
Without a local device selected, toggles through sources on keypad.
Channel - Change channels sequentially - up or down. 

 Enter - Press to choose the highlighted menu option.
May perform “OK" function for devices.
 Last - Press to recall the last-viewed channel.

 Volume - Raise or lower the sound level of the zone being controlled.
Mute - Press to turn the sound off or on in the zone. |
|
|
|
|
|
|
|
|
|
|
|
|
|
|
|
|
Info - View the current channel and program information. |
||||||||
|
|
|
|
|
|
|
|
|
|
||||||||||||||||
Menu - Display the menu for the selected device. |
|
|
|
|
|
|
|
|
|
|
|
|
|
|
|
|
|
|
OK - Press to choose the highlighted menu |
||||||
|
|
|
|
|
|
|
|
|
|
||||||||||||||||
|
|
|
|
||||||||||||||||||||||
|
|
|
|
|
|
||||||||||||||||||||
|
|
|
|
|
|
|
|
|
|
|
|
|
|
|
|
|
|
|
|
|
|
|
|||
|
|
|
|
|
|
|
|
|
|
|
|
|
|
|
|
|
|
|
|
|
|
|
option. May perform “Enter" function for devices. |
||
Cursor Keys - Move the cursor in the menu screens. |
|
|
|
|
|
|
|
|
|
|
Exit - Exit the selected device’s menu, guide, or program |
||||||||||||||
|
|
|
|
|
|
|
|||||||||||||||||||
Guide - Display the program guide for the selected device. |
|
|
|
|
|
|
|
|
|
|
|
|
|
|
|
|
|
|
|
|
|
||||
|
|
|
|
|
|
|
|
|
|
|
|
|
|
|
|
|
|
|
|
||||||
|
|
|
|
|
|
|
|
|
without making a menu selection. |
||||||||||||||||
|
|
||||||||||||||||||||||||
|
|
|
|
|
|
|
|
|
|
|
|
|
|
|
|
|
|
|
|
|
|
|
Control Keys - Skip backward, rewind, fast |
||
|
|
|
|
|
|
|
|
|
|
|
|
|
|
|
|
|
|
|
|
|
|
|
|||
|
|
|
|
|
|
|
|
|
|
|
|
|
|
|
|
|
|
|
|
|
|
|
|||
|
|
|
|
|
|
|
|
|
|
|
|
|
|
|
|
|
|
|
|
|
|
|
|||
|
|
|
|
|
|
|
|
|
|
|
|
|
|
|
|
|
|
|
|
|
|
|
forward, skip forward, record, stop, pause, or play |
||
Programmable Favorites - Select and save |
|||||||||||||||||||||||||
|
|
|
|
tracks on source device. |
|||||||||||||||||||||
favorite source or music. |
|
|
|
|
|||||||||||||||||||||
|
|
|
|
|
|
||||||||||||||||||||
Source Keys - Use these keys to select specific sources on the |
|
|
|
|
|
|
|
|
|
|
|
|
|
|
|
|
|
|
|
Sleep Timer - Access the sleep timer function on the keypad. |
|||||
|
|
|
|
|
|
|
|
|
|
|
|
|
|
|
|||||||||||
|
|
|
|
|
|
|
|
|
|
|
|
|
|
|
|||||||||||
|
|
|
|
|
|
Disc - Direct disc selection on the appropriate device. |
|||||||||||||||||||
|
|
|
|
|
|||||||||||||||||||||
keypad and to set which source the remote will control. |
|
|
|
|
|||||||||||||||||||||
|
|
|
|
|
|
||||||||||||||||||||
|
|
|
|
|
|
|
|
|
|
|
|
|
|
|
|
|
|
|
|
|
|
|
|
Overlays - There are several optional source button overlays |
|
|
|
|
|
|
|
|
|
|
|
|
|
|
|
|
|
|
|
|
|
|
|
|
|
||
|
|
|
|
|
|
|
|
|
|
|
|
|
|
|
|
|
|
|
|
|
|
|
|
included. Review the source configuration and match the system |
|
|
|
|
|
|
|
|
|
|
|
|
|
|
|
|
|
|
|
|
|
|
|
|
|
programing and source placement to the chosen overlay (if used). |
|
|
|
|
|
|
|
|
|
|
|
|
|
|
|
|
|
|
|
|
|
|
|
|
|
Peel the backing from the rear of the overlay and fit it over the |
|
|
|
|
|
|
|
|
|
|
|
|
|
|
|
|
|
|
|
|
|
|
|
|
|
source button block on the SRC-C5 remote. |
|
Russound MCA-C5 User and Installation Manual |
11 |

installation OVERVIEW
Ventilation Requirements
Important: The MCA-C5 should be situated so that its location or position does not interfere with its proper ventilation. Do not block vents above or to the sides of the unit, as it requires ventilation for proper operation. Do not expose to excessive dust, and do not allow dust to build up on the unit and block vent holes. Do not place the MCA-C5 above or below a heat-generating component such as an audio amplifier.
Be sure to leave at least 2 inches of space to the sides of the unit with open air flow above. A single-space rack mount vent or about 1.75 inches must be kept clear above and below the unit.
Installation
The MCA-C5 controller can be rack mounted or placed on a shelf in an equipment rack. The controller will occupy two rack spaces with the feet removed.
The controller can be installed in an equipment rack using the included rackmount ears and hardware to attach the ears to the controller chassis.
Up to six controllers may be connected and allow up to 48 zones on the system.
Electrical Power
The MCA-C5 operates at 100-120VAC ~60 Hz or 220-240VAC ~50 Hz. Voltage is selected by the voltage switch on the rear panel and incorporates the appropriate detachable power cord. It is recommended that the MCA-C5 and the source equipment be plugged into a dedicated 20-amp circuit. A power line conditioner can reduce interference problems caused by noise found in some electrical systems.
The power switch for the unit is on the front panel.
Do not connect the controller’s main power feed until all other connections have been made and verified. Live connection or removal of the keypad wiring or other wiring when the system is powered can cause communication problems in the network. Double-check terminations during each phase of the installation to prevent accidental damage. Incorrect wiring is the number one cause for non-warranty product damage.
Important Considerations
•Disconnect the power cord before making any connections to the controller.
•Verify that all connections and polarity are correct.
•Keep all power cords away from all signal cables to prevent humming from induced noise.
•Choose reliable signal cables and patch cords.
•Label all wires with the room location at both ends of the wire.
•Avoid running speaker wires or signal cables close to house electrical wiring for any distance. If you have to run them parallel, make sure to space the wires at least two feet from the AC line. If you need to cross an AC line it should be at a 90° angle.
•For multiple controllers, the controller ID must be set with the rotary switch on the rear panel. Each controller must be set to a unique number before powering connected controllers.
Important: The necessary software (SCS-C5) to program and configure the system is available via download from the doc center at www.russound.com. With your laptop, you can configure the system and name all of the zones prior to connecting with the MCA-C5 controller. See Section on page 27 for items to be programmed with the software.
12 |
Russound MCA-C5 User and Installation Manual |
 Loading...