


MCA-88X
8 Source, 8 Zone Controller Amplifier
Installation Manual
LOCKDOWN FEATURE
NOTICE:
INTERNET CONNECTION REQUIRED FOR
PRODUCT INSTALLATION
There are two things that must be done at the time of installation of this product that require a working internet connection:
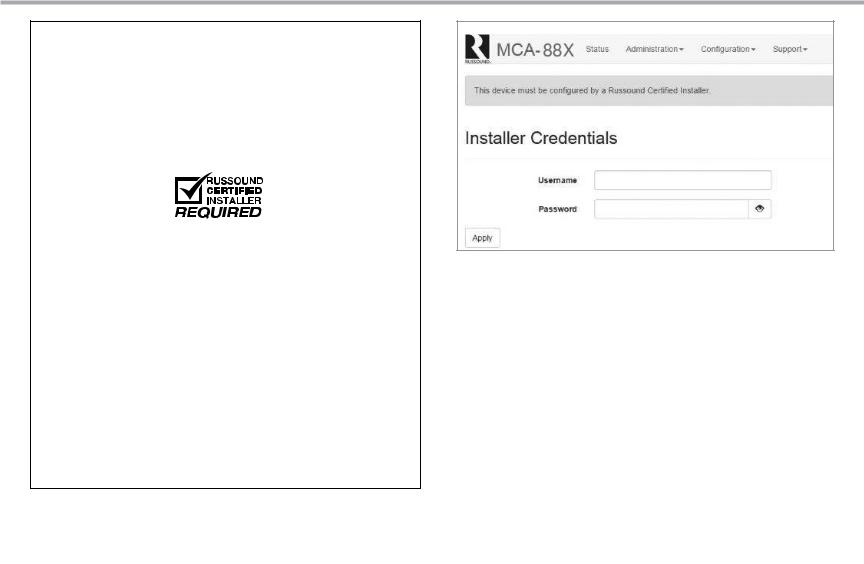
1. Enter valid Russound Certified Installer credentials. The MCA-88X is shipped in a locked state so that it cannot be operated without first being configured by a Russound Certified Installer.
IF YOU ARE NOT A RUSSOUND CERTIFIED INSTALLER, YOU WILL NOT BE ABLE TO INSTALL AND CONFIGURE THIS PRODUCT.
If you are a custom installation professional and wish to become authorized as a Russound Certified Installer, please contact your Russound Sales Representative for more information.
Note: If you are a Russound Certified Installer and you plan on installing this product on a job site that may not have working internet access, please configure the unit at your shop or other location where internet access is available BEFORE you take it to the job site.
2. Firmware may be updated through Web Config configuration webpages or by using a USB stick with the latest firmware. In both cases, an internet connection is required for obtaining the most recent firmware.
Note: If an internet connection will not be available at the place of installation, please download the latest firmware from the Russound website to your laptop or to a USB drive before going to the job site.
Russound Certified Installer credentials must be entered through the Web Config configuration webpages.
Lockdown Feature
When a product is shipped from Russound, it will only operate in a "locked" state. In this state, no audio or control of attached devices via its user interfaces (keypad, touchscreen, MyRussound App) is available. In order to unlock the system, valid Russound Certified Installer credentials must be entered in the Web Config.
When the controller is first powered on, a message will appear on all connected MDK-C6 keypads, XTS touchscreens and the MyRussound App indicating that the device must be unlocked. The message will contain the IP address of the controller. Using your mobile device or computer, browse to the controller’s IP address (type http:// and then the IP address).
If you are using the MyRussound App, the IP address appears as a link that will direct you to the Web Config via your local web browser.
If you do not have a valid Russound Certified Installer credential, please contact your Russound Sales Representative.
2 |
Russound MCA-88X Installation Manual |
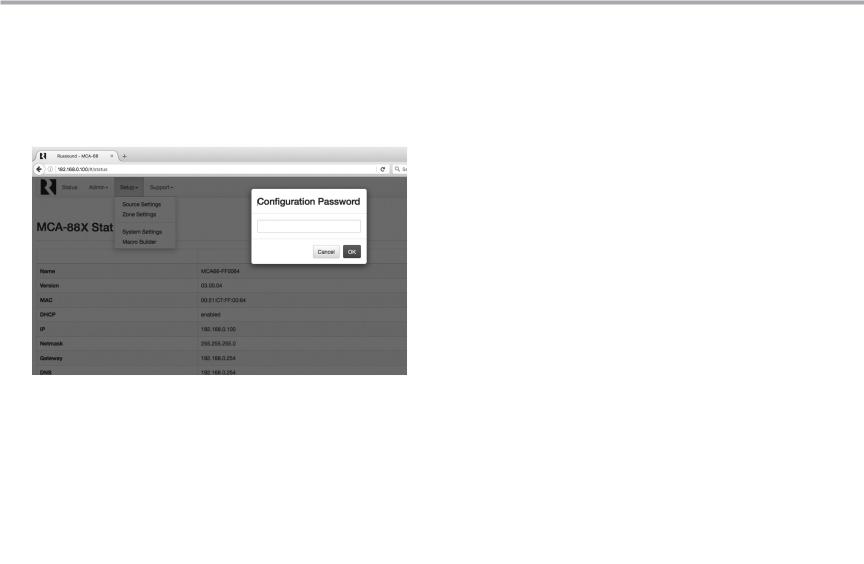
TABLE OF CONTENTS
Configuration Password
In order to prevent unauthorized changes to configuration settings, a default password of russound123 has been created that will be required to be entered prior to changing any configuration settings. Enter this password when prompted for a Configuration Password.
This password is separate from the Russound Certified Installer password that is used to unlock the controller and cannot be modified.
Product Overview........................................................................................................... |
4 |
Programming Software - Web Config................................................ |
4-5 |
Ethernet Connection and Factory Reset................................................................. |
5 |
Controller Front and Back Panel............................................................................ |
6-7 |
Installation Overview ................................................................................................... |
8 |
Installation Guide............................................................................................................ |
9 |
Controller / Keypad Connections............................................................................ |
10 |
XTS In-wall Touchscreen Connections ................................................................. |
10 |
Speaker Connections................................................................................................... |
11 |
Source Connections..................................................................................................... |
12 |
Primary Zone, Bluetooth® and Digital Inputs...................................................... |
13 |
Internal Media Streamer............................................................................................. |
13 |
Listening to AirPlay Streaming.......................................................................... |
14-15 |
Listening to Spotify®............................................................................................. |
16-17 |
Listening to Pandora® Internet Radio.................................................................... |
18 |
Listening to SIRIUSXM® Internet Radio................................................................. |
19 |
Listening to TuneIn™ Internet Radio...................................................................... |
20 |
Listening to vTuner® Internet Radio....................................................................... |
21 |
Listening to Network Audio Files (media Server).............................................. |
22 |
Multiple Controller Installation................................................................................ |
23 |
Zone Amplification....................................................................................................... |
24 |
Page Input Source........................................................................................................ |
25 |
Home Theater Triggers................................................................................................ |
26 |
IR Connections............................................................................................................... |
27 |
System Start Up............................................................................................................. |
28 |
Troubleshooting............................................................................................................ |
28 |
Technical specifications.............................................................................................. |
29 |
Limited Warranty........................................................................................................... |
29 |
Safety Information........................................................................................................ |
30 |
Russound MCA-88X Installation Manual |
3 |

PRODUCT OVERVIEW |
PROGRAMMING SOFTWARE |
Thank you for choosing the Russound MCA-88X Multizone Controller Amplifier to enhance your home with multiroom audio.
MCA-88X Feature Overview
Available User interfaces: The MCA-88X works with the MDK-C6 keypad, SLK1 keypad, XTS wall-mounted touchscreen, and the MyRussound App. For information about user interfaces, go to the Russound website at www. russound.com.
Note: The internal AM/FM tuner, available in our previous C-Series controllers, was replaced in the MCA controllers with a Bluetooth® input extension for the easy addition of an optional BTC-1X Bluetooth receiver. If you'd like to add a tuner, Russound manufactures the ST-1 rack-mountable tuner which can be added to the MCA-88X.
The Russound MCA-88X features built-in XStream™ technology, enabling popular streaming content from the cloud, home network, tablets and phones - all from a single component.
Firmware updates can now be performed using either the USB connection or Ethernet connection.
Configuration of the controller is performed using a network connection only. All of the configuration of the controller can be performed using our browserbased Web Conf.
Key features include:
•Twelve channels of cool running digital amplification rated at 40 watts per channel
•Built-in XStream digital streaming audio source
•Digital Audio Inputs (3 coax, 1 optical)
•8 Sources delivered to up to 8 zones for sharing music throughout the home
•Built-in Bluetooth extension input to connect a BTC-1X receiver.
•Scalable up to 48 zones.
•Ethernet connectivity for programming and control.
•On-board configuration available with Web Config via an internet browser on smartphone, tablet, or laptop.
•Supports 32 Global System Favorites as well as 2 Favorites per Zone.
•Works with RNET smart sources, transmitting metadata (song, artist and other information) for display on the keypads.
•Audio paging with a 12VDC trigger input.
•Party mode, Do Not Disturb, and source / zone linking options.
•Alarm clock and sleep timer (with MDK-C6 keypad required).
Note: Alarm function requires a dedicated source input such as the ST-1 Smart Tuner
•Simplified programming and control via intelligent IR learning capabilities for quick setup.
•Fixed/Variable line level outputs for all zones.
•Routed IR source control outputs for up to 6 sources, with shared IR available for sources 7 and 8 and one common IR output.
•Home Theater trigger in/out.
Key Programming Features
The MCA-88X Controller now has a new programming feature called Web Config. This programming feature allows the installer to connect to the controller via its IP address using any smartphone, tablet, or laptop and configure the entire system.
Web Config is designed to be used with any internet browser. With Web Config, the installer now has the ability to get a system up and running right from their smart phone or tablet.
Web Config Features
•Assign Zone and Source names
•General network configuration (DHCP/static IP)
•Firmware Updates
•Zone Volume Trim
•Enable/Disable Zone All On Participation
•Source Type and Source Volume Trim
•Switch between Digital and Analog inputs
•IR Source Programming
•Learned IR programming
•Macro Setup
•Save/Load configuration files
•Zone page enable/disable
•Keypad button configuration
•Power Management configuration
•Source and Zone linking
•Backup and restore
4 |
Russound MCA-88X Installation Manual |
PROGRAMMING SOFTWARE |
ETHERNET CONNECTION AND FACTORY RESET |
|
|
Advanced Configuration Options
Zone and Source Names - a list of predefined names are available and will be visible in the user interfaces. Custom naming is also possible.
Source Exclusion - allows you to limit the sources available to a particular zone.
Party Mode Participation - defines whether a zone can participate in Party mode.
Zone and Source Linked Groups - two groups of each type are allowed per controller. Groups share source selection and party mode participation.
All ON Participation - defines whether or not a zone will respond to the All ON command.
Page Participation - defines whether a zone will respond to a page event. Page Volume - sets the volume of a page event in each zone.
Power Management of Sources - enabled / disabled per source. This feature uses IR commands and audio signal sensing to power up sources and initiate audio to confirm source power states. If enabled, the source will turn on when the first zone is turned on or the home theater trigger has a12VDC signal present. The source will turn off 5 minutes after the last zone is turned off, or 5 minutes after input is discontinued from the home theater trigger.
Sound Controls - Adjust Bass, Treble, Balance, Loudness and Turn On Volume initial settings per audio zone.
IR Keycode Learning - allows IR codes to be learned, saved, and managed. Page Input on Source 8 - assigns Source 8 as a paging input.
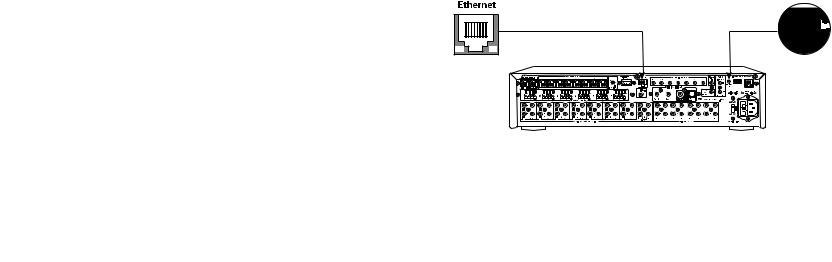
Ethernet Connection
The Ethernet connection is used for configuration and programming as well as for enabling control via the MyRussound App. The default network setting is DHCP-enabled, but it may be configured with a static IP address using the Web Config software.
Note: DHCP must be enabled on the LAN for initial configuration. A static IP address can be configured later.
The IP Address of the MCA controller can be obtained via several methods.
-By viewing the DHCP table of connected devices within the settings of the router.
-By using an IP Scanner app on a smartphone or tablet.
-By using a XTS touchscreen or MDK-C6 keypad:
To display the IP Address on an XTS Touchscreen press and hold the settings button for at least 3 seconds to enter the installer settings menu. The controller IP address will be displayed.
To display the IP Address on an MDK-C6 keypad, select Home > Settings > Installation > Network Settings.
Factory Reset
The factory reset button has two functions. A 3-second press and hold will restore network settings to DHCP. A 10-second press and hold will reset the controller to its factory default settings.
Note: A unit that has been reset to factory default will have no configuration and will need to be unlocked and reconfigured by a Russound Certified Installer.
Russound MCA-88X Installation Manual |
5 |

CONTROLLER FRONT PANEL
Power Button |
Zone LED Indicators visible |
Removable Cover to access IR |
LED indicates "Power On" |
behind cover |
window |
Front Panel
Red IR LED (talk-back)
IR Programming |
IR Receiver Window |
Front Panel with cover removed
6 |
Russound MCA-88X Installation Manual |
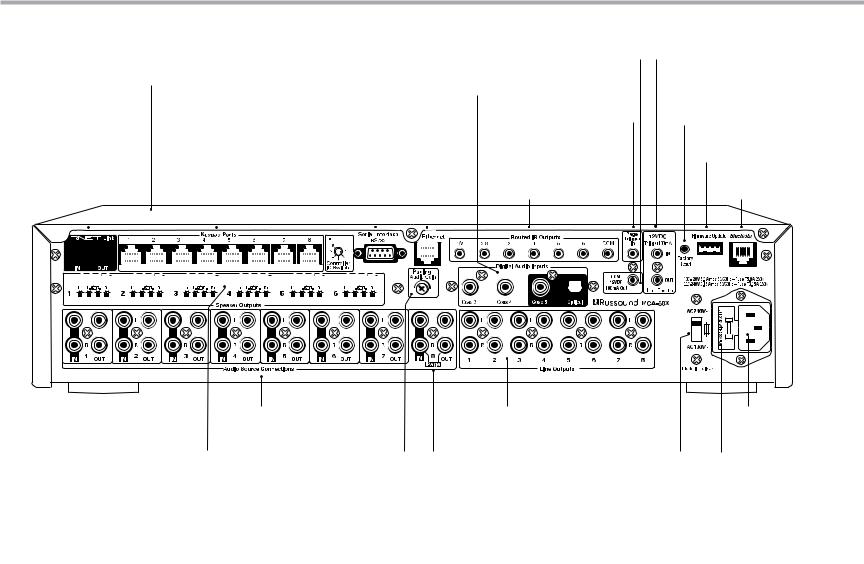
CONTROLLER REAR PANEL
XStream Digital Streaming |
Digital Audio Inputs |
|
Source Built-in streamer |
||
3 SPDIF coaxial and 1 Toslink optical |
||
|
||
|
connection for digital sources |
|
|
|
|
|
|
|
|
|
|
|
|
|
|
|
|
|
|
|
|
|
|
|
|
|
|
|
|
|
|
|
|
|
|
|
|
|
|
|
|
|
Controller ID Switch |
|
Serial Interface |
|||||||||||||||||||||||||||||||
|
|
|
|
|
|
|
|
|
|
|
|
|
|
|
|
|
|
|
|
|
|
|
|
|
|
|
|
|
|
|
|
|
|
|
Set ID for multiple controller |
|
RS-232 port for 3rd party |
|||||||||||||||||||||||||||||||||||||
|
|
|
|
|
|
|
|
|
|
|
|
|
|
|
|
|
|
|
|
|
|
|
|
|
|
|
|
|
|
|
|
|
|
|
|
|
|
|
|
|
|
|
|
configurations |
|
device communication |
||||||||||||||||||||||||||||
RNET Link - Links |
|
Keypad Ports - RJ-45 |
|
|
|
|
Ethernet Port |
|||||||||||||||||||||||||||||||||||||||||||||||||||||||||||||||||||
|
|
|
|
Connections for |
|
|
|
|
|
|
|
For programming |
||||||||||||||||||||||||||||||||||||||||||||||||||||||||||||||
multiple controllers |
|
|
|
|
|
|
|
|
||||||||||||||||||||||||||||||||||||||||||||||||||||||||||||||||||
|
|
|
|
|
zone keypads |
|
|
|
|
|
|
|
and control |
|||||||||||||||||||||||||||||||||||||||||||||||||||||||||||||
and RNET sources |
|
|
|
|
|
|
|
|
|
|||||||||||||||||||||||||||||||||||||||||||||||||||||||||||||||||
|
|
|
|
|
|
|
|
|
|
|
|
|
|
|
|
|
|
|
|
|
|
|
|
|
|
|
|
|
|
|
|
|
|
|
|
|
|
|
|
|
|
|
|
|
|
|
|
|
|
|
|
|
|
|
|
|
|
|
|
|
|
|
|
|
|
|
|
|
|
|
|
|
|
|
|
|
|
|
|
|
|
|
|
|
|
|
|
|
|
|
|
|
|
|
|
|
|
|
|
|
|
|
|
|
|
|
|
|
|
|
|
|
|
|
|
|
|
|
|
|
|
|
|
|
|
|
|
|
|
|
|
|
|
|
|
|
|
|
|
|
|
|
|
|
|
|
|
|
|
|
|
|
|
|
|
|
|
|
|
|
|
|
|
|
|
|
|
|
|
|
|
|
|
|
|
|
|
|
|
|
|
|
|
|
|
|
|
|
|
|
|
|
|
|
|
|
|
|
|
|
|
|
|
|
|
|
|
|
|
|
|
|
|
|
|
|
|
|
|
|
|
|
|
|
|
|
|
|
|
|
|
|
|
|
|
|
|
|
|
|
|
|
|
|
|
|
|
|
|
|
|
|
|
|
|
|
|
|
|
|
|
|
|
|
|
|
|
|
|
|
|
|
|
|
|
|
|
|
|
|
|
|
|
|
|
|
|
|
|
|
|
|
|
|
|
|
|
|
|
|
|
|
|
|
|
|
|
|
|
|
|
|
|
|
|
|
|
|
|
|
|
|
|
|
|
|
|
|
|
|
|
|
|
|
|
|
|
|
|
|
|
|
|
|
|
|
|
|
|
|
|
|
|
|
|
|
|
|
|
|
|
|
|
|
|
|
|
|
|
|
|
|
|
|
|
|
|
|
|
|
|
|
|
|
|
|
|
|
|
|
|
|
|
|
|
|
|
|
|
|
|
|
|
|
|
|
|
|
|
|
|
|
|
|
|
|
|
|
|
|
|
|
|
|
|
|
|
|
|
|
|
|
|
|
|
|
|
|
|
|
|
|
|
|
|
|
|
|
|
|
|
|
|
|
|
|
|
|
|
|
|
|
|
|
|
|
|
|
|
|
|
|
|
|
|
|
|
|
|
|
|
|
|
|
|
|
|
|
|
|
|
|
|
|
|
|
|
|
|
|
|
|
|
|
|
|
|
|
|
|
|
|
|
|
|
|
|
|
|
|
|
|
|
|
Common 12VDC Trigger
12VDC 100mA output when any zone is active
Page 12VDC Trigger
Accepts paging device 12VDC input
IR Outputs
Up to 6 routed IR outputs, shared for 1/7 and 2/8,
1 common IR output
Home Theater 12VDC Trigger
Activates source power management when sharing sources with home theater
Factory Reset Button
A 3-second press and hold resets network to DHCP. A 10-second press and hold deletes all configuration information and locks the unit.
USB Port
For Firmware Updates
Bluetooth Extension Input
Connect Russound BTC-1X.
Audio Source Connections
Signal sensing stereo line level inputs and loop outputs
Speaker Outputs |
Paging Audio Gain |
Connect speakers for each |
Adjusts sensitivity |
of the first six zones |
|
Line level Outputs
Can be set fixed or variable (with software) for each zone
Page Audio In/Loop Out |
AC Voltage Switch |
(optional) |
Select appropriate voltage |
AC 120/240V Input
Detachable grounded power cord connection
Fuse Holder
Holds replaceable fuse for AC input connection
Rear Panel
Russound MCA-88X Installation Manual |
7 |
INSTALLATION OVERVIEW
Ventilation Requirements
Important: The MCA-88X should be situated so that its location or position does not interfere with its proper ventilation. Do not block vents above or to the sides of the unit, as it requires ventilation for proper operation. Do not expose to excessive dust, and do not allow dust to build up on the unit and block vent holes. Do not place the MCA-88X above or below a heat-generating component such as an audio amplifier.
Be sure to leave at least 2 inches of space to the sides of the unit with open air flow above. A single-space rack mount vent or about 1.75 inches must be kept clear above and below the unit.
Installation
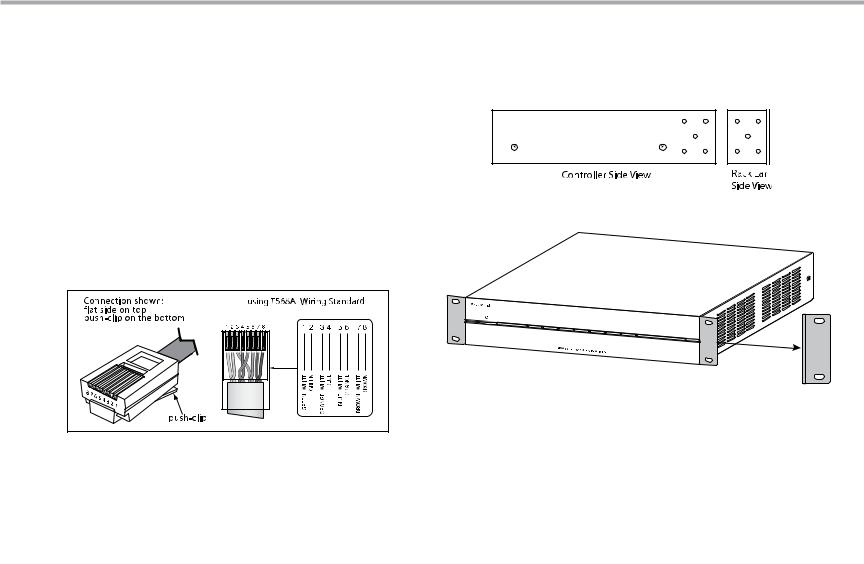
The MCA-88X controller can be rack mounted or placed on a shelf in an equipment rack. The controller occupies two rack spaces with the feet removed.
The controller can be installed in an equipment rack using the included rack-mount ears and hardware to attach the ears to the controller chassis.
Up to six controllers can be connected for up to 48 zones on the system.
Electrical Power
The MCA-88X operates at 100-120VAC ~60 Hz or 220-240VAC ~50 Hz. Voltage is selected by the voltage switch on the rear panel and incorporates the appropriate detachable power cord. It is recommended that the MCA-88X and the source equipment be plugged into a dedicated 20-amp circuit. A power line conditioner can reduce interference problems caused by noise found in some electrical systems.
The power switch for the unit is on the front panel.
Important Considerations
•Disconnect the power cord before making any connections to the controller.
•Verify that all connections and polarity are correct.
•Keep all power cords away from all signal cables to prevent humming from induced noise.
•Choose reliable signal cables and patch cords.
•Label all wires with the room location at both ends of the wire.
•Avoid running speaker wires or signal cables close to house electrical wiring for any distance. If you have to run them parallel, make sure to space the wires at least two feet from the AC line. If you need to cross an AC line it should be at a 90° angle.
•For multiple controllers, the controller ID must be set with the rotary switch on the rear panel. Each controller must be set to a unique number before powering connected controllers.
Do not connect the controller’s main power feed until all other connections have been made and verified. Live connection or removal of the keypad wiring or other wiring when the system is powered can result in erratic operation or system damage. Double-check terminations during each phase of the installation to prevent accidental damage. Incorrect wiring is the number one cause for non-warranty product damage.
8 |
Russound MCA-88X Installation Manual |
INSTALLATION GUIDE
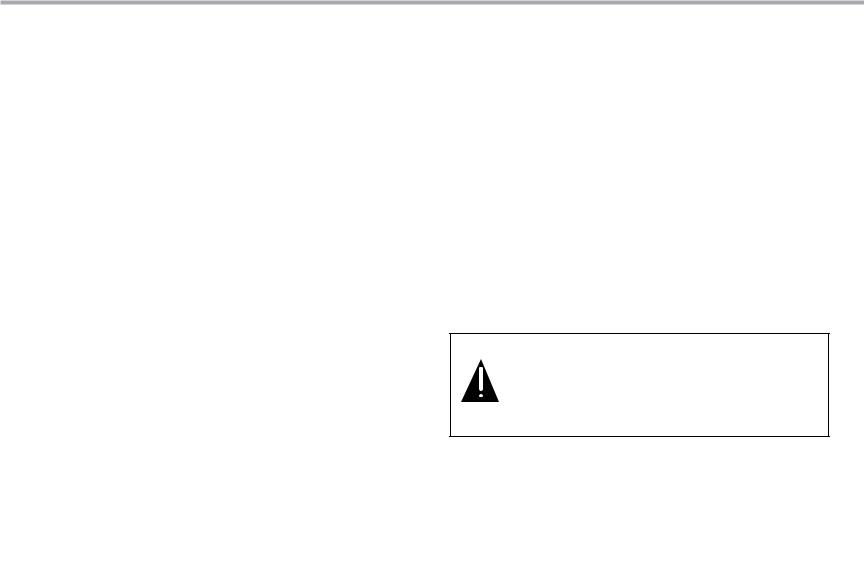
Wiring
Route CAT-5e cable between the keypad locations and the controller. Terminate all CAT-5e cables with an RJ-45 connector using the T568A wiring standard configuration. Utilize a UL/CSA approved electrical box at the keypad (doublegang at least 32 cu. in.) and controller locations. Using connector specific wall plates at the controller location will better organize all of the incoming cables. Route CAT-5e wire from the electrical box to each keypad location, with runs not to exceed 250 feet. Label the wires at both ends with the zone and location.
Route standard 4 conductor speaker wire to each speaker location. Each speaker connection requires a minimum 8 ohm load. Standard 16-gauge 4-conductor stranded speaker wire can be run up to 125 feet; 14-gauge wire can be run up to 250 feet.
Rack Mount Installation
To attach the rack ears, locate the five rack mount holes on each side of the controller’s chassis. Align the holes in the rack ears with the holes in the chassis. Insert and tighten the screws.
RJ-45 CAT-5 Wiring Scheme
RJ-45 |
|
|
|
RJ-45 |
|
|
|
/ |
/ |
/ |
/ |
Russound MCA-88X Installation Manual |
9 |

CONTROLLER / KEYPAD CONNECTION |
XTS IN-WALL TOUCHSCREEN CONNECTIONS |
Controller / Keypad Connection
Each Russound dedicated keypad connects to a keypad port near the top left on the rear of the controller. These RJ-45 ports support MDK-C5, MDK-C6 and SLK-1 keypads.
Eight keypad ports correspond to the eight zones supported by the MCA-88X. When a connected keypad is powered on, the zone becomes active and the corresponding zone LED lights up on the front of the MCA-88X controller.
Connections are made using CAT-5e with RJ-45 connectors using T568A wire configuration. For a clean installation when wiring from a keypad port use a CAT-5e patch cable to connect from the keypad port to a RJ-45 wall plate (optional). Using the same T568A RJ-45 wiring configuration, use CAT-5e cable from the wall plate to the keypad. Maximum CAT-5e cable length is 250 feet between the controller and the keypad.
If more keypads are desired for a zone, use an optional SA-ZX3 keypad splitter with a Russound 1201A (12VDC, 1A) power supply at the controller end. All keypads on an SA-ZX3 control the same zone. More detailed information regarding SA-ZX3 installation and operation can be found in its installation
manual. |
Zone 1 |
Zone 2 |
|
Note: The keypad ports are only to |
|||
|
|
||
be used with Russound keypads |
|
|
|
and are NOT to be used for any |
|
|
|
ethernet or computer networking |
|
|
|
connections. The Russound |
|
|
|
keypad ports output 12VDC that |
|
|
|
will damage networking products. |
|
|
|
|
|
SLK-1 |
|
|
CAT-5e Cables |
|
Keypad connection to the MCA-88X
XTS In-wall Touchscreen Connections
The XTS In-wall Touchscreen is an IP-connected ethernet networked device. It needs to be connected to the same ethernet network as the MCA controller. XTS touchscreens DO NOT connect into keypad ports of Russound controllers.
Connect all XTS touchscreens to the nearest ethernet network switch or to the router of the network where the MCA controller is connected.
XTS |
XSource |
XSource |
|
|
|
|
Network router |
|
|
RCA cables |
|
XTS connection to the MCA-88X
10 |
Russound MCA-88X Installation Manual |
 Loading...