


 Loading...
RuggedSwitch™
RS8000 / RS1600 / RS900
Product Family User Guide
RS1600 |
RS1600T |
RS8000 |
RS8000T |
RuggedCom Inc.
64 Jardin Dr. (Unit 3G)
Concord, Ontario Canada
L4K 3P3
Web: www.ruggedcom.com
Tel: (905) 760-7799
Fax: (905) 760-9909
Toll Free: (888) 264 – 0006

RuggedSwitch™ User Guide
RUGGEDSWITCH™ USER GUIDE
FOR USE WITH RS8000, RS1600, AND RS900 PRODUCTS
RUGGEDSWITCH™ OPERATING SYSTEM V1.5
Version 1.5.1 – Aug. 3, 2004
RuggedCom
64 Jardin Drive, Unit 3G
Concord, Ontario
Canada L4K 3P3
Voice: (905) 760-7799
1-(888) 264-0006
Fax: (905) 760-9909
Support@RuggedCom.com
http://www.RuggedCom.com
Disclaimer
RuggedCom Inc. makes no warranty of any kind with regard to this material.
RuggedCom shall not be liable for errors contained herein or for consequential damages in connection with the furnishing, performance, or use of this material.
Warranty
Five (5) years from date of purchase, return to factory. For warranty details, visit www.ruggedcom.com or contact your customer service representative.
COPYRIGHT © Dec 2002 RuggedCom Inc.
ALL RIGHTS RESERVED
This document contains proprietary information, which is protected by copyright. All rights are reserved.
No part of this document may be photocopied, reproduced or translated to another language without the prior written consent of RuggedCom Inc.
2 |
RuggedCom |

About this User Guide
ABOUT THIS USER GUIDE
This guide is concerned with aiding the user in the configuration and operation of the
RuggedSwitch™ using the RuggedCom User Interface. Specifically, this guide details aspects of:
•Accessing the User Interface
•Security (passwords)
•Configuring the switch
•Status determination
•Performance measurement
•Uploading and downloading files
•Dealing with alarms
This guide is intended solely for the purpose of familiarizing the reader with the ways that the RuggedSwitch™ can be used to support Ethernet switching applications.
Applicable Firmware Revision
This guide is applicable to RuggedSwitch™ Operating System (ROS) software revision 1.5.x.
Who Should Use This User Guide
This guide is to be used by network technical support personnel who are familiar with the operation of networks. Others who might find the book useful are network and system planners, system programmers and line technicians.
How To Use This User Guide
The index of this guide has been prepared with:
•Entries to each of the “Features” sections of the manual,
•Entries to each of the “Troubleshooting” sections of the manual (located at the end of each chapter),
•Entries to each of the Menus, organized by name.
It is recommended that you use this guide along with the following applicable documents.
RuggedSwitch™ RS8000 Family Installation Guide
RuggedSwitch™ RS1600 Family Installation Guide
RuggedSwitch™ RS900 Family Installation Guide
RuggedCom |
1 |

RuggedSwitch™ User Guide
Rugged MediaConverter™ Installation Guide
RuggedCom Fiber Guide
White paper: Rapid Spanning Tree in Industrial Networks
Document Conventions
This publication uses the following conventions:
Note: Means reader take note. Notes contain helpful suggestions or references to materials not contained in this guide.
Quick Start Recommendations
The following description is included to aid those users experienced with switches that may wish to attempt to configure the switch without fully reading the guide. Commands strings have been provided with their full path from the root menu.
1.Locate/mount the chassis in its final resting place.
2.Attach a PC running terminal emulation software to the RS232 port and apply power to the chassis (default baud rate, data bits, parity - “57600 8 n”, no hardware/software flow control). Set the terminal type to VT100. Gain access to the UI (Type <CR>, the default password string is set to “admin”, see Chapter 1).
3.Configure the switch’s IP address (Administration, Configure IP Services, IP Address) and Subnet Mask (Administration, Configure IP Services, Subnet). If instead you wish the switch to load the address via DHCP, set the address type to dynamic (Administration, Configure IP Services, IP Address Type). See Chapter 1 for more details.
4.You may wish to change the default guest, operator and administration passwords (Administration, Configure IP Services, Configure Passwords). See Chapter 1 for more details.
5.The ports are already set up with sensible defaults and autoselects where possible. You may want to hard configure specific settings such as speed, duplex, flow control and far end fault detection. Broadcast filtering is activated. See Chapter 3 for more details.
6.RSTP is enabled for the bridge by default and can be disabled if desired (Spanning Tree, Configure Bridge RSTP Parameters, State). RSTP may also be forced to support only legacy STP (Spanning Tree, Configure Bridge RSTP Parameters, Version Support). Note that the switch deals with legacy STP pathcosts by default and can be set to deal with larger path costs (Spanning Tree, Configure Bridge RSTP Parameters, Cost Style). RSTP may also be set enabled/disabled on a per port basis (Spanning Tree, Configure Port RSTP Parameters, Enable). You may also want to identify controllers and IEDs by setting the Edge parameter to True for those ports (Spanning Tree, Configure Port RSTP Parameters, Edge). See Chapter 6 for more details.
2 |
RuggedCom |

About this User Guide
7.At this point the switch will raise links, learn addresses and forward traffic. By default link alarms and SNMP linkUp/linkDown traps (See Chapter 1) are raised for all ports. The Port Configuration and Status, View Port Status command will indicate the current state of the ports in real time. The Ethernet Statistics, View Ethernet Statistics command will provide a useful indication of traffic on the switch. The Spanning Tree, View Port RSTP Statistics command will provide an indication of which ports have been blocked to prevent traffic loops.
8.By default the switch has VLAN 1 configured on all ports (VLAN 1 is always present for management purposes). IGMP is disabled for VLAN 1 by default and can be enabled by the Virtual LANs, Configure Static VLANs, IGMP command.
9.If remote SNMP management or traps are desired, configure the appropriate manage station (Administration, Configure SNMP Management Stations).
10.Ports that are not in use should be disabled (Port Configuration and Status, Configure Port Parameters Command) to improve security, increase performance, reduce power consumption and cause the switch to run cooler.
11.Further concerns such as configuring static MAC addresses, port security, VLANs and IGMP as well as ensuring robustness, measuring and optimizing performance are dealt with by reading the guide fully.
For Users Migrating From Revisions ROS 1.2 and Earlier..
1.The “operator” access level has been created. The ability to configure, view and operate product features has been aligned with the guest, operator and administration access levels. All passwords are now stored in the configuration file in an encrypted form.
2.The TFTP Server feature is now configurable. It may be configured to be disabled, to only allow files to be retrieved or to provide full access.
3.The CLI shell provides a TFTP client command that can be used to upload and download files from TFTP servers.
4.Port Mirroring has been moved from the Diagnostics menu to the Port Configuration and Status menu.
5.The system log may now be viewed and cleared from the Diagnostics menu.
RuggedCom |
3 |

RuggedSwitch™ User Guide |
|
Table Of Contents |
|
About this User Guide............................................................................................................................ |
i |
Applicable Firmware Revision .............................................................................................................. |
i |
Who Should Use This User Guide......................................................................................................... |
i |
How To Use This User Guide................................................................................................................ |
i |
Document Conventions......................................................................................................................... |
ii |
Quick Start Recommendations.............................................................................................................. |
ii |
For Users Migrating From Revisions ROS 1.2 and Earlier.. ............................................................... iii |
|
Table Of Contents ................................................................................................................................ |
iv |
Chapter 1– Setting Up And Administering The Switch ........................................................................ |
1 |
Introduction............................................................................................................................................ |
1 |
The RuggedSwitch™ User Interface...................................................................................................... |
1 |
Using the RS232 Port to Access the User Interface .............................................................................. |
1 |
The Structure of the User Interface........................................................................................................ |
3 |
Making Configuration Changes............................................................................................................. |
4 |
Updates Occur In Real Time.................................................................................................................. |
4 |
Alarm Indications Are Provided ............................................................................................................ |
4 |
The CLI Shell......................................................................................................................................... |
4 |
Administration Menu ............................................................................................................................. |
5 |
Configure IP Services ............................................................................................................................ |
5 |
IP Address Type..................................................................................................................................... |
5 |
IP Address.............................................................................................................................................. |
6 |
Subnet .................................................................................................................................................... |
6 |
Gateway ................................................................................................................................................. |
6 |
Inactivity Timeout.................................................................................................................................. |
6 |
Telnet Sessions....................................................................................................................................... |
6 |
TFTP Server........................................................................................................................................... |
7 |
SNMP Get Community.......................................................................................................................... |
7 |
Configuring System Identification......................................................................................................... |
8 |
Configure Passwords.............................................................................................................................. |
8 |
Configure Time and Date....................................................................................................................... |
8 |
Time ....................................................................................................................................................... |
9 |
Date ........................................................................................................................................................ |
9 |
Time Zone .............................................................................................................................................. |
9 |
NTP Server Address............................................................................................................................... |
9 |
NTP Update Period ................................................................................................................................ |
9 |
Configure SNMP Management Stations.............................................................................................. |
10 |
Community String................................................................................................................................ |
10 |
Address................................................................................................................................................. |
10 |
Set Access ............................................................................................................................................ |
10 |
Send Traps............................................................................................................................................ |
11 |
Troubleshooting ................................................................................................................................... |
12 |
Chapter 2 - Configuring MAC Address Management......................................................................... |
13 |
Introduction.......................................................................................................................................... |
13 |
MAC Address Management Features.................................................................................................. |
13 |
MAC Address Management Configuration ......................................................................................... |
13 |
RuggedCom

|
Table Of Contents |
MAC Address Management Parameter Ranges & Default Settings |
....................................................13 |
MAC Address Tables Management Menu........................................................................................... |
13 |
Viewing MAC Addresses .................................................................................................................... |
14 |
Purge MAC Address Table.................................................................................................................. |
15 |
Configure MAC Address Learning Options ....................................................................................... |
15 |
Configure Static MAC Address Table................................................................................................. |
15 |
Chapter 3 – Configuring the Ports ....................................................................................................... |
18 |
Introduction.......................................................................................................................................... |
18 |
Port Features ........................................................................................................................................ |
18 |
Port Applications.................................................................................................................................. |
19 |
Port Security ........................................................................................................................................ |
19 |
Broadcast Rate Limiting ...................................................................................................................... |
20 |
Controller Protection Through Loss-of-Link Management ................................................................. |
21 |
Using Port Mirroring............................................................................................................................ |
22 |
Introduction.......................................................................................................................................... |
22 |
Configuring Port Mirroring.................................................................................................................. |
22 |
Port Configuration And Status............................................................................................................. |
23 |
Port Parameter Ranges & Default Settings.......................................................................................... |
23 |
Port Configuration Menu ..................................................................................................................... |
24 |
Port Rate Limiting Menu ..................................................................................................................... |
25 |
Port Security Menu .............................................................................................................................. |
26 |
Port Mirroring Menu............................................................................................................................ |
28 |
Viewing Port Status ............................................................................................................................. |
29 |
Resetting Ports ..................................................................................................................................... |
29 |
Troubleshooting ................................................................................................................................... |
30 |
Chapter 4 – Configuring VLANs......................................................................................................... |
31 |
Introduction.......................................................................................................................................... |
31 |
VLAN Features.................................................................................................................................... |
31 |
VLAN Concepts And Issues................................................................................................................ |
32 |
VLANs and Tags ................................................................................................................................. |
32 |
Tagged vs. Untagged Frames............................................................................................................... |
32 |
Native VLAN....................................................................................................................................... |
32 |
Management VLAN............................................................................................................................. |
33 |
Edge And Trunk Port Types ................................................................................................................ |
34 |
Forbidden Port Lists............................................................................................................................. |
34 |
VLAN Based Services ........................................................................................................................ |
34 |
VLAN Applications ............................................................................................................................. |
34 |
Traffic Domain Isolation...................................................................................................................... |
34 |
Administrative Convenience................................................................................................................ |
35 |
Reduced Hardware............................................................................................................................... |
35 |
Service Differentiation......................................................................................................................... |
36 |
VLAN Configuration ........................................................................................................................... |
36 |
VLAN Parameter Ranges & Default Settings...................................................................................... |
36 |
Virtual LANs Menu ............................................................................................................................. |
37 |
Static VLANs Menu............................................................................................................................. |
37 |
Port VLAN Parameters Menu.............................................................................................................. |
39 |
VLAN Summary Menu ....................................................................................................................... |
42 |
Troubleshooting ................................................................................................................................... |
43 |
RuggedCom |
5 |

RuggedSwitch™ User Guide |
|
Chapter 5 – Configuring Class of Service ........................................................................................... |
44 |
Introduction to CoS.............................................................................................................................. |
44 |
CoS Features ........................................................................................................................................ |
44 |
CoS Concepts And Issues .................................................................................................................... |
44 |
CoS Operation...................................................................................................................................... |
44 |
CoS Configuration ............................................................................................................................... |
46 |
CoS Parameter Ranges & Default Settings.......................................................................................... |
46 |
Classes Of Service Menu ..................................................................................................................... |
46 |
Global CoS Parameters Menu.............................................................................................................. |
47 |
Port CoS Parameters Menu.................................................................................................................. |
47 |
Priority to CoS Mapping Menu............................................................................................................ |
48 |
DSCP to CoS Mapping Menu.............................................................................................................. |
48 |
CoS Access Priorities Menu ................................................................................................................ |
49 |
Chapter 6 – Configuring Rapid Spanning Tree ................................................................................... |
50 |
Introduction ......................................................................................................................................... |
50 |
RSTP Features...................................................................................................................................... |
50 |
RSTP Concepts And Issues ................................................................................................................. |
51 |
RSTP Operation ................................................................................................................................... |
51 |
RSTP Applications............................................................................................................................... |
58 |
RSTP Configuration............................................................................................................................. |
61 |
Bridge and Port Parameter Ranges & Default Settings ....................................................................... |
61 |
Spanning Tree Menu............................................................................................................................ |
62 |
Bridge RSTP Parameters Menu ........................................................................................................... |
62 |
Port RSTP Parameters Menu ............................................................................................................... |
64 |
RSTP Statistics .................................................................................................................................... |
66 |
Bridge RSTP Statistics Menu .............................................................................................................. |
66 |
Port RSTP Statistics Menu................................................................................................................... |
68 |
Troubleshooting ................................................................................................................................... |
71 |
Chapter 7 – Configuring Multicast Filtering........................................................................................ |
75 |
Introduction to Multicast Filtering....................................................................................................... |
75 |
IGMP Features ..................................................................................................................................... |
75 |
IGMP Concepts And Issues ................................................................................................................. |
77 |
Router IGMP Operation....................................................................................................................... |
77 |
Switch IGMP Active and Passive Operation ....................................................................................... |
78 |
Combined Router And Switch IGMP Operation ................................................................................. |
79 |
Multicast Filtering Configuration ........................................................................................................ |
82 |
Multicast Filtering Parameter Ranges & Default Settings................................................................... |
82 |
Multicast Filtering Menu ..................................................................................................................... |
82 |
IGMP Parameters Menu...................................................................................................................... |
82 |
Multicast Filtering Statistics ................................................................................................................ |
83 |
IP Multicast Groups Menu................................................................................................................... |
83 |
Troubleshooting ................................................................................................................................... |
86 |
Chapter 8 – Diagnostics ....................................................................................................................... |
89 |
Introduction.......................................................................................................................................... |
89 |
Using The Alarm System..................................................................................................................... |
89 |
Alarm Concepts And Issues................................................................................................................. |
89 |
Viewing And Clearing Alarms ............................................................................................................ |
91 |
Viewing Alarms ................................................................................................................................... |
91 |
RuggedCom

|
Table Of Contents |
Clearing Alarms ................................................................................................................................... |
92 |
Viewing CPU Diagnostics ................................................................................................................... |
93 |
Viewing and Clearing the System Log ................................................................................................ |
95 |
Viewing Product Identification............................................................................................................ |
95 |
Load Factory Default Configuration.................................................................................................... |
96 |
Resetting The Unit ............................................................................................................................... |
96 |
Chapter 9 – Using Ethernet And RMON Statistics.............................................................................. |
97 |
Introduction.......................................................................................................................................... |
97 |
View Ethernet Statistics....................................................................................................................... |
98 |
View Ethernet Port Statistics ............................................................................................................... |
98 |
Remote Monitoring (RMON) ............................................................................................................ |
100 |
RMON Historical Statistics Concepts And Issues............................................................................. |
101 |
Configure RMON History Control Table Menu................................................................................ |
102 |
RMON History Samples Table Menu................................................................................................ |
103 |
RMON Alarms And Events Concepts And Issues............................................................................. |
104 |
The Alarm Process............................................................................................................................. |
104 |
Alarm Generation And Hysteresis ..................................................................................................... |
105 |
Delta vs. Absolute Values.................................................................................................................. |
105 |
Configure RMON Alarms.................................................................................................................. |
106 |
Configure RMON Events................................................................................................................... |
108 |
RMON Event Logs ............................................................................................................................ |
109 |
Troubleshooting ................................................................................................................................. |
111 |
Chapter 10 - Using The CLI Shell ..................................................................................................... |
112 |
Introduction........................................................................................................................................ |
112 |
Entering And Leaving The Shell ....................................................................................................... |
112 |
Summary Of Commands.................................................................................................................... |
113 |
Viewing Files ..................................................................................................................................... |
114 |
Dir command...................................................................................................................................... |
114 |
Viewing And Clearing Log Files ...................................................................................................... |
114 |
Running Loopback Tests ................................................................................................................... |
115 |
Pinging A Remote Device.................................................................................................................. |
116 |
Tracing Events ................................................................................................................................... |
117 |
Enabling Tracing................................................................................................................................ |
117 |
Starting The Trace.............................................................................................................................. |
118 |
Viewing DHCP Learned Information Using Ipconfig....................................................................... |
119 |
Executing Commands Remotely Through RSH ................................................................................ |
120 |
Resetting The Switch ......................................................................................................................... |
120 |
Chapter 11 – Upgrading Firmware And Managing Configurations .................................................. |
121 |
Introduction........................................................................................................................................ |
121 |
Upgrading Firmware.......................................................................................................................... |
121 |
Upgrading Firmware With Xmodem ................................................................................................. |
122 |
Upgrading Firmware Using A TFTP Client On Your Workstation................................................... |
122 |
Upgrading Firmware Using The TFTP Client On Your RuggedSwitch™........................................ |
124 |
Capturing Configurations................................................................................................................... |
125 |
Capturing Configurations With XModem ......................................................................................... |
125 |
Capturing Configurations With TFTP ............................................................................................... |
125 |
Using SQL Commands ...................................................................................................................... |
127 |
Getting Started ................................................................................................................................... |
127 |
RuggedCom |
7 |

RuggedSwitch™ User Guide |
|
Finding The Correct Table................................................................................................................. |
128 |
Retrieving Information....................................................................................................................... |
128 |
Changing Values In A Table.............................................................................................................. |
129 |
Defaulting A Table............................................................................................................................. |
130 |
Using RSH And SQL......................................................................................................................... |
130 |
Appendix A - Menu Tree................................................................................................................... |
131 |
Appendix B - SNMP MIB Support.................................................................................................... |
132 |
Appendix C – SNMP Trap Summary ................................................................................................ |
132 |
Appendix D – RMON Acceptable MIB Parameters.......................................................................... |
133 |
Index................................................................................................................................................... |
137 |
RuggedCom
|
Table Of Figures |
TABLE OF FIGURES |
|
Figure 1: Main Menu With Screen Elements Identified........................................................................ |
3 |
Figure 2: Administration Menu ............................................................................................................. |
5 |
Figure 3: IP Services Configuration Menu ............................................................................................ |
5 |
Figure 4: Time and Date Menu.............................................................................................................. |
8 |
Figure 5: SNMP Management Stations Menu ..................................................................................... |
10 |
Figure 6: Using A Router As A Gateway ............................................................................................ |
12 |
Figure 7: MAC Address Tables Menu................................................................................................. |
13 |
Figure 8: MAC Addresses Menu ......................................................................................................... |
14 |
Figure 9: MAC Addresses Learning Options Menu ............................................................................ |
15 |
Figure 10: Static MAC Address Table Menu ...................................................................................... |
16 |
Figure 11: Controller Protection Through FEFI .................................................................................. |
21 |
Figure 12: Port Configuration And Status Menu................................................................................. |
23 |
Figure 13: Port Parameters Menu ........................................................................................................ |
24 |
Figure 14: Port Rate Limiting Menu.................................................................................................... |
26 |
Figure 15: Port Security Menu............................................................................................................. |
26 |
Figure 16: Port Mirroring Menu .......................................................................................................... |
28 |
Figure 17: Port Status Menu ................................................................................................................ |
29 |
Figure 18: Multiple and Overlapping VLANs..................................................................................... |
35 |
Figure 19: Inter-VLAN Communications............................................................................................ |
36 |
Figure 20: Virtual LANs Menu............................................................................................................ |
37 |
Figure 21: Static VLANs Menu........................................................................................................... |
37 |
Figure 22: Port VLAN Parameters Menu ............................................................................................ |
39 |
Figure 23: VLAN Summary Menu ...................................................................................................... |
42 |
Figure 24: Determining The CoS Of A Received Frame .................................................................... |
45 |
Figure 25: Use of CoS When Forwarding Frames .............................................................................. |
46 |
Figure 26: Classes Of Service Menu.................................................................................................... |
46 |
RuggedCom |
9 |

RuggedSwitch™ User Guide
Figure 27: Global CoS Parameters Menu ............................................................................................ |
47 |
Figure 28: Port CoS Parameters Menu ................................................................................................ |
47 |
Figure 29: Priority to CoS Mapping Menu .......................................................................................... |
48 |
Figure 30: TOS DSCP to CoS Mapping .............................................................................................. |
48 |
Figure 31: CoS Access Priorities Menu............................................................................................... |
49 |
Figure 32: Bridge and Port States ........................................................................................................ |
52 |
Figure 33: Bridge and Port Roles......................................................................................................... |
54 |
Figure 34: Example Of A Structured Wiring Configuration ............................................................... |
58 |
Figure 35: Example Of A Ring Backbone Configuration.................................................................... |
59 |
Figure 36: Port Redundancy ................................................................................................................ |
60 |
Figure 37: Spanning Tree Menu .......................................................................................................... |
62 |
Figure 38: Bridge RSTP Parameters Menu.......................................................................................... |
62 |
Figure 39: Port RSTP Parameters Menu.............................................................................................. |
64 |
Figure 40: Bridge RSTP Status Menu ................................................................................................. |
66 |
Figure 41: Port RSTP Parameters Menu.............................................................................................. |
68 |
Figure 42: IGMP Operation Example 1............................................................................................... |
77 |
Figure 43: IGMP Operation Example 2............................................................................................... |
79 |
Figure 44: Multicast Filtering Menu.................................................................................................... |
82 |
Figure 45: IGMP Parameters Menu..................................................................................................... |
82 |
Figure 46: IP Multicast Groups Menu ................................................................................................. |
83 |
Figure 47: Diagnostics Menu Showing Alarm Commands ................................................................. |
89 |
Figure 48: Alarms Menu...................................................................................................................... |
91 |
Figure 49: CPU Diagnostics Menu ...................................................................................................... |
93 |
Figure 50: Viewing the System Log .................................................................................................... |
95 |
Figure 51: Ethernet Statistics Menu..................................................................................................... |
97 |
Figure 52: Ethernet Statistics Menu..................................................................................................... |
98 |
Figure 53: Port Statistics Menu............................................................................................................ |
98 |
RuggedCom

|
Table Of Figures |
Figure 54: The History Process.......................................................................................................... |
101 |
Figure 55: History Control Table....................................................................................................... |
102 |
Figure 56: RMON History Samples Table ........................................................................................ |
103 |
Figure 57: The Alarm Process ........................................................................................................... |
104 |
Figure 58: Applying Hysteresis to Alarm Generation ....................................................................... |
105 |
Figure 59: RMON Alarm Configuration Table screens..................................................................... |
106 |
Figure 60: RMON Events Configuration Table screens.................................................................... |
108 |
Figure 61: RMON Events Configuration Table screens.................................................................... |
109 |
Figure 62: Running a Loopback Test ................................................................................................ |
115 |
Figure 63: Displaying Trace settings ................................................................................................ |
117 |
Figure 64: Changing Trace settings ................................................................................................... |
118 |
Figure 65: Starting A Trace ............................................................................................................... |
118 |
Figure 66 Example of an Upgrade using XModem ........................................................................... |
122 |
Figure 67 Example of an Upgrade using a TFTP client on your workstation ................................... |
124 |
Figure 68 Example of an Upgrade using the TFTP client on the RuggedSwitch™........................... |
125 |
Figure 69 The sql command and SQL help ....................................................................................... |
127 |
Figure 70 The sql command and SQL help ....................................................................................... |
128 |
Figure 71 Selecting a table................................................................................................................. |
128 |
Figure 72 Select a parameter with a table.......................................................................................... |
129 |
Figure 73 Selecting rows in a table based upon parameter values..................................................... |
129 |
Figure 74 Selecting rows in a table based upon multiple parameter values ...................................... |
129 |
Figure 75 Changing Values In A Table ............................................................................................. |
129 |
Figure 76 Defaulting A Table ............................................................................................................ |
130 |
Figure 77 Bulk Inspections Using RSH and SQL ............................................................................. |
130 |
RuggedCom |
11 |

Chapter 1– Setting Up And Administering The Switch
Chapter 1– Setting Up And Administering The Switch
Introduction
This chapter familiarizes the user with the RuggedCom user interface as well as describes the following procedures:
•Configuring the IP Address and Subnet Mask
•Configuring the Gateway Address
•Configuring for DHCP Operation
•Configuring the Management Connection Inactivity Timeout
•Configuring the number of Telnet Sessions
•Configuring TFTP Server Permissions
•Configuring the SNMP Get Community Name
•Configuring the System Identification
•Configuring Passwords
•Configuring the time and date
•Configuring SNTP to keep the time and date correct
•Configuring SNMP Management Stations
The RuggedSwitch™ User Interface
Using the RS232 Port to Access the User Interface
Attach a terminal (or PC running terminal emulation software) to the RS232 port on the rear of the chassis. The terminal should be configured for 8 bits, no parity operation at 57.6 Kbps. Hardware and software flow control must be disabled.
Select a terminal type of VT100.
Once the terminal is connected, pressing <CR> will prompt for the password to be entered. The switch is shipped with a default administrator password of “admin”. Once successfully logged in, the user will be presented with the main menu.
RuggedCom |
RuggedCom |

RuggedSwitch™ User Guide
The Structure of the User Interface
The user interface is organized as a series of menus with an escape to a command line interface (CLI) shell. Each menu screen presents the switch name (as proved by the System Identification parameter), Menu Title, Access Level, Alarms indicator, Sub-Menus and Command Bar.
Sub-menus are entered by selecting the desired menu with the arrow keys and pressing the enter key. Pressing the escape key ascends to the parent menu.
|
System Identification |
|
Menu Name |
|
Access Level/Alarms Indicator |
|
|
|
|
|
|
|
|
|
|
|
|
|
|
|
|
My Switch |
Main Menu |
|
Admin Access |
|
|
Administration
Port Configuration and Status
Ethernet Statistics
Spanning Tree
Virtual LANs
Classes of Service
MAC Address Tables
Multicast Filtering
Diagnostics
<CTRL> Z-Help S-Shell X-Logout
Command Bar |
|
Sub-Menus |
|
|
|
Figure 1: Main Menu With Screen Elements Identified
The command bar offers a list of commands that apply to the currently displayed menu. These commands include:
•<CTRL> Z to display help on the current command or data item
•<CTRL> S to switch to the CLI shell
•<CTRL> U/D to jump to next/previous page of a status display
The main menu also provides a <CTRL> X command, which will terminate the session.
RuggedCom

Table Of Contents
Making Configuration Changes
When changing a data item the user selects the data item by the cursor keys and then pressing the enter key. The cursor will change position to allow editing of the data item.
Typing a new value after pressing enter always erases the old parameter value. The left and right cursor keys may be used to position the edit point without erasing the old parameter value. The up and down cursor keys may be used to cycle through the next higher and lower values for the parameter.
After the parameter has been edited, press enter again to change other parameters. When all desired parameters have been modified, press <CTRL> A to apply changes. The switch will automatically prompt you to save changes when you leave a menu in which changes have been made.
Some menus will require you to press <CTRL> I to insert a new record of information and <CTRL> L to delete a record.
Updates Occur In Real Time
All configuration and display menus present the values at the current instant, automatically updating if changed from other user interface sessions or SNMP. All statistics menus will display changes to statistics as they occur.
Alarm Indications Are Provided
Alarms are events for which the user is notified through the Diagnostics menu View Alarms command. All configuration and display menus present an indication of the number of alarms (in the upper right hand corner of the screen) as they occur, automatically updating as alarms are posted and cleared.
The CLI Shell
The user interface provides a shell for operations that are more easily performed at the command line. You may switch back and forth from the menu system and shell by pressing <CTRL> S. For more information on the capabilities of the shell consult Chapter 10 - Using The CLI Shell.
RuggedCom |
3 |

RuggedSwitch™ User Guide
Administration Menu
The Administration command provides the menu shown in the following Figure.
My Switch |
Administration |
Admin Access |
|
Configure IP Services |
|
|
Configure System Identification |
|
|
Configure Passwords |
|
|
Configure Time and Date |
|
|
Configure SNMP Management Stations |
|
Figure 2: Administration Menu
Configure IP Services
The Configure IP Services command provides the ability to change the IP Address/mask, Gateway address, Inactivity Timeout, Telnet Sessions Allowed, TFTP Server and SNMP Get Community parameters.
Note: These parameters are not changed during a factory reload. The following figure shows the settings as shipped from the factory.
My Switch |
IP Services |
Configuration |
Admin Access |
|
IP Address Type |
Static |
|
|
IP Address |
192.168.0.1 |
|
|
Subnet |
255.255.255.0 |
|
|
Gateway |
5 min |
|
|
Inactivity Timeout |
|
|
|
Telnet Sessions Allowed |
8 |
|
|
TFTP Server |
Get Only |
|
|
SNMP Get Community |
public |
|
<CTRL> Z-Help S-Shell
Figure 3: IP Services Configuration Menu
IP Address Type
This parameter specifies if the IP configuration is static (i.e. configured through this menu), or dynamically assigned. If dynamic IP configuration is chosen, the IP Address, Subnet and Gateway fields will become unavailable for editing and will not be displayed. These values will be loaded via Dynamic Host Configuration Protocol (DHCP) and may be viewed using the “ipconfig” shell command.
IP Address
This parameter specifies the IP address of the switch.
RuggedCom

Table Of Contents
Note: Changes to the IP Address take effect immediately upon being saved. Telnet connections in place at the time of an address change will be lost.
Subnet
This parameter specifies the subnet mask of the switch.
Gateway
This parameter specifies the gateway IP address. This is the address to use when forwarding packets to a network other than the one the switch belongs to. It is only required if you intend to manage the switch from a management station that is separated from the switch by a router.
Inactivity Timeout
This parameter specifies the amount of time after keystrokes have been pressed before a management connection will be automatically broken. A value of zero disables timeouts altogether.
Telnet Sessions
This parameter limits the number of Telnet sessions. A value of zero prevents any Telnet access.
Note: If you disable Inactivity Timeouts and reduce the number of Telnet sessions to one, you will not be able to connect via Telnet until your current connection closes.
TFTP Server
This parameter controls how a TFTP client can access the switches built-in TFTP server. A setting of “Disabled” prevents all access, “Get Only” allows retrieval of files and “Enabled” allows storing and retrieval of files.
SNMP Get Community
This string determines the community string that may be used by any management station for SNMP read-only access of settings. Delete this string if you wish to prevent read-only access.
RuggedCom |
5 |

RuggedSwitch™ User Guide
Configuring System Identification
The system identification is displayed in the sign-on screen and in the upper left
hand corner of all RuggedSwitch™ menu screens. Setting the system identification can make it easier to identify the switches within your network.
Setting the location and contact fields can provide information about where the switch is located and who to contact in order to resolve problems.
Configure Passwords
The guest, operator and admin passwords provide differing levels of access to the switch. Guest users can view most settings but may not change settings or run commands. Operators cannot change settings but can reset alarms, statistics and logs. Admin users can change settings and run commands.
Configure Time and Date
The Configure Time and Date command provides the ability to change the switch time, date and time zone. The switch can also be configured to periodically contact an NTP server to correct for drift in the onboard clock.
My Switch |
Time |
and Date |
Admin Access |
|
Time |
14:05:41 |
|
|
Date |
Jan 7, 2003 |
|
|
Time Zone |
UTC-5:00 |
(New York, Toronto) |
|
NTP Server Address |
0.0.0.0 |
|
|
NTP Update Period |
60 min |
|
<CTRL> Z-Help S-Shell
Figure 4: Time and Date Menu
Note: The first revision of the RuggedSwitch™ Management CPU (RSMCPU Rev A) does not have a non-volatile real time clock and relies upon NTP to obtain its time and date after rebooting. The hardware revision of your RSMCPU is provided in the Diagnostics, View Product Identification menu.
Time
The time parameter allows configuration of the local time in local 24-hour format.
Date
The date parameter configures the date.
RuggedCom
Table Of Contents
Time Zone
The time zone setting allows for the conversion of UTC (Universal Coordinated Time) to local time.
NTP Server Address
This parameter specifies the IP address of the NTP (Network Time Protocol) server used to set the on-board real time clock. Programming an address of “0.0.0.0” disables the use of NTP. The current time setting will be overwritten at every NTP sync time interval, as specified by the NTP update period parameter.
Note: If your RuggedSwitch™ is not equipped with a real time clock, NTP is the only mechanism for obtaining the time after a start up.
NTP Update Period
This parameter determines how frequently the time is updated from the NTP server. If the update attempt fails the switch will make two more attempts (at oneminute intervals) after which an alarm is generated. The programmed update rate will then be resumed.
RuggedCom |
7 |

RuggedSwitch™ User Guide
Configure SNMP Management Stations
This command identifies management stations that may configure the switch through SNMP and receive Traps from the switch.
At shipping time and after factory reloads the switch is configured not to allow remote management or raise Traps. Identify a management station to the switch by executing the Configure SNMP Management Stations command and pressing CTRL-I to create a management record, as shown below.
My Switch |
SNMP Management Stations |
Admin Access |
|
|
Community String |
public |
|
|
Address |
Disabled |
|
|
Set Access |
|
|
|
Send Traps |
Enabled |
|
<CTRL> Z-Help |
S-Shell A-Apply |
|
|
Figure 5: SNMP Management Stations Menu
You may create up to eight management stations, each of which may have individual settings for community strings, set access permission and sending of traps. Note that all management stations created this way inherently allow get access and disable set access.
Community String
The community string this management station is authenticated by.
Address
The management station IP address.
Note: If this address does not lie in the same network as the switches IP address then the gateway address must be configured.
Set Access
If enabled, this management station may change configuration parameters.
Send Traps
The management station will be sent SNMP traps if this setting is enabled. The traps issued are summarized in Appendix C – SNMP Trap Summary.
RuggedCom

Table Of Contents
Troubleshooting
Problem One
•I have configured the IP address and a gateway. I am pinging the switch but it is not responding. I am sure the switch is receiving the ping because it’s port LEDs are flashing and the statistics menu shows the pings. What is going on?
Is the switch being pinged through a router? If so, the switch gateway address must be configured. The following figure illustrates the problem.
|
|
|
|
|
|
|
|
|
|
|
|
|
|
Router |
|
|
RuggedSwitchTM |
|
|
|
|
192.168.0.1 |
10.0.0.1 |
10.0.0.2 |
||
|
|
|
|
|
|
|
|
|
|
|
|
|
|
|
|
|
|
Workstation
192.168.0.2
Figure 6: Using A Router As A Gateway
The router is configured with the appropriate IP subnets and will forward the ping from the workstation to the switch. When the switch responds, however, it will not know which its interfaces to use in order to reach the workstation and will drop the response. Programming a gateway of 10.0.0.1 will cause the switch to forward un-resolvable frames to the router.
This problem will also occur if the gateway address is not configured and the switch tries to raise an SNMP trap to a host that is not on the local subnet
RuggedCom |
9 |

RuggedSwitch™ User Guide
Chapter 2 - Configuring MAC Address Management
Introduction
This chapter familiarizes the user with:
•Viewing learned MAC addresses
•Purging MAC Address Entries
•Configuring the switch MAC Address Aging time
•Configuring static MAC addresses
MAC Address Management Features
MAC Address management provides you with the following features:
•The ability to configure static MAC addresses.
•The ability to set the switch MAC address aging time
MAC Address Management Configuration
MAC Address Management Parameter Ranges & Default Settings
Configuration Item |
Default Value |
Supported Values |
|
|
|
Aging Time |
300 seconds |
15 to 800 seconds |
MAC Address Tables Management Menu
The MAC Address Tables menu is accessible from the main menu MAC Address Tables command.
My Switch |
MAC |
Address Tables |
Admin Access |
|
|
View |
MAC Addresses |
|
|
|
Purge MAC |
Address Table |
|
|
|
Configure |
MAC Address Learning Options |
|
|
|
Configure |
Static MAC Address Table |
|
|
<CTRL> Z-Help S-Shell>
Figure 7: MAC Address Tables Menu
RuggedCom

Chapter 2 - Configuring MAC Management
Viewing MAC Addresses
The View MAC Addresses command presents a real time display of learned and static MAC addresses.
My Switch |
MAC Addresses |
|
|
Admin Access |
|
MAC Address |
VID |
Port |
Type |
CoS |
|
00-00-85-05-9A-C4 |
1 |
6 |
Dynamic |
Normal |
|
00-01-E6-64-2B-B6 |
1 |
6 |
Dynamic |
Normal |
|
00-03-47-A0-56-F3 |
1 |
6 |
Dynamic |
Normal |
|
00-03-47-A0-57-37 |
1 |
6 |
Dynamic |
Normal |
|
00-03-47-B0-59-F3 |
1 |
6 |
Dynamic |
Normal |
|
00-06-5B-61-AC-30 |
1 |
6 |
Dynamic |
Normal |
|
00-06-5B-7A-40-BA |
1 |
6 |
Dynamic |
Normal |
|
00-06-5B-95-B2-A4 |
1 |
6 |
Dynamic |
Normal |
|
00-06-5B-A2-51-41 |
1 |
6 |
Dynamic |
Normal |
|
00-06-5B-AF-1A-AA |
1 |
6 |
Dynamic |
Normal |
|
00-06-5B-AF-1A-AD |
1 |
6 |
Dynamic |
Normal |
|
00-0A-DC-00-20-00 |
1 |
6 |
Dynamic |
Normal |
|
00-0A-DC-01-01-0E |
1 |
6 |
Dynamic |
Normal |
|
00-0A-DC-01-01-1E |
1 |
6 |
Dynamic |
Normal |
|
00-50-BA-D4-48-16 |
1 |
6 |
Dynamic |
Normal |
|
00-50-BA-F4-E8-EB |
1 |
6 |
Dynamic |
Normal |
|
00-C0-4F-6C-D9-1B |
1 |
6 |
Dynamic |
Normal |
|
00-E0-18-BB-B4-CA |
1 |
6 |
Dynamic |
Normal |
|
More below ... |
|
|
|
|
|
<CTRL> Z-Help |
S-Shell D-PgDn |
U-PgUp |
|
|
|
Figure 8: MAC Addresses Menu
The display will change as MAC addresses are learned and aged out.
MAC Address
The learned MAC address.
VID
The VLAN the MAC address was learned upon.
Port
The port the MAC address was learned upon.
Type
Either “Static” or “Dynamic”, this parameter describes how the switch has learned the MAC address. Dynamic addresses are learned from received frames. Static addresses are learned from configured entries in the Static MAC Address Table.
CoS
The Class of Service associated with this MAC Address. CoS and its use is more fully described in Chapter 5 – Configuring Class of Service.
RuggedCom |
11 |

RuggedSwitch™ User Guide
Purge MAC Address Table
This command removes all dynamic entries from the MAC address table. The only negative impact of this operation is that it causes flooding while addresses are relearned.
Configure MAC Address Learning Options
This menu allows you to configure MAC management related parameters.
My Switch |
MAC Address Learning Options |
Admin Access |
Aging Time 300 s
<CTRL> Z-Help S-Shell
Figure 9: MAC Addresses Learning Options Menu
Aging Time
This parameter configures the time a learned MAC address is held before being aged out.
Configure Static MAC Address Table
This menu allows you to enter static MAC addresses or MAC addresses whose CoS priority is automatically set to High.
My Switch |
Static MAC Address Table |
Admin Access |
||
|
MAC Address |
VID |
Port |
CoS |
|
00-01-E6-64-2B-B6 |
1 |
1 |
Normal |
|
00-06-5B-AF-1A-AD |
1 |
Learn |
High |
<CTRL> Z-Help S-Shell D-PgDn U-PgUp I-Insert L-Delete
Figure 10: Static MAC Address Table Menu
Static MAC addresses are often configured when the user wishes to enforce port security. The relevant MAC address (and the port it is to be restricted to) is configured in the Static MAC addresses Table. The port is made secure by configuration in the Port Configuration and Status menu, Configure Port Security command.
Static MAC addresses are also configured when a device can receive but cannot transmit frames. Static addresses are automatically displayed in the MAC Addresses display.
Prioritized MAC addresses are configured when traffic to or from a specific device on a LAN segment is to be assigned a higher CoS priority than other devices on
RuggedCom

Chapter 2 - Configuring MAC Management
that LAN segment. Prioritized addresses function much as regular dynamic addresses, appearing in the MAC Addresses display only while they are learned.
MAC Address
This parameter specifies the unicast address that is to be statically configured or prioritized.
VID
This parameter configures the VLAN upon which the MAC address operates.
Port
If a static MAC address is being constructed, enter the port number upon which the device with this address is located. If a prioritized address is being constructed set this parameter to “Learn”.
CoS (Class of Service)
Set this parameter to normal if you want the prioritized address to have a normal CoS priority or to high if you want the prioritized address to have a high CoS priority
RuggedCom |
13 |

RuggedSwitch™ User Guide
Chapter 3 – Configuring the Ports
Introduction
This chapter familiarizes the user with:
•Configuring port physical parameters
•Configuring link alarms/traps for the port
•Configuring rate limiting
•Configuring port security
•Using Port Mirroring
•Viewing the status of ports
•Resetting all or one port
•Using the Loss-of-Link Management feature
Port Features
10BaseT/100Base Interfaces
•Uses RJ45 Connector
10BaseFL Interfaces
•Multi-mode fiber (820nm) optical ports on 62.5µm cable, 2km distances
•Single-mode fiber (1310nm) optical ports on 9µm cable, 15km distances
•Uses ST Connector
•Support Far End Fault Indication (FEFI) through withholding of link pulses
100BaseFX Interfaces
•Multi-mode fiber (1300nm) optical ports on 62.5µm cable, 2km distances
•Single-mode fiber (1310nm) optical ports on 9µm cable, 15km distances
•Multi-mode Uses MTRJ Connector, Single-mode Uses LC Connector
•Support Far End Fault Indication Through FEFI signal
All Interfaces
•Port security
•Broadcast Rate Filtering
•Link based Alarms and Traps
RuggedCom

Chapter 3 – Configuring the Ports
•Port Latency: 10 Mbps - 16µs + frame time, 100 Mbps - 5µs + frame time
Port Applications
Port Security
Port Security provides the ability to filter or accept traffic from specific MAC addresses.
Port Security works by inspecting the source MAC addresses of received frames and validating them against the contents in the Static MAC Address Table (See Chapter 2 - Configuring MAC Address Management). Unauthorized frames will be filtered and, optionally, the port that receives the frame shutdown permanently or for a period of time. An alarm will be raised indicating the unauthorized MAC address (See Chapter 8 – Diagnostics).
Unicast frames to unknown destination addresses will not be flooded through secure ports.
The switch can also be programmed to learn and allow the first source MAC address encountered on the port. This feature provides a convenient means for network administrators to “capture” the appropriate secure addresses when turning up a port. The MAC address will be permanently added to the Static MAC Address Table.
Note: Port security is applied at the edge of the network in order to restrict admission to specific devices. Do not apply port security on core switch connections or where traffic types such as RSTP or IGMP are active.
Broadcast Rate Limiting
Broadcast rate filtering provides a means to limit the rate of broadcast frames accepted by each port.
Broadcast rate filtering limits the severity of broadcast storms.
RuggedCom |
15 |
RuggedSwitch™ User Guide
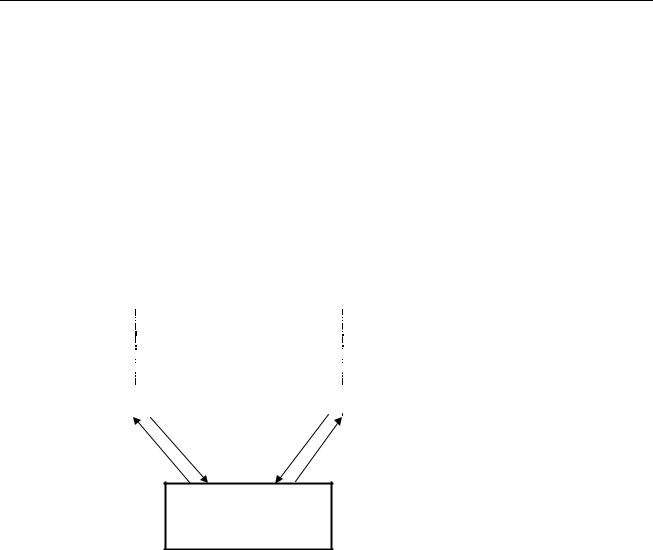
Controller Protection Through Loss-of-Link Management
Modern industrial controllers often feature backup Ethernet ports used in the event of a link failure. When these interfaces are supported by media (such as fiber) that employ separate transmit and receive paths, the interface can be vulnerable to failures that occur in only one of the two paths.
Refer to the following figure. While the link between switch A and the controller functions normally, the controller holds the backup link down. Switch B learns that it must forward frames towards switch A in order to reach the controller.
Unfortunately, if the transmission path from the controller to switch A fails, switch A will still generate link signals to the controller. The controller will still detect link to switch A and will not failover to the backup port.
To remainder of network..
|
|
|
|
|
Switch A |
|
Switch B |
||
|
||||
|
|
|
|
|
Main Backup
Controller
Figure 11: Controller Protection Through FEFI
When FEFI is enabled the switch bases generation of link signal upon its reception of link signal. If switch A fails to receive a link signal from the controller it will stop generating a link signal. The controller will detect the link failure and switch to the backup port.
Part of the Controller Protection Through FEFI feature is the flushing of the MAC address table for the controller port. Frames destined for the controller will be flooded to switch B where they will be forwarded to the controller (after the controller transmits its first frame).
The FEFI feature on 10BaseFL ports causes the transmitter to be disabled, which suspends the sending of link pulses. The FEFI feature on 100BaseFX ports causes a FEFI signal to be sent instead of a link carrier signal.
RuggedCom
Loading...