


RSX-1550
Surround Sound Receiver
Owner’s Manual
Registeryourproductat
www.Rotel.com/register
RSX-1550 English v2.indd 1 |
|
|
27/8/08 14:19:57 |
|
|
||
|
|
|
|
2 |
RSX-1550 Surround Sound Receiver |
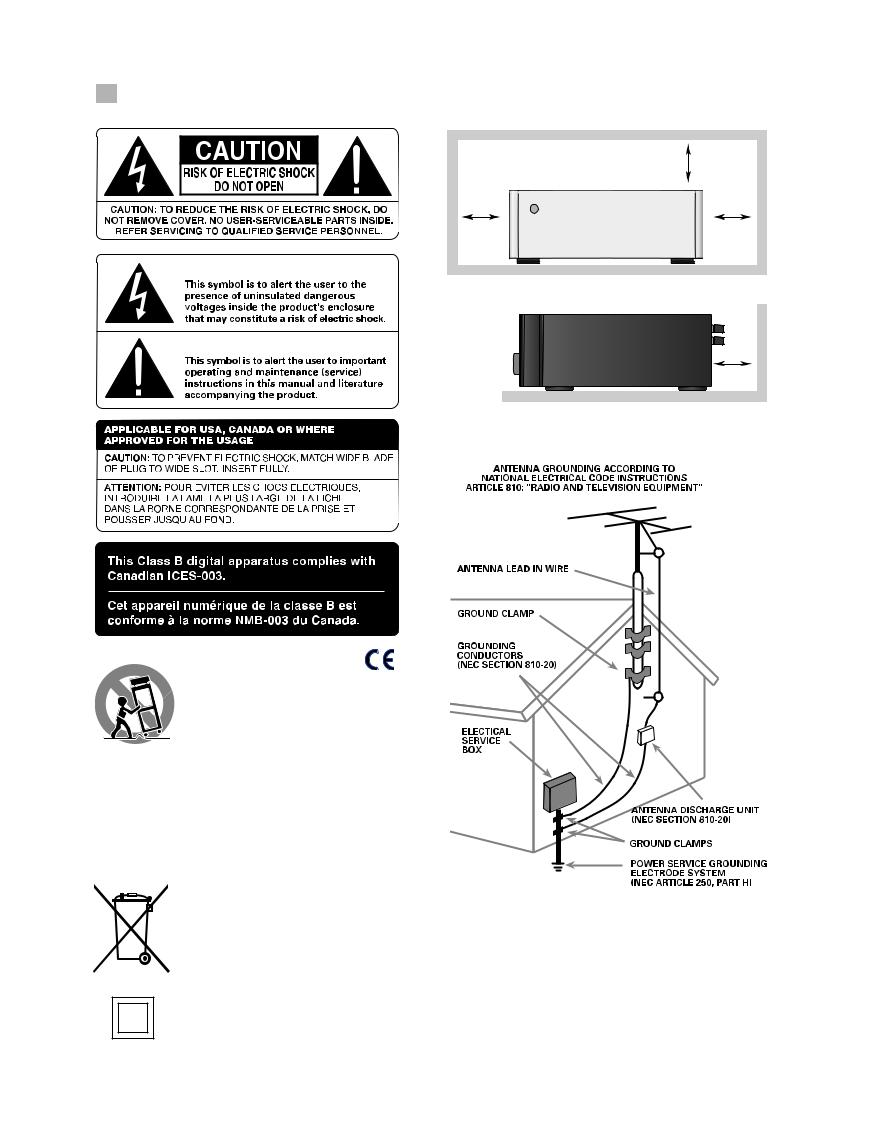
> 10 cm |
> 4 in |
> 10 cm |
> 10 cm |
> 4 in |
> 4 in |
> 10 cm > 4 in
Rotel products are designed to comply with international directives on the Restriction of Hazardous Substances (RoHS) in electrical and electronic equipment and the disposal of Waste Electrical and Electronic Equipment (WEEE). The crossed wheelie bin symbol indicates compliance and that the products must be appropriately recycled or processed in accordance with these directives.
This symbol means that this unit is double insulated. An earth or ground connection is not required.
RSX-1550 English v2.indd 2 |
|
|
27/8/08 14:20:01 |
|
|
||
|
|
|
|

English |
3 |
Notice
The COMPUTER I/O connection should be handled by authorized persons only.
FCC Information
This equipment has been tested and found to comply with the limits for a Class B digital device, pursuant to Part 15 of the FCC Rules. These limits are designed to provide reasonable protection against harmful interference in a residential installation. This equipment generates, uses and can radiate radio frequency energy and, if not installed and used in accordance with the instruction, may cause harmful interference to radio communications.
However, there is no guarantee that interference will not occur in a particular installation. If this equipment does cause harmful interference to radio or television reception, which can be determined by turning the equipment off and on, the user is encouraged to try to correct the interference by one or more of the following measures:
•Reorient or relocate the receiving antenna.(TV, radio, etc.)
•Increase the separation between the equipment and receiver
•Connect the equipment to an outlet on circuit different from that to which the receiver is connected.
•Consult the dealer or an experienced radio/TV technician for additional help.
Caution
This device complies with part 15 of the FCC Rules. Operation is subject to the following to conditions: (1) This device may not cause harmful interference, and (2) this device must accept any
interference received, including interference that may cause undesired operation.
NOTE TO CATV SYSTEM INSTALLER: Call the CATV system or antenna installer’s attention to Article 820-40 of the NEC. This provides guidelines for proper grounding and, in particular, specifies that the cable ground shall be connected to the grounding system of the building, as close to the point of cable entry as practical. See installation diagram.
NOTE: This equipment has been tested and found to comply with the limits for a Class B digital device, pursuant to Part 15 of the FCC Rules. These limits are designed to provide reasonable protection against interference in a residential installation. This equipment generates and can radiate radio frequency energy and, if not installed and used in accordance with the instructions, may cause interference to radio or TV communications. There is no guarantee that interference will not occur in a particular installation. If this equipment does cause interference to radio or television reception, which can be determined by turning the equipment off and on, try to correct the interference by one or more of the following measures:
•Reorient or relocate the receiving antenna.
•Increase the separation between the unit and the television tuner.
•Connect the unit to an AC power outlet on a different electrical circuit.
•Consult your authorized Rotel retailer for assistance.
Important Safety Instructions
WARNING: There are no user serviceable parts inside. Refer all servicing to qualified service personnel.
WARNING: To reduce the risk of fire or electric shock, do not expose the unit to moisture or water. Do not expose the unit to dripping or splashing. Do not place objects filled with liquids, such as vases, on the unit. Do not allow foreign objects to get into the enclosure. If the unit is exposed to moisture, or a foreign object gets into the enclosure, immediately disconnect the power cord from the wall. Take the unit to a qualified service person for inspection and necessary repairs.
Read all the instructions before connecting or operating the unit. Keep this manual so you can refer to these safety instructions.
Heed all warnings and safety information in these instructions and on the product itself. Follow all operating instructions.
Clean the enclosure only with a dry cloth or a vacuum cleaner. Do not use this unit near water.
You must allow a minimum 10 cm or 4 inches of unobstructed clearance around the unit. Do not place the unit on a bed, sofa, rug, or similar surface that could block the ventilation openings. If the unit is placed in a bookcase or cabinet, there must be ventilation of the cabinet to allow proper cooling.
Keep the component away from radiators, heat registers, stoves, or any other appliance that produces heat.
The unit must be connected to a power supply only of the type and voltage specified on the rear panel. (USA: 120 V/60Hz, EC: 230V/50Hz)
Connect the component to the power outlet only with the supplied power supply cable or an exact equivalent. Do not modify the supplied cable. A polarized plug has two blades, with one wider than the other. A grounding plug has two blades plus a third grounding prong. These are provided for your safety. Do not defeat grounding and/or polarization safety provisions. If the supplied plug does not fit your outlet, please consult an electrician for replacement of the obsolete outlet. Do not use extension cords.
The main plug of the power cordset is a disconnect device of the apparatus. In order to completely disconnect the apparatus from the supply mains, the main plug of the power cordset should be unplugged from the mains (AC) outlet. The stand-by LED indicator will not be lit up to show the power cord is unplugged. The disconnect device should remain readily operable.
Do not route the power cord where it will be crushed, pinched, bent, exposed to heat, or damaged in any way. Pay particular attention to the power cord at the plug and where the cord exits the unit.
The power cord should be unplugged from the wall outlet during a lightning storm or if the unit is to be left unused for a long period.
Use only accessories specified by the manufacturer.
Use only with a cart, stand, rack, bracket or shelf system recommended by Rotel. Use caution when moving the unit in a stand or rack to avoid injury from a tip-over.
Use Class 2 wiring for speaker connections to ensure proper installation and minimize the risk of electrical shock.
Immediately stop using the component and have it inspected and/or serviced by a qualified service agency if:
•The power supply cord or plug has been damaged.
•Objects have fallen or liquid has been spilled into the unit.
•The unit has been exposed to rain.
•The unit shows signs of improper operation
•The unit has been dropped or damaged in any way
WARNING: The master power switch is located on the rear panel. The unit must be located in the open area allowing unobstructed access to the main power switch.
RSX-1550 English v2.indd 3 |
|
|
27/8/08 14:20:05 |
|
|
||
|
|
|
|

4 |
RSX-1550 Surround Sound Receiver |
1: Controls and Connections
|
|
|
|
|
|
|
|||
|
|
|
|
|
|
RSX-1550 English v2.indd 4 |
|
|
27/8/08 14:20:08 |
|
|
||
|
|
|
|
English |
5 |
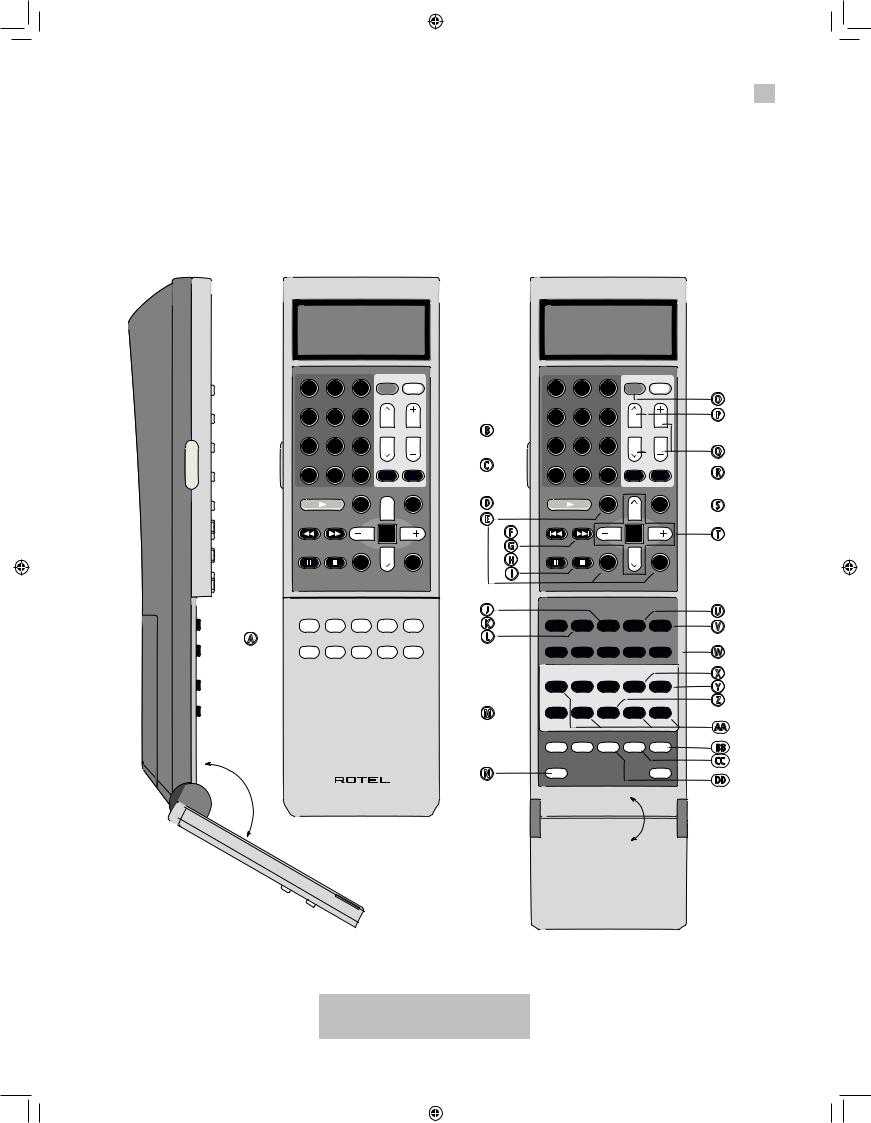
2: RR-1061 Remote
This remote control may be supplied with alternative Rotel products. As a result some of the buttons may not apply to this particular model.
|
|
|
|
|

|
|
|
|
|
|
|
|
|
|
|
|
|
|
|
|
|
|
|
|
|
|
|
|
|
|
|
|
|
|
|
|
|
|
|
|
|
|
|
||
|
|
|
|
|
|
|
|
|
|
|
|
|
|
|
|
|
|
|
||
|
|
|
|
|
||
|
|
|
|
|
|
|
|
|
|
|
|
|
|
|
|
|
|
|
||
|
|
|
|
|
||
|
|
|
|
|
|
|
|
|
|
|
|
|
|
|
|
|
|
|
|
|
|
|
|
|
|
|
|
|
|
|
|
|
|
|
|
|
|
|
|
|
|
|
|
|
|
|
||
|
|
|
|
|
|
|
|
|
|
|
|
||
|
|
|
|
|
|
|
|
|
|
|
|
|
|
|
|
|
|
|
|
|
|
|
|||||
|
|
|
|
|
|
|
|
|
|
|
|
|
|
|
|
|
|
|
|
|
|
|
|
|
|
|
|
|
|
|||||
|
|
|
|
|
|
|
|
|
|
|
|
|
|
|
|
|
||||
|
|
|
|
|
|
|
|
|
|
|
|
|
|
|
|
|
|
|
|
|
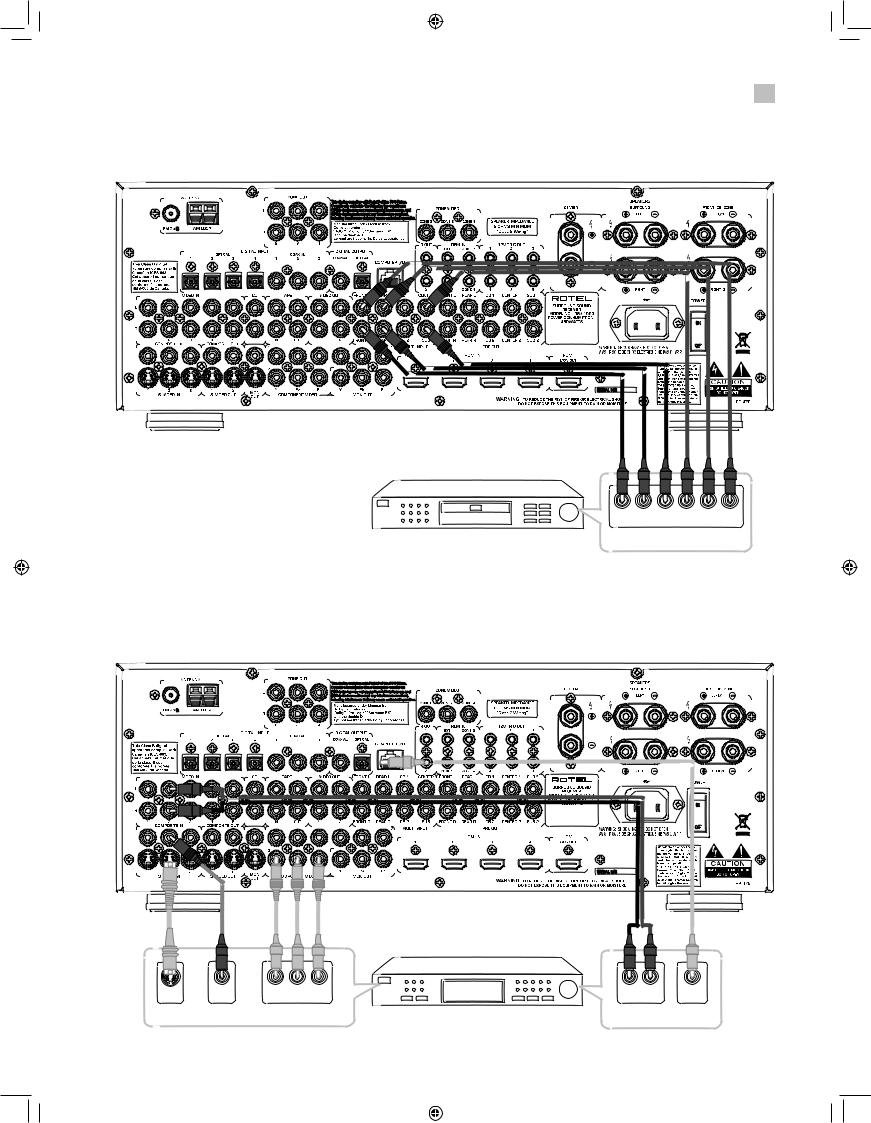
Turn off the RSX-1550 and the entire system before making connections!
RSX-1550 English v2.indd 5 |
|
|
27/8/08 14:20:20 |
|
|
||
|
|
|
|
6 |
RSX-1550 Surround Sound Receiver |
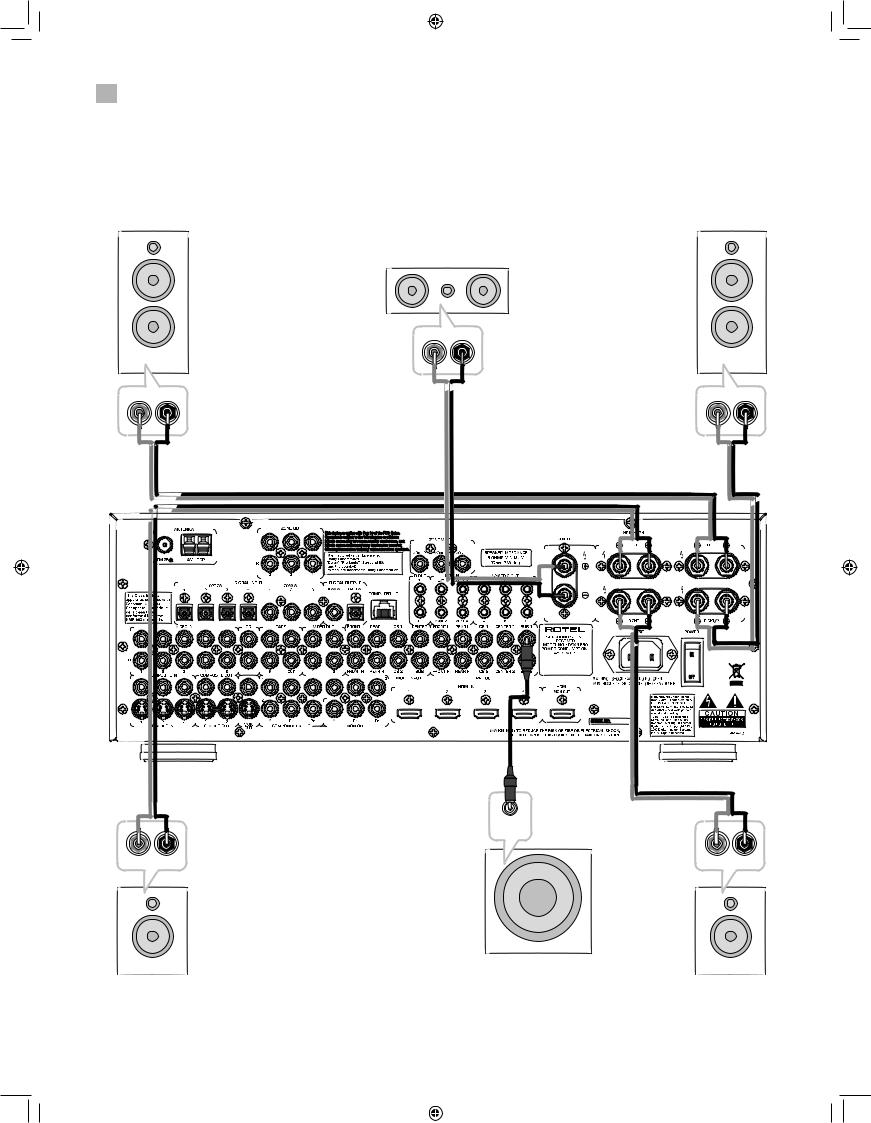
3: Connecting the Speakers
RSX-1550 English v2.indd 6 |
|
|
27/8/08 14:20:22 |
|
|
||
|
|
|
|
English |
7 |
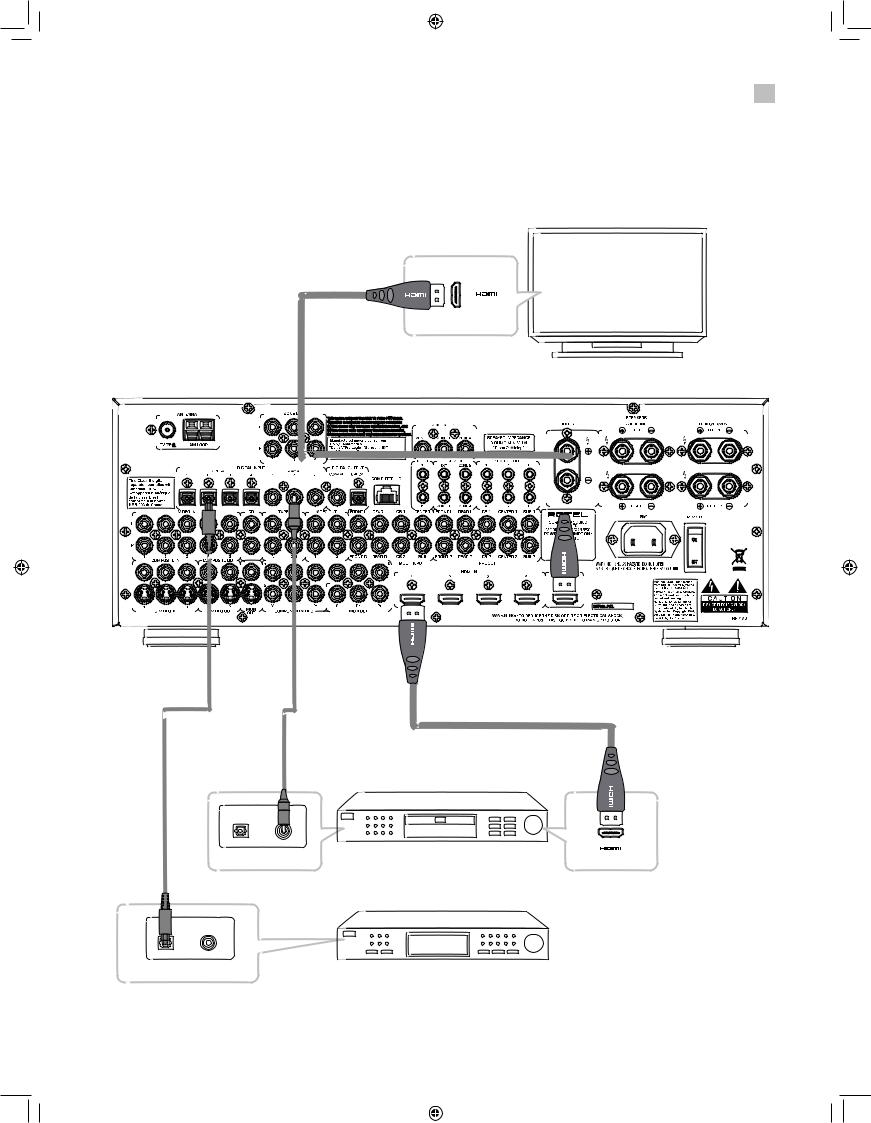
4: Digital Video Connections
RSX-1550 English v2.indd 7 |
|
|
27/8/08 14:20:33 |
|
|
||
|
|
|
|

8 |
RSX-1550 Surround Sound Receiver |
5: TV Analog Connections
|
|
|
|
|
|
|
|
|
|
6: DVD Player Analog Connections
|
|
|
|
|
|
|
|
|
|
||
|
|
|
|
RSX-1550 English v2.indd 8 |
|
|
27/8/08 14:20:45 |
|
|
||
|
|
|
|
English |
9 |
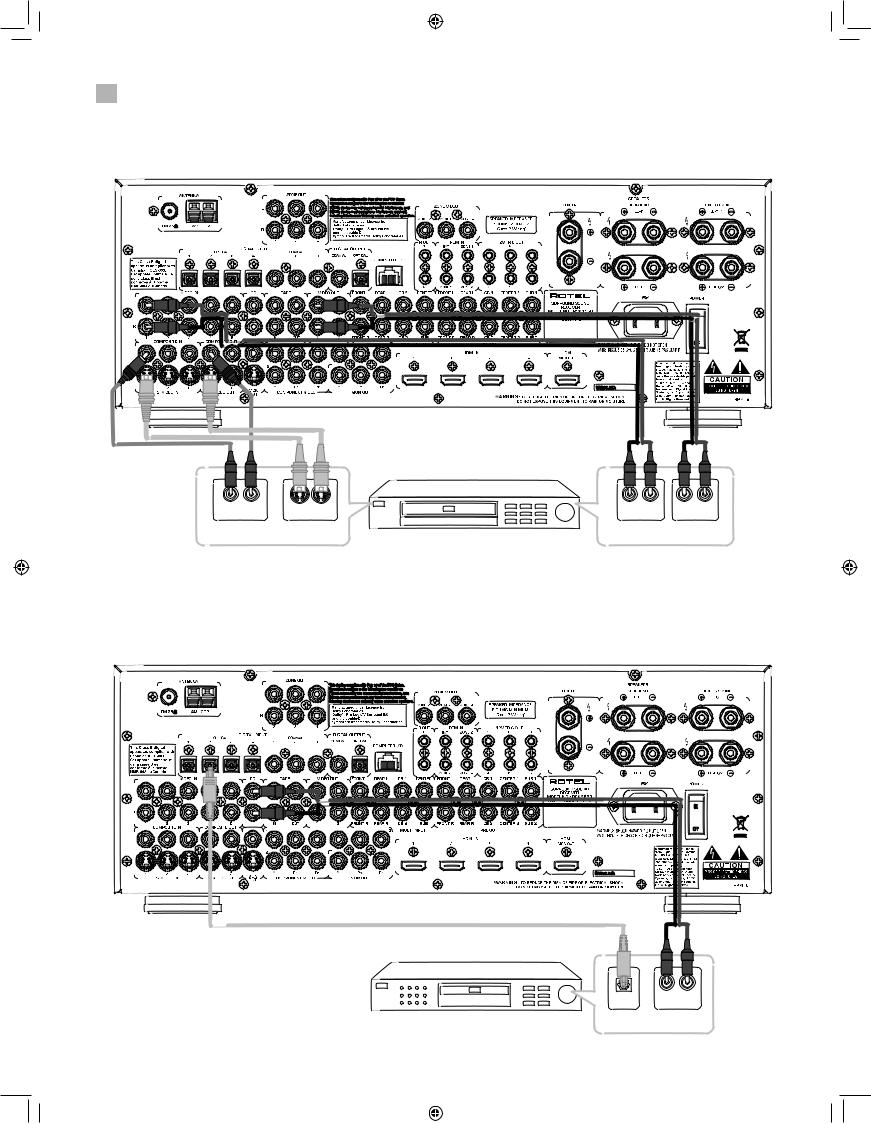
7: DVD-A or SACD Player Connections
8: Cable, Satellite, or HDTV Analog Connections
|
|
|
|
|
|
|
|
|
|
|
RSX-1550 English v2.indd 9 |
|
|
27/8/08 14:21:05 |
|
|
||
|
|
|
|
10 |
RSX-1550 Surround Sound Receiver |
9: Video Recorder Analog Connections
10: CD Player Connections
|
|
|
|
RSX-1550 English v2.indd 10 |
|
|
27/8/08 14:21:26 |
|
|
||
|
|
|
|
English |
11 |
11: Audio Recorder Connections
|
|
|
|
|
|
|
|
|
|
||
|
|
|
|
|
|
12: AM and FM Antennae Connections
RSX-1550 English v2.indd 11 |
|
|
27/8/08 14:21:46 |
|
|
||
|
|
|
|
12 |
RSX-1550 Surround Sound Receiver |
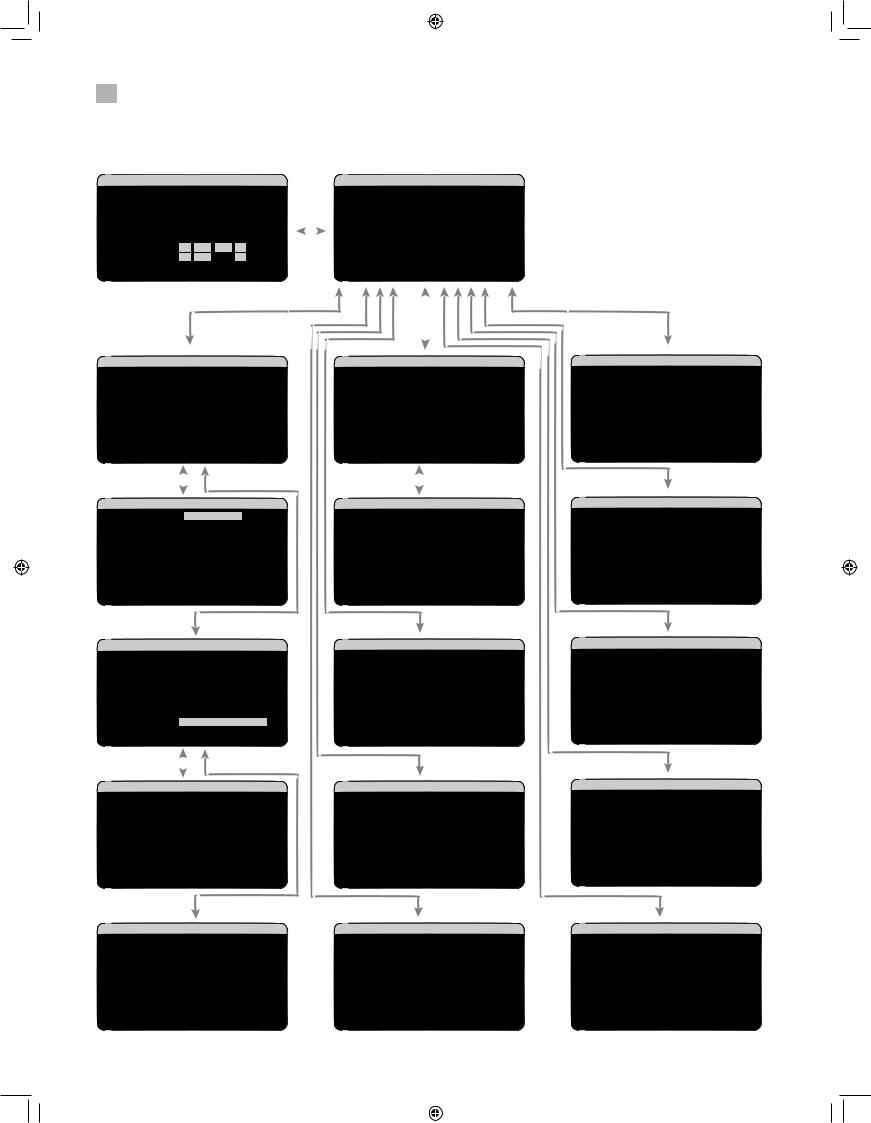
13: On-Screen Menus
|
|
|
|
|
|
|
|
|
|
|
|
|
|
|
|
|
|
|
|
|
|
|
|
|
|
|
|
|
|
|
|
|
|
|
|
|
|
|
|
|
|
|
|
|
|
|
|
|
|
|
|
|
|
|
|
|
|
|
|
|
|
|
|
|
|
|
|
|
|
|
|
|
|
|
|
|
|
|
|
|
|
|
|
|
|
|
|
|
|
|
|
|
|
|
|
|
|
|
|
|
|
|
|
|
|
|
|
|
RSX-1550 English v2.indd 12 |
|
|
27/8/08 14:22:03 |
|
|
||
|
|
|
|

English |
13 |
Contents
Boxed numbers refer to RSX-1550 illustration. Circled letters refer to RR-1061 illustration.
FCC Information |
3 |
Caution |
3 |
Important Safety Instructions . . . . . . . . . . . . . . . . . . . . . . . . . . . . . . . . . . . . . . |
. 3 |
1: Controls and Connections |
4 |
2: RR-1061 Remote |
5 |
3: Connecting the Speakers |
6 |
4: Digital Video Connections |
7 |
5: TV Analog Connections |
8 |
6: DVD Player Analog Connections |
8 |
7: DVD-A or SACD Player Connections |
9 |
8: Cable, Satellite, or HDTV Analog Connections |
9 |
9: VCR Analog Connections |
10 |
10: CD Player/CDR Recorder Connections |
10 |
11: Audio Recorder Connections |
11 |
12: AM and FM Antennae Connections |
11 |
13: On-Screen Menus |
12 |
About Rotel. . . . . . . . . . . . . . . . . . . . . . . . . . . . . . . . . . . . . . . . . . . . . . . . . . . |
15 |
Getting Started . . . . . . . . . . . . . . . . . . . . . . . . . . . . . . . . . . . . . . . . . . . . . . . . |
15 |
Video features. . . . . . . . . . . . . . . . . . . . . . . . . . . . . . . . . . . . . . . . . . . . . . . . . . . . . . . . . . . . . |
15 |
Audio features |
15 |
Surround features |
16 |
Other features |
16 |
Unpacking |
16 |
Placement |
16 |
OVERVIEW OF CONNECTIONS.. . . . . . . . . . . . . . . . . . . . . . . . . . . . . . . . . . . . . 17 |
|
Video Inputs & Outputs . . . . . . . . . . . . . . . . . . . . . . . . . . . . . . . . . . . . . . . . . . |
17 |
HDMI IN 1–4 Video Inputs x |
18 |
COMPOSITE IN 1–3 Video Inputs f |
18 |
COMPOSITE OUT 1–2 Video Outputs g |
18 |
S-VIDEO IN 1–3 Video Inputs f |
18 |
S-VIDEO 1–2 Video Outputs g |
18 |
COMPONENT VIDEO 1–3 Video Inputs g |
18 |
High Definition TV Monitor Outputs v |
19 |
Standard Definition TV Monitor Outputs h |
19 |
ZONE 2–4 VIDEO Outputs f |
19 |
Audio Inputs & Outputs . . . . . . . . . . . . . . . . . . . . . . . . . . . . . . . . . . . . . . . . . . |
19 |
Digital Inputs ] |
19 |
Digital Outputs u |
20 |
CD Inputs j |
20 |
TAPE Inputs k |
20 |
TAPE Outputs k |
20 |
VIDEO 1–5 Audio Inputs d |
20 |
VIDEO 1–2 Audio Outputs ; |
20 |
MULTI Inputs z |
20 |
Speaker Outputs s |
20 |
Preamp Outputs c |
20 |
ZONE 2–4 Audio Outputs i |
21 |
Other Connections . . . . . . . . . . . . . . . . . . . . . . . . . . . . . . . . . . . . . . . . . . . . . . |
21 |
AC Input b |
21 |
Master Power Switch n |
21 |
12V TRIGGER Connections a |
21 |
REM IN Jacks \ |
21 |
IR OUT Jacks [ |
21 |
Computer I/O p |
21 |
MAKING CONNECTIONS. . . . . . . . . . . . . . . . . . . . . . . . . . . . . . . . . . . . . . . . . . |
21 |
CD Player uj |
21 |
DVD Player udflx; |
21 |
Cable, Satellite, or HDTV Tuner udflx; |
22 |
Audio Recorder uok |
22 |
Video Recorder \fg; |
22 |
DVD-A or SACD Player zx |
23 |
HDTV Monitor v |
23 |
SDTV Monitor h |
23 |
Speakers s |
23 |
Subwoofer c |
24 |
Amplifiers c |
24 |
AM Antenna y |
24 |
FM Antenna t |
25 |
Remote Zone Connections i]\ |
25 |
A Word About Watts |
25 |
OPERATING THE RSX-1550 . . . . . . . . . . . . . . . . . . . . . . . . . . . . . . . . . . . . . . . |
25 |
Front Panel Overview . . . . . . . . . . . . . . . . . . . . . . . . . . . . . . . . . . . . . . . . . . . |
25 |
Front-panel Display 5 |
25 |
Remote Sensor 2 |
26 |
Remote Control Overview . . . . . . . . . . . . . . . . . . . . . . . . . . . . . . . . . . . . . . . . |
26 |
Using the RR-1061 AUDIO Button A |
26 |
Overview of Buttons and Controls . . . . . . . . . . . . . . . . . . . . . . . . . . . . . . . . . . |
26 |
STANDBY Button 1 |
26 |
POWER Button N |
26 |
ON/OFF Buttons O |
26 |
VOLUME Knob - |
26 |
VOLUME Buttons Q |
26 |
MUTE Buttons wR |
26 |
LIGHT Button C |
26 |
DEVICE/INPUT Buttons 6qA |
26 |
D-SLT Button Y |
26 |
SEL Button r |
26 |
REC Button J |
26 |
ZONE Buttons eU |
27 |
UP/DOWN Buttons T |
27 |
+/– Buttons T |
27 |
Speaker Selection Buttons E |
27 |
EQ Button K |
27 |
TONE Button X |
27 |
Surround Mode Buttons =W |
27 |
SUR+ Button V |
27 |
DYN Button L |
27 |
MENU/OSD Button S |
27 |
ENTER Button T |
27 |
BAND Buttons 4I |
27 |
TUNING Buttons 3P |
27 |
MEM Buttons 0 |
27 |
NUMERIC Buttons 7 |
27 |
DIRECT Button8 |
27 |
FRQ DIRECT Button D |
27 |
MONO Button 9 |
27 |
FM MONO Button H |
27 |
TUNE Button F |
27 |
PRESET Button G |
27 |
P-TUN Button Z |
27 |
SCAN Button M |
27 |
RDS/RBDS Buttons |
27 |
OUTPUT Button |
27 |
PIP Button |
27 |
RSX-1550 English v2.indd 13 |
|
|
27/8/08 14:22:05 |
|
|
||
|
|
|
|

14 |
RSX-1550 Surround Sound Receiver |
POP Button |
27 |
Basic Operations . . . . . . . . . . . . . . . . . . . . . . . . . . . . . . . . . . . . . . . . . . . . . . . |
28 |
Power and Standby On/Off 1nTT |
28 |
Volume Adjustments -Q |
28 |
Muting the Sound wR |
28 |
Selecting Inputs . . . . . . . . . . . . . . . . . . . . . . . . . . . . . . . . . . . . . . . . . . . . . . . . |
28 |
Input Buttons 69A |
28 |
Selecting a Source Input from the Front Panel 6qer |
29 |
Selecting a Source from the Remote AJU |
29 |
Party Mode: Selecting the Same Input for all Outputs erJU |
29 |
Selecting Digital Inputs Y |
29 |
Overview of Surround Formats. . . . . . . . . . . . . . . . . . . . . . . . . . . . . . . . . . . . . |
29 |
Dolby Surround |
29 |
Dolby Pro Logic II |
29 |
Dolby Digital |
30 |
DTS5.1 |
30 |
DTS 96/24 |
30 |
DTS Neo:6 |
30 |
Dolby Digital Surround EX |
30 |
DTS-ES6.1 and 7.1 Channel Surround |
30 |
Dolby Pro Logic IIx 6.1 and 7.1 Channel Surround |
31 |
Rotel XS 6.1 and 7.1 Channel Surround |
31 |
Dolby Digital Plus |
31 |
Dolby TrueHD |
31 |
DTS-HD Master Audio and DTS-HD High Resolution Audio |
31 |
DSP Music Modes |
31 |
2Ch/5Ch/7Ch Stereo Formats |
31 |
Other Digital Formats |
31 |
Automatic Surround Modes. . . . . . . . . . . . . . . . . . . . . . . . . . . . . . . . . . . . . . . . |
32 |
Manually Selecting Surround Modes . . . . . . . . . . . . . . . . . . . . . . . . . . . . . . . . . |
32 |
Dolby Digital 5.1 discs |
33 |
Dolby Digital Surround EX discs =TVW |
33 |
Dolby Digital 2.0 discs =TVW |
33 |
DTS 5.1 discs |
33 |
DTS 96/24 discs |
33 |
DTS-ES 6.1 discs =TVW |
33 |
Digital Stereo discs =TVW |
34 |
Analog Stereo =TVW |
35 |
Other Settings. . . . . . . . . . . . . . . . . . . . . . . . . . . . . . . . . . . . . . . . . . . . . . . . . |
35 |
Speaker Level ET |
35 |
Group Delay ET |
35 |
Dynamic Range L |
35 |
Contour/Tone Settings TX |
35 |
Cinema EQ K |
35 |
Tuner Controls . . . . . . . . . . . . . . . . . . . . . . . . . . . . . . . . . . . . . . . . . . . . . . . . . |
36 |
BAND Buttons 4I |
36 |
TUNING Buttons 3P |
36 |
MEMORY Button 0B |
36 |
NUMERIC Buttons: Station Presets 70B |
36 |
DIRECT Button 8 |
37 |
FRQ DIRECT Button D |
37 |
MONO Button 9 |
37 |
FM MONO Button H |
37 |
TUNE Button F |
37 |
PRESET Button G |
37 |
P-TUN Button Z |
37 |
SCAN Button M |
37 |
RDS and RBDS Tuning. . . . . . . . . . . . . . . . . . . . . . . . . . . . . . . . . . . . . . . . . . . . |
37 |
DISP Button |
38 |
PTY Button |
38 |
TP Button |
38 |
TA Button |
38 |
Remote Zone Operation . . . . . . . . . . . . . . . . . . . . . . . . . . . . . . . . . . . . . . . . . . |
38 |
Remote Zone Power On/Off |
39 |
Controlling Zones 2–4 from the Main Room 16-AQTU |
39 |
Controlling Zones 2–4 from the Remote Location AQTU |
39 |
SETUP. . . . . . . . . . . . . . . . . . . . . . . . . . . . . . . . . . . . . . . . . . . . . . . . . . . . . . . |
40 |
Menu Basics . . . . . . . . . . . . . . . . . . . . . . . . . . . . . . . . . . . . . . . . . . . . . . . . . . |
40 |
Navigation Buttons ST |
40 |
System Status |
40 |
Main Menu |
41 |
Configuring Inputs . . . . . . . . . . . . . . . . . . . . . . . . . . . . . . . . . . . . . . . . . . . . . . |
41 |
Input Setup |
41 |
Multi Input Setup |
42 |
Dolby Pro Logic IIx |
42 |
DTS Neo:6 |
43 |
Configuring Speakers and Audio . . . . . . . . . . . . . . . . . . . . . . . . . . . . . . . . . . . . |
43 |
Understanding Speaker Configuration |
43 |
Speaker Setup |
44 |
Advanced Speaker Setup |
45 |
Subwoofer Setup |
45 |
Test Tone |
46 |
Delay Setup |
47 |
Contour Setup |
47 |
Miscellaneous Settings . . . . . . . . . . . . . . . . . . . . . . . . . . . . . . . . . . . . . . . . . . . |
48 |
Other Options |
48 |
Video/HDMI Setup |
48 |
Zones 2–4 Setup |
49 |
Default Setup |
49 |
MORE INFORMATION. . . . . . . . . . . . . . . . . . . . . . . . . . . . . . . . . . . . . . . . . . . . 51
Troubleshooting . . . . . . . . . . . . . . . . . . . . . . . . . . . . . . . . . . . . . . . . . . . . . . . . 51
HDMI: Frequently Asked Questions. . . . . . . . . . . . . . . . . . . . . . . . . . . . . . . . . . 51
Specifications. . . . . . . . . . . . . . . . . . . . . . . . . . . . . . . . . . . . . . . . . . . . . . . . . . 53
Audio |
53 |
Video |
53 |
FM Tuner |
53 |
AM Tuner |
53 |
General |
53 |
RSX-1550 English v2.indd 14 |
|
|
27/8/08 14:22:07 |
|
|
||
|
|
|
|

English |
15 |
About Rotel
Our story began nearly 50 years ago. Over the decades, we have received hundreds of awards for our products and satisfied hundreds of thousands of people who take their entertainment seriously – like you!
Rotel was founded by a family whose passionate interest in music led them to manufacture high-fidelity components of uncompromising quality. Through the years, that passion has remained undiminished and the family goal of providing exceptional value for audiophiles and music lovers, regardless of their budget, is shared by all Rotel employees.
Rotel’s engineers work as a close team, listening to, and fine tuning, each new product until it reaches their exacting musical standards. They are free to choose components from around the world in order to make that product the best they can. You are likely to find capacitors from the United Kingdom and Germany, semiconductors from Japan or the United States, while toroidal power transformers are manufactured in Rotel’s own factory.
We all have concerns about our environment. And, as more and more electronics are produced and later discarded, it is especially important for a manufacturer to do all it can to engineer products that have a minimum negative impact on landfill sites and water tables.
At Rotel, we are proud to do our part. We have reduced the lead content in our electronics by using special ROHS solder, while our new Class D (not digital) amplifiers are up to five times more efficient than our legacy designs and still deliver power and performance. These products run cool, give minimum wasted energy, are good for the environment and give better sound too.
Finally, we have printed this brochure on recycled paper stock.
While we understand that these are small first steps, they are still important ones. And we continue to pursue new methods and materials for a cleaner and greener manufacturing process.
All of us at Rotel thank you for buying this product. We are sure it will bring you many years of enjoyment.
Manufactured under license from Dolby Laboratories. Dolby and the double-D symbol are trademarks of Dolby Laboratories. Copyright 1995-2005. All rights reserved.
Manufactured under license under U.S. Patents: 5,451,942; 5,956,674; 5,974,380; 5,978,762; 6,226,616; 6,487,535 and other U.S. and worldwide patents issued and pending. DTS is a registered trademark and the DTS logos, Symbol, DTS-HD and DTS-HD Master Audio are trademarks of DTS, Inc. Copyright 1996-2007 DTS, Inc. All Rights Reserved.
Getting Started
Thank you for purchasing the Rotel RSX-1550 Surround Sound Receiver. The RSX-1550 is four products in one:
1.A digital audio/video processor for a wide range of formats including Dolby Surround®, Dolby Digital® and DTS® source material.
2.A full-featured audio/video control center for analog and digital source components.
3.A high-quality AM/FM tuner with RDS capability.
4.A 5-channel power amplifier to drive two front speakers (or two center back speakers), a center channel speaker, and two rear surround speakers.
Video features
•Analog input and output video connections for use with Composite video, S-Video, and Component Video signals, including conversion to Component Video output.
•HDMI switching for digital video signals up to 1080p and HDMI Bypass video. Compatible with DVI components with HDMI-DVI adapter. For more information see the section ‘HDMI: Frequently Asked Questions’ in this manual.
•Videophile line-doubling and scaling up to high-definition resolutions.
•Accepts any type of video input: NTSC 480i, PAL 576i, NTSC 480p, PAL 576p, 720p, 1080i, 1080p and 1080p 24Hz.
•Outputs digital or analog video at any resolution (NTSC 480i, PAL 576i, NTSC 480p, PAL 576p, 720p, 1080i, 1080p) to match any digital or analog TVs.
Audio features
•Rotel’s Balanced Design Concept combines advanced circuit board layout, comprehensive parts evaluation, and extensive listening tests for superior sound and reliability.
•Analog bypass mode for pure 2-speaker stereo with no digital processing.
•Optical digital, coax digital, and analog input and output audio connections. (HDMI video connections also carry digital audio, so when using HDMI there is no need for separate audio cables.)
•DVD-A high-resolution multichannel audio signals are automatically detected.
•MULTI Input for 7.1 channel analog signals from DVD-A and SACD players. Subwoofer options include .1 channel pass through or bass redirect feature with an analog low-pass filter for a summed subwoofer output from seven channels.
•AM/FM tuner with 30 station presets, direct access tuning, and autotuning.
•RDS (Radio Data Systems) and RBDS (Radio Broadcast Data Service) capability.
RSX-1550 English v2.indd 15 |
|
|
27/8/08 14:22:07 |
|
|
||
|
|
|
|

16 |
RSX-1550 Surround Sound Receiver |
Surround features
•Five built-in amplifier channels, each delivering 75 watts (all channels driven).
•Automatic Dolby® Digital decoding for Dolby® Digital 2.0, Dolby® Digital 5.1, Dolby® Digital Surround EXTM, Dolby® TrueHD and Dolby® Digital Plus recordings.
•Dolby® Pro Logic® IIx decoding (for 6.1 and 7.1 channel systems) with improved separation and frequency response for Dolby® Surround matrix encoded recordings. Can be optimized for Music or Cinema sources, Pro Logic® or Games.
•Automatic decoding for DTS® 5.1 channel, DTS-ES® Matrix 6.1 channel, DTS-ES® Discrete 6.1 channel, DTS 96/24, DTS-ES® 96/24 digital, DTS-HDTM Master Audio and DTS-HDTM High Resolution recordings.
•DTS® Neo:6® Surround modes for deriving surround channels for 5.1, 6.1 or 7.1 channel systems from 2-channel stereo or matrix surround recordings. Can be optimized for Music or Cinema sources.
•Rotel XS (eXtra Surround) automatically ensures proper decoding and optimum performance from any multichannel digital signal on 6.1 and 7.1 channel systems. Always active in any system with center back speaker(s), Rotel XS even works with signals that would not otherwise activate the proper decoding (such as non-flagged DTSES and Dolby Surround EX discs) or for which there is no extended surround decoder (such as DTS 5.1, Dolby Digital 5.1, and even Dolby Pro Logic II decoded Dolby Digital 2.0 recordings).
•Surround modes for playback of surround sound material on 2 channel and 3 channel systems for total compatibility.
•Four DSP Music modes.
Other features
•Zone 2, 3, and 4 outputs with independent input selection and volume adjustments for multi-zone custom installations along with IR-repeater capability for operation from the remote zone.
•User friendly ON-SCREEN DISPLAY (OSD) menu system with programmable labels for all inputs. Choice of languages.
•Learning remote control to operate this receiver and other components.
•Upgradable microprocessor software to accommodate future upgrades.
•Assignable 12V trigger outputs for remote turn-on of power amplifiers and other components.
Unpacking
Remove the unit carefully from its packing. Find the remote control and other accessories. Save the box as it will protect the product if you move or need to return it for maintenance.
Placement
Place the unit on a solid, level surface away from sunlight, heat, moisture, or vibration. Make sure that the shelf can support the weight of the unit.
Place the unit close to the other components in your system and, if possible, on its own shelf. This will make initial hookup, and subsequent system changes easier.
The unit can generate heat during normal operation. Do not block ventilation openings. Allow a minimum of 10 cm or 4 inches of unobstructed space around the unit. If installed in a cabinet, make sure that there is adequate ventilation.
Don’t stack other components or objects on top of the unit. Don’t let any liquid fall into the cabinet.
RSX-1550 English v2.indd 16 |
|
|
27/8/08 14:22:08 |
|
|
||
|
|
|
|

English |
17 |
OVERVIEW OF CONNECTIONS
Although the rear panel may look daunting, connecting the unit to your system is straightforward. Each of the source components in the system are connected to the receiver’s inputs with a pair of standard RCA cables for analog audio, a video connection (Composite, S-Video, Component Video, and/or HDMI), and an optional digital audio cable (coax or optical).
Note: Surround formats like Dolby Digital and DTS are digital formats and the receiver can only decode them when a digital input signal is available. For this reason, you should always connect your DVD player’s digital outputs to the receiver, using either the optical or coax inputs.
The outputs of the receiver are sent to up to five speakers, or to optional power amplifier(s) with standard RCA cables from the preamp audio outputs. The video signal from the RSX-1550 is sent to the TV monitor using Composite video, S-Video, Component Video, and/or HDMI connections.
In addition, the receiver has MULTI input connections for a source component that does its own surround decoding, remote IR sensor inputs, and 12V trigger connections for remote turn-on of other Rotel components.
Note: Do NOT plug any system component into an AC source until all connections have been properly made.Video cables should have a 75 ohm impedance. The S/PDIF digital audio interface standard also specifies a 75 ohm impedance and all good digital cables adhere to this requirement. Do NOT substitute conventional audio interconnect cables for digital or video signals. Standard audio interconnects will pass these signals, but their limited bandwidth reduce performance.
When making signal connections, connect LEFT channels to LEFT channel jacks and RIGHT channels to RIGHT channel jacks. All RCA-type connections on this product follow these standard color codes:
Left channel audio: white RCA jack
Right channel audio: red RCA jack
Composite video: yellow RCA jack
Note: Each source input must be properly configured using the INPUT SETUP menu of the OSD menu system. We recommend going to this menu after connecting each source to configure it as desired. See Input Setup in the Setup section for information.
Video Inputs & Outputs
These connections are used for connecting video signals to and from the unit. See the Making Connections section for specific instructions for each type of component.
The RSX-1550 provides Composite, S-Video, Component Video, and HDMI connections Composite video connections simplify system configuration; however, S-Video connections typically provide better
picture quality. Component Video or HDMI connections provide the best signal quality and are required for HDTV or progressive scanned DVD video.
Note: For proper operation, all HDMI components and TVs connected to this receiver should be compatible with the HDMI Version 1.1 standard or higher. The HDMI digital connections are usually compatible with DVI components with an appropriate DVI-D cable adapter. For more information see the section HDMI: Frequently Asked Questions, in this manual.
VIDEO INPUT/OUTPUT FORMATS
√ √ √ √ √ √ √ √ √ √
√ √ √ √ √ √ √ √ √ √
√ √ √ √ √ √ √
√ √ √ √ √
√ √ √ √ √
√ √ √ √ √
√
√
√
√
√
√
√
Input video formats supported: 480i, 576i, 480p, 576p, 720p60, 720p50,1080i60, 1080i50, 1080p60, 1080p50 60Hz video input gives 60Hz video output; 50Hz video input gives 50Hz video output
RSX-1550 English v2.indd 17 |
|
|
27/8/08 14:22:09 |
|
|
||
|
|
|
|
 Loading...