


Owner’s Manual
VR-09
VR-730
 Owner’s Manual (this document)
Read this first. It explains the basic things you need to know in order to use the unit.
|
|
|
PDF Manual (download from the Web) |
|
|
To obtain the PDF manual |
||||||||||||||||||||
|
|
|
|
|
||||||||||||||||||||||
|
|
|
|
|
||||||||||||||||||||||
|
• Reference Manual |
|
1. Enter the following URL in your |
|
|
|
|
|
|
|
|
|
|
|
|
|
|
|
|
|
|
|
|
|||
|
|
|
This explains all functions of the unit. |
|
|
|
|
|
|
|
|
|
|
|
|
|
|
|
|
|
|
|
|
|
||
|
• Data List |
|
|
computer. |
|
|
|
|
|
|
|
|
|
|
|
|
|
|
|
|
|
|
|
|
||
|
|
|
|
|
|
|
|
|
|
|
|
|
|
|
|
|
|
|
|
|
|
|
||||
|
|
|
http://roland.cm/om |
|
|
|
|
|
|
|
|
|
|
|
|
|
|
|
|
|
|
|
|
|||
|
|
|
This is a list of the sounds, drum kits, rhythm patterns, and sound effects built |
|
|
|
|
|
|
|
|
|
|
|
|
|
|
|
|
|
|
|
|
|
|
|
|
|
|
into the unit. |
|
2. Choose “V-Combo VR-09” or |
|
|
|
|
|
|
|
|
|
|
|
|
|
|
|
|
|
|
|
|
|
|
• MIDI Implementation |
|
|
|
|
|
|
|
|
|
|
|
|
|
|
|
|
|
|
|
|
|
||||
|
|
|
This is detailed information about MIDI messages. |
|
|
“V-Combo VR-730” as the product name. |
||||||||||||||||||||
|
|
|
|
|
|
|
|
|
|
|
|
|
|
|
|
|
|
|
|
|
|
|
|
|
|
|
Before using this unit, carefully read “USING THE UNIT SAFELY” and “IMPORTANT NOTES” (the leaflet “USING THE UNIT SAFELY” and the Owner’s Manual (p. 32)). After reading, keep the document(s) where it will be available for immediate reference.
Copyright © 2017 ROLAND CORPORATION

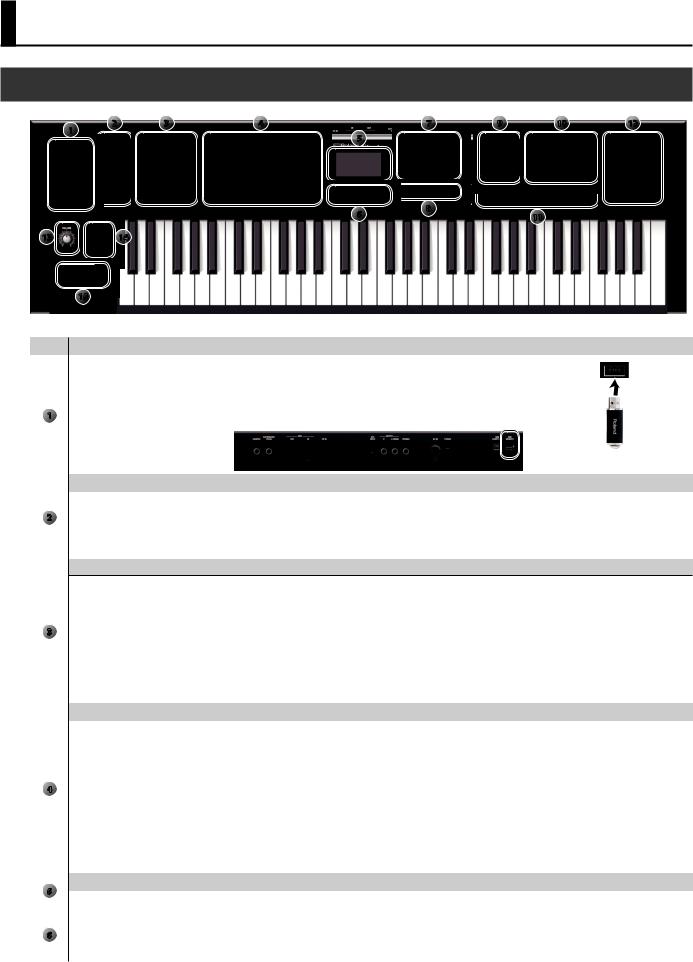
An Overview of This Unit
Sound Sections
This unit has three sound sections—organ, piano, and synthesizer—and each section occupies a separate area of the panel.
You can also play two sounds simultaneously, or divide the keyboard into two regions and play different sounds in the left and right regions.
Organ section |
|
Piano section |
|
Synthesizer section |
|
|
|
|
|
|
|
Here you can use the harmonic bars to |
Here you can choose |
|
Here you can select synthesizer sounds. |
||
shape the organ sound to your taste. |
sounds. |
|
|
|
|
MODE buttons
Here you can select an individual organ sound, piano sound, or synthesizer sound at a single touch.
* The illustration shows the VR-09.
REFERENCE
•“Selecting Sounds” (p. 9)
•“Modifying the Organ Sound” (p. 12)
•“ModifyingtheSynthesizerSound”(p.13)
•“Combining Two Sounds” (p. 18)
Effect/Rotary
You can apply effects and a rotary speaker simulation.
By operating the knobs and buttons you can make the sound change in real time.
Registration
Sound and effect settings as well as combinations of sounds can be stored as a “registration.”
You can easily switch between sounds by recalling a previously-stored registration.
REFERENCE
“Selecting Your Favorite Sounds (Registration)” (p. 10)
REFERENCE
•“Adding Effects to the Sound” (p. 14)
•“Using the Rotary Effect” (p. 12)
Drum section
The drum section lets you do the following.
•Play drum sounds or sound effects from the keyboard (p. 11).
•Perform while playing back internal rhythm patterns or songs from a USB flash drive (p. 22, p. 24).
•Record your performance (p. 23).
•Perform using the looper (p. 26).
2
Contents
An Overview of This Unit. . . . . . . . . . . . . . . . . . . . . . . . . . . . . . . . . . . . . . . . . . 2
Panel Descriptions. . . . . . . . . . . . . . . . . . . . . . . . . . . . . . . . . . . . . . . . . . . . . . . . 4
Front Panel. . . . . . . . . . . . . . . . . . . . . . . . . . . 4 Rear Panel (Connecting Devices).. . . . . . . . . . . . . . . . 6
Getting Ready. . . . . . . . . . . . . . . . . . . . . . . . . . . . . . . . . . . . . . . . . . . . . . . . . . . . 7
Installing Batteries . . . . . . . . . . . . . . . . . . . . . . . . 7 Attaching the Ferrite Core. . . . . . . . . . . . . . . . . . . . 7 Turning the Power On/Off. . . . . . . . . . . . . . . . . . . . 8 Turning the Power On. . . . . . . . . . . . . . . . . . . 8 Turning the Power Off. . . . . . . . . . . . . . . . . . . 8 Listening to the Demo Songs. . . . . . . . . . . . . . . . . . . 8 Using the Included USB Memory Protector. . . . . . . . . . . . 8
Selecting Sounds . . . . . . . . . . . . . |
. . . . |
. . . . . . . . . . . . . . . . . . . . . . . . . . . . |
. . |
. . 9 |
Selecting Sounds with One Touch. . . . . . . . . . . . . . . . . . . . . . . . . . . . |
. . |
. . 9 |
||
Selecting Organ Sounds . . . . . . . . . . . . . .. . |
. |
. 9 |
||
Selecting Piano Sounds. . |
. . . . . . . . . . . . . . . . |
|
9 |
|
Selecting Synthesizer Sounds.. . . . . . . . . . . . . |
. |
10 |
||
Selecting Your Favorite Sounds (Registration) . . . . . . .. . |
. 10 |
|||
Recalling a Registration. . |
. . . . . . . . . . . . . . . |
|
10 |
|
Switching Registration Banks . . . . . . . . . . . .. . |
. |
11 |
||
Storing a Registration . . |
. . . . . . . . . . . . . . . |
. |
.11 |
|
Selecting Drum Sounds . . |
. . . . . . . . . . . . . . . . . |
. |
.11 |
|
|
|
|
|
|
Modifying the Organ Sound. . . |
. . . . |
. . . . . . . . . . . . . . . . . . . . . . . . . . . . . |
. |
.12 |
Using the Harmonic Bars . . . . . . . . . . . . . . . . . . . |
. |
12 |
||
Using the Rotary Effect. . . . . . . . . . . . . . . . . . . . |
. |
12 |
||
Using Percussion. . . . . . . . . . . . . . . . . . . . . . . |
. |
12 |
||
Using Vibrato/Chorus. . . . . . |
. . . . |
. . . . . . . . . . . |
|
12 |
|
|
|
||
Modifying the Synthesizer Sound.. . . . . . . . . . . . . . . . . . . . . . . . . . . . . . . . |
|
13 |
||
Changing the Volume Envelope (ATTACK, DECAY, RELEASE). . |
. .13 |
|||
Adjusting the Tonal Character (CUTOFF, RESONANCE) . . .. . |
. 13 |
|||
|
|
|
|
|
Adding Effects to the Sound.. . |
. . . . |
. . . . . . . . . . . . . . . . . . . . . . . . . . . . . . . |
|
14 |
Applying Effects (EFX). . . . . . . . . . . . . . . . . . . . |
. |
.14 |
||
Modifying the Sound / Producing Sound Effects (D-BEAM |
|
15 |
||
Controller). . . . . . . . . . . . . . . . . . . . . . . . . . |
. |
|||
D-BEAM Controller Settings. . . . . . . . . . . . . . . |
|
15 |
||
Changing the Pitch/Applying Vibrato (Pitch Bend/Modulation |
|
16 |
||
Lever) . . . . . . . . . . . . . . . . . . |
. . . . |
. . . . . . . |
|
|
Making the Pitch Change Smoothly (Portamento) . . . . .. . |
. 16 |
|||
Specifying the Time of Pitch Change . . . . . . . .. . |
. |
.16 |
||
|
|
|
|
|
Changing the Key Range. . . . . . . |
. . . |
. . . . . . . . . . . . . . . . . . . . . . . . . . . . . |
. |
.17 |
Raising or Lowering the Range in Octaves (Octave) . . . .. . |
. .17 |
|||
Transposing the Key (Transpose) . . . . . . . . . . . . . . . . |
|
17 |
||
|
|
|
|
|
Combining Two Sounds. . . . . |
. . . . . . . . . . . . . . . . . . . . . . . . . . . . . . . . . . . |
. |
.18 |
Layering Two Sounds (Dual) . . . . . . . . . . . . . . . .. . |
|
.18 |
|
Layering a Piano Sound and Synthesizer Sound . . . . 18. . |
|||
Combining an Organ Sound with a Piano Sound or |
|
18 |
|
Synthesizer Sound . |
. . . . . . . . . . . . . . . . . . |
. |
|
Cancelling Dual. . . . . . . . . . . . . . . . . . . . . |
|
.18 |
|
Playing Different Sounds in the Left and Right Hands (Split) . . |
. 19 |
||
Assigning the Dual Sounds to the Left and Right Regions. |
|
.19 |
|
Combining Two Organ Sounds. . . . . . . . . . . . . . . . . . . . . . . . . . |
. |
.19 |
|
Combining a Piano Sound and Synthesizer Sound.. . . . 20 |
|||
Combining an Organ Sound with a Piano Sound or |
|
20 |
|
Synthesizer Sound . |
. . . . . . . . . . . . . . . . . . |
. |
|
Playing Drum Sounds in the Lower Part . . . . . . .. . |
. 21 |
||
Changing the Split Point . . . . . . . . . . . . . . . . . |
|
21 |
|
Cancelling Split . . |
. . . . . . . . . . . . . . . . . . . |
|
.21 |
|
|
|
|
Performing with Rhythm Pattern . . . . . . . . . . . . . . . . . . . . . . . . . . . . . . . |
. |
.22 |
|
Selecting/Playing Rhythm Pattern . . . . . . . . . . . . .. . |
|
.22 |
|
Changing the Tempo of the Rhythm Pattern. . . . . . . . . . |
|
22 |
|
Adjusting the Volume of the Rhythm Pattern . . . . . . . .. . |
|
.22 |
|
|
|
|
|
Recording Your Performance |
. . . . . . . . . . . . . . . . . . . . . . . . . . . . . . . . . . . |
. |
.23 |
Recording. . . . . . . . . . . . . . . |
. . . . . . . . . . . . |
|
23 |
Playing a Song. . . . . . . . . . . . . . . . . . . . . . . . |
. |
24 |
|
Renaming a Song. . . . . . . . . . . . . . . . . . . . . . . |
|
.24 |
|
Deleting a Song. . . . . . . . . . . . . . . . . . . . . . . . |
|
.24 |
|
|
|
|
|
Using the Looper . . . . . . . . . . . . |
. . . . . . . . . . . . . . . . . . . . . . . . . . . . . . . . . . |
. |
.26 |
Recording with the Looper . . . . . . . . . . . . . . . .. . |
. |
26 |
|
Recording While a Rhythm Pattern Plays . . . . . . .. . |
|
.27 |
|
Loading an Audio File for Playback or Recording. . . . . |
|
27 |
|
Deleting the Phrase . . . . . . . . . . . . . . . . .. . |
|
.27 |
|
Saving a Phrase. . . . . . . . . . . . . . . . . . . . . . . . |
|
.27 |
|
|
|
|
|
Convenient Functions.. . . . . . . |
. . . . . . . . . . . . . . . . . . . . . . . . . . . . . . . . . . . . |
|
28 |
Making the Power Automatically Turn Off After a Time (Auto Off).28 |
|||
Saving Registrations to a USB Flash Drive (Save Registration) . . |
|
.28 |
|
Loading Saved Registrations from a USB Flash Drive (Load |
|
29 |
|
Registration). . . . . . . . . . . . . . . . . . . . . . . . . |
. |
||
Individually Loading Registrations from a USB Flash Drive (Load |
.29 |
||
One Regist) . . . . . . . . . . . . . . . . . . . . . . . . . . |
|
||
Formatting a USB Flash Drive (Format USB). . . . . . . . . . . |
|
30 |
|
Initializing a Synthesizer Sound . . . . . . . . . . . . . .. . |
. |
30 |
|
Restoring the Factory Settings (Factory Reset) . . . . . . . ... |
|
30 |
|
|
|
|
|
Detailed Settings for All Functions (Menu). . . . . . . . . . . . . . . . . . . . . . . . |
|
31 |
|
|
|
|
|
Main Specifications. . . . . . . . . . |
. . . . . . . . . . . . . . . . . . . . . . . . . . . . . . . . . . |
. |
.31 |
|
|
|
|
USING THE UNIT SAFELY. . . . . . . |
. . . . . . . . . . . . . . . . . . . . . . . . . . . . . . . . . . |
|
32 |
|
|
|
|
IMPORTANT NOTES . . . . . . . . . . |
. . . . . . . . . . . . . . . . . . . . . . . . . . . . . . . . . . |
. |
.32 |
|
|
|
|
3
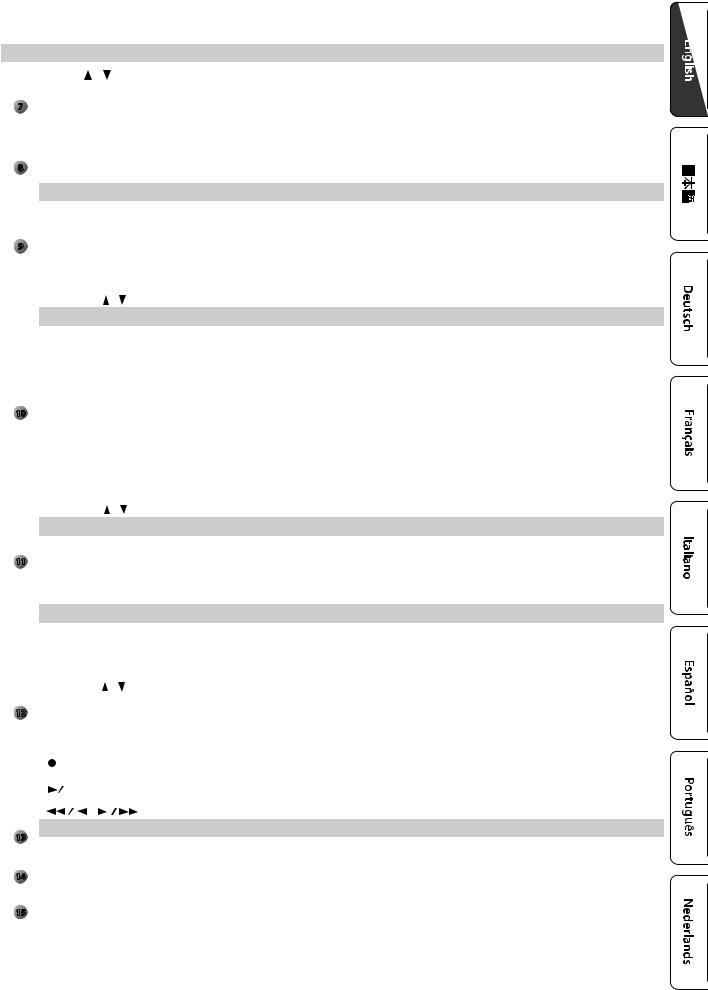
Panel Descriptions
Front Panel
1 |
2 |
3 |
4 |
7 |
9 |
10 |
12 |
|
|
|
5 |
|
|
|
|
|
|
|
|
|
|
|
|
|
|
|
|
|
|
|
|
|
|
8 |
|
|
|
|
|
|
13 |
|
|
|
|
|
14 |
|
6 |
|
|
|
|
11 |
|
|
|
|
|
|
|
|
|
|
|
|
|
|
|
|
|
|
||||
|
|
|
|
|
|
|
|
|
|
|
|
|
|
|
|
||
|
|
|
|
|
|
|
|
|
|
|
|
|
|
|
|
|
|
|
|
|
|
|
|
|
|
|
|
|
|
|
|
|
|
|
|
|
|
|
15 |
|
|
|
|
|
|
|
|
|
|
|
|
|
|
* The illustration shows the VR-09. |
|
|
|
|
|
|
|
|
|
|
|
||||||
|
|
|
|
|
|
|
|
|
|
||||||||
Number |
Name |
Explanation |
|
|
|
|
|
|
Page |
||||||||
|
|
|
|
|
|
|
|
|
|
|
|
|
|
|
|||
|
|
|
|
|
|
|
Connect a USB flash drive (sold separately) here. |
|
|
|
|
|
|
|
|||
|
|
|
|
|
|
|
You can save or play back songs you’ve recorded, and save or load registration sets. |
|
|||||||||
|
|
|
|
|
|
|
If you connect a wireless USB adapter (WNA1100-RL; sold separately), you’ll be able to use |
|
|
|
|||||||
1 |
|
|
USB MEMORY port |
applications that support wireless. |
|
|
|
|
|
|
p. 23 |
||||||
|
|
* The VR-730’s USB MEMORY port is located at the right side of the rear |
panel. |
|
|
|
p. 28 |
||||||||||
|
|
|
|
|
|
|
|
|
|
||||||||
|
|
|
|
|
|
|
|
|
|
|
|
|
|
|
|||
|
|
|
|
|
|
|
|
|
|
|
|
|
|
|
|
|
|
|
|
|
|
|
|
|
|
|
|
|
|
|
|
|
|
|
|
|
|
|
D-BEAM controller |
|
|
|
|
|
|
|
|
|
|
|
|||
|
|
|
|
|
|
|
|
|
|||||||||
|
|
|
You can apply various effects to the sound by positioning your hand above the D-BEAM controller. |
|
|
|
|
||||||||||
2 |
|
|
|
|
|
|
|
|
|
||||||||
|
|
[PITCH] button |
If this is on, the D-BEAM controller will control the pitch. |
|
|
|
|
||||||||||
|
|
|
|
|
|
|
|
|
|
||||||||
|
|
|
[SFX] button |
If this is on, the D-BEAM controller will control the sound effects. |
|
|
|
p. 15 |
|||||||||
|
|
|
[CONTROLLER] button |
If this is on, the D-BEAM controller will control the effect you’ve assigned. |
|
|
|
|
|||||||||
|
|
|
|
|
|
|
|
|
|
|
|
|
|
|
|
|
|
Effect section
Here you can apply effects to the sound.
|
[OVERDRIVE] knob |
Applies a distortion effect. |
|
|
|
|
|
|
|
3 |
[TONE] knob |
Adjusts the tonal character. |
|
|
|
|
|
||
[COMPRESSOR] knob |
Makes the sound more consistent. |
p. 14 |
||
|
||||
|
|
|
||
|
[MFX] knob |
Applies a multi-effect (multiple effects). |
||
|
|
|||
|
|
|
|
|
|
[DELAY] knob |
Delays the sound to create an echo-like effect. |
|
|
|
|
|
|
|
|
[REVERB] knob |
Applies reverberation to the sound. |
|
|
|
|
|
|
|
|
Organ section |
|
|
|
|
|
|
||
|
Here you can select organ sounds. You can also create your own organ sounds, and adjust the volume. |
|
||
|
|
|
|
|
|
Harmonic bars |
Use these to shape the organ sound. |
p. 12 |
|
|
You can modify the sound in real time as you play. |
|||
|
|
|
||
|
|
|
|
|
4 |
[LEVEL] bar |
Adjusts the volume of the organ section. |
— |
|
|
|
|
||
[TYPE] button |
Selects the variation of organ sounds. |
p. 9 |
||
|
||||
|
ORGAN [SPLIT] button |
Divides the organ into two keyboard regions. |
p. 19 |
|
|
|
|
|
|
|
[UPPER/LOWER] button |
Selects the part when using the harmonic bars to shape the sound. |
p. 19 |
|
|
|
|
|
|
|
[PERCUSSION] button |
Turns the percussion effect of the organ sound on/off. |
p. 12 |
|
|
|
|
|
|
|
[VIBRATO/CHORUS] button |
Turns the vibrato or chorus effect of the organ sound on/off. |
p. 12 |
|
|
|
|
|
|
5 |
Display |
|
|
|
|
|
|
||
Display |
Sound names and other settings are shown here. |
— |
||
|
||||
|
|
|
|
|
|
MODE [ORGAN] button |
Allows you to play organ sounds. |
p. 9 |
|
6 |
|
|
|
|
MODE [PIANO] button |
Allows you to play piano sounds. |
p. 9 |
||
|
|
|
|
|
|
MODE [SYNTH] button |
Allows you to play synthesizer sounds. |
p. 10 |
|
|
|
|
|
|
4
|
|
|
|
|
|
|
|
|
|
|
Panel Descriptions |
|
|
|
|
|
|
|
|
|
|
|
|
|
|
|
Number |
Name |
|
|
|
Explanation |
|
Page |
||||
|
|
|
|
|
|
|
|
|
|
|
||
|
|
CURSOR [ ] [ |
] buttons |
|
Use these to select parameters. |
|
— |
|||||
|
|
|
|
|
|
|
|
|
|
|
|
|
|
|
[VALUE] dial |
|
|
|
Use this to modify a value. |
|
— |
||||
7 |
|
|
|
|
|
|
|
|
|
|
||
[MENU] button |
|
|
|
Accesses the menu screen. |
|
p. 28 |
||||||
|
|
|
|
|
|
|
|
|
|
|
|
|
|
|
[ENTER] button |
|
|
|
Confirms a value or executes an operation. |
|
— |
||||
|
|
|
|
|
|
|
|
|
|
|
|
|
|
|
[EXIT] button |
|
|
|
Returns to the previous screen, or cancels an operation. |
|
— |
||||
|
|
|
|
|
|
|
|
|
|
|
||
8 |
[TRANSPOSE] button |
|
Raises or lowers the keyboard range in steps of one semitone. |
|
p. 17 |
|||||||
OCTAVE [DOWN] [UP] buttons |
|
Raise or lower the keyboard range in steps of one octave. |
|
p. 17 |
||||||||
|
|
|
|
|||||||||
|
|
|
|
|
|
|
|
|
|
|
|
|
|
|
Piano section |
|
|
|
|
|
|
||||
|
|
|
|
|
|
|
|
|
||||
|
|
Here you can select piano sounds and adjust the volume of the piano sound. |
|
|
||||||||
|
|
|
|
|
|
|
|
|
|
|
|
|
|
|
[PIANO] button |
|
|
|
Selects piano sounds. |
|
|
||||
9 |
[E.. PIANO] button |
|
|
Selects electric piano sounds. |
|
p. 9 |
||||||
|
|
[CLAV] button |
|
|
|
Selects clavi sounds. |
|
|||||
|
|
|
|
|
|
|
||||||
|
|
|
|
|
|
|
|
|
|
|
|
|
|
|
[OTHERS] button |
|
|
Selects piano sounds that are not shown on the panel. |
|
|
|||||
|
|
|
|
|
|
|
|
|
|
|
|
|
|
|
PIANO LEVEL [ |
] [ |
] buttons |
|
Adjust the volume of the piano section. |
|
— |
||||
|
|
|
|
|
|
|
|
|
|
|
|
|
|
|
Synthesizer section |
|
|
|
|
|
|||||
|
|
|
|
|
|
|
|
|
||||
|
|
Here you can select synthesizer sounds and adjust the volume of the synthesizer sound. |
|
|
||||||||
|
|
|
|
|
|
|
|
|
|
|||
|
|
SYNTH [SPLIT] button |
|
Divides the keyboard, allowing you to play two different sounds. |
|
p. 19 |
||||||
|
|
|
|
|
|
|
|
|
|
|
|
|
|
|
[BRASS] button |
|
|
|
Selects brass sounds. |
|
|
||||
|
|
|
|
|
|
|
|
|
|
|
|
|
|
|
[STRINGS] button |
|
|
Selects strings sounds. |
|
|
|||||
10 |
[SYNTH LEAD] button |
|
Selects synth lead sounds. |
|
|
|||||||
|
|
|
|
|
|
|
|
|
|
|
||
[BASS] button |
|
|
|
Selects bass sounds. |
|
p. 10 |
||||||
|
|
|
|
|
|
|||||||
|
|
|
|
|
|
|
|
|
|
|
|
|
|
|
[PAD] button |
|
|
|
Selects synth pad sounds. |
|
|||||
|
|
|
|
|
|
|
||||||
|
|
|
|
|
|
|
|
|
|
|
|
|
|
|
[CHOIR] button |
|
|
|
Selects choir sounds. |
|
|
||||
|
|
|
|
|
|
|
|
|
|
|
|
|
|
|
[SFX] button |
|
|
|
Selects sound effects. |
|
|
||||
|
|
|
|
|
|
|
|
|
|
|
|
|
|
|
[OTHERS] button |
|
|
Selects synthesizer sounds that are not shown on the panel. |
|
|
|||||
|
|
|
|
|
|
|
|
|
|
|
|
|
|
|
SYNTH LEVEL [ |
] [ |
] buttons |
|
Adjusts the volume of the synthesizer section. |
|
— |
||||
|
|
|
|
|
|
|
|
|
|
|
|
|
|
|
Registration |
|
|
|
|
|
|
||||
|
|
|
|
|
|
|
|
|
||||
|
|
Here you can store and recall your favorite sound settings. |
|
|
||||||||
11 |
|
|
|
|
|
|
|
|
|
|
||
[BANK] button |
|
|
|
Selects the registration bank. |
|
p. 11 |
||||||
|
|
|
|
|
|
|
|
|
|
|
|
|
|
|
[1]–[4] buttons |
|
|
|
Select a registration (1–4). |
|
p. 10 |
||||
|
|
|
|
|
|
|
|
|
|
|
|
|
|
|
[NEXT] button |
|
|
|
Selects the next registration. |
|
p. 10 |
||||
|
|
|
|
|
|
|
|
|
|
|
|
|
|
|
Drum section |
|
|
|
|
|
|
||||
|
|
|
|
|
|
|
|
|
||||
|
|
Here you can select drum kits or rhythm patterns, and select and play songs. |
|
|
||||||||
|
|
|
|
|
|
|
|
|
|
|
|
|
|
|
[RHYTHM] button |
|
|
Selects drum kits. |
|
p. 11 |
|||||
|
|
|
|
|
|
|
|
|
|
|
|
|
|
|
[TAP TEMPO] button |
|
|
Specifies the tempo of the rhythm pattern. |
|
p. 22 |
|||||
|
|
|
|
|
|
|
|
|
|
|
|
|
|
|
DRUM LEVEL [ |
] [ |
] buttons |
|
Adjust the volume of the drum kit, song, or rhythm pattern. |
|
p. 22 |
||||
|
|
|
|
|
|
|
|
|
|
|
|
|
12 |
[LOOPER] button |
|
|
Turns the looper function on/off. |
|
p. 26 |
||||||
|
|
|
|
|
|
|
|
|
|
|
||
[SONG/RHYTHM] button |
|
Selects songs or rhythm patterns. |
|
p. 22 |
||||||||
|
|
|
|
|||||||||
|
|
|
|
p. 24 |
||||||||
|
|
|
|
|
|
|
|
|
|
|
|
|
|
|
|
|
|
|
|
|
|
|
|
|
|
|
|
[ |
] (REC) button |
|
|
Records your performance. |
|
p. 23 |
||||
|
|
|
|
|
p. 26 |
|||||||
|
|
|
|
|
|
|
|
|
|
|
|
|
|
|
|
|
|
|
|
|
|
|
|
|
|
|
|
[ |
|
|
] (START/STOP) button |
|
Starts/stops recording or playback. |
|
p. 24 |
|||
|
|
|
|
|
|
|||||||
|
|
|
|
|
|
|
|
|
|
|
|
|
|
|
[ |
|
] [ |
|
] buttons |
|
Move the playback position of the song. |
|
p. 24 |
||
|
|
|
|
|
|
|
|
|||||
|
|
|
|
|
|
|
|
|
|
|
|
|
13 |
Controllers at the left of the keyboard |
|
|
|
||||||||
|
|
|
|
|
|
|
|
|
|
|
||
[VOLUME] knob |
|
|
|
Adjusts the overall volume. |
|
— |
||||||
|
|
|
|
|
|
|||||||
|
|
|
|
|
|
|
|
|
|
|
||
|
|
ROTARY SOUND [ON/OFF] button |
|
Turns the rotary speaker (modulation effect) on/off. |
|
p. 12 |
||||||
14 |
|
|
|
|
|
|
|
|
|
|||
ROTARY SOUND [FAST/SLOW] |
|
Changes the speed of the rotary speaker. |
|
p. 12 |
||||||||
|
|
button |
|
|
|
|
||||||
|
|
|
|
|
|
|
|
|||||
|
|
|
|
|
|
|
|
|
|
|
||
15 |
Pitch bend/Modulation lever |
|
You can use the lever to modify the sound in real time. |
|
p. 16 |
|||||||
|
|
|
|
|
|
|
|
|
|
|
|
|
5
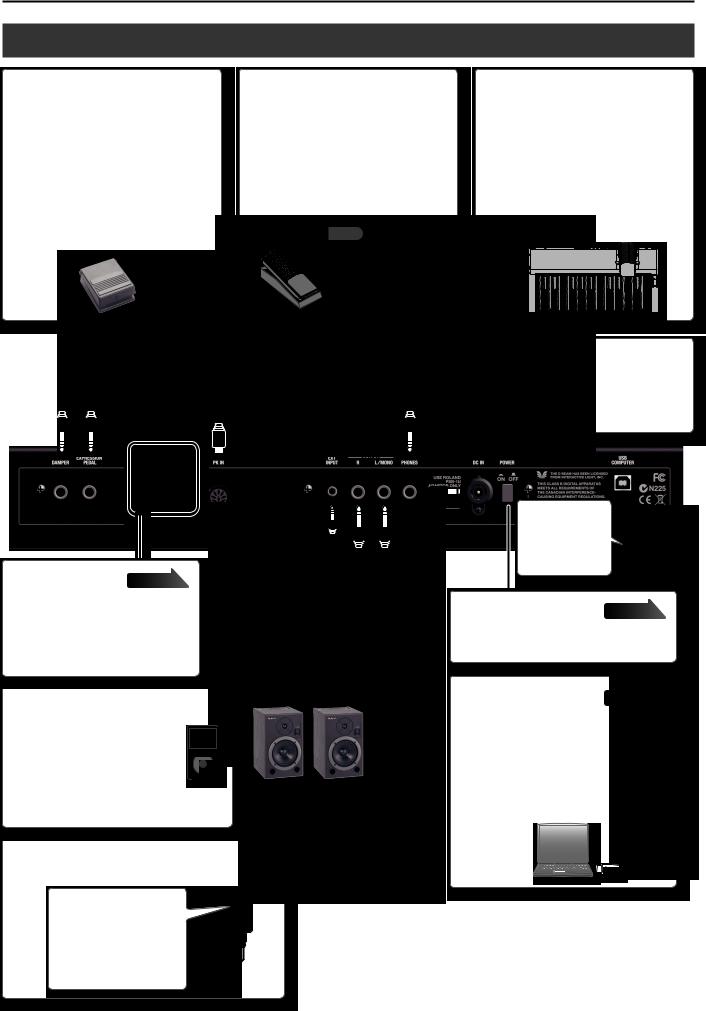
Panel Descriptions
Rear Panel (Connecting Devices)
DAMPER jack
You can connect a pedal switch or a damper pedal (DP series; sold separately) here.
The pedal switch can be used to sustain the notes.
While you continue holding down the pedal, notes will continue sounding even after you take your fingers off the keys.
You can also use the pedal switch to control the looper (Damper Assign: &PDF).
EXPRESSION PEDAL jack |
PK IN connector |
Connect an expression pedal (EV series; sold |
Connect a pedalboard (PK-9; sold separately) |
separately) to this jack. |
to this connector. |
You can use the expression pedal to control |
This allows you to play the pedal part of the |
the volume. |
organ. |
* Use only the specified expression pedal (EV |
|
series; sold separately). By connecting any |
|
other expression pedal, you risk causing |
|
malfunction and/or damage to the unit. |
|
MEMO |
|
You can also connect a |
|
pedal switch (DP-2; sold |
|
separately) here to control |
|
the looper (Expression |
|
Assign :&PDF). |
|
PHONES jack
Connect you headphones (sold separately) to this jack.
MIDI connectors |
Connect an external MIDI device here to transfer performance data.
*The MIDI connectors and the MIDI functionality of the USB COMPUTER port cannot be used simultaneously.
EXT INPUT jack
If you use a stereo mini-plug cable to connect your audio player or other audio source here, the sound from the connected device will be output from the OUTPUT jacks. Use the controls
of the connected device to adjust its volume.
*This sound cannot be recorded.
DC IN jack
Connect the included AC adaptor to this jack.
Place the AC adaptor so the side with the indicator faces upwards and the side with textual information faces downwards.
The indicator will light when you plug the AC adaptor into an AC outlet.
OUTPUT jacks
Connect an amp or mixer to these jacks to output the sound.
If you connect a USB cable, you must attach the ferrite core (VR-730 only: p. 7).
[POWER] switch |
page 8 |
Press this switch to turn it on/off.
USB COMPUTER port |
You can use a commercially available USB cable to connect this unit to your computer so that performance data (MIDI data) can be transmitted and received.
*The MIDI connectors and the MIDI functionality of the USB COMPUTER port cannot be used simultaneously.
*To prevent malfunction and equipment failure, always turn down the volume, and turn off all the units before making any connections.
*If you turn the power of this instrument on/off while a MIDI device is connected to the MIDI OUT connector, unexpected data might be transmitted from the MIDI OUT connector. If a problem occurs, disconnect the MIDI device while this instrument is still powered-on.
*When you operate the expression pedal, please be careful not to get your fingers pinched between the movable part and the panel. In places where small children are present, make sure that an adult provides supervision and guidance.
6
Getting Ready
Installing Batteries
If eight commercially available rechargeable Ni-MH batteries (AA, HR6) are installed, you’ll be able to play this unit without connecting the AC adaptor.
*If you handle batteries improperly, you risk explosion and fluid leakage. Make sure that you carefully observe all of the items related to batteries that are listed in “USING THE UNIT SAFELY” and “IMPORTANT NOTES” (leaflet “USING THE UNIT SAFELY” and Owner’s manual (p. 32)).
*We recommend that you keep batteries installed in the unit even though you’ll be powering it with the AC adaptor. That way, you’ll be able to continue a performance even if the cord of
Types of batteries that can be used
If operating this unit on batteries, please use rechargeable Ni-MH batteries.
Using rechargeable Ni-MH batteries will allow approximately 5 hours of continuous operation at room temperature. (However, the duration will be approximately 3 hours if
USB flash drive is connected. The duration of continuous operation may differ depending on the conditions of use.)
NOTE
Do not use alkaline batteries or carbon-zinc battery batteries.
1. While pressing the tabs of the battery compartment cover on this unit’s bottom panel, remove the cover..
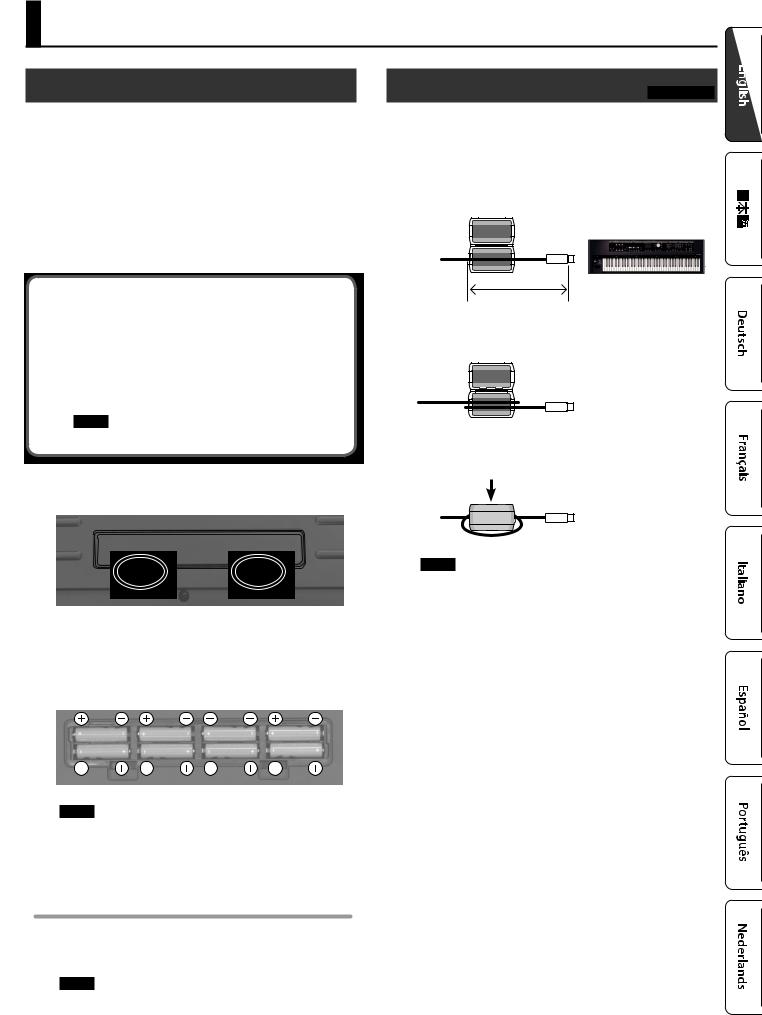
Attaching the Ferrite Core |
VR-730 only |
If you use the USB cable, you must attach the included ferrite core.
This is for the purpose of preventing electromagnetic noise; do not remove it.
1. Open the ferrite core and position it over the cable..
*You must attach the ferrite core near the plug (10 cm or less) that is connected to this unit.
10 cm or less
2. Wrap the cable around the ferrite core; one turn is enough..
3. Close it firmly; you should hear a distinct sound as it clicks shut..
*When turning the unit over, be careful so as to protect the buttons and knobs from damage. Also, handle the unit carefully; do not drop it.
2.Insert the batteries into the battery compartment, taking care to observe the correct polarity (+/- orientation)..
NOTE
Carefully follow the installation instructions for batteries, and make sure you observe the correct polarity.
3. Securely close the battery compartment cover..
When to Replace the Batteries
When the batteries run low, the display will indicate “Charge Battery.”
Stop use, and recharge the batteries.
NOTE
If you continue using the unit after the “Charge Battery” indication appears, the “Battery Low!” indication will appear, and further operation will not be possible.
NOTE
•Take care not to get your fingers pinched when attaching the ferrite core.
•Make sure you don’t apply undue force and damage the cable when clamping on the ferrite core.
Depending on the thickness of the cable, you might not be able to close the ferrite core with the cable wrapped once around
it. Use a cable of a thickness that allows the ferrite core to be attached with the cable wrapped once around it.
7
Getting Ready
Turning the Power On/Off
Turning the Power On
1. Before turning on this unit’s power, consider these two questions:
•Is the AC adaptor and any other equipment connected correctly?
•Have the volume controls of this unit and all connected audio devices been turned to their lowest settings?
2.Press the [POWER] switch of this unit to turn it on..
3.Turn on the power for any connected audio devices..
4.While playing the keyboard and listening to the sound, slowly increase the volume of this unit and the volume of the connected equipment until you obtain the desired volume..
Turning the Power Off
1. Before turning off the power, consider the following question:
•Have the volume controls of this unit and all connected audio devices been turned to their lowest settings?
2.Turn off the power for all connected audio devices..
3.Turn off the [POWER] switch of this unit..
Concerning the Auto Off function
The power to this unit will be turned off automatically after a predetermined amount of time has passed since it was last used for playing music, or its buttons or controls were operated (Auto Off function).
If you do not want the power to be turned off automatically, disengage the Auto Off function (p. 28).
•Any settings that you are in the process of editing will be lost when the power is turned off. If you have any settings that you want to keep, you should save them beforehand.
•To restore power, turn the power on again.
Listening to the Demo Songs
1. |
Here’s how to listen to the demo songs. |
|||
Turn the power on.. |
||||
2. |
Press the |
|
|
] (START/STOP) button.. |
|
||||
|
||||
3. |
Press the |
|
|
] (START/STOP) button.. |
|
||||
|
||||
|
Demo playback starts. |
|||
|
When the selected demo song finishes playing, the next demo song |
|||
|
will begin playing. |
|
||
4. |
Press the |
|
|
] (START/STOP) button.. |
|
||||
|
||||
The demo song will stop playing.
|
MEMO |
|
|
|
|
If |
|
button or [SONG/RHYTHM] button is lit, pressing |
|
|
screen. |
|
] (START/STOP) button will not bring up the demo |
|
|
|
|||
|
|
|
||
*All rights reserved. Unauthorized use of this material for purposes other than private, personal enjoyment is a violation of applicable laws.
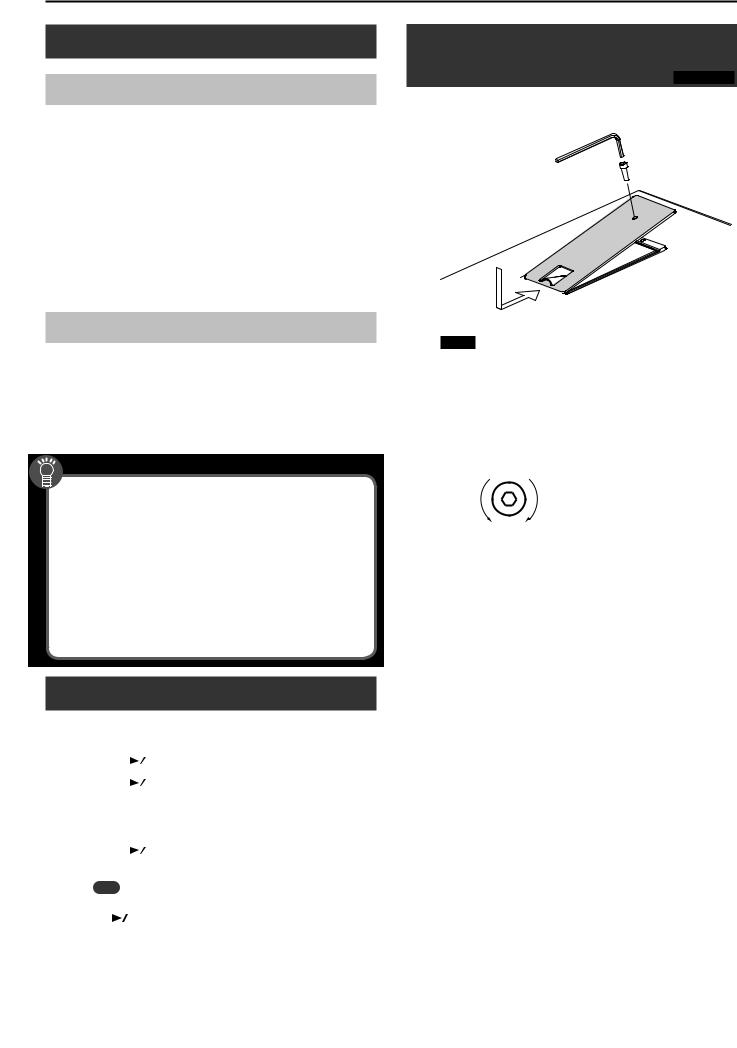
Using the Included USB Memory |
|
Protector |
VR-09 only |
You can use the included USB memory protector to prevent theft of the USB flash drive connected to the VR-09.
NOTE
•You must use the included screws.
•You must use the included Allen wrench to tighten or remove the screws. Using a tool that does not match the screw heads will damage them.
•Be careful not to over-tighten the screws. Doing so may damage the screw’s head, causing the wrench to rotate uselessly.
•To tighten the screws, turn the Allen wrench clockwise. To loosen the screws, turn the Allen wrench counter-clockwise.
loosen |
tighten |
•Keep the removed screws out of the reach of small children to ensure they are not swallowed accidentally.
•Never allow foreign objects (e.g., coins, wires) to enter the USB memory box.
•When opening/closing the USB flash drive cover, please be careful not to get your fingers pinched between the movable part and the panel. In places where small children are present, make sure that an adult provides supervision and guidance.
8
Selecting Sounds
Selecting Sounds with One Touch
By using the Mode buttons you can play organ, piano, and synthesizer sounds individually.
REFERENCE
For details about the sounds, refer to “Sound List” in the “Data List” (PDF).
You can download the “Data List” (PDF) from the Roland website. http://www.roland.com/manuals/
Selecting Organ Sounds
1. Press the MODE [ORGAN] button..
The MODE [ORGAN] button will light.
Sound Sound variation
 Volume ([LEVEL] bar)
Octave (p.. 17)
 Harmonic bars (p.. 12)
Multi-effect type (&PDF)
|
MEMO |
|
Use the CURSOR [ ] [ ] buttons to move the cursor to an item, |
|
and turn the [VALUE] dial to change the sound variation/multi- |
|
effect type. |
Selecting the organ sound variation |
|
1. |
In the organ section, press the [TYPE] button.. |
2. |
Turn the [VALUE] dial to select the desired type of sound.. |
MEMO
•You can play the keyboard to audition the sound at which the cursor is located.
•If you press the [TRANSPOSE] button while the ORGAN TYPE screen is shown, it will be held. Press the [EXIT] button to return to the previous screen.
•The organ sounds of this unit reproduce the distinctive way in which notes played on a vintage organ are triggered even by a shallow key-press. This is called the “quick firing function.”
•The organ sounds of this unit are produced by a “virtual tonewheel sound engine” that uses digital technology to faithfully simulate the way in which a tonewheel organ generates sound.
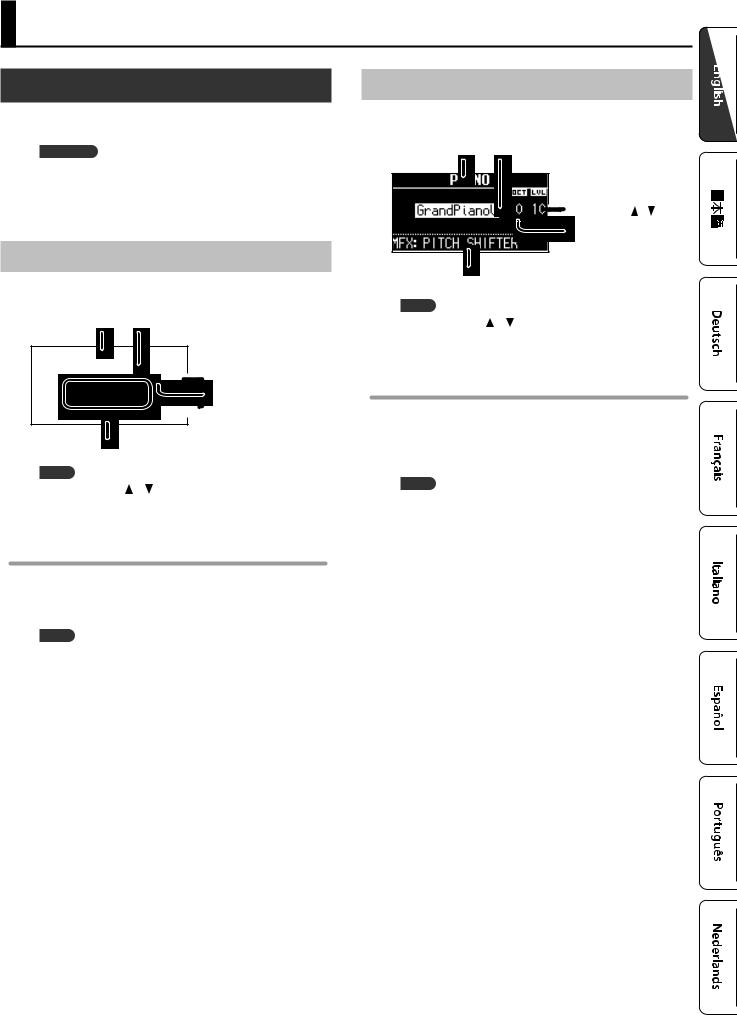
Selecting Piano Sounds
1. Press the MODE [PIANO] button..
The MODE [PIANO] button will light.
Sound Sound variation
Volume
 (PIANO LEVEL [ ] [ ] button) Octave (p.. 17)
Multi-effect type (&PDF)
MEMO
Use the CURSOR [ ] [ ] buttons to move the cursor to an item, and turn the [VALUE] dial to change the sound variation/multieffect type.
Selecting the piano sound variation
1. Press one of the sound buttons in the piano section..
2. Turn the [VALUE] dial to select the desired sound variation..
MEMO
•You can play the keyboard to audition the sound at which the cursor is located.
•If you press the [TRANSPOSE] button while the sound variation select screen is shown, the select screen will be held. Press the [EXIT] button to return to the previous screen.
9
Selecting Sounds
Selecting Synthesizer Sounds
1.
Selecting Your Favorite Sounds (Registration)
You can assign a name to your favorite organ, piano, and synthesizer sounds (or combination of sounds), and store it as a “registration.”
A registration can be recalled instantly by pressing a single button. This is a convenient way to switch sounds for each song, or to instantly switch between settings during a live performance.
Registrations are organized into banks, with 4 registrations in each bank.
There are 25 banks, allowing you to store a total of 100 registrations.
25
4
Bank |
3 |
|
|
|
||
|
|
|
||||
1 |
2 |
|
|
|
|
|
|
|
|
|
|||
|
|
|
|
|
||
|
|
|
|
|
||
|
|
|
|
|
|
|
|
|
|
|
|
|
|
|
|
|
|
|
|
|
|
|
|
|
|
|
|
|
|
|
|
|
|
|
4 registrations
= Bank
MEMO
•When this unit is shipped from the factory, several banks contain registrations with the same settings.
•Sets of registrations can be saved on a USB flash drive (p. 28).
•Sets of registrations saved on a USB flash drive can be loaded back into this unit (p. 29).
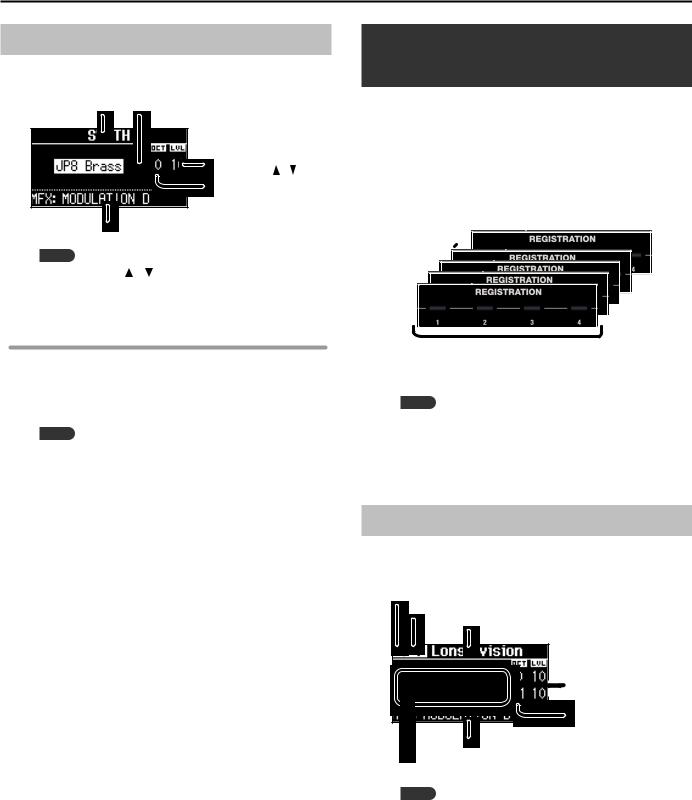
Recalling a Registration
1. Press the [1]–[4] buttons to select a registration..
The registration screen is shown in the display.
Bank number
Registration number
Registration name
 Volume
Octave (p.. 17)
Multi-effect type (&PDF)
Split or Dual setting (p.. 18)
MEMO
•You can select a registration by moving the cursor to the registration number and turning the [VALUE] dial.
•You can select the next registration by pressing the [NEXT] button.
•If registration 4 is selected, pressing the [NEXT] button will
select registration 1 of the next bank.
 Loading...