


Operating Instructions
Troubleshooting: TCRU/ORU
For safe and correct use, be sure to read Safety Information before using the machine.

TABLE OF CONTENTS |
|
Introduction......................................................................................................................................................... |
6 |
How to Read This Manual................................................................................................................................. |
7 |
Symbols........................................................................................................................................................... |
7 |
Disclaimer........................................................................................................................................................ |
7 |
Notes............................................................................................................................................................... |
7 |
1. Before You Begin |
|
About This Manual............................................................................................................................................. |
9 |
Guide to Components...................................................................................................................................... |
10 |
About the Display for Options......................................................................................................................... |
11 |
Before you change a setting............................................................................................................................ |
12 |
About Printing Surfaces.................................................................................................................................... |
13 |
2. Troubleshooting Service Call Problems (SC Codes) |
|
What Are SC Codes?...................................................................................................................................... |
15 |
If an SC code appears:............................................................................................................................... |
15 |
SC Code List..................................................................................................................................................... |
16 |
3. Troubleshooting Image Quality Problems |
|
Toner Spotting/Staining.................................................................................................................................. |
17 |
Paper Is Spotted with Toner........................................................................................................................ |
17 |
Black Spots................................................................................................................................................... |
18 |
Streaks (1).................................................................................................................................................... |
19 |
Streaks (2).................................................................................................................................................... |
21 |
Streaks (3).................................................................................................................................................... |
22 |
Streaks (4).................................................................................................................................................... |
22 |
Two 13-mm Long Vertical Streaks.............................................................................................................. |
23 |
Two 14-mm Wide Streaks.......................................................................................................................... |
25 |
Stained Paper Edges................................................................................................................................... |
27 |
Stained Background.................................................................................................................................... |
27 |
Ghosting....................................................................................................................................................... |
28 |
Scratched Images and Stained Paper Edges............................................................................................ |
29 |
Toner Scatter..................................................................................................................................................... |
31 |
Toner Scatter (1).......................................................................................................................................... |
31 |
Toner Scatter (2).......................................................................................................................................... |
32 |
Toner Scatter (3).......................................................................................................................................... |
34 |
1

Color Loss......................................................................................................................................................... |
37 |
White Spots.................................................................................................................................................. |
37 |
Blister-like White Spots................................................................................................................................ |
38 |
Mottling......................................................................................................................................................... |
39 |
Density Problems.............................................................................................................................................. |
42 |
Uneven Image Density................................................................................................................................ |
42 |
Uneven Density from Top to Bottom........................................................................................................... |
45 |
Fainter Leading Edge................................................................................................................................... |
46 |
Fainter Trailing Edge.................................................................................................................................... |
48 |
Uneven Density within 90 mm (3.5 in.) of the Trailing Edge.................................................................... |
49 |
Periodic Density Fluctuation........................................................................................................................ |
51 |
Entire Image Faint........................................................................................................................................ |
52 |
Color Is Too Dense...................................................................................................................................... |
53 |
Broken Thin Lines.......................................................................................................................................... |
54 |
Blurred Images............................................................................................................................................. |
55 |
Dropouts (Character Voids)........................................................................................................................ |
56 |
Afterimages.................................................................................................................................................. |
58 |
White Streaks............................................................................................................................................... |
59 |
Shock jitter: When the paper is inserted.................................................................................................... |
60 |
Gloss Problems................................................................................................................................................. |
63 |
Vertical Glossy Lines.................................................................................................................................... |
63 |
Insufficient Gloss.......................................................................................................................................... |
64 |
Fusing Problems................................................................................................................................................ |
65 |
Insufficient Toner Fusing............................................................................................................................... |
65 |
Improving Image Quality When Using Different Types of Paper............................................................ |
66 |
4. Troubleshooting Paper Delivery Problems |
|
Frequent Paper Misfeeds................................................................................................................................. |
69 |
Wrapped Around the Upper Fixing Side Separation Plate..................................................................... |
70 |
Messages Reporting Paper Misfeeds............................................................................................................. |
73 |
If (J049) Appears......................................................................................................................................... |
73 |
If (J050) Appears......................................................................................................................................... |
75 |
If (J080) Appears......................................................................................................................................... |
77 |
If (J082) Appears......................................................................................................................................... |
78 |
2

If (J099/J424/J425/J439/J440) Appears........................................................................................... |
80 |
If (J430/J431/J445/J446/J460/J461) Appears................................................................................ |
81 |
If (J085/J086/J087) Appears When Using Coated Paper................................................................... |
82 |
Paper Skew....................................................................................................................................................... |
83 |
Wrong Detection of Skew............................................................................................................................... |
84 |
Double Feeding................................................................................................................................................ |
85 |
Wrong Detection of Double Feeding............................................................................................................. |
88 |
Paper Misfeeding............................................................................................................................................. |
89 |
Paper Feed Problems Affecting Image Quality.............................................................................................. |
93 |
The Image Is Positioned Incorrectly............................................................................................................ |
93 |
Image Scaling Error on the Side 1 of Paper.............................................................................................. |
94 |
Image Scaling Error on the Side 2 of Paper.............................................................................................. |
95 |
Paper Edges Are Soiled (1)........................................................................................................................ |
96 |
Paper Edges Are Soiled (2)........................................................................................................................ |
96 |
Paper Edges Are Soiled (3)........................................................................................................................ |
98 |
Scratches, Streaks, or Vertical Creases Appear on the Image................................................................ |
99 |
Decurling Results in Scratches, Streaks, or Creases............................................................................... |
100 |
The Leading/Trailing Edge Margin Is Long............................................................................................ |
102 |
Curling........................................................................................................................................................ |
103 |
Ear-fold....................................................................................................................................................... |
104 |
Cleaning the Paper Feed Path...................................................................................................................... |
106 |
Cleaning Paper Trays 1-3........................................................................................................................ |
107 |
Cleaning the Paper Feed Path for Paper Trays 1-3................................................................................ |
108 |
Cleaning the Paper Feed Path in the Drawer.......................................................................................... |
110 |
Cleaning the Paper Feed Path in the Wide LCT...................................................................................... |
122 |
Cleaning the Paper Feed Path in the LCT................................................................................................ |
124 |
Cleaning the Paper Feed Path in the Multi Bypass Tray........................................................................ |
125 |
Cleaning the Paper Feed Rollers and Paper Feed Belt in the Interposer.............................................. |
125 |
Cleaning the Rollers and Guide Boards in the Finisher.......................................................................... |
128 |
5. Post-Processing Option Troubleshooting |
|
Finisher SR5090/Booklet Finisher SR5100................................................................................................ |
135 |
Delivered Sheets Are Not Stacked Properly........................................................................................... |
135 |
Large Delivered Sheets Are Not Stacked Properly................................................................................ |
136 |
3

Trailing edge of stapled sheets close to the paper exit.......................................................................... |
138 |
Sheets cannot be stapled properly.......................................................................................................... |
139 |
Finisher SR5110/Booklet Finisher SR5120................................................................................................ |
141 |
Delivered Sheets Are Not Stacked Properly........................................................................................... |
141 |
Large Delivered Sheets Are Not Stacked Properly................................................................................ |
142 |
Trailing edge of stapled sheets close to the paper exit.......................................................................... |
144 |
Sheets cannot be stapled properly.......................................................................................................... |
146 |
The Edge Is Rolled..................................................................................................................................... |
146 |
Carbonless Sheets Are Not Stacked In an Aligned Manner................................................................. |
148 |
Stitching missing, incorrect stitching position, ear-fold, or misaligned occurs...................................... |
151 |
Paper is stained.......................................................................................................................................... |
151 |
Paper jam occurs on thin coated paper of Paper Weight 2 or less...................................................... |
152 |
Scratches on the edge of the stapled paper occur................................................................................. |
153 |
Paper jam occurs while saddle stitching.................................................................................................. |
153 |
Multi-Folding Unit.......................................................................................................................................... |
155 |
Inaccurate Folding (Folding Deviation)................................................................................................... |
155 |
Folding Deviation...................................................................................................................................... |
156 |
Folds soiled by multi-sheet folding........................................................................................................... |
161 |
Edges of letter fold bent............................................................................................................................ |
162 |
Z-Folding is Not Performed Properly....................................................................................................... |
164 |
Folded Sheets Are Not Stacked Properly................................................................................................ |
165 |
High Capacity Stacker.................................................................................................................................. |
167 |
Delivered Sheets Are Severely Curled.................................................................................................... |
167 |
The Machine Wrongly Detects That the Tray Is Full............................................................................... |
169 |
The Paper Press Leaves an Impression on the Paper.............................................................................. |
170 |
Paper Pressed Down Insufficiently........................................................................................................... |
171 |
Paper of Paper Weight 1 does not align correctly................................................................................. |
171 |
Interposer........................................................................................................................................................ |
173 |
Paper jam due to paper misfeeding or double feeding occurs............................................................. |
173 |
Vertical lines and scratches occur at random positions.......................................................................... |
175 |
6. Improving Throughput |
|
Reducing the Waiting Time Prior to Printing................................................................................................ |
177 |
4

Improving Throughput When Printing on Coated Paper with a Thickness Equivalent to Paper Weight 7 or |
|
Higher............................................................................................................................................................. |
178 |
Reducing the Waiting Time When Different Types of Paper are Used..................................................... |
180 |
Reducing the Time the Machine Takes to Return from Standby Mode..................................................... |
182 |
5

Introduction
This manual contains detailed instructions and notes on the operation and use of this machine. For your safety and benefit, read this manual carefully before using the machine. Keep this manual in a handy place for quick reference.
6

How to Read This Manual
Symbols
This manual uses the following symbols:
Indicates points to pay attention to when using functions. This symbol indicates points that may result in the product or service becoming unusable or result in the loss of data if the instructions are not obeyed. Be sure to read these explanations.
Indicates supplementary explanations of the product's functions and instructions on resolving user errors.
Indicates where you can find further relevant information.
[ ]
Indicates the names of keys or buttons on the product or display.
Disclaimer
Contents of this manual are subject to change without prior notice.
In no event will the company be liable for direct, indirect, special, incidental, or consequential damages as a result of handling or operating the machine.
Notes
The manufacturer shall not be responsible for any damage or expense that might result from the use of parts other than genuine parts from the manufacturer with your office products.
For good output quality, the manufacturer recommends that you use genuine toner from the manufacturer.
Some illustrations in this manual might be slightly different from the machine.
Certain options might not be available in some countries. For details, please contact your local dealer.
Depending on which country you are in, certain units may be optional. For details, please contact your local dealer.
Two kinds of size notation are employed in this manual.
7

8
1. Before You Begin
About This Manual
If the machine will not print, does not print as expected, or exhibits any other problem, find the problem in this manual and troubleshoot accordingly.
•Before you replace any unit:
•To prevent electrical shock, turn off the printer controller on the machine control panel, switch off the main power switch then the AC power switch, and then disconnect the machine from the power supply.
•Allow the machine to cool for at least 30 minutes before replacing a part.
9
1. Before You Begin
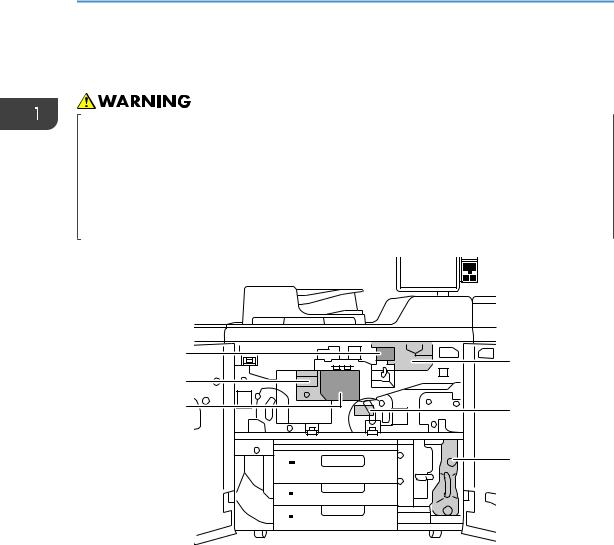
Guide to Components
•Do not remove any covers or screws other than those explicitly mentioned in this manual. Inside this machine are high voltage components that are an electric shock hazard and laser components that could cause blindness. Contact your sales or service representative if any of the machine's internal components require maintenance, adjustment, or repair.
•Do not attempt to disassemble or modify this machine. Doing so risks burns and electric shock. Note again that exposure to the laser components inside this machine risks blindness.
1 |
4 |
|
|
2 |
|
3 |
5 |
1 |
6 |
2 |
|
3 |
|
|
ECH004 |
1.Developer Outlet/Inlet
2.Fusing Unit
3.Cleaning Unit for Intermediate Transfer Belt
4.Development Unit
5.Paper Transfer Unit
6.Waste Toner Bottle
10

About the Display for Options
About the Display for Options
This machine displays all of the adjustment items in the Adjustment Settings for Operators menu and advanced settings for custom paper regardless of whether or not the items are for options. Note that any modifications to the option settings do not take effect unless the applicable options are installed on this machine.
•For details about the options available for this machine, see "Guide to Functions of the Machine's Options", Preparation.
11

1. Before You Begin
Before you change a setting
• When changing the current settings, make a note of their present values before changing them.
•If the problem persists even though the setting has been changed, restore the value noted.
•Operating the machine with the changed setting may cause problems, such as inferior printed images.
12

About Printing Surfaces
About Printing Surfaces
Depending on the setting, printed copies are fed as follows:
Side 1 is the surface of the paper printed during one-sided printing, or the surface of the first print during duplex printing.
Side 2 is the surface of the paper printed on the back side of Side 1 during duplex printing.
Single-sided printing: Printed side face down
DSM008
A.Side 1
B.Paper feed direction of Side 1
Single-sided printing: Printed side face up
DSM009
A.Side 1
B.Paper feed direction of Side 1
13

1. Before You Begin
Duplex printing
DSM010
A.Side 1
B.Paper feed direction of Side 1
C.Side 2
D.Paper feed direction of Side 2
14

2. Troubleshooting Service Call
Problems (SC Codes)
What Are SC Codes?
If an error occurs during operation, the machine displays an SC code ("SCnnn", where "nnn" is a threedigit number). The machine stops and cannot be used when an SC code is displayed.
If an SC code appears:
1.Write down the SC number.
2.Turn off the main power switch.
3.Wait a few moments, then turn the machine on again.
In most cases, cycling the machine off and on will restore it to full operation.
4.If the SC code reappears, check it against the SC code table. For details, see page 16 "SC Code List".
Check for the SC code in the table.
If the SC code is listed in the table, carry out the recommended procedure. If the SC code is not listed in the table, contact your service representative.
15

2. Troubleshooting Service Call Problems (SC Codes)
SC Code List
This table contains a list of selected SC codes. If the SC code that is displayed on the control panel is listed in this table, carry out the recommended procedure. If the SC Code is not listed in this table, contact your service representative.
• If the error persists after replacing the unit, contact your service representative.
Code |
Error |
Procedure |
|
|
|
332-01 |
Toner supply motor 1 error (left bottle) |
Check that toner supply motor 1 operates |
|
|
properly. |
|
|
|
332-05 |
Toner supply motor 2 error (right bottle) |
Check that toner supply motor 2 operates |
|
|
properly. |
|
|
|
336-01 |
Developer imperfect setting (K) |
Check the developer. |
|
|
|
410-01 |
Remaining potential: Vr detection error (K) |
Replace the photoconductor unit. |
|
|
|
411-01 |
Charge potential: Vd adjustment error (K) |
Replace the charge unit. |
|
|
|
412-01 |
Exposure potential: Vpl adjustment error (K) |
Replace the charge unit. |
|
|
|
16
3. Troubleshooting Image Quality
Problems
Toner Spotting/Staining
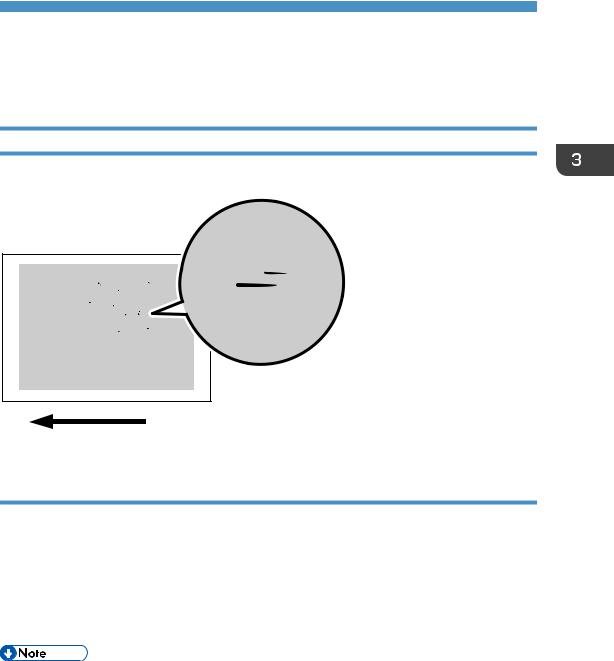
Paper Is Spotted with Toner
Paper is soiled with toner spots of 0.5–1 mm (0.02–0.04 inches) in diameter.
CEZ538
Cause:
Toner fragments have slipped through the cleaning web, which cleans the pressure roller, and readhered to paper.
This may occur if:
•Printing on both sides of paper
•Printing on uncoated (especially rough-textured) paper
•Printing a single-dot halftone image
•To adjust the following settings, pre-register the type of paper in use as a custom paper. For details about registering custom papers, see "Registering a Custom Paper", Preparation.
17

3. Troubleshooting Image Quality Problems
Solution:
Increasing the temperature when using thin paper with a thickness equivalent to Paper Weight 0 or 1 may cause paper curling, resulting in paper jams at the fusing unit. Carry out steps from Step 6 when using thin paper with a thickness equivalent to Paper Weight 0 or 1.
1.In [Advanced Settings] for the custom paper in use, select 1206: [Fusing Temperature], and then increase the temperature by 5 degrees in [Heat Roller Temp].
2.Print the image. Is the problem resolved?
Yes |
Finished! |
|
|
No |
Go to the next step. |
|
|
3.Increase the temperature an additional 5 degrees in [Heat Roller Temp].
4.Print the image. Is the problem resolved?
Yes |
Finished! |
|
|
No |
Go to the next step. |
|
|
5. Have changes to the settings resulted in glossy lines or paper misfeed?
Yes |
Decrease the temperature by 10 degrees, and then go to the next step. |
|
|
No |
Go to the next step. |
|
|
6.In [Advanced Settings] for the custom paper in use, select 1209: [Fusing Cleaning], and then set [Cleaning Interval] to 0.01.
7.Print the image. Is the problem resolved?
|
|
Yes |
Finished! |
|
|
|
|
|
|
No |
No further improvement is likely. Contact your service representative. |
|
|
|
|
|
|
|
|
|
|
|
|
• Decreasing the value in [Cleaning Interval] will shorten the replacement cycle of the cleaning web.
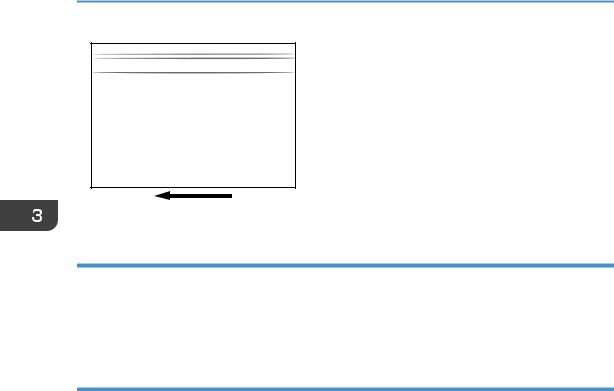
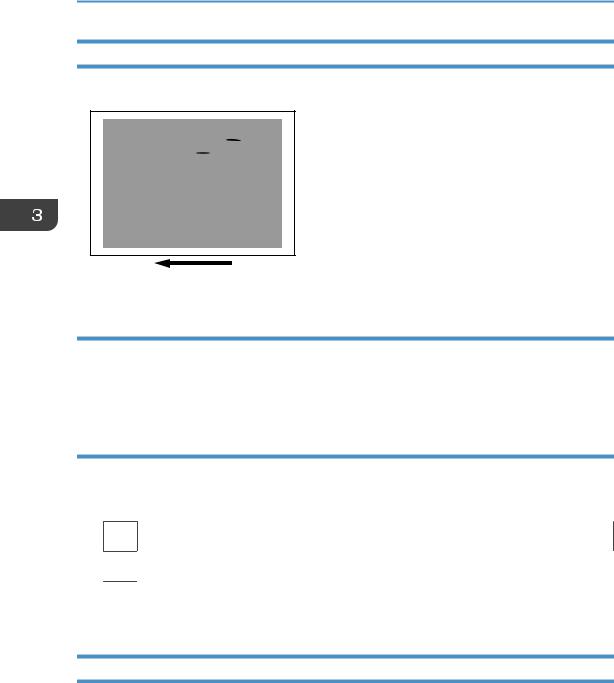
Black Spots
Black spots appear at 314 mm (12.4 inches) intervals.
18
Toner Spotting/Staining
314 mm (12.4 in.)
CZC307
Cause:
The drum is scratched or stained.
Solution:
1. |
Detach the photoconductor unit and check the drum surface. Is the surface scratched? |
||
|
|
|
|
|
|
Yes |
Replace the photoconductor unit. |
|
|
|
|
|
|
No |
Contact your service representative. |
|
|
|
|
2. |
If the problem persists, contact your service representative. |
||
|
• |
For details about replacing the photoconductor unit, see Replacement Guide. |
|
|
|||
|
|||
Streaks (1)
Streaks parallel to the paper feed direction appear.
19
3. Troubleshooting Image Quality Problems
CZC346
Cause:
•The charger is stained.
•The cleaning unit for PCU has worn out.
•The drum surface is scratched.
Solution:
1.In the [Main Unit: Maintenance] group on the [Adjustment Settings for Operators] menu, select 0522: [Execute Charger Cleaning] and execute [Charger Cleaning].
2.Print the image. Is the problem resolved?
Yes |
Finished! |
|
|
No |
Go to the next step. |
|
|
3. Detach the charge unit and check its surface. Is the surface stained?
Yes |
Contact your service representative. |
|
|
No |
Go to the next step. |
|
|
4.Detach the photoconductor unit and check the drum surface. Is the surface stained or scratched?
Stained: |
Replace the cleaning unit for PCU. |
|
|
Scratched: |
Replace the photoconductor unit. |
|
|
Neither: |
Contact your service representative. |
|
|
5.If the problem persists even though you have replaced the cleaning unit for PCU or photoconductor unit, contact your service representative.
20
Toner Spotting/Staining
•For details about replacing the charge unit, cleaning unit for PCU and photoconductor unit, see Replacement Guide.
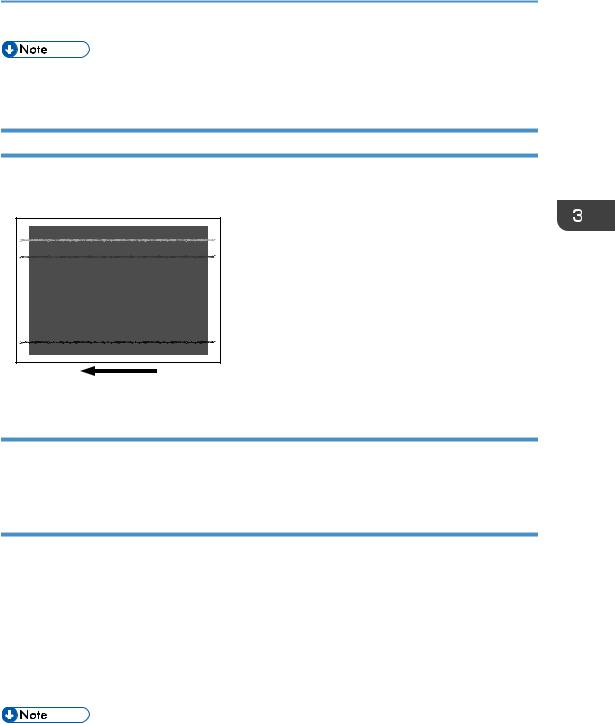
Streaks (2)
Extended, blurred streaks parallel to the paper feed direction appear. The streaks also appear randomly in the margins.
CWH401
Cause:
If the temperature or humidity is low, remaining toner might be missed by the cleaning blade of the cleaning unit for intermediate transfer belt or transfer unit, causing streaks to appear sporadically.
Solution:
1. Is the printed side affected by the problem?
Yes |
Go to the next step. |
|
|
No |
Contact your service representative. |
|
|
2.Replace the cleaning unit for intermediate transfer belt.
3.If the problem persists even though you have replaced the cleaning unit for intermediate transfer belt, contact your service representative.
• For details about replacing the cleaning unit for intermediate transfer belt, see Replacement Guide.
21
3. Troubleshooting Image Quality Problems
Streaks (3)
Streaks appear in solid-filled areas.
CEZ542
Cause:
If the toner contains small clumps, they disintegrate in the development unit, producing streaks.
This problem may occur if the machine is left unattended for a long period or the toner bottle is kept out of its moisture-proof bag for a long period.
Solution:
1.Print 350 full-page, solid-fill A3 or DLT sheets.
2.Print the image. Is the problem resolved?
Yes Finished!
No Replace the toner bottle.
3.Print 350 full-page, solid-fill A3 or DLT sheets.
4.If the problem persists, contact your service representative.
Streaks (4)
Irregular black streaks appear, running parallel to the feed direction.
This occurs on both sides regardless of whether printing one-sided or duplex.
22

Toner Spotting/Staining
DTH009
These are not toner streaks. You can remove them by rubbing them with an eraser or similar.
Cause:
If the machine remains in standby mode without paper or toner in it for a long time, friction between the pressure roller and the cleaning web may cause dust to accumulate, resulting in streaks.
This may occur when either of the following conditions is met:
•The Low Power Mode Timer function in System Settings, which specifies the length of time before switching to low-power mode, is set to a long time.
•Paper with excessive dust is used.
•The printing amount each month is small (less than approx. 30,000 pages).
Solution:
1.Set the Low Power Mode Timer function in System Settings to the initial value of 15 minutes.
2.If the problem persists, contact your service representative.
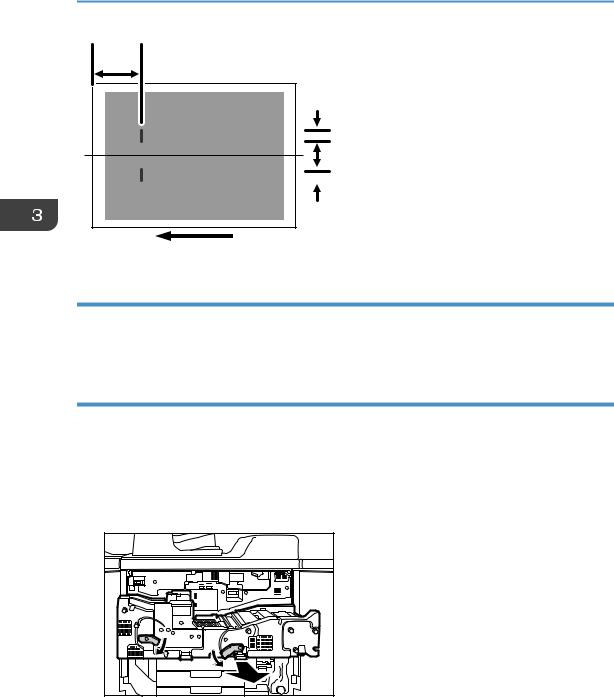
Two 13-mm Long Vertical Streaks
Two 13-mm long vertical streaks appear within 50 mm (2.0 inches) from the leading edge.
23
3. Troubleshooting Image Quality Problems
50 mm
(2.0 in.)
13 mm
(0.5 in.)
67 mm
(2.6 in.)
 13 mm
13 mm
(0.5 in.)
CZC313
Cause:
The invert exit drive rollers or invert exit idle rollers in the drawer are soiled.
This may occur if sheets are delivered face down after one-sided printing.
Solution:
Clean the rollers, sensors, and guide boards in the drawer.
1.Make sure that the system is turned off and the machine power cord is disconnected from the power source.
2.Open the front covers.
3.Lower the levers C1 and C2, and then pull the drawer out completely until it stops.
CZC300 |
24

Toner Spotting/Staining
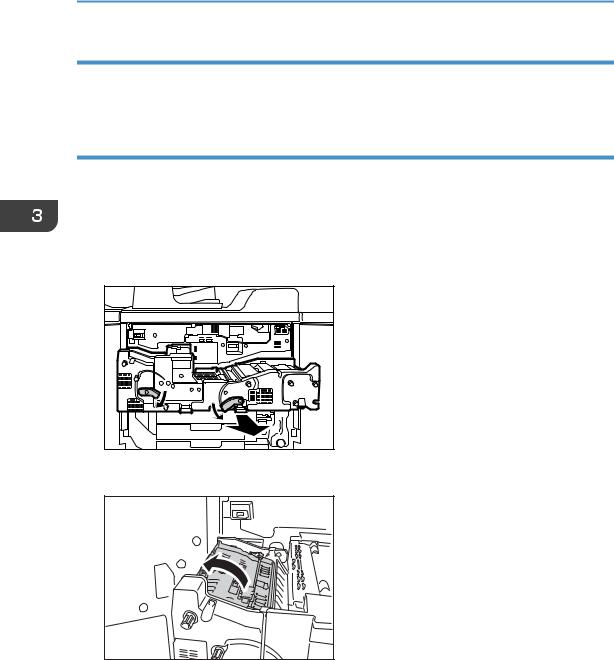
4. Pull down and open the cover D4.
CZC301 |
5.Clean the rollers, sensors, and guide boards.
For details about cleaning the parts, see page 106 "Cleaning the Paper Feed Path".
CZC302 |
6. After cleaning, restore the machine so that it resumes operation.
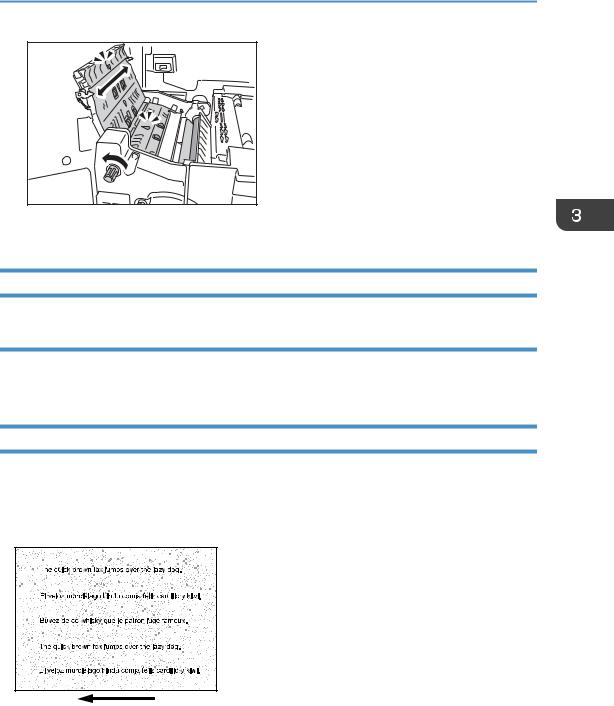
Two 14-mm Wide Streaks
Two 14-mm wide streaks parallel to the paper feed direction appear.
14 mm
 (0.5 in.)
64 mm
(2.5 in.)
 14 mm (0.5 in.)
CZC314
25
3. Troubleshooting Image Quality Problems
Cause:
The exit drive rollers, exit idle rollers, exit relay drive rollers, or exit relay idle rollers in the drawer are soiled.
Solution:
Clean the rollers, sensors, and guide boards in the drawer.
1.Make sure that the system is turned off and the machine power cord is disconnected from the power source.
2.Open the front covers.
3.Lower the levers C1 and C2, and then pull the drawer out completely until it stops.
CZC300 |
4. Pull up and open the cover D3.
CZC341 |
5.Clean the rollers while turning the knob D1. Clean the sensors and guide boards also.
For details about cleaning the parts, see page 106 "Cleaning the Paper Feed Path".
26
Toner Spotting/Staining
CZC342 |
6. After cleaning, restore the machine so that it resumes operation.
Stained Paper Edges
Solution:
1.If the paper edges are stained, carry out the procedure in page 65 "Insufficient Toner Fusing".
Stained Background
Random "powdered" dots appear, creating a dirty background.
The background may be partially or completely stained.
Completely stained background
CEZ543 |
27

3. Troubleshooting Image Quality Problems
Partially stained background
CEZ544
Cause:
This may occur because of wearing of the developer, drum unit, or charger.
Solution:
1.If a message prompting replacement of a unit has appeared, replace the unit.
2.In the [Main Unit: Image Quality] group on the [Adjustment Settings for Operators] menu, select 0202: [Adjust Image Density] and execute [Adjust Image Density].
3.Print the image. Is the problem resolved?
Yes Finished!
No Contact your service representative.
Ghosting
A ghost image of an image to be printed appears at a distance of 314 mm (12.4 in.) to the side of the intended image.
28
 Loading...