


Operating
Instructions
Preparations for Using the Projector
Projecting an Image
Projecting Images from a USB Memory Device or Digital Camera
Using the Projector via a Network
Changing the Projector Settings
Troubleshooting
Maintenance
Appendix
For safe and correct use, be sure to read the Safety Information in Read This First before using the machine.

TABLE OF CONTENTS |
|
Introduction......................................................................................................................................................... |
6 |
Copyrights to Images..................................................................................................................................... |
6 |
Important......................................................................................................................................................... |
6 |
Notes to Users Viewing 3D Images.............................................................................................................. |
6 |
Manuals Provided with the Projector................................................................................................................ |
8 |
How to Read This Manual................................................................................................................................. |
9 |
Symbols........................................................................................................................................................... |
9 |
Notes............................................................................................................................................................... |
9 |
Model-Specific Information............................................................................................................................. |
10 |
1. Preparations for Using the Projector |
|
Precautions for Using the Projector................................................................................................................. |
11 |
Main Functions................................................................................................................................................. |
13 |
Checking the Accessories................................................................................................................................ |
15 |
Projector Parts and Their Functions................................................................................................................. |
17 |
Exterior.......................................................................................................................................................... |
17 |
Ports on the Projector................................................................................................................................... |
18 |
Control Panel................................................................................................................................................ |
19 |
Remote Control Parts and Their Functions...................................................................................................... |
21 |
How to Use the Remote Control...................................................................................................................... |
23 |
Effective Range of the Remote Control....................................................................................................... |
23 |
Loading Batteries into the Remote Control................................................................................................. |
24 |
Inputting Text................................................................................................................................................ |
25 |
Operating Multiple Projectors with the Remote Control........................................................................... |
25 |
Positioning the Projector................................................................................................................................... |
28 |
Projection Mode.......................................................................................................................................... |
28 |
Relationship Between the Projection Distance and the Screen Size........................................................ |
29 |
Connecting Equipment to the Projector.......................................................................................................... |
32 |
Connecting a Computer.............................................................................................................................. |
32 |
Connecting AV Equipment.......................................................................................................................... |
34 |
Connecting an External Display Device..................................................................................................... |
35 |
Connecting an External Speaker................................................................................................................ |
35 |
2. Projecting an Image |
|
Basic Operations for Using the Projector....................................................................................................... |
37 |
1

Turning On the Projector............................................................................................................................. |
37 |
Projecting an Image..................................................................................................................................... |
38 |
Turning Off the Projector............................................................................................................................. |
40 |
Adjusting the Projected Image........................................................................................................................ |
42 |
Adjusting the Angle of the Projection......................................................................................................... |
42 |
Changing the Size of the Projected Image................................................................................................ |
42 |
Adjusting the Focus...................................................................................................................................... |
44 |
Adjusting for Keystone Distortion................................................................................................................ |
45 |
Operations while Projecting Images............................................................................................................... |
47 |
Adjusting the Volume of the Speaker......................................................................................................... |
47 |
Enlarging the Image.................................................................................................................................... |
47 |
Temporarily Blanking the Image and Muting the Audio.......................................................................... |
48 |
Freezing the Image...................................................................................................................................... |
49 |
Specifying the Lamp Settings...................................................................................................................... |
49 |
Using the Presentation Timer....................................................................................................................... |
50 |
3. Projecting Images from a USB Memory Device or Digital Camera |
|
Requirements for Projecting Images from a USB Device.............................................................................. |
51 |
How to Project Images from USB Memory Device....................................................................................... |
53 |
Connecting the USB Device........................................................................................................................ |
53 |
Projecting Images from a USB Memory Device........................................................................................ |
53 |
Controlling the Projected Image................................................................................................................. |
55 |
Disconnecting the USB Device.................................................................................................................... |
55 |
Projecting Images in a Slide Show................................................................................................................. |
57 |
Projecting a Slide Show at a Specified Time............................................................................................. |
57 |
Customizing a Slide Show.......................................................................................................................... |
61 |
Converting Presentation Files to JPEG Files Using JPEG Conversion Tool................................................... |
64 |
How to Use JPEG Conversion Tool............................................................................................................ |
64 |
Converting Presentation Files to JPEG Files................................................................................................ |
65 |
4. Using the Projector via a Network |
|
Before Connecting to a Network.................................................................................................................... |
67 |
Connecting an Ethernet Cable.................................................................................................................... |
67 |
Precautions for Using a Wireless LAN....................................................................................................... |
68 |
Connecting the Projector to a Network.......................................................................................................... |
70 |
2

Opening Network Setting Wizard............................................................................................................. |
71 |
Configuring the Wired LAN Settings.......................................................................................................... |
72 |
Configuring the Wireless LAN Settings for Infrastructure Mode.............................................................. |
73 |
Configuring the Wireless LAN Settings for Ad Hoc Mode....................................................................... |
76 |
Projecting a Computer's Screen via a Network............................................................................................. |
77 |
How to Use QuickProjection....................................................................................................................... |
77 |
Projecting Images Using QuickProjection.................................................................................................. |
78 |
Projecting Images Using DLNA-Compatible Devices................................................................................... |
80 |
Preparation................................................................................................................................................... |
81 |
Projecting Images from DLNA-Compatible Devices................................................................................. |
81 |
Projecting Images Stored on the DLNA Server......................................................................................... |
82 |
Projecting Images Using Smart Devices (RICOH PJ X3351N/WX3351N/WX4241N only)............... |
85 |
5. Changing the Projector Settings |
|
Viewing the Menu Screen............................................................................................................................... |
87 |
Changing the Settings...................................................................................................................................... |
89 |
Restoring All the Settings to Their Defaults..................................................................................................... |
92 |
Image Adjustment Menu.................................................................................................................................. |
93 |
Display Settings Menu..................................................................................................................................... |
97 |
Energy Saving Settings Menu....................................................................................................................... |
102 |
Default Settings 1 Menu................................................................................................................................ |
105 |
Default Settings 2 Menu................................................................................................................................ |
107 |
USB Settings Menu........................................................................................................................................ |
110 |
Settings....................................................................................................................................................... |
110 |
Display Status............................................................................................................................................ |
111 |
Network Settings Menu................................................................................................................................. |
112 |
Wired LAN................................................................................................................................................. |
112 |
Wireless LAN (RICOH PJ X3351N/WX3351N/WX4241N only)................................................... |
113 |
LAN Common............................................................................................................................................ |
118 |
Projector ID................................................................................................................................................ |
119 |
Setup Wizard............................................................................................................................................ |
120 |
Display Status............................................................................................................................................ |
120 |
Network Application Settings Menu............................................................................................................ |
121 |
Administration Tools.................................................................................................................................. |
121 |
3

Security....................................................................................................................................................... |
124 |
Server......................................................................................................................................................... |
125 |
Display Status............................................................................................................................................ |
127 |
Administrator Authentication.................................................................................................................... |
127 |
Display Status................................................................................................................................................. |
128 |
6. Troubleshooting |
|
Indicator Display List...................................................................................................................................... |
131 |
Common Problems......................................................................................................................................... |
136 |
Accessing the Online Knowledge Base................................................................................................... |
140 |
7. Maintenance |
|
Operating Precautions.................................................................................................................................. |
143 |
Cleaning the Projector................................................................................................................................... |
145 |
Cleaning the Lens...................................................................................................................................... |
145 |
Cleaning the Projector.............................................................................................................................. |
145 |
Replacing the Lamp....................................................................................................................................... |
146 |
Managing the Projector Using Projector Management Utility................................................................... |
151 |
Installing Projector Management Utility................................................................................................... |
151 |
Settings Required to Use Projector Management Utility........................................................................ |
152 |
Starting Projector Management Utility..................................................................................................... |
152 |
Managing the Projector Using Web Image Monitor.................................................................................. |
154 |
Displaying Web Image Monitor.............................................................................................................. |
154 |
About Browse Mode and Edit Mode...................................................................................................... |
155 |
Login to Edit Mode.................................................................................................................................... |
156 |
Controlling and Monitoring the Projector Using Crestron RoomView....................................................... |
157 |
Displaying Crestron WebUI..................................................................................................................... |
157 |
Using Crestron WebUI.............................................................................................................................. |
158 |
Consumables.................................................................................................................................................. |
161 |
8. Appendix |
|
Specifications for the Projector..................................................................................................................... |
163 |
List of Compatible Signals............................................................................................................................. |
166 |
Video Input................................................................................................................................................. |
166 |
Y/Pb/Pr Input............................................................................................................................................ |
166 |
Computer Input.......................................................................................................................................... |
167 |
4

HDMI Input................................................................................................................................................ |
168 |
3D Format.................................................................................................................................................. |
169 |
Specifications for Ports.................................................................................................................................. |
171 |
Computer1 In Port and Computer2 In/Monitor Out Port...................................................................... |
171 |
Control Port................................................................................................................................................ |
172 |
Information..................................................................................................................................................... |
174 |
Copyrights.................................................................................................................................................. |
174 |
Updating the Firmware............................................................................................................................. |
174 |
Where to Inquire....................................................................................................................................... |
174 |
Trademarks..................................................................................................................................................... |
175 |
INDEX........................................................................................................................................................... |
179 |
5

Introduction
Copyrights to Images
When projecting images using the projector, be careful not to infringe the copyright of protected materials.
The following are examples that may infringe the copyright of protected materials.
•Broadcasting images or movies for commercial purposes
•Modifying images or movies using functions such as freeze, magnify, or zoom to broadcast images for commercial purposes or public viewing
•Varying the aspect ratio of images or movies using a function that changes the screen size to broadcast images for commercial purposes or public viewing
Important
In no event will the company be liable for direct, indirect, special, incidental, or consequential damages as a result of handling or operating the machine.
The manufacturer shall not be responsible for any damage or expense that might result from the use of parts other than genuine parts from the manufacturer with your office products.
Notes to Users Viewing 3D Images
Pay attention to the following points when viewing images using 3D glasses with the projector:
•You need 3D glasses to view 3D images. The projector uses DLP Link technology to synchronize with 3D glasses. You need to use the optional 3D glasses that support DLP Link (RICOH PJ 3D Glasses Type 2).
•How 3D images are viewed may vary according to the individual.
•Do not use 3D glasses for viewing any material other than 3D images.
•Before viewing 3D images, make sure to read the manuals provided with your 3D glasses and 3D compatible content.
•Avoid viewing 3D images for a long period of time. Take a break of 15 minutes or longer after every hour of viewing.
•If you feel sick while viewing 3D images, stop viewing them. If you continue to feel sick, consult a doctor.
6

•When viewing 3D images in a room where an LED lighting system or fluorescent lights are used, you may feel that the light in the room flickers. If this is the case, dim the lights until you do not notice any flickers, or turn off the lights.
•If you or any member of your family has a history of light-sensitive seizures, consult a doctor before viewing 3D images.
•To view 3D images, sit in front of the screen so that your eyes are parallel and level with the screen.
•Viewing 3D images from a place that is too close to the screen may result in eye strain. The distance between the screen and you should be at least three times the height of the screen.
•Adult supervision is required for children using 3D glasses.
•Viewing 3D images is not recommended for children under 6 years old. It may negatively affect development of their vision. Consult a doctor before using 3D glasses.
7

Manuals Provided with the Projector
Read this manual carefully before you use the projector.
Refer to the manuals that are relevant to what you want to do with the projector.
•The manuals are provided in various formats.
•Adobe® Acrobat® Reader®/Adobe Reader must be installed in order to view the manuals as PDF files.
Read This First
Provides information about safe usage of the projector.
To avoid injury and prevent damage to the projector, be sure to read the section of this manual entitled Safety Information.
Start Guide
Provides basic information about how to install the projector and how to project images. Since the contents of this manual are a summary of Operating Instructions, see Operating Instructions for detailed information.
Operating Instructions


Provide information about how to install the projector, how to project images using the projector, and how to configure the projector. It also provides information about troubleshooting and maintenance.
The CD-ROM includes only the English manual. For other languages, download the latest version from the website.
• The following software products are referred to using general names:
Product name |
General name |
|
|
RICOH JPEG Conversion Tool Type A |
JPEG Conversion Tool |
|
|
8
How to Read This Manual
Symbols
This manual uses the following symbols:
Indicates points to pay attention to when using the projector.
Indicates supplementary explanations of the projector’s functions, and instructions on resolving user errors.
[ ]
Indicates the names of buttons on the control panel and remote control. It also indicates items displayed on the menu screens.


 (mainly Europe and Asia)


 (mainly North America)
Differences in the functions of Region A and Region B models are indicated by two symbols. Read the information indicated by the symbol that corresponds to the region of the model you are using. For details about which symbol corresponds to the model you are using, see page 10 "Model-Specific Information".
Notes
Contents of this manual are subject to change without prior notice. Two kinds of size notation are employed in this manual.
Some illustrations in this manual might be slightly different from the machine.
Certain options might not be available in some countries. For details, please contact your local dealer.
Depending on which country you are in, certain units may be optional. For details, please contact your local dealer.
9
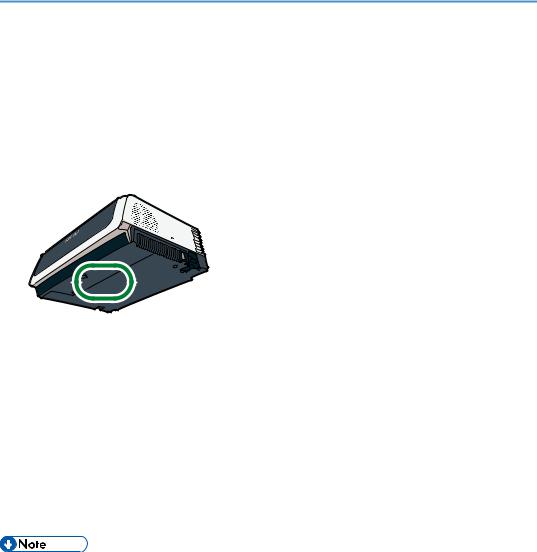
Model-Specific Information
This section explains how you can identify the region your projector belongs to.
There is a label on the bottom of the projector, located in the position shown below. The label contains details that identify the region your projector belongs to. Read the label.
CUD107
The following information is region-specific. Read the information under the symbol that corresponds to the region of your projector.


 (mainly Europe and Asia)
If the label contains the following, your projector is a region A model:
• CODE XXXX -27


 (mainly North America)
If the label contains the following, your projector is a region B model:
•CODE XXXX -17
•Dimensions in this manual are given in two units of measure: metric and inch. If your projector is a Region A model, refer to the metric units. If your projector is a Region B model, refer to the inch units.
10

1. Preparations for Using the Projector
This chapter explains the names and functions of the different parts of the projector and remote control, and how to use them. It also explains how to position the projector and how to connect it to other equipment.
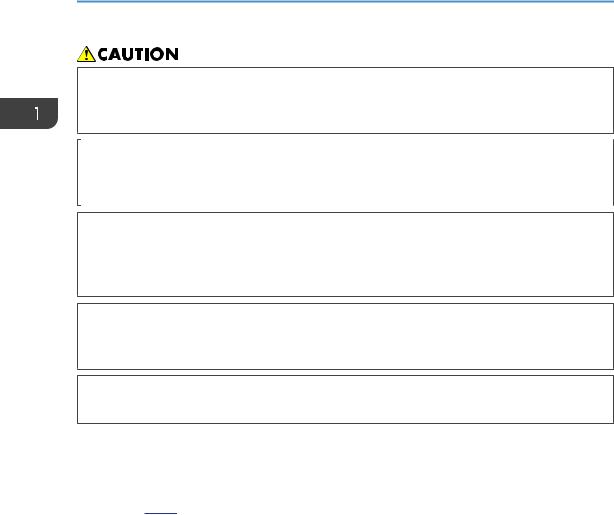
Precautions for Using the Projector
•If metal objects, or water or other fluids fall inside this machine, you must turn off its power immediately. After turning off the power, be sure to disconnect the power cord plug from the wall outlet. Then contact your service representative and report the problem. Do not use the machine. Doing so could result in fire or electric shock.
•Do not use any power sources other than those that match the specifications shown. Doing so could result in fire or electric shock.
•The supplied power cord is for use with this machine only. Do not use it with other appliances. Doing so could result in fire or electric shock.
•It is dangerous to handle the power cord plug with wet hands. Doing so could result in electric shock.
•Do not place the power cord and connection cable in front of the lens or exhaust vents when the product is turned on. Doing so may result in fire.
•Be sure to locate the machine as close as possible to a wall outlet. This will allow easy disconnection of the power cord in the event of an emergency.
•Do not look into the lens or vent when the machine is on. The bright light may damage your eyes. Be especially careful in an environment with children.
•Do not use flammable sprays or solvents in the vicinity of this machine. Also, avoid placing these items in the vicinity of this machine. Doing so could result in fire or electric shock.
•Do not place low heat resistant material near the exhaust vents. Hot air may come from the exhaust vents, resulting in damage to the machine or an accident.
•Do not place the power cord and connection cable in a way that might cause someone to trip and fall. The machine might fall over and cause an injury.
11
1. Preparations for Using the Projector
•Push the power plug all the way into the power outlet. Do not use a power outlet with a loose connection. Doing so may result in heat buildup. Plug the power cord in the correct direction into
the base. If they are not plugged in correctly, it could result in smoke, fire, or electric shock.
•When disconnecting the power cord from the wall outlet, always pull the plug, not the cord. Pulling the cord can damage the power cord. Use of damaged power cords could result in fire or electric shock.
•Do not block the projection light when it is on. If you do so, the part that is blocking the projection light may get quite hot and deform, deteriorate or cause a burn or fire. The reflected light may make the lens hot and cause a machine failure. To temporarily suspend projection, select the AV mute function. To suspend longer, turn off the machine.
•Do not increase the volume unless you are listening while increasing the volume. Also, lower the volume before turning off the power, because a loud sound may be emitted when the power is turned on and cause hearing damage.
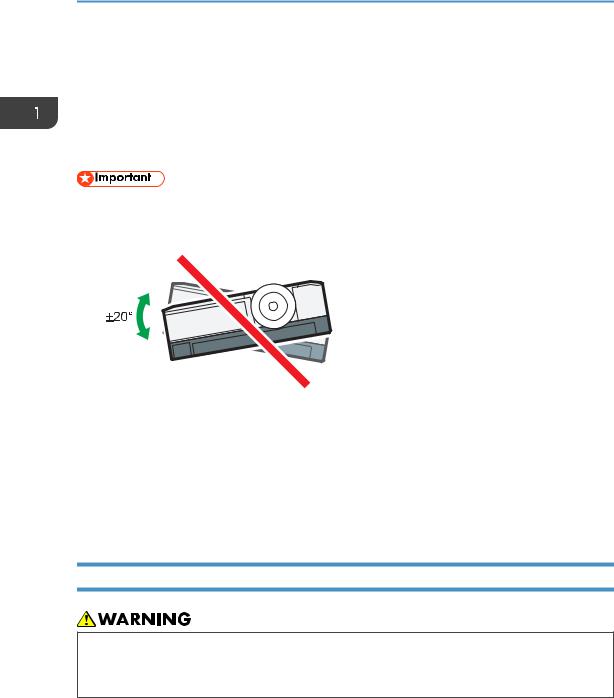
•Do not tilt the machine horizontally more than ±20 degrees. Doing so may cause the entrance of foreign objects in the housing of the machine which could result in fire or electric shock.
•Power Source
•


 (mainly Europe and Asia) 220–240 V, 1.7 A or more, 50/60Hz
•


 (mainly North America) 120 V, 3.1 A or more, 60Hz
Please be sure to connect the power cord to a power source as above.
12

Main Functions
Main Functions
The projector features the following functions that you can use.
360-degree installation angle
The 360-degree installation angle enables tilt-free vertical projection.
Auto eco function
The projector switches the lamp power automatically by detecting the brightness of the projecting location and image signals. This function is useful for energy saving.
Quick on
The projector starts projection automatically if it detects a device that is connected.
Horizontal keystone distortion adjustment
You can adjust for horizontal keystone distortion which occurs when the projector is tilted to the right or left.
Auto keystone function
The projector automatically adjusts for the vertical distortion of the projected image according to the angle at which the projector is positioned.
Automatic focus function (RICOH PJ X3351N/WX3351N only)
The projector automatically adjusts the focus when you turn on the projector and reposition it.
AV Mute/Freeze
Pressing the [AV Mute] button mutes the sound and blanks the screen. Pressing the [Freeze] button freezes the image temporarily.
Magnify/Zoom
Pressing the [Magnify] button enlarges the projected image. Pressing the [Zoom] button reduces the projected image.
Presentation timer function
Pressing the [Timer] button displays the countdown timer on the projection screen. You can check the elapsed time on the projection screen.
Wall color mode
You can adjust the hue of the image in accordance with the color of the wall on which it is projected.
Password setting/Key lock
You can specify a password for the projector to limit the people that can use it. The buttons on the control panel can be disabled with the key lock setting to prevent misoperation.
13

1. Preparations for Using the Projector
Administrator authentication
Enable administrator authentication so that only the administrator can change the security settings. This improves the security of the projector because general users cannot change the settings.
User logo function
The projector can project a registered logo or image when there is no signal or when it is starting up.
Presentations without a computer
The projector can project JPEG and MPEG files stored on a USB memory device or a digital camera.
It is possible to convert PowerPoint materials to JPEG format using JPEG Conversion Tool and then project them using the projector.
QuickProjection
QuickProjection is an application that is provided with the projector and is used for connecting the projector and a computer to project images.
Miracast (RICOH PJ X3351N/WX3351N/WX4241N only)
The projector is compatible with Miracast, which allows you to duplicate the screen of your smart device on the projection screen.
14
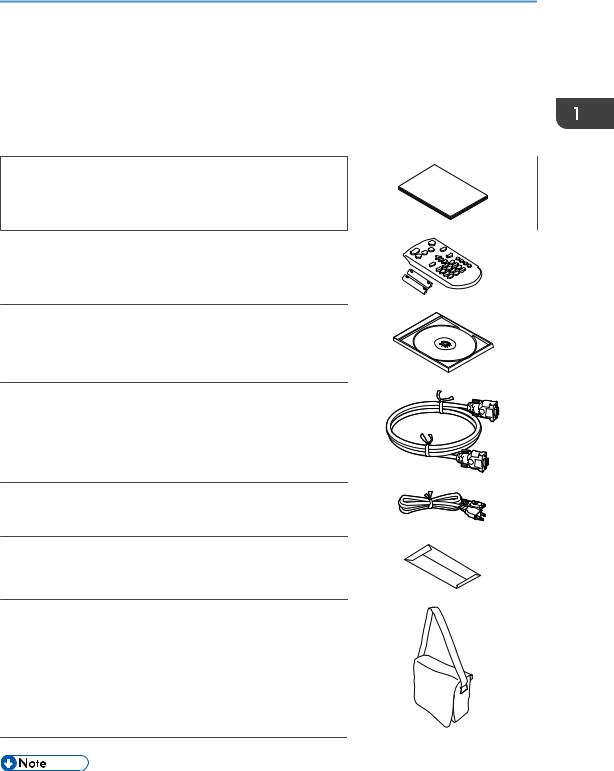
Checking the Accessories
Checking the Accessories
The projector is provided with the following accessories. Make sure that everything is included in the package.
If anything is missing or damaged, contact your sales representative or service representative.
Read This First
Start Guide
Remote control
AAA battery LR03
CD-ROM
RGB cable
Power cord
Warranty card
Carrying bag
(RICOH PJ X3351N/WX3351N only)
•The bundled accessories may vary depending on the location that this projector was purchased.
•Use only the RGB cable and power cord provided with the projector.
15

1.Preparations for Using the Projector
•The various applications are on the provided CD-ROM. For instructions about using the applications, see page 64 "How to Use JPEG Conversion Tool", page 77 "How to Use QuickProjection", and page 151 "Managing the Projector Using Projector Management Utility".
16
Projector Parts and Their Functions
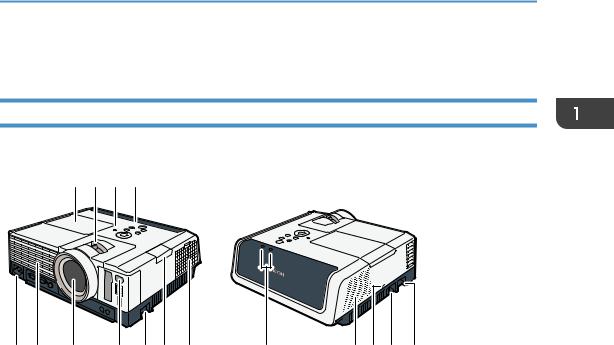
Projector Parts and Their Functions
Exterior
The illustrations below depict the RICOH PJ X3351N/WX3351N.
1 2 3 4
5 |
6 |
7 |
8 |
9 |
10 |
11 |
12 |
1.Lamp cover
Remove to replace the lamp.
2.Zoom lever/Focus lever
•Zoom lever (RICOH PJ X3351N/WX3351N) Adjusts the size of the projected image.
•Focus lever (RICOH PJ X4241N/WX4241N) Adjusts the focus of the projected image.
3.Illuminance sensor
Measures the brightness of the projecting location.
4.Control panel
See page 19 "Control Panel".
5.AC In socket
For connecting the power cord set provided with the projector.
6.Exhaust vents
Releases hot air from inside the projector.
7.Lens
Enlarges and projects the image (light).
8.Remote control receiver
Receives the signal from the remote control.
13 |
14 |
15 |
9 |
|
|
|
DHY169 |
17

1.Preparations for Using the Projector
9.Adjustable feet
Adjusts the angle of the projection. Adjustable feet are located on the left and right sides on the projector.
10.Interactive kit attachment cover
Remove this cover when attaching the adapter for the optional interactive kit. Be sure to disconnect the power cord before attaching or detaching the adapter. Also, be sure to attach the cover before turning on the projector. For detail, see the manual for the interactive kit.
11.Intake vents
For circulating air from the outside to cool the projector. Be sure to use the projector with the intake vents cover attached.
12.LED indicators
You can confirm the status of the projector by referring to the LED indicators. The left LED shows the status of the lamp, and the right LED shows the temperature inside the projector. For details, see page 131 "Indicator Display List".
13.Speaker
Outputs the audio input from an external device.
14.Security slot
For connecting an anti-theft cable.
15.Security bar
For connecting an anti-theft cable or chain.
•The top of the projector is covered with a protective film when it is shipped. Remove the film before using the projector.
Ports on the Projector
The illustrations below depict the RICOH PJ X3351N/WX3351N.
7
8
|
|
|
|
|
|
|
|
|
|
|
|
|
|
|
|
|
|
|
|
|
|
|
|
|
|
|
|
|
|
|
|
|
|
|
|
|
|
|
|
|
|
|
|
|
|
|
|
|
|
|
|
|
|
|
|
|
|
|
|
|
|
|
|
|
|
|
|
|
|
|
|
|
|
|
|
|
|
|
|
|
|
|
|
|
|
|
|
|
|
|
|
|
|
|
|
|
|
|
|
|
|
|
|
|
|
|
|
|
|
|
|
|
|
|
|
|
|
|
|
|
|
|
|
|
|
|
|
|
|
|
|
|
|
|
|
|
|
|
|
|
|
|
|
|
|
|
|
|
|
|
|
|
|
|
|
|
|
|
|
|
|
|
|
|
|
|
|
|
|
|
|
|
|
|
|
|
|
|
|
|
|
|
|
|
|
|
|
|
1 |
2 |
3 |
|
4 |
5 |
6 |
|
|
CUD063 |
|||||||||||||||||
|
|
|
|
|
|
|
|
|
|
|
|
|
|
|
|
|
|
|
|
|
|
|
|
|
|
|
1.Computer1 In port (Y/Pb/Pr)
For inputting RGB signals from a computer or component image signals (Y/Pb/Pr) from a video player.
18
Projector Parts and Their Functions
2.Computer2 In/Monitor Out port
For inputting RGB signals, or outputting the image signals input into the "Computer1 In port" to an external display device. You can switch the purpose of this port in [Computer 2 Terminal] under [Default Settings 1].
3.Video In port
For inputting image signals from a video player.
4.HDMI port
For inputting HDMI signals from a computer or video player.
5.Audio In port
For inputting audio signals from a computer or video player.
6.Audio Out port
For outputting audio signals to an external speaker.
7.LAN port
For connecting an Ethernet cable.
8.USB port
For connecting a USB memory device or USB device cable.
Control Panel
RICOH PJ X3351N/WX3351N RICOH PJ X4241N/WX4241N
1 |
|
|
2 |
|
|
3 |
6 |
6 |
4 |
7 |
|
5 |
|
|
DHY100
1.Arrow buttons
Used to operate the menu screen and the value bar. The [ ] and [
 ] buttons are used to adjust the keystone distortion. The [
 ] and [
 ] buttons are used to adjust the volume.
2.[Enter] button
Enters the selected item or mode.
3.[Menu] button
Displays the menu screen. Press it again to close the menu screen.
19

1.Preparations for Using the Projector
4.[Input] button
Switches the signal input. For details about how to switch the input signal, see page 38 "Projecting an Image".
5.[Power] button
Turns the projector on and off. You can confirm the status of the projector with the indicator.
•On: Power is on.
•Off: Power is off.
•Flashing at 1 or 3 second intervals: Standby.
•Flashing at short intervals: Starting up or cooling.
6.[Focus] button/[Eco] button
•[Focus] button (RICOH PJ X3351N/WX3351N)
Adjusts the focus manually. Press it, and then adjust the focus using the [ ] and [
 ] buttons.
•[Eco] button (RICOH PJ X4241N/WX4241N)
Displays the [Energy Saving Settings] screen. On the [Energy Saving Settings] screen, you can specify the energy saving settings for the lamp.
7.[AV Mute] button
Temporarily blanks the screen and mutes the audio. The button lights up blue when the projector is muted.
20

Remote Control Parts and Their Functions
Remote Control Parts and Their Functions
1 |
6 |
|
2 |
7 |
|
3 |
8 |
|
4 |
9 |
|
|
10 |
16 |
|
|
|
|
11 |
17 |
|
12 |
|
|
|
|
|
13 |
18 |
5 |
14 |
|
|
15 |
|
|
|
CUD050 |
1.[Menu] button
Displays the menu screen. Press it again to close the menu screen.
2.[Input] button
Switches the signal input. For details about how to switch the input signal, see page 38 "Projecting an Image".
3.[AV Mute] button
Temporarily blanks the screen and mutes the audio. For details, see page 48 "Temporarily Blanking the Image and Muting the Audio".
4.Arrow buttons
Used to operate the menu screen and the value bar.
5.Number buttons
Used to enter numbers.
6.[Power] button
Turns the projector on and off.
7.[Freeze] button
Temporarily freezes the image. For details, see page 49 "Freezing the Image".
8.[Magnify] button
Displays the magnification ratio bar. Press it, and then specify the magnification ratio using the [ ] and [
 ] buttons. For details, see page 47 "Enlarging the Image".
21

1.Preparations for Using the Projector
9.[Enter] button
Enters the selected item or mode.
10.[Zoom] button
Displays the digital zoom bar. Press it, and then adjust the size of the projected image using the [ ] and [
 ] buttons. For details, see page 43 "Reducing the size of the projected image".
11.[Focus] button
•RICOH PJ X3351N/WX3351N
Adjusts the focus manually. Press it, and then adjust the focus using the [ ] and [
 ] buttons. For details, see page 44 "Adjusting the focus of RICOH PJ X3351N/WX3351N".
•RICOH PJ X4241N/WX4241N This button is not used.
12.[Keystone] button
Displays the keystone adjustment bars. Press this, select [Keystone (Vertical)] or [Keystone (Horizontal)] using the [ ] and [
 ] buttons, and then adjust the keystone distortion using the [
 ] and [
 ] buttons. For details, see page 45 "Adjusting for Keystone Distortion".
13.[Volume] button
Displays the volume control bar. Press it, and then adjust the volume of the speaker using the [ ] and [
 ] buttons. For details, see page 47 "Adjusting the Volume of the Speaker".
14.[Timer] button
Displays the presentation timer. For details, see page 50 "Using the Presentation Timer".
15.[ID] button
Registers the remote control ID. For details, see page 25 "Operating Multiple Projectors with the Remote Control".
16.[R-Click] button
This button is not used.
17.[Page] buttons
Changes the image while projecting images from a USB device. Press [ ] to go to the next page. Press [ ] to go to the previous page.
18.[Eco] button
Displays the [Energy Saving Settings] screen. On the [Energy Saving Settings] screen, you can specify the energy saving settings for the lamp. For details, see page 49 "Specifying the Lamp Settings".
22
How to Use the Remote Control
How to Use the Remote Control
You can use the remote control to turn the projector on and off, and to change the signal of the image being input and projected. You can also enlarge or reduce the image and mute the audio.
Note the following precautions when using the remote control:
•Do not drop or hit the remote control.
•Do not place the remote control in a place that is very hot or very humid.
•Do not get the remote control wet. Also, do not place it on anything that is wet.
•Do not dismantle the remote control.
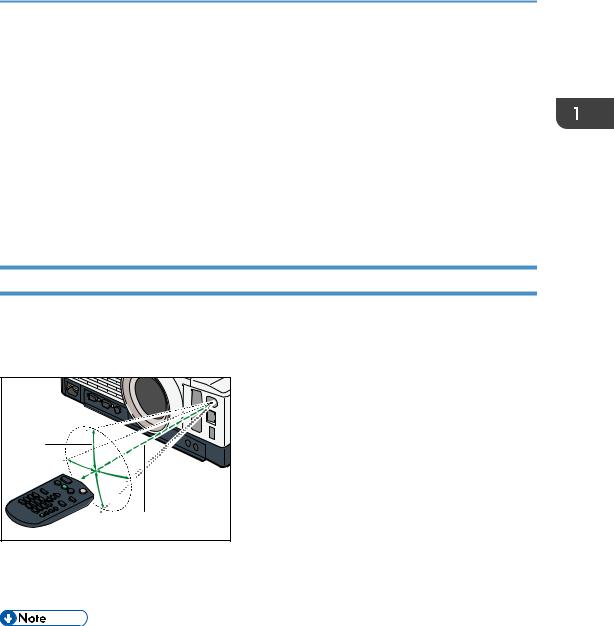
Effective Range of the Remote Control
Point the remote control at the remote control receiver on the projector to use it.
The effective range of the remote control is about 5 meters (16.4 feet) from the receiver and at an angle of about 15 degrees to the remote control receiver on the projector.
2 |
1 |
CUD071 |
1.Distance: up to 5 meters (16.4 feet)
2.Angle: within 15 degrees
•The remote control may not be effective in some areas and in some conditions. If this happens, point the remote control at the projector and try it again.
•The remote control may not work if the remote control receiver on the projector is exposed to sunlight, fluorescent light, or strong light.
•You can use the remote control from behind the projector by reflecting the signal off of the screen. However, the effective range may change depending on the shape and material of the screen.
23
1. Preparations for Using the Projector
Loading Batteries into the Remote Control
•For safe operation, follow the warnings below regarding the batteries. If you use the batteries incorrectly, it may result in fire or injury due to batteries leaking or exploding.
•Do not use batteries other than the ones specified.
•Do not mix and use batteries that are different types or that are new and old.
• Correctly insert batteries according to the polarity ( / ).
/ ).
•Do not charge non-rechargeable batteries.
•Do not heat or throw the batteries into fire or water.
•Do not connect the positive and negative terminals on a battery with a wire.
•Remove the batteries that are past their suggested use period or that are depleted.
•Remove the batteries when they will not be used for extended periods.
•Keep the batteries out of the reach of children. Children may swallow or choke on the batteries. If this happens, contact a doctor immediately.
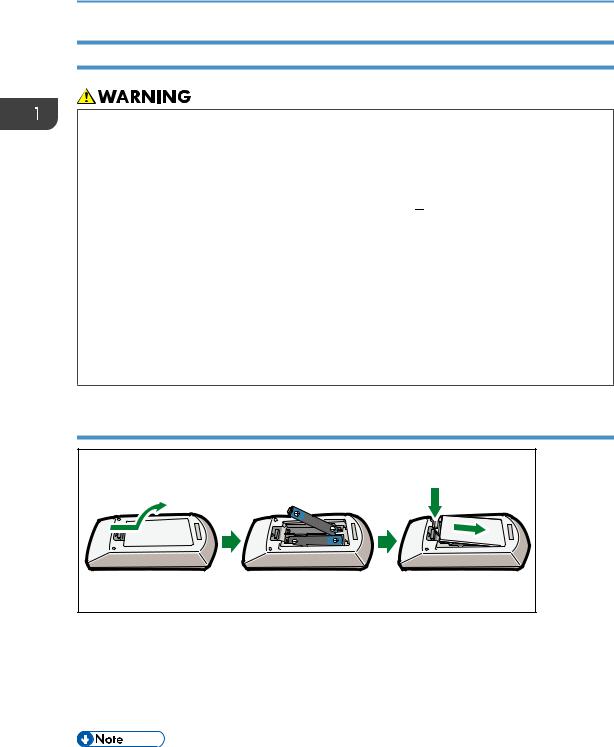
Loading batteries
1 |
2 |
3 |
|
|
CUD092 |
1.Remove the battery cover from the remote control.
2.Insert the batteries.
Note the direction of the positive and negative terminals when inserting the batteries.
3.Close the battery cover.
•Replace the batteries if the remote control does not work or if the effective distance becomes too narrow.
24
How to Use the Remote Control
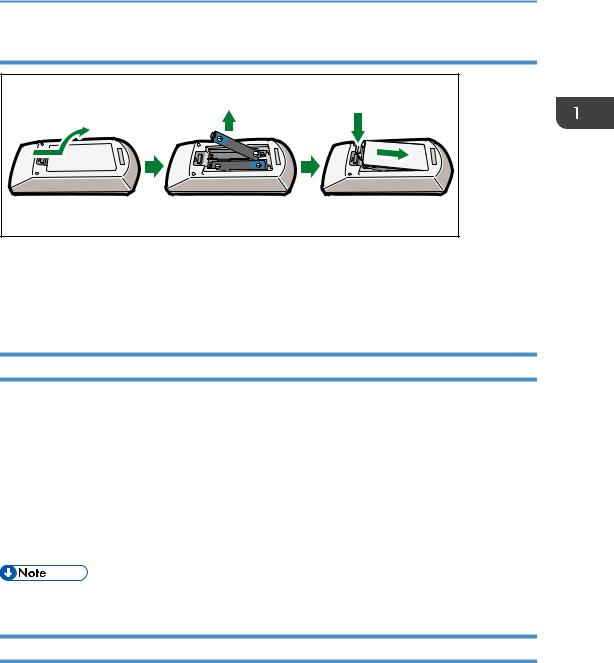
Removing batteries
1 |
2 |
3 |
|
|
DHY115 |
1.Remove the battery cover from the remote control.
2.Remove the batteries.
3.Close the battery cover.
Inputting Text
Use the keyboard that is displayed on screen to input text on the setting screen.
1.Select a character using the [ ], [
], [ ], [
], [ ], and [
 ] buttons on the remote control.
The selected character is highlighted in orange.
2.Press the [Enter] button.
The selected character appears in the text area.
3.After inputting all the characters, select [OK].
4.Press the [Enter] button.
• You can also use the number buttons on the remote control to input numbers.
Operating Multiple Projectors with the Remote Control
You can operate multiple projectors with a single remote control. It is possible to operate a maximum of four projectors. To operate the projector with the remote control, you must assign the same ID number to the projector and remote control.
Use the following procedure to assign the same ID number to the projector and the remote control.
25
1. Preparations for Using the Projector
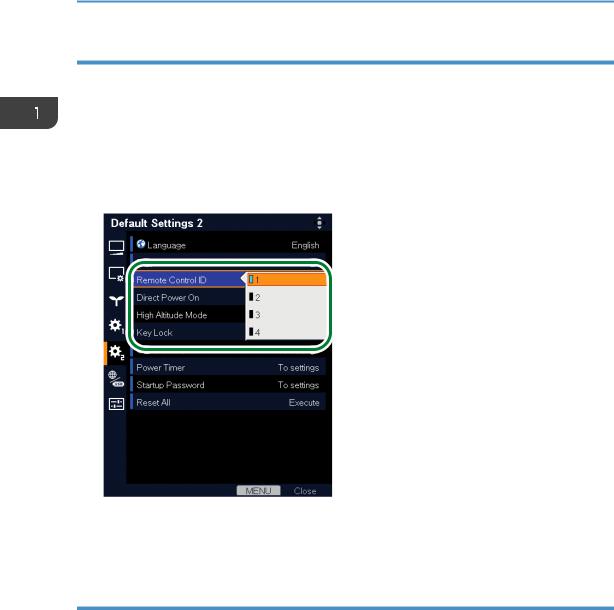
Assigning an ID number to the projector
To operate multiple projectors with a single remote control, assign a different ID number to each projector. Use the buttons on the control panel to perform the following procedure.
1.Press the [Menu] button.
2.Select [Default Settings 2], and then press the [ ] button.
3.Select [Remote Control ID], and then press the [Enter] button.
4.Select the ID number to assign to the projector, and then press the [Enter] button.
DHY116
5.Select [OK] on the confirmation screen, and then press the [Enter] button.
6.Press the [Menu] button to close the menu screen.
Changing the remote control's ID number
You can switch the ID number of the remote control to match the ID number of a projector. You can check the ID numbers of projectors in [Remote Control ID] in [Default Settings 2].
26
How to Use the Remote Control
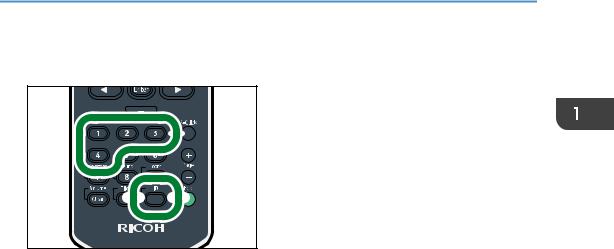
1.Press and hold the [ID] button, and then press the number button that is the ID number of the projector you want to operate for at least three seconds.
CZE109
After the ID number of the remote control is switched, you can operate the projector with the remote control.
27
1. Preparations for Using the Projector
Positioning the Projector
When positioning the projector, place it so that the projector's lens faces the screen. Make sure the projector and the screen are parallel to each other.
Adjust the distance between the projector and the screen according to the size of the projected image. For details, see page 29 "Relationship Between the Projection Distance and the Screen Size".
•The projector can be installed at any vertical angle. However, the projector cannot be tilted to the left or right. Do not use the projector horizontally inclined (±20 degrees or greater).
DHY039
•When the projector is installed on a ceiling with the lens-down, be sure to press the [Power] button and wait until the projector cooling process completes before disconnecting the power cord. Otherwise, you cannot turn the projector back on for up to approximately 25 minutes because it needs to release the internal heat.
•When installing the projector lens-up, be sure to secure the projector to the wall or ceiling using brackets.
Projection Mode
•If a machine is installed and fixed on a wall or ceiling incorrectly, it may fall down and cause an injury. Contact your sales or service representative to install and fix a machine on a wall or ceiling.
Four projection modes are available for the projector.
Select the setting according to the position of the projector in [Projection Mode] under [Default Settings 2]. For details, see page 107 "Default Settings 2 Menu".
28
 Loading...