


 Loading...
Ricoh AFICIO 1515F, 3515, DSM415F, LD015, DSM415 Manual
...Operating Instructions
Copy Reference
***CPY999.tif***
Placing Originals
Copying
Troubleshooting
User Tools (Copier Features)
Remarks
Specifications
Read this manual carefully before you use this product and keep it handy for future reference. For safe and correct use, please be sure to read the Safety Information in this manual before using the machine.

Type for 3515/DSm415/LD015 /Aficio 1515 Type for 3515F/DSm415f/LD015f /Aficio 1515F
Type for 3515MF/DSm415pf/LD015spf /Aficio 1515MF Printed in China
EN USA B129-6607

Introduction
This manual describes detailed instructions on the operation and notes about the use of this machine. To get maximum versatility from this machine all operators are requested to read this manual carefully and follow the instructions. Please keep this manual in a handy place near the machine.
Important
Contents of this manual are subject to change without prior notice. In no event will the company be liable for direct, indirect, special, incidental, or consequential damages as a result of handling or operating the machine.
Notes
Some illustrations in this manual might be slightly different from the machine.
Certain options might not be available in some countries. For details, please contact your local dealer.
Laser Safety:
CDRH Regulations
This equipment complies with requirements of 21 CFR subchapter J for class 1 laser products. This equipment contains a 5 milliwatt, 760-800 nanometer wavelength, GaAIAs laser diode. This equipment does not emit hazardous light, since the beam is totally enclosed during all customer modes of operation and maintenance.
Caution:
Use of controls or adjustments or performance of procedures other than those specified in this manual might result in hazardous radiation exposure.
Notes:
Certain types might not be available in some countries. For details, please contact your local dealer.
Two kinds of size notation are employed in this manual. With this machine refer to the inch version.
For good copy quality, the supplier recommends that you use genuine toner from the supplier.
The supplier shall not be responsible for any damage or expense that might result from the use of parts other than genuine parts from the supplier with your office products.
Power Source
120V, 60Hz, 8A or more
Please be sure to connect the power cord to a power source as above. For details about power source, see p.51 “Power Connection”.
In accordance with IEC 60417, this machine uses the following symbols for the main power switch: a means POWER ON.
c means STAND BY.
Trademark
PostScript® and Acrobat® are registered trademarks of Adobe Systems Incorporated.
Other product names used herein are for identification purposes only and might be trademarks of their respective companies. We disclaim any and all rights to those marks.
Copyright © 2003
Manuals for This Machine
The following manuals describe the operational procedures of this machine. For particular functions, see the relevant parts of the manual.

 Note
Note
Manuals provided are specific to machine type.
Adobe Acrobat Reader is necessary to view the manuals as a PDF file.
Two CD-ROMs are provided:
•CD-ROM 1 "Operating Instructions for Printer/Scanner"
•CD-ROM 2 "Scanner Driver & Document Management Utilities"
General Settings Guide
Provides an overview of the machine and describes System Settings (paper trays, Key Operator Tools, etc.), and troubleshooting.
Refer to this manual for Address Book procedures such as registering fax numbers, e-mail addresses, and user codes.
Network Guide (PDF file - CD-ROM1)
Describes procedures for configuring the machine and computers in a network environment.
Copy Reference (this manual)
Describes operations, functions, and troubleshooting for the machine's copier function.
Facsimile Reference <Basic Features>
Describes operations, functions, and troubleshooting for the machine's facsimile function.
Facsimile Reference <Advanced Features>
Describes advanced functions and settings for key operators.
Printer Reference 1
Describes system settings and operations for the machine's printer function.
Printer Reference 2 (PDF file - CD-ROM1)
Describes operations, functions, and troubleshooting for the machine's printer function.
Scanner Reference (PDF file - CD-ROM1)
Describes operations, functions, and troubleshooting for the machine's scanner function.
i
Manuals for DeskTopBinder V2 Lite
DeskTopBinder V2 Lite is a utility included on the CD-ROM labeled "Scanner Driver & Document Management Utilities".
•DeskTopBinder V2 Lite Setup Guide (PDF file - CD-ROM2)
Describes installation of, and the operating environment for DeskTopBinder V2 Lite in detail. This guide can be displayed from the [Setup] dialog box when DeskTopBinder V2 Lite is installed.
•DeskTopBinder V2 Introduction Guide (PDF file - CD-ROM2)
Describes operations of DeskTopBinder V2 Lite and provides an overview of its functions. This guide is added to the [Start] menu when DeskTopBinder V2 Lite is installed.
•Auto Document Link Guide (PDF file - CD-ROM2)
Describes operations and functions of Auto Document Link installed with DeskTopBinder V2 Lite. This guide is added to the [Start] menu when DeskTopBinder V2 Lite is installed.
Manuals for ScanRouter V2 Lite
ScanRouter V2 Lite is a utility included on the CD-ROM labeled "Scanner Driver & Document Management Utilities".
•ScanRouter V2 Lite Setup Guide (PDF file - CD-ROM2)
Describes installation of, settings, and the operating environment for ScanRouter V2 Lite in detail. This guide can be displayed from the [Setup] dialog box when ScanRouter V2 Lite is installed.
•ScanRouter V2 Lite Management Guide (PDF file - CD-ROM2)
Describes delivery server management and operations, and provides an overview of ScanRouter V2 Lite functions. This guide is added to the [Start] menu when ScanRouter V2 Lite is installed.
Other manuals
•PostScript3 Supplement (PDF file - CD-ROM1)
•Unix Supplement (Available from an authorized dealer, or as a PDF file on our Web site.)
ii

TABLE OF CONTENTS |
|
Manuals for This Machine ...................................................................................... |
i |
Notice ...................................................................................................................... |
1 |
How to Read This Manual ..................................................................................... |
3 |
Safety Information ................................................................................................. |
4 |
Safety During Operation............................................................................................. |
4 |
Positions of RWARNING and RCAUTION Labels ............................................. |
6 |
Control Panel.......................................................................................................... |
8 |
Display ....................................................................................................................... |
9 |
Turning On the Power ......................................................................................... |
11 |
Turning On the Main Power ..................................................................................... |
11 |
Turning On the Power .............................................................................................. |
11 |
Turning Off the Power .............................................................................................. |
12 |
Turning Off the Main Power ..................................................................................... |
12 |
Saving Energy.......................................................................................................... |
13 |
1. Placing Originals |
|
Originals ............................................................................................................... |
15 |
Sizes and Weights of Recommended Originals....................................................... |
15 |
Sizes Selectable as Regular Size Originals ............................................................. |
16 |
Missing Image Area ................................................................................................. |
16 |
Placing Originals.................................................................................................. |
17 |
Original Orientation .................................................................................................. |
17 |
Placing Originals on the Exposure Glass................................................................. |
17 |
Placing Originals in the ADF .................................................................................... |
18 |
Placing Regular Size Originals................................................................................. |
18 |
Placing Custom Size Originals................................................................................. |
19 |
2. Copying |
|
Basic Procedure................................................................................................... |
21 |
Copying from the Bypass Tray........................................................................... |
22 |
When copying onto regular size paper..................................................................... |
24 |
When copying onto custom size paper .................................................................... |
24 |
When copying onto special paper ............................................................................ |
25 |
When copying onto envelopes ................................................................................. |
25 |
Copier Functions ................................................................................................. |
27 |
Adjusting Image Density .......................................................................................... |
27 |
Selecting Original Type Setting................................................................................ |
27 |
Selecting Copy Paper .............................................................................................. |
28 |
Preset Reduce/Enlarge ............................................................................................ |
28 |
Zoom ........................................................................................................................ |
29 |
Sort........................................................................................................................... |
30 |
Duplex ...................................................................................................................... |
31 |
One-Sided Combine................................................................................................. |
32 |
Two-Sided Combine................................................................................................. |
33 |
iii

3. Troubleshooting |
|
If Your Machine Does Not Operate As You Want |
..............................................35 |
When a Message Is Displayed................................................................................. |
35 |
If You Cannot Make Clear Copies....................................................................... |
36 |
If You Cannot Make Copies As You Want ......................................................... |
37 |
When Memory Is Full ............................................................................................... |
38 |
B Loading Paper ................................................................................................. |
39 |
Loading Paper.......................................................................................................... |
39 |
D Adding Toner................................................................................................... |
40 |
Handling Toner......................................................................................................... |
40 |
Toner Storage .......................................................................................................... |
40 |
Used Toner .............................................................................................................. |
40 |
Removing Toner................................................................................................... |
41 |
Inserting Toner..................................................................................................... |
42 |
4. User Tools (Copier Features) |
|
Accessing User Tools (Copier Features)........................................................... |
43 |
Changing Default Settings ....................................................................................... |
43 |
Quitting User Tools .................................................................................................. |
44 |
Settings You Can Change with User Tools ....................................................... |
45 |
Auto Tray Switching ................................................................................................. |
45 |
Original Type Setting ............................................................................................... |
45 |
Duplex Mode Priority................................................................................................ |
45 |
Orientation................................................................................................................ |
46 |
Max. Number of Sets ............................................................................................... |
46 |
Original Count Display ............................................................................................. |
46 |
Reproduction Ratio .................................................................................................. |
46 |
Preset R/E Priority ................................................................................................... |
47 |
Duplex Margin .......................................................................................................... |
47 |
5. Remarks |
|
Do's and Don'ts .................................................................................................... |
49 |
Where to Put Your Machine ................................................................................ |
50 |
Machine Environment .............................................................................................. |
50 |
Moving...................................................................................................................... |
51 |
Power Connection.................................................................................................... |
51 |
Access to the Machine ............................................................................................. |
52 |
Maintaining Your Machine .................................................................................. |
53 |
Cleaning the Exposure Glass................................................................................... |
53 |
Cleaning the ADF..................................................................................................... |
53 |
6. Specifications |
|
Combination Chart............................................................................................... |
55 |
Supplementary Information ................................................................................ |
56 |
INDEX......................................................................................................... |
59 |
iv

Notice
Important
Do not make copies of any item for which copying is prohibited by law.
Copying the following items is normally prohibited by local law:
Bank billes, revenue stamps, bonds, stock certificates, bank drafts, checks, passports, driver's licenses.
Notice To Wireless LAN Interface (option) Users
Notes to users in the United States of America
Notice:
This equipment has been tested and found to comply with the limits for a Class B digital device, pursuant to Part 15 of the FCC Rules. These limits are designed to provide reasonable protection against harmful interference in a residential installation. This equipment generates, uses and can radiate radio frequency energy and, if not installed and used in accordance with the instructions, may cause harmful interference to radio communications. However, there is no guarantee that interference will not occur in a particular installation. If this equipment does cause harmful interference to radio or television reception, which can be determined by turning the equipment off and on, the user is encouraged to try to correct the interference by one more of the following measures:
•Reorient or relocate the receiving antenna.
•Increase the separation between the equipment and receiver.
•Connect the equipment into an outlet on a circuit different from that to which the receiver is connected.
•Consult the dealer or an experienced radio/TV technician for help.
This device complies with part 15 of the FCC Rules.
Operation is subject to the following two conditions:
(1) This device may not cause harmful interference, and (2) this device must accept any interference received, including interference that may cause undesired operation.
Warning
Changes or modifications not expressly approved by the party responsible for compliance could void the user's authority to operate the equipment.
1
Note to users in Canada
Note:
This Class B digital apparatus complies with Canadian ICES-003.
Operation is subject to the following two conditions:
(1) This device may not cause interference, and (2) this device must accept any interference, including interference that may cause undesired operation of the device.
IEEE 802.11b Interface Unit Type D:
This device complies with RSS-210 of Industry Canada.
The term “IC:” before the certification/registration number only signifies that the Industry Canada technical specifications were met.
To prevent radio interference to the licensed service, this device is intended to be operated indoors and away from windows to provide maximum shielding. Equipment (or its transmit antenna) that is installed outdoors is subject to licensing.
Remarque concernant les utilisateurs au Canada
Avertissement:
Cet appareil numérique de la classe B est conforme á la norme NMB-003 du Canada.
L'utilisation de ce dispositif est autorisée seulement aux conditions suivantes: (1) il ne doit pas produire de brouillage et (2) l'utilisateur du dispositif doit être prêt á accepter tout brouillage radioélectrique reçu, même si ce brouillage est susceptible de compromettre le fonctionnement du dispositif.
IEEE 802.11b Interface Unit Type D:
Ce dispositif est conforme á la norme CNR-210 d'Industrie Canada.
L'expression «IC:» avant le numéro d'homologation/enregistrement signifie seulement que les spécifications techniques d'Industrie Canada ont été respectées.
Pour empêcher que cet appareil cause du brouillage au service faisant l'objet d'une licence, il doit être utilisé á l'intérieur et devrait être placé loin des fenêtres afin de fournir un écran de blindage maximal.
Si le matériel (ou son antenne d'emission) est installe á l'extérieur, il doit faire l'objet d'une licence.
2
How to Read This Manual
Symbols
The following set of symbols is used in this manual.
RWARNING:
This symbol indicates a potentially hazardous situation that might result in death or serious injury when you misuse the machine without following the instructions under this symbol. Be sure to read the instructions, all of which are described in the Safety Information section.
RCAUTION:
This symbol indicates a potentially hazardous situation that might result in minor or moderate injury or property damage that does not involve personal injury when you misuse the machine without following the instructions under this symbol. Be sure to read the instructions, all of which are described in the Safety Information section.
* The statements above are notes for your safety.
 Important
If this instruction is not followed, paper might be misfed, originals might be damaged, or data might be lost. Be sure to read this.
 Preparation
This symbol indicates information or preparations required prior to operating.

 Note
Note
This symbol indicates precautions for operation, or actions to take after abnormal operation.
 Limitation
This symbol indicates numerical limits, functions that cannot be used together, or conditions in which a particular function cannot be used.

 Reference
This symbol indicates a reference.
[ ]
Keys that appear on the machine's display panel.
{}
Keys built into the machine's control panel.
3

Safety Information
When using this machine, the following safety precautions should always be followed.
Safety During Operation
In this manual, the following important symbols are used:
RWARNING:
Indicates a potentially hazardous situation which, if instructions are not followed, could result in death or serious injury.
RCAUTION:
Indicates a potentially hazardous situation which, if instructions are not followed, may result in minor or moderate injury or damage to property.
RWARNING:
•Disconnect the power plug (by pulling the plug, not the cable) if the power cable or plug becomes frayed or otherwise damaged.
•To avoid hazardous electric shock or laser radiation exposure, do not remove any covers or screws other than those specified in this manual.
•Turn off the power and disconnect the power plug (by pulling the plug, not the cable) if any of the following occurs:
•You spill something into the machine.
•You suspect that your machine needs service or repair.
•The external housing of your machine has been damaged.
•Do not incinerate spilled toner or used toner. Toner dust might ignite when exposed to an open flame.
•Disposal can take place at our authorized dealer.
•Dispose of the used toner bottle in accordance with the local regulations.
•Connect the machine only to the power source described on the inside front cover of this manual. Connect the power cord directly into a wall outlet and do not use an extension cord.
•Do not damage, break or make any modifications to the power cord. Do not place heavy objects on it. Do not pull it hard nor bend it more than necessary. These actions could cause an electric shock or fire.
4

RCAUTION:
•Protect the machine from dampness or wet weather, such as rain and snow.
•Unplug the power cord from the wall outlet before you move the machine. While moving the machine, you should take care that the power cord will not be damaged under the machine.
•When you disconnect the power plug from the wall outlet, always pull the plug (not the cable).
•Do not allow paper clips, staples, or other small metallic objects to fall inside the machine.
•Keep toner (used or unused) and toner bottle out of the reach of children.
•For environmental reasons, do not dispose of the machine or expended supply waste at household waste collection points. Disposal can take place at an authorized dealer.
•The inside of the machine could be very hot. Do not touch the parts with a label indicating the “hot surface”. Otherwise, an injury might occur.
•Keep the machine away from humidity and dust. Otherwise a fire or an electric shock might occur.
•Do not place the machine on an unstable or tilted surface. If it topples over, an injury might occur.
•When the optional paper tray unit is installed, do not push the upper part of the main unit horizontally. An injury might occur if the paper tray unit becomes detached from the main unit.
•If you use the machine in a confined space, make sure there is a continuous air turnover.
5

Positions of RWARNING and RCAUTION
Labels
This machine has labels for RWARNING and RCAUTION at the positions shown below. For safety, please follow the instructions and handle the machine as indicated.
The inside of this machine gets very hot. Do not touch the inside. Doing so could result in a burn.
ABU016S.eps
A
ABU017S.eps
B The anti-condensation heater in the lower part of the machine interior gets very hot. Do not touch it. Doing so could result in a burn.
ZFOH710E.eps
C The anti-condensation heater in the upper part of the machine interior gets very hot. Do not touch it. Doing so could result in a burn.
ZFOH720E.eps
6

 Note
Note
The anti-condensation heater is optional. For details, contact your service representative.
7
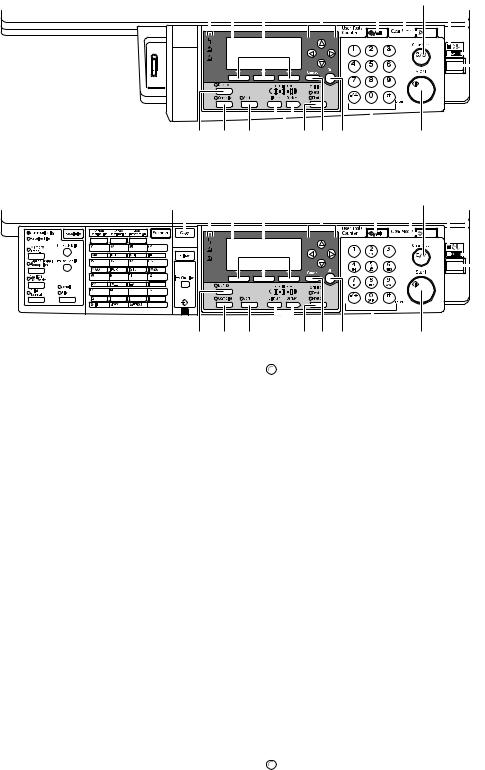
Control Panel
Copier only
ABU108S.eps
2 |
3 |
4 |
5 |
6 |
7 |
8 |
9 10 11 |
|||||||||||||
|
|
|
|
|
|
|
|
|
|
|
|
|
|
|
|
|
|
|
|
|
|
|
|
|
|
|
|
|
|
|
|
|
|
|
|
|
|
|
|
|
|
|
|
|
|
|
|
|
|
|
|
|
|
|
|
|
|
|
|
|
|
|
|
|
|
|
|
|
|
|
|
|
|
|
|
|
|
|
|
|
|
|
|
|
|
|
|
|
|
|
|
|
|
|
|
|
|
|
|
|
|
|
|
|
|
|
|
|
|
|
|
|
|
|
|
|
|
|
|
|
|
|
|
|
|
|
|
|
|
|
|
|
|
|
|
|
|
|
|
|
|
|
|
|
|
|
|
|
|
|
|
|
|
|
|
|
|
|
|
|
|
|
|
|
|
|
|
|
|
|
|
|
|
|
|
|
|
|
|
|
|
|
|
|
|
|
|
|
12 |
13 |
14 |
15 16 17 18 |
19 |
20 |
ABU108S
Fax, printer and/or scanner installed
ABU109S.eps
1 |
2 |
3 |
4 |
5 |
6 |
7 8 |
9 10 11 |
|||||||||||||||
|
|
|
|
|
|
|
|
|
|
|
|
|
|
|
|
|
|
|
|
|
|
|
|
|
|
|
|
|
|
|
|
|
|
|
|
|
|
|
|
|
|
|
|
|
|
|
|
|
|
|
|
|
|
|
|
|
|
|
|
|
|
|
|
|
|
|
|
|
|
|
|
|
|
|
|
|
|
|
|
|
|
|
|
|
|
|
|
|
|
|
|
|
|
|
|
|
|
|
|
|
|
|
|
|
|
|
|
|
|
|
|
|
|
|
|
|
|
|
|
|
|
|
|
|
|
|
|
|
|
|
|
|
|
|
|
|
|
|
|
|
|
|
|
|
|
|
|
|
|
|
|
|
|
|
|
|
|
|
|
|
|
|
|
|
|
|
|
|
|
|
|
|
|
|
|
|
|
|
|
|
|
|
|
|
|
|
|
|
|
|
|
|
|
|
|
|
|
|
|
|
|
|
|
|
|
|
12 |
13 |
14 |
15 16 17 18 |
19 |
20 |
ABU109S
1. {Copy}key
Press to activate the copier function.
2. Indicators
Display errors and machine status.
•h: Error indicator
See “Control Panel”, General Settings Guide.
•D: Add Toner indicator
See p.40 “DAdding Toner”.
•B: Load Paper indicator See p.39 “BLoading Paper”.
3. Display
Displays operation status and messages.
4. Selection keys
Correspond to items on the display. Press to select the corresponding item.
5. Scroll keys
Press to select an item. {U}: scroll upward {T}: scroll downward {V}: scroll right
{W}: scroll left

 Reference
See p.10 “Reading the Display and
Using Keys”.
6. {User Tools/Counter}key
•User Tools
Press to change default and conditions according to requirement. See p.43 “Accessing User Tools (Copier Features)”.
•Counter
Press to check or print the counter value.
7. {Clear Modes}key
Press to clear the current settings.
8. {Clear/Stop}key
Clear: clears an entered numeric value. Stop: stops copying.
9. Main power indicator
Lights when the main power switch is turned on.

 Reference
p.11 “Turning On the Power”
8

10. On indicator
Lights when the operation switch is on.

 Reference
p.11 “Turning On the Power”
11. Operation switch
Press to turn the power on. The On indicator lights. To turn the power off, press again.

 Note
Note
This key is inactivate during scanning or while setting defaults.
12. {Duplex}key
Makes two-sided copies.

 Reference
See p.31 “Duplex”.
13. {Combine}key
Press to make combine copies.

 Reference
p.32 “One-Sided Combine”
p.33 “Two-Sided Combine”
14.{Sort}key
Automatically sorts copies.
15.{Lighter}and {Darker}
Press to change the image density setting. Select the image density in five increments, lighter to darker.
16. {Original Type}key
Press to select the original type registered with [Original Type 1 (Text)] or [Original Type 2 (Photo)]. When the original type is selected, the corresponding indicator lights.
17. {Cancel}key
Press to cancel an operation or return to the previous display.
18. {OK}key
Press to set a selected item or entered numeric value.
19. Number keys
Press to enter numeric values.
20. {Start}key
Press to start copying.
Display
This section explains how to read the display and use the Selection key.

 Note
Note
The copy display is set as the default screen when the machine is turned on.
Initial copy display
ABU018S.eps |
|
|
1 |
2 |
3 |
4
|
ABU018S |
1. Operational status or messages |
3. Number of copies set. |
2. Messages and the selected tray appear here. Currently selected items appear in brackets.
4. Reduce/Enlarge ratio function for non-fixed ratios.
9
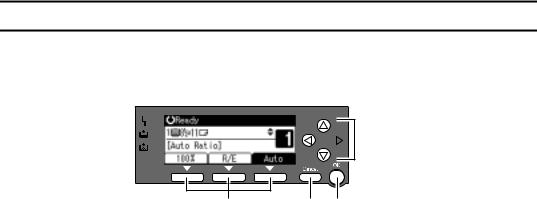
Reading the Display and Using Keys
The display is not touch sensitive. Use the following keys to select the keys and items displayed on the screen.
ABU110S.eps

 4
4
1 |
2 3 |
ABU110S |
1. Selection keys |
2. {Cancel}key |
|
Correspond to items at the bottom line on the display.
Example: when the combine function is set
•When the instruction “press [100%]” appears in this manual, press the left selection key.
•When the instruction “press [R/E]” appears in this manual, press the center selection key.
•When the instruction “press [Auto]” appears in this manual, press the right selection key.
Press to cancel an operation or return to the previous display.
3. {OK}key
Press to set a selected item or entered numeric value.
4. Scroll keys
Press to move the cursor to each direction one by one.
When {U},{T},{V}, or {W} key appears in this manual, press the scroll key of the same direction.
10
Turning On the Power
This machine has two power switches.
Operation switch (right side of the control panel)
Press to activate the machine. When the machine has finished warming up, you can operate the machine.
Main power switch (left side of the machine)
Turning off this switch makes the main power indicator on the right side of the control panel go off. When this is done, machine power is completely off.
When the fax unit is installed, fax files in memory may be lost if you turn this switch off. Use this switch only when necessary.

 Note
Note
This machine automatically enters Energy Saver mode or turns itself off if you do not use it for a while. See General Settings Guide.
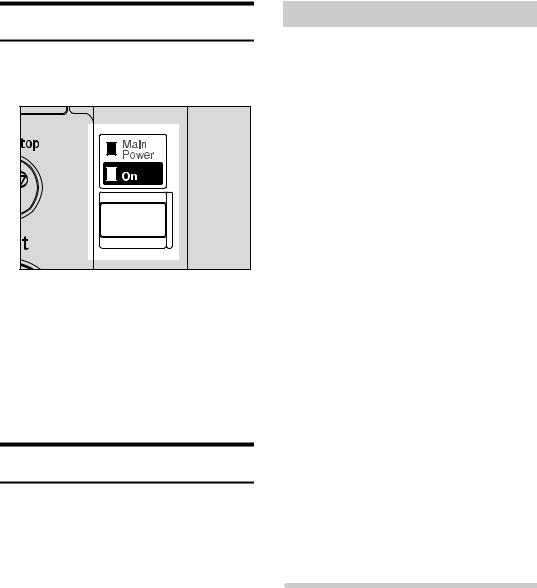
Turning On the Main Power
A Make sure the power cord is firmly plugged into the wall outlet.
B Turn on the main power switch.
ABU111S.eps
 Important
Do not turn off the main power switch immediately after turning it on. Doing so may result in damage to the memory, leading to malfunctions.
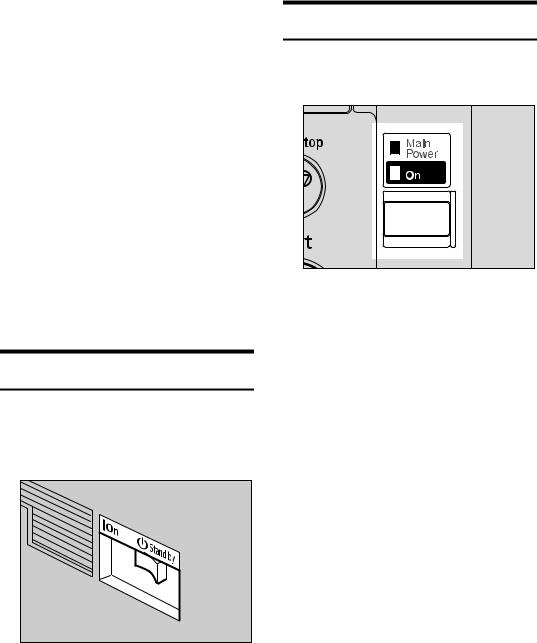
Turning On the Power
A Press the operation switch.
The On indicator goes on.
ABU112S.eps
ABU112S

 Note
Note
If the power does not come on when the operation switch is pressed, check the main power switch is on. If it is off, turn it on.
ABU111S
The main power indicator goes on.
11
Turning Off the Power
A Press the operation switch.
The On indicator goes off.
ABU112S.eps
ABU112S

 Note
Note
Even if you press the operation switch, the indicator does not go out, but blinks in the following case:
•During communication with external equipment.
Turning Off the Main Power
 Important
Do not turn off the main power switch when the On indicator is lit or blinking. Doing so may result in damage to the memory.
Make sure 100% is shown as available memory on the initial scanner display before turning off the main power switch.
Be sure to turn off the main power switch before pulling out the power plug. Not doing this may result in damage to the memory.
A Be sure the On indicator is not lit.
B Turn off the main power switch.
The main power indicator goes out.
12
-When the fax unit is installed
When the main power switch is turned off while using the fax function, waiting fax and print jobs may be canceled, and incoming fax documents not received. If you have to turn off this switch for some reason, keep the following points in mind:
 Important
Make sure 100% is shown as available memory on the display before turning off the main power switch or unplugging the power cord. Fax files in memory are deleted an hour after you turn off the main power switch or unplug the power cord. See ”Turning Off the Main Power/In Case of a Power Failure”, Facsimile Reference <Advanced Features>.
If the On indicator does not go out, but blinks in dial-in mode even if you press the operation switch, check the explanations below and turn off the main power switch.
•the computer is not controlling the machine.
•the machine is not receiving a fax.
Saving Energy
•Low Power/Auto Off
The machine automatically enters Low Power mode automatically after a job is finished, and the selected time elapsed.
After a specified period has passed, following job completion, the machine automatically turns off, in order to conserve energy. This function is called “Auto Off”.

 Note
Note
You can change the Energy Saver Timer and Auto Off Timer. See General Settings Guide.
The Low Power Timer and Auto Off Timer function will not operate in the following cases:
•When a warning message appears
•When the service call message appears
•When paper is jammed
•When the cover is open
•When the “Add toner” message appears
•When toner is being replenished
•When the User Tools screen is displayed
•When fixed warm-up is in progress
•When the facsimile, printer, or other functions are active
•When operations are suspended during printing
•When the On-hook dialing function is in use
•When a receiver is being registered in the Address Book or group dial list
•When the Data In indicator is on or blinking
13
Loading...