


User Guide
Selected Version
Getting Started
Copy
Fax
Scan
Document Server
Web Image Monitor
Adding Paper and Toner
Troubleshooting
Information for This Machine
For information not found in this manual, see the online manuals available on our web site (https://www.ricoh.com/) or via the control panel.
For safe and correct use, be sure to read Safety Information before using the machine.

TABLE OF CONTENTS |
|
|
|
How to Read This Manuals................................................................................................................................ |
|
|
7 |
Symbols Used in This Manuals...................................................................................................................... |
|
|
7 |
1. Getting Started |
|
|
|
Names of Major Features.................................................................................................................................. |
|
|
9 |
Model-Specific Information............................................................................................................................. |
|
|
10 |
Guide to Names and Functions of Components............................................................................................ |
|
11 |
|
Guide to Components................................................................................................................................. |
|
|
11 |
Connecting and Setting the Network............................................................................................................. |
|
|
18 |
Setting Wired LAN....................................................................................................................................... |
|
|
18 |
Setting Wireless LAN................................................................................................................................... |
|
|
20 |
Connecting the USB Interface......................................................................................................................... |
|
|
30 |
Connecting to the USB (Type B) Interface................................................................................................. |
|
|
30 |
Connecting a Device to the Machine's USB Host Interface..................................................................... |
|
30 |
|
Connecting the Machine to a Telephone Line and Telephone/Handset.................................................... |
32 |
||
Connecting the Telephone Line |
(mainly Europe and Asia).................................................. |
32 |
|
Connecting the Telephone Line |
(mainly North America)...................................................... |
33 |
|
Selecting the Line Type................................................................................................................................ |
|
|
34 |
Settings Needed for Each Function................................................................................................................ |
|
|
36 |
Guide to Functions of the Machine's External Options |
(mainly Europe and Asia)................. |
37 |
|
Guide to Functions of the Machine's External Options |
(mainly North America).................... |
38 |
|
Order of Option Installation............................................................................................................................ |
|
|
39 |
Attaching the Paper Feed Unit........................................................................................................................ |
|
|
40 |
The number of tray that you can install...................................................................................................... |
|
|
41 |
Installing the Offline Stapler............................................................................................................................ |
|
|
43 |
Installing the Wireless LAN interface board.................................................................................................. |
|
|
47 |
Installing the IEEE 1284 interface board....................................................................................................... |
|
|
48 |
Connecting to the IEEE 1284 Interface..................................................................................................... |
|
|
49 |
Installing the Extended USB board................................................................................................................. |
|
|
50 |
Installing the USB device server...................................................................................................................... |
|
|
51 |
Procedure for installing the USB device server.......................................................................................... |
|
51 |
|
Connecting to the Extra Ethernet Interface with the USB Device Server Option.................................... |
52 |
||
Specifying an IP address for the USB Device Server................................................................................ |
|
54 |
|
Installing the File Format Converter................................................................................................................ |
|
|
57 |
1

Installing SD Card Options.............................................................................................................................. |
|
58 |
Installing the Handset |
(mainly North America)......................................................................... |
60 |
Connecting the handset............................................................................................................................... |
|
60 |
Connecting the telephone........................................................................................................................... |
|
64 |
Guide to the Names and Functions of the Machine's Control Panel........................................................... |
65 |
|
Changing the Display Language.................................................................................................................... |
|
66 |
How to Use the [Home] Screen...................................................................................................................... |
|
67 |
Possible Operations on the Standard Application Screen....................................................................... |
69 |
|
Adding Shortcuts to the [Home] Screen..................................................................................................... |
71 |
|
Adding Shortcuts to Bookmarks on the [Home] Screen............................................................................ |
71 |
|
Adding Shortcuts to Programs to the [Home] Screen............................................................................... |
72 |
|
Adding Widgets to the [Home] Screen...................................................................................................... |
72 |
|
How to Use Each Application......................................................................................................................... |
|
73 |
[Copy] (standard) Screen........................................................................................................................... |
|
74 |
[Fax] (standard) Screen.............................................................................................................................. |
|
76 |
[Scanner] (standard) Screen....................................................................................................................... |
|
82 |
Registering Frequently Used Functions........................................................................................................... |
88 |
|
Turning On/Off the Power.............................................................................................................................. |
|
91 |
Turning On/Off the Main Power................................................................................................................ |
91 |
|
Logging In the Machine................................................................................................................................... |
|
93 |
User Code Authentication........................................................................................................................... |
|
93 |
Logging In/Out Using the Control Panel................................................................................................... |
93 |
|
Placing Originals.............................................................................................................................................. |
|
95 |
Placing Originals on the Exposure Glass................................................................................................... |
95 |
|
Placing Originals in the Auto Document Feeder....................................................................................... |
95 |
|
2. Copy |
|
|
Basic Procedure................................................................................................................................................ |
|
97 |
Auto Reduce / Enlarge.................................................................................................................................... |
|
98 |
Duplex Copying............................................................................................................................................... |
|
99 |
Specifying the Original and Copy Orientation...................................................................................... |
100 |
|
Combined Copying....................................................................................................................................... |
|
102 |
One-Sided Combine................................................................................................................................. |
|
103 |
Two-Sided Combine................................................................................................................................. |
|
104 |
2

Copying Onto Custom Size Paper............................................................................................................... |
106 |
Copying onto Envelopes............................................................................................................................... |
107 |
Sort.................................................................................................................................................................. |
108 |
Changing the Number of Sets.................................................................................................................. |
108 |
Storing Data in the Document Server........................................................................................................... |
109 |
3. Fax |
|
Basic Procedure for Fax Transmissions (Memory Transmission)................................................................ |
111 |
Registering a Fax Destination................................................................................................................... |
111 |
Changing or Deleting a Fax Destination................................................................................................. |
114 |
Transmitting while Checking Connection to Destination (Immediate Transmission)................................. |
116 |
Canceling a Fax Transmission...................................................................................................................... |
117 |
Canceling a Transmission Before the Original Is Scanned.................................................................... |
117 |
Canceling a Transmission While the Original Is Being Scanned.......................................................... |
117 |
Canceling a Transmission After the Original Is Scanned....................................................................... |
117 |
Storing a Fax Document................................................................................................................................ |
119 |
Sending Stored Fax Documents............................................................................................................... |
120 |
Printing the Records Manually...................................................................................................................... |
122 |
4. Print |
|
Installing the Printer Driver for Network Connection (Windows)............................................................... |
123 |
Installing the PCL 6 Printer Driver from the CD-ROM............................................................................. |
123 |
Installing the Printer Driver for USB Connection (Windows)...................................................................... |
127 |
Installing the Printer Driver from the CD-ROM........................................................................................ |
127 |
Displaying the Printer Driver Properties........................................................................................................ |
130 |
Standard Printing........................................................................................................................................... |
131 |
When Using the PCL 6 Printer Driver....................................................................................................... |
131 |
Printing on Both Sides of Sheets................................................................................................................... |
135 |
How to Print on Both Sides of the Paper (When Using the PCL 6 Printer Driver)................................. |
135 |
Combining Multiple Pages into Single Page............................................................................................... |
136 |
How to Print Multiple Pages onto a Single Sheet (When Using the PCL 6 Printer Driver)................... |
136 |
Printing on Envelopes.................................................................................................................................... |
138 |
Configuring Envelope Settings Using the Control Panel........................................................................ |
138 |
Printing on Envelopes Using the Printer Driver........................................................................................ |
138 |
Saving and Printing Using the Document Server......................................................................................... |
139 |
3

Storing Documents in Document Server.................................................................................................. |
139 |
Managing Documents Stored in Document Server................................................................................ |
140 |
Using the Quick Print Release Function........................................................................................................ |
141 |
Using the Print/Scan(Memory Storage Device) Function.......................................................................... |
143 |
5. Scan |
|
Basic Procedure When Using Scan to Folder............................................................................................. |
147 |
Creating a Shared Folder on a Computer Running Windows/Confirming a Computer's Information..... |
|
.................................................................................................................................................................... |
147 |
Registering an SMB Folder....................................................................................................................... |
150 |
Deleting an SMB registered folder.......................................................................................................... |
154 |
Entering the Path to the Destination Manually........................................................................................ |
155 |
Basic Procedure for Sending Scan Files by E-mail...................................................................................... |
156 |
Registering an E-mail Destination............................................................................................................. |
156 |
Changing or Deleting an E-mail Destination........................................................................................... |
158 |
Entering an E-mail Address Manually..................................................................................................... |
159 |
Basic Procedure for Storing Scan Files........................................................................................................ |
160 |
Checking a Stored File Selected from the List......................................................................................... |
162 |
Specifying the File Type................................................................................................................................ |
164 |
Specifying Scan Settings............................................................................................................................... |
165 |
6. Document Server |
|
Storing Data................................................................................................................................................... |
167 |
Printing Stored Documents............................................................................................................................ |
170 |
7. Web Image Monitor |
|
Displaying Top Page..................................................................................................................................... |
173 |
8. Adding Paper and Toner |
|
Loading Paper................................................................................................................................................ |
175 |
Loading Paper into Paper Trays............................................................................................................... |
175 |
Loading Paper into the Bypass Tray........................................................................................................ |
178 |
Loading Orientation-fixed Paper or Two-sided Paper........................................................................... |
180 |
Specifying the Paper Setting for the Bypass Tray................................................................................... |
183 |
Recommended Paper.................................................................................................................................... |
186 |
When Loading Thick Paper...................................................................................................................... |
192 |
When Loading Envelopes......................................................................................................................... |
193 |
4

Adding Toner................................................................................................................................................. |
|
|
196 |
Faxing/Scanning Operations When Toner Has Run Out..................................................................... |
|
198 |
|
Disposing of Used Print Cartridge............................................................................................................ |
|
|
198 |
9. Troubleshooting |
|
|
|
When a Status Icon Is Displayed on the Control Panel.............................................................................. |
|
201 |
|
When the Indicator Lamp for [Check Status] Is Lit or Flashing................................................................... |
|
202 |
|
When the Machine Makes a Beeping Sound............................................................................................. |
|
204 |
|
When You Have Problems Operating the Machine................................................................................... |
|
206 |
|
When Multiple Functions Cannot Be Executed Simultaneously............................................................ |
|
212 |
|
Messages Displayed When You Use the Copy/Document Server Function........................................... |
213 |
||
Messages Displayed When You Use the Fax Function.............................................................................. |
|
215 |
|
Messages Displayed on the Control Panel When You Use the Printer Function...................................... |
225 |
||
Messages Printed on the Error Logs or Reports When You Use the Printer Function............................... |
228 |
||
Messages Displayed on the Control Panel When You Use the Scanner Function................................... |
237 |
||
Messages Displayed on the Client Computer When You Use the Scanner Function.............................. |
248 |
||
When Other Messages Appear................................................................................................................... |
|
|
254 |
Cautions in Removing Jammed Paper.......................................................................................................... |
|
|
262 |
Removing Jammed Paper.............................................................................................................................. |
|
|
268 |
Locating Jammed Paper............................................................................................................................ |
|
|
269 |
10. Information for This Machine |
|
|
|
ENERGY STAR Program................................................................................................................................ |
|
|
271 |
Energy Saving Functions............................................................................................................................... |
|
|
272 |
User Information on Electrical and Electronic Equipment |
(mainly Europe).......................... |
274 |
|
Users in the countries where this symbol shown in this section has been specified in national law on |
|||
collection and treatment of E-waste......................................................................................................... |
|
|
274 |
All Other Users.......................................................................................................................................... |
|
|
274 |
For Users in India....................................................................................................................................... |
|
|
274 |
For Turkey Only......................................................................................................................................... |
|
|
275 |
Note for the Battery and/or Accumulator Symbol (For EU countries only) |
(mainly Europe)..... |
||
......................................................................................................................................................................... |
|
|
276 |
Environmental Advice for Users |
(mainly Europe).................................................................... |
|
277 |
Users in the EU, Switzerland and Norway............................................................................................. |
|
277 |
|
Notes to users in the state of California (Notes to Users in USA) |
(mainly North America). 278 |
||
5

Specifications for the Main Unit................................................................................................................... |
279 |
Specifications for the Document Server....................................................................................................... |
285 |
Specifications for Facsimile........................................................................................................................... |
286 |
Fax Transmission and Reception.............................................................................................................. |
286 |
IP-Fax Transmission and Reception.......................................................................................................... |
286 |
Internet Fax Transmission and Reception................................................................................................ |
287 |
E-mail Transmission and Reception, and Folder Transmission............................................................... |
288 |
Specifications for Printer................................................................................................................................ |
290 |
Specifications for Scanner............................................................................................................................ |
292 |
Specifications for Lower Paper Tray (250 sheets)...................................................................................... |
295 |
Specifications for Lower Paper Tray (500 sheets)...................................................................................... |
296 |
Specifications for IEEE 1284 Interface Board............................................................................................. |
297 |
Specifications for Wireless LAN Interface Board........................................................................................ |
298 |
Specifications for Auto Document Feeder................................................................................................... |
300 |
Specifications for USB Device Server.......................................................................................................... |
301 |
INDEX........................................................................................................................................................... |
303 |
6
How to Read This Manuals
Symbols Used in This Manuals
This manual uses the following symbols:
Indicates points to pay attention to when using functions. This symbol indicates points that may result in the product or service becoming unusable or result in the loss of data if the instructions are not obeyed. Be sure to read these explanations.
Indicates supplementary explanations of the machine's functions, and instructions on resolving user errors.
Indicates where you can find further relevant information.
[ ]
Indicates the names of keys or buttons on the product or display.


 (mainly Europe and Asia), (mainly Europe), or (mainly Asia)


 (mainly North America)
Differences in the functions of Region A and Region B models are indicated by two symbols. Read the information indicated by the symbol that corresponds to the region of the model you are using. For details about which symbol corresponds to the model you are using, see page 10 "Model-Specific Information" .
.
7

8
1. Getting Started
This chapter describes how to start using this machine.
Names of Major Features
In this manual, major features of the machine are referred to as follows:
• Auto Document Feeder  ADF
ADF
9

1. Getting Started
Model-Specific Information
This section explains how you can identify the region your machine belongs to.
There is a label on the rear of the machine, located in the position shown below. The label contains details that identify the region your machine belongs to. Read the label.
DVL351 |
The following information is region-specific. Read the information under the symbol that corresponds to the region of your machine.


 (mainly Europe and Asia)
If the label contains the following, your machine is a region A model:
•CODE XXXX -27, -29
•220–240 V


 (mainly North America)
If the label contains the following, your machine is a region B model:
•CODE XXXX -17
•120–127 V
•Dimensions in this manual are given in two units of measure: metric and inch. If your machine is a Region A model, refer to the metric units. If your machine is a Region B model, refer to the inch units.
•If your machine is a region A model and "CODE XXXX -27" is printed on the label, see "


 (mainly Europe)" also.
•If your machine is a region A model and "CODE XXXX -29" is printed on the label, see "


 (mainly Asia)" also.
10

Guide to Names and Functions of Components
Guide to Names and Functions of Components
Guide to Components
•Do not obstruct the machine's vents. Doing so risks fire caused by overheated internal components.
•Do not press or hit the staple unit strongly. Doing so may damage it. If stapling fails after the stapler has been forcefully hit, the staples in the cartridge may be broken.
•Do not hold the staple unit when you move the machine.
11

1. Getting Started
Front and right view
6 7
22 |
21 |
20 |
19
18
17
16
15
1 |
2 |
3 |
4 |
5 |
8
9
10
11
12
13
11
14
DVL352
1.ADF
Lower the ADF over originals placed on the exposure glass.
If you load a stack of originals in the ADF, the ADF will automatically feed the originals one by one.
2.ADF cover
Open this cover to remove originals jammed in the ADF.
3.ADF cover open lever
Pull this lever to open the ADF cover.
4.Input tray for the ADF
Place stacks of originals here.
12

Guide to Names and Functions of Components
5.Extender for the ADF tray
Extend this when placing paper longer than A4 in the input tray for ADF.
6.Exposure glass
Place originals face down here.
7.Cover for the exposure glass
Open this cover to place originals on the exposure glass.
8.Output tray for the ADF
Originals scanned with the ADF are output here.
9.Stop fence for the ADF
Pull out this fence to prevent originals from falling off.
10.Control panel
See page 65 "Guide to the Names and Functions of the Machine's Control Panel".
11.Ventilation holes
Prevent overheating.
12.Cover for installing an offline stapler
Remove when you install the offline stapler.
13.Internal tray
Copied/printed paper and fax messages are delivered here.
14.Front cover open button
Push this button to open the front cover.
15.Lower paper tray
Load paper here.
For details, see page 37 "Guide to Functions of the Machine's External Options 


 (mainly Europe and Asia)" or page 38 "Guide to Functions of the Machine's External Options


 (mainly North America)".
16.Tray 1
Load paper here.
17.Front cover
Open to access the inside of the machine and remove jammed paper. Open here to replace the print cartridge and the drum unit.
18.Main power switch
To operate the machine, the main power switch must be on. If it is off, turn the switch on. See page 91 "Turning On/Off the Power".
19.Stop fence
Pull this fence to prevent paper from falling off.
20.Bypass tray
Use to copy or print on thick paper, OHP transparencies, envelopes, and label paper (adhesive labels).
13

1.Getting Started
21.Extender for the bypass tray
Pull this extender out when loading A4 , 81/2 × 11
 or larger size paper in the bypass tray.
22.Paper guides
When loading paper in the bypass tray, align the paper guides flush against the paper.
Rear and left view
11 |
|
|
|
|
10 |
|
|
|
|
9 |
|
|
|
|
8 |
|
|
|
1 |
|
|
|
|
|
7 |
|
|
|
|
6 |
|
|
|
2 |
5 |
2 |
4 |
3 |
DVL267 |
|
|
|
|
1.Handset slit 


 (mainly North America)
Attach the handset bracket to the slit.
2.Vents
Prevent overheating.
3.Power connector
Connect the power cord to the machine. Insert the other end into an electrical outlet.
4.Rear cover
Open to access the inside of the machine and remove jammed paper. Open here to replace the fusing unit.
5.Rear cover open lever
Pull this lever to open the rear cover.
6.External telephone connector
For connecting an external telephone.
7.G3 interface unit connector
For connecting a telephone line.
14
Guide to Names and Functions of Components
8.Slot
Optional interface boards can be inserted.
9.Expansion card slots
Remove the cover to install SD cards.
10.Ethernet port
Use a network interface cable to connect the machine to a network.
11.USB Host Interface
Connect external devices such as a card authentication device.
Interior: Front view
1 2
DVL354
1.Print cartridge
To remove jammed paper, pull out the print cartridge and drum unit as a single unit.
Messages appear on the screen when the print cartridge needs to be replaced, or a new cartridge needs to be prepared.
For details about the messages that appear on the screen when consumables need to be replaced, see "Adding Toner", Maintenance.
When you remove jammed paper, pull out the print cartridge with the drum unit. If you want to remove only the print cartridge, pull down the lever on the left side of the print cartridge, and then pull the print cartridge out.
2.Drum unit
Messages appear on the screen when the drum unit needs to be replaced, or a new drum unit needs to be prepared.
For details about the messages that appear on the screen when consumables need to be replaced, see "Replacing the Drum Unit", Maintenance.
15
1. Getting Started
For IM 350F, IM 350, IM 430F:
When the drum unit needs to be replaced, contact your service representative.
Interior: Rear view
1
DVL355
1.Fusing unit
Pull out the fusing unit and remove jammed paper.
Messages appear on the screen when the fusing unit needs to be replaced, or a new fusing unit needs to be prepared.
For details about the messages that appear on the screen when consumables need to be replaced, see "Replacing the Maintenance Kit", Maintenance.
For IM 350F, IM 350, IM 430F:
When the fusing unit needs to be replaced, contact your service representative.
Staple unit
1
2
3
4 |
5 |
DVL425 |
1. Staple unit cradle
16
Guide to Names and Functions of Components
2.Staple unit
3.Stapling slot
4.Slide switch
5.LED (to indicate there are no more staples)
Staple cartridge
1
2
3
DVL426
1.Staple holder
2.Staple cartridge
3.Faceplate
17

1. Getting Started
Connecting and Setting the Network
Setting Wired LAN
Connecting Ethernet Interface
This section describes how to connect an Ethernet interface cable to the Ethernet port.
If you use an Ethernet interface cable that supports 1000BASE-T, set [Ethernet Speed] to [Auto Select: Enable 1Gbps] in [Interface Settings] in [System Settings].
•Use the following Ethernet cables.
•When using 100BASE-TX/10BASE-T:
Unshielded Twisted Pair Cable (UTP) or Shielded Twisted Pair Cable (STP) and Category type 5 or more
•When using 1000BASE-T:
Unshielded Twisted Pair Cable (UTP) or Shielded Twisted Pair Cable (STP) and Category type 5e or more
•When you use IPv6, set [Effective Protocol] to [Active] in [Interface Settings] in [System Settings]. IPv6 is inactive as a factory default. When you enable IPv6, a link-local address is automatically set.
•To use IPv6, consult your network administrator.
1.Make sure the main power is switched off.
2.Connect the Ethernet interface cable to the Ethernet port.
DVL802 |
3.Connect the other end of the Ethernet interface cable to a network connection device such as a hub.
18
Connecting and Setting the Network
4. Turn on the main power switch of the machine.
1
3 |
2
DRS703
1.Indicator (orange)
When 100BASE-TX is operating, the LED is lit orange.
2.Indicator (green)
When 10BASE-T is operating, the LED is lit green.
3.Indicators (both orange and green)
When 1000BASE-T is operating, both LEDs are lit.
•When Energy Saver mode is enabled, the LEDs may not light up.
Obtaining an IP address automatically (IPv4 DHCP)
The machine is set to obtain IP addresses automatically as a factory default.
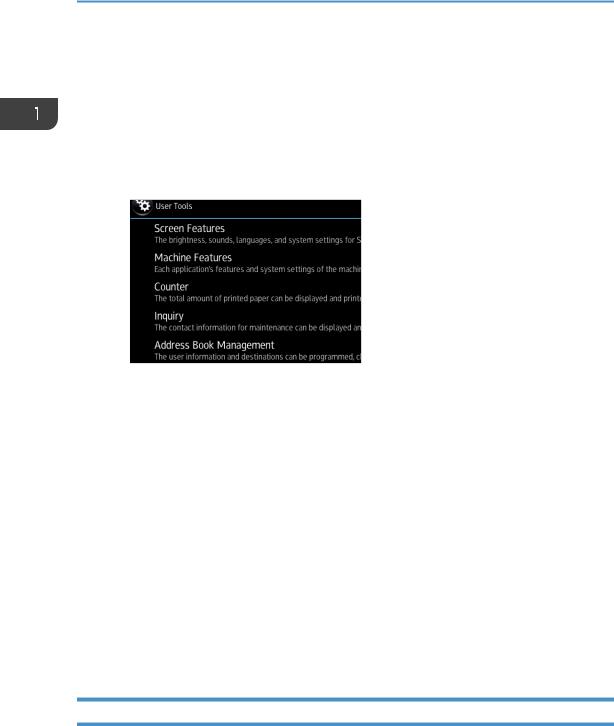
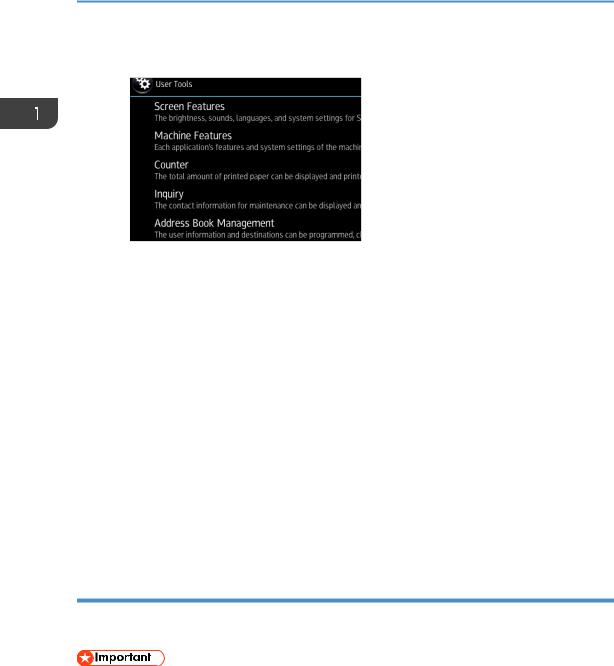
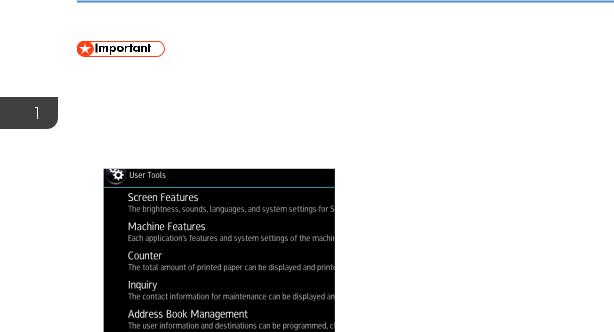
1.Press [Home] ( ) at the bottom of the screen in the center.
2.Flick the screen to the left, and then press the [User Tools] icon ( ).
).
3.Press [Machine Features].
4.Press [System Settings].
5.Press [Interface Settings] tab.
6.Press [Network].
7.Press [Machine IPv4 Address].
19
1.Getting Started
8.Press [Auto-Obtain (DHCP)].
9.Press [OK].
Specifying an IP address (IPv4)
1.Press [Home] ( ) at the bottom of the screen in the center.
2.Flick the screen to the left, and then press the [User Tools] icon ( ).
).
3.Press [Machine Features].
4.Press [System Settings].
5.Press [Interface Settings] tab.
6.Press [Network].
7.Press [Machine IPv4 Address].
8.Press [Specify].
9.Press [Change] next to [Machine IPv4 Address], and then input the IP address.
When you complete entering the IP address, press [ ].
].
10.Press [OK].
11.Press [Change] next to [Subnet Mask], and then enter the subnet mask.
When you complete entering the subnet mask, press [ ].
].
12.Press [OK].
13.Press [IPv4 Gateway Address], and then enter the gateway address.
14.Press [OK].
Setting Wireless LAN
Wireless LAN connection is available when you install the optional Wireless LAN interface board.
See page 47 "Installing the Wireless LAN interface board" for how to install the Wireless LAN interface board.
20

Connecting and Setting the Network
Selecting the communication mode for the Wireless LAN
Select the communication mode according to your environment.
How to select the mode
Which wireless LAN environment are you using?
A wireless LAN 
 router is being used.

A wireless LAN router is not being used.
Do you know how to specify the SSID*1 or the password for connecting your device to a network?
Yes |
No |
Infrastructure |
Wireless Direct |
Wireless Direct Mode |
|
Group Owner Mode |
|||
|
|
DVL258
*1 SSID is an identifier to distinguish Wireless LAN networks. It is also called a "Network name" or "Access point name".
You can also connect via Ad hoc mode. For detailed information, see the explanation for each mode.
About the modes
Mode |
|
Description |
|
|
In infrastructure mode, you can connect |
Infrastructure Mode |
|
several devices and the machine via a wireless |
|
LAN router. |
|
|
|
|
|
|
You can also print data on a network, such as |
|
|
a website, even when a device is connected. |
|
DVL259 |
The machine's communication mode is set to |
|
|
infrastructure mode as a factory default. |
21
1. Getting Started
|
Mode |
Description |
|
|
|
In Wireless Direct Mode, you can connect the |
|
|
|
machine and a device without using a wireless |
|
Wireless Direct Mode |
LAN router. |
||
|
|||
• |
Wireless Direct Group Owner Mode |
There are two types of connection methods in |
|
Wireless Direct mode. |
|||
|
|
||
|
|
• Wireless Direct Group Owner Mode |
|
|
|
You can connect several devices, including |
|
|
|
devices that are not compliant with Wi-Fi |
|
|
|
Direct. You need to enter the SSID and |
|
|
|
password of the machine on the device you |
|
|
|
want to connect. |
|
|
|
• Wireless Direct |
|
|
DVL260 |
You can connect the machine and a device |
|
|
|
||
• |
Wireless Direct |
directly to each other. |
|
|
|
Select the machine from the device you want to |
|
|
|
connect. |
|
|
|
Only devices that are Android 4.0 or later and |
|
|
DVK542 |
support Wi-Fi Direct can be connected. |
|
|
|
You cannot print data on a network, such as a |
|
|
|
website, when a device is connected. |
|
Ad-hoc Mode |
You need to set the ad-hoc channel and other |
||
|
|
settings, on the device you are connecting. |
|
|
|
You cannot select WPA2 as the security |
|
|
|
method. You cannot print data on a network, |
|
|
DVL261 |
such as a website, when a device is connected. |
|
Procedure for the settings
For Ad hoc Mode, see page 23 "Connecting in Ad hoc Mode".
For Infrastructure Mode, see page 24 "Connecting in Infrastructure Mode".
For Direct Connection Mode, see page 26 "Connecting in Direct Connection Mode".
For Direct Connection Group Owner Mode, see page 27 "Connecting in Direct Connection Group Owner Mode".
22

Connecting and Setting the Network
Connecting in Ad hoc Mode
In Ad hoc mode, you can specify an SSID to the machine, and connect your computer directly to the machine via a wireless LAN.
• The Wireless LAN interface board must be installed to use Ad hoc mode.
1.Press [Home] ( ) at the bottom of the screen in the center.
2.Flick the screen to the left, and then press the [User Tools] icon ( ).
).
3.Press [Machine Features].
4.Press [System Settings].
5.Press [Interface Settings] tab.
6.Press [Network].
7.Press [LAN Type].
8.Press [Wireless LAN].
9.Press [Wireless LAN].
10.Press [Communication Mode], and then press [802.11 Ad-hoc Mode].
11.Press [OK].
12.Press [SSID Setting].
13.Press [Enter SSID] and enter SSID, and then press [OK].
14.Press [OK].
15.Press [Ad-hoc Channel], and then press the channel to use.
16.Press [OK].
17.Press [Security Method].
18.Press [WEP].
To not use security setting, select [No].
19.Press [Enter] in [WEP (Encryption) key].
23

1.Getting Started
20.Enter WEP key, and then press [OK].
21.Press [OK].
The settings are complete.
You can connect the device in Ad hoc mode by specifying the SSID, channel, and security method that are specified for the machine.
See the instructions supplied with the device for how to connect it in ad hoc mode.
Connecting in Infrastructure Mode
Use infrastructure mode to connect the machine to an access point.
•The Wireless LAN interface board must be installed to use Infrastructure mode.
•When you use IPv6, set Effective Protocol to Active in Interface Settings in System Settings. IPv6 is inactive as a factory default. When you enable IPv6, a link-local address is automatically set.
•To use IPv6, consult your network administrator.
1.Press [Home] ( ) at the bottom of the screen in the center.
2.Flick the screen to the left, and then press the User Tools icon ( ).
).
3.Press [Machine Features].
4.Press [System Settings].
5.Press [Interface Settings] tab.
6.Press [Network].
7.Press [LAN Type].
8.Press [Wireless LAN].
9.Press [Wireless LAN].
10.Press [Communication Mode], and then press [Infrastructure Mode].
11.Press [OK].
24

Connecting and Setting the Network
12.Press [SSID Setting].
13.Press [Enter SSID] and enter the SSID for the access point you want to connect to, and then press [OK].
14. Press [OK].
15.Press [Security Method].
16.Enter the security method that is specified for the access point you want to connect to.
Press [WEP] or [WPA2], and then press [Enter] on the screen to enter your password. If you do not use security setting, select [No].
17.Press [OK].
The settings are complete.
To check the connection status, press [Wireless LAN Signal] in [Wireless LAN] in [Interface Settings] in [System Settings] and confirm the signal status.
Obtaining an IP address automatically (IPv4 DHCP)
The machine is set to obtain IP addresses automatically as a factory default.
1.Press [Home] ( ) at the bottom of the screen in the center.
2.Flick the screen to the left, and then press the [User Tools] icon ( ).
).
3.Press [Machine Features].
4.Press [System Settings].
5.Press [Interface Settings] tab.
6.Press [Network].
7.Press [Machine IPv4 Address].
8.Press [Auto-Obtain (DHCP)].
9.Press [OK].
Specifying an IP address (IPv4)
1.Press [Home] ( ) at the bottom of the screen in the center.
2.Flick the screen to the left, and then press the [User Tools] icon ( ).
).
25
1.Getting Started
3.Press [Machine Features].
4.Press [System Settings].
5.Press [Interface Settings] tab.
6.Press [Network].
7.Press [Machine IPv4 Address].
8.Press [Specify].
9.Press [Change] next to [Machine IPv4 Address], and then input the IP address.
When you complete entering the IP address, press [ ].
].
10.Press [OK].
11.Press [Change] next to [Subnet mask], and then enter the subnet mask.
When you complete entering the subnet mask, press [ ].
].
12.Press [OK].
13.Press [IPv4 Gateway Address], and then enter the gateway address.
14.Press [OK].
Connecting in Direct Connection Mode
To connect another device and the machine directly using the wireless direct function, use the Wireless Direct mode.
• The Wireless LAN interface board must be installed to use Wireless Direct mode.
1.Press [Home] ( ) at the bottom of the screen in the center.
2.Flick the screen to the left, and then press the [User Tools] icon ( ).
).
26

Connecting and Setting the Network
3. Press [Machine Features].
4.Press [System Settings].
5.Press [Interface Settings] tab.
6.Press [Network].
7.Press [LAN Type].
8.Press [Wireless LAN].
9.Press [Wireless LAN].
10.Press [Communication Mode], and then press [Direct Connection Mode].
11.Press [OK].
12.Press [Direct Connection].
13.Press [Active/Inactive] and press [Active].
14.Press [OK].
15.Press [Direct Connection Settings].
16.Check [Device Name] and [Connection Password], and then press [OK].
17.Press [Wireless LAN].
18.Press [Wireless LAN: Easy Setup/Direct Connection].
19.Press [Push Button].
20.Press [Connect].
The settings are complete.
Operate the push buttons on the device that you want to connect.
See the instructions supplied for the device for how to connect it in Wireless Direct mode.
Connecting in Direct Connection Group Owner Mode
To connect to multiple wireless direct-compliant devices by using the machine as a simple access point, use the Direct Connection Group Owner mode. Up to nine devices can be connected. Non-wireless direct-compliant devices can be connected too.
27
1. Getting Started
• The Wireless LAN interface board must be installed to use Wireless Direct Group Owner mode.
1.Press [Home] ( ) at the bottom of the screen in the center.
2.Flick the screen to the left, and then press the User Tools icon ( ).
).
3.Press [Machine Features].
4.Press [System Settings].
5.Press [Interface Settings] tab.
6.Press [Network].
7.Press [LAN Type].
8.Press [Wireless LAN].
9.Press [Wireless LAN].
10.Press [Communication Mode], and then press [Direct Connection: Group Owner Mode].
11.Press [OK].
12.Press [Direct Connection].
13.Press [Active/Inactive] and press [Active].
14.Press [OK].
15.Press [Direct Connection Settings].
16.Check [Device Name] and [Connection Password], and then press [OK].
17.Press [Wireless LAN].
18.Press [Wireless LAN: Easy Setup/Direct Connection].
19.Press [Push Button].
20.Press [Connect].
The settings are complete.
Operate the push buttons on the device that you want to connect.
See the instructions supplied for the device for how to connect it by Wireless Direct mode.
28
 Loading...