


User Guide
What You Can Do with This Machine
Getting Started
Copy
Fax
Scan
Web Image Monitor
Adding Paper and Toner
Troubleshooting
Appendix
For information not in this manual, refer to the HTML/PDF files on the supplied
CD-ROM.
For safe and correct use, be sure to read the Safety Information in "Read This First" before using the machine.

TABLE OF CONTENTS |
|
How to Read the Manuals................................................................................................................................. |
5 |
Symbols used in the manuals........................................................................................................................ |
5 |
Model-Specific Information............................................................................................................................... |
6 |
Names of Major Features.................................................................................................................................. |
7 |
1. What You Can Do with This Machine |
|
I Want to Save Paper......................................................................................................................................... |
9 |
I Want to Convert Documents to Electronic Formats Easily.......................................................................... |
10 |
I Want to Register Destinations....................................................................................................................... |
11 |
I Want to Operate the Machine More Effectively......................................................................................... |
12 |
You Can Make Copies Using Various Functions........................................................................................... |
13 |
You Can Print Data Using Various Functions................................................................................................. |
14 |
You Can Use the Scanner in a Network Environment................................................................................... |
15 |
You Can Prevent Information Leakage (Security Functions)......................................................................... |
16 |
You Can Monitor and Set the Machine Using a Computer......................................................................... |
17 |
2. Getting Started |
|
Guide to Names and Functions of Components............................................................................................ |
19 |
Guide to Components................................................................................................................................. |
19 |
Guide to Functions of the Machine's Options................................................................................................ |
24 |
Guide to Functions of the Machine's External Options ............................................................................ |
24 |
Guide to the Names and Functions of the Machine's Control Panel........................................................... |
25 |
Changing the Display Language.................................................................................................................... |
28 |
Turning On/Off the Power.............................................................................................................................. |
29 |
Turning On the Main Power........................................................................................................................ |
29 |
Turning Off the Main Power........................................................................................................................ |
29 |
Placing Originals.............................................................................................................................................. |
31 |
Placing Originals on the Exposure Glass................................................................................................... |
31 |
Placing Originals in the Auto Document Feeder....................................................................................... |
31 |
3. Copy |
|
Basic Procedure................................................................................................................................................ |
33 |
Reducing or Enlarging Originals..................................................................................................................... |
35 |
Preset Reduce/Enlarge............................................................................................................................... |
35 |
Zoom............................................................................................................................................................. |
36 |
Auto Reduce/Enlarge................................................................................................................................. |
36 |
1

Duplex Copying............................................................................................................................................... |
38 |
Combined Copying......................................................................................................................................... |
40 |
One-Sided Combine................................................................................................................................... |
41 |
Two-Sided Combine.................................................................................................................................... |
43 |
Copying onto Custom Size Paper from the Bypass Tray.............................................................................. |
45 |
Copying onto Envelopes................................................................................................................................. |
46 |
Sort.................................................................................................................................................................... |
47 |
4. Fax |
|
Basic Procedure for Transmissions (Memory Transmission).......................................................................... |
49 |
Sending Originals Using the ADF............................................................................................................... |
50 |
Sending Originals Using the Exposure Glass............................................................................................ |
51 |
Registering a Fax Destination...................................................................................................................... |
52 |
Deleting a Fax Destination.......................................................................................................................... |
53 |
Canceling a Transmission................................................................................................................................ |
54 |
Canceling a Transmission Before the Original Is Scanned...................................................................... |
54 |
Canceling a Transmission While the Original Is Being Scanned............................................................. |
54 |
Canceling a Transmission After the Original Is Scanned (While a Transmission Is in Progress)........... |
54 |
Canceling a Transmission After the Original Is Scanned (Before a Transmission Is Started)................ |
55 |
Printing the Journal Manually.......................................................................................................................... |
57 |
5. Print |
|
Quick Install for USB........................................................................................................................................ |
59 |
Quick Install for Network................................................................................................................................. |
60 |
Displaying the Printer Driver Properties.......................................................................................................... |
61 |
Standard Printing.............................................................................................................................................. |
62 |
When Using the PCL 6 Printer Driver.......................................................................................................... |
62 |
6. Scan |
|
Basic Procedure for Using Scan to Folder...................................................................................................... |
63 |
Using Scan to Folder in the Windows Environment.................................................................................. |
64 |
Registering an SMB Folder......................................................................................................................... |
66 |
Deleting an SMB Registered Folder........................................................................................................... |
68 |
Specifying a Folder Path by Entering it Manually..................................................................................... |
68 |
Basic Procedure for Sending Scan Files by E-mail........................................................................................ |
70 |
Registering an E-mail Destination............................................................................................................... |
71 |
2

Deleting an E-mail Destination.................................................................................................................... |
71 |
Specifying an E-mail Address by Entering It Manually............................................................................ |
72 |
Specifying Send Options................................................................................................................................. |
73 |
Resolution..................................................................................................................................................... |
73 |
Original Orientation.................................................................................................................................... |
73 |
Original Setting............................................................................................................................................ |
74 |
Scan Size...................................................................................................................................................... |
74 |
File Type........................................................................................................................................................ |
74 |
7. Web Image Monitor |
|
Displaying the Top Page.................................................................................................................................. |
77 |
8. Adding Paper and Toner |
|
Loading Paper into Paper Trays...................................................................................................................... |
79 |
Loading Paper into the Bypass Tray............................................................................................................... |
83 |
Printing from the Bypass Tray Using the Printer Function.......................................................................... |
85 |
Loading Orientation-fixed Paper or Two-sided Paper.................................................................................. |
87 |
Recommended Paper Sizes and Types.......................................................................................................... |
88 |
Thick Paper................................................................................................................................................... |
93 |
Envelopes..................................................................................................................................................... |
93 |
Adding Toner.................................................................................................................................................... |
96 |
Sending Faxes or Scanned Documents When Toner Has Run Out......................................................... |
97 |
Disposing of Used Toner............................................................................................................................. |
98 |
9. Troubleshooting |
|
Indicators.......................................................................................................................................................... |
99 |
Panel Tone...................................................................................................................................................... |
100 |
When You Have Problems Operating the Machine................................................................................... |
101 |
When Messages Are Displayed on the Control Panel............................................................................... |
104 |
Messages Displayed When Using the Copy Function........................................................................... |
104 |
Messages Displayed When Using the Facsimile Function..................................................................... |
105 |
Messages Displayed When Using the Printer Function.......................................................................... |
107 |
Messages Displayed When Using the Scanner Function...................................................................... |
110 |
When Messages Are Displayed on Your Computer Screen..................................................................... |
115 |
Messages Displayed When Using the Scanner Function...................................................................... |
115 |
3

10. Appendix |
|
Trademarks..................................................................................................................................................... |
121 |
INDEX........................................................................................................................................................... |
123 |
4
How to Read the Manuals
Symbols used in the manuals
This manual uses the following symbols:
Indicates points to pay attention to when using the machine, and explanations of likely causes of paper misfeeds, damage to originals, or loss of data. Be sure to read these explanations.
Indicates supplementary explanations of the machine's functions, and instructions on resolving user errors.
This symbol is located at the end of sections. It indicates where you can find further relevant information.
[ ]
Indicates the names of keys on the machine's display or control panels.
Indicates the key sequence order you should perform using the control panel. Example:
Select [System]  Press [OK]
(Select [System], and then press the [OK] key.) 


 (mainly Europe and Asia)


 (mainly North America)
Differences in the functions of Region A and Region B models are indicated by two symbols. Read the information indicated by the symbol that corresponds to the region of the model you are using. For details about which symbol corresponds to the model you are using, see page 6 "Model-Specific Information".
5
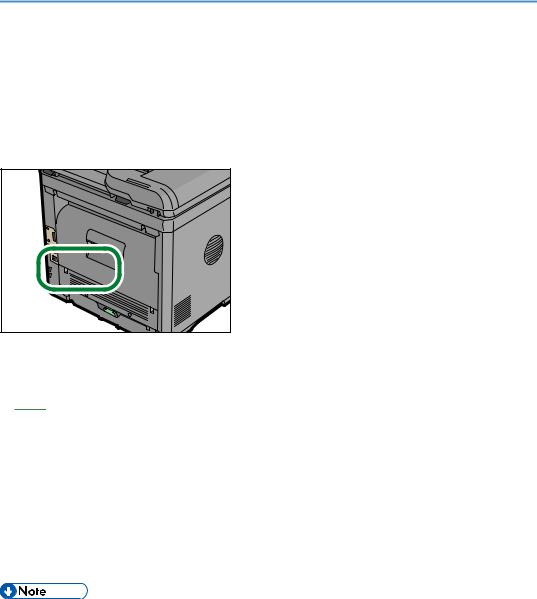
Model-Specific Information
This section explains how you can identify the region your machine belongs to.
There is a label on the rear of the machine, located in the position shown below. The label contains details that identify the region your machine belongs to. Read the label.
DBH040 |
The following information is region-specific. Read the information under the symbol that corresponds to the region of your machine.


 (mainly Europe and Asia)
If the label contains the following, your machine is a region A model:
•CODE XXXX -27
•220–240 V


 (mainly North America)
If the label contains the following, your machine is a region B model:
•CODE XXXX -17
•120–127 V
•Dimensions in this manual are given in two units of measure: metric and inch. If your machine is a Region A model, refer to the metric units. If your machine is a Region B model, refer to the inch units.
6

Names of Major Features
In this manual, major features of the machine are referred to as follows:
• Auto Document Feeder  ADF
ADF
7

8
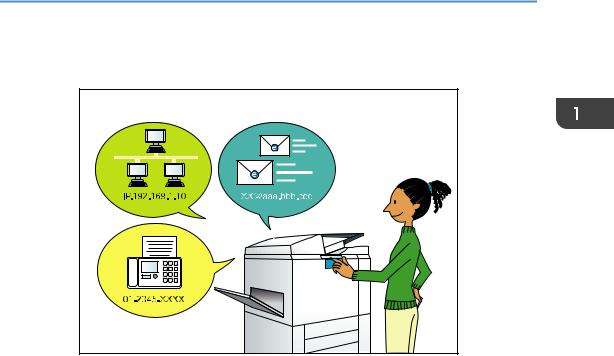
1. What You Can Do with This Machine
You can search for a description by what you want to do.
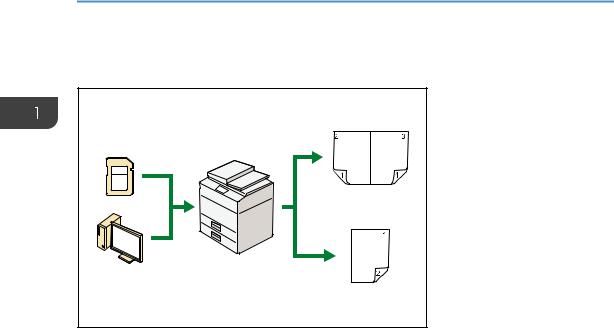
I Want to Save Paper
BRL059S
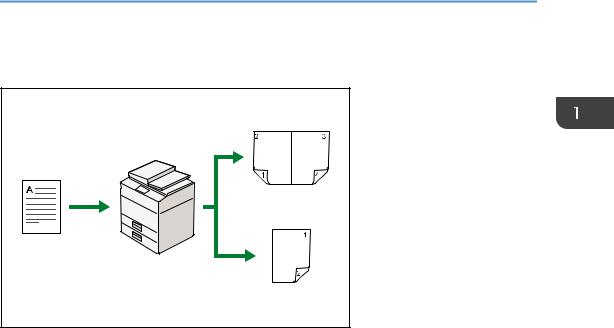
Printing multi-page documents on both sides of sheets (Duplex Copy)
 See "Duplex Copying", Copy
 .
.
Printing multi-page documents on a single sheet (Combine)
 See "Combined Copying", Copy
 .
.
Printing received faxes on both sides of sheets (2 Sided Print)
 See "Two-Sided Printing", Fax
 .
.
Sending files from the computer without printing them (LAN-Fax)
 See "Sending Fax Documents from Computers", Fax
 .
.
9

1. What You Can Do with This Machine
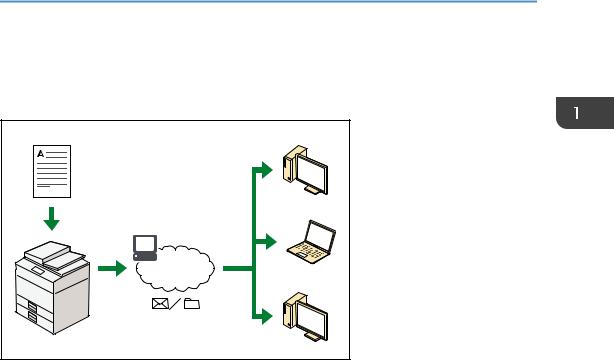
I Want to Convert Documents to Electronic Formats Easily
BQX138S |
Sending scan files
 See "Basic Procedure for Sending Scan Files by E-mail", Scan
 .
.
Storing scan files in a shared folder
 See "Basic Procedure for Using Scan to Folder", Scan
 .
.
Storing scan files on media
 See "Storing the Scanned Documents on a USB Flash Memory Device", Scan
 .
.
10
I Want to Register Destinations
I Want to Register Destinations
BRL060S
Using the control panel to register destinations in the Address Book
 See "Registering Addresses and Users for Facsimile/Scanner Functions ", Connecting the Machine/ System settings
 .
.
Downloading destinations registered in the machine to the LAN-Fax driver destination list
 See "Using the machine's Address Book as the LAN-Fax destination list", Fax
 .
.
11
1. What You Can Do with This Machine
I Want to Operate the Machine More Effectively
BQX139S |
Registering frequently-used printing settings to the printer driver
 See "Using One Click Presets", Print
 .
.
Changing the initial settings of the printer driver to frequently-used printing settings
 See "Displaying the Printing Preferences Dialog Box", Print
 .
.
12
You Can Make Copies Using Various Functions
You Can Make Copies Using Various Functions
CMQ002 |
•You can reduce or enlarge the copy image. With the Auto Reduce/Enlarge function, the machine automatically calculates the reproduction ratio based on the sizes of the originals and the paper you have specified.
 See "Reducing or Enlarging Originals", Copy
 .
.
•Copier functions such as Duplex and Combine allow you to save on paper by copying multiple pages onto single sheets.
 For details about duplex copying, see "Duplex Copying", Copy
 .
.
 For details about combined copying, see "Combined Copying", Copy
 .
.
•You can copy onto various types of paper such as envelopes.
 See "Copying onto Various Types of Paper Using the Bypass Tray", Copy
 .
.
•You can sort copies.  See "Sort", Copy
 .
.
13
1. What You Can Do with This Machine
You Can Print Data Using Various Functions
CMQ004 |
•This machine supports network and local connections.
•You can collate printed paper.  See "Collate", Print
 .
.
14
You Can Use the Scanner in a Network Environment
You Can Use the Scanner in a Network
Environment
CJQ607 |
•You can send scan files to a specified destination using e-mail (Sending scan files by e-mail).  See "Basic Procedure for Sending Scan Files by E-mail", Scan
 .
.
•You can send scan files directly to folders (Sending scan files by Scan to Folder).  See "Basic Procedure for Using Scan to Folder", Scan
 .
.
15
1. What You Can Do with This Machine
You Can Prevent Information Leakage
(Security Functions)
CJQ608
•By setting passwords, you can prevent unauthorized access via the network.
•See Security Guide .
.
16
You Can Monitor and Set the Machine Using a Computer
You Can Monitor and Set the Machine Using a
Computer
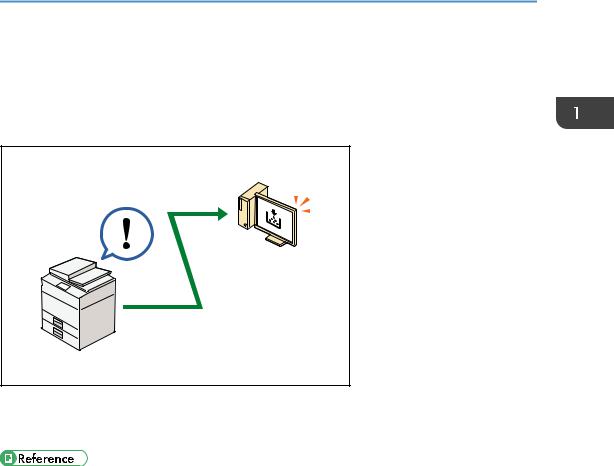
Using Web Image Monitor, you can check the machine's status and change the settings.
CJQ609
You can check which tray is running out of paper, register information in the Address Book, specify the network settings, and configure the system settings.
•See "Using Web Image Monitor", Connecting the Machine/ System Settings .
.
•See Web Image Monitor Help.
17

1. What You Can Do with This Machine
18

2. Getting Started
This chapter describes how to start using this machine.
Guide to Names and Functions of Components
Guide to Components
•Do not obstruct the machine's vents. Doing so risks fire caused by overheated internal components.
Exterior: Front view
5 6
22 |
21 |
20
19
18
17
16
15
1 2 3 4
7
8
9
10
11
12
13
12 |
14 |
DBH030
19

2.Getting Started
1.ADF
Lower the ADF over originals placed on the exposure glass.
If you load a stack of originals in the ADF, the ADF will automatically feed the originals one by one.
2.ADF cover
Open this cover to remove originals jammed in the ADF.
3.Input tray for the ADF
Place stacks of originals here.
4.Extender for the ADF tray
Extend this when placing paper longer than A4 in the input tray for ADF.
5.Exposure glass
Place originals face down here.
6.Cover for the exposure glass
Open this cover to place originals on the exposure glass.
7.Output tray for the ADF
Originals scanned with the ADF are output here.
8.Stop fence for the ADF
Pull out this fence to prevent originals from falling off.
9.Control panel
See page 25 "Guide to the Names and Functions of the Machine's Control Panel".
10.Standard tray
Copied/printed paper and fax messages are delivered here.
11.Media slot
Insert a USB flash memory device.
12.Ventilation holes
Prevent overheating.
13.Front cover open button
Push this button to open the front cover.
14.Front cover
Open to access the inside of the machine and remove jammed paper. Open here to replace the toner cartridge and the drum unit.
15.Lower paper tray (option)
Load paper here.
16.Tray 1
Load paper here.
17.Main power switch
To operate the machine, the main power switch must be on. If it is off, turn the switch on.
20
Guide to Names and Functions of Components
18.Bypass tray open lever
Push this lever to open the bypass tray.
19.Tray Extension
Pull this fence to prevent paper from falling off.
20.Bypass tray
Use to copy or print on thick paper, OHP transparencies, envelopes, and label paper (adhesive labels).
21.Extender for the bypass tray
Pull this extender out when loading A4 , 81/2 × 11
 or larger size paper in the bypass tray.
22.Paper guides
When loading paper in the bypass tray, align the paper guides flush against the paper.
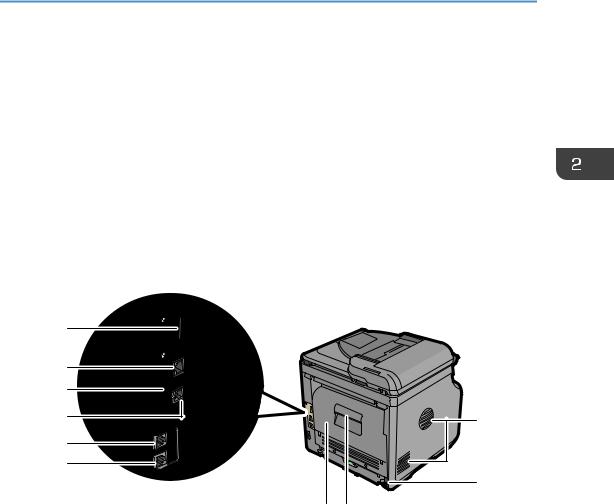
Exterior: Rear view
10
9
8
7 |
1 |
|
6 5
2
4 3
DBH031
1.Ventilation holes
Prevent overheating.
2.Power connector
Connect the power cord to the machine. Insert the other end into an electrical outlet.
3.Rear cover open lever
Pull this lever to open the rear cover.
4.Rear cover
Open to access the inside of the machine and remove jammed paper. Open here to replace the fusing unit.
5.External telephone connector
For connecting an external telephone.
6.Line interface connector
For connecting a telephone line.
21
2.Getting Started
7.USB 2.0 [Type B] port
Use a USB cable to connect the machine to a computer.
8.Security slot
Connect a security cable to prevent theft.
9.Ethernet port
Use a network interface cable to connect the machine to a network.
10.Slot
Optional wireless LAN interface unit can be inserted.
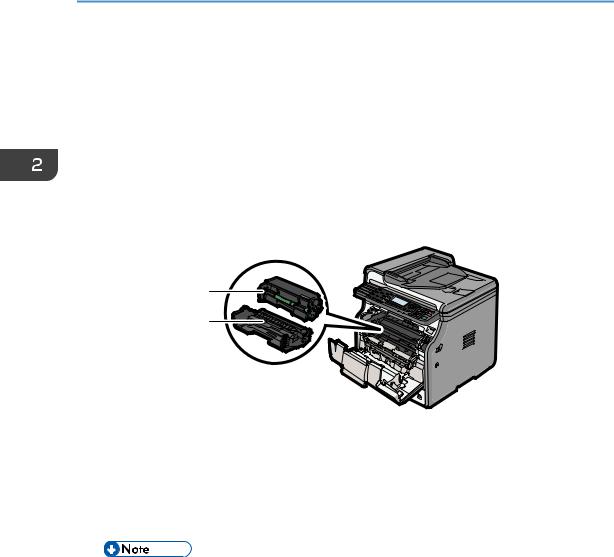
Interior: Front view
1
2
DBH032
1.Toner cartridge
Pull out the toner cartridge and remove jammed paper.
Messages appear on the screen when the toner cartridge needs to be replaced, or a new cartridge needs to be prepared.
For details about the messages that appear on the screen when consumables need to be replaced, see "Replenishing and Replacing Consumables", Maintenance and Specifications .
.
•When you remove jammed paper, pull out the toner cartridge with the drum unit. If you want to remove only the toner cartridge, pull down the lever on the right side of the toner cartridge, and then pull the toner cartridge out.
2.Drum unit
Messages appear on the screen when the drum unit needs to be replaced, or a new drum unit needs to be prepared.
For details about the messages that appear on the screen when consumables need to be replaced, see "Replenishing and Replacing Consumables", Maintenance and Specifications .
.
22

Guide to Names and Functions of Components
Interior: Rear view
1
DBH033
1.Fusing unit
Pull out the fusing unit and remove jammed paper.
Messages appear on the screen when the fusing unit needs to be replaced, or a new fusing unit needs to be prepared.
For details about the messages that appear on the screen when consumables need to be replaced, see "Replenishing and Replacing Consumables", Maintenance and Specifications .
.
The fusing unit is included in Maintenance Kit.
23
2. Getting Started
Guide to Functions of the Machine's Options
Guide to Functions of the Machine's External Options
1 


2
DBH086
1.Handset


 (mainly North America)
Used as a receiver.
Allows you to use the Manual Dial functions. It also allows you to use the machine as a telephone.
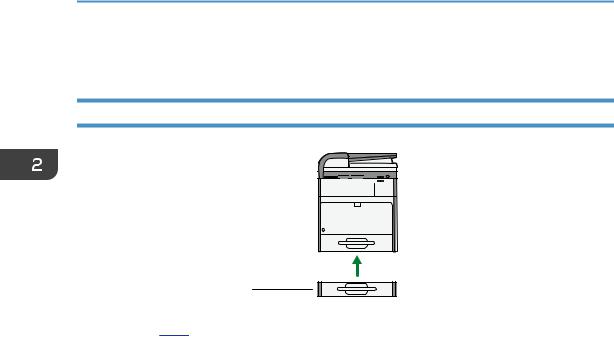
2.Lower paper tray
You can install a 250-sheet paper feed unit or a 500-sheet paper feed unit.
24
Guide to the Names and Functions of the Machine's Control Panel
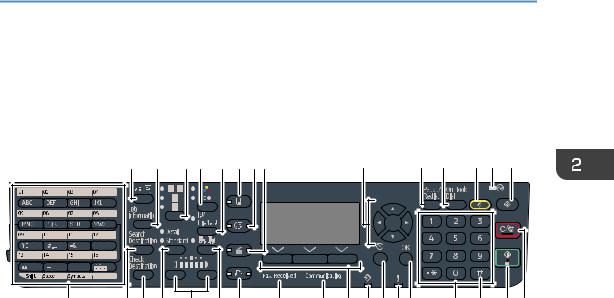
Guide to the Names and Functions of the Machine's Control Panel
This illustration shows the control panel of the machine with options fully installed.
1 |
2 |
3 |
4 |
5 |
6 |
7 8 |
9 |
10 |
11 |
12 13 |
14 |
15 |
16 17 |
18 |
19 |
20 |
21 |
22 |
23 |
24 |
25 26 27 28 |
29 |
30 |
31 32 |
|
|
|
|
|
|
|
|
|
|
|
|
DBH001 |
1.[ID Card Copy] key
Press to jump to the ID card copy setting menu.
2.[Job Information] key (scanner and facsimile mode)
Press to obtain status information on transmitted data.
3.Original Selection key (copier, scanner and facsimile mode)
Press to select the most suitable scanning method for the original.
4.Color Selection key
Press to scan originals in full color.
5.[Duplex/Combine/Series] key (copier mode)
•Duplex
Perform duplex printing when copying a multiple-sheet original.
•Combine
Combines and prints the pages of a multiple-sheet original onto a single sheet.
•Series
Prints each page of a double-page spread as a single-page copy.
6.[Copy] key
Press to activate the copy function.
7.[Facsimile] key
Press to activate the facsimile function.
8.[Scanner] key
Press to activate the scanner function.
25

2.Getting Started
9.Scroll keys
Press these keys to move the cursor in each direction.
When the [ ] [
] [ ] [
] [ ] [
] [ ] keys appear in this manual, press the applicable key for the direction that you want to move the cursor.
10.[Pause/Redial] key (facsimile mode)
•Pause
Press to insert a pause in a fax dialing sequence. The pause is indicated by “-”.
•Redial
Press this to select a recently-dialed destination.
11.[On Hook Dial] key (facsimile mode)
Press to use the On Hook Dial function.
12.[Reset] key
Press to clear the current settings.
13.Main power indicator
The main power indicator goes on when you turn on the main power switch.
14.[User Tools] key
Press to change the default settings to meet your requirements.
15.Quick Dial keys
Press to enter letters and symbols.
Press to select the registered destination at a single touch.
16.[Search Destination] key (scanner and facsimile mode)
Press to search for a destination registered in the destination list.
17.[Check Destination] key (scanner and facsimile mode)
Press to check the specified destination.
18.Resolution Selection key (facsimile mode)
Press to specify the resolution of the fax.
19.Density Selection keys (copier, scanner, and facsimile mode)
Press to adjust the scanning density under the copier, scanner, and fax functions.
20.[Sort] key (copier mode)
Press to automatically sort printed copies.
21.[Printer] key
Press to activate the printer function.
22.Fax Received indicator (facsimile mode)
Lights continuously while data other than personal box or Memory Lock file is being received and stored in the fax memory.
23.Communicating indicator (facsimile mode)
Lights continuously during data transmission and reception.
26

Guide to the Names and Functions of the Machine's Control Panel
24.Selection keys
Correspond to items on the display. Press to select the corresponding item.
25.Data In indicator
Flashes when the machine is receiving print jobs or LAN-Fax documents from a computer.
26.[Escape] key
Press to cancel an operation or return to the previous display.
27.Alert Indicators
Lights up when a machine error occurs.
Steady red: printing is not possible, or is possible but print quality cannot be ensured. Flashing yellow: the machine will soon require a replacement consumable.
28.[OK] key
Press to set a selected item or an entered numeric value.
29.Number keys
Use to enter the numbers for copies, fax numbers, and data for the selected function.
30.[ ] key (Enter key)
Press to confirm values entered or items specified.
31.[Start] key
Press to start copying, printing, scanning, or sending.
32.[Clear/Stop] key
•Clear
Clears an entered numeric value.
•Stop
Stops a job in progress, such as copying, scanning, faxing, or printing.
27

2. Getting Started
Changing the Display Language
You can change the language used on the display. English is set as default.
Press the [User Tools] key, and then select the setting items using the [ ] or [
 ] key.
1.Select [Language]  Press [OK]
2.Select the language you want to use  Press [OK]
28
 Loading...