


 Loading...
TM-P60
with Peeler
User’s Manual. . . . . . . . . . . . . . . . . . . . 1 Bedienungsanleitung . . . . . . . . . . . . . . 15 Gebruikershandleiding . . . . . . . . . . . . . 29 Manuel d’utilisation . . . . . . . . . . . . . . . 41 Manual do utilizador . . . . . . . . . . . . . . . 55 Manual del usuario. . . . . . . . . . . . . . . . 69 Manuale dell’utente . . . . . . . . . . . . . . . 83
410312603
1 |
2 |
3 |
4 |
A |
|
|
|
5 |
6 |
7 |
8 |
9 |
B
 10
10
 11
11
12 13 14
C
15
ii

D E F
G H
c
e 

d
I J
16
iii
K L
17

 CAUTION:
During printing or after printing, the thermal head can be very hot.
M N
18 19
O P
 20
20
iv

Specifications
Print method |
|
Thermal line printing |
Print density |
|
203 dpi × 203 dpi [dpi: dots per 25.4 mm (dots per inch)] |
Printing width (default) |
48.5 mm {1.91"}, 388 dot positions (label width 54 mm {2.13"}, |
|
|
|
backing paper width 58 mm {2.28"}) |
Print font |
Font |
Font A: 12 × 24, Font B (default): 10 × 24, Font C: 8 × 16 |
|
Characters per line |
Font A: 35, Font B: 42, Font C: 52 |
|
Character size |
Font A: 1.50 × 3.0, Font B: 1.25 × 3.0, Font C: 1.0 × 2.0 |
|
(W×H) |
|
|
Character set |
95 Alphanumeric, 48 International, 128 × 10 Graphic |
Paper |
Roll paper |
29.5 ± 0.5 mm ~ 57.5 ± 0.5 mm {1.16 ± 0.02"} ~ {2.26 ± 0.02"} |
|
dimensions |
(59.5 ± 0.5 mm {2.34 ± 0.02"} by removing the spacer |
|
(default) |
installed) |
|
Paper roll spool |
outside 31.4 mm {1.24"} or more |
|
diameter |
|
|
Receipt paper |
Original: Kanzaki Specialty Paper (USA): |
|
|
P350 (paper thickness: 62 µm) |
|
|
P310 (paper thickness: 58 µm) |
|
|
P300 (paper thickness: 56 µm) |
|
Label roll paper |
ETLA058050025 |
|
|
ETLA055050051 |
|
|
ETLA029050025 |
|
|
|
Print speed |
|
Maximum 80 mm/s {3.15 in/s} (maximum 40 mm/s {1.57 in/s} |
|
|
when using the peeler), when number of dots per dot line is |
|
|
64 dots or less (printing with a fully charged battery, at 25°C |
|
|
{77°F}, print density 100%) |
|
|
|
Interface |
|
RS-232C, IEEE802.11b |
Receive buffer |
|
128 bytes |
Power |
Specified battery |
Lithium-ion battery: Product name: LIP-2500, Trade name: |
consumption |
|
Seiko Epson Corporation |
|
|
Output: DC 7.4 V |
|
|
Capacity: 2200 mAh |
|
AC adapter: |
Output voltage: DC 12 V |
|
EPSON PS-10 |
Input voltage: AC 100 V ~ 240 V |
|
(Model DA-42Y12) |
Product name: PS-10, Trade name: Seiko Epson Corporation |
Life |
Label |
500,000 labels |
|
Receipt |
10,000,000 lines printing |
|
Print head |
100,000,000 dots |
Temperature/ |
Operation |
5 ~ 45°C {41 ~ 113°F}, 10 ~ 90% RH |
humidity |
(Print quality |
|
|
guaranteed) |
|
|
Storage |
Abnormal operations not found when the printer is left |
|
|
under the environment of 25°C {77°F}, 60% RH for 2 hours |
|
|
after it was left in the following conditions: |
|
|
High temperature and humidity: 50°C {122°F}, 90% RH for |
|
|
120 hours |
|
|
High temperature: 70°C {158°F} for 120 hours |
|
|
Low temperature: -25°C {-13°F} for 120 hours |
|
|
|
Overall dimensions (mm) |
103 × 159 × 65 {4.1 × 6.3 × 2.6"} (W × D × H) |
|
Mass (with the battery, without roll |
Approx. 640 g {1.41 lb} |
|
paper) |
|
|
Note: For the battery specifications, see its instructions.
v

vi

English
TM-P60with Peeler
User’s Manual
Specifications
The technical specifications are at the beginning of this manual.
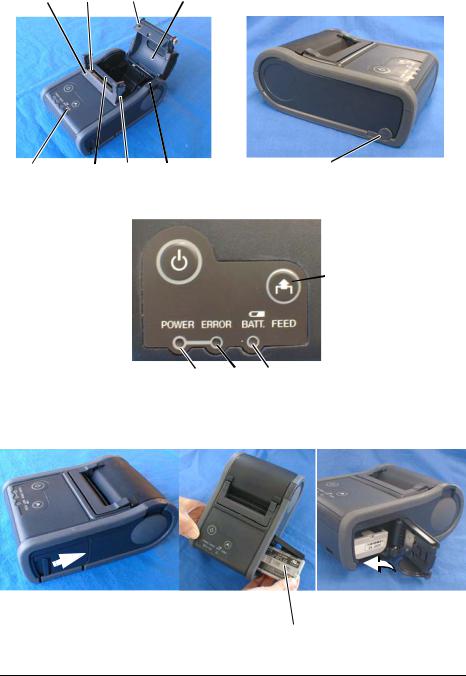
Illustrations
All of the illustrations are at the beginning of this manual. They are identified by letters (A, B, C . . .). In the text the illustrations are referred to by these letters. (“See illustration A,” for example.) Some of these illustrations have numbered arrows or lines pointing to parts of the illustration. See the list below for the meaning of the numbers.
Illustration A |
Illustration B |
Illustration K |
|||
1. |
Peeler cover |
10. |
POWER button |
17. |
Thermal head |
2. |
Label peeler detector |
11. |
FEED button |
Illustration N |
|
3. |
Paper detector |
12. |
POWER LED |
18. |
Peeler holder |
4. |
Roll paper cover |
13. |
ERROR LED |
19. |
Roller |
5. |
Control panel |
14. |
BATT. LED |
Illustration P |
|
6. |
Peeler holder |
Illustration C |
20. |
Roll paper guide |
|
7. |
Peeler change over lever |
15. |
Battery |
|
|
8. |
Open button |
Illustration J |
|
|
|
9. |
Connector for AC adapter |
16. |
Belt clip |
|
|
All rights reserved. No part of this publication may be reproduced, stored in a retrieval system, or transmitted in any form or by any means, electronic, mechanical, photocopying, recording, or otherwise, without the prior written permission of Seiko Epson Corporation. No patent liability is assumed with respect to the use of the information contained herein. While every precaution has been taken in the preparation of this book, Seiko Epson Corporation assumes no responsibility for errors or omissions. Neither is any liability assumed for damages resulting from the use of the information contained herein. Neither Seiko Epson Corporation nor its affiliates shall be liable to the purchaser of this product or third parties for damages, losses, costs, or expenses incurred by purchaser or third parties as a result of: accident, misuse, or abuse of this product or unauthorized modifications, repairs, or alterations to this product, or (excluding the U.S.) failure to strictly comply with Seiko Epson Corporation’s operating and maintenance instructions.
Seiko Epson Corporation shall not be liable against any damages or problems arising from the use of any options or any consumable products other than those designated as Original EPSON Products or EPSON Approved Products by Seiko Epson Corporation.
EPSON and ESC/POS are registered trademarks of Seiko Epson Corporation in the U.S. and other countries.
NOTICE: The contents of this manual are subject to change without notice. Copyright © 2005 by Seiko Epson Corporation, Nagano, Japan.
TM-P60 with Peeler User’s Manual 1

EMC and Safety Standards Applied
Product Name: TM-P60 with Peeler Model Name: M196C
The following standards are applied only to the printers that are so labeled. (EMC is tested using the Epson power supplies.)
North America: EMI: FCC/ICES-003 Class B
|
Safety: UL 60950/CSA C22.2 No. 60950 |
Europe: |
CE Marking |
WARNING
The connection of a non-shielded printer interface cable to this printer will invalidate the EMC standards of this device.
You are cautioned that changes or modifications not expressly approved by Seiko Epson Corporation could void your authority to operate the equipment.
FCC Compliance Statement For American Users
This equipment has been tested and found to comply with the limits for a Class B digital device, pursuant to Part 15 of the FCC Rules. These limits are designed to provide reasonable protection against harmful interference in a residential installation.
This equipment generates, uses, and can radiate radio frequency energy and, if not installed and used in accordance with the instruction manual, may cause harmful interference to radio communications. However, there is no guarantee that interference will not occur in a particular installation. If this equipment does cause harmful interference to radio or television reception, which can be determined by turning the equipment off and on, the user is encouraged to try to correct the interference by one or more of the following measures:
-Reorient or relocate the receiving antenna.
-Increase the separation between the equipment and receiver.
-Connect the equipment into an outlet on a circuit different from that to which the receiver is connected. -Consult the dealer or an experienced radio/TV technician for help.
For Canadian Users
This Class B digital apparatus complies with Canadian ICES-003.
RF Module
This equipment contains the following wireless module.
Manufacturer: TOYOTA INDUSTRIES CORPORATION
Type: 6180210
Product Name: WIRELESS LAN CF-CARD
This device complies with Part 15 of the FCC Rules and RSS-210 of the IC Rules. Operation is subject to the following two conditions:
(1)this device may not cause harmful interference, and
(2)this device must accept any interference received, including interference that may cause undesired operation.
2 TM-P60 with Peeler User’s Manual

USA
NOTICE
This device conforms to Part 15 of the FCC rules.
This device has been tested and found to comply with the limits for a Class B digital device, pursuant to Part 15 of the FCC Rules. These limits are designed to provide reasonable protection against harmful interference in a residential installation. This equipment generates, uses, and can radiate radio frequency energy and, if not installed and used in accordance with the instruction manual, may cause harmful interference to radio communications. However, there is no guarantee that interference will not occur in a particular installation. If this equipment does cause harmful interference to radio or television reception, which can be determined by turning the equipment off and on, the user is encouraged to try to correct the interference by one or more of the following measures:
-Reorient or relocate the receiving antenna.
-Increase the separation between the equipment and receiver.
-Connect the equipment into an outlet on a circuit different from that to which the receiver is connected. -Consult the dealer or an experienced radio/TV technician for help.
This transmitter must not be co-located or operated in conjunction with any other antenna or transmitter. FCC WARNING
Changes or modifications not expressly approved by the party responsible for compliance could void the user's authority to operate the equipment.
Canada
This device conforms to IC, Low Power License-Exempt Radio Communication Devices (RSS-210). The information such as Certification No., Model Name, and Manufacturer Name are described on the surface of the module.
SAR
The available scientific evidence does not show that any health problems are associated with using low power wireless devices. There is no proof, however, that these low power wireless devices are absolutely safe. Low power wireless devices emit low levels of radio frequency energy (RF) in the microwave range while being used. Whereas high levels of RF can produce health effects (by heating tissue), exposure to low-level RF that does not produce heating effects causes no known adverse health effects. Many studies of low-level RF exposures have not found any biological effects. Some studies have suggested that some biological effects might occur, but such findings have not been confirmed by additional research. TM-P60 with Peeler has been tested and found to comply with FCC radiation exposure limits set forth for an uncontrolled equipment and meets the FCC radio frequency (RF) Exposure Guidelines in Supplement C to OET65. The maximum SAR levels tested for TM-P60 with Peeler has been shown to be 0.144W/kg at Body.
Europe
Hereby, TOYOTA INDUSTRIES CORPORATION declares that this 6180210 is in compliance with the essential requirements and other relevant provisions of Directive 1999/5/EC and 89/336/EEC.
France
In France, using the TM-P60 with Peeler outdoors is prohibited.
Italy
In Italy, if used outside of own premises, general authorization is required.
TM-P60 with Peeler User’s Manual 3

The TM-P60 with Peeler can be Used Only in the Countries Listed Below:
Austria, Belgium, Germany, Luxembourg, Netherlands, Switzerland, France, Italy, Greece, Spain, Portugal, Denmark, Finland, Ireland, Sweden, UK, USA, Canada, Czeck Republic, Estonia, Hungary, Lithuania, Latvia, Poland, Slovenia, Slovak Republic, and Norway.
Important Safety Information
This section presents important information intended to ensure safe and effective use of this product. Read this section carefully and store it in an accessible location.
Key to Symbols
The symbols in this manual are identified by their level of importance, as defined below. Read the following carefully before handling the product.
 DANGER:
Dangers must be observed carefully to avoid serious injury or death.
 WARNING:
Warnings must be observed carefully to avoid serious bodily injury.
 CAUTION:
Cautions must be observed to avoid minor injury to yourself or damage to your equipment.
Safety Precautions
 WARNING:
Shut down your equipment immediately if it produces smoke, a strange odor, or unusual noise. Continued use may lead to fire. Immediately unplug the equipment and contact your dealer or a Seiko Epson service center for advice.
Never attempt to repair this product yourself. Improper repair work can be dangerous.
Never disassemble or modify this product. Tampering with this product may result in injury or fire.
Be sure to use the specified power source. Connection to an improper power source may cause fire.
Do not allow foreign matter to fall into the equipment. Penetration by foreign objects may lead to fire.
If water or other liquid spills into this equipment, do not continue to use it. Continued use may lead to fire. Unplug the equipment immediately and contact your dealer or a Seiko Epson service center for advice.
4 TM-P60 with Peeler User’s Manual
 CAUTION:
Do not connect cables in ways other than those mentioned in this manual. Different connections may cause equipment damage and burning.
Be careful not to drop this product. The product may break or cause injury if it is dropped.
Do not use in locations subject to high humidity or dust levels. Excessive humidity and dust may cause equipment damage or fire.
Do not place heavy objects on top of this product. Never stand or lean on this product. Equipment may fall or collapse, causing breakage and possible injury.
To ensure safety, unplug this product before leaving it unused for an extended period.
Before moving the product, unplug it and unplug all cables connected to it.
Do not use aerosol sprayers containing flammable gas inside or around this product. Doing so may cause fire.
Safety Precautions for Rechargeable Battery Pack
 DANGER:
If any liquid from the battery gets into your eyes, promptly wash it out with clean water for more than 10 minutes and consult your doctor at once. If you do not, the liquid may cause loss of eyesight.
Never disassemble or modify the battery pack. This may cause fire, explosion, leakage, overheating or damage.
Do not expose the battery to fire or heat it. This may cause fire, explosion, leakage, overheating or damage.
 WARNING:
Keep the battery pack away from fire or flame if it produces a strange odor or leakage. Otherwise fire or explosion may occur.
Should any battery liquid get on skin or clothing, promptly wash it off with clean water. If you do not, the liquid may damage your skin.
Do not expose the battery to water. Do not allow water to contact the terminals. This may cause fire, overheating, or electric shock.
Be sure to use and charge the battery that came with the printer. Using a battery other than the one specified may cause fire, explosion, leakage, overheating, or other damage.
Safety Label

 CAUTION:
During printing or after printing, the thermal head can be very hot.
Purpose of This Manual
This manual provides information to operators of the TM-P60 with Peeler printer to describe basic operations to enable safe and correct use of the printer.
TM-P60 with Peeler User’s Manual 5

Notes on Use
Be sure to use the power switch to turn the printer on and off.
Do not unplug or plug in the AC adapter during printing.
Be sure not to open the roll paper cover when the printer is operating.
Protect the printer from impact.
Do not apply excessive force to the printer case.
Do not place food or beverages such as coffee on the case of the printer.
Notes on Installation
Be sure that the printer is installed horizontally when you install it on a table.
Be sure that the roll paper side is on the bottom when you install the printer vertically.
Notes on the Rechargeable Battery
Before using the printer for the first time, charge the battery. The safety precautions for the rechargeable battery are described previously in this manual. For more details, see the battery instructions that came with the printer.
Notes on AC Adapter
Use the specified AC adapter (EPSON PS-10, Model: DA-42Y12) only.
Power Supply Cable Requirements
For US and Canada:
UL and CSA Approved;
Plug: AC125V, 7A or more, NEMA 5-15P,
Cable: 6 to 10 feet long, 3*AWG 18, SPT-2 or heavier,
Connector: AC125V, 7A or more.
For Europe:
EN Standard Approved;
Plug: AC250V, 10A or 16A Approved,
Cable: H03 or H05 (227IEC52, or 53), 3G 0.75mm² or more,
Connector: EN60320-1 approved AC250V 10A.
For UK:
BS Approved Type;
Plug: BS1363 Approved AC250V 10A or More Plug,
Cable: H03 or H05 (227IEC52, or 53), 3G 0.75mm² or more,
Connector: BS EN60320-1 Approved AC250V 10A.
Part Names
See illustration A.
6 TM-P60 with Peeler User’s Manual

Unpacking
The following items are included for the standard specification printer. If any item is damaged, contact your dealer.
Printer
Roll paper
Battery pack (LIP-2500) and its User’s Manual
AC adapter (PS-10)
User’s Manual (this manual)
Control Panel (LEDs and Switches)
See illustration B.
POWER LED |
|
|
|
Meaning |
|
|
|
|
|
|
|
On |
|
Power is on. |
|
||
|
|
|
|
|
|
Off |
|
Power is off. |
|
||
|
|
|
|
|
|
Flashing |
|
The printer is in power-off operation or is in an area where wireless communication |
|||
|
|
is not possible. |
|
||
|
|
|
|
|
|
|
|
|
|
||
Printer Condition |
|
ERROR LED |
Meaning |
||
|
|
|
|
||
Power On |
|
On |
Printer is offline (paper out, power-on initialization, roll paper cover |
||
|
|
|
|
open, power-off operation, or when the battery is used to supply |
|
|
|
|
|
the power, the remaining battery charge is not enough for printer |
|
|
|
|
|
operation). |
|
|
|
|
|
|
|
|
|
|
Off |
Printer is online. |
|
|
|
|
|
|
|
|
|
|
Flashing |
The temperature of the printer is too high. The printer resumes |
|
|
|
|
|
printing automatically when the temperature returns to normal. |
|
|
|
|
|
||
Power Off, battery |
|
On |
Indicates that an abnormality occurred during battery charging. |
||
installed, and AC |
|
|
The battery must be replaced with a new one. |
||
adapter connected |
|
|
|||
Off |
Battery is being charged. (BATT. [battery] LED is on.) |
||||
|
|
|
|||
|
|
|
|
||
|
|
|
|
||
Printer Condition |
|
BATT. LED |
Meaning |
||
|
|
|
|
||
Power On and |
|
On |
Remaining battery charge is not enough. It must be fully charged. |
||
battery installed |
|
|
|
||
|
Off |
Remaining battery charge is adequate. |
|||
|
|
|
|||
|
|
|
|
|
|
|
|
|
Flashing |
Remaining battery charge is below half. |
|
|
|
|
|
||
Power Off and |
|
On |
The battery is being charged. |
||
battery installed |
|
|
|
||
|
Off |
The battery is fully charged. |
|||
|
|
|
|||
|
|
|
|
|
|
Buttons
POWER
Press the button to turn the power on or off. To turn off the power, you need to hold the button for more than 2 seconds.
FEED
Press the button to feed paper.
TM-P60 with Peeler User’s Manual 7

Supplying Power
You can supply power through the battery pack packaged with the printer or the AC adapter PS-10 (Model: DA-42Y12). See illustration C.
 WARNING:
Be sure to use the battery LIP-2500 that came with the printer. Using a battery other than the one specified may cause fire, explosion, leakage, overheating or other damage.
 CAUTION:
There is risk of explosion if the battery is replaced by an incorrect type. Dispose of used batteries according to the instructions.
1.Slide the battery cover to open it.
2.Install or remove the battery and close the cover.
3.If you use the AC adapter, plug in the connector as shown in illustration A.
Battery Recharging
 WARNING:
Be sure to charge the battery that came with the printer. Using a battery other than the one specified may cause fire, explosion, leakage, overheating or other damage.
Note:
The battery can be charged only when the temperature is 0 ~ 40°C (32 ~ 104°F).
1.Be sure that the printer is turned off and the battery to be charged is installed.
2.Connect the AC adapter to the printer (see illustration A).
3.Recharging will now be started.
Recharging will take approximately 5 hours with the AC adapter, or if you use the fast recharger (option), recharging will take approximately 2.5 hours. For detailed information for the fast recharger (option), see its instructions. The times described above are the times taken to charge a battery pack that is fully discharged.
Switching Issuing Mode
The issuing mode can be switched between the label continuous issuing mode and the label peeler issuing mode by folding the peeler holder under the peeler cover.
Installing or Replacing Roll Paper
 CAUTION:
Be sure to use roll paper that meets the specifications.
Note:
Do not use paper rolls that have the paper glued to the core.
1.Press the open button to open the roll paper cover and the peeler cover. See illustration D.
2.Remove the used roll paper core if there is one.
(When using the label continuous issuing mode)
3.Fold the peeler holder under the peeler cover. This covers the label peeler detector. See illustration E.
8 TM-P60 with Peeler User’s Manual

(When using the label peeler issuing mode)
3.Peel off the first label, and press the peeler change over lever to lift the peeler holder.
(When installing the label paper horizontally)
4.Set the new roll paper on the inside of the roll paper cover.
Note:
Note the direction the paper comes off the roll. See illustration F.
(When installing the label paper vertically)
4.Set the new roll paper in the inside of the roll paper cover. See c in illustration G.
5.Pull the leading edge of the roll paper. See d in illustration G.
6.Align the left edge of the roll paper with the edge of the cover. See e in illustration G.
Note:
Note the direction the paper comes off the roll.
7.Pull the leading edge of the roll paper. See illustration F.
8.Close the roll paper cover.
9.Close the peeler cover.
Note:
Removing the issued label enables the label peeler detector to detect a PAPER END and the printer to issue the next label.
If the first label is not removed when using the label peeler issuing mode, the thickness of the label and the backing paper overloads the peeler holder, possibly stopping the paper feed motor.
When closing the peeler cover, make sure to close it firmly, pressing both ends. See illustration H.
When tearing the backing paper, pull it in the direction of the arrow shown in the illustration I as you tear it. Otherwise, the backing paper may move to one side, causing a paper jam.
When the label is completely fed to the peeling position, the printer goes in the label removal waiting state, so remove the label.
When the label peeler detector detects the paper at the power on, the printer goes in the label removal waiting state and the ERROR LED comes on. Be sure to remove the label before powering off the printer. Otherwise, the printer goes into the label removal waiting state when it is powered on again.
Buzzer
The factory default is set to On (buzzer sounds) to indicate the following:
Remaining battery charge is not adequate
Host disconnection
Roll paper end
Error
Transmission of status information
TM-P60 with Peeler User’s Manual 9

Belt Clip
See illustration J.
You can hang the printer on your belt using the belt clip attached to the back of the printer. If you want to hang the printer on your neck, you can use the neck strap provided as an option.
Troubleshooting
No lights on the control panel
Check that the battery is installed.
ERROR LED is flashing or on
The printer temperature may be too high. The printer resumes printing automatically when the temperature returns to normal.
Make sure that the roll paper cover is properly closed.
Make sure that roll paper is installed.
When the printer power is on, if the ERROR LED and the BATT. LED are on, the remaining battery charge is not enough for printer operation. The battery must be fully charged.
When the battery is being charged, if the ERROR LED is on, an abnormality has occurred. The battery must be replaced with a new one.
Turn off the power, wait several seconds, and then turn it on again. If the error remains, contact a qualified service person.
In the label peeler issuing mode, the ERROR LED may flash when a label blocks the label peeler detector. In this case, remove the label. If you cannot remove the label, reload the label roll paper or press the FEED button for more than 1 second to execute a forced paper feed.
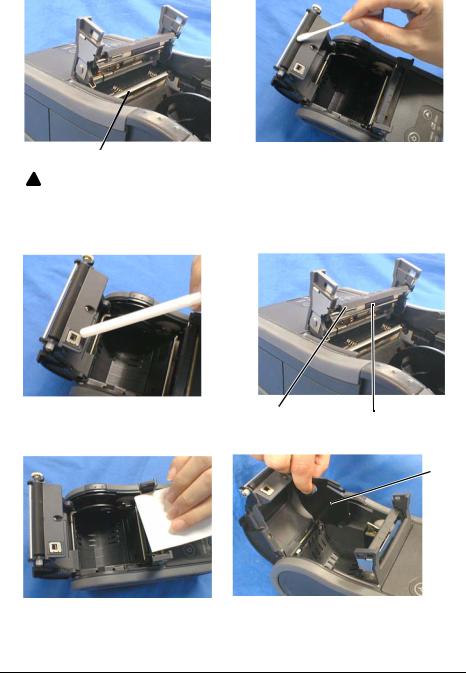
Cleaning the Thermal Head
 CAUTION:
After printing, the thermal head can be very hot. Be careful not to touch it and to let it cool before you clean it. Do not damage the thermal head by touching it with your fingers or any hard object.
Turn off the printer, open the peeler cover and the roll paper cover, and clean the thermal elements of the thermal head with a cotton swab moistened with an alcohol solvent (ethanol, methanol, or IPA). See illustration K.
EPSON recommends cleaning the thermal head periodically (generally every 3 months) to maintain print quality.
Cleaning the Platen Roller/Roll Paper End Sensor
When paper dust accumulates on the platen rollers or the roll paper end sensor, follow the steps below to clean them. To maintain good functional capabilities, clean them regularly (every 6 months).
1.Turn off the printer, open the peeler cover, and then the roll paper cover.
2.Clean the platen roller with a cotton swab lightly moistened with water or alcohol, as shown in illustration L.
3.Blow the paper dust accumulated around the roll paper end sensor with a blower or a straw, as shown in illustration M.
10 TM-P60 with Peeler User’s Manual

 CAUTION:
Do not wipe the roll paper end sensor with water or alcohol. Its functional capabilities may be affected.
4.Close the roll paper cover after the water or alcohol has dried.
Cleaning the Peeler Unit
After the peeler is used for a prolonged period of time, the glue from the labels accumulates on the rollers of the peeler unit. If you leave the rollers in such a condition, the glue may stick to issued labels, or a paper jam may occur. To prevent malfunctions and maintain good print quality, clean the rollers regularly (every 20,000 labels).
You can clean them easily if you use a wasted label, as shown in illustration O.
Note:
Do not use any alcohol based solvents for cleaning. Such solvents may enter the roller shaft and cause a malfunction of the peeler.
Using Different Paper Widths
6 paper widths from 29.5 mm to 57.5 mm are available by using the roll paper guide. If you remove the roll paper guide, you can also select 59.5 mm.
1.Press the button and open the peeler holder and the roll paper cover.
2.Remove the roll paper if there is one.
3.Insert your finger into the hole of the roll paper guide and lift it upward. Undo the top part that is fixed in one of the slots. See illustration P.
4.Move the roll paper guide to the position matching the width of the paper you are using.
5.Insert the top of the roll paper guide and press it down until it clicks.
6.Insert the roll paper. See “Installing Roll Paper” for detailed information.
Note:
Do not increase the paper width after you have used a narrower width because if the printer has ever been used with narrow paper, part of the head contacts the platen. Therefore, when a wider setting is used, part of the head may be worn out, which can cause poor printing.
How to Set Up the Network
Preparation
Printing a Status Sheet
Make sure the printer is turned off and the roll paper cover is closed properly. Power on the printer and then open the roll paper cover. Hold down the FEED button until the printer beeps (about 2 seconds). Close the roll paper cover. The printer prints the parameters for the printer. You can check all setting values necessary (SSID, Network mode, IP address, Subnet mask, Gateway address) for the network connection.
TM-P60 with Peeler User’s Manual 11

Connection
Set the setting of the host PC and AP to match the network setting that you have confirmed with the status sheet.
Note:
The AP mentioned above applies only to the printer if it is in the InfraStructure mode (you can check it with the status sheet).
You can check whether the connection to the printer has been correctly done by inputting the ping command through the command prompt.
Example: Ping 192.168.192.168
Note:
Although the example shows the address 192.168.192.168, use whatever IP address is reported on the status sheet.
Because the default IP addresses for all the wireless printers are the same, you should power on and configure only one printer at a time.
Resetting the Printer to Factory Defaults
Open the roll paper cover. Turn on the printer’s power while pressing down the FEED button. Press the FEED button 6 times. Close the roll paper cover. The printer prints the procedure for resetting. Follow the procedure.
Host Operating System
Windows® XP and 2000 are the recommended host PC operating systems because they have built-in TCP/IP support.
Setup
There are two methods for the setup. For details, see the TM-P60 with Peeler Technical Reference Guide.
Using a Web browser
1.Start Windows Internet Explorer (or your Web browser).
2.Input the IP address of the TM-P60 with Peeler in the browser address bar and press Enter (Example: http://192.168.192.168 [default]).
3.The browser displays a dialog box requesting a user name and password. Click OK without entering any user name or password. (If you have changed the user name and password, you need to input them.)
4.You can modify the parameters by following the menus. You must click Submit to send the change to the printer and then click Reset to make the submission effective on each Web page. If you change the IP address, SSID, etc., you have to change the setting of the host PC and AP to match the printer’s setting.
Using the TMNetWinConfig (version 2.0) and the TM-P60 with Peeler Technical Reference Guide
For details, go to the following web site: http://pos.epson.com/
Downloading Drivers, Utilities, and Manuals
Drivers, utilities, and manuals can be downloaded from one of the following URLs.
For customers in North America, go to the following web site: http://www.epsonexpert.com/ and follow the on-screen instructions.
For customers in other countries, go to the following web site: http://www.epson-pos.com/
Select the product name from the “Select any product” pulldown menu.
12 TM-P60 with Peeler User’s Manual

Recycling the Batteries
Contains a lithium-ion battery. Must be recycled or disposed of properly.
For American Users:
The lithium-ion battery is recyclable. At the end of its useful life, under various state and local laws, it is illegal to dispose of this battery into your municipal waste stream. Please call 1-800-8-BATTERY for information on how to recycle this battery.
CE Marking
|
DECLARATION of CONFORMITY |
According to ISO/IEC Guide 22 and EN 45014 |
|
Manufacturer: |
SEIKO EPSON CORPORATION |
Address: |
3-5, Owa 3-chome, Suwa-shi, |
|
Nagano-ken 392-8502 JAPAN |
Representative: |
EPSON Engineering Europe S.A. |
Address: |
Parc Technologique Europarc 60, Rue Auguste |
Perret 94043 Creteil Cedex France
Declares that the Product:
Product Name: Printer
Model Name: M196C
Commercial Name: TM-P60 with Peeler
Conforms to the following Directives and Norms
Directive 1999/5/EC and 89/336/EEC EN 301 481-1
EN 301 489-17
EN 300 328-2
EN 60950-1
EN 55022 Class B EN 55024
IEC 61000-4-2
IEC 61000-4-3
IEC 61000-4-4
IEC 61000-4-5
IEC 61000-4-6
IEC 61000-4-11
TM-P60 with Peeler User’s Manual 13

FCC
DECLARATION of CONFORMITY
According to 47CFR, Part 2 and 15 for Class B Personal Computers and Peripherals; and/or CPU Boards and Power Supplies used with Class B Personal Computers:
We: |
EPSON AMERICA, INC. |
Located at: |
MS 3-13 |
|
3840 Kilroy Airport Way |
|
Long Beach, CA 90806 |
|
Telephone: 562-290-5254 |
Declare under sole responsibility that the product identified herein, complies with 47CFR Part 2 and 15 of the FCC rules as a Class B digital device. Each product marketed, is identical to the representative unit tested and found to be compliant with the standards. Records maintained continue to reflect the equipment being produced can be expected to be within the variation accepted, due to quantity production and testing on a statistical basis as required by 47CFR §2.909 Operation is subject to the following two conditions: (1) this device may not cause harmful interference, and (2) this device must accept any interference received, including interference that may cause undesired operation.
Trade Name: |
EPSON |
Type of Product: |
Printer |
Model: |
M196C |
14 TM-P60 with Peeler User’s Manual
Deutsch
TM-P60 mit Etikettenablöser
Bedienungsanleitung
Spezifikation
Die technische Spezifikation befinden sich am Anfang dieses Handbuchs.
Abbildungen
Alle Abbildungen befinden sich am Anfang dieses Handbuchs und sind mit den Buchstaben (A, B, C…) gekennzeichnet. Im Text wird auf die Abbildungen anhand dieser Buchstaben Bezug genommen (z.B. “Siehe Abbildung A”). Einige dieser Abbildungen haben numerierte Pfeile bzw. Linien, die auf einen Teil der Abbildung zeigen. Die Bedeutung der Nummern ist unten aufgeführt.
Abbildung A |
Abbildung B |
Abbildung K |
||
1. |
Etikettenablöserabdeckung |
10. Ein-/Ausschalter (POWER) |
17. |
Thermo-Druckkopf |
2. |
Etikettenablösersensor |
11. Papiervorschubtaste (FEED) |
Abbildung N |
|
3. |
Papiersensor |
12. Betriebsanzeige (POWER LED) |
18. |
Ablöserhalter |
4. |
Papierrollenabdeckung |
13. Fehleranzeige (ERROR LED) |
19. |
Rolle |
5. |
Bedienfeld |
14. Batteriezustandsanzeige (BATT. LED) |
Abbildung P |
|
6. |
Ablöserhalter |
Abbildung C |
20. |
Papierrollenführung / |
7. |
Ablöserwechselhebel |
15. Batterie |
|
-abstandhalter |
8. |
Öffnungstaste |
Abbildung J |
|
|
9. |
Anschluss für Netzteil |
16. Gürtel-Clip |
|
|
Alle Rechte vorbehalten. Diese Veröffentlichung darf ohne ausdrückliche schriftliche Genehmigung der Seiko Epson Corporation nicht reproduziert, in einem Abrufsystem gespeichert oder in beliebiger Form und auf jedwede Weise übermittelt werden, weder durch Fotokopieren, Aufzeichnen, noch auf elektronische, mechanische oder sonstige Weise. Für die hierin enthaltenen Informationen wird keine Patenthaftung übernommen. Obgleich bei der Zusammenstellung dieser Anleitung mit Sorgfalt vorgegangen wurde, übernimmt die Seiko Epson Corporation keine Verantwortung für Fehler und Auslassungen. Zudem wird keine Haftung übernommen für Schäden, die aus der Verwendung der hierin enthaltenen Informationen entstehen.
Weder die Seiko Epson Corporation noch ihre Tochtergesellschaften sind dem Käufer dieses Produkts oder Drittparteien gegenüber für Schäden, Verluste, Kosten oder Ausgaben haftbar, die für den Käufer oder etwaige Drittparteien aufgrund von Unfall, Mißbrauch oder Zweckentfremdung dieses Produkts, nicht autorisierten Modifikationen, Reparaturen oder Produktumbauten sowie (mit Ausnahme USA) aufgrund des Versäumnisses anfallen, die Bedienungsund Wartungsanleitungen der Seiko Epson Corporation genau einzuhalten.
Die Seiko Epson Corporation ist nicht haftbar für Schäden oder Probleme, die bei Verwendung von Optionen oder Verschleißteilen auftreten, die nicht als Original-Epson-Produkte oder von der Seiko Epson Corporation zugelassene Epson Produkte gelten.
TM-P60 mit Etikettenablöser Bedienungsanleitung 15

EPSON und ESC/POS sind eingetragene Warenzeichen der Seiko Epson Corporation in den VEREINIGTEN STAATEN und in anderen Ländern.
HINWEIS: Änderungen am Inhalt dieser Anleitung ohne Vorankündigung vorbehalten. Copyright © 2005 Seiko Epson Corporation, Nagano, Japan.
Geltende EMCund Sicherheitsnormen
Produktname: TM-P60 mit Etikettenablöser Typenname: M196C
Die folgenden Normen gelten nur für entsprechend gekennzeichnete Drucker. (EMC wurde mit EpsonNetzteilen getestet.)
Nordamerika: EMI: |
FCC/ICES-003 Klasse B |
|
|
Sicherheit: |
UL 60950/CSA C22.2 No. 60950 |
Europa |
CE-Plakette |
|
WARNUNG
Die EMC-Normen für dieses Gerät werden ungültig, wenn ein nicht isoliertes Drucker-Schnittstellenkabel an den Drucker angeschlossen wird.
Bitte beachten Sie, dass durch Änderungen oder Modifikationen, die nicht ausdrücklich von der Seiko Epson Corporation genehmigt wurden, die Bedienung des Geräts unter Umständen unzulässig wird.
HF-Modul
Das Gerät enthält das folgende drahtlose Modul:
Hersteller: |
TOYOTA INDUSTRIES CORPORATION |
Modellname: |
6180210 |
Produktname: |
WIRELESS LAN CF-CARD |
Europa
Hiermit erklärt TOYOTA INDUSTRIES CORPORATION dass das Modell 6180210 den wesentlichen Anforderungen und sonstigen relevanten Vorschriften von Direktive 1999/5/EG und 89/336/EWG entspricht.
Das Modell TM-P60 mit Etikettenablöser kann nur in den unten aufgeführten Ländern verwendet werden
Österreich, Belgien, Deutschland, Luxemburg, die Niederlande, Schweiz, Frankreich, Italien, Griechenland, Spanien, Portugal, Dänemark, Finnland, Irland, Schweden, Großbritannien, USA, Kanada, Tschechische Republik, Estland, Ungarn, Litauen, Lettland, Polen, Slowenien, Slowakische Republik, und Norwegen.
Wichtige Sicherheitshinweise
Dieser Abschnitt enthält wichtige Informationen für die sichere und effektive Nutzung dieses Produkts. Bitte lesen Sie diesen Abschnitt sorgfältig durch und bewahren Sie ihn leicht zugänglich auf.
Symbole
Die in diesem Handbuch verwendeten Symbole sind der untenstehenden Wichtigkeit entsprechend definiert. Folgende Angaben vor Umgang mit dem Produkt sorgfältig durchlesen.
16 TM-P60 mit Etikettenablöser Bedienungsanleitung

 GEFAHREN:
Gefahrenhinweise sind sorgfältig zu beachten, um schwere Verletzungen und Tod auszuschalten.
 WARNUNG:
Warnungen müssen zur Vermeidung von möglicherweise schweren Körperverletzungen genau beachtet werden.
 VORSICHT:
Vorsichtshinweise müssen zur Vermeidung leichter Körperverletzungen und Beschädigungen des Gerätes beachtet werden.
Sicherheitsmassnahmen
 WARNUNG:
Schalten Sie das Gerät bei Rauchentwicklung, Abgabe eines eigenartigen Geruchs oder ungewöhnlichen Geräuschs sofort aus. Bei weiterer Verwendung besteht Feuergefahr. Ziehen Sie den Netzstecker des Gerätes sofort aus der Netzsteckdose und benachrichtigen Sie Ihren Händler oder ein Seiko Epson Service Center.
Versuchen Sie keinesfalls das Gerät selbst zu reparieren. Falsch durchgeführte Reparaturarbeiten können Gefahren mit sich bringen.
Das Produkt keineswegs auseinandernehmen oder umbauen. Nach unbefugten Eingriffen in dieses Produkt sind Verletzungsund Feuergefahr nicht auszuschließen.
Verwenden Sie nur das für dieses Produkt spezifizierte Netzteil. Beim Anschluss an das falsche Netzteil besteht Brandgefahr.
Keine Fremdkörper in das Gerät fallen lassen. Beim Eindringen von Fremdkörpern besteht Feuergefahr.
Falls Wasser oder sonstige Flüssigkeiten in dieses Gerät eindringen, nicht weiter verwenden. Bei Weiterverwendung des Geräts besteht Feuergefahr. Ziehen Sie sofort den Netzstecker und setzen Sie sich mit Ihrem Händler oder einem Seiko Epson Service Center in Verbindung.
 VORSICHT:
Schließen Sie Kabel nur auf die in diesem Handbuch beschriebene Weise an. Andere Kabelverbindungen können das Gerät beschädigen und einen Brand verursachen.
Dieses Produkt nicht fallenlassen. Das Produkt kann beim Herabfallen beschädigt werden oder Verletzungen verursachen.
Verwenden Sie das Gerät nicht an Orten mit hohem Feuchtigkeitsoder Staubgehalt. Eine übermäßige Feuchtigkeitsoder Staubentwicklung kann das Gerät beschädigen oder einen Brand verursachen.
Stellen Sie keine schweren Gegenstände auf dieses Produkt.
Stellen Sie sich nie auf das Produkt und lehnen Sie sich nicht dagegen. Das Gerät kann fallen oder beschädigt werden und dabei Gegenstände beschädigen oder Personen verletzen.
Aus Sicherheitsgründen ziehen Sie bitte den Netzstecker aus der Netzsteckdose wenn Sie beabsichtigen, das Gerät über einen längeren Zeitraum nicht zu verwenden.
TM-P60 mit Etikettenablöser Bedienungsanleitung 17

Falls das Produkt transportiert werden soll, den Netzstecker und alle angeschlossenen Kabel abziehen.
Verwenden Sie keine brennbaren Sprühmittel in und in der Nähe des Gerätes. Brandgefahr!
Sicherheitsvorkehrungen für die wiederaufladbare Batterie (Akku)
 GEFAHREN:
Falls Flüssigkeit aus der Batterie in Ihre Augen gelangt, das betroffene Auge sofort mindestens 10 Minuten mit sauberem Wasser ausspülen und sofort einen Arzt zu Rate ziehen. Andernfalls kann die Flüssigkeit eine Einbuße der Sehfähigkeit verursachen.
Den Akku keinesfalls auseinandernehmen oder modifizieren. Andernfalls besteht Brand-, Explosions-, Auslauf-, Überhitzungsund Beschädigungsgefahr.
Die Batterie von offenem Feuer fernhalten und nicht erhitzen. Andernfalls besteht Brand-, Explosions-, Auslauf-, Überhitzungsund Beschädigungsgefahr.
 WARNUNG:
Wenn der Akku einen eigenartigen Geruch entwickelt oder ausläuft, von Feuer und offenen Flammen fernhalten. Andernfalls besteht Feuerund Explosionsgefahr.
Falls Batterieflüssigkeit in Kontakt mit der Haut oder Bekleidung gerät, sofort mit sauberem Wasser abwaschen. Andernfalls besteht Gefahr, dass die Flüssigkeit die Haut verletzt.
Wasser von der Batterie fernhalten. Kein Wasser auf die Anschlusspole bringen. Andernfalls besteht Feuer-, Überhitzungsund Stromschlaggefahr.
Es ist stets darauf zu achten, dass die mit dem Drucker gelieferte Batterie verwendet und geladen wird. Bei Verwendung einer anderen als der angegebenen Batterie besteht Feuer-, Explosions-, Überhitzungsund sonstige Beschädigungsgefahr.
Sicherheitsaufkleber

 VORSICHT:
Während des Druckvorgangs und nach dem Drucken kann der Thermo-Druckkopf sehr heiß sein.
Zweck dieser Bedienungsanleitung
Diese Bedienungsanleitung enthält Informationen für die Benutzer des Druckers “TM-P60 mit Etikettenablöser” und erläutert die Grundfunktionen für den sicheren und korrekten Druckergebrauch.
Gebrauchshinweise
Den Drucker nur mit dem Ein- /Ausschalter einund ausschalten.
Das Netzteil während des Druckens nicht herausziehen oder einstecken.
Keinesfalls die Papierrollenabdeckung öffnen, während der Drucker in Betrieb ist.
Den Drucker vor Stoßeinwirkung schützen.
Keine übermäßige Kraft auf das Druckergehäuse ausüben.
Keine Esswaren oder Getränke (Kaffee usw.) auf den Drucker stellen.
18 TM-P60 mit Etikettenablöser Bedienungsanleitung

Installationshinweise
Stellen Sie sicher, dass der Drucker bei Tischmontage horizontal installiert ist.
Stellen Sie sicher, dass sich die Papierrollenseite bei vertikaler Druckerinstallation unten befindet.
Hinweise zur wiederaufladbaren Batterie
Die Batterie vor dem erstmaligen Gebrauch des Druckers laden. Die Sicherheitshinweise für die wiederaufladbare Batterie (den Akku) sind weiter vorn in dieser Bedienungsanleitung zu finden. Weitere Einzelheiten, siehe die im Lieferumfang des Druckers enthaltenen Batteriebedienungsanleitung.
Hinweise zum Netzteil
Verwenden Sie ausschließlich das angegebene Netzteil (EPSON PS-10, Modell DA-42Y12).
Anforderungen an das Netzkabel
Europa:
EN-standardgeprüft;
Stecker: 250 V AC, genehmigt für 10 A oder 16 A,
Kabel: H03 oder H05 (227IEC52 oder 53), 3G 0,75 mm² oder dicker, Steckverbinder: gemäß EN60320-1, 250 V AC, 10 A.
Namen der Teile
Siehe Abbildung A.
Auspacken
Folgendes ist im Lieferumfang des Druckers mit Standardspezifikationen enthalten. Falls eine der Systemkomponenten beschädigt ist, setzen Sie sich bitte mit Ihrem Händler in Verbindung.
Drucker
Papierrolle
Akku (LIP-2500) und zugehörige Bedienungsanleitung
Netzteil (PS-10)
Bedienungsanleitung (die vorliegende Anleitung)
TM-P60 mit Etikettenablöser Bedienungsanleitung 19

Bedienfeld (LEDs und Schalter)
Siehe Abbildung B.
NETZ-LED |
|
Bedeutung |
|
||
|
|
|
|
|
|
Ein |
|
Drucker ist eingeschaltet. |
|
||
|
|
|
|
|
|
Aus |
|
Drucker ist ausgeschaltet. |
|||
|
|
|
|
|
|
Blinkt |
|
Der Drucker befindet sich im Ausschaltvorgang oder in einem Bereich, in dem eine |
|||
|
|
drahtlose Kommunikation nicht möglich ist. |
|||
|
|
|
|
|
|
|
|
|
|
|
|
Druckerzustand |
|
Fehleranzeige |
|
Bedeutung |
|
|
|
|
(ERROR-LED) |
|
|
|
|
|
|
|
|
Eingeschaltet |
|
Ein |
|
Der Drucker ist offline (Papier leer, Einschaltinitialisierung, |
|
|
|
|
|
|
Papierrollenabdeckung offen, Ausschaltmodus oder bei |
|
|
|
|
|
Batteriebetrieb reicht die restliche Batterieladung für den |
|
|
|
|
|
Druckerbetrieb nicht aus.) |
|
|
|
|
|
|
|
|
|
Aus |
|
Drucker ist online. |
|
|
|
|
|
|
|
|
|
Blinkt |
|
Die Temperatur des Druckers ist zu hoch. Der Drucker nimmt |
|
|
|
|
|
den Druckvorgang wieder auf, sobald die Temperatur |
|
|
|
|
|
wieder einen normalen Wert erreicht hat. |
|
|
|
|
|
|
Ausgeschaltet, |
|
Ein |
|
Zeigt an, dass beim Laden der Batterie eine Störung |
|
Batterie installiert und |
|
|
aufgetreten ist. Die Batterie muss gegen eine neue |
||
Netzteil |
|
|
|
ausgewechselt werden. |
|
angeschlossen |
|
|
|
|
|
|
Aus |
|
Batterie wird geladen (BATT. [Batterie]-LED leuchtet). |
||
|
|
|
|
||
|
|
|
|
|
|
|
|
|
|
||
Druckerzustand |
|
BATT. LED |
|
Bedeutung |
|
|
|
|
|
||
Eingeschaltet und |
Ein |
|
Verbliebene Batterieladung reicht nicht aus. Vollständiges |
||
Batterie installiert |
|
|
Aufladen erforderlich. |
||
|
|
|
|
|
|
|
|
|
Aus |
|
Verbliebene Batterieladung ist ausreichend. |
|
|
|
|
|
|
|
|
|
Blinkt |
|
Batterie höchstens noch halb geladen. |
|
|
|
|
||
Strom ausgeschaltet |
Ein |
|
Batterie wird geladen. |
||
und Batterie installiert |
|
|
|
||
Aus |
|
Batterie ist voll aufgeladen. |
|||
|
|
|
|
||
|
|
|
|
|
|
Tasten
POWER (Ein-/Ausschalter)
Diese Taste zum Einund Ausschalten des Druckers drücken. Zum Ausschalten des Druckers muss die Taste mindestens 2 Sekunden gedrückt werden.
FEED (Papiervorschubtaste)
Drücken Sie die Papiervorschubtaste, um Papier vorzuschieben.
Spannungsversorgung
Die Spannungsversorgung des Druckers kann entweder über das mitgelieferte Batteriepack erfolgen oder über das Netzteil PS-10 (Modell DA-42Y12).
Siehe Abbildung C.
 WARNUNG:
Es ist stets darauf zu achten, dass die mit dem Drucker gelieferte Batterie (LIP-2500) verwendet und geladen wird. Bei Verwendung einer anderen als der angegebenen Batterie besteht Feuer-, Explosions-, Überhitzungsund sonstige Beschädigungsgefahr.
20 TM-P60 mit Etikettenablöser Bedienungsanleitung

 VORSICHT:
Wenn die Batterie durch einen falschen Batterietyp ersetzt wird, besteht Explosionsgefahr. Die Batterien gemäß den Anweisungen entsorgen.
1.Schieben Sie die Batterieabdeckung auf.
2.Installieren oder entnehmen Sie die Batterie und schließen Sie die Abdeckung.
3.Falls das Netzteil verwenden, stecken Sie den Anschluss-Stecker wie in Abbildung A gezeigt ein.
Wiederaufladen der Batterie
 WARNUNG:
Es ist stets darauf zu achten, dass die mit dem Drucker gelieferte Batterie verwendet und geladen wird. Bei Verwendung einer anderen als der angegebenen Batterie besteht Feuer-, Explosions-, Überhitzungsund sonstige Beschädigungsgefahr.
Hinweis:
Die Batterie kann nur bei Temperaturen im Bereich von 0°C bis 40°C geladen werden.
1.Achten Sie darauf, dass der Drucker ausgeschaltet und die zu ladende Batterie installiert ist.
2.Schließen Sie das Netzteil an den Drucker an (siehe Abbildung A).
3.Nun beginnt der Wiederaufladevorgang.
Das Wiederaufladen dauert mit dem Netzteil ca. 5 Stunden, mit dem SchnellLadegerät (Option) ca. 2,5 Stunden. Ausführliche Informationen über das SchnellLadegerät (Option) sind in der jeweiligen Bedienungsanleitung zu finden. Die obigen Zeitangaben gelten für völlig entladene Akkus.
Wechseln des Ausgabemodus
Für den Ausgabemodus kann zwischen kontinuierlicher Ausgabe und Etikettenablöser-Modus gewählt werden, indem der Ablöserhalter unter dessen Abdeckung zurückgeklappt wird.
Einlegen oder Auswechseln der Papierrolle
 VORSICHT:
Verwenden Sie nur Papierrollen, die den Spezifikationen entsprechen.
Hinweis:
Verwenden Sie keine Papierrollen, bei denen das Papier am Rollenkern fixiert oder in einer Schleife um den Kern gelegt ist.
1.Drücken Sie die Öffnungstaste, um die Papierrollenabdeckung und die Ablöserabdeckung zu öffnen. Siehe Abbildung D.
2.Entfernen Sie ggf. den Papierrollenkern.
(bei kontinuierlichem Ausgabemodus)
3.Klappen Sie den Ablöserhalter unter dessen Abdeckung. Damit wird der Etikettenlösedetektor verdeckt. Siehe Abbildung E.
(bei Etikettenablöser-Ausgabemodus)
3.Ziehen Sie das erste Etikett ab, und heben Sie den Ablöserhalter mittels des Ablöserwechselhebels an.
TM-P60 mit Etikettenablöser Bedienungsanleitung 21

(bei horizontaler Zuführung des Etikettenpapiers)
4.Legen Sie die neue Papierrolle in die Papierrollenaufnahme.
Hinweis:
Beachten Sie die Abwickelrichtung des Papiers. Siehe Abbildung F.
(bei vertikaler Zuführung des Etikettenpapiers)
4.Legen Sie die neue Papierrolle in die Papierrollenaufnahme. Siehe c in Abbildung G.
5.Ziehen Sie die Papierkante vor. Siehe d in Abbildung G.
6.Richten Sie die linke Seite des Papiers an der Kante der Abdeckung aus. Siehe e in Abbildung G.
Hinweis:
Achten Sie auf die Abwickelrichtung des Papiers.
7.Ziehen Sie die Papierkante vor. Siehe Abbildung F.
8.Schließen Sie die Papierrollenabdeckung.
9.Schließen Sie die Ablöserabdeckung.
Hinweis:
Wird das ausgegebene Etikett entfernt, kann der Etikettenlösedetektor PAPER END melden, so dass der Drucker bereit ist, das nächste Etikett auszugeben.
Wird im Etikettenablöser-Ausgabemodus das erste Etikett nicht entfernt, überlastet die Dicke des Etiketts zusammen mit dem Trägerpapier den Ablöserhalter, und der Papiervorschub wird möglicherweise blockiert.
Beim Schliessen der Etikettenablöserabdeckung auf beide Enden drücken und darauf achten, dass sie richtig geschlossen ist. Siehe Abbildung H.
Trägerband beim Abreißen in Richtung des Pfeils ziehen (siehe Illustration I), um zu vermeiden, dass sich das Papier auf die Seite verschiebt und einen Papierstau verursacht. Sobald das Etikett vollständig auf die Ablöseposition vorgeschoben ist, geht der Drucker in einen Wartezustand über, bis das Etikett entnommen wird.
Befindet sich beim Einschalten ein Etikett auf dem Ablöser, wird es vom Ablösesensor erkannt, so dass der Drucker in den Wartezustand übergeht und der ERROR-LED (Fehler-LED) aufleuchtet. Fertige Etiketten immer vor Ausschalten des Druckers entnehmen, damit der Drucker beim darauffolgenden Einschalten betriebsbereit ist.
Signalton
Der Summer ist ab Werk eingeschaltet und signalisiert folgende Zustände:
Verbliebene Batterieladung reicht nicht aus
Verbindung zum Host unterbrochen
Papierrollenende
Fehler
Übermittlung von Statusinformationen
Gürtel-Clip
Siehe Abbildung J.
Sie können sich den Drucker mit Hilfe des an der Rückseite befestigten Clips an den Gürtel hängen. Wenn Sie sich den Drucker anderweitig tragen möchten, können Sie auch den optionalen Schulterriemen verwenden.
22 TM-P60 mit Etikettenablöser Bedienungsanleitung

Fehlersuche
Auf dem Bedienfeld leuchten keine Lämpchen
Stellen Sie sicher, dass die Batterie installiert ist.
ERROR-LED (Fehler-LED) blinkt oder leuchtet
Unter Umständen ist die Druckertemperatur zu hoch. Der Drucker nimmt den Druckvorgang wieder auf, sobald die Temperatur einen normalen Wert erreicht hat.
Achten Sie darauf, dass die Papierrollenabdeckung korrekt geschlossen ist.
Achten Sie darauf, dass eine Papierrolle eingelegt ist.
Wenn der Drucker eingeschaltet ist und die ERROR-LED und die BATT.-LED leuchten, reicht die Ladung der Batterie für den Druckbetrieb nicht aus. Die Batterie muss vollständig geladen sein.
Wenn beim Laden der Batterie die ERROR-LED leuchtet, ist eine Störung aufgetreten. Die Batterie muss gegen eine neue ausgewechselt werden.
Schalten Sie den Drucker aus, warten Sie einige Sekunden und schalten Sie ihn wieder ein. Wenn der Fehler weiter besteht, setzen Sie sich mit einem qualifizierten Servicetechniker in Verbindung.
Im Etikettenablöser-Ausgabemodus blinkt die ERROR-LED (Fehler-LED) möglicherweise, wenn ein Etikett den Etikettenablösersensor blockiert. Entfernen Sie in diesem Fall das Etikett. Wenn dies nicht möglich ist, laden Sie das Papier der Etikettenrolle erneut, oder halten Sie die Papiervorschubtaste (FEED) für länger als 1 Sekunde gedrückt, um einen Papiervorschub zu erzwingen.
Reinigen des Thermo-Druckkoptes
 VORSICHT:
Der Thermo-Druckkopt ist nach dem Drucken unter Umständen sehr heiß. Achten Sie darauf, dass Sie ihn nicht versehentlich berühren, und lassen Sie ihn vor dem Reinigen abkühlen. Berühren Sie den Thermo-Druckkopt nicht mit den Fingern oder einem harten Gegenstand, damit er nicht beschädigt wird.
Schalten Sie den Drucker aus, öffnen Sie die Ablöserund die Papierrollenabdeckung. Reinigen Sie die Thermoelemente des ThermoDruckkopfs mittels eines Wattestäbchens, das Sie zuvor mit Alkohol (Ethanol, Methanol oder Isopropanol) befeuchtet haben. Siehe Abbildung K.
EPSON empfiehlt, den Thermo-Druckkopf in regelmäßigen Abständen (normalerweise alle 3 Monate) zu reinigen, um die Druckqualität beizubehalten.
Reinigen der Rolle und des Papierrollenendesensors
Wenn sich Papierstaub auf der Rolle oder dem Papierrollenendesensor angesammelt hat, führen Sie die folgenden Reinigungsschritte durch. Zur Beibehaltung einer guten Druckqualität sollten Sie eine regelmäßige Reinigung durchführen (alle 6 Monate).
1.Schalten Sie den Drucker aus, und öffnen Sie die Abdeckung der Ablöseeinheit und anschließend die Papierrollenabdeckung.
2.Reinigen Sie die Rolle mit einem Wattestäbchen, das leicht mit Wasser oder Alkohol (Ethanol, Methanol oder IPA) befeuchtet ist. Siehe Abbildung L.
TM-P60 mit Etikettenablöser Bedienungsanleitung 23

3.Blasen Sie den um den Papierrollenendesensor angesammelten Staub mit einem Gebläse oder mit Hilfe eines Strohhalms weg, wie in Abbildung M gezeigt.
 VORSICHT:
Wischen Sie den Papierendesensor nicht mit Wasser oder Alkohol ab. Andernfalls kann seine Funktion beeinträchtigt werden.
4.Lassen Sie das Wasser bzw. den Alkohol verdunsten, und schließen Sie die Papierrollenabdeckung.
Reinigen der Ablösereinheit
Nach längerem Benutzen des Etikettenablösers setzt sich der Etikettenklebstoff an den Rollen der Ablösereinheit fest. Wenn Sie die Rollen in einem solchen Zustand belassen, kann sich der Klebstoff an ausgegebenen Etiketten festsetzen, oder es kann ein Papierstau auftreten. Zur Vermeidung von Fehlfunktionen und Beibehaltung guter Druckqualität reinigen Sie die Rollen regelmäßig (alle 20.000 Etiketten).
Die Rollen können leicht unter Zuhilfenahme eines übrig gebliebenen Etiketts gereinigt werden wie in Abbildung O gezeigt.
Hinweis:
Zum Reinigen keine alkoholhaltigen Lösungsmittel verwenden. Derartige Lösungsmittel können in den Rollenschaft eindringen und beim Etikettenablöser eine Fehlfunktion verursachen.
Verwendung verschiedener Papierbreiten
Die Papierrollenführung erlaubt das Verwenden von sechs Papierbreiten zwischen 29,5 mm und 57,5 mm. Wenn Sie die Papierrollenführung entfernen, können Sie auch 59,5 mm wählen.
1.Drücken Sie die Öffnungstaste, um den Ablöserhalter und die Papierrollenabdeckung zu öffnen.
2.Entfernen Sie ggf. die Papierrolle.
3.Heben Sie die Papierrollenführung mit dem Finger an. Entfernen Sie das in einem der Schächte befindliche Oberteil. Siehe Abbildung P.
4.Schieben Sie die Papierrollenführung auf die mit der Papierbreite übereinstimmende Position.
5.Führen Sie die Oberseite der Papierrollenführung ein, und drücken Sie sie hinein, bis sie mit einem Klicken einrastet.
6.Legen Sie die Papierrolle ein. Weitere Informationen erhalten Sie im Abschnitt "Einlegen der Papierrolle".
Hinweis:
Erhöhen Sie die Papierbreite nicht, wenn Sie zuvor ein schmaleres Papier verwendet haben. Die Breite darf nicht erhöht werden, wenn der Drucker bereits benutzt wurde, da bei schmalem Papier ein Teil des Druckkopfes in Kontakt mit der Rolle kommt. Wird anschließend eine breitere Einstellung gewählt, ist der Druckkopf möglicherweise zum Teil abgenutzt, wodurch sich die Druckqualität verschlechtern kann.
24 TM-P60 mit Etikettenablöser Bedienungsanleitung
Loading...