


REVELL Jeff Gordon DuPont 2003 Monte Carlo User Manual [nl, it, gr, da, no, fi, sv, es, pt, hr, et, fi, hu, lv, lt, pl, ro, RU, sr, sk, sl, cs, tr, bg, uk, he, hi, id, kk, ms, fa, th, vi, sq, mk]
KIT 2195 85219500200
Jeff Gordon®
DuPont® 2003 Monte Carlo™
Much has been written and spoken over the last eleven years about Jeff Gordon’s dominance of the NASCAR® Cup division. As of this writing, Jeff is 32 years of age and has already amassed 61 wins, four Cup Championships, two Daytona 500 wins…well, you know, the list goes on for quite a while. The reason this is especially notable and the reason why Jeff’s age is mentioned
is that barring any career ending injury or voluntary exit from the series, it’s generally thought that Jeff still has a good fifteen or more years ahead of him in the driver’s seat. If any driver had a chance to attain the magical eighth Cup Championship that eluded both Richard Petty and the late Dale Earnhardt, it’s Jeff.
Yet, time goes on and Jeff Gordon is no longer the young whiz kid but a seasoned veteran although he’s still younger than the majority of competing drivers. What does the future hold? It’s hard to predict how many more records Jeff can break and how many more races he can win. Jeff’s amazing success over the years has also spurred NASCAR® race team owners to bring in younger and younger drivers to their own programs. Ironically, those young guns
have also shown an amazing ability to quickly acclimate themselves to the difficulties of professional auto racing, winning pole positions and races and providing Jeff Gordon a reason to keep a look out over his shoulder. The new drivers are coming up quickly and they all look to Jeff as their inspiration-and competition.
Jeff can’t rest on his laurels for long and neither can RevellMonogram. While our 1:24 NASCAR® glue kits have long been the leaders of the market, constant changes made by the sanctioning body require us to continue to change and improve our kits for you, our customers. If you have built our race car kits previously, you’ll notice how many changes we’ve made to our Monte Carlo™ stockers. Besides revising the decal sheets to accurately depict how the #24 looks as it streaks across the track and your TV screen during the 2003 season, we’ve also made substantial revisions to the chassis. Look for a more realistic drivers seat, rear springs, front & rear shocks, rear end cooler detail, front engine detail and much more.
* REPEAT SEVERAL TIMES |
* OPTIONAL PARTS |
* DECAL |
* ALTERNATIVE ASSEMBLY |
* CEMENT TOGETHER |
* REMOVE AND THROW AWAY |
* DO NOT CEMENT |
* A REPETER PLUSIEURS FOIS |
* PIECES EN OPTION |
* DECAL COMANIE |
* ENSEMBLAGE ALTERNATIVE |
* A COLLER |
* A RETIRER ET JETER |
* NE PAS COLLER |
|
|
|
|
|
|
|
READ THIS BEFORE YOU BEGIN
*Study the assembly drawings.
*Each plastic part is identified by a number.
*In the assembly drawings, some parts will be marked by a star ( ) to indicate chrome plated plastic.
*For better paint and decal adhesion, wash the plastic parts in a mild detergent solution. Rinse and let air dry.
*Check the fit of each piece before cementing in place.
*Use only cement for polystyrene plastic.
*Scrape plating and paint from areas to be cemented.
*Allow paint to dry thoroughly before handling parts.
*Any unused parts may be discarded.
DECAL APPLICATION INSTRUCTIONS
1.Cut desired decal from sheet.
2.Dip decal in water for a few seconds.
3.Place wet decal on paper towel.
4.Wait until decal is movable on paper backing.
5.Place decal in position on model, face up and slide backing away.
6.Press out air bubbles with a soft damp cloth.
7.Milkiness that may appear is for better decal adhesion and will dry clear. Wipe away any excess adhesive.
8.Do not touch decal until fully dry.
9.Allow the decals 48 hours to dry before applying clear coat.
NOTE: Decals are compatible with setting solutions or solvents.
LIRE CE QUI SUIT AVANT DE COMMENCER
*Etudier les schémas de montage.
*Chaque pièce en plastique est identifiée par un numéro.
*Sur les schémas de montage, certaines pièces sont marquées d'une étoile ( ) pour indiquer qu'elles sont en plastique chromé.
*Pour une meilleure prise de la peinture et des autocollants, laver les pièces en plastique avec une solution détergente peu concentrée. Les rincer et les laisser sécher à l'air.
*Vérifier que chaque pièce s'ajuste bien avant de la coller en place.
*N'utiliser que de la colle pour polystyrène.
*Gratterlespartiesàcollerpourenleverlechromeetlapeinture.
*Laisser la peinture bien sécher avant de manipuler les pièces.
*Toute pièce inutilisée peut être jetée.
DIRECTIVES D'APPLICATION DES AUTOCOLLANTS
1.Découper l'autocollant désiré de la feuille.
2.Tremper l'autocollant dans de l'eau pendant quelques secondes.
3.Placer l'autocollant mouillé sur une serviette en papier.
4.Attendez que l'autocollant puisse être déplacé sur son support en papier.
5.Mettre l'autocollant en position sur le modèle face sur le dessus et faire glisser le support pour l'enlever.
6.Appuyeravecunchiffondouxhumidepouréliminerlesbullesd'air.
7.La substance laiteuse qui peut apparaître est destinée à améliorer l'adhésion de l'autocollant et devient incolore au séchage. Essuyer pour enlever tout excédent d'adhésif.
8.Ne pas toucher l'autocollant tant qu'il n'est pas bien sec.
9.Laisser l'autocollant sécher pendant 48 heures avant d'appliquer une couche transparente.
REMARQUE: Les autocollants sont compatibles avec les solutions de fixage ou les solvants.
This paint guide is provided to complete this kit as shown on the box.
Ce guide de peinture est fourni pour reproduire le modèle réduit qui apparaît sur la boîte.
Aluminum |
Aluminium |
|
|
Dark Gray |
Gris foncé |
|
|
Flat Black |
Noir mat |
|
|
Flat Red |
Rouge mat |
|
|
Flat White |
Blanc mat |
|
|
Gloss Black |
Noir brilliant |
|
|
Gloss Blue Metallic |
Bleu brilliant metallisé |
|
|
Gloss Gray |
Gris brilliant |
|
|
Gloss Red |
Rouge brilliant |
|
|
Gold |
Or |
|
|
Gunmetal |
Bronze |
|
|
Jet Exhaust |
Flux d’éjection |
|
|
Semigloss Black |
Noir satiné |
|
|
If you have any questions or comments, call our hotline at: (800) 833-3570 or, please write to:
Revell-Monogram Consumer Service Department, 725 Landwehr, Northbrook, Illinois 60062
Be sure to include the plan number (85219500200), part number, description, your return address and phone number.
Visit our website: www.revell-monogram.com
REVELL-MONOGRAM, LLC Northbrook, IL. Copyright © 2003. All rights reserved.
1 |
ENGINE ASSEMBLY |
|
|||
A |
|
|
B |
|
|
|
|
|
|
19 |
|
5 |
|
|
|
CARBURETOR |
|
|
|
|
|
|
|
RIGHT ENGINE |
|
|
|
ALUMINUM |
|
|
|
|
|
|
|
BLOCK HALF |
|
|
|
|
98 |
ALUMINUM |
|
|
|
|
DISTRIBUTOR |
|
|
|
|
|
ALUMINUM |
|
|
75 |
77 |
|
11 |
|
|
RIGHT HEADER |
|||
|
|
INTAKE |
|||
|
|
LEFT ENGINE |
JET EXHAUST |
|
|
|
|
|
MANIFOLD |
||
|
|
BLOCK HALF |
|
|
|
|
|
|
|
ALUMINUM |
|
|
|
ALUMINUM |
|
|
|
|
|
|
|
|
|
|
ENGINE |
8 |
|
|
|
|
BLOCK |
VALVE COVER |
|
|
|
|
ASSEMBLY |
ALUMINUM |
106 |
|
|
|
|
|
|
|
|
|
|
|
ALTERNATOR |
|
|
|
|
|
ALUMINUM |
|
|
8 |
|
|
|
|
|
VALVE COVER |
|
|
|
|
|
ALUMINUM |
|
|
|
|
|
|
|
9 |
|
104 |
|
|
CYLINDER |
|
POWER |
76 |
|
|
|
HEAD |
STEERING PUMP |
||
|
|
LEFT HEADER |
|||
|
ALUMINUM |
102 |
ALUMINUM |
||
|
JET EXHAUST |
||||
|
|
|
BELT |
|
|
|
|
|
|
|
|
9 |
7 |
|
FLAT BLACK |
|
|
|
|
|
|
||
OIL PAN |
|
|
|
|
|
CYLINDER |
|
103 |
|
|
|
ALUMINUM |
|
|
|
||
HEAD |
|
|
|
||
|
|
OIL PUMP |
|
|
|
ALUMINUM |
|
|
|
|
|
|
|
BELT |
|
|
|
|
|
|
|
|
|
|
|
|
FLAT BLACK |
|
|
2 |
CHASSIS ASSEMBLY |
|
|||
A |
|
|
28 |
|
|
|
|
|
FIREWALL |
|
|
|
|
|
GLOSS GRAY |
|
|
|
|
|
(SHADED AREA |
|
|
|
|
|
ALUMINUM) |
|
|
|
26 R |
|
|
|
|
|
RIGHT |
|
|
|
27 |
|
UPPER A-ARM |
|
|
|
|
|
|
|
|
CHASSIS |
|
|
GLOSS GRAY |
|
|
|
|
|
|
|
|
GLOSS GRAY |
|
|
|
|
|
|
|
|
|
|
26 L |
|
|
|
|
|
LEFT |
|
|
|
|
|
UPPER A-ARM |
|
|
|
|
|
GLOSS GRAY |
|
|

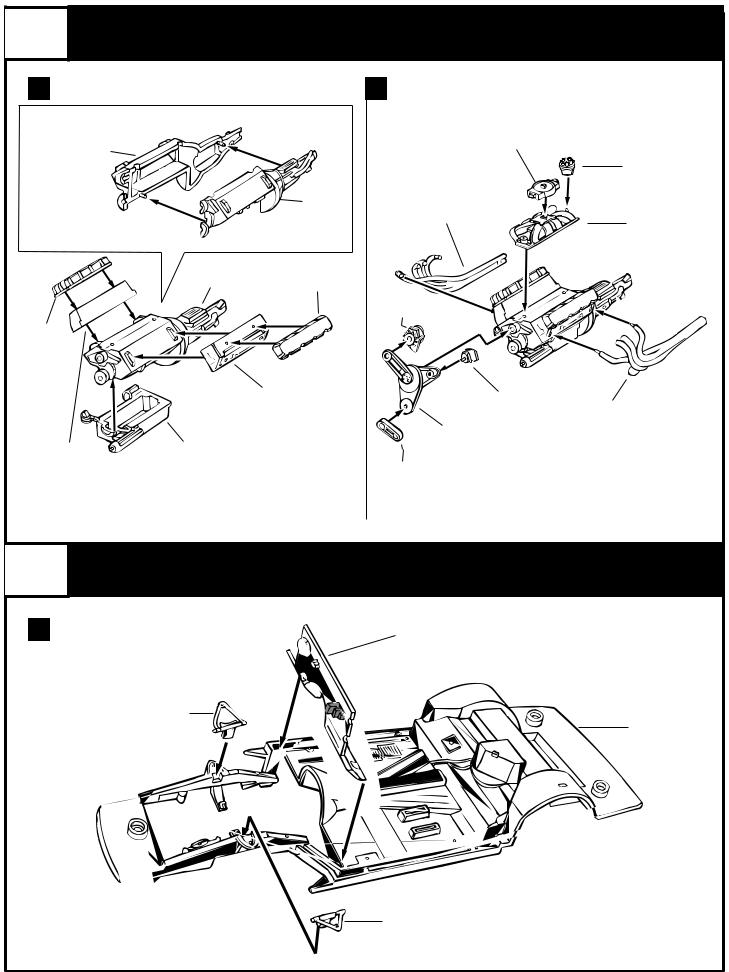
2CHASSIS ASSEMBLY CONTINUED
B
|
96 |
|
|
HEADREST |
|
|
FLAT BLACK |
|
|
95 |
|
30 |
SEAT |
|
FLAT BLACK |
||
RIGHT SIDE |
||
|
||
ROLLCAGE |
|
|
GLOSS GRAY |
|
32 REAR
ROLLCAGE
GLOSS GRAY
(PAINT SHADED AREA GLOSS RED)
48 SHIFTER
GLOSS GRAY
(PAINT KNOB GLOSS WHITE)
C
34 CROSSBAR
GLOSS GRAY
(PAINT LIGHT SHADED AREAS SEMI-
GLOSS BLACK. PAINT DARK SHADED
AREAS ALUMINUM)
CROSSBAR SHOWN IN POSITION
 Loading...