

ResMed VPAP Auto, VPAP ST, VPAP S User Manual

VPAP™ Auto
VPAP™ ST
VPAP™ S
POSITIVE AIRWAY PRESSURE DEVICE
H5i™
HEATED HUMIDIFIER
Welcome Guide
English

Welcome
Thank you for choosing the S9 VPAP Series or H5i. Before operating these devices, please read the entire Welcome and Information Guides.
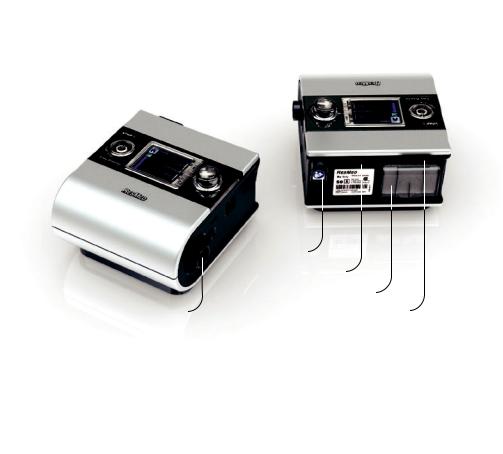
DC power inlet |
|
|
|
|
Module/Adapter port |
||
|
|
|
Air filter |
Air outlet |
|
|
SD card slot |
S9 at a glance |
|
|
|
The S9 system comprises the following elements: |
|
|
|
• S9 device • Air tubing • 90W power supply unit |
• S9 Travel bag |
• |
SD card • S9 SD card protective |
folder. |
|
|
|
Optional components include: |
|
|
|
• H5i heated humidifier • Standard air tubing • SlimLine air tubing |
• |
3m air tubing • ClimateLine |
|
heated air tubing • ClimateLineMAX heated air tubing |
• 30W power supply unit (does not support H5i) |
||
• Power Station II battery pack • DC/DC Converter 24V/90W. |
|
|
|
Traveling with the S9
When traveling with your S9 only:
•Ensure you pack the SlimLine or Standard air tubing as the ClimateLine or ClimateLineMAX heated air tubing is not designed to connect directly to the device.
•Please ensure you purchase and travel with the approved power cord for the region where you will be using the device.
1 English
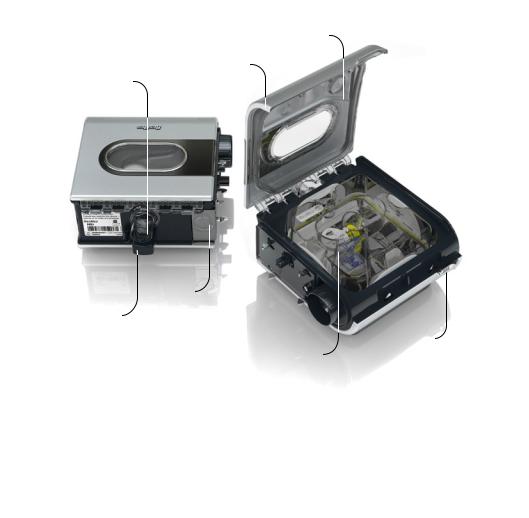
Flip lid seal
Flip lid
Air outlet
|
Release |
|
button |
ClimateLine or |
|
ClimateLineMAX |
|
connection port |
Latch |
|
H5i water tub |
H5i at a glance
The H5i system comprises the following elements:
• H5i heated humidifier • H5i standard water tub • ClimateLineMAX heated air tubing (if sold as a Climate Control Kit).
Optional components include:
• ClimateLine heated air tubing • H5i cleanable water tub.
Traveling tips
When moving or traveling with your H5i:
•Ensure that the water tub is empty.
•Disconnect the H5i from the S9 by using the release button.
2
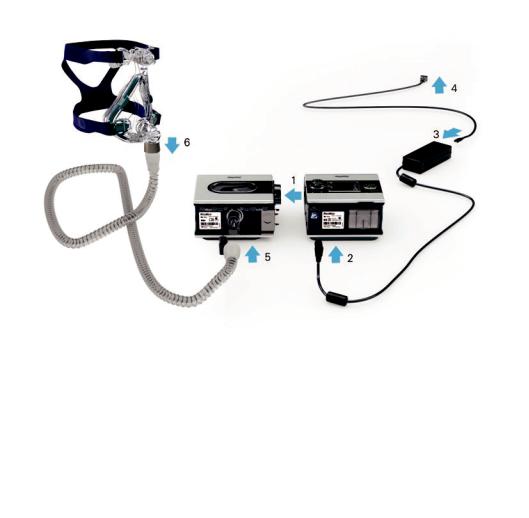
Setup
1.Align your H5i with your S9 and push them together until they click into place.
2.Connect the DC plug of the power supply unit to the rear of the S9.
3.Connect the power cord to the power supply unit.
4.Plug the other end of the power cord into the power outlet.
5.Connect one end of the air tubing firmly onto the air outlet.
6.Connect the assembled mask system to the free end of the air tubing.
Notes:
•• Always ensure that the S9 and H5i are placed on a stable, level surface for proper operation.
•• Place the power supply unit away from the H5i to allow for adequate ventilation.
•• For more information on assembling your mask see your mask user guide.
•• Recommended masks are available on www.resmed.com on the Products page under Service & Support.
3 English
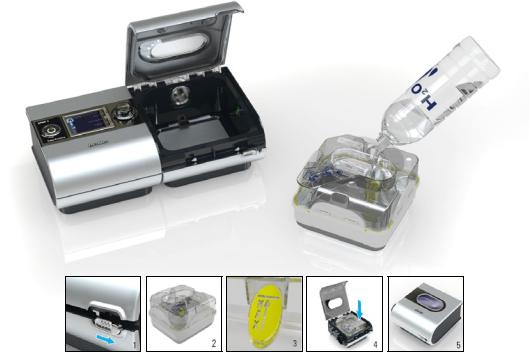
Filling the water tub
1.Slide the latch and lift open the flip lid.
2.Remove the water tub.
3.Fill the water tub (through the center hole) with distilled or deionized water up to the maximum water level mark (380 mL).
4.Return the water tub to the H5i.
5.Close the flip lid ensuring that it clicks into place.
4
 Loading...