


Use & Care Guide
®
®
MC
Precision®
Beard & Mustache Trimmer
Use & Care Manual
Thank you for purchasing a Precision® Beard and Mustache Trimmer from Remington®.
Inside you will find tips on using and caring for your trimmer to help you look your best.
Models:
MB-10
MB-30
MB-35
MB-40
MB-45
MB-50
IMPORTANT SAFETY
INSTRUCTIONS
When using your Beard & Mustache Trimmer, basic precautions should always be observed, including the following. Read all instructions before using this trimmer.
DANGER
To reduce the risk of electric shock:
■Do not reach for a trimmer that has fallen into water. Unplug immediately.
■Do not use while bathing or in a shower.
■Do not place or store trimmer where it can
fall or be pulled into a tub or sink. Do not place in or drop into water or other liquid.
■Except when charging, always unplug this trimmer from the electrical outlet immediately after using.
■Unplug this trimmer before cleaning.
WARNING
To reduce the risk of burns, fire, electric shock, or injury:
■Your trimmer should never be left unattended when plugged in, except when charging your rechargeable trimmer.
■Close supervision is necessary when this trimmer is used by, on, or near children or invalids.
■Use this trimmer only for its intended use as described in this manual. Do not use attachments not recommended by the manufacturer.
■Keep the cord away from heated surfaces.
■Never operate this trimmer if it has a damaged cord or if it is not working properly, if it has been dropped or damaged, or dropped into water. Return the trimmer to a service center for examination and repair.
■Never drop or insert any object into any opening.
■Do not use outdoors or operate where aerosol (spray) products are being used or where oxygen is being administered.
■Do not use this trimmer with a damaged or broken cutting unit, as facial injury may occur.
■Always attach plug to trimmer, then adapter to outlet. To disconnect, turn all controls to OFF, then remove adapter from outlet, then detach power cord from the trimmer for storage.
■Always store your trimmer and adapter in a moisture-free area. Make sure the cord is disconnected from the trimmer.
■Dispose of used batteries properly. Do not incinerate. Batteries may explode if overheated. Do not wrap in metal or aluminum foil. Wrap in newspaper before discarding. It is suggested that you contact local town/city officials to determine proper battery redemption site(s)
in your area.
■Do not attempt to recharge alkaline, heavyduty, or regular batteries in a nickel-cadmium battery charger.
■For household use only.
SAVE THESE
INSTRUCTIONS

Your New Trimmer
Before Using Your Trimmer
■Beard, mustache, or sideburn hairs should be dry. Avoid using lotions before using your trimmer.
■Be certain trimmer guard is at the desired setting. When first using, you may want to begin on a higher setting (#9- longest hair) to prevent trimming off too much hair initially.
■For first-time use, or if the trimmer has not been used for a long period of time, for the MB-30,35,40, 45 and 50, you will need to charge the batteries
for 14-16 hours to enjoy the full capacity of cordless operation. After first use, the MB-50 can be recharged in 1 to 3 hours.
■Use only the adapter provided with unit.
■Comb hairs outward so they are at their maximum height and facing in the same direction.
■Clean cutter blades regularly (see Maintenance section).
■Never use trimmer with a damaged or broken cutter unit.
For assistance or help, call our customer service at 1-800-736-4648.
MB-10/30/35/40/45/50
Permanently lubricated cutting blades
Pop-up miniature |
Cleaning |
Styling comb |
mustache trimmer |
|
|
brush |
|
|
(rear of unit) |
|
|
(MB-40, MB-45 & |
|
|
MB-50) |
|
|
Adapter plug/cord
MB 60
Product Features
Length
Position
Indicator
LED Indicators (MB-30, MB-35, MB-40, MB-45, MB-50)
Adapter Socket (MB-30, MB-35, MB-40, MB-45, MB-50)
Battery Compartment (MB-10)
9Position “Zoom” Wheel
Soft touch “no slip ”side grips
Removable trimmer guard attachment
Cord/cordless or rechargeable adapter cord
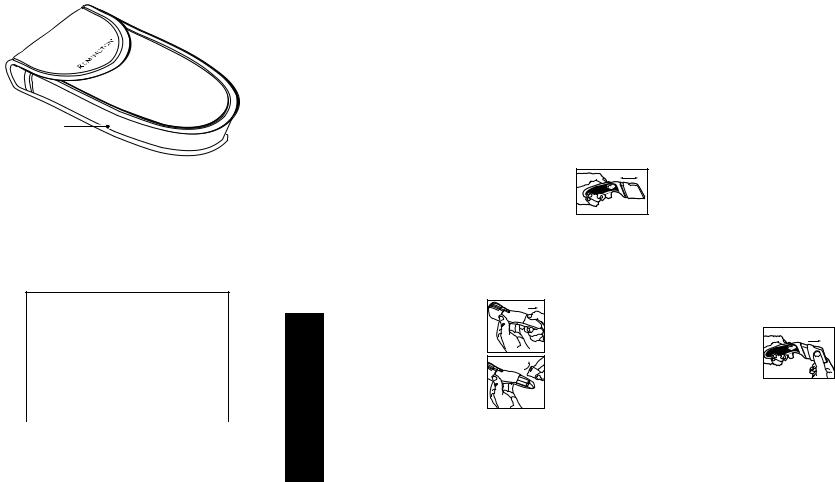
Storage pouch (MB-30, MB-40, MB-50)
Which model is yours?
MB-50 |
Adapter provides AC operation for corded |
MB-45 |
use or recharges battery for cordless use. |
MB-40 |
|
|
|
MB-30 |
Cordless rechargeable operation. Adapter |
MB-35 |
recharges battery only for cordless use. |
|
|
|
|
MB-10 |
Battery operated (“AA” alkaline only) |
|
|
Operating Your Trimmer
Charging/Recharging
(MB-30, MB-35, MB-40, MB-45, MB-50)
To recharge these models, use only the charging adapter provided.
■Turn the trimmer off. Insert the adapter plug into the bottom of the trimmer, then plug the adapter into an electric wall outlet. The charging indicator will glow green, indicating unit is charging.
A full charge will take approx. 14-16 hours for MB-30, MB-35 MB40, MB-45 and three hours for the MB-50.
■Your trimmer cannot be overcharged. You may leave it plugged in between uses. However, if the trimmer is not going to be used for an extended period (2 weeks), unplug the unit and recharge when resuming use.
■Charge the trimmer at temperatures between 40 – 90°F,
to avoid adversely affecting battery life.
Corded Rechargeable Operation
(MB-30, MB-35)
The MB-30 and Mb-35 are designed for cordless operation only. Plugging in the adapter cord will not provide power to the trimmer, but only recharge the batteries.
Batteries (MB-10 only)
Your trimmer requires 2 “AA” alkaline batteries.
■Be sure the trimmer is turned off.
■Hold the trimmer with the bottom end slightly above the top end. Depress the two locking tabs on the
front and back covers and pull the battery cover off the bottom of the unit.
■ Insert batteries so that the (+) and (-) marks on the batteries face the same
marks in the battery compartment.
■ Replace the battery cover by sliding it back on the end of the trimmer until it seats with an audible “click.”
NOTE: trimmer will not operate if batteries are inserted incorrectly.
NOTE: Battery cover only fits one way. If the cover does not go on correctly, turn it around.
Hair Length Selector and Removable Trimmer Guard Attachment
NOTE: trimmer guard must be attached to the trimmer in order to use the hair length selector.
The hair length selector and trimmer guard
attachment ensures precise trimming and has nine adjustable positions:
Setting |
Beard Style |
Length |
|
1 |
Stubble look |
1.5 mm |
0.06" |
2 |
|
2.5 mm |
0.1" |
3 |
Short |
4 mm |
0.16" |
4 |
|
5.5 mm |
0.22" |
5 |
Medium |
7 mm |
0.28" |
6 |
|
9 mm |
0.35" |
7 |
|
11 mm |
0.43" |
8 |
Long |
14 mm |
0.55" |
9 |
|
18 mm |
0.71" |
|
■ To adjust, roll the “Zoom Wheel” toward the top of |
||
|
the trimmer to adjust for longer length, and toward |
||
|
the bottom of the trimmer for shorter length. |
||
|
The wheel will click into one of nine positions. |
||
■ Begin trimming at one of the longest settings |
|
|
|
(#8 or #9 to avoid accidentally trimming hair too short). As you become |
|||
familiar with the settings, you can then select your desired length setting.
Trimmer Guard Attachment
Remove trimmer guard attachment if you are: defining hairline edges such as sideburns, trimming the nape of your neck, trimming your beard line on front of neck, or if you want to clean cutter assembly.
To remove:
■Be sure the trimmer is in OFF position.
■While holding trimmer in one hand, and holding
the “Zoom Wheel” to prevent it from turning, gently pull the trimmer guard attachment away from the trimmer. The guard can be removed and replaced on any setting.
To replace:
■Be certain trimmer is in OFF position.
■While holding the trimmer in one hand, and holding the “Zoom Wheel” to prevent it from turning, slide the guard over the top of the trimmer until it “clicks” into position.
NOTE: the trimmer guard attachment can only be placed on the trimmer one way; if it does not fit properly, remove and reverse it.
Trimming Beards
■Before you begin, comb your hair in the direction that it grows so that the hairs are at their maximum height and facing in the same direction.
■Determine how much hair you want to cut and position the hair
length selector accordingly. Remember, until you are familiar with using the trimmer, it’s always better to select a longer hair setting initially in order not to trim too much hair.
■Turn the unit’s power switch to ON, and begin trimming.
■When finished trimming, turn the unit’s power switch to OFF.
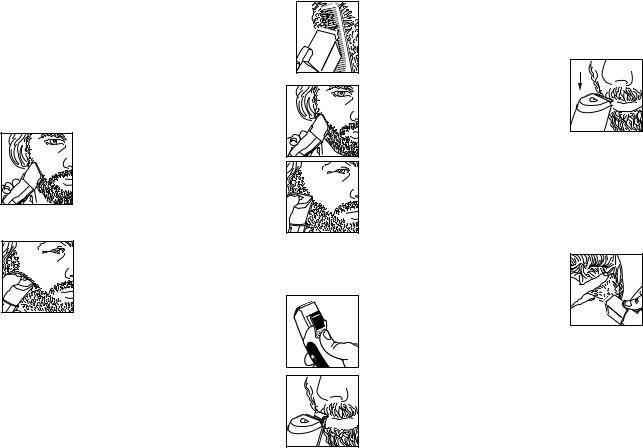
To Trim the Beard’s Hair Length
■ Trimmer guard attachment is on.
■Turn the trimmer so the front of the cutting unit (“Zoom Wheel” side) is facing away from you.
■Start trimming under your chin and, following your jaw-
bone line, work toward your ear and upper beard line using an upward motion. Allow the hair length selector attachment to follow the contours of your face. You may trim either against or with the direction of beard growth, whichever is preferred.
To Define the Beard Line
■Remove trimmer guard attachment.
■Hold trimmer vertically with trimmer cutting blades
facing you.
■ Start with edge of beard line, and with the cutting blades resting lightly against your skin, use motions towards edge of beard line to trim the beard line to desired location in facial area and away from beard in neck area.
To Thin and Taper the Beard
■ Trimmer guard attachment is off.
■ Use the unit’s styling comb or a small comb to comb and hold the beard hairs in place while trimming. ■ Holding the trimmer horizontally with the cutting unit facing away from you, move the trimmer along the length of the comb.
Creating the “Stubble Look”
■ Trimmer guard attachment should be
on and set to position 1 (1.5 mm) or 2 (2.5 mm). ■ Hold trimmer horizontally with the cutting unit facing either up or down.
■ Trim hairs using an upward or downward motion against or with the direction of hair growth, whichever is preferred.
■ For an even closer “stubble look,” remove the hair length selector attachment and repeat the previous two steps. However, caution must be taken not to remove too much hair, creating a “blotchy” look.
To Trim Mustache and Sideburns
with the Pop-Up Trimmer (MB-40, 45 & 50) The small size of this trimmer makes edging and defining mustaches and cutting stray hairs quick and easy.
■ Comb hairs outward so they are at their maximum height.
■ Open the pop-up trimmer by sliding the trimmer switch upward.
■Hold trimmer perpendicular, as shown, to achieve desired line above the lip.
■Trim any stray hairs.
Attention: Main cutter is still operating while pop-up trimmer is in use.
■ Close trimmer by sliding trimmer switch down. ■ Turn trimmer OFF.
Without trimmer guard attachment
■Remove trimmer guard attachment.
■Place a finger on upper lip only to lift hair up, away from skin.
■Trim hairs using an upward motion.
■After achieving desired length, use a downward motion to blend mustache hairs.
NOTE: Use slow and light pressure. Too much pressure may trim off more hair than desired.
■ Turn trimmer off.
To trim sideburns
■Comb sideburns following the direction of your hair growth.
■Be certain trimmer guard attachment is ON.
■Hold trimmer vertically with front of trimmer facing you.
■Trim sideburns using a downward motion.
■Turn trimmer OFF.
Trimming the Nape of Your Neck
■You will need a hand mirror for this operation if performing it alone. The mirror is not necessary if trimming is performed by a second person.
■Remove the hair length selector attachment.
■Use your fingers to lift the hair at the base of your head up off the neck. Your index finger should be covering the roots of the hairs you are lifting to prevent accidental removal by trimmer.
■ Using your other hand, hold the trimmer horizontally to the base of your neck with the cutting unit facing up, and move the trimmer along the length of
the neck until the unit touches your finger covering the hair roots at the base of your head. Repeat this procedure for the entire area of the neck. Be sure to
move the unit slowly when performing this operation and to keep the hair roots at the base of your head out of the way of the trimmer.
■ Use the hand mirror to inspect the results of the operation and ensure all hairs along the nape of the neck have been trimmed.
Cleaning & Maintenance
Cleaning and Maintaining Your Trimmer
Your trimmer is fitted with high-quality hardened steel or ceramic cutting blades that are permanently lubricated. Cleaning should only be done with a soft brush, such as the brush supplied with the unit.
Clean your trimmer regularly to ensure that the unit’s operating life is not prematurely shortened.
■Unplug adapter from wall outlet (MB-30, MB-35, MB-40, MB-45 & MB-50).
■Do not apply pressure or hard objects to the cutters.
■Do not use liquid cleaners on the cutters or harsh or corrosive chemicals on the unit’s main body.
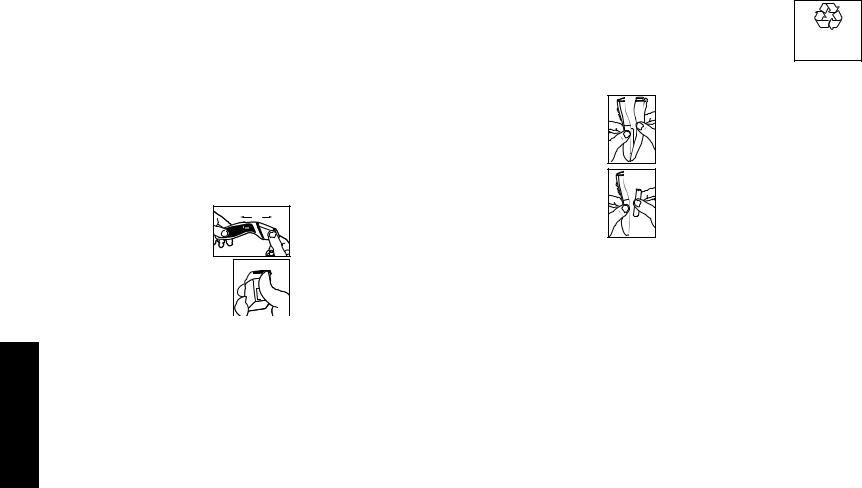
Weekly
Trimmer should always be shut off. Remove trimmer guard attachment from trimmer. Shake or blow out any accumulated hairs.
Main trimmer
1. Flip the blades open by pushing upward
on the cutter teeth. The
cutter assembly will swing up and the underside of the cutter assembly will be accessible. 2. Blow out any
loose hair that has accumulated. Brush out any  remaining hair from the cutter teeth and hair
 pocket with the brush
  provided. Do not rinse the cutter
  assembly under water or use cleaning fluids, which
could remove the lubrication.
Miniature Trimmer (MB-40, MB-45, MB-50)
■Flip the miniature trimmer up into operating position.
■Brush any hair from the trimmer blades and blow out any hairs from the recess that holds the trimmer in retracted position.
Troubleshooting (MB-30, MB-35, MB-40, MB-45, MB-50)
The trimmer does not work when turned on:
■Trimmer must be charged for a full 14-16 hours- MB-30, MB-35, MB40 and MB-45 (3 HRS for MB-50).
■Contact an authorized Remington Service Center regarding
battery replacement (see enclosed card for the nearest location).
Trimmer cutters do not move:
■The cutting unit may be dirty and clogged. Clean the unit as directed in Cleaning & Maintenance section.
Trimmer does not hold charge:
■Fully discharge battery by running trimmer until it stops; then follow recharging instructions (see section on To Charge/Recharge). If time between recharging cycles does not increase, battery may need replacing. Contact an authorized Remington Service Center (see separate card in this package for the location nearest you).
Troubleshooting (MB-10)
The trimmer does not work when turned on:
■Be certain batteries have been properly installed. Trimmer will not operate unless batteries are correctly positioned.
■If battery power has been depleted, replace with 2 “AA” alkaline batteries (see Battery section).
■Contact an authorized Remington Service Center regarding battery replacement (see enclosed card for the nearest location).
Trimmer cutters do not move:
■The cutting unit may be dirty and clogged. Clean the
unit as directed in Cleaning and Maintenance section.
You need help…
service information or locations:
Call 1-800-736-4648 for the authorized Remington Service Center closest to you or contact one of the Remington Service Centers provided on the enclosed card accompanying this package.
If the MB-50 trimmer requires charging, but the charger light does not glow when the charging adapter is connected, the batteries may have been severely discharged or not recharged for a long period of time. Connect the charger to the trimmer and plug the charger into a 120 VAC outlet. After three minutes, turn ON/OFF switch on, then off. Continue to charge the trimmer for 24 hours.
Battery Removal
(MB-30, MB-35, MB-40, MB-45, MB-50)
When your rechargeable Beard & Mustache Trimmer reaches the end of its useful life, the batteries must be removed from the shaver and recycled or disposed of properly in accordance with your local and state requirements.
Ni-Cd
CONTAINS NICKEL-
CADMIUM BATTERY.
BATTERY MUST BE RECYCLED OR DISPOSED OF PROPERLY.
The following procedure should be followed for battery removal:
■ Make sure your trimmer is unplugged from any
outlets so you don’t risk an electric shock.
■ Remove the trimmer guard as instructed in the section Removing Trimmer Guard Attachment.
■Using a small Phillips head screwdriver, remove the four screws from the trimmer (2 in back, 2 under the comb).
■Pull or gently pry the trimmer halves apart,
exposing the batteries.
■ Lift the rubber side panels from their cradles and put them aside.
■Pull or pry batteries from PC board.
■Twist batteries to break wires. Wires may also be cut.
CAUTION: THESE NICKEL-CADMIUM BATTERIES MUST BE RECYCLED OR DISPOSED OF IN ACCORDANCE WITH STATE AND LOCAL REGULATIONS. Do not burn or mutilate, as they may burst or release toxic materials. Do not short-circuit, as this may cause burns.
Warranty Service
Remington® Money-Back Offer
You have just bought one of the finest trimmers available today. If for any reason within 30 days of purchase of your Remington® Precision® Trimmer you are not satisfied with your trimmer and would like a refund, just return your trimmer, together with the sales receipt, to the retailer from whom you purchased it. Remington will reimburse all retailers who accept trimmers within 30 days of purchase. If you have any questions regarding this money-back guarantee, please call 800-736-4648 in the United States or 888 277-6333 in Canada.
Full Two-Year Warranty
Remington warrants that your product, except as noted below, is, on date of purchase, free from defect in material and workmanship. Remington will correct any such defect without charge if you return the complete product either in person or by mail, postage paid, to a Remington Company-owned Service Center or Authorized Service Dealer within two years after the date of purchase with the returned item.
Do not return the product to the retailer from whom the product was purchased.
This warranty does not cover damage by accident, misuse, abuse or by affixing an unauthorized accessory or alteration to the product, or by connection of the product to any but the specific current and voltage indicated in an accompanying instruction booklet, or by any other conditions beyond our control. REMINGTON SHALL NOT BE RESPONSIBLE FOR ANY INCIDENTAL, SPECIAL OR CONSEQUENTIAL DAMAGES.
IN ADDITION, THIS WARRANTY DOES NOT COVER THE TRIMMER BLADE ON OUR BEARD AND MUSTACHE TRIMMERS.
For questions or comments, please write:
Remington Products |
Remington Products (Canada) Inc. |
Company, L.L.C. |
61 Amber Street |
20 Constitution BLVD. South |
Markham, Ontario |
P.O. Box 884 |
Canada L3R 3J7 |
Shelton, CT 06484-0884 |
Attn: Consumer Affairs |
Attn: Customer Service |
|
Performance Guarantee
ALL IMPLIED WARRANTIES INCLUDING BUT NOT LIMITED TO IMPLIED WARRANTIES OF FITNESS AND MERCHANTABILITY, ARE LIMITED IN DURATION TO TWO YEARS FROM DATE OF ORIGINAL PURCHASE.
This warranty gives you specific legal rights, and you may also have other rights that vary from state to state. Some states do not allow the exclusion limitation of incidental or consequential damages or limitations on how long an implied warranty lasts, so that the above limitations and exclusions may not apply to you.
No responsibility, obligation, or liability is assumed for the installation or maintenance of this product. Warranty service must be performed by a Remington Company-owned Service Center or Authorized Service Dealer and damage or loss of any kind resulting from servicing by any other person is not covered under warranty. Enclosed is a listing of Company-owned Service Centers. Authorized Service Center Dealers may be found in the yellow pages of your directory. If you wish, you may mail the product, postpaid, to Remington Products Company, 60 Main Street, Bridgeport, CT 06604 Attention: Service Department.
U.S. Warranty Service
In the United States, service is provided by our Company-owned Service Centers and over 300 Authorized Service Dealers.
For the address of your nearest Authorized Service Dealer, please consult the Yellow Pages under “Shaver - Electric - Repair.” If you wish, you may mail the product,
postpaid, to Remington Products Company L.L.C., 60 Main Street, Bridgeport, CT 06604, Attention: Service Department.
International Warranty Service
Service under the Remington warranty can be obtained outside the United States by Remington-Authorized Distributors and Service Dealers. Please consult your local telephone directory for the nearest location.
The EPA-certified RBRC® Battery Recycling Seal on the nickel-cadmium (Ni-Cd) battery indicates Remington Products Company, L.L.C. is voluntarily participating in an industry program to collect and recycle these batteries at the end of their useful life, when taken out of service in the United States or Canada. The RBRC® program provides a convenient alternative to placing used Ni-Cd batteries into the trash or the municipal waste stream, which may be illegal in your area. Please call 1-800- 8-BATTERYSM for information on Ni-Cd battery recycling
and disposal bans/restriction in your area. Remington Products Company, L.L.C.’s involvement in this program is part of our commitment to preserving our environment and conserving our natural resources.
Questions or Comments: Please call 800-736-4648 inthe U.S. or 888 277-6333 in Canada.
Visit us at www.remington-products.com
®
Remington and Precision are trademarks of Remington Corporation, L.L.C. in the United States. Remington is a trademark of Remington Corporation, L.L.C. in Canada.
© 2003 R.P.C, L.L.C. Job #GO3-017 4/03 P/N 13708
MB-30 – U.S. design patent: 454,979. Canadian design patent 96,794. MB-40/50 – U.S. design patent: 454,978. Canadian design patent 96,929.
Remington Products Company, L.L.C. |
Remington Products (Canada) Inc. |
60 Main Street |
61 Amber Street |
Bridgeport, CT 06604 |
Markham, Ontario L3R 3J7 |
MADE IN CHINA |
|
 Loading...