


Remington HC-810, HC-815, HC-8017, HC-912, HC-920 User Manual
...G03-038 Haircut Kit I.B. 9/1/05 9:34 AM Page 1
®
®
TRIMMING
Use and Care Guide
A Superior
Cut Every
Time
Models HC-810, HC-815, HC-8017, HC-912, HC-920, HC-921, HC-930
G03-038 Haircut Kit I.B. 9/1/05 9:34 AM Page 2
IMPORTANT SAFETY
INSTRUCTIONS
When using an electrical appliance, basic precautions should always be observed, including the following.
Read all instructions before using this appliance.
DANGER
To reduce the risk of electric shock:
■Do not reach for an appliance that has fallen into water. Unplug it immediately.
■Do not use while bathing or in the shower.
■Do not place or drop into water or other liquid.
■Do not place or store this appliance where it can fall or be pulled into a tub or sink.
■Except when charging, always unplug this appliance from the electrical outlet immediately after using.
■Unplug this appliance before cleaning it.
WARNING
To reduce the risk of burns, fire, electric shock or injury to persons:
■This appliance is for household use only.
2
■An appliance should never be left unattended when it’s plugged in, except when charging a rechargeable appliance.
■Close supervision is necessary when this appliance is used by, on, or near children or invalids.
■Use this appliance only for its intended use as described in this manual. Do not use attachments not recommended by Remington.
■Keep the cord away from heated surfaces.
■Never operate this appliance if it has a damaged cord or plug, if it is not working properly, if it has been dropped or damaged, or if it has been dropped into water. If any
of these things happen, return the appliance to a Remington authorized service center for examination and repair.
■Never drop or insert any object into any of the appliance’s openings.
■Do not use outdoors or operate where aerosol (spray) products are being used, or where oxygen is being administered.
■Always store this appliance and cord in a moisture-free area. Do not store it in temperatures exceeding 140°F (60°C).
■Do not plug or unplug this appliance when your hands are wet.
■Do not use an extension cord or a voltage converter with this appliance.
■Do not wrap the cord around the appliance.
■Always attach the plug to the appliance, then to the outlet. To disconnect, turn all controls to OFF, then remove plug from outlet. Detach removable power cords from appliances for storage.
■Do not place this appliance on any surface while operating.
■This appliance has a polarized plug (one blade is wider than the other). As a safety feature, this plug will fit in a polarized outlet only one way. If the plug does not
fit fully in the outlet, reverse the plug. If it still does not fit, contact a qualified electrician. Do not attempt to defeat this safety feature.
■Do not use this appliance with a damaged or broken cutting unit, as injury may occur. Always make certain blades are aligned properly.
■This clipper is designed for use with 110-120 Volts AC, 60 HZ electrical outlets. Do not connect the clipper to a higher voltage than indicated, as it may result in personal injury and/or damage to the clipper.
■This appliance does not contain any user-serviceable parts. Bring this appliance to an authorized service representative for service.
SAVE THESE INSTRUCTIONS
Contents
English ................................ |
2 |
Spanish ........................... |
13 |
French .............................. |
25 |
3

G03-038 Haircut Kit I.B. 9/1/05 9:34 AM Page 4
Product Features
Congratulations on your purchase of one of the finest hair clippers available today. Your Remington® hair clipper is designed to perform dependably and efficiently for years, helping you maintain a range of hair styles.
Part |
Unit: |
HC-810 |
HC-815 |
HC-8017 |
HC-912 |
HC-920 |
HC-921 |
HC-930 |
|
|
|||
1. |
Hair Clipper |
|
x |
|
x |
x |
x |
x |
x |
x |
|
|
|
2. |
Blade Guard |
|
x |
|
x |
x |
x |
x |
x |
x |
|
|
|
3. |
1/8" Guide Comb |
|
x |
|
x |
x |
x |
x |
x |
x |
|
|
|
4. |
1/4" Guide Comb |
|
x |
|
x |
x |
x |
x |
x |
x |
|
|
|
5. |
3/8" Guide Comb |
|
x |
|
x |
|
|
x |
x |
x |
|
|
|
6. |
1/2" Guide Comb |
|
x |
|
x |
x |
x |
x |
x |
x |
|
|
|
7. |
5/8" Guide Comb |
|
|
|
|
x |
|
x |
x |
x |
|
|
|
8. |
3/4" Guide Comb |
|
|
|
|
x |
|
x |
x |
x |
|
|
|
9. |
7/8" Guide Comb |
|
|
|
|
|
|
x |
x |
x |
|
|
|
10. |
1" Guide Comb |
|
|
|
x |
x |
|
x |
x |
x |
|
|
|
11. Left Ear Guide |
|
|
|
|
x |
x |
x |
x |
x |
|
|
||
12. Right Ear Guide |
|
|
|
|
x |
x |
x |
x |
x |
|
|
||
13. Barber's Comb |
|
|
|
|
|
|
x |
x |
x |
|
|
||
14. Styling Comb |
|
x |
|
x |
x |
x |
x |
|
x |
|
|
||
15. Scissors |
|
x |
|
x |
x |
x |
x |
x |
x |
|
|
||
16. Barber's Cape |
|
|
|
|
|
|
x |
x |
x |
|
|
||
17. Sectioning Clips |
|
|
|
x3 |
x3 |
x3 |
x4 |
x3 |
x5 |
|
|
||
18. Neck Brush |
|
|
|
x |
x |
x |
x |
x |
x |
|
|
||
19. Cleaning Brush |
|
x |
|
x |
x |
x |
x |
x |
x2 |
|
|||
20. Lubricating Oil |
|
x |
|
|
|
|
|
|
|
|
|
|
|
21. Instruction Book |
|
x |
|
x |
x |
x |
x |
x |
x |
|
|
||
22. Storage Case |
|
|
|
|
x |
x |
x |
x |
x |
|
|
||
23. Power Cord Adaptor |
|
|
|
|
|
x |
|
x |
|
|
|||
24. Personal Groomer |
|
|
|
|
|
|
x |
|
x |
|
|
||
25. Beard Combs |
|
|
|
|
|
|
|
|
x |
|
|
||
26. Nose & Ear Trimmer |
|
|
|
|
|
|
|
x |
|
||||
|
(1) |
|
|
|
|
|
|
|
|
|
|
|
|
|
HC-810 |
|
|
|
|
|
|
|
|
(2) |
|||
|
HC-815 |
|
|
|
|
|
|
|
|
||||
|
|
|
|
|
|
|
|
|
|
|
|
|
|
|
HC-8017 |
|
|
HC-920 |
|
|
|
|
|
|
|
|
|
|
HC-912 |
|
|
|
|
|
|
|
|
|
|
||
|
|
|
|
HC-930 |
|
HC-921 |
|
|
|
|
|
||
(3)(4)
(7) (8)
(15)
(16)
(21) |
|
|
® |
Use and |
C |
|
|
|
erior |
|
A Sup |
|
ry |
|
Cut Eve |
|
Time |
(5) |
(6) |
(11) |
(12) |
(13)
(14)
(9)(10)
(17) |
(18) |
(19) |
(20) |
(22)
(23)
(24) |
(25) |
(26) |
4 |
5 |
G03-038 Haircut Kit I.B. 9/1/05 9:34 AM Page 6
How to Use
Charging (HC-920 and HC-930 only)
The HC-920 and HC-930 may be operated with or without the cord attached. For cordless operation, the unit should be fully charged first. Attach the cord to the unit and plug it in for 14 hours before use.
Line Cord Safety Tips
NOTE: This appliance has a polarized plug (one blade is wider than the other). As a safety feature, this plug will fit in a polarized outlet only one way. If the plug does not fit fully in the outlet, reverse the plug. If it still does not fit, contact a qualified electrician. Do not attempt to defeat this safety feature.
1.To insert plug, grasp it firmly and guide it into outlet.
2.To disconnect the appliance, grasp the plug and remove it from outlet. Do not pull or yank on the cord or appliance.
Do not wrap the cord around the appliance.
Blade Care
The life of your clippers will depend on frequency of use, care, application of oil, and hair type and condition. Blades should be replaced when cutting efficiency has deteriorated. Contact a Remington Service Center for a quotation.
HC-815, HC-8017, HC-912, HC-920, HC-921, and HC-930 blades are lubed for life and do not require additional oil.
Oiling the HC-810’s Blades
■We have pre-oiled and aligned the blades on your Remington® hair clipper.
■The blades on your HC-810 hair clipper
should be oiled before every haircut. Simply place
a few drops of oil on the teeth of the blades.
■Not applying enough oil to
the HC-810’s blades generally causes cutting problems. Blades will wear prematurely and not cut properly if they are not sufficiently lubricated. There may also be a pulling sensation on the hair.
Oil Cautions
■Use only the light-grade oil supplied or a suitable alternative like sewing machine oil.
■Do not use hair oil, grease, or any oil mixed with kerosene or solvent, as the solvent will evaporate and leave the thick oil, slowing the blades.
Before Cutting Hair
1.Make sure your hair clipper is oiled (if model HC-810) and runnning smoothly, with a slight vibration.
2.Place a cape around the neck of the person whose hair is being trimmed or cut. (A cape is provided with models HC-920, HC-921, and HC-930.)
3.This person should be seated so that the top of his head is at your eye level.
4.Comb the hair as it is normally styled.
5.Comb out all knots and tangles.
6.Ensure the hair is dry. Hair clippers perform best with dry hair, making it easier to see how much hair is being cut.
7.Hold the hair clipper in the palm of one hand with your thumb resting firmly on the top of the hair clipper. This grip provides comfortable cutting control.
Although the hair clipper may be used with the left or right hand, using it righthanded allows you to access the taper lever more easily.
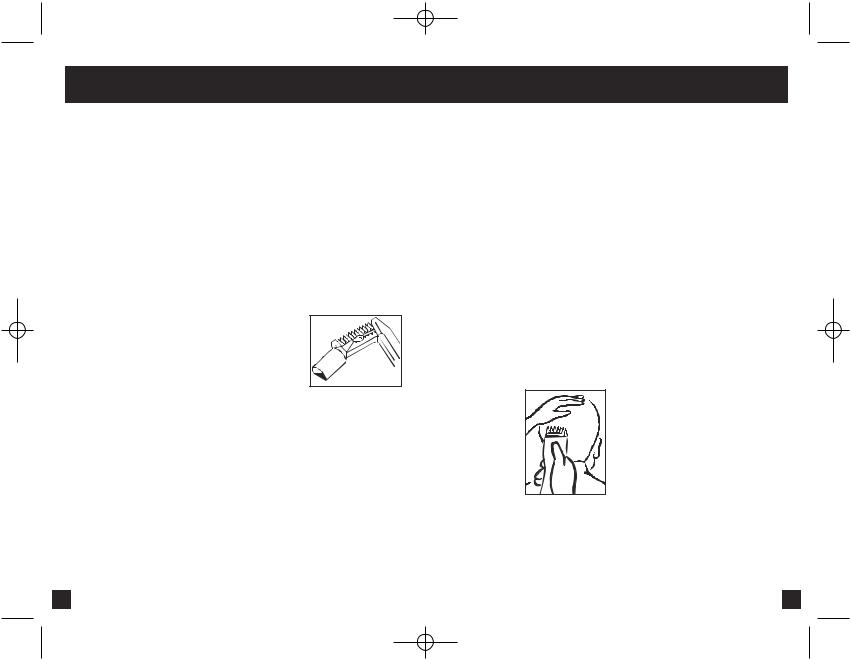
To Attach Trimming Guides
1.Select the trimming guide that matches the length you want the hair to be after the cut. The trimming guides are numbered and marked with 1/8” (3mm), 1/4” (7mm), 3/8” (9mm), 1/2” (12mm), 5/8”(15mm), 3/4”(18mm), 7/8”(22mm), and 1”(25mm). See preceding chart to determine which combs your model contains.
2.While the clipper is off, hold the trimming guide with the teeth up. Slide the trimming guide onto the blades until it locks into place.
6 |
7 |
G03-038 Haircut Kit I.B. 9/1/05 9:34 AM Page 8
Usage Tips
Giving a Comfortable, Even Cut
Allow the clipper to cut through the hair without moving it too quickly. Moving the clipper too quickly may create a pulling sensation.
Use short strokes when cutting, and initially use the longest trimming guide. You can always use a closer trimming guide later if you want a closer cut.
How to Give a Haircut
1.Start at the back of the head. Holding the clipper as shown, lightly stroke upward making sure you
are taking off the desired amount of hair. Work your way up to the crown
of the head in layers. When
completed, comb the area
to remove any
loose hair and to determine whether you need any further cutting.
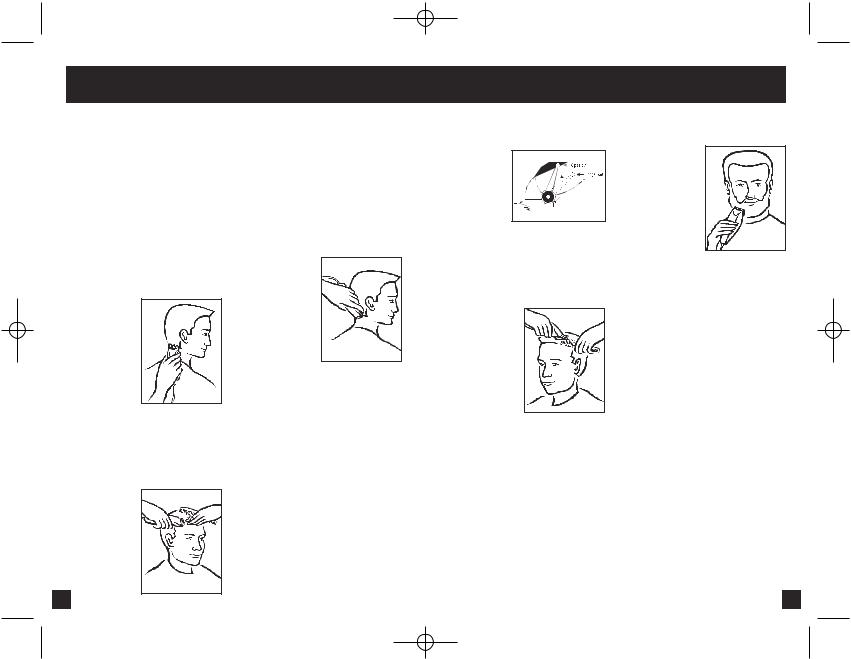
2.Repeat the same procedure for each side of the head. Make sure the length of the hair is trimmed to the same length on both sides of the head.
3.To cut the hair at the top of the
head, hold the hair between your fingers and cut a small amount at a time. Cut from the front to the back.
4.If you have the HC-920, HC-921, HC-930, or HC-8017 remove the trimming guide and replace with either the left or right ear guide. The shorter guide teeth are designed to be toward the ear. Move the clipper from the front of the head to the back. This creates a tapered effect around the ears and back of the neck.
To trim around the ears and short hairs at the nape of the neck with the HC-810 and HC-815, you must remove the trimming guide.
Angle the clipper and lightly stroke around each ear to the back of the neck. Be careful not to touch the ears or to press too hard.
5.The final trim
can be made with the hair clipper or the included scissors. Make sure to check over the entire head for any uneven areas. For styled hair or giving quick trims, you may prefer using your hair clipper without the trimming guide.
6.The adjustable taper control lever allows you to gradually change the closeness of your cut,
either with
or without a trimming guide. When the lever is fully forward
the blades
will give you the closest cut. Moving the lever gradually backward increases the cut length.
Very short styles
1.Using the 1/2” (12mm) trimming guide, hold the comb
flat against the
head and move
the hair clipper from the back of the neck to the crown of the head.
2. Cut in a similar
manner from the side to the
top of the head. Then cut from the front to the crown of the head.
3.If a “Flat Top” style is desired, then remove the trimming guide and use the barber’s comb. Trim a little at a time until a flat look is achieved.
Trimming Beards & Mustaches
1. Comb your beard in the direction it
grows. 2. Determine the
length you want
the beard to remain, and fit
the appropriate trimming guide.
Remember the 1/8” (3mm) guide will give you the shortest beard while the 1/2” (12mm) or 1” (25mm) will give you the longest. If you want a longer beard you can use the barber’s comb as a trimming guide.
3.Start trimming under your chin and work toward your ear and beard line. Cut in different directions for a uniform trim.
4.Lightly stroke the edge of your mustache in a downward movement.
8 |
9 |
G03-038 Haircut Kit I.B. 9/1/05 9:34 AM Page 10
Disposal
Battery Removal
(HC-920 and HC-930)
When your rechargeable clipper reaches the end of its useful life, the batteries must be removed from the
clipper and recycled or disposed of properly in accordance with your local and state requirements.
The following procedure should be followed for battery removal:
■ Make sure your clipper is unplugged from any outlets so you don’t risk
an electric shock.
■ Remove the decorative plug from the back cover.
■ Using a small Phillips head screwdriver, remove the screw from the back of the clipper.
■Pull or gently pry the clipper halves apart, exposing the batteries.
■Remove batteries from unit.
■Twist batteries to break wires. Wires may also be cut.
CAUTION: THESE NICKEL-CADMIUM BATTERIES MUST BE RECYCLED
OR DISPOSED OF IN ACCORDANCE WITH STATE AND LOCAL REGULATIONS.
Do not burn or mutilate, as they may burst or release toxic materials. Do not shortcircuit, as this may cause burns.
The EPA-certified RBRC® Battery Recycling Seal on the nickel-cadmium (Ni-Cd) battery indicates Remington Products Company, L.L.C. is voluntarily participating in an industry program to collect and recycle these batteries at the end of their useful life, when taken out of service in the United States or Canada. The RBRC® program provides a convenient alternative to placing used Ni-Cd batteries into the trash or the municipal waste stream, which may be illegal in your area. Please call 1-800-8-BATTERYSM for information on Ni-Cd battery recycling and disposal bans/restriction in your area. Remington Products Company, L.L.C.’s involvement in this program is part of our commitment to preserving our environment and conserving our natural resources.
Warranty
Warranty Service
In the U.S. and Canada, service is provided by authorized service dealers. For the address of your nearest authorized service dealer, contact us at 800-736-4648 (in U.S.), 888-277-6333 (in Canada), visit our website at www.remington-products.com or consult your local Yellow Pages under "Shaver-Electric-Repair."
KEEP ORIGINAL SALES RECEIPT AS PROOF OF PURCHASE FOR WARRANTY PURPOSES.
Questions or comments:
Call 800-736-4648 in the U.S. or 888-277-6333 in Canada.
Or visit www.remington-products.com
Remington and Precision are trademarks of Remington Products Company, L.L.C. in the U.S.
Remington is a trademark of Remington Products Company, L.L.C. in Canada.
© 2004 R.P.C, L.L.C.
Job #G03-038 1/04 Part No.13494
®
Remington Products Company, L.L.C. In the U.S. call 800-736-4648
MADE IN CHINA
Remington Products Company, L.L.C. In Canada call 888-277-6333
10 |
11 |
 Loading...