


CATALOG NO.: 3300.51I Effective: 01-01-03
Replaces: 01-01-01
OPERATING AND
INSTALLATION
INSTRUCTIONS
Model B-195
GAS FIRED AUTOMATIC
INSTANTANEOUS
BOOSTER WATER
HEATER
FOR YOUR SAFETY
Do not store or use gasoline or other flammable vapors and liquids or other combustible materials in the vicinity of this or any other appliance. To do so may result in an explosion or fire.
WARNING: Improper installation, adjustment, alteration, service or maintenance can cause property damage, personal injury or loss of life. Refer to this manual. Installation and service must be performed by a qualified installer, service agency or the gas supplier.
FOR YOUR SAFETY
WHAT TO DO IF YOU SMELL GAS
*Do not try to light any appliance.
*Do not touch any electrical switch; do not use any phone in your building.
*Immediately call your gas supplier from a neighbor's phone. Follow the gas supplier's instructions.
*If you cannot reach your gas supplier, call the fire department.
This manual should be maintained in legible |
NSF® |
condition and kept adjacent to the heater or kept |
|
in a safe place for future reference. |
Product Discontinued December 2003 |
P/N 240707 |
|
CONTENTS
PAGE DESCRIPTION
31. RECEIVING EQUIPMENT
32. GENERAL SPECIFICATIONS AND DIMENSIONS
43. INSTALLATION PROCEDURES
4 |
|
- Code Requirements |
|
4 |
|
- |
Combustion/Ventilation Air |
5 |
|
- |
Venting |
8 |
|
- |
Gas Piping |
8 |
|
- |
Water Piping |
11 |
|
- |
Electrical Wiring |
12 |
4. START-UP AND OPERATION |
||
12 |
|
- |
Component Location |
12 |
|
- |
Sequence of Operation |
12 |
|
- START-UP Procedures. |
|
16 |
5. |
SERVICING UNIT |
|
16 |
|
- |
Trouble Shooting Guide |
|
|
- |
Maintenance |
18 |
6. |
PARTS |
|
19 |
|
- |
Illustrated Parts |
20 |
|
- |
Parts List |
23 |
|
WARRANTY |
|
These instructions are provided to assure the proper installation, operation and maintenance of the Raypak Booster Heater. Should questions arise regarding the specification, installation, operation or servicing of the unit, contact the local distributor or contact the Raypak factory.
CALIFORNIA PROPOSITION 65 WARNING: This product contains chemicals known to the State of California to cause cancer, birth defects or other reproductive harm.
2
1. RECEIVING EQUIPMENT
On receipt of your equipment it is suggested that you visually check for external damage to the carton. If the carton is damaged, it is suggested that a note be made on the Bill of Lading when signing for equipment. Remove the heater from the carton and if it is damaged report the damage to the carrier immediately. Be sure that you receive the number of packages indicated on the Bill of Lading. Claims for shortages and damages must be filed with the carrier by consignee.
Purchased parts are subject to replacement only under the manufacturer's limited warranty. Debits for defective replacement parts will not be accepted and defective parts will be replaced in kind only per our standard warranties.
When ordering parts, you must specify Model and Serial Number of heater. When ordering under limited warranty conditions, you must also specify date of installation.
Raypak recommends that this manual be reviewed thoroughly before installing your Raypak Heater. If there are any questions which this manual does not answer, please contact your local Raypak Representative.
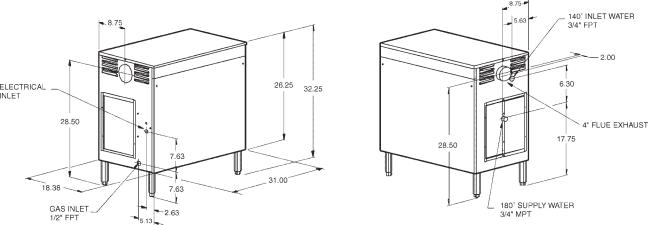
2. GENERAL SPECIFICATIONS
The Raypak Booster Heater is design certified and tested under the requirements of the American National Standard, ANSI Z 21.10.3 ,and the Canadian National Standard, CAN 1-4.3-M85, and bears the National Sanitation Foundation, NSF, seal.
The Raypak Booster Heater is an instantaneous tube type free standing unit intended for use as a supplier of 180 Deg. F dishwasher rinse water. Inlet water temperature to the heater of 140 deg. F is required for optimum operation of the heater.
Water enters the heat exchanger from the heater inlet water connection. The water then is circulated through two passes of copper finned tubes, through a stainless steel tank and to the dishwasher. Water is also recirculated through a bypass system that assures the availability of the proper temperature water at the heater outlet.
SPECIFICATIONS AND DIMENSIONS
|
Input |
|
GPH Delivery at Indicated Temperature Rise |
|
|||||
Model |
MBH |
40°F |
50°F |
60°F |
70°F |
80°F |
100°F |
120°F |
140°F |
B-195 |
195 |
490 |
392 |
327 |
280 |
245 |
196 |
163 |
140 |
|
|
|
|
|
|
|
|
|
|
Fig #9165
3

3. INSTALLATION PROCEDURES.
CODE REQUIREMENTS
Installation must be in accordance with local codes, or in the absence of local codes with the latest edition of the National Fuel Gas Code, ANSI Z223.1, the National Electrical Code, ANSI/NFPA 70. For Canada, CAN/
CGA B149.1 and .2, and CSA C22.2 No. 1.
LEG INSTALLATION
Four (4) legs are supplied loose within the carton for installation at the site. This will provide the required sixinch clearance off the floor. To install the legs, raise one end of the heater just high enough to allow the legs to be screwed into the two corners of that end. Make sure each leg is tightened securely by hand. Lower the heater gently to minimize any undue strain on the two (2) legs. Gently raise the other end, and repeat the same procedure for the other two (2) legs. Rotate the lower section of each leg as necessary to level the heater in place.
Booster water heater should not be located in an area where water leakage will result in damage to the area adjacent to it or to lower floors of the structure. Where such areas cannot be avoided, it is recommended that a suitable catch pan, adequately drained, be installed under this heater. Do not install directly on carpeting.
CLEARANCE REQUIREMENTS
Floor |
Top |
Left |
Right |
Front |
Back |
Vent |
|
|
Side |
Side |
|
|
|
* |
0" |
6" |
6" |
Alcove |
6" |
1" |
*Approved for installation on combustible flooring.
A front clearance of at least 24" is recommended for adequate service of burner-tray and controls.
COMBUSTION/VENTILATION AIR
B195 COMBUSTION AIR ADJUSTMENT
This model is equipped with an air adjustment screw on the combustion air blower inlet. For natural gas the opening is factory set at about 2.12" diagonal dimension, for propane gas the opening is 1.875" diagonal dimension, which should be the proper setting for most installations. However, field conditions including unusual gas characteristics may create a need for adjustment to achieve optimum performance. When the combustion air setting is proper, there will be some lifting of the flames on some areas of the burner tile under cold start conditions. After about five minutes of operation, the flames should settle down and blue tips should become visible on some areas and orange glow on other sections of the burner tile. Lifting of flames beyond five minutes would indicate too much combustion air. The adjustment screw should be turned clockwise to reduce the combustion air supply until the lifting settles down. If the blue tips disappear and the entire burner surface becomes radiant white, it indicates that there is not enough combustion air and the adjustment screw should be turned counterclockwise to increase the combustion air opening until the blue tips and orange glow become visible again.
The optimum excess air will result in CO2 levels between 8 and 8.5% for natural gas and 9.2 to 9.7% for propane. If a flue gas analyzing equipment is available, the opening can be adjusted to achieve this CO2 level. Or, if an inclined manometer is available, pressure measured at the combustion air switch pressure tap, can be set at -0.35" W.C. for natural gas and -0.60" W.C. for propane by means of the adjustment screw. Pressure at this level will result in the proper CO2 levels mentioned above.
Again, the factory setting will be adequate for most field conditions and adjustment will not normally be required.
CAUTION: A dusty kitchen environment combined with greasy laden air will clog the combustion air blower wheel and cause premature failure of the heater. Combustion air must not be contaminated by corrosive chemical fumes which can severely damage the heater.
4

Measures must be taken to prevent the entry of corrosive chemical fumes to the combustion and ventilation air supply. Such chemicals include, but are not limited to, chlorinated and/or fluorinated hydrocarbons such as found in refrigerants, aerosol propellants, dry-cleaning fluids, degreasers, and paint removers. Other harmful elements may come from bleaches, air fresheners, or mastics. Vapors from these types of products can form corrosive acid compounds when burned in a gas flame. The resulting acid condensate can damage or substantially reduce the life of the heater. It may be necessary to provide outside air directly to the heater in order to avoid this problem.
An adequate supply of air for proper combustion and ventilation must be provided in accordance with Sec.
5.3of the National Fuel Gas Code, ANSI Z223.1. or applicable provisions of the local building codes. Do not obstruct the flow of combustion and ventilation air to the heater.
VENTING
The vent pipe must be the same size or larger than the 4" diameter outlet on the heater. The standard vent outlet is on the right side, but this can be changed to the left side by reversing the orientation of the flue collector box. This can be done easily in the field. Remove the top casing cover to gain access to the flue collector box. Remove the screws along the sides of the flue collector. Disconnect the vent switch tubing from the fitting and remove the fitting from the flue collector box. Lift the box and turn around the other direction. Remove the stainless steel plug button and install the fitting in its place; then install the plug button where the fitting was removed. Reconnect the vent switch tubing to the fitting. Replace and secure the flue collector box with the screws previously removed.
The maximum flue gas temperature at the heater outlet is less than 400 degrees F. Use only the special gas vents listed for use with Category III gas burning heaters, such as the stainless steel Saf-T Vent manufactured by Heat-Fab, Inc. (800-772-0739), or the StaR-34 stainless steel gas vents manufactured by Flex-L International, Inc. (800-561-1980), of the FasNSeal stainless steel gas vents manufactured by ProTech Systems, Inc. (800- 766-3473). A special adapter may be required. Pipe joints must be positively sealed. Follow carefully the vent manufacturers' installation instructions.
WARNING: Provide a screen or barrier to prevent personal injury in areas where personnel contact with vent pipe can occur; but DO NOT INSULATE the vent pipe, nor use means that will restrict thermal expansion or movement of the vent.
5

Fig. #8975.3
6
All horizontal runs of the vent pipe shall have a minimum rise of 1/4" per foot of length and should be supported at maximum intervals of 5 feet (for Canada, 3 feet) and at each point where an elbow is used.
For horizontal venting, the total length of 4-inch diameter pipe shall not exceed 30 feet with up to two 90° elbows and 1 termination vent. For each additional elbow, reduce the total pipe length by 10 feet. The minimum length, in either case, is 2 feet with two elbows ending in a termination vent. For vertical venting, the lengths described above should be followed, with a termination vent at the top. The minimum length is 5 feet with up to two elbows and a termination vent.
For sidewall venting, locate the heater as close as possible to the wall being used. The maximum and minimum wall thickness is determined by the wall thimble available from the vent manufacturer. Refer to the vent manufacturer installation instructions.
Additional requirements when venting through a sidewall:
1.The vent terminal shall be located at least three feet above any forced air inlet located within ten feet;
or at least four feet below, four feet horizontally from, or one foot above any door, window, or gravity air inlet into any building.
It shall also have a minimum horizontal clearance of four feet from electric meters, gas meters, regulator and relief equipment.
2.The vent terminal shall be located not less than seven feet above grade when it is adjacent to public walkways.
3.The bottom of the vent terminal shall be located at least twelve inches above grade or ground, or normally expected snow accumulation level. The snow level may be higher on walls exposed to prevailing winds.
4.Avoid areas where local experience indicates that condensate drippage may cause problems such as above planters, patios, or over public walkways, or over an area where condensate or vapor could create a nuisance or hazard, or could be detrimental to the operation of regulators, relief valves, or other equipment.
The gas booster heater may be vented 3 ways:
1.Through the sidewall, or the ceiling, as discussed previously.
2.Into the exhaust system. (See illustration on page
6)Vent pipe must not penetrate filter.
When the unit is vented into the exhaust system, an electrical inter-lock must be provided to allow the flow of gas to the booster heater burner ONLY when the exhaust system is energized.
3.Free vented into a room or space where other gas fired equipment is installed, provided that one or more of the other installed equipment is furnished with a venting system or other approved means for removing the vent gases so the aggregate input of the remaining unvented equipment, including the booster heater, does not exceed 20 BTU per hour per cubic foot of volume. The volume of a room or space directly connected by a doorway, archway or other opening of comparable size that cannot be closed, may be included in the calculations. Refer to the National Fuel Gas Code ANSI Z223.1, NFPA 54.
7
 Loading...