


20-520.fm Page 1 Wednesday, August 4, 1999 3:06 PM
Owner’s Manual |
Cat. No. 20-520 |
PRO-90 300-Channel
TrunkTracker Scanner
Please read before using this equipment.

20-520.fm Page 2 Wednesday, August 4, 1999 3:06 PM
FEATURES
Your new RadioShack PRO-90 300-Channel TrunkTracker Scanner is the first of a new generation of scanners designed to track Motorolaä Type I and Type II (such as Smartnetä, and Privacy Plusä) and hybrid analog trunking systems, which are extensively used in many 800 MHz communication systems.
Trunking communications systems let a large group of 2- way radio users (or even different groups of 2-way radio users) efficiently use a large range of frequencies. Instead of selecting a specific frequency for a transmission, the 2- way radio user simply selects a talk group. The trunking system automatically transmits the call on the first available frequency, and also sends a code that uniquely identifies that 2-way radio user’s transmission on a different frequency called a data channel.
Since the trunking system might send individual 2-way radio user’s calls and response transmissions on different frequencies, it is difficult to listen to trunked communications using a regular scanner. The PRO-90 lets you select and monitor the data channel frequency sent with a 2-way radio user’s transmission, so you can hear the call and response for that 2-way radio user and easily “follow” the conversation.
The scanner also lets you scan conventional transmissions, and is preprogrammed with service-search banks for convenience. By pressing a single button, you can quickly search those frequencies most commonly used by public service and other agencies without tedious and complicated programming.
This scanner gives you direct access to over 31,000 exciting frequencies, including police and fire departments, ambulance services, and amateur radio services, and you can change your selection at any time.
Your scanner also has these special features:
Triple-Conversion Circuitry — virtually eliminates any interference from IF (intermediate frequency) images, so you hear only the selected frequency.
©1997 Tandy Corporation. All Rights Reserved.
RadioShack is a registered trademark used by Tandy Corporation. HyperSearch and HyperScan are trademarks used by
Tandy Corporation.
Motorola, Smartnet, and Privacy Plus are trademarks of Motorola, Inc.
2

20-520.fm Page 3 Wednesday, August 4, 1999 3:06 PM
Ten Channel-Storage Banks — let you store 30 channels in each bank to group channels so you can more easily identify calls.
Five Scan Lists — let you store up to 50 IDs in each tracking bank (up to a total of 500).
Two-Second Scan Delay — delays scanning for about 2 seconds before moving to another channel, so you can hear more replies that are made on the same channel.
Lock-Out Function — lets you set your scanner to skip over specified channels or frequencies when scanning or searching, and skip over IDs when tracking trunked systems.
Priority Channels — lets you program one channel in each bank (10 in all) and then have the scanner check it every 2 seconds so you don't miss transmissions on those channels.
Five Service-Search Banks — lets you search preset frequencies in separate police, fire/emergency, aircraft, marine, and weather banks, to make it easy to locate specific types of calls.
HyperSearchä and HyperScanä — lets you set the scanner to search at up to 300 steps per second and scan at up to 100 frequencies per second in frequency bands with 5 kHz steps, to help you quickly find interesting broadcasts. The normal search speed is 100 steps per second.
Data Signal Skip — lets you set the scanner to skip non-modulated or data signals during searches. This lets the scanner avoid non-voice signals, making a search faster.
Key Lock — lets you lock the scanner's keys to help prevent accidental changes to the scanner's programming.
Manual Access — lets you directly access any channel.
Liquid-Crystal Display — makes it easy to view and change programming information.
Display Backlight — makes the scanner easy to read in low-light situations.
3

20-520.fm Page 4 Wednesday, August 4, 1999 3:06 PM
Flexible Antenna with BNC Connector — provides excellent reception and is designed to help prevent antenna breakage. Or, you can connect an external antenna.
Memory Backup — keeps the frequencies stored in memory for an extended time.
Three Power Options — let you power the scanner using the built-in rechargeable battery pack, external AC power using the supplied AC adapter/charger, or DC power using an optional DC cigarette-lighter power cable.
Key Confirmation Tones — the scanner sounds a tone when you perform an operation correctly, and an error tone if you make an error.
Battery Low Alert — warns you when battery power gets low.
Battery Save — saves battery power when the scanner does not detect any transmissions for more than 1 minute when a channel is manually selected.
Your scanner can receive these bands:
Frequency Range |
Step |
Transmission |
29–29.7 MHz |
5 kHz |
10-Meter Ham |
|
|
Band |
29.7–50 MHz |
5 kHz |
VHF Lo |
50–54 MHz |
5 kHz |
6-Meter Ham Band |
108–136.9875 MHz |
12.5 kHz |
Aircraft |
137–144 MHz |
5 kHz |
Military Land |
|
|
Mobile |
144–148 MHz |
5 kHz |
2-Meter Ham Band |
148–174 MHz |
5 kHz |
VHF Hi |
406–420 MHz |
12.5 kHz |
Federal Govern- |
|
|
ment |
420–450 MHz |
12.5 kHz |
70-cm Ham Band |
450–470 MHz |
12.5 kHz |
UHF Standard |
|
|
Band |
470–512 MHz |
12.5 kHz |
UHF “T” Band |
806–956 MHz |
12.5 kHz |
Public Service |
|
|
“800” Band, except |
|
|
cellular band |
4

20-520.fm Page 5 Wednesday, August 4, 1999 3:06 PM
We recommend you record your scanner’s serial number here. The number is on the bottom panel.
Serial Number: ___________________________
FCC NOTICE
Your scanner might cause radio or TV interference even when it is operating properly. To determine whether your scanner is causing the interference, turn off your scanner. If the interference goes away, your scanner is causing it. Try the following methods to eliminate the interference:
•Move your scanner away from the receiver
•Connect your scanner to an outlet that is on a different electrical circuit from the receiver
•Contact your local RadioShack store for help
Note: Mobile use of this scanner is unlawful or requires a permit in some areas. Check the laws in your area.
SCANNING LEGALLY
Your scanner covers frequencies used by many different groups including police and fire departments, ambulance services, government agencies, private companies, amateur radio services, military operations, pager services, and wireline (telephone and telegraph) service providers. It is legal to listen to almost every transmission your scanner can receive. However, there are some transmissions you should never intentionally listen to. These include:
•Telephone conversations (either cellular, cordless, or other private means of telephone signal transmission)
•Pager transmissions
•Any scrambled or encrypted transmissions
According to the Electronic Communications Privacy Act (ECPA), you are subject to fines and possible imprisonment for intentionally listening to, using, or divulging the contents of such a transmission unless you have the consent of a party to the conversation (unless such activity is otherwise illegal). We encourage responsible, legal scanner use.
5

20-520.fm Page 6 Wednesday, August 4, 1999 3:06 PM
CONTENTS |
|
Preparation ................................................................ |
8 |
Power Sources ..................................................... |
8 |
Using the Rechargeable Battery Pack .......... |
8 |
Using Standard AC Power ............................ |
9 |
Using Vehicle Battery Power ....................... |
10 |
Connecting the Antenna ..................................... |
11 |
Connecting an Optional Antenna ................ |
12 |
Connecting an Earphone/Headphones .............. |
13 |
Listening Safely .......................................... |
13 |
Traffic Safety ............................................... |
13 |
Connecting an Extension Speaker ..................... |
14 |
Attaching the Belt Clip ........................................ |
14 |
Understanding Your Scanner ................................. |
15 |
A Look at the Keypad ......................................... |
15 |
A Look at the Display ......................................... |
17 |
Understanding Banks ......................................... |
19 |
Channel Storage Banks .............................. |
19 |
Service Banks ............................................. |
19 |
Understanding Trunking ..................................... |
19 |
Operation ................................................................. |
20 |
Turning On the Scanner and Setting Squelch .... |
20 |
Storing Known Frequencies into Channels ........ |
21 |
Limit Search ....................................................... |
22 |
Scanning Service Banks .................................... |
23 |
Scanning the Stored Channels .......................... |
25 |
Manually Selecting a Channel ............................ |
25 |
Deleting a Stored Frequency ............................. |
25 |
Special Features ...................................................... |
26 |
Delay .................................................................. |
26 |
Turning Channel-Storage Banks On and Off ..... |
27 |
Locking Out Channels and Frequencies ............ |
27 |
Locking Out Channels ................................ |
27 |
Locking Out Frequencies ............................ |
28 |
Priority ................................................................ |
28 |
Using the Keylock .............................................. |
30 |
Using the Display Backlight ................................ |
30 |
Changing Search Speeds .................................. |
30 |
Battery Save ...................................................... |
31 |
Skipping Data Signals ........................................ |
31 |
6

20-520.fm Page 7 Wednesday, August 4, 1999 3:06 PM
Trunk Tracking ......................................................... |
32 |
Types of Trunked Systems ................................. |
32 |
Setting the Scanner to the Trunk Tracking Mode |
33 |
Setting Squelch for the Trunk Tracking Mode .... |
34 |
Programming Trunked Frequencies ................... |
34 |
Scanning a Trunked Bank .................................. |
36 |
Monitoring an Active ID ............................... |
37 |
Locking Out IDs ........................................... |
38 |
Unlocking a Single ID .................................. |
38 |
Unlocking All IDs ......................................... |
38 |
Using Trunk Tracking Scan Delay ............... |
39 |
Monitoring IDs ............................................. |
39 |
Channel Activity Indicators ................................. |
40 |
Scan Lists ........................................................... |
41 |
Manually Storing IDs into Scan Lists ........... |
41 |
Storing IDs Into Scan Lists |
|
While Searching .......................................... |
42 |
Automatically Storing an ID |
|
in a Scan List Location ................................ |
42 |
Deleting a Stored ID .................................... |
43 |
Scanning the Scan Lists ..................................... |
43 |
Scanning Type I and Hybrid Trunked Systems ... |
44 |
Selecting a Preset Fleet Map ..................... |
48 |
Programming a Fleet Map .......................... |
49 |
Programming a Hybrid System .................. |
50 |
A General Guide to Scanning ................................. |
51 |
Guide to Frequencies ......................................... |
51 |
National Weather Frequencies .................... |
51 |
Canadian Weather Frequencies .................. |
51 |
Birdie Frequencies ...................................... |
51 |
Guide to the Action Bands ................................. |
52 |
Typical Band Usage .................................... |
52 |
Primary Usage ............................................. |
52 |
Band Allocation ................................................. |
53 |
Frequency Conversion ...................................... |
57 |
Troubleshooting ....................................................... |
58 |
Care and Maintenance ............................................. |
61 |
Specifications .......................................................... |
62 |
7

20-520.fm Page 8 Wednesday, August 4, 1999 3:06 PM
PREPARATION
POWER SOURCES
You can power your scanner from any of three sources:
•Built-in rechargeable battery pack
•Standard AC power using the supplied AC adapter/ charger
•Vehicle battery power using an optional DC ciga- rette-lighter power cable
Using the Rechargeable Battery Pack
You must charge your scanner’s built-in rechargeable battery pack before you can use it to power the scanner. Your scanner has a built-in charging circuit that lets you charge the rechargeable battery pack while it is in the scanner.
To charge the battery pack, simply connect the supplied AC adapter/charger or an optional DC cigarette-lighter power cable to the scanner’s jack. See “Using Standard AC Power” on Page 9 or “Using Vehicle Battery Power” on Page 10.
It takes about 14–16 hours to recharge a battery pack that is fully discharged. (You can operate the scanner while recharging the battery pack, but charging takes longer).
Notes:
•The scanner automatically stops charging the battery pack when it is fully charged, even if the supplied AC adapter/charger or a DC cigarette-lighter power cable is still connected to the scanner.
•A rechargeable battery pack lasts longer and delivers more power if you occasionally let it fully discharge. To do this, simply use the scanner until the low battery indicator appears. Then fully charge the battery pack.
If the battery pack doesn’t power the scanner even after you charge it, you must replace it. You can order a replacement battery pack from your local RadioShack store.
8
20-520.fm Page 9 Wednesday, August 4, 1999 3:06 PM
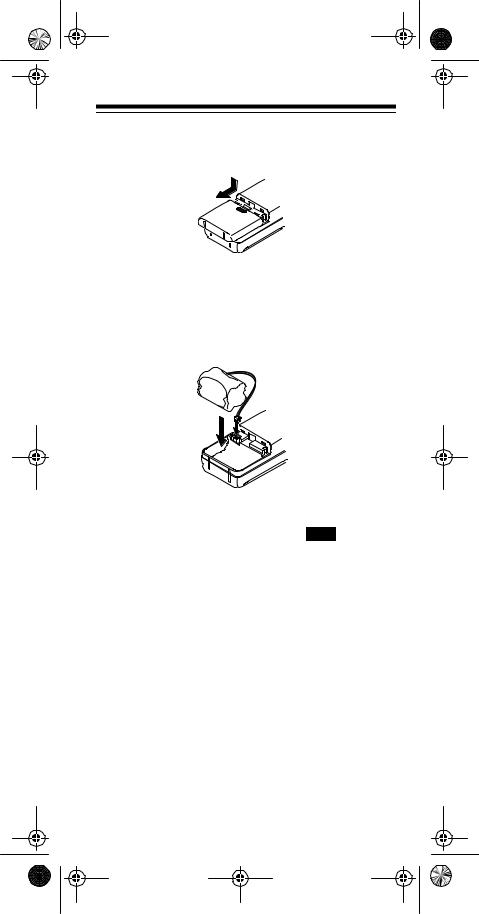
1.Press down on the battery compartment cover and slide the cover in the direction of the arrow to remove it.
2.Disconnect the battery pack’s connector from the scanner’s connector. Then remove the battery pack from the battery compartment.
3.Attach the new battery pack's connector to the battery socket inside the battery compartment. Then put the battery pack into the compartment.
4. Replace the cover.
When the scanner’s battery gets low,  blinks and the scanner beeps about every 15 seconds.
Important: At the end of a rechargeable battery pack's useful life, it must be recycled or disposed of properly. Contact your local, county, or state hazardous waste management authorities for information on recycling or disposal programs in your area. Some options that might be available are: municipal curb-side collection, drop-off boxes at retailers such as your local RadioShack store, recycling collection centers, and mailback programs.
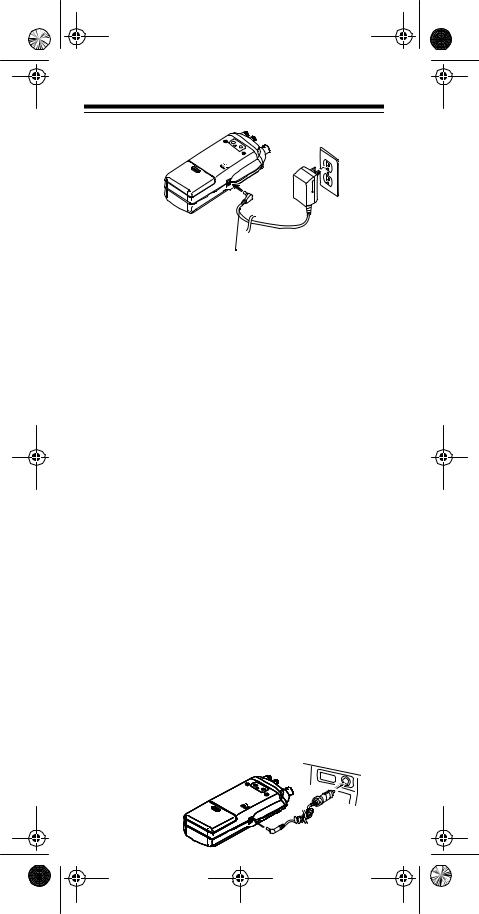
Using Standard AC Power
To power the scanner from AC power, use the supplied AC adapter/charger. Plug the adapter/charger's barrel plug into the scanner's jack. Then plug the AC adapter/charger's power module into a standard AC outlet.
9
20-520.fm Page 10 Wednesday, August 4, 1999 3:06 PM
EXT. PWR Jack
Warning: Do not use the AC adapter/charger's polarized plug with an extension cord, receptacle, or other outlet unless the blades can be fully inserted to prevent blade exposure.
Caution: Use only the supplied AC adapter/charger. It is specifically designed for this scanner.
Using Vehicle Battery Power
To power the scanner from your vehicle's cigarette-light- er socket, you need a DC cigarette-lighter power cable, such as Cat. No. 270-031.
Cautions:
•The DC cigarette-lighter power cable must be capable of delivering 12 volts, its center tip must be set to positive, and its barrel plug must correctly fit the scanner's EXT. PWR jack. The recommended power cable meets these specifications. Using a power cable that does not meet these specifications could damage the scanner or the power cable.
•To protect your vehicle's electrical system, always plug the power cable into the scanner before you plug it into your vehicle's cigarette-lighter socket. Always unplug the power cable from the vehicle's cigarette-lighter socket before you unplug it from the scanner.
•Insert the DC cigarette-lighter power cable's barrel plug into the EXT. PWR jack, then plug the power cable's other end into your vehicle's cigarette-lighter socket. .
10
20-520.fm Page 11 Wednesday, August 4, 1999 3:06 PM
When you finish using the DC cigarette-lighter power cable, disconnect it from the cigarette-lighter socket, then disconnect it from your scanner.
Note: If the scanner does not operate properly when you connect a DC cigarette-lighter power cable, unplug the power cable from the cigarette-lighter socket and clean the socket to remove ashes and other debris.
CONNECTING THE ANTENNA
Follow these steps to attach the supplied flexible antenna to the connector on the top of your scanner.
1.Align the slots around the antenna’s connector with the tabs on the scanner’s BNC connector.
2.Slide the antenna’s connector down over the scanner’s connector and rotate the antenna connector’s outer ring clockwise until it locks into place.
11

20-520.fm Page 12 Wednesday, August 4, 1999 3:06 PM
Connecting an Optional Antenna
The scanner’s antenna jack makes it easy to use the scanner with a variety of antennas. Instead of the supplied antenna, you can attach a different one, such as an external mobile antenna or outdoor base station antenna. Your local RadioShack store sells a variety of antennas.
Always use 50-ohm coaxial cable, such as RG-58 or RG-8, to connect an outdoor antenna. For lengths over 50 feet, use RG-8 low-loss dielectric coaxial cable. If your antenna’s cable does not have a BNC connector, use a BNC adapter available at your local RadioShack store.
Follow the installation instructions supplied with the antenna, route the antenna cable to the scanner, then connect it to the antenna jack.
Warning: Use extreme caution when installing or removing an outdoor antenna. If the antenna starts to fall, let it go! It could contact overhead power lines. If the antenna touches a power line, contact with the antenna, mast, cable or guy wires can cause electrocution and death! Call the power company to remove the antenna. Do not attempt to do so yourself.
Cautions:
•Do not run the cable over sharp edges or moving parts.
•Do not run the cable next to power cables or other antenna cables.
•Do not run the cable through a vehicle’s engine compartment or other areas that produce extreme heat.
•Follow all cautions and warnings included with the antenna.
12
20-520.fm Page 13 Wednesday, August 4, 1999 3:06 PM
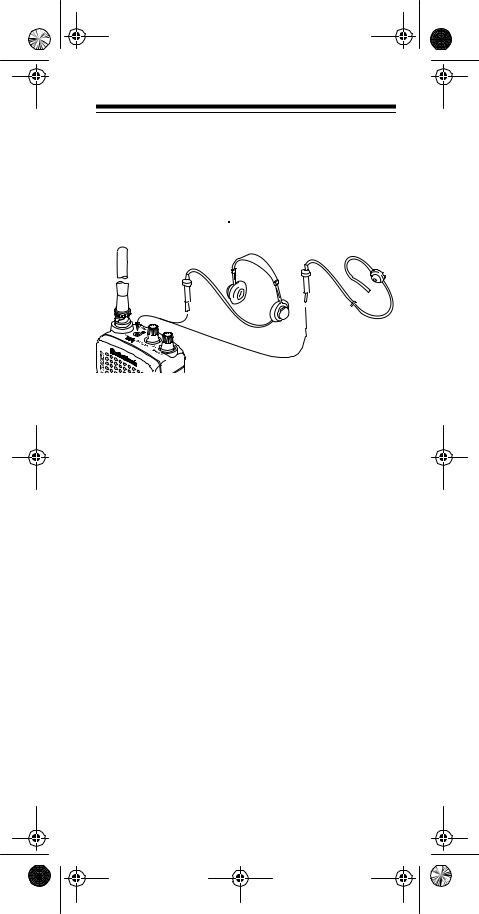
CONNECTING AN EARPHONE/ HEADPHONES
For private listening, you can plug an earphone or headphones with a 1/8-inch mini-plug (such as Cat. No. 33175 or 20-210) into the 
 jack on top of your scanner. This automatically disconnects the internal speaker.
Listening Safely
To protect your hearing, follow these guidelines when you use an earphone or headphones.
•Do not listen at extremely high volume levels. Extended high-volume listening can lead to permanent hearing loss.
•Set the volume to the lowest setting before you begin listening. After you begin listening, adjust the volume to a comfortable level.
•Once you set the volume, do not increase it. Over time, your ears adapt to the volume level, so a volume level that does not cause discomfort might still damage your hearing.
Traffic Safety
Do not use an earphone/headphones with your scanner when operating a motor vehicle or riding a bicycle in or near traffic. Doing so can create a traffic hazard and could be illegal in some areas.
If you use an earphone/headphones with your scanner, be very careful. Do not listen to a continuous broadcast. Even though some earphones/headphones let you hear some outside sounds when listening at normal volume levels, they still can present a traffic hazard.
13

20-520.fm Page 14 Wednesday, August 4, 1999 3:06 PM
CONNECTING AN EXTENSION SPEAKER
In a noisy area, an extension speaker (such as Cat. No. 21-549), positioned in the right place, might provide more comfortable listening. Plug the speaker cable’s 1/ 8- inch mini-plug into your scanner’s 
 jack.
jack.
ATTACHING THE BELT CLIP
You can attach the supplied belt clip to make your scanner easier to carry when you are on the go. Use a Phillips screwdriver and the two supplied screws to attach the belt clip to the scanner. Then slide the belt clip over your belt or waistband.
Belt Clip
14
20-520.fm Page 15 Wednesday, August 4, 1999 3:06 PM
UNDERSTANDING YOUR SCANNER
Once you understand a few simple terms we use in this manual and familiarize yourself with your scanner’s features, you can put the scanner to work for you. You simply find the communications you want to receive, then set the scanner to scan them.
A frequency is the tuning location of a station (expressed in kHz or MHz). To find active frequencies, you can use the search function.
You can also search the service-search banks, which are preset groups of frequencies categorized by type of service.
When you find a frequency, you can store it into a programmable memory location called a channel, which is grouped with your other channels in a channel-storage bank. You can then scan the channel-storage banks to see if there is activity on the frequencies stored there. Each time the scanner finds an active frequency, it stays on that channel until the transmission ends.
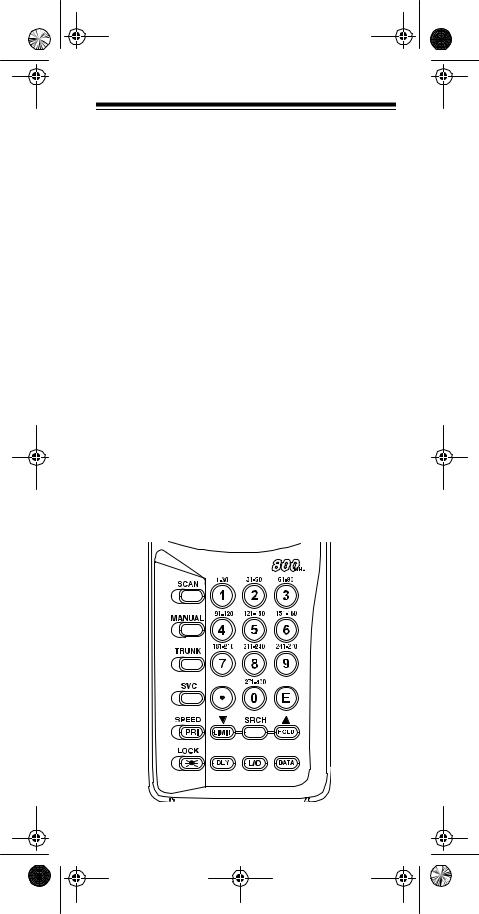
A LOOK AT THE KEYPAD
Your scanner’s keys might seem confusing at first, but this information should help you understand each key’s function.
15

20-520.fm Page 16 Wednesday, August 4, 1999 3:06 PM
SCAN — scans through the stored channels.
MANUAL — stops scanning and lets you directly enter a channel number or frequency.
TRUNK — switches between conventional and trunk tracking modes.
SVC (service) — selects a service bank.
SPEED/PRI (speed/priority) — turns on and off the Hypersearch mode; sets and turns on and off the priority feature.
LOCK/  — locks the keypad to prevent accidental program changes. Also turns on the display light for 15 seconds.
Number Keys — each key has a single-digit label and a range of numbers. The single digits are used to enter a channel, frequency, or ID number. The range of numbers (31–60, for example) indicates the channels that make up a memory bank.
• — enters a decimal point or clears an incorrect entry.
E (enter) — enters frequencies into channels.
t/LIMIT — sets the search direction and holds the frequency search; sets the frequency range.
— programs a 2-second delay for the selected channel, a limit search, or each service scan. Also programs a 5–second delay in the trunk tracking mode.
SRCH — searches a specified frequency range to find frequencies; searches for another active ID in the trunk tracking mode.
— lets you lock out selected channels or frequencies; lets you lock out a selected ID in the trunk tracking mode.
s/HOLD — sets the search direction and holds the frequency search; holds on the current ID in the trunk tracking mode.
DATA — turns on or off the data signal skip feature or checks the current trunking bank in the trunk tracking mode.
16
20-520.fm Page 17 Wednesday, August 4, 1999 3:06 PM
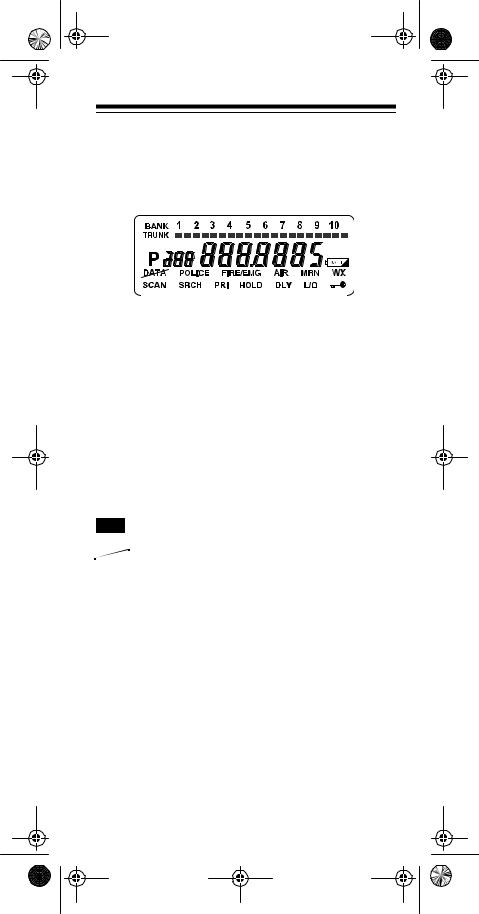
A LOOK AT THE DISPLAY
The display has indicators that show the scanner’s current operating status. A good look at the display will help you understand how your scanner operates.
BANK — appears with numbers (1–10). Numbers with a bar under them show which channel-storage banks are turned on for scanning.
TRUNK — appears when the scanner is in the trunk tracking mode.
 (channel activity indicators) — each represents a received trunking frequency or a data frequency in the trunk tracking mode (see “Channel Activity Indicators” on Page 40).
P — appears when a priority channel is selected.
 — blinks when the scanner’s battery is low.
DATA — appears when the data skip function is active.
POLICE — appears when you search the police service bank.
FIRE/EMG — appears when you search the fire/emergency service bank.
AIR — appears when you search the air service bank.
MRN — appears when you search the marine service bank.
WX — appears when you search the weather service bank.
SCAN — appears when you scan channels.
17

20-520.fm Page 18 Wednesday, August 4, 1999 3:06 PM
SRCH — lights steadily during a limit search and ID search, and blinks while HyperSearch is active and when you monitor IDs (see “Monitoring IDs” on Page 39).
PRI — appears when the priority feature is turned on.
HOLD — appears when you manually select a channel or when the scanner is in the hold mode during a search or service bank scan or during a limit search.
DLY — appears when you program a delay.
L/O — appears when you manually select a channel or frequency you locked out.

 — appears when you lock the keypad.
Error — appears when you make an entry error.
18

20-520.fm Page 19 Wednesday, August 4, 1999 3:06 PM
UNDERSTANDING BANKS
Channel Storage Banks
To make it easier to identify and select the channels you want to listen to, channels are divided into 10 banks of 30 channels each. Use each channel-storage bank to group frequencies, such as the police department, fire department, ambulance services, or aircraft (see “Guide to the Action Bands” on Page 52). For example, the police department might use four frequencies, one for each side of town. You could program the police frequencies starting with Channel 1 (the first channel in bank 1) and program the fire department frequencies starting with Channel 31 (the first channel in bank 2).
Service Banks
The scanner is preprogrammed with the frequencies allocated by police, fire/emergency, aircraft, marine, and weather services. This is handy for quickly finding active frequencies instead of searching through an entire band (see “Scanning Service Banks” on Page 23).
UNDERSTANDING TRUNKING
In the past, groups that broadcast frequently, such as police departments, were restricted to transmitting on just a few frequencies. This resulted in heavy traffic and often required 2-way radio users to wait for a specific frequency to clear before transmitting.
Trunked systems allow more groups of 2-way radio users to use fewer frequencies. Instead of selecting a specific frequency to transmit on, a trunked system chooses one of several frequencies when the 2-way radio user presses PTT (push to talk). The system automatically transmits the call on that frequency, and also sends a code that identifies that 2-way radio user’s transmission on a data channel.
This scanner lets you select the data channel frequency that you want it to monitor, so you can hear both the call and response transmissions for that 2-way radio user and therefore follow the conversation. (You cannot listen to the data channel itself).
19
20-520.fm Page 20 Wednesday, August 4, 1999 3:06 PM
OPERATION
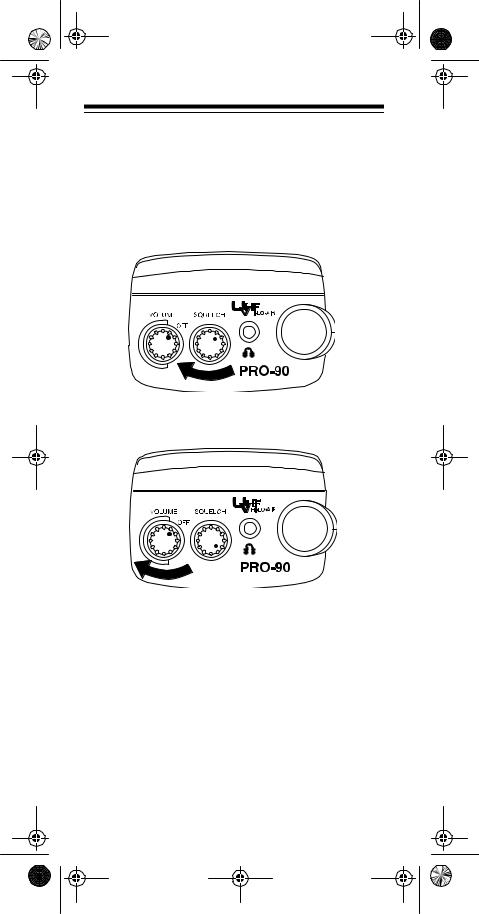
TURNING ON THE SCANNER AND SETTING SQUELCH
Note: Make sure the scanner's antenna is connected before you turn it on.
1. Turn SQUELCH fully clockwise.
2.Turn VOLUME/OFF clockwise until it clicks and you hear a hissing sound.
3.Press MANUAL and turn SQUELCH counterclockwise, then leave it set to a point just after the hissing sound stops.
20
 Loading...