


12-519 User’s Guide
All-Hazards Weather Alert Clock Radio with Skywarn
Thank you for purchasing your All-Hazards Weather Alert Clock Radio with Skywarn from RadioShack. Please read this user’s guide before installing, setting up, and using your new weather radio.

Contents
Contents |
|
Package Contents ......................................................................................................... |
3 |
Features......................................................................................................................... |
3 |
Setup................................................................................................................... |
4 |
Understanding Your Radio............................................................................................. |
4 |
Power your Radio........................................................................................................... |
6 |
Install Backup Batteries............................................................................................. |
6 |
Use the Antenna............................................................................................................ |
7 |
Basic Operation.................................................................................................. |
8 |
Set the Clock.................................................................................................................. |
8 |
Set the Alarm................................................................................................................. |
8 |
When the Alarm Sounds............................................................................................ |
8 |
Using the Radio.............................................................................................................. |
8 |
Set Radio Station Memory......................................................................................... |
9 |
Using the Weather Radio .......................................................................................... |
9 |
Set Weather Channel Memory.................................................................................. |
9 |
Viewing Weather Alerts........................................................................................... |
10 |
Receiving Alerts for Specific Areas.......................................................................... |
10 |
Using Skywarn.............................................................................................................. |
10 |
Programming Skywarn Channels into Memory....................................................... |
11 |
Advanced Operation........................................................................................ |
12 |
Changing Radio Settings ............................................................................................ |
12 |
Turning Audible Alerts ON or OFF.............................................................................. |
15 |
Connecting an External Alert....................................................................................... |
15 |
Restoring Factory Default Settings.............................................................................. |
15 |
Additional Information...................................................................................... |
16 |
NWS Alert Descriptions............................................................................................... |
16 |
Frequently Asked Questions (FAQs)............................................................................ |
19 |
Specifications............................................................................................................... |
22 |
Care.............................................................................................................................. |
22 |
Service and Repair....................................................................................................... |
22 |
FCC Information........................................................................................................... |
23 |
Limited Warranty.......................................................................................................... |
24 |

Package Contents
• Radio |
• AC Adapter |
• BNC-to-Phono Adapter |
|
• User’s Guide |
• Quick Start |
Features
•Multifunctional design: alarm clock, radio, and weather radio
•Receive FM, AM, seven NOAA weather channels, and Skywarn reports.
•Digital SAME technology.
•Programmed with all U.S. states and counties.
•Sixteen alert volume levels.
•Separate daytime and night time alert volume settings.
•Different color LEDs indicate if the alert is a warning (red), watch (orange), or advisory (yellow).
•Alert reminder lets you know if you’ve missed an incoming transmission.
•Alert notifications display as text and can sound as tone or tone with voice.
•Auxiliary input enables you to play an MP3 player or other device through the radio speakers.
•Dual alarm clock can be set for two people to wake up at different times.
•Choose an alarm to wake you up: FM, AM, or alarm tone.
•Battery indicators.
•60-hour battery backup.
•Recharges Ni-MH rechargeable batteries.
•Bilingual display: English or Spanish.
Setup
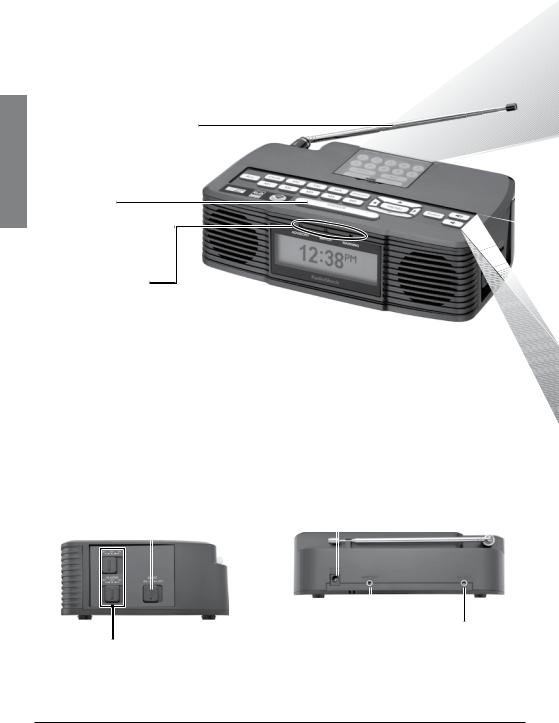
Understanding Your Radio
Setup
Telescopic Antenna
Adjust to receive best signal reception.
SNOOZE
Pause the alarm for 15 minutes.
Alert Indicators
ADVISORY/WATCH/WARNING
•Flashes for 60 seconds when the alert begins, then lights for the duration of the alert.
•Alternating flashes indicate loss of weather signal.
Right Panel |
Back Panel |
|||
ALERT ON/OFF |
DC 12V |
|||
Turn audible alerts |
Connect the AC adapter. |
|||
on or off. |
|
|
|
|
|
|
|
|
|
|
|
|
|
|
|
|
|
|
|
ALARM1 SET/ON/OFF, ALARM2 SET/ON/OFF
Turn the alarm on /off or set alarm.
ALERT OUT |
AUX INPUT |
Connect to a |
Connect to an |
compatible external |
external audio |
alert device with a |
source. |
3.5mm phono plug. |
|

Number Buttons
Enter FIPS code or Skywarn channel frequency.

 Manual/Scan/Program/Enter
Refer to “Using Skywarn” on page 10.
Setup
CLOCK |
FM/AM/ WX |
/ |
Press and hold |
SKYWARN |
Increase /decrease |
to set the clock. |
Select a band. |
volume. |
AUX |
M1 – M5 |
Menu and |
SELECT |
Listen to an |
Radio station |
,,, |
Confirm |
external audio |
memory |
•Set time and |
settings. |
source. AUX |
locations. |
choose radio |
|
appears. |
|
stations. |
|
|
|
•Navigate and |
|
|
|
adjust menu |
|
|
|
items. |
|
nNote: The power source must supply 12V DC and deliver at least 400mA. Its center tip must be set to positive and its plug must fit the DC 12V jack. Using an adapter that does not meet these specifications could damage the radio or adapter.
Setup
Power your Radio
Connect the supplied AC adapter to the DC 12 V jack and plug in to a standard household outlet.
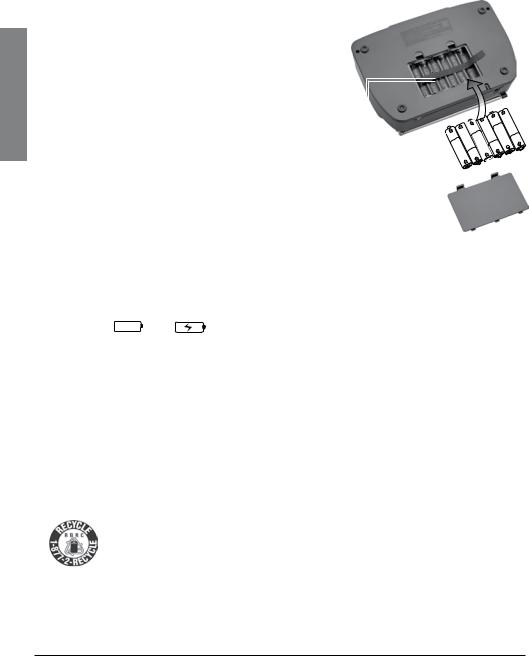
Install Backup Batteries
1. |
Open the battery compartment cover. |
|
|
|
|
2. |
Slide the RCH/ALK switch to RCH for |
|
|
|
|
|
rechargeable or ALK for alkaline backup |
|
|
|
|
|
|
|
|
|
|
|
batteries. |
|
|
|
|
3. |
Install six AA alkaline or Ni-MH rechargeable |
|
|
|
|
|
batteries (neither supplied). Insert batteries |
|
|
|
|
|
|
|
|
|
|
|
as indicated by the polarity symbols (+ and –) |
|
|
|
|
|
marked inside. |
|
|
|
|
|
RCH/ALK |
|
|||
nNotes: |
|
||||
|
|
|
|
||
• flashes when the rechargeable batteries are charging,
  will appear when charging is finished. Charging can take up to 30 hours.
•If the radio’s power supply is switched from AC to battery operation, the three alert LEDs will blink for 3 minutes.
bBattery Notes:
• When |
or |
displays, replace the batteries. |
•Use only fresh batteries of the required size and type.
•Dispose of old batteries promptly and properly. Do not burn or bury them.
•Do not mix old and new batteries, different types of batteries (standard, alkaline, or rechargeable), or rechargeable batteries of different capacities.
•If you do not plan to use your radio for a long period, remove the batteries. Batteries can leak chemicals that may damage electronic parts.
Recycle Rechargeable Batteries
Placing rechargeable batteries in the trash can be harmful to the environment. Instead, recycle old rechargeable batteries at your local RadioShack store free of charge. RadioShack participates in the RBRC© battery recycling program, and is committed to
preserving the environment and conserving natural resources. Call 1-800-THE-SHACK (1-800-843- 7422) for more information.
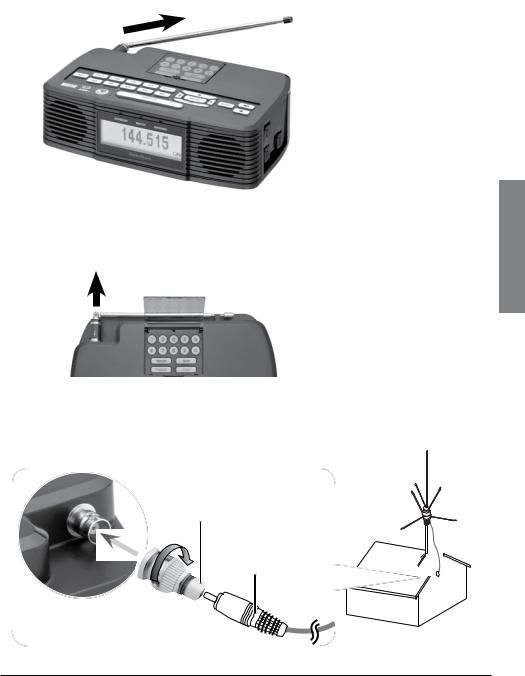
Use the Antenna
Telescopic Antenna
External Antenna
For better reception, you can install an external antenna to your radio.
1. Pull out the installed telescopic antenna.
2.If needed, connect the supplied BNC-to-phono adapter to the phono/RCA plug from your antenna.
3.Connect the external antenna (Follow the installation instructions that came with your external antenna.)
BNC-to-Phono Adapter
Phono/RCA plug
Operation Basic

Basic Operation
Basic Operation
Set the Clock
1.If necessary, press CLOCK to switch to clock mode.
2.Briefly hold CLOCK until the hour digits flash.
3.Use ,,, to set the hour, minute and AM/PM.
4.After setting clock , press CLOCK or SELECT to confirm and exit.
Set the Alarm
1.Slide ALARM 1 or ALARM 2 to SET.
2.Press ,,, to set the alarm hour, minute, and alarm source (buzzer loudness  /
/ /
/ or FM / AM).
3.After setting the alarm, slide ALARM 1 or ALARM 2 to ON/OFF to confirm and exit.
4.To turn the alarm on, slide ALARM 1 / ALARM 2 to ON. To turn it off, slide
ALARM 1 / ALARM 2 to OFF.
When the Alarm Sounds
•The alarm will sound for 2 hours at the set time.
•To pause the alarm for 15 minutes, press SNOOZE.
•When the alarm time expires, the alarm will sound again the next day at the same time.
nNote: The radio automatically exits setting mode if you do not press any button for 15 seconds while setting the alarm or clock.
Using the Radio
Press AM or FM to enter radio mode. Manual Scan – Press or to find a station.
Auto Scan – Briefly hold or until the channels start to change rapidly. The radio automatically stops when it finds a station. If no station is found, the radio will continue scanning.
 Loading...