


 Loading...
A Guide to QuarkXPress 2018
Contents
About this guide .......................................................................... |
1 |
What we’re assuming about you....................................................................... |
1 |
Where to go for help ........................................................................................ |
1 |
Conventions ...................................................................................................... |
1 |
Technology note................................................................................................ |
2 |
The user interface ........................................................................ |
3 |
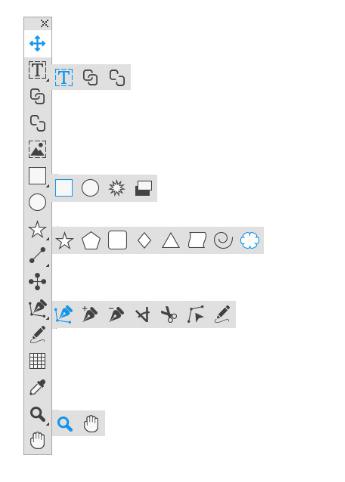
Tools.................................................................................................................. |
3 |
Scissors tool .............................................................................................................. |
6 |
Starburst tool ............................................................................................................ |
6 |
ShapeMaker tools ..................................................................................................... |
7 |
Menus ............................................................................................................. |
24 |
QuarkXPress menu (Mac OS X only) ....................................................................... |
24 |
File menu ................................................................................................................ |
25 |
Edit menu................................................................................................................ |
26 |
Style menu .............................................................................................................. |
28 |
Item menu............................................................................................................... |
31 |
Page menu.............................................................................................................. |
32 |
Layout menu ........................................................................................................... |
33 |
Table menu ............................................................................................................. |
33 |
View menu .............................................................................................................. |
34 |
Utilities menu .......................................................................................................... |
36 |
Window menu......................................................................................................... |
38 |
Help menu .............................................................................................................. |
39 |
Context menus................................................................................................ |
40 |
Palettes ........................................................................................................... |
40 |
Articles palette........................................................................................................ |
41 |
Advanced Image Control palette ........................................................................... |
41 |
Books palette .......................................................................................................... |
42 |
Callout Styles palette .............................................................................................. |
42 |
Colors palette ......................................................................................................... |
42 |
Conditional Styles palette....................................................................................... |
43 |
Content palette....................................................................................................... |
43 |
Content Variables palette ....................................................................................... |
44 |
Footnote Styles palette........................................................................................... |
44 |
A GUIDE TO QUARKXPRESS 2018 | I
Glyphs palette......................................................................................................... |
45 |
Gradients palette .................................................................................................... |
45 |
Grid Styles palette .................................................................................................. |
46 |
Guides palette ........................................................................................................ |
46 |
HTML5 Palette ........................................................................................................ |
46 |
Hyperlinks palette ................................................................................................... |
47 |
Image Editing palette ............................................................................................. |
47 |
Index palette........................................................................................................... |
47 |
Item Styles palette .................................................................................................. |
48 |
JavaScript palette ................................................................................................... |
48 |
JavaScript Debugger palette.................................................................................. |
49 |
Layers palette.......................................................................................................... |
49 |
Lists palette............................................................................................................. |
50 |
Measurements palette ............................................................................................ |
50 |
Page Layout palette................................................................................................ |
55 |
Profile Information palette ...................................................................................... |
56 |
Redline palette........................................................................................................ |
56 |
Scale palette ........................................................................................................... |
56 |
Style Sheets palette ................................................................................................ |
56 |
Table Styles palette................................................................................................. |
57 |
Text Shading Styles palette..................................................................................... |
57 |
Tools palette ........................................................................................................... |
58 |
Palette groups and palette sets .............................................................................. |
58 |
Layout controls ............................................................................................... |
60 |
Views and view sets........................................................................................ |
61 |
Splitting a window .................................................................................................. |
61 |
Creating a window .................................................................................................. |
62 |
Using Story Editor view........................................................................................... |
62 |
View sets ................................................................................................................. |
62 |
Projects and layouts ................................................................... |
65 |
Working with projects..................................................................................... |
65 |
Options for Print layouts ......................................................................................... |
66 |
Creating a project from an IDML file ...................................................................... |
67 |
Saving and naming a QuarkXPress project............................................................. |
68 |
Exporting layouts and projects ............................................................................... |
68 |
Custom page size ................................................................................................... |
69 |
Working with layouts ...................................................................................... |
70 |
Project-level and layout-level resources.................................................................. |
71 |
Adaptive scaling ..................................................................................................... |
72 |
Working with guides ....................................................................................... |
74 |
Column and margin guides .................................................................................... |
74 |
Ruler guides ............................................................................................................ |
74 |
Snapping to guides................................................................................................. |
75 |
Dynamic Guides...................................................................................................... |
75 |
ii | A Guide to QuarkXPress 2018
Undoing and redoing actions.......................................................................... |
76 |
Native QuarkXPress objects ...................................................... |
77 |
Convert an existing item to a native QuarkXPress object.............................. |
77 |
Import an object as a native QuarkXPress object .......................................... |
78 |
Content variables ....................................................................... |
80 |
Edit content variables ..................................................................................... |
81 |
Create a custom content variable ................................................................... |
82 |
Insert a content variable ................................................................................. |
84 |
Boxes, lines, and tables.............................................................. |
85 |
Understanding items and content................................................................... |
85 |
Understanding handles ................................................................................... |
86 |
Understanding Bézier shapes ......................................................................... |
87 |
Drop Shadows................................................................................................. |
90 |
Item Find/Change ........................................................................................... |
91 |
Working with boxes ........................................................................................ |
92 |
Creating text and picture boxes ............................................................................. |
92 |
Resizing boxes ........................................................................................................ |
93 |
Locking box and picture proportions...................................................................... |
94 |
Reshaping boxes..................................................................................................... |
94 |
Adding borders to boxes....................................................................................... |
95 |
Applying colors to boxes ........................................................................................ |
95 |
Applying gradients to boxes................................................................................... |
96 |
Specifying number of columns in text boxes.......................................................... |
96 |
Merging and splitting boxes................................................................................... |
96 |
Adding text and pictures to boxes ......................................................................... |
97 |
Changing box type ................................................................................................. |
97 |
Creating a box from a clipping path....................................................................... |
98 |
Copying attributes from one box to another.......................................................... |
98 |
Super Step and Repeat........................................................................................... |
98 |
ShapeMaker ............................................................................................................ |
99 |
Working with lines ........................................................................................ |
104 |
Creating lines ........................................................................................................ |
105 |
Line modes for orthogonal lines ........................................................................... |
105 |
Resizing lines......................................................................................................... |
106 |
Reshaping lines ..................................................................................................... |
106 |
Controlling line appearance ................................................................................. |
106 |
Joining lines .......................................................................................................... |
107 |
Joining, extending and closing open paths.......................................................... |
107 |
Copying attributes from one line to another ........................................................ |
107 |
Manipulating items ....................................................................................... |
108 |
Selecting items...................................................................................................... |
108 |
Moving items ........................................................................................................ |
109 |
A Guide to QuarkXPress 2018 | iii
Cutting, copying, and pasting items..................................................................... |
109 |
Controlling the stacking order of items ................................................................ |
109 |
Grouping items ..................................................................................................... |
110 |
Duplicating items .................................................................................................. |
110 |
Spacing and aligning items................................................................................... |
111 |
Rotating items....................................................................................................... |
111 |
Skewing items ....................................................................................................... |
112 |
Locking and unlocking items ................................................................................ |
112 |
Anchoring items and groups in text...................................................................... |
112 |
Working with callouts ................................................................................... |
112 |
Understanding callouts ......................................................................................... |
113 |
Creating a callout.................................................................................................. |
115 |
Configuring a callout anchor................................................................................. |
116 |
Working with callout styles ................................................................................... |
116 |
Callouts and runaround ........................................................................................ |
117 |
Working with tables...................................................................................... |
117 |
Drawing a table..................................................................................................... |
118 |
Converting text to tables ...................................................................................... |
119 |
Importing Excel tables .......................................................................................... |
120 |
Importing Excel charts .......................................................................................... |
121 |
Inline tables........................................................................................................... |
122 |
Table styles............................................................................................................ |
123 |
Adding text and pictures to tables ....................................................................... |
124 |
Editing table text .................................................................................................. |
124 |
Linking table cells ................................................................................................. |
125 |
Formatting tables.................................................................................................. |
125 |
Formatting gridlines.............................................................................................. |
125 |
Inserting and deleting rows and columns ............................................................. |
126 |
Combining cells .................................................................................................... |
126 |
Manually resizing tables, rows, and columns ........................................................ |
126 |
Converting tables back to text.............................................................................. |
126 |
Working with tables and groups ........................................................................... |
127 |
Continuing tables in other locations..................................................................... |
127 |
Table Import.......................................................................................................... |
130 |
Text and typography................................................................ |
132 |
Editing text ................................................................................................... |
132 |
Fit Box to Text feature........................................................................................... |
133 |
Importing and exporting text ....................................................................... |
133 |
Importing and exporting text with Unicode options ............................................ |
134 |
Word Filter.................................................................................................... |
134 |
Finding and changing text ............................................................................ |
136 |
Special character codes ........................................................................................ |
137 |
Working with footnotes and endnotes ......................................................... |
138 |
Inserting footnotes and endnotes......................................................................... |
138 |
iv | A Guide to QuarkXPress 2018
Footnote/Endnote styles ...................................................................................... |
139 |
Footnote separators.............................................................................................. |
142 |
Checking spelling .......................................................................................... |
144 |
Auxiliary dictionaries ............................................................................................. |
146 |
Counting words and characters .................................................................... |
146 |
Working with grouped characters ................................................................ |
148 |
Working with non-breaking character sets ................................................... |
148 |
Format painter .............................................................................................. |
148 |
Aligning characters on a line......................................................................... |
149 |
Applying character attributes....................................................................... |
151 |
Applying a font ..................................................................................................... |
152 |
Choosing a font size ............................................................................................. |
152 |
Applying type styles.............................................................................................. |
153 |
Applying color, shade, and opacity ...................................................................... |
153 |
Applying horizontal or vertical scale ..................................................................... |
154 |
Applying baseline shift.......................................................................................... |
154 |
Applying emphasis value ...................................................................................... |
155 |
Applying text stroke.............................................................................................. |
155 |
Controlling half-width characters .......................................................................... |
156 |
Working with font sets .......................................................................................... |
156 |
Applying multiple character attributes ................................................................. |
157 |
Applying paragraph attributes ..................................................................... |
158 |
Controlling alignment ........................................................................................... |
158 |
Controlling indentation......................................................................................... |
159 |
Controlling leading ............................................................................................... |
159 |
Controlling space before and after paragraphs.................................................... |
160 |
Controlling column flow........................................................................................ |
161 |
Setting tabs........................................................................................................... |
165 |
Controlling widow and orphan lines ..................................................................... |
165 |
Working with text shading............................................................................ |
165 |
Creating and editing text shading styles .............................................................. |
166 |
Applying text shading........................................................................................... |
168 |
Controlling kerning ....................................................................................... |
170 |
Kerning manually .................................................................................................. |
170 |
Kerning automatically ........................................................................................... |
170 |
Controlling hyphenation and justification ..................................................... |
171 |
Specifying hyphenation exceptions ...................................................................... |
174 |
Hyphenation exception files ................................................................................. |
175 |
Using discretionary hyphens ................................................................................. |
183 |
Controlling tracking ...................................................................................... |
183 |
Tracking manually ................................................................................................. |
183 |
Editing tracking tables .......................................................................................... |
184 |
Sending................................................................................................................. |
184 |
Working with style sheets............................................................................. |
184 |
A Guide to QuarkXPress 2018 | v
Creating and editing paragraph style sheets........................................................ |
184 |
Creating and editing character style sheets.......................................................... |
187 |
Applying style sheets ............................................................................................ |
188 |
Appending style sheets ........................................................................................ |
189 |
Working with conditional styles.................................................................... |
189 |
Creating a conditional style .................................................................................. |
191 |
Applying a conditional style ................................................................................. |
193 |
Removing conditional styles ................................................................................. |
194 |
Using conditional style markers ............................................................................ |
194 |
Editing a conditional style..................................................................................... |
196 |
Bullets and numbering .................................................................................. |
196 |
Working with bullet styles ..................................................................................... |
196 |
Working with numbering styles............................................................................. |
198 |
Working with outline styles ................................................................................... |
199 |
Bullets, numbering, outlines, and style sheets...................................................... |
201 |
Positioning text in text boxes....................................................................... |
202 |
Using baseline grid ............................................................................................... |
202 |
Aligning text vertically .......................................................................................... |
202 |
Specifying text inset.............................................................................................. |
203 |
Specifying story direction ..................................................................................... |
203 |
Controlling font usage .................................................................................. |
203 |
Converting text to boxes.............................................................................. |
204 |
Using text runaround .................................................................................... |
204 |
Running text around all sides of an item............................................................... |
204 |
Running text around lines and text paths ............................................................. |
205 |
Running text around text boxes............................................................................ |
205 |
Running text around pictures................................................................................ |
205 |
Fine-tuning a runaround path ............................................................................... |
206 |
Editing a runaround path ...................................................................................... |
207 |
Working with text paths ............................................................................... |
207 |
Creating drop caps........................................................................................ |
208 |
Creating rules above and below paragraphs ................................................ |
208 |
Using anchored boxes................................................................................... |
208 |
Anchoring boxes and lines in text......................................................................... |
208 |
Cutting, copying, pasting, and deleting anchored boxes and lines ..................... |
209 |
External anchors.................................................................................................... |
209 |
Working with OpenType Styles..................................................................... |
209 |
Applying OpenType styles.................................................................................... |
211 |
Using ligatures ...................................................................................................... |
213 |
Working with OpenType stylistic sets ................................................................... |
214 |
Working with Color Fonts............................................................................. |
215 |
Working with the Glyphs palette.................................................................. |
216 |
Displaying invisible characters...................................................................... |
218 |
Inserting special characters........................................................................... |
218 |
vi | A Guide to QuarkXPress 2018
Inserting spaces .................................................................................................... |
218 |
Inserting other special characters ......................................................................... |
219 |
Specifying character language ...................................................................... |
219 |
Using font fallback ........................................................................................ |
219 |
Working with font mapping rules ................................................................. |
219 |
Working with design grids............................................................................ |
220 |
Understanding design grids.................................................................................. |
220 |
Design grid basics................................................................................................. |
223 |
Working with grid styles........................................................................................ |
234 |
Using design grids ................................................................................................ |
236 |
Working with rubi text.................................................................................. |
238 |
Rubi alignment options......................................................................................... |
240 |
Mono rubi ............................................................................................................. |
242 |
Rubi base alignment options ................................................................................ |
243 |
Rubi overhang options.......................................................................................... |
244 |
Working with hanging characters ................................................................. |
246 |
Creating hanging character classes ...................................................................... |
248 |
Creating hanging character sets ........................................................................... |
249 |
Applying hanging character sets .......................................................................... |
249 |
Working with Mojigumi sets and classes ...................................................... |
249 |
Creating and editing Mojigumi character classes................................................. |
250 |
Creating and editing Mojigumi sets ..................................................................... |
250 |
Applying Mojigumi sets ........................................................................................ |
254 |
Character mapping for legacy projects......................................................... |
254 |
Mapping for projects that use UDA/VDA characters ............................................ |
254 |
Mapping for projects that use custom characters................................................. |
256 |
Type Tricks..................................................................................................... |
256 |
Make Fraction ....................................................................................................... |
256 |
Make Price ............................................................................................................ |
257 |
Word Space Tracking ............................................................................................ |
257 |
Line Check ............................................................................................................ |
258 |
Custom Underline ................................................................................................. |
259 |
Hyperlinks ..................................................................................................... |
259 |
Creating a destination........................................................................................... |
260 |
Creating an anchor ............................................................................................... |
261 |
Creating a hyperlink using an existing destination ............................................... |
261 |
Creating a hyperlink from scratch ......................................................................... |
262 |
Showing links in the Hyperlinks palette ................................................................ |
262 |
Formatting hyperlinks ........................................................................................... |
262 |
Editing and deleting destinations......................................................................... |
263 |
Editing and deleting anchors................................................................................ |
263 |
Editing and deleting hyperlinks ............................................................................ |
263 |
Navigating using the Hyperlinks palette............................................................... |
263 |
A Guide to QuarkXPress 2018 | vii
Pictures .................................................................................... |
264 |
Working with pictures................................................................................... |
264 |
Importing a picture ............................................................................................... |
264 |
Moving pictures .................................................................................................... |
265 |
Resizing pictures ................................................................................................... |
265 |
Cropping pictures ................................................................................................. |
266 |
Rotating and skewing pictures.............................................................................. |
266 |
Coloring and shading pictures.............................................................................. |
266 |
Flipping pictures ................................................................................................... |
266 |
Listing, verifying status of, and updating pictures ................................................ |
267 |
Specifying background colors for pictures............................................................ |
267 |
Maintaining picture attributes............................................................................... |
267 |
Editing the raster image ....................................................................................... |
267 |
Working with clipping paths ......................................................................... |
273 |
Creating clipping paths......................................................................................... |
273 |
Using embedded clipping paths .......................................................................... |
274 |
Manipulating clipping paths ................................................................................. |
274 |
Creating special effects with clipping paths ......................................................... |
275 |
Working with alpha masks ............................................................................ |
275 |
Working with PSD pictures ........................................................................... |
276 |
Preparing PSD files ............................................................................................... |
276 |
Working with PSD layers ....................................................................................... |
276 |
Working with PSD channels .................................................................................. |
277 |
Working with PSD paths ....................................................................................... |
278 |
Printing PSD pictures ............................................................................................ |
279 |
Cross references....................................................................... |
280 |
Inserting a cross reference............................................................................ |
280 |
Synchronizing cross references ..................................................................... |
282 |
Color, opacity, and drop shadows ............................................ |
283 |
Working with colors ...................................................................................... |
283 |
The Colors palette ................................................................................................ |
283 |
The Colors dialog box .......................................................................................... |
284 |
Creating a color .................................................................................................... |
284 |
Creating gradients ................................................................................................ |
285 |
Editing a color....................................................................................................... |
287 |
Duplicating a color................................................................................................ |
288 |
Deleting a color .................................................................................................... |
288 |
Adding colors using the color picker tool............................................................. |
288 |
Importing colors from another article or project................................................... |
291 |
Changing all instances of one color to another color........................................... |
291 |
Applying color and shade to text ......................................................................... |
291 |
Applying color and shade to lines ........................................................................ |
292 |
Applying transparency blend modes.................................................................... |
292 |
viii | A Guide to QuarkXPress 2018
Working with opacity.................................................................................... |
296 |
Specifying opacity................................................................................................. |
296 |
Specifying opacity for groups ............................................................................... |
297 |
Creating blends with transparency ....................................................................... |
297 |
Color management........................................................................................ |
297 |
Source setups and output setups ......................................................................... |
297 |
The color management experience for users ....................................................... |
298 |
Working with source setups and output setups from a color expert .................... |
299 |
Working in a legacy color management environment .......................................... |
300 |
Proofing color on screen (soft proofing) ............................................................... |
300 |
Color management for experts............................................................................. |
301 |
Creating a source setup ........................................................................................ |
301 |
Creating an output setup...................................................................................... |
302 |
Managing profiles ................................................................................................. |
303 |
Working with drop shadows ......................................................................... |
304 |
Applying drop shadows ........................................................................................ |
304 |
Customizing drop shadows................................................................................... |
304 |
Incorporating drop shadows with items................................................................ |
305 |
Custom Bleeds ......................................................................... |
306 |
Using Custom Bleeds .................................................................................... |
306 |
Using Clip at Bleed Edge .............................................................................. |
307 |
Item Styles ............................................................................... |
308 |
Using the Item Styles palette ....................................................................... |
308 |
Creating Item Styles ..................................................................................... |
309 |
Checking Item Style usage............................................................................ |
310 |
DejaVu (Windows only) ............................................................ |
311 |
Document construction ............................................................ |
312 |
Using automatic page numbering ................................................................. |
312 |
Creating an automatic text box .................................................................... |
312 |
Working with master pages .......................................................................... |
313 |
Creating a master page ........................................................................................ |
313 |
Applying master pages......................................................................................... |
317 |
Updating master pages ........................................................................................ |
317 |
Master pages and layout families ......................................................................... |
318 |
Working with layers ...................................................................................... |
318 |
Understanding layers ............................................................................................ |
319 |
Creating layers ...................................................................................................... |
319 |
Selecting layers ..................................................................................................... |
319 |
Showing and hiding layers.................................................................................... |
320 |
Determining which layer an item is on.................................................................. |
321 |
Deleting layers ...................................................................................................... |
321 |
A Guide to QuarkXPress 2018 | ix
Changing layer options......................................................................................... |
321 |
Moving items to a different layer .......................................................................... |
322 |
Copying and pasting items between layers.......................................................... |
322 |
Changing the stacking order of layers .................................................................. |
323 |
Layers and text runaround .................................................................................... |
323 |
Duplicating layers ................................................................................................. |
324 |
Merging layers ...................................................................................................... |
324 |
Locking items on layers......................................................................................... |
325 |
Using master pages with layers............................................................................. |
325 |
Suppressing printout of layers .............................................................................. |
325 |
Using PDF layers ................................................................................................... |
326 |
Working with lists ......................................................................................... |
326 |
Preparing for lists .................................................................................................. |
326 |
Creating a list ........................................................................................................ |
327 |
Importing lists from another document ................................................................ |
328 |
Navigating with lists.............................................................................................. |
328 |
Building lists.......................................................................................................... |
328 |
Updating lists ........................................................................................................ |
329 |
Working with indexes ................................................................................... |
329 |
Specifying the index marker color ........................................................................ |
329 |
Creating index entries........................................................................................... |
329 |
Creating cross-references ..................................................................................... |
331 |
Editing an index entry........................................................................................... |
332 |
Deleting an index entry ........................................................................................ |
333 |
Specifying the punctuation used in an index........................................................ |
333 |
Building an index .................................................................................................. |
334 |
Editing final indexes.............................................................................................. |
335 |
Working with books...................................................................................... |
336 |
Creating books...................................................................................................... |
336 |
Working with chapters .......................................................................................... |
337 |
Controlling page numbers.................................................................................... |
339 |
Synchronizing chapters ......................................................................................... |
340 |
Printing chapters ................................................................................................... |
341 |
Generate a PDF from a Book................................................................................ |
341 |
Creating indexes and tables of contents for books .............................................. |
342 |
Working with libraries................................................................................... |
343 |
Creating libraries................................................................................................... |
344 |
Adding library entries ........................................................................................... |
344 |
Retrieving library entries ....................................................................................... |
344 |
Manipulating library entries .................................................................................. |
344 |
Working with labels............................................................................................... |
345 |
Saving libraries...................................................................................................... |
345 |
Guides Palette .............................................................................................. |
346 |
Using the Guides palette ...................................................................................... |
346 |
x | A Guide to QuarkXPress 2018
Guides palette menu ............................................................................................ |
347 |
Creating guides with the Guides palette.............................................................. |
348 |
Creating grids with the Guides palette................................................................. |
349 |
Creating rows and columns .................................................................................. |
350 |
Creating bleed and safety guides......................................................................... |
351 |
Scale functionality ......................................................................................... |
353 |
Cloner functionality....................................................................................... |
354 |
ImageGrid functionality ................................................................................ |
356 |
Linkster functionality .................................................................................... |
358 |
Output...................................................................................... |
360 |
Printing layouts............................................................................................. |
360 |
Updating picture paths ......................................................................................... |
360 |
Setting Print dialog box controls .......................................................................... |
360 |
Print dialog box..................................................................................................... |
362 |
Printing color separations ..................................................................................... |
367 |
Printing color composites ..................................................................................... |
368 |
Exporting layouts.......................................................................................... |
369 |
Exporting a layout in EPS format .......................................................................... |
369 |
Exporting a layout in PDF format.......................................................................... |
370 |
Creating a PostScript file....................................................................................... |
372 |
Exporting a layout as an image ............................................................................ |
372 |
Using Collect for Output............................................................................... |
373 |
Working with output styles........................................................................... |
374 |
App Studio output styles ...................................................................................... |
375 |
HTML5 Publication output styles .......................................................................... |
377 |
Working with trapping.................................................................................. |
378 |
Understanding flattening and production issues .......................................... |
379 |
PDF ............................................................................................................... |
379 |
Importing a PDF file into a picture box................................................................. |
379 |
Collaboration and single-sourcing ............................................ |
382 |
Working with shared content........................................................................ |
382 |
Sharing and synchronizing content....................................................................... |
383 |
Understanding synchronization options................................................................ |
385 |
Placing a synchronized item.................................................................................. |
386 |
Placing synchronized content ............................................................................... |
386 |
Importing content into the shared content library................................................ |
386 |
Working with Composition Zones................................................................. |
386 |
Understanding Composition Zones ...................................................................... |
386 |
Creating a Composition Zones item ..................................................................... |
389 |
Placing a Composition Zones item................................................................ |
391 |
Managing multiple pages in a placed Composition Zones item .......................... |
392 |
Editing the attributes of a Composition Zones item............................................. |
392 |
Converting a Composition Zones item to a picture.............................................. |
393 |
A Guide to QuarkXPress 2018 | xi
Unsynchronizing a Composition Zones item......................................................... |
393 |
Editing a composition layout: Content ......................................................... |
393 |
Editing the contents of a composition layout............................................... |
393 |
Unsynchronizing a composition layout.......................................................... |
394 |
Deleting a composition layout ...................................................................... |
394 |
Notes........................................................................................ |
395 |
Creating notes .............................................................................................. |
395 |
Working with notes....................................................................................... |
396 |
Opening and closing notes................................................................................... |
396 |
Showing and hiding notes .................................................................................... |
396 |
Deleting notes ...................................................................................................... |
396 |
Converting between notes and text ..................................................................... |
396 |
Viewing notes by author, date, name, or color..................................................... |
396 |
Moving and resizing notes.................................................................................... |
397 |
Printing notes........................................................................................................ |
397 |
Notes in PDFs ....................................................................................................... |
397 |
Redline ..................................................................................... |
398 |
Tracking changes........................................................................................... |
398 |
Viewing tracked changes.............................................................................. |
399 |
Accepting and rejecting changes .................................................................. |
399 |
Job Jackets .............................................................................. |
401 |
Understanding Job Jackets........................................................................... |
401 |
What are Job Jackets? .......................................................................................... |
402 |
The structure of Job Jackets ................................................................................. |
402 |
Sample Job Jackets workflow............................................................................... |
406 |
Working with Job Jackets............................................................................. |
407 |
Basic mode and Advanced mode......................................................................... |
407 |
Creating Job Jackets files ..................................................................................... |
408 |
Working with Job Tickets ............................................................................. |
412 |
Creating a Job Ticket template ............................................................................ |
412 |
Adding a layout definition to a Job Ticket: Advanced mode............................... |
416 |
Applying a Job Ticket template to a project ........................................................ |
417 |
Applying a layout definition to a project .............................................................. |
420 |
Exporting and importing Job Tickets ................................................................... |
420 |
The default Job Jackets file .......................................................................... |
421 |
Editing the default Job Ticket template: File menu ............................................. |
421 |
Editing the default Job Ticket template: Utilities menu ....................................... |
421 |
Editing the default Job Jackets file....................................................................... |
422 |
Working with Resources: Advanced mode ................................................... |
422 |
Accessing Resources: Advanced mode ................................................................ |
422 |
Configuring Resources: Advanced mode ............................................................. |
423 |
Specifying the location of Resources: Advanced mode ....................................... |
424 |
xii | A Guide to QuarkXPress 2018
Working with Layout Specifications.............................................................. |
425 |
Creating a Layout Specification: Advanced mode................................................ |
425 |
Applying a Layout Specification to a layout ......................................................... |
426 |
Working with Rules and Rule Sets ................................................................ |
427 |
Creating Rules: Advanced mode .......................................................................... |
428 |
Adding Rules to a Rule Set: Advanced mode....................................................... |
430 |
Applying a Rule Set to a layout ............................................................................ |
431 |
Evaluating a layout ....................................................................................... |
432 |
Job Jackets locking....................................................................................... |
434 |
Printing with JDF output .............................................................................. |
435 |
Working with multiple languages............................................. |
437 |
Applying a character language ..................................................................... |
437 |
Changing the program language .................................................................. |
438 |
XTensions software .................................................................. |
439 |
Working with XTensions modules ................................................................. |
439 |
Installing XTensions modules ................................................................................ |
439 |
Enabling and disabling XTensions modules.......................................................... |
440 |
Working with XTensions sets ................................................................................ |
440 |
(Windows only)...................................................................................................... |
440 |
Script XTensions software............................................................................. |
440 |
Box Tools submenu............................................................................................... |
441 |
Grid submenu ....................................................................................................... |
441 |
Images submenu................................................................................................... |
442 |
Picture Box submenu ............................................................................................ |
442 |
Saving submenu.................................................................................................... |
442 |
Special submenu................................................................................................... |
442 |
Stories submenu ................................................................................................... |
443 |
Tables submenu .................................................................................................... |
443 |
Typography submenu ........................................................................................... |
443 |
Preferences .............................................................................. |
444 |
Understanding preferences ......................................................................... |
444 |
Nonmatching Preferences alert ............................................................................ |
444 |
Changes to QuarkXPress preferences .................................................................. |
445 |
What’s in the preferences files .............................................................................. |
445 |
Application preferences................................................................................ |
447 |
Preferences — Application — Display .................................................................. |
447 |
Preferences — Application — Color Theme......................................................... |
448 |
Preferences — Application — Key Shortcuts........................................................ |
448 |
Preferences — Application — Input Settings........................................................ |
449 |
Preferences — Application — Font Fallback ........................................................ |
450 |
Preferences — Application — Undo ..................................................................... |
451 |
Preferences — Application — Open and Save ..................................................... |
451 |
A Guide to QuarkXPress 2018 | xiii
Preferences — Application — XTensions Manager............................................... |
452 |
Preferences — Application — Sharing.................................................................. |
452 |
Preferences — Application — Fonts ..................................................................... |
452 |
Preferences — Application — Text Highlighting .................................................. |
453 |
Preferences — Application — East Asian ............................................................. |
453 |
Preferences — Application — Dynamic Guides Color.......................................... |
453 |
Preferences — Application — File List.................................................................. |
453 |
Preferences — Application — Default Path .......................................................... |
454 |
Preferences — Application — Index ..................................................................... |
454 |
Preferences — Application — Job Jackets ........................................................... |
454 |
Preferences — Application — Notes .................................................................... |
455 |
Preferences — Application — PDF ....................................................................... |
455 |
Preferences — Application — Redline.................................................................. |
455 |
Preferences — Application — Spell-Check........................................................... |
456 |
Preferences — Application — Tables.................................................................... |
456 |
Preferences — Application — Fraction/Price........................................................ |
457 |
Project preferences....................................................................................... |
457 |
Preferences — Project — General ........................................................................ |
457 |
Layout preferences ....................................................................................... |
458 |
Preferences — Layout — General......................................................................... |
458 |
Preferences — Layout — Measurements .............................................................. |
459 |
Preferences — Layout — Paragraph ..................................................................... |
460 |
Preferences — Layout — Character...................................................................... |
461 |
Preferences — Layout — Tools ............................................................................. |
463 |
Preferences — Layout — Guides and Grid ........................................................... |
463 |
Preferences — Layout — Grid Cell Fill.................................................................. |
464 |
Preferences — Layout — Color Manager ............................................................. |
464 |
Preferences — Layout — Layers ........................................................................... |
465 |
Contacting Quark..................................................................... |
466 |
In the Americas ............................................................................................. |
466 |
Outside the Americas ................................................................................... |
466 |
Legal notices ............................................................................ |
467 |
xiv | A Guide to QuarkXPress 2018
ABOUT THIS GUIDE
About this guide
You do not need to read the QuarkXPress® documentation from beginning to end. Instead, use this guide to quickly look up information, find out what you need to know, and get on with your work.
What we’re assuming about you
In writing this guide, we assume that you are familiar with your computer and know how to:
•Launch an application
•Open, save, and close files
•Use menus, dialog boxes, and palettes
•Work within a networked computing environment
•Use the mouse, keyboard commands, and modifier keys
Consult the documentation provided with your computer or other resources if you need more information in any of these areas.
Where to go for help
If you’re new to QuarkXPress, or if you want to explore one of its other longstanding features, consult the following resources:
•Third-party books
•General books about desktop publishing
If your issues are at the system level — saving files, moving files, activating fonts, for example — consult the documentation resources provided with your computer.
Conventions
Formatting conventions highlight information to help you quickly find what you need.
•Bold type style: The names of all dialog boxes, fields, and other controls are set in bold type. For example: “Click OK.”
A GUIDE TO QUARKXPRESS 2018 | 1
ABOUT THIS GUIDE
•References: In descriptions of features, parenthetical references guide you in accessing those features. For example: “The Find/Change dialog box (Edit menu) lets you find and replace text.”
•Arrows: You will often see arrows (>), which map out the menu path to a feature. For example: “Choose Edit > Style Sheets to display the Style Sheets dialog box.”
•Icons: Although many tools and buttons are referenced by name, which you can see by displaying ToolTips, in some cases icons are shown for easy identification. For example, “Click the  button on the Measurements palette to center text.”
•Cross-platform issues: This application is quite consistent across operating systems. However, some labels, buttons, key combinations, and other aspects of the application must differ between Mac OS® and Windows® because of user interface conventions or other factors. In such cases, both the Mac OS and Windows versions are presented, separated by a slash, with the Mac OS version presented first. For example, if the Mac OS version of a button is labeled Select, and the Windows version is labeled Browse, you are directed to “Click
Select/Browse.” More complex cross-platform differences are mentioned in notes or parenthetical statements.
Technology note
Quark developed QuarkXPress for Mac OS X and Windows to give publishers control over typography, color, and collaboration. In addition to unique typographic controls, QuarkXPress offers comprehensive font support, including support for TrueType®, OpenType®, and Unicode®. Designers can use PANTONE® (the PANTONE MATCHING SYSTEM®), Hexachrome®, Trumatch®, Focoltone®, DIC®, and Toyo to add color to page layouts.
QuarkXPress acts as a hub for collaborative publishing environments because it allows you to import and export content in multiple file formats, and to share design components with other users. You can import files from applications such as Microsoft® Word, Microsoft Excel®, Adobe® Illustrator®, and Adobe Photoshop®. QuarkXPress supports copy paste of content from external applications, and allows the user to convert the imported vector picture data to Native Objects. You can output content as PostScript® or in PDF format for Adobe Acrobat® Reader®. QuarkXPress supports export of digital output in ePub, Kindle format, and HTML5 Publications. The ePub file is compatible with all prominent ePub Readers and Google Chrome. The Kindle file is compatible with Kindle devices. You can also export files that can be viewed using Internet Explorer®, Safari®, Google Chrome®, and Firefox®. Using features such as Job Jackets® and Composition Zones®, you can be sure that multiple people share specifications to produce consistent publications, even while working on a single publication simultaneously.
The QuarkXPress software architecture lets you and software developers expand publishing capability. Through XTensions® software technology, third-party developers can create custom modules for QuarkXPress. QuarkXTensions® (Quark® XTensions software) also provide a modular approach for meeting your particular publishing needs. And if you can write AppleScript® scripts, you can use this scripting language from Apple® to automate many QuarkXPress activities.
2 | A Guide to QuarkXPress 2018
THE USER INTERFACE
The user interface
Skimming through the QuarkXPress user interface, you will find that many commands are familiar or self-explanatory. Once you become familiar with QuarkXPress menus and dialog boxes, you will discover that keyboard commands and palettes offer convenient access to features that you can also access through menus.
Tools
The Tools palette
The Tools palette includes the following controls:
A GUIDE TO QUARKXPRESS 2018 | 3
THE USER INTERFACE
•Use the Item tool  to select, move, resize, and reshape items (boxes, lines, text paths, and groups). When the Item tool is not selected, you can press Command/Ctrl to temporarily access the Item tool.
•Use the Text Content tool  to draw text boxes and work with text in boxes.
•Use the Text Linking tool  to link text boxes. To maintain the text in their respective boxes, hold down the Alt/Option key when using this tool.
•Use the Text Unlinking tool  to unlink text boxes. To maintain the text in their respective boxes, hold down the Alt/Option key when using this tool. To move the box out of the text chain, with its text, hold down the Shift+Option keys when using this tool.
•Use the Picture Content tool  to draw picture boxes and work with pictures in boxes.
•Use the Rectangle Box tool  to create a rectangular box. To draw a square box, press and hold Shift while drawing.
•Use the Starburst tool  to create a star-shaped box.
•Use the Composition Zones tool  to create a Composition Zones box.
•Use the Oval Box tool  to create an oval box. To create a circular box, press and hold Shift while drawing.
•Use the Star tool  to create a star shape.
•Use the Polygon tool  to create a polygon shape
•Use the Rounded Rectangle tool  to create a rounded corner rectanglular shape.
•Use the Diamond tool  to create a diamond shape.
•Use the Triangle tool  to create a triangle shape.
•Use the Wave tool  to create a wave shape.
•Use the Spiral tool  to create a spiral shape.
•Use the Cloud tool  to create a cloud shape.
•Use the Line tool  to create straight diagonal lines of any angle. To constrain a line angle to 45 degrees, press and hold Shift while drawing.
•Use the Orthogonal Line tool  to create orthogonal lines.
•Use the Bézier Pen tool  to create Bézier lines and boxes. To constrain a line angle to 45 degrees, press and hold Shift while drawing.
•Use the Add Point tool  to add a point to any type of path. Adding a point to a content box automatically turns the content box into a Bézier item.
•Use the Remove Point tool  to remove a point from any type of path.
4 | A Guide to QuarkXPress 2018

THE USER INTERFACE
•Use the Convert Point tool  to automatically convert corner points to curve points, and curve points to corner points. Click and drag to change the position of a point, the curve of a curved line segment, or the position of a straight line segment. Select this tool and click a rectangular box or straight line to convert the item to a Bézier box or line.
•Use the Scissors tool  to cut an item into distinct paths.
•Use the Select Point tool  to select curves or points so that you can move them or delete them. Press Shift and click to select multiple points. Option- click/Alt-click a point to make it symmetrical.
•Use the Freehand Drawing tool  to draw any shape line or box you want. If you don’t close a freehand box, it remains a line. To automatically close a freehand box, press Option/Alt.
•Use the Item Format Painter tool  to copy all attributes applied to one item and apply them to any other item.
•Use the Tables tool  to create a table.
•Use the Zoom tool  to enlarge or reduce the document view.
•Use the Pan tool  to reposition the active layout.
You can use key commands to declare the box content type as you draw using the
Rectangle Box tool: Press R while drawing to declare Picture content or press T
while drawing to declare Text content. To change the content type of an existing box, right-click on the box and choose Content > T xt, Picture or None
For more information about Bézier boxes and lines, see “Creating Bézier boxes“ and “Creating Bézier lines.”
To pan the layout while a Pen tool is selected, press Shift+Space and then click and drag.
To add text to a line or path, select the Text Content tool  and double-click the line or path.
For more information about Composition Zones, see “Creating a Composition Zones item.”
Users can display the Tools palette (Windows menu) horizontally, as well as vertically. To display the palette horizontally, on Windows Ctrl+double-click the title bar and on Mac OS X dock the tool palette to the top edge.
Tool key commands
When no text box or text path is active, you can switch tools quickly using the following key commands:
Tool |
Windows |
Mac OS X |
|
|
|
Item tool |
V |
V |
|
|
|
Text Content tool |
T |
T |
|
|
|
Text Linking tool |
T |
N |
|
|
|
A Guide to QuarkXPress 2018 | 5
THE USER INTERFACE
Tool |
Windows |
Mac OS X |
|
|
|
Text Unlinking tool |
T |
N |
|
|
|
Picture Content tool |
R |
R |
|
|
|
Rectangle Box tool |
B |
B |
|
|
|
Oval Box tool |
B |
B |
|
|
|
Starburst tool |
B |
B |
|
|
|
ShapeMaker tool |
M |
M |
|
|
|
Composition Zones tool |
L |
B |
|
|
|
Line tool |
P |
L |
|
|
|
Orthogonal Line tool |
P |
L |
|
|
|
Bézier Pen tool |
P |
P |
|
|
|
Add Point tool |
P |
P |
|
|
|
Remove Point tool |
P |
P |
|
|
|
Convert Point tool |
P |
P |
|
|
|
Scissors tool |
P |
P |
|
|
|
Select Point tool |
P |
P |
|
|
|
Freehand Drawing tool |
P |
P |
|
|
|
Item Format Painter tool |
I |
I |
|
|
|
Table tool |
G |
G |
|
|
|
Zoom tool |
Z |
Z |
|
|
|
Pan tool |
X |
X |
|
|
|
Scissors tool
Use the Scissors tool to cut the outline of a box and turn it into a line, or to cut a line or text path into two.
The Scissors tool displays in the QuarkXPress Tools palette. To use the Scissors tool:
1.Select the Scissors tool  .
.
•When a picture box is cut, it is converted to a Bézier line. As a result, the contents of the box are not retained after the cut is made.
•When a text box is cut, it is converted to a text path.
•When a text path is cut, it is converted into two linked text paths.
2.Select the Select Point tool  and click and drag the point to adjust it.
Starburst tool
Use the Starburst tool to quickly and easily create star-shaped boxes. Create a star-shaped picture box using the Starburst tool in two ways. 1 Select the Starburst tool  , and then click and drag.
6 | A Guide to QuarkXPress 2018
THE USER INTERFACE
2 To define specific attributes as you create the star burst box, select the Starburst
tool, and then position the crosshair pointer  where you want the star-shaped box and click once. When the Starburst dialog box displays, enter values for the following fields, and then click OK:
•Star Width
•Star Height
•Number of Spikes
•Spike Depth: Enter the desired distance from the tip of the spike to the base of the spike as a percentage.
•Random Spikes: Enter a value between 0 and 100, where 0 is no randomness applied and 100 is full randomness applied.
ShapeMaker tools
Use the following tools to quickly and easily create different shapes:
•Star tool
•Polygon tool
•Rounded Rectangle tool
•Diamond tool
•Triangle tool
•Wave tool
•Spiral tool
•Cloud tool
Press the m key to toggle through the different shape tools.
You can also access the ShapeMaker tools by selecting Utilities > ShapeMaker. See “ShapeMaker.”
Using the Star tool
To create a star shape in two ways:
1 Select the Star tool  , position the crosshair pointer
  where you want the star and then click and drag.
2 Select the Star tool  , position the crosshair pointer
  where you want the star and click once. The Create Star dialog box displays:
A Guide to QuarkXPress 2018 | 7
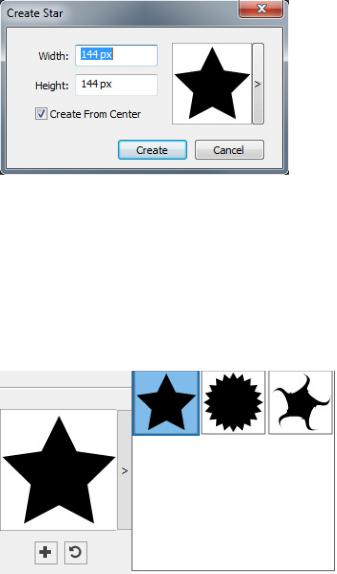
THE USER INTERFACE
Enter values for the following fields:
•Width
•Height
•Select Create From Center to specify that the center of the shape should be where you placed the crosshair point.
You can apply the default attributes or click the arrrow next to the shape preview to select a predefined shape.
Click Create.
Default star settings
To edit the default star settings that will automatically be applied when using this tool, double-click the Star tool. The Edit Star Settings dialog displays:
8 | A Guide to QuarkXPress 2018
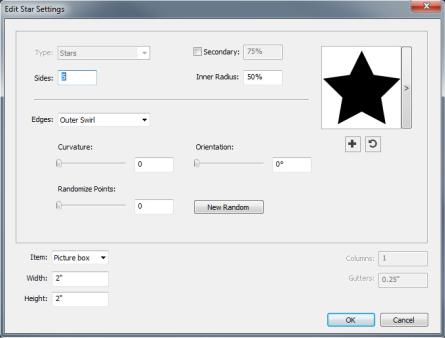
THE USER INTERFACE
Specify the default settings that will be applied when using this tool:
•Check Secondary to add additional secondary sides/points. This allows you to add a different angle/shape in between the sides of a Star shape
•Sides: Specify the number of sides (points) the star will have .
•Inner Radius: Specify the inner radius of each point in the star.
•Edges: Specify the shape the edges of the star will be (Flat, Concave, Convex,
Outer Swirl, Inner Swirl, Opposite Swirl, or Tandem Swirl). If you choose an option other than Flat, you can indicate the curvature of the edges with the
Curvature controls. If you choose one of the Swirl options, you can indicate the direction of the swirl with the Orientation controls.
•Randomize Points: Lets you control the degree of randomness in the shape, from 0 (none) to 100 (maximum).
•New Random: Applies some randomness to the shape.
•Item: Specifies the type of box the shape should be placed into. The choices are
Text Box, Picture Box, None Box, Text Path, and Rule Path.
•Width, Height, Columns, and Gutters: Specifies the box attributes.
To revert to the default shape, click the Reset button  .
.
Once you have defined the default attributes, you can click the Add Preset button  to save this customized shape to use later.
A Guide to QuarkXPress 2018 | 9
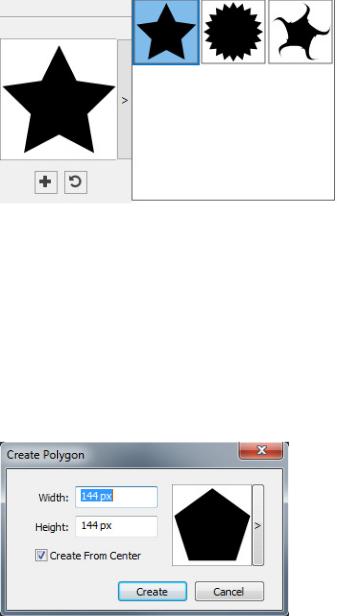
THE USER INTERFACE
To delete a predefined shape, hold down the Alt/Option key while selecting it from the list.
Using the Polygon tool
To create a polygon shape in two ways.:
1.Select the Polygon tool  , position the crosshair pointer
  where you want the polygon and then click and drag.
2.Select the Polygon tool  , position the crosshair pointer
  where you want the polygon and click once. The Create Polygon dialog box displays:
Enter values for the following fields:
•Width
•Height
•Select Create From Center to specify that the center of the shape should be where you placed the crosshair point.
You can apply the default attributes or click the arrrow next to the shape preview to select a predefined shape.
10 | A Guide to QuarkXPress 2018
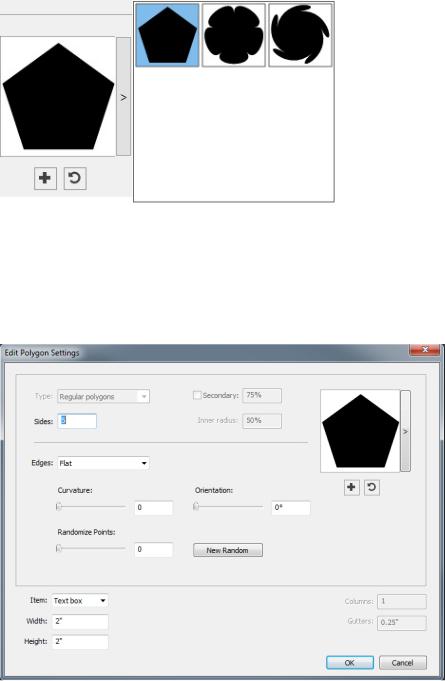
THE USER INTERFACE
Click Create.
Default polygon settings
To edit the default polygon settings that will automatically be applied when using this tool, double-click the Polygon tool. The Edit Polygon Settings dialog displays:
Specify the default settings that will be applied when using this tool:
•Sides: Lets you specify how many sides the polygon has
•Edges: Lets you control whether the edges of the box are flat or curved. If you choose an option other than Flat, you can indicate the curvature of the sides with the Curvature controls. If you choose one of the Swirl options, you can indicate the direction of the swirl with the Orientation controls.
•Randomize Points: Lets you control the degree of randomness in the shape, from 0 (none) to 100 (maximum).
•New Random: Applies some randomness to the shape.
•Item: Specifies the type of box the shape should be placed into. The choices are
Text Box, Picture Box, None Box, Text Path, and Rule Path.
A Guide to QuarkXPress 2018 | 11
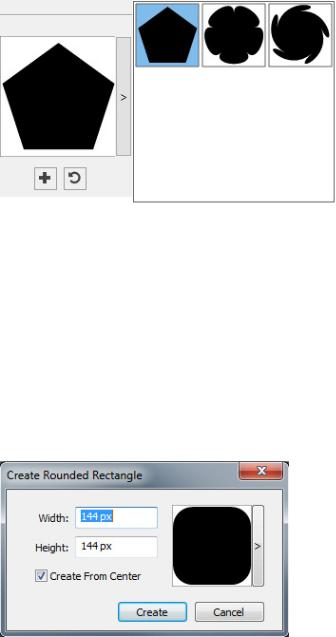
THE USER INTERFACE
• Width, Height, Columns, and Gutters: Specifies the box attributes.
To revert to the default shape, click the Reset button  .
.
Once you have defined the default attributes, you can click the Add Preset button  to save this customized shape to use later.
To delete a predefined shape, hold down the Alt/Option key while selecting it from the list.
Using the Rounded Rectangle tool
To create a rounded rectangle shape in two ways:
1 Select the Rounded Rectangle tool  , position the crosshair pointer
  where you want the star and then click and drag.
2 Select the Rounded Rectangle tool  , position the crosshair pointer
  where you want the rectangle and click once. The Create Rounded Rectangle dialog box displays:
Enter values for the following fields:
•Width
•Height
•Select Create From Center to specify that the center of the shape should be where you placed the crosshair point.
You can apply the default attributes or click the arrrow next to the shape preview to select a predefined shape.
12 | A Guide to QuarkXPress 2018
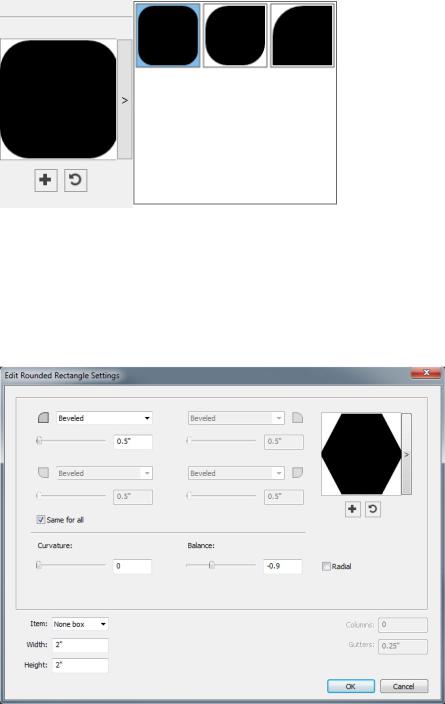
THE USER INTERFACE
Click Create.
Default rounded rectangle settings
To edit the default rounded rectangle settings that will automatically be applied when using this tool, double-click the Rounded Rectangle tool. The Edit Rounded Rectangle Settings dialog displays:
Specify the default settings that will be applied when using this tool:
•Check Same for all to configure all four corners of the shape with a single set of controls. To separately configure each corner of the box uncheck Same for all.
•Use the drop-down menus to specify a corner type (Normal, Rounded, Beveled,
Concave, Pointed, or Inset) and a diameter (for options that involve a diameter).
•Curvature: Controls how curved the corners are if you select an option that includes curvature.
•Balance: For some options, lets you control whether the corners lean toward the sides of the box or toward the top.
A Guide to QuarkXPress 2018 | 13
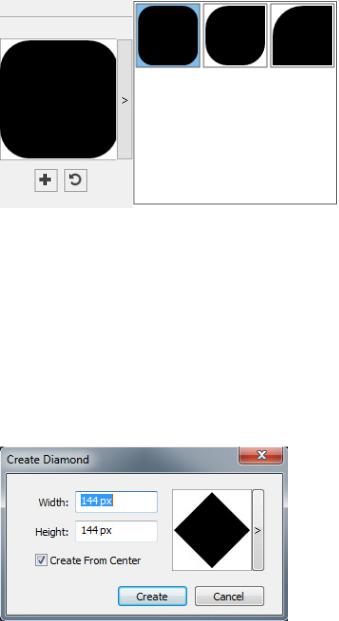
THE USER INTERFACE
•Radial: For some options, lets you control whether the corners of the box are aligned with the center of the box or not.
•Item: Specifies the type of box the shape should be placed into. The choices are
Text Box, Picture Box, None Box, Text Path, and Rule Path.
•Width, Height, Columns, and Gutters: Specifies the box attributes.
To revert to the default shape, click the Reset button  .
.
Once you have defined the default attributes, you can click the Add Preset button  to save this customized shape to use later.
To delete a predefined shape, hold down the Alt/Option key while selecting it from the list.
Using the Diamond tool
To create a diamond shape in two ways:
1 Select the Diamond tool  , position the crosshair pointer
  where you want the diamond and then click and drag.
2 Select the Diamond tool  , position the crosshair pointer
  where you want the diamond and click once. The Create Diamond dialog box displays:
Enter values for the following fields:
•Width
•Height
14 | A Guide to QuarkXPress 2018

THE USER INTERFACE
•Select Create From Center to specify that the center of the shape should be where you placed the crosshair point.
You can apply the default attributes or click the arrrow next to the shape preview to select a predefined shape.
Default diamond settings
To edit the default diamond settings that will automatically be applied when using this tool, double-click the Diamond tool. The Edit Diamond Settings dialog displays:
Specify the default settings that will be applied when using this tool:
•Edges: Specify the shape the edges of the diamond will be (Flat, Concave,
Convex, Outer Swirl, Inner Swirl, Opposite Swirl, or Tandem Swirl). If you choose an option other than Flat, you can indicate the curvature of the eges with the Curvature controls. If you choose one of the Swirl options, you can indicate the direction of the swirl with the Orientation controls.
A Guide to QuarkXPress 2018 | 15
Loading...