


Q-See Q25DVR4ES User's Manual
Q25DVR4ES
Economy Series
User Manual
Contact Us:
Q-See Products
8015 E. Crystal Dr
Anaheim, CA 92807
Website: http://www.q-see.com Customer Service:
Phone: 877-998-3440 x 538
Email: cs@dpsi-usa.com
Tech Support:
Phone: 877-998-3440 x 539
Email: ts@dpsi-usa.com
Fax:
714-998-3509
Rev 101207
Page 1

Q-See Q25DVR4ES User's Manual
Q-SEE Product Warranty
Thank you for choosing our products.
All of our products users have a conditional free warranty repair service for hardware within 12 months starting from purchase date, and a free exchange service within one month (valid for manufacturing defects).
Permanent upgrading service is provided for the software.
Liability Exclusions:
Any product malfunction, abnormalities in operation or damage caused by following reasons are not within the free service scope of our company.
Please select payable service.
(1)Equipment damage caused by improper operation
(2)Improper environment and conditions in/on which the equipment operates, e.g., improper power, environment temperature, humidity and lightening strike etc. that cause equipment damage.
(3)Damage caused by acts of nature: earthquake and fire etc.
(4)Equipment damage caused by the maintenance of personnel not authorized by our company.
(5)Product sold over 12 months ago.
In order to provide various services to you, please complete registration procedure after you purchase the product. Cut off or copy User's Information Card and fax or mail it to us after the card is filled in. You can also register the product by going to the www.q-see.com website and clicking on the Register link.
Customer Information Card
User's Name |
Mr./Mrs. |
Company Name |
|
Postal Address |
|
Postal code |
|
Phone Number |
|
|
|
Model Number of |
|
Product |
|
Serial Number of |
|
Product |
|
Purchase Date |
|
Distributor |
|
Q-See Q25DVR4ES User's Manual
Table of Contents
1.DVR Features


 3 2.Layout


 3 2.1Front Panel


 3 2.2Rear Panel


 4 2.3Remote Control


 4 3.Installation


 5 3.1Installing Hard Drive


 5 3.2Connecting Camera and TV Monitor


 6 3.3Connecting Power Supply


 .6 4.System Boot


 6 4.1Detecting Installed Hard Drive


 6 4.2Recovering Lost Data


 7 4.3Restore Recording Feature


 7 4.4Main Screen


 7 5.DVR Setup


 8 5.1Setup Menu


 8 5.2Camera Select


 9 5.3Record Select


 9 5.4Record Mode


 9 5.5Recording Frame Rate


 10 5.6Recording Quality


 10 5.7Schedule Set


 11 5.8Sub Menu - Auto Record


 11 5.9Sub Menu - Password Enable


 11 5.10Sub Menu - Password Change


 12 5.11Sub Menu - Color Set


 12 5.12Sub Menu - Time Set


 13 5.13Hard Disk Setup


 13 5.14Motion Setup


 14 5.15NTSC/PAL Output Selection


 15 5.16Factory Reset


 15 6.Recording


 16 6.1Start Recording


 16 6.2Stop Recording


 16 6.3Recording Time on Hard Drive


 17 7.Playback


 17 8.USB DVR Access


 18
18
8.1Program Installation


 18
18
8.2Program Buttons


 19 9.Specifications


 22 10.Appendix


 24 10.1System Connection Diagram


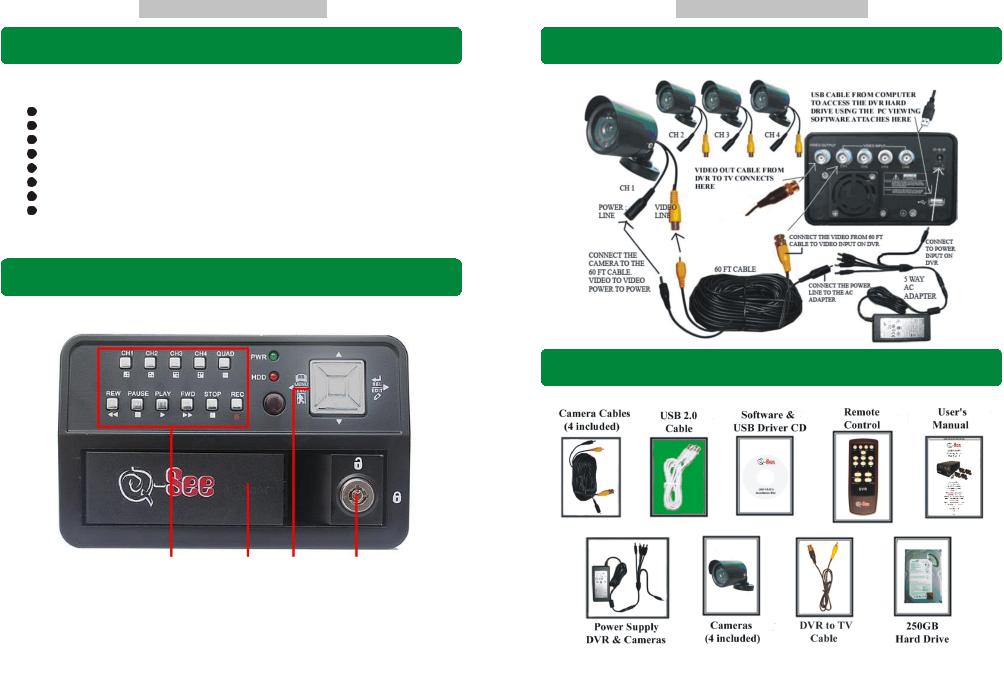
 24 10.2DVR Accessories (included)


 24 Q-SEE Product Warranty


 ..25
..25
Page 25 |
Page 2 |
Q-See Q25DVR4ES User's Manual |
|
Q-See Q25DVR4ES User's Manual |
Chapter 1: DVR Features |
Chapter 10: Appendix - 10.1 System Connection Diagram |
|
4 Channel BNC Camera Input.
1 Channel BNC Video Output.
Video Source Option: NTSC / PAL.
Motion Detection with Sensitivity and Area Settings.
Time Schedule Recording / Motion Triggered Recording.
One ATA-100 Hard Disk Interface.
USB 2.0 Back up to computer.
With Remote Control & Removable Hard Drive Tray.
Chapter 2: Layout - 2.1 Front Panel
Chapter 10: Appendix - 10.2 DVR Accessories (included)
1 |
2 |
3 |
4 |
1.FUNCTION KEYS
2.REMOVABLE HARD DRIVE TRAY
3.SELECTION / DIRECTION KEYS
4.HDD LOCK
Page 3 |
Page 24 |

Q-See Q25DVR4ES User's Manual |
|
Q-See Q25DVR4ES User's Manual |
Chapter 2: Layout - 2.2 Rear Panel
Camera Specifications
1 |
2 |
3 |
4 |
5 |
1. 1 x BNC VIDEO OUTPUT
2. FAN
3. 4 X BNC VIDEO INPUT
4. 12V DC POWER SUPPLY
5. USB 2.0 PORT
Chapter 2: Layout-2.3 Remote Control
01. CH1 |
Select or enlarge CH1 |
02. CH2 |
Select or enlarge CH2 |
03. CH3 |
Select or enlarge CH3 |
04. CH4 |
Select or enlarge CH4 |
05. QUAD |
Quad View |
06. |
Rewind |
07. |
Play recording list |
08. |
Forward |
09. |
Record |
10. |
Pause |
11. |
Stop recording |
13. MENU |
Enter or exit setup menu |
14. UP |
Move up prompt |
15. SEL/Edit |
Modify item |
16. DOWN |
Move down prompt |
Page 23 |
Page 4 |
 Loading...