


AcousticDesign™ Multi-Use Loudspeaker
AD-S52and AD-S52T
All-Weather 133 mm (5.25”) two-way with shielded woofer and neodymium tweeter “T” suffix models: 70V/100V transformer equipped (bypassable)
User Manual |
EN |
|
|
Manual para el Usuario |
ES |
|
|
Manuel d’utilisation |
FR |
|
|
Benutzerhandbuch |
DE |
|
|
|
CH |
|
|
*TD-000139-00*
TD-000139-00 rev.C
IMPORTANT SAFETY PRECAUTIONS & EXPLANATION OF SYMBOLS
EN
1- Read these instructions.
2- Keep these instructions.
3- Heed all warnings.
4- Follow all instructions.
5- Clean only with a dry cloth.
6- Install in accordance with QSC Audio Product’s instructions and a licensed, professional engineer.
7- Do not install near any heat sources such as radiators, heat registers, stoves, or other apparatus (including amplifiers) that produce heat.
8- Only use attachments/accessories from QSC Audio Products, Inc. 9- Use only with mounts or brackets specified by QSC Audio Products.
10Refer all servicing to qualified personnel. Servicing is required when the apparatus has been damaged in any way.
The lightning flash with arrowhead symbol within an equilateral triangle is intended to alert the user to the presence of uninsulated “dangerous” voltage within the product’s enclosure that may be of sufficient magnitude to constitute a risk of electric shock to humans.
The exclamation point within an equilateral triangle is intended to alert the user to the presence of important operating and maintenance (servicing) instructions in this manual.
WARNING! Before placing, installing, rigging, or suspending any speaker product, inspect all hardware, suspension, cabinets, transducers, brackets and associated equipment for damage. Any missing, corroded, deformed or non-load rated component could significantly reduce the strength of the installation, placement, or array. Any such condition severely reduces the safety of the installation and should be immediately corrected. Use only hardware which is rated for the loading conditions of the installation and any possible short-term unexpected overloading. Never exceed the rating of the hardware or equipment. Consult a licensed, professional engineer when any doubt or questions arise regarding a physical equipment installation.
Warranty (USA only; other countries, see your dealer or distributor)
Disclaimer
QSC Audio Products, Inc. is not liable for any damage to amplifiers, or any other equipment that is caused by negligence or improper installation and/or use of this loudspeaker product.
QSC Audio Products 3 Year Limited Warranty
QSC Audio Products, Inc. (“QSC”) guarantees its products to be free from defective material and / or workmanship for a period of three (3) years from date of sale, and will replace defective parts and repair malfunctioning products under this warranty when the defect occurs under normal installation and use - provided the unit is returned to our factory or one of our authorized service stations via pre-paid transportation with a copy of proof of purchase (i.e., sales receipt). This warranty provides that the examination of the return product must indicate, in our judgment, a manufacturing defect. This warranty does not extend to any product which has been subjected to misuse, neglect, accident, improper installation, or where the date code has been removed or defaced. QSC shall not be liable for incidental and/or consequential damages. This warranty gives you specific legal rights. This limited warranty is freely transferable during the term of the warranty period.
Customer may have additional rights, which vary from state to state.
In the event that this product was manufactured for export and sale outside of the United States or its territories, then this limited warranty shall not apply. Removal of the serial number on this product, or purchase of this product from an unauthorized dealer, will void this limited warranty.
Periodically, this warranty is updated. To obtain the most recent version of QSC’s warranty statement, please visit www.qscaudio.com.
Contact us at 800-854-4079 or visit our website at www.qscaudio.com.
© Copyright 2004, QSC Audio Products, Inc.
QSC® is a registered trademark of QSC Audio Products, Inc.
“QSC” and the QSC logo are registered with the U.S. Patent and Trademark Office
2
Introduction
Thank you and congratulations on your purchase of the AcousticDesign AD-S52 multi-use, weather resistant loudspeakers. These products represent the state-of-the-art in all-weather, lightweight SR (sound reinforcement) loudspeaker systems. To get the most from your investment, we encourage you to review this manual carefully.
The AD-S52 loudspeaker systems are full range, high output, two-way designs delivering superior sound quality and high SPL in a lightweight, weather resistant enclosure. The low frequency driver is magnetically shielded and the neodymium high frequency driver has very little stray magnetic field, making the AD-S82 perfect for use near video monitors. The included ball mount provides secure and versatile installation.
These loudspeakers make an excellent choice for a wide variety of SR applications.
AD-S52T models have a 70V/100V matching transformer and tap selector switch. The transformer may be bypassed.
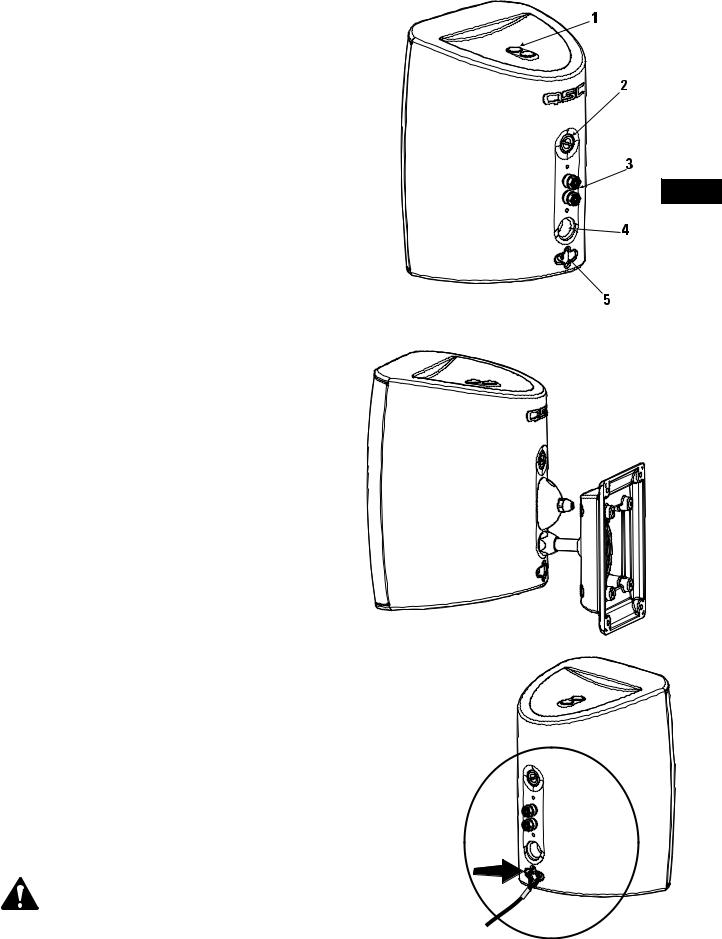
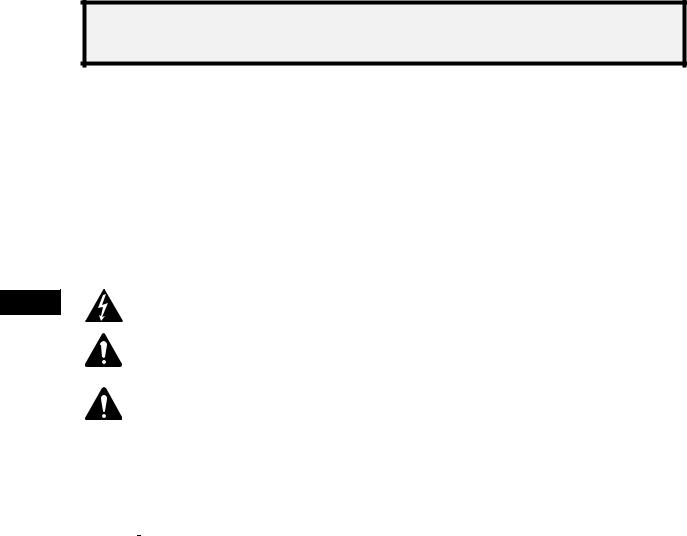
The illustration (at right) highlights product features:
1- two sets of threaded inserts for optional YM-5 yoke mount 2- transformer tap selector (AD-S52T model only)
3- binding post input terminals (weather resistant cover removed) 4- ball mount attachment point (ball mount removed)
5- safety cable attachment point
What’s Included
The carton contains:
•AD-S52 (or AD-S52T) loudspeaker assembly (2 each) •Ball mount assembly (2 each)
•6 mm hex key (Allen wrench) •Input cover (2 each)
•Input cover gasket (2 each, may be part of cover) •Input strain relief bushing (2 each, may be part of cover)
•M4 x 1.4 x 15 mm long pan head Phillips screw (4 ea., for covers) •This User Manual
Mounting
Stand Alone Mounting
If using the loudspeaker only (no ball mount or optional yoke mount) the loudspeaker can be set on any appropriate surface. The cabinet will lean back at a slight angle when set on a flat surface.
When operated at high output levels, the cabinet can vibrate, causing the cabinet to move or creep if set on a hard surface. Use anti-slip matting under the cabinet or self-adhesive rubber feet to keep the cabinet from creeping.
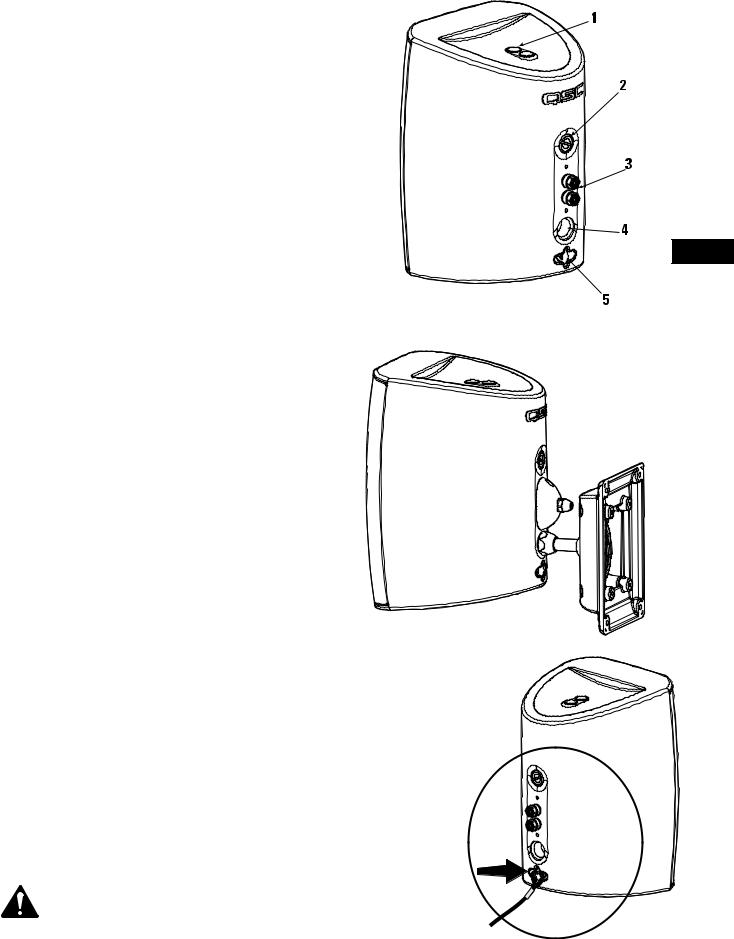
Safety Cable Attachment
On the back of the loudspeaker, near the bottom, is a safety cable attachment point. Install a safety cable strong enough to support several times the weight of the loudspeaker assembly in the event it may fall. The cable must be secured to a secondary support point which is also strong enough to support several times the loudspeaker’s weight.
IMPORTANT! ENSURE THAT THE LOUDSPEAKER IS MOUNTED PROPERLY AND A SAFETY CABLE IS INSTALLED TO RETAIN THE LOUDSPEAKER IN THE EVENT OF A MOUNTING FAILURE.
EN
Attach safety cable here.
3
Mounting (continued)
Ball Mount Adapter
EN
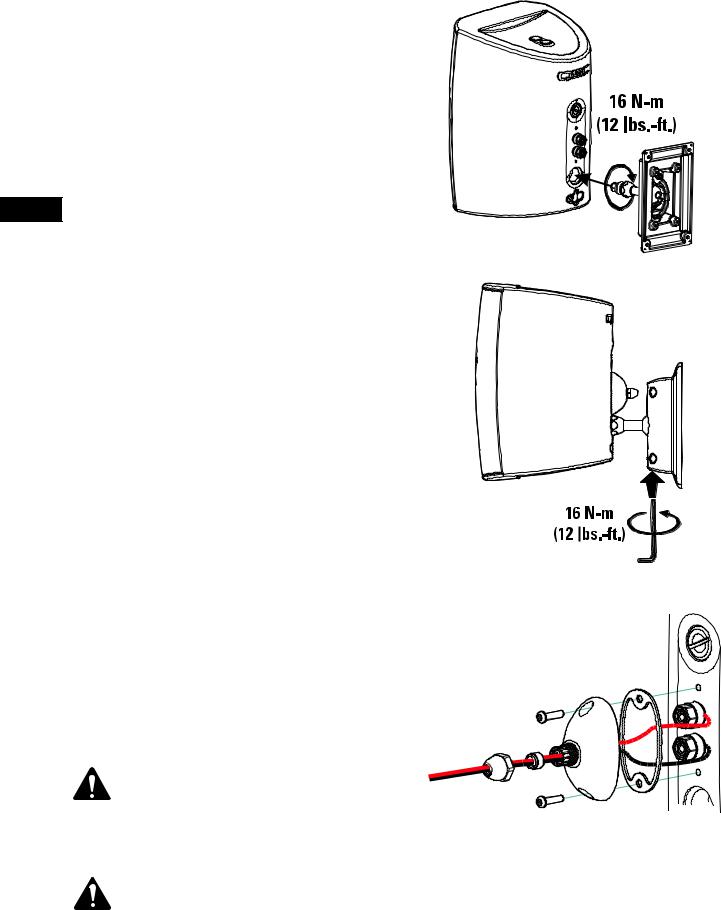
The included ball mount adapter can be attached to almost any flat surface. The ball mount adapter’s back plate can be removed, if desired. This will reduce the overall depth of the assembly and the footprint of the mount on the wall.
To use the wall mount adapter, secure to the mounting surface using four screws. Ensure the mounting surface is sufficiently strong to support the loudspeaker and any vibration or seismic activity. Connect the wiring to the loudspeaker and install the terminal cover, if desired. Thread the adapter into the threaded insert on the bottom of the loudspeaker. Adjust the angle of the loudspeaker and tighten the hardware fully. We recommend 12 lbs.-ft (15 N-m) of tightening torque be applied to both fasteners.
Optional Yoke Mount
There is an optional yoke mount available, model YM-5. Contact your QSC Audio Products representative for details.
Connection
AD-S52 or AD-S52T?
Connection is the same for both models, but for the AD-S52T you must set the transformer Tap Selector Switch to the appropriate setting before applying audio.
Terminations
The binding post terminals will accept:
•bare wire (up to 0.15” or 3.8 mm diameter) •spade lug terminals
•banana plugs (singles or dual 0.75” spaced)
Input Connection Cover (wire termination only)
The loudspeaker includes a weather resistant cover for the input terminals. For proper sealing, the cable jacket must be round (or close to round) and be between 0.12” (3mm) and 0.25” (6.3mm) outside diameter.
•Pass the wires through the compression nut, gasket, and cover.
•Loosen the binding post nuts.
•Strip the wires and insert into binding posts. •Tighten nuts.
•Slide the cover over the terminals and secure using the two machine screws provided.
•Ensure gasket is seated properly; tighten compression nut.
To assure weather-tight connections, make sure the Input Cover fits flush against the loudspeaker cabinet, all gaskets are properly placed, and hardware is tightened sufficiently. Use of the Input Cover may require the use of smaller wire sizes for proper fit.
NOTE! You cannot use banana type connectors or spade lugs when the Input Connection Cover is used. Connect the wires directly to the terminals when using the Input Cover.
4
Wiring
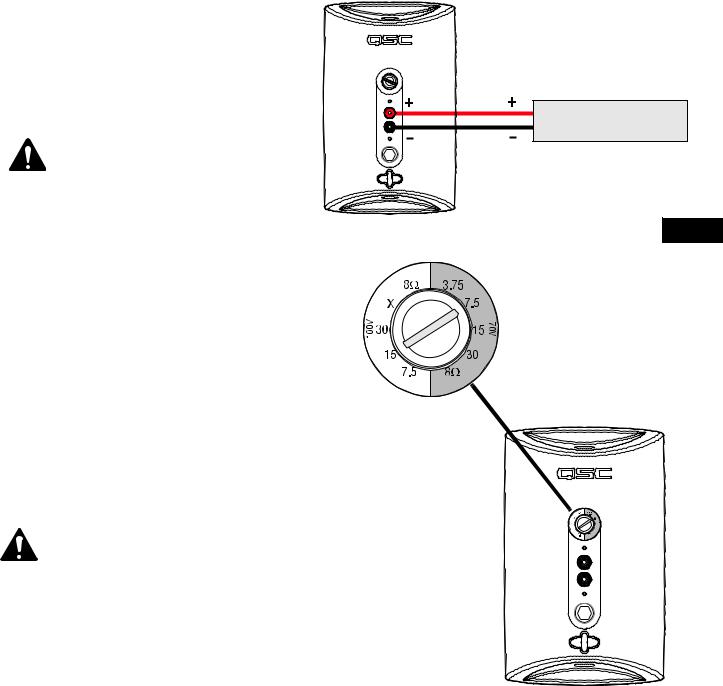
Connect the amplifier’s + and - outputs directly to the loudspeaker’s + (red) and - (black) terminals. The binding post terminals accept wire, spade terminals, or banana plugs. Use only wire connections when using the Input Cover. The terminals are spaced 0.75” (19 mm).
Maintain proper speaker and amplifier connection polarity throughout the entire system. All positive-marked loudspeaker terminals should be connected to positive-marked amplifier output terminals. This will provide the best possible low-frequency output from your system.
AD-S52T 70V/100V Transformer Tap Selection
AMPLIFIER
EN
AD-S52T models are equipped with a 70V/100V matching transformer for distributed audio systems. There is a transformer tap selector switch on the rear panel for setting the power level of the loudspeaker. The switch may also be set for 8 ohm operation, bypassing the transformer completely.
To select the power level, align the slot with the desired power setting number.
Use a coin or flat tip screwdriver to operate the switch.
70V distributed systems: use the right side markings. Select from 3.75, 7.5, 15, or 30 watts.
100V distributed systems: use the left side markings. Select from 7.5, 15, or 30 watts. the “X” position should not be used.
NOTE! 8 ohm setting should be used for 8 ohm audio systems only. Do not use 8 ohm setting when connecting the AD-S52T loudspeaker to 70V/100V distributed audio systems.
Painting the Loudspeaker
The loudspeaker enclosure, grill, and mount can be painted to match any decor, provided the following precautions are observed. The cabinet is made of high impact polystyrene which requires controlled painting procedures in order to obtain good results. Use a paint “system” designed for high impact polystyrene from any reputable paint supplier.
1- Remove the grill.
2- If painting mount and loudspeaker as a unit: Attach the ball mount or yoke mount. 3- Mask the loudspeaker’s input connector.
4- Mask the woofer, tweeter, and port being certain not to apply tape directly to the drivers. Alternatively, the inside of the grill can be completely masked and set in place on the loudspeaker enclosure for painting.
5- Wash the components to be painted with a mild soap and hot water. Be careful not to get water on or into either of the drivers or the input connections. Rinse with hot water. Allow to dry thoroughly.
6- Scuff-sand the components to be painted using red Scotchbrite® pad or 320 - 400 grit sandpaper.
7- Using compressed air, remove all dust from the components to be painted. Do not blow compressed air directly into either driver. 8- Clean the components to be painted.
9- Using a clean, lint-free, white cloth, wipe the components to be painted with suitable prep solution. 10Apply adhesion promoter.
11Apply primer topcoat.
12Apply paint.
13Allow to dry for at least 8 hours before handling.
5
Specifications
|
Frequency Response1: |
7519k Hz (-6 dB) |
|
|
|
6420k Hz (-10 dB) |
|
|
Drivers: |
low frequency- 5.25” (133 mm) magnetically shielded |
|
|
|
high frequencymetallized dome, neodymium magnet structure |
|
|
Maximum Output2: |
105 dB SPL continuous rms output |
|
|
(calculated) |
111 dB SPL peak output |
|
|
Impedance: |
6 ohms nominal |
|
|
|
6 ohms minimum, 286 Hz |
|
EN |
|
||
|
33 ohms maximum, 2.2k Hz |
||
|
Power Rating3: |
||
|
|
|
|
|
rms (IEC 100 hrs): |
70 watts rms |
|
|
recommended amp power: |
140 watts rms |
|
|
Sensitivity: |
86.5 dB, 1 watt, 1 meter, free field (4 pi) |
|
|
Directivity Index: |
500 Hz |
3.4 |
|
|
1000 Hz |
5.5 |
|
|
2000 Hz |
9.3 |
|
|
4000 Hz |
7.9 |
|
|
8000 Hz |
13.6 |
|
|
16000 Hz |
6.8 |
|
Q: |
500 Hz |
2.2 |
|
|
1000 Hz |
3.5 |
|
|
2000 Hz |
8.6 |
|
|
4000 Hz |
6.2 |
|
|
8000 Hz |
23.0 |
|
|
16000 Hz |
4.7 |
|
Weight per pair: |
AD-S52: 15 lb. net, 22 lb. shipping |
|
|
|
AD-S52T: 18 lb. net, 25 lb. shipping |
|
|
Nominal Coverage: |
90° horizontal. x 60° vertical |
|
|
Enclosure and Grill: |
high impact polystyrene, removable metal grill |
|
|
Connectors: |
binding posts (accept up to 0.15” (3.8 mm) diameter wire, banana plugs, or spade lugs) |
|
|
Mounting Hardware: |
Included: ball mount adapter with variable wall plate configurations, alloy construction |
|
|
|
Optional: yoke mount with retaining knobs (model YM-5) |
|
NOTES:
1- All frequency ranges specified refer to measured free-field response (4 pi).
2- Calculated maximum peak SPL at 1 m, free-field, speaker operating at rated rms power pink noise input, 50 Hz to 20 kHz.
3- Maximum input power tested in accordance with IEC recommendations; 50 Hz to 20 kHz band limiting, 6 dB signal crest factor.
Specifications are subject to change without notice.
6

Dimensions
EN
7
IMPORTANTES PRECAUCIONES DE SEGURIDAD
Y EXPLICACIÓN DE LOS SÍMBOLOS
ES
1- Lea estas instrucciones.
2- Conserve estas instrucciones.
3- Observe todas las advertencias.
4- Siga todas las instrucciones.
5- Limpie sólo con un paño seco.
6- Instale de acuerdo con las instrucciones de QSC Audio Product y de un ingeniero profesional licenciado. 7- No instale cerca de fuentes de calor tales como radiadores, registros térmicos, estufas ni otros aparatos
(inclusive amplificadores) que produzcan calor.
8- Sólo use piezas y accesorios de QSC Audio Products, Inc.
9- Use sólo con accesorios de montaje o soportes especificados por QSC Audio Products.
10Refiera todo el servicio a personal calificado. Cuando el aparato haya sido dañado de alguna manera, es necesario proporcionarle servicio.
El símbolo del rayo con una punta de flecha dentro de un triángulo equilátero tiene la intención de alertar al usuario de la presencia de voltaje "peligroso" no aislado dentro de la caja del producto, que puede ser de magnitud suficiente para constituir un riesgo de descarga eléctrica a los seres humanos.
El signo de exclamación dentro de un triángulo equilátero tiene la intención de alertar al usuario de la presencia de importantes instrucciones de operación y mantenimiento (servicio) en este manual.
¡ADVERTENCIA! Antes de colocar, instalar, montar o suspender cualquier altavoz, inspeccione todo el herraje, dispositivos de suspensión, gabinetes, transductores, soportes y equipo asociado para verificar que estén en buenas condiciones. Cualquier componente faltante, corroído, deformado o sin carga nominal podría reducir significativamente la resistencia de la instalación, la colocación o la configuración. Cualquiera de tales condiciones reduce gravemente la seguridad de la instalación y se debe corregir inmediatamente. Use sólo herraje que esté clasificado para las condiciones de carga de la instalación y cualquier carga excesiva a corto plazo inesperada posible. Nunca exceda la clasificación del herraje ni del equipo. Consulte a un ingeniero profesional licenciado cuando surjan dudas o preguntas referentes a la instalación física del equipo.
Garantía (Sólo en EE.UU.; en otros países, consulte a su concesionario o distribuidor)
Liberación de responsabilidad
QSC Audio Products, Inc. no es responsable por ningún daño a los amplificadores, ni a ningún otro equipo que sea causado por negligencia o instalación y/o uso inadecuado de este altavoz.
Garantía limitada de 3 años de QSC Audio Products
QSC Audio Products, Inc. (“QSC”) garantiza que sus productos estarán libres de materiales y/o mano de obra defectuosos por un periodo de tres (3) años a partir de la fecha de la venta, y reemplazará las piezas defectuosas y reparará los productos que funcionen mal bajo esta garantía cuando el defecto ocurra bajo condiciones normales de instalación y uso, siempre y cuando la unidad se devuelva a nuestra fábrica o a una de nuestras estaciones autorizadas de servicio mediante transportación prepagada con una copia del comprobante de compra (por ejemplo, el recibo de la compra). Esta garantía supone que el examen del producto devuelto debe indicar, a nuestro criterio, un defecto de fabricación. Esta garantía no se extiende a ningún producto que haya estado sujeto a mal uso, negligencia, accidente, instalación inadecuada o cuando el código de la fecha se ha quitado o desfigurado. QSC no será responsable por daños incidentales ni resultantes. Esta garantía le otorga derechos legales específicos. Esta garantía limitada se puede transferir libremente durante el término del periodo de la garantía.
El cliente puede tener derechos adicionales, que dependen del estado en que resida.
En el caso de este producto se haya fabricado para su exportación y venta fuera de Estados Unidos o de sus territorios, entonces esta garantía limitada no aplicará. La remoción del número de serie de este producto, o la compra de este producto de un concesionario no autorizado, anulará esta garantía limitada.
Periódicamente se actualiza esta garantía. Para obtener la versión más reciente de la declaración de garantía de QSC, por favor visite www.qscaudio.com.
Comuníquese con nosotros al 800-854-4079 o visite nuestro sitio Web en www.qscaudio.com.
© Derechos de autor 2004, QSC Audio Products, Inc.
QSC® es una marca comercial registrada de QSC Audio Products, Inc.
“QSC” y el logo QSC están registrados con la Oficina de Patentes y Marcas Comerciales de EE.UU.
8
Introducción
Muchas gracias y felicitaciones por la compra de los altavoces AcousticDesign AD-S52 de múltiple uso, resistentes a la intemperie. Estos productos representan lo más avanzado en sistemas de altavoces SR (con refuerzo de sonido), ligeros y resistentes a la intemperie. Para obtener el mejor provecho de su inversión, le recomendamos que revise detenidamente este manual.
Los sistemas de altavoces AD-S52 ofrecen un diseño bidireccional de amplitud total y salida alta que proporciona un sonido de calidad superior y un alto nivel de presión sonora (SPL) en una caja ligera, resistente a la intemperie. El excitador de baja frecuencia está blindado magnéticamente y el excitador de neodimio de alta frecuencia tiene muy poca dispersión magnética, lo que hace que el AD-S82 sea perfecto para usarse en monitores de vídeo. El montaje de esfera incluido permite una instalación segura y versátil. Estos altavoces son una excelente selección para una amplia variedad de aplicaciones SR.
Los modelos AD-S52T tienen un transformador de adaptación de 70V/100V y un conmutador selector de derivaciones. El transformador se puede derivar.
La ilustración (a la derecha) resalta las características del producto:
1- dos juegos de accesorios roscados para el montaje opcional en horquilla YM-5 2- selector de derivación del transformador (sólo modelo AD-S52T)
3- terminales de entrada con bornes de conexión (sin la cubierta de protección contra la intemperie)
4- punto de conexión del montaje de esfera (sin el montaje de esfera) 5- punto de conexión del cable de seguridad
ES
Qué se incluye
La caja contiene:
•Conjunto de altavoces AD-S52 (o AD-S52T) (2 de cada uno) •Conjunto del montaje de esfera (2 de cada uno)
•Llave hexagonal de 6 mm (llave Allen) •Cubierta de la entrada (2 de cada una)
•Junta de la cubierta de la entrada (2 de cada una, puede ser parte de la cubierta)
•Manguito de alivio de tensión de la entrada (2 de cada uno, puede ser parte de la cubierta)
•Tornillo Phillips de cabeza troncocónica M4 x 1.4 x 15 mm de largo (4 de cada uno, para las cubiertas)
•Este Manual para el Usuario
Montaje
Montaje autónomo
Si se va a usar el altavoz solo (sin el montaje de esfera ni el montaje en horquilla) el altavoz se puede colocar en cualquier superficie apropiada. El gabinete se inclinará hacia atrás en un ligero ángulo cuando se lo coloque sobre una superficie plana.
Cuando se opera a niveles altos de salida, el gabinete puede vibrar, y se puede mover o deslizar cuando está colocado sobre una superficie rígida. Use un tapete antideslizante debajo del gabinete o unas patas de caucho autoadhesivas para evitar el deslizamiento del gabinete.
Conexión del cable de seguridad
En la parte posterior del altavoz, cerca de la parte inferior, se encuentra un punto de conexión del cable de seguridad. Instale un cable de seguridad lo suficientemente fuerte como para que soporte varias veces el peso del conjunto del altavoz en caso de que se caiga. El cable debe estar asegurado a un punto de apoyo secundario que también debe ser lo suficientemente fuerte para soportar varias veces el peso del altavoz.
¡IMPORTANTE! ASEGÚRESE DE QUE EL ALTAVOZ ESTÉ MONTADO ADECUADAMENTE Y QUE EL CABLE DE SEGURIDAD ESTÉ INSTALADO PARA RETENER EL ALTAVOZ EN CASO DE UNA FALLA EN EL MONTAJE.
Adjunte el cable
de seguridad aquí.
9
 Loading...