

Page 1

Thank you for purchasing a QSAN XCubeFAS storage system.
This QIG will get you up and running quickly and is applicable to the following mode: XF2026D.
The QIGs in other languages can be downloaded from the QSAN website: https://qsan.com/download
Open the Carrier Handle of a Disk Drive Tray
- The procedure of opening an SFF disk drive tray carrier
handle: shift the carrier handle release button from up to
down; then carrier handle will automatically pop out.
Install an SFF Disk Drive into an SFF Tray
1. Place a disk drive tray onto a stable surface.
2. Remove the supporting bracket. Then align the disk drive
with the connector facing away from the carrier handle.
3. Align the four disk drive tray screw holes on both sides of the
disk tray.
4. Install and tighten all four screws to secure disk drive within
the tray.
XCubeFAS Quick Installation Guide
1 BEFORE YOU BEGIN
Package Contents
Prepare for Installation
More Information
Please prepare the following information for installation.
- System name
- Admin password
- NTP server address
- Management IP address at controller 1
- DNS server address
For additional manual, or compatibility matrix which includes HDD, SSD, HBA,
and switch requirements, please refer to the QSAN download center at
https://qsan.com/download
1
SFF : Small Form Factor / 2.5” disk drive
2
INSTALL THE SOLID-STATE DRIVES
Unlock the Disk Drive Tray
- The standard position of the disk drive tray is locked to
prevent damage during transport.
- To unlock SFF disk drive tray: shift the release button lock
from left to right.
Release Direction
Carrier Handle
Release Button
Unlock Direction
Unlock
Direction
R
e
l
e
a
s
e
B
u
t
t
o
n
L
o
c
k
A QSAN XCubeFAS model includes:
- System chassis (x1)
- Disk drive trays: (x26 SFF¹) for 2U 26-bay
- Cache-to-flash module:
- Battery backup module + flash module (model name:
C2F-BM256G)
- Rail kit (model name: SLR-RM3640)
- AC power cords (x2)
- RS-232 console cable (x2) for dual controller model
- Screws pack for disk drives
- This quick installation guide
Optional accessories:
- 4 port 16Gb/8Gb Fibre Channel host card SFP+
(model name: HQ-16F4S2)
- 2 port 16Gb/8Gb Fibre Channel host card SFP+
(model name: HQ-16F2S2)
- 4 port 10GbE iSCSI host card SFP+
(model name: HQ-10G4S2)
- 2 port 10GBASE-T iSCSI host card RJ45
(model name: HQ-10G2T)
- USB LCM module (model name: LCM-U162)
Install the Tray with the Disk Drive into the System Chassis
-
Users must open the carrier handle of a drive tray before
installing it into the empty bay of the system chassis.
-
The following is the procedure for installing a disk drive
with the tray into the system for SFF disk drive trays:
1. Align a disk drive with the tray to the empty bay you would like
to installand then push it all the way into the disk drive bay until
the carrier handle can be closed.
2. Lock the release button lock by pushing the lock from right
to left.
- Refer to the label on the system chassis for disk drive
numbering. The disk drive numbering for 2U 26-bay system
will be printed on the chassis.
3 INSTALL THE OPTIONAL HOST CARDS
Please refer to the QSAN XCubeFAS Hardware Manual for
detailed instructions.
1. Uninstall host card dummy bracket.
2. Insert the host card to slot 1.
Release Button Lock
1
1
2
2
Supporting Bracket
SFF Tray
Page 2

4 INSTALL THE OPTIONAL RAIL KIT
The rail kit is an accessory for XCubeFAS series product, Please follow the racking instructions below.
CAUTION:
The populated XCubeFAS system can be very heavy, to avoid any potential injury or harm to installers, or damage to the system, we strongly recommend at least two certified operators
or engineers perform the system installation.
4. See the diagram below to determine the meaning of the lights and indicators on the front of the system.
TIP:
Please wait for the controller status LED to turn green on the rear of the chassis before attempting to discover or manage the storage system.
It may take a few minutes to boot the XCubeFAS system.
5
POWER ON THE STORAGE SYSTEM
Connect the Power Cables
Power on the System Components
1. Power on any network switches, routers, or other standalone components.
2. Power on any expansion enclosures that might be a part of the system.
3. Power on the XCubeFAS system by pressing the power button on the front of the system.
Pull the inner rail out and slide the intermediate member back. Install the inner rail onto the chassis.
Insert the chassis to complete the installation.
Rear Bracket
Front Bracket
Note : Please repeat the insta llation steps for the other side.
6
DISCOVER AND SETUP THE SYSTEM
Discover the System
The default setting for the management IP address is DHCP. We provide the XFinder Java utility to search for QSAN products on the network and aid
quick access to the login page of the XEVO web interface.
XFinder Utility
To download XFinder, please visit: https://qsan.com/XFinder
QFinder is a Java based program. To execute this program, JRE (Java Runtime Environment) is required. You can visit the following website to download
and install JRE: http://www.java.com/en/download/
After JRE is installed, run the QFinder.jar program. The SAN storage system in your
network will be detected and listed in the table.
Select the system you are looking for. Double clicking the selected entry will
automatically bring up the browser and display the login page.
1 2
4
Install the outer rail / bracket assembly to the frame.
3
Step 1. Pull the middle rail fully extended in locked position.
Step 2. Ensure ball bearing retainer is located at the front of the middle rail.
Step 3. Insert chassis into middle-outer rail.
Step 4. When hit the stop, pull / push release tab to unlock and retract chassis into rack.
Step 5. Use M5x20 screws to fasten the chassis ear.
1. System Power Button / LED
4. System Status LED
5. USB Port
2. UID (Unique ldentifier) Button / LED
3. System Access LED
4
5
1. Connect power cables from each power supply module
to apower source.
2. Make sure to secure the power cables the power supply
modules so they can not be pulled out accidentally.
TIP:
If the LAN doesn’t have a DHCP server, the management port will be
assigned a fix IP address: 169.254.1.234/16. So you can configure the IP
address of your management computer to the same subnet domain of the
storage system, e.g.: 169.254.1.1/16. Then open a browser and enter
http://169.254.1.234 to go into the login page.
Power Cord
Connector (left)
Power Cord
Connector (right)
Page 3
Storage Management
Initial Setup
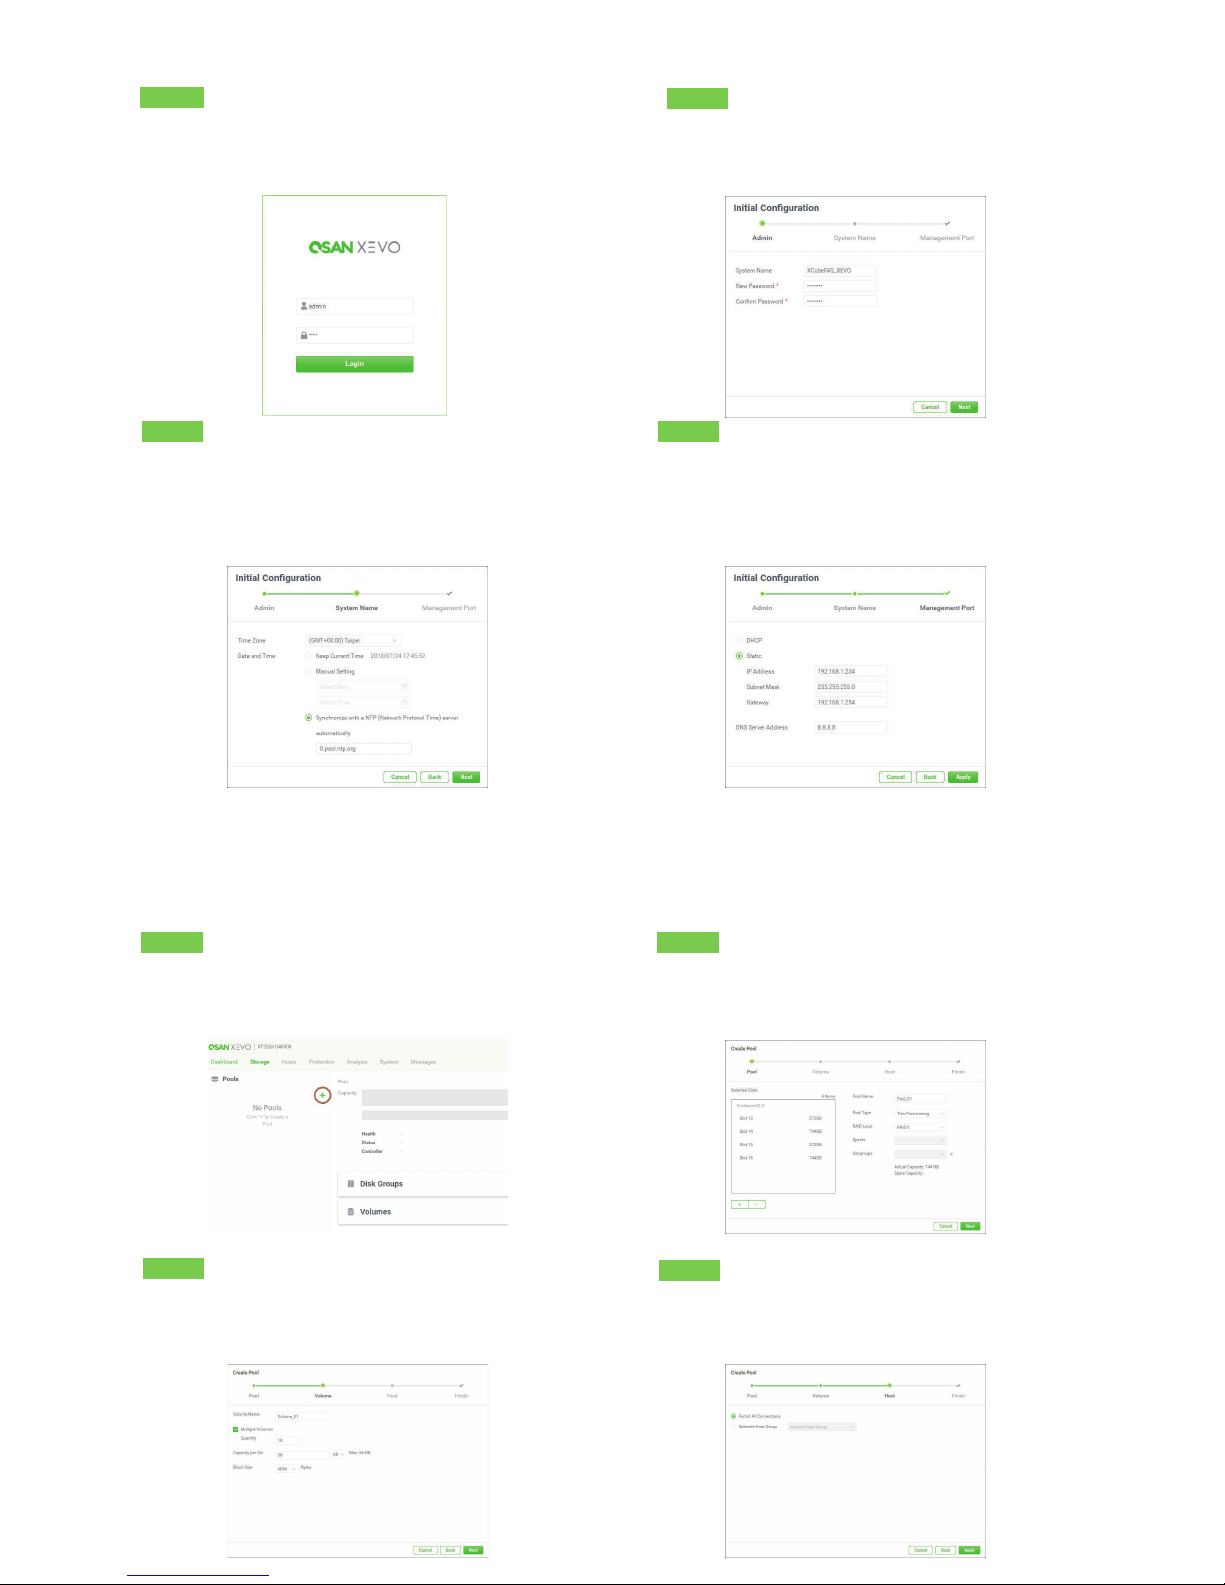
The Initial configuration wizard will guide the first time user to initialize and setup the system quickly.
Step 1
To access the XEVO web interface, you have to enter a username and
password. The initial defaults for the administrator login are:
- Username: admin - Password: 1234
Step 2
- Enter a system name.
- Change the admin’s password.
Step 3
- Select a Time Zone depending on your location.
- Set the local Date and Time. Date and time can be set by manually
or synchronized with a NTP (Network Tim e Protocol) server.
- Click the Next button to proceed.
After all configurations are set up, the system will redirect your page to the new IP address you just set for the management port. Then you have to
login with new admin password.
After initial setup, the next step is to configure the specific storage settings. To deploy your storage, you have to go to the Storage tab first.
Step 1
- Click the “+” icon at the left-top of the Storage tab to pop up a
Create Pool wizard.
Step 4
- Confirm or change the management port IP address and DNS server.
- Click the Apply button to complete the initial configuration.
Step 2
- Click the “+” button to add disks. The system will suggest the default
configurations depend on the amount of disks you have selected.
- Click the Next button to proceed.
Step 3
- Adjust the capacity of the volume to be created and select its block
size.
- Click the Next button to proceed.
Step 4
- Select a host group or leave the option Forbid All Connections and set it
later.
- Click the Next button to proceed.
Page 4

Host Configuration
After creating volumes at the Storage tab, you have to connect the volumes to hosts to complete the storage deployment.
7 GETTING TECHNICAL SUPPORT
Please follow the troubleshooting tips in the XCubeFAS series Hardware Owner’s Manual or the XEVO User’s Manual to diagnose and resolve common
problems during initial setup and configuration. If you are still encountering trouble, please contact QSAN technical support for help using one of the
options below.
- Via the Web: https://qsan.com/support
- Via Telephone: +886-2-7720-2118 extension 136 (Service hours: 09:30 - 18:00, Monday - Friday, UTC+8)
- Via Skype Chat, Skype ID: qsan.support (Service hours: 09:30 - 02:00, Monday - Friday, UTC+8, Summer time: 09:30 - 01:00)
- Via Email: support@qsan.com
©2018 QSAN Technology Inc. All rights reserved. No part of this document may be reproduced or repurposed without the express written consent of QSAN. XCubeFAS, XEVO, XFinder, and the QSAN
logo are trademarks of QSAN. All other trademarks are the property of their respective owners. Features, specifications, model numbers, and product appearance is subject to change without notice.
July 2018
Step 5
- Check the summary of all processes.
- Click the Close button to complete the wizard.
Now you can connect from the server to the FAS storage system.
Step 1
To complete the storage deployment, you have to create a host
group in the Hosts tab.
- Click the “+” icon at the left-top of Hosts tab to pop up a Create
Host Group wizard.
Step 2
- Select iSCSI / IQN or FC / WWN protocol.
- Input one or more host names which comes from your servers and click the
Add to IQN List button to add them into the IQN list.
- Select the IQNs and click the “>” button to move the selected IQNs to the
right side.
- Click the Next button to
proceed.
Step 3
- Select the data ports which are allowed to transmit.
- Click the Next button to proceed.
Step 4
- Select the volumes you want to deploy to your servers.
- Click the “>” button to move the selected volumes to the right side.
- Click the Done button to complete the storage deployment.
 Loading...