


 Loading...
[ Quick Start Guide ]
Q U I C K S T A R T G U I D E
i S C S I H B A I N S T A L L A T I O N |
d |
|
|
Q L A ® 4 0 5 0 / 4 0 5 0 C / 4 0 5 2 C
Q L E 4 0 6 0 C / 4 0 6 2 C
Purchasers of OEM products should consult with the OEM for support.
Support Headquarters |
QLogic Corporation |
|
12984 Valley View Road |
|
Eden Prairie, MN 55344-3657 |
QLogic Web Site |
www.qlogic.com |
Technical Support Web Site |
support.qlogic.com |
Technical Support Email |
support@qlogic.com |
Technical Training Email |
tech.training@qlogic.com |
North American Region |
|
support@qlogic.com |
|
Phone |
+1 952-932-4040 |
Fax |
+1 952-932-4018 |
Europe, Middle East, and Africa Region |
|
emeasupport@qlogic.com |
|
Phone Numbers by Language |
+353 1 6924960 — English |
|
+353 1 6924961 — Français |
|
+353 1 6924962 — Deutsch |
|
+353 1 6924963 — Español |
|
+353 1 6924964 — Português |
|
+353 1 6924965 — Italiano |
Asia Pacific Region |
|
apacsupport@qlogic.com |
|
Phone Numbers by Language |
+63-2-885-6712 — English |
|
+63-2-885-6713 — Mandarin |
|
+63-2-885-6714 — Japanese |
|
+63-2-885-6715 — Korean |
Latin and South America Region |
|
calasupport@qlogic.com |
|
Phone Numbers by Language |
+52 55 5278 7016 — English |
|
+52 55 5278 7017 — Español |
|
+52 55 5278 7015 — Português |

Quick Start Guide
Installation Instructions
This Quick Start Guide describes how to install and configure your new QLogic SANblade® host bus adapter (HBA) and SANsurfer iSCSI HBA Manager application in four simple steps:
Step 1. Verify the package contents.
Step 2. Install the HBA hardware.
Step 3. Install the HBA driver.
Step 4. Install the SANsurfer iSCSI HBA Manager application.
|
Keep the HBA in the antistatic bag until installation. The HBA contains parts that can be damaged by |
|
electrostatic discharge (ESD). Before handling the HBA, use standard methods to discharge static |
CAUTION! |
electricity. Place the HBA on the bag when examining it. Retain the bag for future use. |
System Requirements
Your system must have the functionality described in the following sections to support the QLogic SANblade HBA.
Minimum Software Requirements
Windows® 2000: Service Pack (SP) 4 or later (QLA405x HBAs)
Windows® Server™ 2003 SP 1 or SP 2
Windows XP Pro SP 1 or SP 2
Windows PE 2.0, 2004, 2005
Windows Vista (Business and Enterprise)
Linux™ Red Hat® Enterprise Linux 3.0 Update 7 or later (QLA405x HBAs), Linux Red Hat Enterprise Linux 4.0 Update 3 or later (QLA405x and QLE406xC HBAs)
Novell SUSE Linux: SLES 8 Update 3 or later (QLA405x HBAs), SLES 9 Update 2 or later (QLA405x and QLE406xC HBAs), SLES 10 (QLA405x and QLE406xC HBAs)
Solaris: Solaris 9 or later for Solaris SPARC and x86 (IA32 and x64)
VMware® 3.0.1 (QLA405x HBAs)
NOTE: The operating systems listed above are applicable to all HBA models unless otherwise noted.
Minimum Hardware Requirements
Empty PCI-X 32-bit or PCI-X 64-bit slot (QLA405x HBAs), 2.5-GHz PCI Express x4 slot (QLE406xC HBAs)
PCI-X: 3.3-volt signaling (QLA4050 HBAs); 3.3V or 5-volt signaling (QLA4050/4052C HBAs)
The correct media:
QLA4050: 62.5/125-μM multimode fiber
QLA4050C/4052C, QLE4060C/4062C: UTP copper (Cat5E or Cat6)
The correct connectors:
QLA4050: LC duplex
QLA4050C/4052C, QLE4060C/4062C: RJ45
1

Step 1. Verify the Package Contents
The QLogic HBA is shipped with the following items:
QLogic SANblade HBA
Low-profile bracket (not available in all models)
Quick Start Guide (this document)
SANsurfer® for SANblade iSCSI HBAs CD(s)
Step 2. Install the HBA Hardware
NOTE: When installing the QLogic HBA and driver in a Solaris system that does not already have QLogic HBAs or drivers installed, please install the QLogic Solaris driver before you install the QLogic HBA hardware. This allows Solaris to correctly bind the QLogic Solaris driver to the QLogic HBA. Failure to do so will require an additional system reboot after the driver is loaded.
To install the HBA hardware, you need to open the computer and locate the appropriate bus slot. If necessary, consult your computer system manual for instructions to remove the computer cover.
Depending on the HBA you are installing, the bus connector will look like one of the following samples:
|
|
|
PCI-X |
PCI Express |
|
|
|
|
|
|
|
|
QLA4050 |
N/A |
|
Optical |
|
|
|
|
|
|
|
|
|
|
|
QLA4050C |
QLE4060C |
|
|
|
|
|
|
Copper |
|
QLA4052C |
QLE4062C |
|
|
|
|
|
|
|
|
|
|
Follow these steps to install the HBA hardware: |
|
|
||
1.Power off the computer, then disconnect the power cable.
2.Remove the computer cover and find an empty bus slot.
2
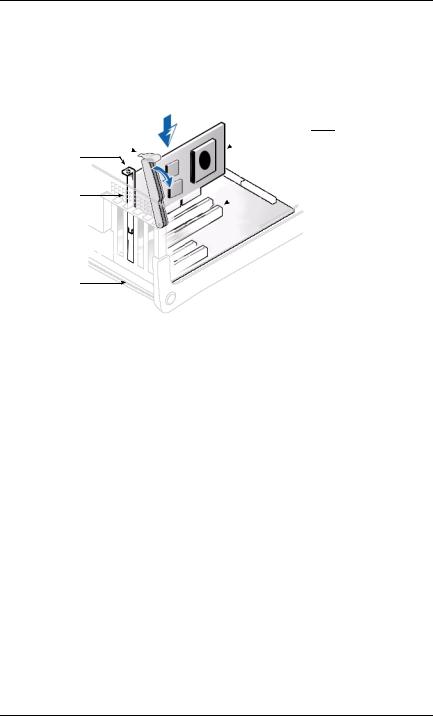
3.Pull out the slot cover (if any) by removing the screw or releasing the lever.
4.Grasp the HBA by the top edge and seat it firmly into the slot.
5.Refasten the HBA’s retaining bracket using the existing screw or lever.
6.Close the computer cover.
7.Plug in the power cable and turn on the computer.
HBA
LEVER
SCREW
64-BIT PCI-X SLOT
(QLA405x HBAs) OR
PCI EXPRESS x4, x8, x16 SLOT (QLE406xC HBAs)
A RETAINING BRACKET
SLOT COVERS 
SYSTEM
CHASSIS
Sample motherboard and slots
Step 3. Install the HBA Driver
After you have completed the hardware installation and turned on the computer, insert the applicable SANsurfer for SANblade iSCSI HBAs CD into the CD-ROM drive, based on your operating system. Follow the instructions below for your operating system.
The latest drivers and documentation can be found on the QLogic Web site, www.qlogic.com.
Windows 2000 (QLA405x HBAs only)
NOTE: If an earlier version of the Windows 2000 driver is already installed, see the readme file for information about updating the existing driver.
Perform the following steps to install the HBA driver for Windows 2000:
1.Log onto the computer as Administrator.
2.Download and save the HBA driver to your hard drive:
a.Type or browse the path to the QLogic driver directory on the applicable SANsurfer for SANblade iSCSI HBAs CD. For example:
<CD-ROM Drive Letter>:\autoplay\iSCSI_HBA_drivers\Windows
b.Locate and launch (double-click) the executable (.exe) file containing the driver.
c.When prompted, type or browse to a location on your hard drive to store the driver files. Click OK.
3.Windows detects the newly installed device, then displays the Found New Hardware with Ethernet Controller message. Click Next.
3
Loading...