

Page 1

SS-257/SS-259
LCD Smart Soldering Iron Station
Main menu
Thank
you for purchasing the
SS-257/SS-259 LCD Smart
Soldering Iron Station. Please read this manual before operating the
SS-257/SS-259.
Please store the manual in a safe, easily accessible place for future
reference.
Features
• Large screen with backlight, LCD contrast and brightness are adjustable.
• Designed with functional manual and shuffle knob for easy setting, more
convenient and user friendly.
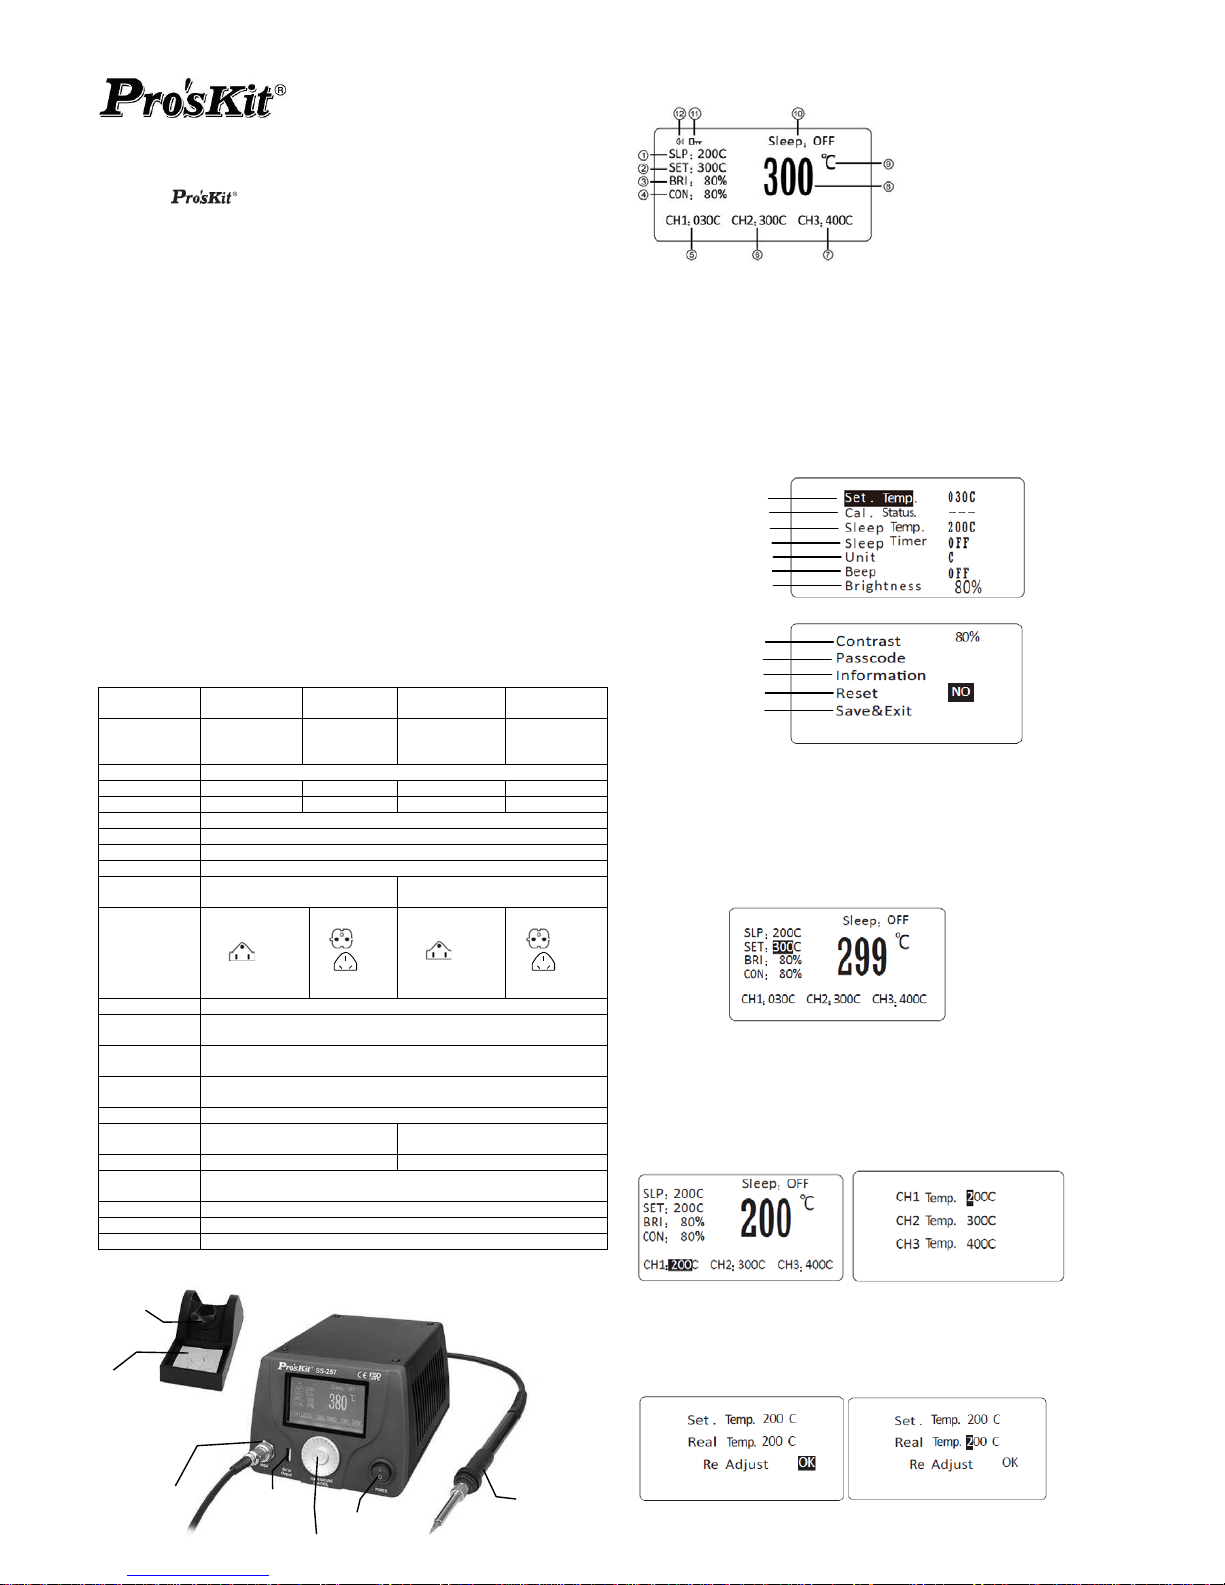
LCD Di
splay function description
1. Temperature of sleep mode 2.Serting temperature
•Comes w
ith high end quad-wire heating element for heat fast recovery.
3.
LCD brightness ratio 4.
LCD screen contrast ratio
• Microprocessor controlled provide best perfo
rmance and accurate
temperature control.
5. CH1 temp
erature memory setting
6. CH2 temperature memory setting
• Temperatu
re calibration function.
7. CH3 temp
erature memory setting
• Auto sleep and w
ake up function, system lock, tip calibration and low
consumption.
8.
Current temperature
9. Temperature unit 10. Current sleep mode
•3 data memorie
s store and recall frequently used temperature values.
1
1. Temperature lock 12. Current beep on or off
•Built-in DC 5V/1A USB port fo
r power supply.
• Complies with CE and ESD standard, conform to RoHS.
Func
tion setting menu
• Comes w
ith UL Certified Wires.
Press knob for 3
sec., it will enter the function setting menu.
• Silicone handpiece cord
wire heat-resistant up to 200°C.
• Resettable fuse protection design.
Packing List
Temperature setting
Please check the
contents of the Soldering station package and confirm
that all the items listed below are included.
Calibration of te
mp.
Soldering
Station………..……………1
Iron Stand(with cleaning sponge).1
Soldering Iron…………………………1
Power Cord…………………..….……1
Alligator Clip Grounding Wire….…....1
User’s Manual……………...…………1
Specifications
Model No.
SS-257E
SS-257EU
SS-257B
SS-257H
SS-259E
SS-259EU
SS-259B
SS-259H
Input Voltage
110~120V
60Hz
220~240V
50Hz
110~120V
60Hz
220~240V
50Hz
Control system Microprocessor-controlled
Power consumption 75W 75W 90W 90W
Output voltage 24VAC 24VAC 25VAC 25VAC
LCD Display 73mmX40mm,240X120 dot. Backlight
Temperature range 30~500°C /86~932°F
Temperature calibration 0~699℃(32~1290℉),Adjustment
Temperature stability ±2℃/±36℉ (no load)
Heating element High end quad-wire heater High end Silver alloy heater
Plug
E
B
H
E
B
H
Sleep mode OFF & 1~360min adjustment
Temperature of sleep
mode
30~400℃/86~752℉
USB port output DC 5V/1A
Memory setting 3set
Temperature lock function yes
Replacement heater 9SS-257-HT 9SS-259-HT
Replacement soldering
iron
9SS-257-SI 9SS-259-SI
Tip-to-ground resistance
potential
≦2Ω/≦2mV
Size (mm) 180 x 150 x 106mm
Weight 2.3kg
Package Color Box
Setting up & operating the Soldering Station
Start to use
Turn on the soldering station, LCD screen will display main menu after
three seconds, last set temperature will display.
Temperature setting
In the main menu, press lower part of shuffle knob, move cursor to
the ”SET” mode (as follow picture),rotate around the shuffle knob in
clockwise direction to increase temperature,counter clockwise direction to
decrease temperature.
Temperature memory choose
In the main menu, press the center of shuffle knob twice, cursor will move
to the CH1/CH2/CH3(see fig.1) ,press the left or right position of shuffle
knob, choose the temperature needed.
Temperature memory setting
Press 3 seconds of shuffle knob into the function setting menu. Press knob
and move cursor to the ”Set. Temp.” mode, press knob again to the
temperature setting (see fig 2.), rotate around the shuffle knob in clockwise
direction to increase temperature, counter clockwise direction to decrease
temperature. Press knob to the next menu, choose the “Save & Exit” save
the temperature and exit the menu.
Fig.1 Fig.2
T
emperature unit
Sleep time setting
Sleep temperature setting
Beep setting
LCD brightness setting
LCD contrast ratio setting
T
emperature passcode
Page 2

Temperature Calibration Set
The soldering iro
n should be recalibrated after changing the iron, or
replacing the heating element or tip.
1 In the function setting menu, move cursor to the “Cal. Status.” mode
then press the knob. Move cursor to the ”Real Temp” , input the real
temperature, move cursor to the “OK” (see fig 3) then press knob confirm
it. Press knob to the next menu, choose the “Save & Exit” save the
temperature and exit menu.
Fig.3 Fig.4
2. Calibrating the iron temperature
Setting the soldering iron station temperature to 350, when the
temperature stabilizes, use soldering iron tip thermometer measurement
and record tip real temperature, follow the procedure 1 input real
temperature (see Fig.4), soldering iron station will calculate temperature.
3 Cal. Status description
3.1. When Cal. status display “----“(see Fig 5),it means temperature
have not calibration.
Fig.5 Fig.6
3.2. When Cal. status display “>>>>” (see Fig 6.),it means “Real Temp.”
has calibrated and increase temperature.
For example :“set.Temp”is 350℃, "Real Temp.”is 320℃, after temperature
calibration as Fig 4.,temperature will rise to 350℃.
3.3.When Cal. status display “<<<<” (see Fig 7.),it means “Real Temp.”
has calibrated and decrease temperature.
3.4. When Cal. status display “
》 》 》” (see Fig 8.),it means “Real Temp.” has
calibrated to max. temperature, can not increase anymore, but it can
decrease temperature.
Fig.7 Fig.8
3.5 When Cal. status display “
《 《 《” (see Fig 9.),it means “Real Temp.” has
calibrated to minimum temperature, can not decrease anymore, but it can
increase temperature.
Fig.9
Auto sleep mode setting
1 In the function setting menu, move cursor to the “Sleep Temp.” mode,
press knob to the setting, temperature range is 30~400℃ (86~752℉),
after setting, press knob to the next menu, choose the “Save & Exit”
save the temperature and exit the menu.
2 In the function setting menu, move cursor to the ”Sleep Timer” mode,
press knob to the setting, sleep timer is adjustable from 1~360 minutes
or setting “OFF” stop sleep mode activate, after setting, press knob to
the next menu, choose the “Save & Exit” save the setting and exit the
menu.
Fig. 10
Fahrenheit and Centigrade Selecti
the “Unit” mode,press knob to
menu, move cursor to the “Be to the
e error code appears, it will have di-di-di alarm sound.
de, press
ob adjustment screen brightness,
menu, move cursor to the “Contrast” mode, press
knob adjustment screen contrast,
ing menu, move cursor to the “Passcode” mode,
g(see Fig 11), input the old code and
he
enu, other function was locked.
e,
setting.
.1
5. Af
s .
on
In the function setting menu, move cursor to
the setting, rotate around the knob , sel ec t “Fahrenheit” or “Centigrade” unit,
press knob to the next menu, choose the “Save & Exit” save the setting
and exit the menu.
Beep setting
In the function setting ep ”, press knob
setting, rotate around the knob , switch “ON” or “OFF” mode, press knob to
the next menu, choose the “Save & Exit” save the setting and exit the
menu.
When beep is setting “ON” mode, press knob will have key beep.
When th
LCD screen brightness adjustment
In the function setting menu, move cursor to the “Brightness” mo
knob to the setting, rotate around the kn
press knob to the next menu, choose the “Save & Exit” save the setting
and exit the menu.
LCD screen contrast adjustment
In the function setting
knob to the setting, rotate around the
press knob to the next menu, choose the “Save & Exit” save the setting
and exit the menu.
Temperature passcode setting
1. In the function sett
press knob into the passcode settin
new code, press knob to the next menu, choose the “Save & Exit” save t
setting and exit the menu.
2. After passcode set, only temperature memory CH1/CH2/CH3 can be
choose in the main m
3. In the main menu, press 3 seconds of shuffle knob, input the passcod
into the function setting menu, now can start to do any
4. Cancel passcode : In the main menu, press 3 seconds of shuffle knob,
input the passcode, into the function setting menu, follow the 12
procedure, set new code “000” .
ter setting, press knob to the next menu, choose the “Save & Exit”
ave the setting and exit the menu
CAUTION: Factory initial setting is “000”, this code without lock
function.
Fig11 pass code setting Input old code error
Change pass code successful have not input new code
Input different new code
Reset
In the function setting eset” mode,initial
s “NO” (see Fig12) rotate around the knob , choose “YES” (see
the
menu, move cursor to the “R
setting i ,
Fig 13) and press knob confirm it, press knob to the next menu, choose
“Save & Exit” save the setting and exit the menu.
Fig. 12 Fig.13
er in the same
Passcode forgot and reset
If forgot passcode, turn off the power, press knob and pow
time, LCD screen will display “input code” (see Fig. 14), input passcode
“888” , the soldering iron station will reset passcode become”000”.
If need to reset passcode, please follow
Temperature passcode setting renew your code.
Fig.14
rther more detailed informati se visit Pro’skit website For fu on, plea
http://www.prokits.com.tw
or scan the QR code
Page 3
示面板 LCD顯
SS-257/259 LCD 智能控溫焊台
感謝您選購 SS-257/259 LCD智能控溫焊台。使用焊台前請詳閱本使用說
為收存,以
CE、ESD、RoHS 安全規範.。
數,設定更簡單。
存取並快速切換至常用溫度
生產線溫度管
間可設定, 能,省電安全
.
芯短路時 變壓器
無誤:
… ……………………………1
SS-257E
SS-257EU
SS-257B
SS-257H
SS-259E
SS-259EU
SS-259B
SS-259H
明書,閱後請妥 備日後查閱。
特性
符合
智
LCD 顯
示幕描述
顯示設置的休眠溫度 2.顯示當前設置溫度 3.顯示設置螢幕的亮度
設置螢幕的對比度 5. 顯示快捷存儲 1 的存儲溫度值
2的存儲溫度值 7. 顯示快捷存儲3的存儲溫度值
8. 顯示溫度值 9. 溫度單位 / 10. 休眠模式
11. 密碼鎖定 12. 顯示蜂鳴器開啟與關閉
設置功能表模式
長按飛梭旋鈕約 3 秒進入設置功能表介面(如下圖)
慧微電
腦(MCU)控制。
功能選單式操作,搭配單鍵式飛梭旋鈕調節參
1.
4.顯示
6. 顯示快
捷存儲
3組快捷鍵
(記憶溫度)可 。
提供溫度密碼鎖定功能,管理員可以輕鬆鎖定設定的焊接溫度,便於
控。
自動校正溫度功能,快速消除溫度偏差,軟體校溫更精確,更方便。
休眠時 按旋鈕退出休眠功
LCD顯示感測器的故障狀況警示功能
一組USB供電5V/1A輸出
ESD(防靜電)安全設計,使用更安全
自恢復保
險功能,確保發熱 不燒
包
電焊台
裝清單: 請檢查產品包裝,以證實所列清單專案正確
………
烙鐵座(包含清潔海綿)…………………1
烙鐵…………………………………………1
使用說明書…………………………………1
電源線………………………………………1
香蕉頭接地線………………………………1
產品規格
產品型號
輸入電壓
AC 110~120V
20V
60Hz
AC
220~240V
50Hz
AC 110~1
60Hz
AC
220~240V
50Hz
控制系統 智慧微電腦(MCU)控制
消耗功率 75W 90W 75W 90W
輸出電壓 26VAC 26VAC 25VAC 25VAC
LCD 顯示面板 LCD 73mmX40 X120 點 功能 mm,240 背光
溫度範圍 30~500℃/86~932℉
智能校溫範圍 0~699℃(32~1290℉),可調整設定
溫度穩定度 ±2℃/±36℉ (無負載)
發熱芯材質
不銹鋼鎳烙絲發熱體(感測器前
置) 銀合金發熱芯
插頭型號
E
B
H
E
B
H
休眠模式 預設關閉, 1~360 分鐘, 可調整設定
休眠模式溫度
範圍 30~400℃/86~752℉
USB 電源輸
出 1組 DC 5V/1A
常用溫度記憶
組數 3組
溫度鎖定 有
選購發熱體型
-257-HT 9SS-259-HT
號
9SS
選購烙鐵型號 9SS-257-SI 9SS-259-SI
烙鐵頭對地電
阻/電壓
≦2Ω/≦2mV
尺寸 (mm) 180 x 150 x 106mm
重量 2.3kg
包裝方式 彩盒
部件名稱
操作介紹
開機
機器 顯示開機畫面約3秒後進入主介面,設置的溫度記
憶為上次關
溫
主畫 梭旋鈕,移動遊標停留在”SET”當前設置溫 上(如下圖),飛
梭旋鈕往順時針 溫度。
通電後,打開電源開關,LCD屏
機前設定的溫度。
度設定方式
面模式,向下按壓飛 度
方向旋轉增加溫度,逆時方向旋轉降低
度 取
度,再次按壓旋鈕進入
下一設置功能表,使用旋鈕選擇“Save & Exit”選項保存並退出功能表
快捷溫 存
主畫面模式,連續按壓 2 次飛梭旋鈕,遊標停留在 CH1/CH2/CH3(如圖 1) ,再次按壓
飛梭旋鈕選取所需溫度。
快捷溫度設定
進入設置菜單,移動遊標至”Set. Temp.”選項,按壓 飛梭旋 鈕,進入快捷 溫度設 定(如圖
2),飛梭旋鈕往順時針方向旋轉增加溫度,逆時方向旋轉降低溫
圖 1 圖 2
至“Cal. Status.”選項,按壓旋鈕進入校溫模式,旋轉旋鈕
p”輸入實測溫度,按壓旋鈕進入下一行,順時針旋轉使遊標停留在 OK
智慧校溫操作
1 進入設置菜單,移動遊標
至”Real Tem
上(如圖 3),按壓旋鈕確認,使用旋鈕選擇“Save & Exit”選項保存並退出功能表
圖 3 圖 4
烙鐵
5V/1A
USB 介面
烙鐵連接插口
飛梭旋鈕
電源開關
烙鐵架
海綿
溫度設定
智慧校溫
睡眠溫度
位
產品資訊
置
睡眠時間設定
溫度單
蜂鳴器開關設定
螢幕亮度調整
螢幕對比調整
溫度鎖定功能
恢復出廠設
儲存並退出
Page 4

2.校溫方法
準備好溫度測溫儀,建議將焊台溫度設定在 350℃(若需校準低於 200 度溫度時,請將
溫度設定在所需溫度),待焊台溫度到達並處於恒溫狀態時,測量烙鐵溫度並記錄(測量
前請先將烙鐵頭鍍上少許焊錫以利緊密接觸),在圖 4 位置輸入所實際測試到的溫度,
機器將自動校準溫度。
3 溫度校準狀態說明
arus顯示”---“(見圖5),表示焊台溫度未被校準過,出廠時通過物理方法
(
3.1當Cal. S
t
校溫電位器)達到最佳狀態。
圖.5 圖.6
被校準調高過。
校準後,溫度將由 320℃調升
350℃。
us <<<< 7),表示焊台溫度已被校準過,溫度已向下調整。
3.2 當Cal. Starus顯示“>>>>” (見圖6),表示焊台溫度已
例:設置溫度 350℃,實際溫度 320℃,如圖 4 進行溫度
到
3.3 當Cal. Star 顯示“ ”(見圖
圖7 .8 圖
3.4 當Cal. Starus顯示“ 》 》 ” (見圖8),表示焊台溫度向上調整已經達限制或校溫
幅度過大,出於機器安全考慮,此時無法再繼續向上調整溫度,但可向下調整。
3.5當Cal. Starus顯示“ 《 《 ” (見圖9),表示焊台溫度向下調整已經達限制或校溫
幅度過大,出於機器安全考慮,此時無法再繼續向下調整溫度,但可向上調整。
圖9
睡眠溫度與睡眠時間設定
1 進入設置菜單,移動遊標至“Sleep Temp.”選項,按壓旋鈕進入睡眠溫度設定,睡眠
溫度可設置範圍為 30~400℃(86~752℉),設置完成後,使用旋鈕選擇“Save & Exit”
選項保存並退出功能表
2 進入設置菜單,移動遊標至”Sleep Timer”選項,按壓旋鈕進入睡眠時間調整,睡眠時
間可設置範圍為 OFF 或 1~360 分鐘,設置完成後,使用旋鈕選擇“Save & E it”選x
項保存並退出功能表
注意:
睡眠時間可設置為 OFF 或 1~360 分鐘,當設定為 OFF 時產品關閉睡眠功能。睡眠功
能開啟後,如果在設定的待機時間內沒有進行任何的焊接使用或設置等操作,焊台將進
入睡眠狀態(如圖 10),同時溫度會逐漸下降到所設定的睡眠溫度內進入休眠狀態。當
需要進行焊接時,按任意鍵喚起焊台,焊台會升溫到之前設置的溫度後即可開始工作。
圖10
溫度單位切換
前
“S 出功能表
蜂鳴器開關設定
進入設置 ,移動遊標至“Beep”選項,按壓旋鈕進入蜂鳴器設置,
螢幕亮度調整
進入設置功能表,移動遊標至“Brightness”選項,按壓旋鈕進入螢
鈕可調整亮度,再次按壓旋鈕後並選擇“Save & Exit”選項保存並
螢幕對比度調整
進入設置功能表,移動遊標至“Contrast”選項,按壓旋鈕進入螢幕對比度調整,旋轉旋
鈕可調整對比度,再次按壓旋鈕後並選擇“Save & Exit”選項保存並退出功能表
溫度鎖定功能
1 進入設置菜單,移動遊標至“Passcode”選項,按壓旋鈕進入密碼設定狀態
(如圖 11) ,在第一行“Input The old code”輸入當前密碼(原始為“000”亦代表無密碼狀
態),在第二行“Input The new code”輸入新密碼,在第三行“Confirm The new code”再
次輸入新密碼。設定密碼完成後,使用旋鈕選擇“Save 項保存並退出功
後,整機功能均被鎖定,只保留快捷溫度選取功能,以方便生產線
置
在主畫面模式,長按飛梭旋鈕 3 秒後,輸入當前密碼,進入設置功
能表,如步驟 1 操作,將新 定為“000”後即為無密碼狀態。
& Exit”選
能表
2 當密
碼設置成功
不同溫度需求的操作。
3 解鎖操作,在主畫面模式,長按飛梭旋鈕 3 秒後,輸入當前密碼,進入設置功能表,
此時可以依據需要的功能進行設
4 取消密碼設定,
密碼設
5 設定密碼完成後,使用旋鈕選擇“Save & Exit”選項保存並退出功能表
注:原始密 “0 0”,代表碼為 0 無密碼狀態
圖 11. 密碼設定畫面 密碼設定錯誤
密碼修改成功 未輸入新密碼
兩次輸入新密碼不一致
恢復出廠設定
進入設置功能表,移動遊標至“Reset”選項,按壓旋鈕進入恢復出廠設定,此時顯示默
認為“NO”(如圖 12),旋轉旋鈕選擇為“YES”(如圖 13)後按壓旋鈕確認,並選擇“Save &
Exit”選項保存並退出功能表
圖 12 圖 13
密碼重設
源開關開啟焊台,
此時出現密碼重設介面(如圖 14),輸入密碼“888”即可將密碼恢復為“000”(即無密碼狀
態),若需要重新設定密碼請依照溫度鎖定功能重新設定。
當所設定密碼忘記時,關機狀態下按住飛梭旋鈕不放手,同時按下電
進入設置
功能表,移動遊標至“Unit”選項,按壓旋鈕進入溫度單位設置,此時顯示為當
的溫度單位,旋轉旋鈕切換”℃”攝氏度 或”℉””華氏度單位,再次按壓旋鈕後並選擇
ave & Exit”選項保存並退
功能表
圖 14
www.prokits.com.tw/
旋轉旋鈕
可選擇蜂鳴器”ON”開啟或”OFF”關閉狀態,再次按壓旋鈕後並選擇“Save &
Exit”選項保存並退出功能表
當蜂鳴器設定為“ ON”時, 按壓旋鈕會有按鍵音, 同時當出現錯誤訊息 ERROR 代碼
時,會出現“滴-滴-滴”警報聲。
更詳細完整的操作說明及產品介紹,請至寶工官網下載
http://
或掃瞄二維條碼
幕亮度調整,旋轉旋
退出功能表
Page 5

SS-257/259 LCD 智能控温焊台
感谢您选购 SS-257/259 LCD智能控温焊台。使用焊台前请详阅
明书,阅后请妥为收存,以备日后查阅。
功能选单式操作,搭配单键式飞梭旋钮调节参数,设定更简单。
3组快捷键(记忆温度)可存取并快速切换至常用温度。
提供温度密码锁定功能,管理员可以轻松锁定设定的焊接温度,便于生产
线温度管控。
自动更正温度功能,快速消除温度偏差,软件校温更精确,更方便。
休眠时间可设定,按旋钮退出休眠功能,省电安全
LCD显示传感器的故障状况警示
一组USB供电5V/1A输出
ESD(防静电)安全设计,使用更安全.
自恢复保险功能,确保发热芯短路时不烧变压器
目正确无误:
铁座(包含清洁海绵)…………………1
…………………………………………1
用说明书…………………………………1
源线………………………………………1
蕉头接地线………………………………1
产品规格
产品型号
SS-257E
SS-257EU
SS-257B
SS-257H
SS-259E
SS-259EU
SS-259B
SS-259H
本使用说
特性
符合CE、ESD、RoHS 安全规
范.。
智慧微电脑(MCU)控制。
功能
包装清单: 请检查产品包
装,以证实所列清单项
电焊台………………………………………1
烙
烙铁
使
电
香
输入电压
AC
110~120V
AC
220~240V
AC
110~120
60Hz 50Hz
V
60Hz
AC
220~240V
50Hz
控制系统 智慧微电脑(MCU)控制
消耗功率 75W 90W 90W 75W
输出电压 26VAC 26VAC 25VAC 25VAC
LCD 显示面板 LCD 73mmX40mm,240X120 点 背光功能
温度范围 30~500℃/86~932℉
智能校温范围 0~699℃(32~1290℉),可调整设定
温 稳定度 /±36 ( ) 度 ±2℃ ℉ 无负载
发热芯材质
发热体(传感器
前置)
银合金发热芯
不锈钢镍烙丝
插头型号
E
B
H
E
B
H
休眠模式 预设关闭, 1~360 分钟, 可调整设定
休眠模式温度范围 30~400℃/86~752℉
USB 电源输出 1组 DC 5V/1A
常用温度记忆组数 3组
温度锁定 有
选购发热体型号 9SS-257-HT 9SS-259-HT
选购烙铁型号 9SS-257-SI 9SS-259-SI
烙铁头对地电阻/电
压
≦2Ω/≦2mV
尺寸 (mm) 180 x 150 x 106mm
重量 2.3kg
包装方式 彩盒
部件名称
L 面板 CD显示
LCD 显示屏描述
休眠温度 2.显示当前设置温度 3.显示设置屏幕的亮度
4.显示设置屏幕的对比度 5. 显示快捷存储 1 的存储温度值
6. 显示快捷存储2的存储温度值 7. 显示快捷存储3的存储温度值
8. 显示温度值 9. 温度单位 ℃/℉ 10. 休眠模式
码锁定 12. 显示蜂鸣器开启与关闭
设置菜单模式
长按飞梭旋钮约 3 秒进入设置菜单接口(如下图)
1.显示设置的
11. 密
度设定
操作介绍
开机
机器通电后,打开电源开关,LCD屏显示开机画面约3秒后进入主接口,设置的温度记
忆为上次关机前设定的温度。
上(如下图),飞
温度设定方式
主画面模式,向下按压飞梭旋钮,移动游标停留在”SET”当前设置温度
梭旋钮往顺时针方向旋转增加温度,逆时方向旋转降低温度。
快捷温度存
主画面模式 2 次飞梭旋钮,游标停留在 CH1/CH2/CH3(如图 1) ,再次按压
飞梭旋 。
快捷温度设
进入 ”选项,按压飞梭旋钮,进入快捷温度设定(如图
2),飞 温度,逆时方向旋转降低温度, 按压旋钮进入
下一设置菜单,使用旋钮选择“Save & Exit”选项保存并退出菜单
取
,连续按压
钮选取所需温度
定
设置菜单,移动游标至”Set. Temp.
梭旋钮往顺时针方向旋转增加 再次
图 1 图 2
使用旋钮选择“Save & Exit”选项保存并退出菜单
智能校温
1 进入操作设置菜单,移动游标至“Cal. Status.”选项,按压旋钮进入校温模式,旋转旋钮
至”Real Temp”输入实测温度,按压旋钮进入下一行,顺时针旋转使游标停留在 OK
上(如图 3),按压旋钮确认,
图 3 图 4
烙铁
5V/1A
B 界面 US
烙铁连接插口
飞梭旋钮
电源开关
烙铁架
海
温
智慧校温
睡眠温度
时间
设定
溫度單位
蜂鸣器开关设定
屏
睡眠
幕亮
度调整
屏幕对比调整
能
产品信息
恢复出厂设置
储存并退出
温度锁定功
绵
Page 6

2.校温方法
准备好温度测温仪,建议将焊台温度设定在 350℃(若需校准低于 200 度温度时,请
将温度设定在所需温度),待焊台温度到达并处于恒温状态时,测量烙铁温度并记录
将烙铁头镀上少许焊锡以利紧密接触),在图 4 位置输入所实际测试到的
3.1当Cal. Starus显示”---“(见图5),表示焊台温度未被校准过,出厂时通过物理方法
(校温电位器)达到最佳状态。
(测量前请先
温度,机器将自动校准温度。
3 温度校准状态说明
图 .6 .5 图
3
3.3 当 Cal. Starus 显示“ <<<< ”(见图 7),表示焊台温度已被校准过,温度已向下调整。
.2 当Cal. Starus显示“>>>>” (见图6),表示焊台温度已被校准调高过。
例:设置温度 350℃,实际温度 320℃,如图 4 进行温度校准后,温度将由 320℃
调升到 350℃。
图7 图.8
3.4 当Cal. Starus显示“ 》 》 ” (见图8),表示焊台温度向上调整已经达限制或校温幅
器安全考虑,此时无法再继续向上调整温度,但可向下调整。
过
度过大,出于机
3.5当Cal. Starus显示“ 《 《 ” (见图9),表示焊台温度向下调整已经达限制或校温幅度
大,出于机器安全考虑,此时无法再继续向下调整温度,但可向上调整。
图9
睡眠温度与睡眠时间设定
1 进入设置菜单,移动游标至“Sleep Temp.”选项,按压旋钮进入睡眠温度设定,睡眠
温度可设置范围为 30~400℃(86~752℉),设置完成后,使用旋钮选择“Save & Exit”
选项保存并退出菜单
2 进入设置菜单,移动游标至”Sleep er”选项,按压旋钮进入睡眠时间调整 睡眠时
选择“Save & Exit”选
Tim ,
间可设置范围为 OFF 或 1~360 分钟,设置完成后,使用旋钮
项保存并退出菜单
注意:
眠时间可设置为 O睡 FF 或 1~360 分钟,当设定为 OFF 时产品关闭睡眠功能。睡眠功
需要进行焊接时,按任意键唤起焊台,焊台会升温到之前设置的温度后即可开始工作。
能开启后,如果在设定的待机时间内没有进行任何的焊接使用或设置等操作,焊台将进
入睡眠状态(如图 10),同时温度会逐渐下降到所设定的睡眠温度内进入休眠状态。当
图10
温度单位切换
进入设置菜单,移动游标至“Unit”选项,按压旋钮进入温度单位设置,此时显示为当前
的温度单位,旋转旋钮切换”℃”摄氏度 或”℉””华氏度单位,再次按压旋钮后并选择
“Save & Exit”选项保存并退出菜单
蜂鸣器开关设定
进入设置菜单,移动游标至“Beep”选项,按压旋钮进入蜂鸣器设
旋转旋钮可选择蜂鸣器”ON”开启或”OFF”关闭状态,再次按压旋钮
Exit”选项保存并退出菜单
当蜂鸣器设定为“ ON”时, 按压旋钮会 , 同时当出现错误 ,
会出现“滴-滴-滴”警报声。
屏
温
1 进入设置 至“Passcode”选项,按压旋钮进入密码设定状态
d
不同温度
需求的操作。
3 解锁操作,在主画面模式,长按飞梭旋钮 3 秒后,输入当前密码,进入设置菜单,
此时可以依据需要的功能进行设置
4 取消密码设定,在主画面模式,长按飞梭旋钮 3 秒后,输入当前密码,进入设置菜
单,如步骤 1 操作,将新密码设定为“000”后即为无密码状态。
5 设定密码完成后,使用旋钮选择“Save & Exit”选项保存并退出菜单
注:原始密码为“000”,代表无密码状态
图 11. 密码设定画面 密码设定错误
密码修改成功 未输入新密码
进入设置菜单,移动游标至“Reset”选项,按压旋钮进入恢复出厂设定,此时显示默认
为“N )后按压旋钮确认,并选择“Save & Exit”
选项保存
两次输入新密码不一致
恢复出厂设定
O”(如图 12),旋转旋钮选择为“YES”(如图 13
并退出菜单
密码重设
当所设定
密码忘记时,关机状态下按住飞梭旋钮不放手,同时按下电源开关开启焊台,
此时出现密码重设接口(如图 14),输入密码“888”即可将密码恢复为“000”(即无密码状
态),若需要重新设定密码请依照温度锁定功能重新设定。
图 12 图 13
图 14
更详细完整的操作说明及产品介绍,请至宝工官网下载
http://www.prokits.com.tw/
置,
后并选择“Save &
讯息 ERROR 代码时有按键音
屏幕亮度调整
进入设置菜单,移动游标至“Brightness”选项,按压旋钮进入屏幕亮度调整,旋转旋钮
可调整亮度,再次按压旋钮后并选择“Save & Exit”选项保存并退出菜单
幕对比度调整
进入设置菜单,移动游标至“Contrast”选项,按压旋钮进入屏幕对比度调整,旋转旋钮
可调整对比度,再次按压旋钮后并选择“Save & Exit”选项保存并退出菜单
度锁定功能
单,移动游标菜
图 11) ,在(如 第一行“Input The ol code”输入当前密码(原始为“000”亦代表无密码状
态),在第二行“Input The new code”输入新密码,在第三行“Confirm The new code”再
次输入新密码。设定密码完成后,使用旋钮选择“Save & Exit”选项保存并退出菜
单
2 当密
码设置成功后,整机功能均被锁定,只保留快捷温度选取功能,以方便生产线
或扫 形码
PROKIT’S INDUSTRIES CO., LTD
h
瞄二维条
.
ttp://www.prokits.com.tw
E mail.prokits.com.tw
©
-mail:pk@
2016 Prokit’s Industries Co., Ltd. All rights reserved 2016001
 Loading...