


 Loading...
Assembly Guide
EFX® 5.25
Elliptical Fitness CrosstrainerTM
Thank you for choosing Precor. For proper installation, please read this guide thoroughly and follow the assembly instructions. If you do not assemble the EFX according to these guidelines, you could void the Precor Limited Warranty.
Obtaining Service
You should not attempt to service the EFX except for maintenance tasks described in the owner’s manual. Should you need more information regarding Customer Support numbers or a list of Precor authorized Service Centers, visit the Precor web site at www.precor.com.
Unpacking the Equipment
The EFX is carefully tested and inspected before shipment. The unit is shipped in one box. Ask for help to unpack and assemble the EFX. If any items are missing, contact your dealer.
Important: (240 volt 5.25 model only) If the power cord attached to your equipment is not compatible with your local power plug standards, the container should also include a power cord for your region. You will need to install this cord in place of the one attached to the equipment. If you need such a cord and it was not included with your EFX, please contact your Precor dealer for the correct Precor power cord. For a list of authorized Precor dealers in your area, please contact Customer Support at www.Precor.com.
Required Tools
•Wire cutter
•Rubber mallet
Installation Requirements
Follow these installation requirements when assembling the unit:
•Assemble the EFX in the location where you plan to use it. No rollers or wheels exist on the EFX, so it is not easy to move once it is fully assembled.
•Provide ample space around the unit.
Important: Consult your owner’s manual for proper placement of your equipment.
•Set up the unit on a solid, flat surface.
A smooth, flat surface under the unit helps keep it level. A level unit has fewer malfunctions.
•Open the box and assemble the components in the sequence presented in this guide.
•Obtain assistance.
Ask another capable adult for assistance during the assembly process.
•Use your fingers or the appropriate tools to insert fasteners.
Proper alignment helps alleviate cross-threading. Do not fully tighten fasteners until instructed to do so.
When fully tightening, the head of the fastener should be flush with the product. If it is not, cross-threading has occurred. Do not attempt to rework the assembly as more damage to the equipment will occur. Contact Customer Support. Refer to Obtaining Service.
EFX5.25 Elliptical Fitness CrossTrainer Assembly Guide |
1 |
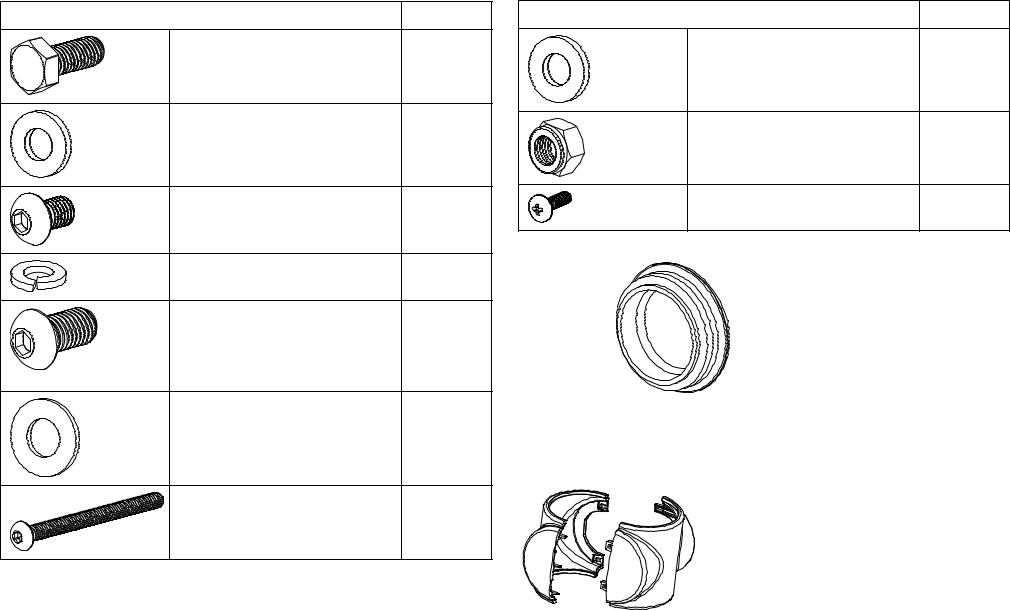
Hardware Kit
Fasteners |
|
Quantity |
(A) Hex head screw (M8 x 20 mm) |
8 |
|
(B) |
Flat washer (M8) |
8 |
(C) Buttonhead screw (M8 x 12 mm) |
6 |
|
(D) Lock washer (M8) |
6 |
|
(E) |
Buttonhead (M10 x 20 mm) |
2 |
(F) |
Flat washer (M10) |
2 |
(G) Buttonhead screw (M5 x 50 mm) |
2 |
|
Fasteners |
Quantity |
(H) Flat washer (M8) |
4 |
(J) |
Locknut (M8) |
|
2 |
(K) |
Phillips-head screw (M5 x 16 mm) |
3 |
|
2 — |
1 |
— Double-ended box wrench (N) |
|
Handlebar |
1 |
— Hex key (P) |
|
caps (L) |
|
||
1 |
— Power cord |
|
|
|
|
||
2 - Moveable arm cuffs (each cuff is two pieces) (M)
EFX5.25 Elliptical Fitness CrossTrainer Assembly Guide |
2 |
Assembly Steps
Important: Read the Installation Requirements before assembling the EFX.
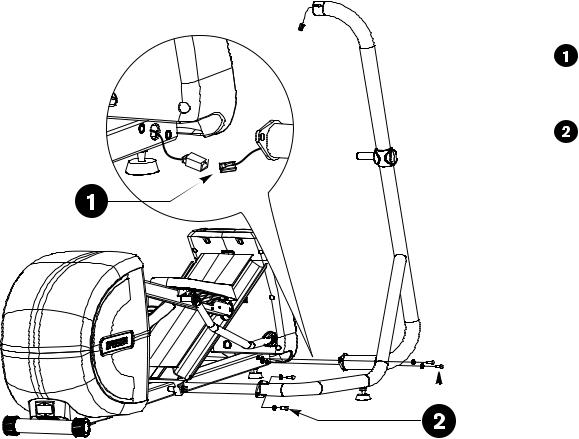
Ask your assistant to hold the right stabilizer, which has the cable protruding from both ends, next to the base frame. Connect the base cable. An audible click is heard when the cable is properly attached. Place excess cable into the base frame.
Secure the stabilizer to the base frame using four hex head screws
(A) and four washers (B). Partially tighten.
Note: For easier access to the base mounts, lift the front of the
EFX off the floor and place a wedge of packaging beneath its base.
|
|
|
|
|
|
|
|
EFX5.25 Elliptical Fitness CrossTrainer Assembly Guide |
3 |
||
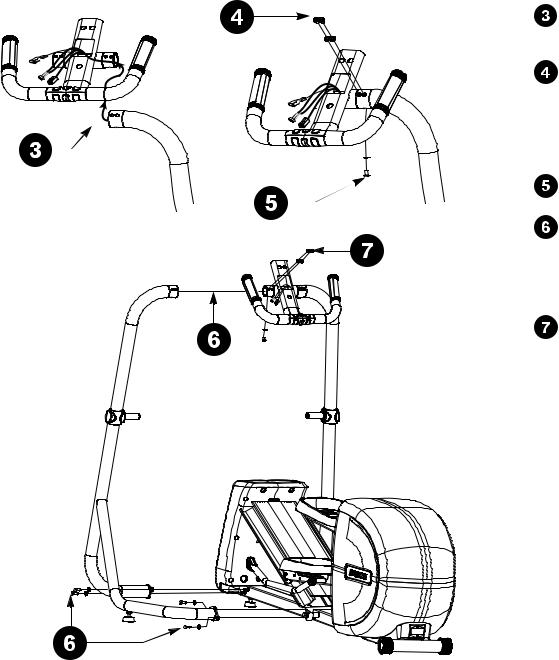
Cut any wire ties that secure the cable to the stabilizer. Unwrap the cable and remove any kinks. Feed the cable through the console bracket as shown in the illustration.
Slide the console bracket into the right stabilizer and align the three mounting holes. Insert the top two buttonhead screws (C) with lock washers (D). Partially tighten.
CAUTION: Make sure you do not pinch the cables while attaching the console bracket. Any damage caused during installation is not covered by the Precor Limited Warranty.
Insert the bottom buttonhead screw (C) with lock washer (D). Partially tighten.
Slide the left stabilizer onto the console bracket and secure its base using four hex head screws (A) and four washers (B). Partially tighten.
Note: You may need to pivot the stabilizer back and forth to fit it snugly onto the console bracket.
Return to the console bracket and insert the three remaining fasteners. Fully tighten all six console bracket fasteners.
|
|
|
|
EFX5.25 Elliptical Fitness CrossTrainer Assembly Guide |
4 |
||

Attach the right moving handlebar. Slide the handlebar pivot joint onto the stabilizer axle (use a rubber mallet if needed).
Secure the handlebar using one hex head screw (E) and one washer (F). Fully tighten. Snap the moveable arm cuff (M) into place and then place a handlebar cap (L) onto the connection.
CAUTION: Guide the handlebar to its balance point and let it rest there. When attaching the lower link arms, have your assistant hold the moving handlebar for safety. Failure to do so could result in injury.
Remove the locking pin so you can move the foot pedals to a convenient location to attach the moving handlebars. Store the locking pin underneath the ramp.
Attach the handlebar to the lower link arm using one buttonhead screw (G), two washers (H), and one locknut (J). Fully tighten. Repeat steps 8, 9, and 10 to secure the left handlebar.
|
|
|
|
|
|
|
|
|
|
|
|
|
|
|
|
|
|
|
|
|
|
|
|
|
|
|
|
|
|
|
|
|
|
|
|
|
|
|
|
EFX5.25 Elliptical Fitness CrossTrainer Assembly Guide |
5 |
||||||
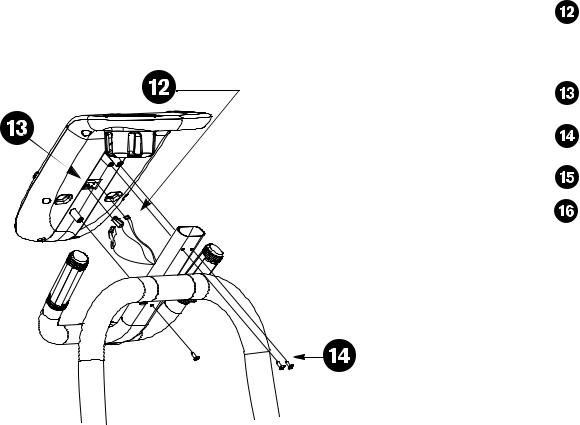
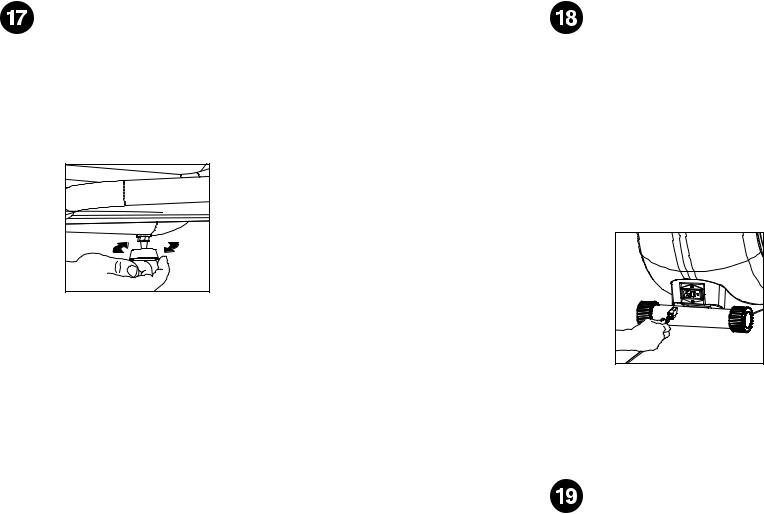
Connect the 4-pin connector and the RJ45 to the appropriate receptacles on the back of the display console. An audible click is heard when the cable is properly attached.
Place the excess cable into the console bracket.
Connect the green grounding wire to the middle receptacle marked GND.
Attach the display console to the console bracket using three Phillips-head screws (K). Tighten securely.
Return to the base of the stabilizers and fully tighten all eight hex head screws.
If necessary, remove the wedge of packing material used in step 2.
EFX5.25 Elliptical Fitness CrossTrainer Assembly Guide |
6 |
Before exercising, make sure the EFX is level and does not wobble from side to side.
Important: If the EFX is placed on a slightly uneven surface, turning the leveling pads can help, but will not compensate for extremely uneven surfaces.
1.Kneel by the side of the stabilizer and lift the base slightly so you can access the levelers.
2.Rotate the levelers as needed.
3.When the EFX is level, fully tighten the lock nut and lower the EFX to the floor.
Connect the power cord.
CAUTION: Use the supplied power cord. Do not remove or otherwise bypass the 3-prong plug with an adapter in order to use a nongrounded outlet. Do not plug the EFX into a power transformer in an attempt to adjust the voltage requirements. Failure to follow these instructions might damage the unit and will void the Precor Limited Warranty. If an appropriate cord for your location was not included with your EFX, please contact your Precor dealer for the proper Precor power cord. For more information on authorized Precor dealers in your area, please contact Customer Support at www.Precor.com.
1.Insert the power plug connector into its receptacle at the rear of the unit.
2.Plug the other end into a grounded outlet so you can maintain a consistent power source without overloading any other circuitry. Be sure to use the appropriate voltage. Refer to Grounding Instructions in the owner’s manual.
Turn the unit On.
Use the power switch to turn the unit On. Check that the Precor banner appears on the display. If the display remains blank, cycle the power. If the display continues to remain blank, check the cable connections.
Important: Make sure the locking pin is removed and stored before you begin exercising.
EFX5.25 Elliptical Fitness CrossTrainer Assembly Guide |
7 |
Notes:
EFX5.25 Elliptical Fitness CrossTrainer Assembly Guide |
8 |

Precor Incorporated |
|
|
|
|
|
|
|
|
|
|
|
|
|
||
|
|
|
|
|
|
||
©2011 Precor Incorporated |
|||||||
20031 142nd Avenue NE |
|||||||
P.O. Box 7202 |
www.precor.com |
||||||
Woodinville, WA USA 98072-4002 |
EFX 5.25 AG 300086-241, en |
||||||
1-800-347-4404 |
15 September 2011 |
||||||

QUICKSTART™
CAUTION: Before using the EFX, read all these instructions. Failure to do so may result in serious injury.
• Do not allow children or those unfamiliar with its |
|
|
|
operation, on or near this equipment. |
|
|
|
• Before beginning any fitness program, see your |
|
|
|
physician for a thorough physical examination. |
|
|
|
Seek advice from your physician to learn the |
|
|
|
target heart rate appropriate for your |
|
|
|
fitness level. |
|
|
|
• Always face the display and use the |
|
|
|
stationary handrail for balance. Never |
EFX |
|
5.25 |
attempt to turn around on the EFX. |
® |
||
• If you feel pain, faintness, or dizziness, |
|
|
|
stop exercising immediately.
USER keys
Pick one of the USER keys to store workout preferences. The next time you exercise, press the appropriate USER key when the Precor banner appears. Your workout preferences are immediately restored. Press QUICKSTART to begin using the displayed program.
The Locking Pin on the Roller Arm
The locking pin on the EFX ramp secures the roller arm from use. To prevent unauthorized use, secure the roller arm with the locking pin after every workout.
Pull firmly on the pin to slide it out of the roller arm. A lanyard attaches the locking pin to the ramp. Store the locking pin underneath the ramp once it is removed from the roller arm.
Workout Tips
•Before and after an exercise session, gently stretch your lower body and back to help prevent stiffness or soreness.
•At the beginning of an exercise session, take several minutes to bring your heart rate into your target zone (shown in Diagram A on the other side of this card).
•To display your heart rate, use both hands to grasp the touch-sensitive grips.
•To pause during your workout, stop pedaling. The pause mode has a 10-minute time limit.
•Incorporate a cool-down period into your exercise session to help lower your heart rate and minimize muscle stiffness and soreness.
Begin Your Workout with QUICKSTART
To begin exercising immediately without personalizing your exercise session, take the following steps.
1.Turn On the EFX using the power switch located at the rear of the unit, near the power cord.
2.Remove the locking pin that secures the roller arm.
3.Hold on to the stationary handrail and step on the foot pedals.
4.Begin pedaling. Maintain a comfortable stride rate between 100 and 150 strides per minute depending on your level of fitness.
Important: Do not use the Total Body feature until you are comfortable with the movement of the EFX 5.25.
5.Press QUICKSTART and the Manual Program begins. An exercise session goal of 30 minutes appears in the TIME display and counts down.
Note: To select a different program or choose a USER key, refer to your owner’s manual.
6.To increase or decrease the ramp incline or resistance, use the CROSSRAMP or RESISTANCE arrow keys.
7.When you reach the time goal, you automatically enter a cool-down period. After you complete the cool-down period, the equipment displays a summary of your exercise session statistics. If you used the touch-sensitive grips during your workout, your average heart rate appears in the display as well.
8.Stop pedaling and hold on to the stationary handrail while you carefully step down from the EFX.
9.To prevent unauthorized use, turn Off the EFX and secure the roller arm with the locking pin.
Note: To personalize your exercise experience, refer to Workout Options in your owner’s manual.
5.25 QSC 300089-141, 23 July 2011 en

Choosing a Program
•Determine your level of fitness: beginner, intermediate, or advanced.
•Determine your immediate goal: endurance training, cardio-conditioning, or weight loss.
If you are a beginner, start a cardio-conditioning program to slowly adjust your body to a comfortable level of exercise. Over a recommended 8-week period, you will increase your endurance and strength while improving flexibility.
For all fitness levels, plan to exercise at a comfortable pace for 20 to 30 minutes a day. To monitor your heart rate, use the touch-sensitive grips. Supplement your plans with fitness workouts from the Precor web site (www.precor.com).
Using the Touch Heart Rate Feature
Note: Touch heart rate performance may vary based on a user’s physiology, fitness level, age, and other factors. You may experience an erratic readout if your hands are dry, dirty, or oily, or if the skin on your palms is especially thick. Wearing hand lotion can also cause an erratic readout. In addition, make sure that the sensors are clean to ensure proper contact can be maintained.
To use the touch heart rate feature, place the palm of your hands directly on the metal heart rate sensors on the equipment’s handlebars. To ensure a more accurate heart rate readout, make sure you follow these tips:
•Both hands must grip the sensors for your heart rate to register.
•It takes a number of consecutive heart beats (15-20 seconds) for your heart rate to register.
•When gripping the sensors, do not grip tightly. Keep a loose, cupping hold. Holding the grips tightly can affect the reading.
•As you work out, your perspiration will help transmit your heart rate signal. If you have difficulty using the handheld grips to determine your heart rate, try the sensors again later in the workout to see if you can obtain a heart rate signal.
•If the touch heart rate feature does not work for you, Precor recommends that you use a chest transmitter strap.
CAUTION: Your heart rate should never exceed 85% of your maximum aerobic heart rate. Your maximum heart rate is equal to 220 minus your age. (Diagram A).
Heart Rate Target Zones
Your Heart Rate
200 |
|
|
|
|
|
|
|
|
|
|
|
|
|
190 |
|
|
|
|
|
|
|
|
|
|
|
|
|
180 |
|
|
|
|
|
|
|
|
|
|
|
|
|
170 |
|
|
|
|
|
|
|
|
|
|
|
|
|
160 |
|
c |
o |
|
|
|
|
|
|
|
|
|
|
150 |
Re |
m |
|
|
|
|
|
|
|
|
|||
|
|
|
|
|
|
|
|
|
|
|
|
||
|
|
|
|
|
m |
en |
|
|
|
|
|
||
140 |
|
|
|
|
|
|
|
de |
d |
C |
ar |
di |
|
|
|
|
|
|
|
|
|
|
|
||||
|
|
|
|
|
|
|
|
|
|
|
|||
130 |
|
|
|
|
|
|
|
|
|
|
|
|
o |
|
|
|
|
|
|
|
|
|
|
|
|
|
|
120 |
Rec |
o |
mm |
e |
n |
|
|
|
|
|
|
||
|
|
|
|
|
|
|
|
|
|
|
|
||
110 |
|
|
|
|
|
|
ded W |
|
ght |
||||
|
|
|
|
|
|
|
|
|
ei |
||||
|
|
|
|
|
|
|
|
|
|
|
|
||
100 |
|
|
|
|
|
|
|
|
|
|
|
|
|
90 |
|
|
|
|
|
|
|
|
|
|
|
|
|
80 |
|
|
|
|
|
|
|
|
|
|
|
|
|
70 |
|
|
|
|
|
|
|
|
|
|
|
|
|
20 |
25 |
|
30 |
35 |
40 |
||||||||
|
|
||||||||||||
v |
sc |
|
|
|
a |
|
|
|
|
|
ul |
r |
|
|
|
a |
|
|
|
|
|
Z |
|
|
|
|
o |
|
|
|
|
|
n |
e |
|
|
|
|
|
L |
|
|
|
|
oss |
|
|
|
|
|
Z |
|
|
|
|
one |
|
|
|
45 50 55 60 65 70 75
High
Peak
Cardio
Fatburn
Warmup
Your Age
Diagram A
Using a Chest Strap Transmitter
WARNING Signals used by the Chest Strap Transmitter (or heart rate strap)
may interfere with pacemakers or other implanted devices. Consult your physician and the manufacturers of your Chest Strap Transmitter and implanted device before using a Chest Strap Transmitter.
Wearing a chest strap transmitter during your workout provides steady heart rate information. For the equipment to detect your heart rate, you must grip the touch heart rate sensors or wear a chest strap transmitter while exercising. In the presence of both touch and wireless data, the touch data takes precedence and will display.
Note: To receive an accurate reading, the strap needs to be in direct contact with the skin on the lower sternum (just below the bust line for women).
To use a chest strap:
1.Carefully dampen the back of the strap with tap water.
Important: Do not use deionized water. It does not have the proper minerals and salts to conduct electrical impulses.
2.Adjust the strap and fasten it around your chest. The strap should feel snug, not restrictive.
3.Make sure that the chest strap is right side up, lies horizontally across, and is centered in the middle of your chest.
4.Test the chest strap placement by checking the heart rate function on the equipment. If a heart rate is registering, your chest strap placement is correct. If the equipment does not register a heart rate, readjust the strap and recheck the heart rate function.
Precor Incorporated
20031 142nd Avenue NE
P.O. Box 7202
Woodinville, WA USA 98072-4002
www.precor.com
5.2x HR INFO 300090-141
©2011 Precor Incorporated

EFX® 5.25

Important Safety Instructions
Read the following precautions thoroughly before you begin assembly, and save them afterward for future reference.
Important: (240 volt 5.25 model only) If the power cord attached to your equipment is not compatible with your local power plug standards, the container should also include a power cord for your region. You will need to install this cord in place of the one attached to the equipment. If you need such a cord and it was not included with your EFX, please contact your Precor dealer for the correct Precor power cord. For a list of authorized Precor dealers in your area, please contact Customer Support at www.Precor.com.
Safety Precautions
Always follow basic safety precautions when using the EFX to reduce the chance of injury, fire, or damage. Other sections in this manual provide more details of safety features. Be sure to read these sections and observe all safety notices. These precautions include the following:
•Read all instructions in this guide before installing and using the equipment and follow any labels on the equipment.
•Make sure all users see a physician for a complete physical examination before they begin any fitness program.
•Il est conseillé de subir un examen médical complet avant d'entreprendre tout programme d'exercise. Si vous avez des étourdissements ou des faiblesses, arrêtez les exercices immédiatement.
•Do not allow children, or people unfamiliar with the operation of this equipment, on or near it. Do not leave children unsupervised around the equipment.
•Make sure all users wear proper exercise clothing and shoes for their workouts and avoid loose or dangling clothing. Users should not wear shoes with heels or leather soles, and they should check the soles of their shoes to remove any dirt and embedded stones. They should also tie long hair back.
•Never leave the equipment unattended when it is plugged in. Unplug the equipment from its power source when it is not in use, before cleaning it, and before providing authorized service.
Note: The optional power adapter is considered a power source for self-powered equipment.
•Use the power adapter provided with the equipment. Plug the power adapter into an appropriate, grounded power outlet as marked on the equipment.
NSTRUCTIONSI AFETYS MPORTANTI
Owner’s Manual: Important Safety Instructions |
1 |

•Care should be taken when mounting or dismounting the equipment.
•Read, understand, and test the emergency stop procedures before use.
•Keep the power cord or optional power adapter and plug away from heated surfaces.
•Route power cables so that they are not walked on, pinched, or damaged by items placed upon or against them, including the equipment itself.
•Ensure the equipment has adequate ventilation. Do not place anything on top of or over the equipment. Do not use on a cushioned surface that could block the ventilation opening.
•Assemble and operate the equipment on a solid, level surface.
•Proper Location for Equipment
•For all equipment other than treadmills: Locate at least 40 inches (1 meter) away from walls or furniture on either side of the equipment, and 40 inches (1 meter) away from objects behind the equipment.
•For treadmills: Locate at least 40 inches (1 meter) away from walls or furniture on either side of the treadmill, and at least 80 inches (2 meters) away from objects behind the treadmill.
•Equipment Weight Restriction: Do not exceed maximum specified user weight of 250 pounds (115 kg).
•Keep equipment away from water and moisture. Avoid dropping anything on or spilling anything inside the equipment to prevent electric shock or damage to the electronics.
•Do not operate electrically powered equipment in damp or wet locations.
•Never operate this equipment if it has a damaged cord or plug, if it is not working properly, or if it has been dropped, damaged, or exposed to water. Call for service immediately if any of these conditions exist.
•Maintain the equipment to keep it in good working condition, as described in the Maintenance section of the assembly and maintenance guide. Inspect the equipment for incorrect, worn, or loose components, and then correct, replace or tighten prior to use.
•If you plan to move the equipment, obtain help and use proper lifting techniques. Refer to the "Moving the Equipment" section of the assembly and maintenance guide.
•Use the equipment only for its intended purpose as described in this manual. Do not use accessory attachments that are not recommended by Precor. Such attachments may cause injuries.
NSTRUCTIONSI AFETYS MPORTANTI
Owner’s Manual: Important Safety Instructions |
2 |

•Do not operate the equipment where aerosol (spray) products are being used or where oxygen is being administered.
•Do not use outdoors.
•Do not attempt to service the equipment yourself, except to follow the maintenance instructions in this manual.
•Never drop or insert objects into any opening. Keep hands away from moving parts.
•Do not set anything on the stationary handrails, handlebars, control console, or covers. Place liquids, magazines, and books in the appropriate receptacles.
•Do not lean on or pull on the console at any time.
CAUTION: DO NOT remove the cover, or you may risk injury due to electric shock. Read the assembly and maintenance guide before operating. There are no user-serviceable parts inside. Contact Customer Support if the equipment needs servicing. For use with single phase AC supply only.
Grounding Instructions
Important: (240 volt 5.25 model only) If the power cord attached to your equipment is not compatible with your
local power plug standards, the container should also include a power cord for your region. You will need to install this cord in place of the one attached to the equipment. If you need such a cord and it was not included with your EFX, please contact your Precor dealer for the correct Precor power cord. For a list of authorized Precor dealers in your area, please contact Customer Support at www.Precor.com.
The EFX must be grounded. If the unit malfunctions or breaks down, grounding provides a path of least resistance for electric current, which reduces the risk of electrical shock. The unit is equipped with a power cord having an equipment-grounding conductor and a grounding plug. The plug must be inserted into an outlet that is properly installed and grounded in accordance with all local codes and ordinances. Failure to properly ground the EFX could void the Precor Limited Warranty.
DANGER |
Improper connection of the |
equipment-grounding conductor can |
|
|
result in a risk of electric shock. Check |
|
with a qualified electrician or service |
|
person if you are in doubt as to |
|
whether the unit is properly grounded. |
|
Do not modify the plug provided with |
|
the EFX. If it does not fit the outlet, |
|
have a proper outlet installed by a |
|
qualified electrician. |
NSTRUCTIONSI AFETYS MPORTANTI
Owner’s Manual: Important Safety Instructions |
3 |

Hazardous Materials and Proper
Disposal
The batteries within self-powered equipment contain materials that are considered hazardous to the environment.
Federal law requires proper disposal of these batteries. If you plan to dispose of your equipment, contact Precor Commercial Products Customer Support for information regarding battery removal. Refer to Obtaining Service.
Product Recycling and Disposal
This equipment must be recycled or discarded according to applicable local and national regulations.
Product labels, in accordance with European Directive 2002/96/EC concerning waste electrical and electronic equipment (WEEE), determine the framework for the return and recycling of used equipment as applicable throughout the European Union. The WEEE label indicates that the product is not to be thrown away, but rather reclaimed upon end of life per this Directive.
In accordance with the European WEEE Directive, electrical and electronic equipment (EEE) is to be collected separately and to be reused, recycled, or recovered at end of life. Users of EEE with the WEEE label per Annex IV of the WEEE Directive must not dispose of end of life EEE as unsorted municipal waste, but use the collection framework available to customers for the return, recycling, and recovery of WEEE. Customer participation is important to minimize any potential effects of EEE on the environment and human health due to the potential presence of hazardous substances in EEE. For proper collection and treatment, refer to Obtaining Service.
NSTRUCTIONSI AFETYS MPORTANTI
Owner’s Manual: Important Safety Instructions |
4 |
Loading...