


USER GUIDE |
Software 5.0.0 | August 2013 | 1725-49090-001 Rev C |
Polycom® VVX® 400 and 410 Business Media Phones

Polycom VVX 400 and 410 Business Media Phones User Guide |
Version 5.0.0 |
Copyright ©2013, Polycom, Inc. All rights reserved. No part of this document may be reproduced, translated into another language or format, or transmitted in any form or by any means, electronic or mechanical, for any purpose, without the express written permission of Polycom, Inc.
6001 America Center Drive San Jose, CA 95002
USA
Trademarks
Polycom®, the Polycom logo and the names and marks associated with Polycom products are trademarks and/or service marks of Polycom, Inc. and are registered and/or common law marks in the United States and various other countries. All other trademarks are property of their respective owners. No portion hereof may be reproduced or transmitted in any form or by any means, for any purpose other than the recipient's personal use, without the express written permission of Polycom.
End User License Agreement
By installing, copying, or otherwise using this product, you acknowledge that you have read, understand and agree to be bound by the terms and conditions of the End User License Agreement for this product.
Patent Information
The accompanying product may be protected by one or more U.S. and foreign patents and/or pending patent applications held by Polycom, Inc.
Open Source Software Used in this Product
This product may contain open source software. You may receive the open source software from Polycom up to three (3) years after the distribution date of the applicable product or software at a charge not greater than the cost to Polycom of shipping or distributing the software to you. To receive software information, as well as the open source software code used in this product, contact Polycom by email at OpenSourceVideo@polycom.com.
Disclaimer
While Polycom uses reasonable efforts to include accurate and up-to-date information in this document, Polycom makes no warranties or representations as to its accuracy. Polycom assumes no liability or responsibility for any typographical or other errors or omissions in the content of this document.
Limitation of Liability
Polycom and/or its respective suppliers make no representations about the suitability of the information contained in this document for any purpose. Information is provided “as is” without warranty of any kind and is subject to change without notice. The entire risk arising out of its use remains with the recipient. In no event shall Polycom and/or its respective suppliers be liable for any direct, consequential, incidental, special, punitive or other damages whatsoever (including without limitation, damages for loss of business profits, business interruption, or loss of business information), even if Polycom has been advised of the possibility of such damages.
Customer Feedback
We are striving to improve our documentation quality and we appreciate your feedback. Email your opinions and comments to DocumentationFeedback@polycom.com.
Visit the Polycom Support Center for End User License Agreements, software downloads, product documents, product licenses, troubleshooting tips, service requests, and more.
Polycom, Inc. |
2 |

Contents
About This Guide ...................................................................................................... |
6 |
Conventions Used in this Guide ..................................................................................................... |
6 |
Terms and Writing Conventions....................................................................................................... |
6 |
Information Elements ....................................................................................................................... |
7 |
Typographic Conventions ................................................................................................................ |
8 |
What’s in This Guide? ...................................................................................................................... |
8 |
Getting Help and Support Resources............................................................................................. |
9 |
Getting Started ........................................................................................................ |
10 |
Viewing Your Phone Keys and Hardware .................................................................................... |
10 |
Understanding Phone Views ......................................................................................................... |
11 |
Home View..................................................................................................................................... |
12 |
Lines View...................................................................................................................................... |
13 |
Calls View ...................................................................................................................................... |
14 |
Understanding Phone Icons and Status Indicators .................................................................... |
15 |
Navigating Your Phone Interface .................................................................................................. |
16 |
Entering and Updating Data Fields............................................................................................... |
17 |
Using the Dialpad Keys.................................................................................................................. |
18 |
Registering the Phone.................................................................................................................... |
19 |
Configuring Your Phone Using the Web Configuration Utility .................................................. |
19 |
Using Basic Features ............................................................................................. |
21 |
Managing Call Activity ................................................................................................................... |
21 |
Answering Incoming Calls............................................................................................................. |
22 |
Answering Additional Calls ............................................................................................................ |
23 |
Answering Calls on Shared Lines .................................................................................................. |
23 |
Answering Calls Automatically....................................................................................................... |
24 |
Managing Multiple Calls................................................................................................................. |
24 |
Placing Calls ................................................................................................................................... |
25 |
Calling from the Dialer.................................................................................................................... |
26 |
Placing Calls from Favorites, Recent Calls, and Directories ......................................................... |
27 |
Redialing Numbers......................................................................................................................... |
28 |
Ending Calls .................................................................................................................................... |
28 |
Using Headsets............................................................................................................................... |
28 |
Enabling Headset Memory Mode................................................................................................... |
29 |
Responding to Incoming Calls...................................................................................................... |
29 |
Ignoring Incoming Calls.................................................................................................................. |
29 |
Rejecting Incoming Calls................................................................................................................ |
30 |
Forwarding Incoming Calls ............................................................................................................ |
30 |
Managing Active Calls.................................................................................................................... |
30 |
Holding Calls .................................................................................................................................. |
31 |
Transferring Calls........................................................................................................................... |
31 |
Polycom, Inc. |
3 |

Polycom VVX 400 and 410 Business Media Phones User Guide |
Version 5.0.0 |
Managing Conference Calls .......................................................................................................... |
32 |
Initiating Conference Calls ............................................................................................................. |
32 |
Holding and Resuming Conference Calls ...................................................................................... |
33 |
Ending Conference Calls ............................................................................................................... |
33 |
Splitting Conference Calls.............................................................................................................. |
33 |
Managing Conference Call Participants......................................................................................... |
34 |
Changing the Way Calls are Answered ........................................................................................ |
35 |
Forwarding All Calls to Another Person ......................................................................................... |
35 |
Rejecting Calls from a Contact ...................................................................................................... |
36 |
Diverting Calls from a Contact ....................................................................................................... |
37 |
Using Do Not Disturb ..................................................................................................................... |
37 |
Using Do Not Disturb with Multiple Lines....................................................................................... |
38 |
Listening to Voicemail.................................................................................................................... |
39 |
Viewing Recent Calls...................................................................................................................... |
40 |
Managing Your Contact Directory ................................................................................................ |
41 |
Managing a Corporate Directory................................................................................................... |
44 |
Controlling Audio and Volume...................................................................................................... |
45 |
Updating the Incoming Call Ringtone ............................................................................................ |
45 |
Updating a Contact’s Ringtone ...................................................................................................... |
46 |
Changing the Ringer Volume......................................................................................................... |
46 |
Muting the Microphone................................................................................................................... |
46 |
Changing the Audible Ring Setting ................................................................................................ |
46 |
Managing Favorites ........................................................................................................................ |
47 |
Managing Shared Lines ................................................................................................................. |
48 |
Using Advanced Features ...................................................................................... |
50 |
Using Buddy Lists .......................................................................................................................... |
50 |
Updating Your Status ..................................................................................................................... |
51 |
Managing a Buddy List................................................................................................................... |
52 |
Blocking Contacts .......................................................................................................................... |
53 |
Monitoring Buddies ........................................................................................................................ |
53 |
Integrating with Microsoft Lync Server 2010............................................................................... |
55 |
Using the Browser .......................................................................................................................... |
55 |
Navigating the Main Browser ......................................................................................................... |
56 |
Entering Information in the Main Browser...................................................................................... |
57 |
Broadcasting Messages Using Push-to-Talk and Group Paging .............................................. |
57 |
Push-to-Talk Mode......................................................................................................................... |
58 |
Using Group Paging Mode............................................................................................................. |
61 |
Using the Calendar ......................................................................................................................... |
64 |
Opening and Closing the Calendar................................................................................................ |
66 |
Navigating Month View .................................................................................................................. |
66 |
Navigating Day View ...................................................................................................................... |
67 |
Navigating Meeting View ............................................................................................................... |
68 |
Managing Meeting Reminders ....................................................................................................... |
68 |
Joining Meetings from the Calendar .............................................................................................. |
69 |
Using a Mouse and Keyboard with Your Phone.......................................................................... |
70 |
Using a Mouse and Keyboard with Your Phone ............................................................................ |
70 |
Logging into Your Phone............................................................................................................... |
74 |
Polycom, Inc. |
4 |

Polycom VVX 400 and 410 Business Media Phones User Guide |
Version 5.0.0 |
Logging In and Out of a Phone ...................................................................................................... |
74 |
Placing Calls from Phones that are in the Logged-Out State ........................................................ |
75 |
Changing Your Password .............................................................................................................. |
75 |
Locking Your Phone....................................................................................................................... |
76 |
About Your User Password............................................................................................................ |
76 |
Locking and Unlocking Your Phone............................................................................................... |
77 |
Placing and Answering Calls on a Locked Phone ......................................................................... |
77 |
Accessing Features with Your Login Credentials....................................................................... |
78 |
Customizing the Phone’s Display ......................................................................... |
80 |
Changing the Language on Your Phone ...................................................................................... |
80 |
Changing the Time and Date Display ........................................................................................... |
80 |
Changing the Backlight.................................................................................................................. |
81 |
Changing the Phone’s Background Picture ................................................................................ |
82 |
Changing the Background Picture ................................................................................................. |
83 |
Using a Personal Photo as a Background Picture......................................................................... |
83 |
Displaying Screen Savers.............................................................................................................. |
84 |
Choosing a Screen Saver .............................................................................................................. |
84 |
Administrative Tasks.............................................................................................. |
85 |
Understanding Phone Warnings................................................................................................... |
85 |
Restarting the Phone...................................................................................................................... |
85 |
Updating Phone Configuration ..................................................................................................... |
86 |
Testing Phone Hardware................................................................................................................ |
86 |
Getting Help............................................................................................................. |
87 |
Related Documents ........................................................................................................................ |
87 |
The Polycom Community............................................................................................................... |
88 |
Copyright, Safety, and Regulatory Notices .......................................................... |
89 |
Polycom, Inc. |
5 |

About This Guide
This guide uses a number of conventions that help you to understand information and perform tasks.
Conventions Used in this Guide
This user guide contains terms, graphical elements, and a few typographic conventions. Familiarizing yourself with these terms, elements, and conventions to help you successfully perform tasks.
Terms and Writing Conventions
The Phone/your phone These terms refer to either the VVX 400 or VVX 410 phone. Unless specifically noted in this guide, both phones operate in the same way, and the information in this guide applies to both phones. Throughout the guide, VVX 400 is used to represent both the VVX 400 and VVX 410 phones.
Press This action refers to pressing a key on the keypad, a line key, an arrow key, a hard key, like Hold or Microphone Mute, or pressing and holding soft key.
Select Submenu > Submenu > Submenu This convention describes how to access submenus. Each submenu name is in boldface and separated by a greater than (>) symbol. If the instructions indicate to select Basic > Preferences > Language, select the Basic submenu, select the Preferences submenu, and select the Language submenu.
Highlight This action refers to selecting an item on the screen so that its appearance brightens. Soft keys apply to highlighted items.
Select Selecting an item on the screen refers to using the up, down, left, and right arrow keys to highlight an item. Press the central Select key so that another screen opens.
Views Your phone has four views: Home, Calls, Active Call, and Lines, which is the default view. A view is a specific screen on the phone interface that provides unique information and enables you to perform specific tasks.
Dialpad The dialpad is the area of the keypad you use to enter numbers and characters. The dialpad consists of all the number keys, as well as the asterisk (*) and pound (#) keys.
Key This term refers to any button on the phone console. Phone keys include the dialpad keys
 ,
,  ,
,  ,
,  ,
,  ,
,  ,
, , and
, and  .
.
Option An option is one of a series of items you can select for a phone setting, such as Enabled and Disabled.
Held call This term describes any call, including a conference call, that is on hold. Audio for held calls cannot be heard.
Active call This term refers to a call, including a conference call, you’re currently in. An active call has audio associated with the call.
Setting The name of a field for which you can define information or choose an option.
Field This term describes the area of the screen next to a setting in which you can enter information or select an option.
Polycom, Inc. |
6 |
Polycom VVX 400 and 410 Business Media Phones User Guide |
Version 5.0.0 |
Icon A picture on the screen. There are two types of icons:
Select to access a function, feature, setting, or application. For example, when you’re in Home view, select the New Call icon  to place a call.
Provides phone information or status only. Selecting this type of icon doesn’t access another function. For example, your phone displays an icon to indicate that you have a voicemail message to notify you of the current status.
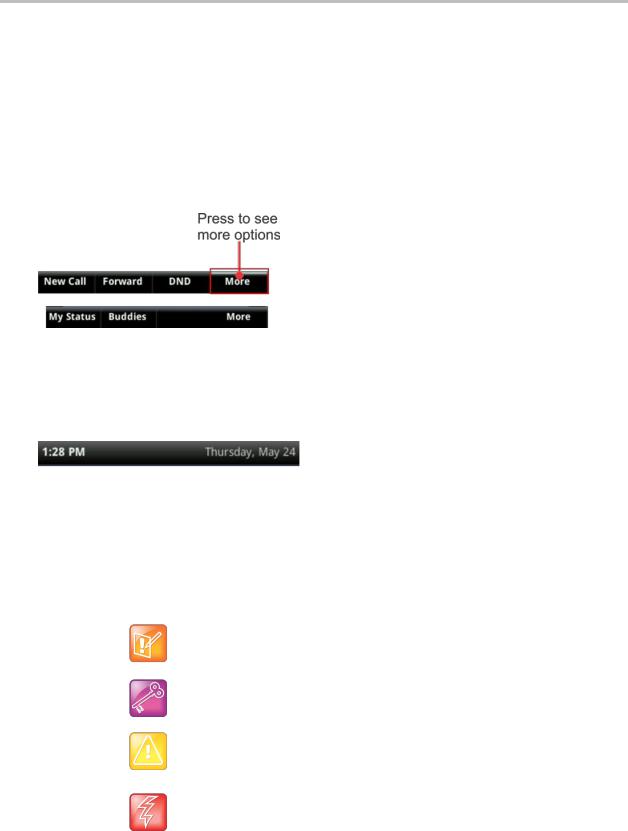
Soft key This term describes the context-sensitive keys that display at the bottom of the screen and that update depending upon the task you’re performing. To see additional options, press More, if available. The More soft key displays on the far-right of the soft key area.
Soft key area The soft key area is the area along the bottom of the screen that displays contextsensitive soft keys, as shown above.
Status bar The status bar is the top-most part of the screen. It displays the time, date, and other messages, as shown next.
Information Elements
This guide includes any of the following icons to alert you to important information.
Icons Used in this Guide
Name |
Icon |
Description |
|
|
|
Note |
|
The Note icon highlights information of interest or important information you |
|
|
need to accomplish a procedure or to understand a concept. |
|
|
|
Administrator Tip |
|
Highlights techniques, shortcuts, or productivity related tips. |
|
|
|
Caution |
|
Highlights information you need to know to avoid a hazard that can impact |
|
|
device performance, application functionality, or successful feature |
|
|
configuration. |
|
|
|
Warning |
|
Highlights an action you must perform (or avoid) to prevent issues that may |
|
|
cause you to lose information or your configuration setup, and/or affect phone |
|
|
or network performance. |
|
|
|
Polycom, Inc. |
7 |

Polycom VVX 400 and 410 Business Media Phones User Guide Version 5.0.0
Name |
Icon |
Description |
|
|
|
Web Info |
|
Highlights supplementary information available online such as documents or |
|
|
downloads on support.polycom.com or other locations. |
|
|
|
Timesaver |
|
Highlights a faster or alternative method for accomplishing a method or |
|
|
operation. |
|
|
|
Power Tip |
|
Highlights faster, alternative procedures for advanced administrators already |
|
|
familiar with the techniques being discussed. |
|
|
|
Troubleshooting |
|
Highlights information that can help you solve a relevant problem or to refer you |
|
|
to other troubleshooting resources. |
|
|
|
Settings |
|
Highlights settings you need to choose a specific behavior, enable a specific |
|
|
feature, or access customization options. |
|
|
|
Typographic Conventions
A few typographic conventions are used in this guide to distinguish types of in-text information.
Typographic Conventions
Convention |
Description |
|
|
Bold |
Highlights interface items such as menus, soft keys, file names, and directories. |
|
Also represents menu selections and text entry to the phone. |
|
|
Italics |
Emphasizes text to show example values or inputs and to show titles of reference |
|
documents. |
|
|
Blue Text |
Highlights cross references to other sections within this document and for |
|
hyperlinks to external sites and documents. |
|
|
Courier |
Indicates code fragments and parameter names. |
|
|
What’s in This Guide?
This guide is organized into six chapters. The beginning chapters introduce the phone and explain how to use the phone’s basic features. The next few chapters describe advanced features, and how to customize your phone to suit your needs. The final chapters show you where to get help and outline known issues and workarounds. The guide also includes safety and legal information.
Polycom, Inc. |
8 |

Polycom VVX 400 and 410 Business Media Phones User Guide |
Version 5.0.0 |
Getting Started This chapter contains general information about your phone that is helpful before you start using your phone. This chapter also describes phone hardware and phone views, and how to navigate menus and enter data.
Using Basic Features This chapter describes all the basic features that your phone offers, such as how to add contacts and favorites, or transfer or forward calls.
Using Advanced Features This chapter describes the advanced, optional features, available for your phone, which includes recording calls, locking your phone, monitoring buddies, and accessing a Browser.
Customizing Your Phone This chapter describes the ways you can customize your phone, including setting up a screen saver or changing the backlight, choosing a background picture, or setting the time and date format.
Administrative Tasks This chapter describes tasks that your administrator can ask you to perform.
These tasks include investigating phone issues, restarting the phone, updating the phone’s configuration, and testing the phone’s hardware.
Getting Help This chapter provides you with links to Polycom or partner documents and web sites. You can also find links to the Polycom Community, which provides a number of discussion forums you can use to share ideas with your colleagues.
Copyright, Safety, and Regulatory Notices This section provides important safety and compliance information relating to your phone.
End-User License Agreement The End-User License Agreement outlines important safety and compliance information for your phone.
Getting Help and Support Resources
This user guide includes a Getting Help section where you can find links to Polycom product and support sites and partner sites. You can also find information about The Polycom Community, which provides access to discussion forums you can use to discuss hardware, software, and partner solution topics with your colleagues. To register with the Polycom Community, you need to create a Polycom online account.
The Polycom Community includes access to Polycom support personnel, as well as user-generated hardware, software, and partner solutions topics. You can view top blog posts and participate in threads on any number of recent topics.
Polycom, Inc. |
9 |

Getting Started
This user guide helps you to navigate and use your Polycom® VVX® 400 and the Polycom® VVX® 410 business media phones, gives you an overview of your phone and walks you through tasks so you can successfully use your phone to perform basic and advanced functions. This guide contains overview information for people just starting to learn about their VVX 400 or VVX 410 phone, or who have experience, but need a quick refresher. It is intended for beginner through advanced users who want to learn about their phone’s features.
Before you start using your VVX phone, you need to become familiar with the phone’s features and user interface. This chapter outlines your phone’s components and the screen layout. This chapter also shows you how to configure your phone remotely using the Polycom Web Configuration Utility.
Note: Accessing Features and Options
As you read this guide, keep in mind that certain phone features are configurable by your system administrator or determined by your phone environment. As a result, some features are disabled or operate differently on your phone. The examples and figures in this guide do not always reflect what displays on your phone screen.
Viewing Your Phone Keys and Hardware
Use the following figure to understand your Polycom phone’s hardware features. For more information about attaching phone hardware, including how to connect your phone to the network, see the Quick Start Guide for your phone available your phones web page on Polycom Business Media Phones.
Figure 1: Understanding VVX 400 and 410 Hardware Features
Polycom, Inc. |
10 |
Polycom VVX 400 and 410 Business Media Phones User Guide Version 5.0.0
Table 1: VVX 400 and 410 Hardware Features
Feature |
Description |
|
|
|
|
|
|
Speaker |
Provides ringer and hands-free (speakerphone) audio output. |
|
|
|
|
|
|
Dialpad |
Enables you to enter numbers, letters, and special characters. You can also use |
|
|
|
the dialpad keys to select menu items that have index numbers. |
|
|
|
|
|
|
Security slot |
The connector on the back of your phone that enables you to attach a laptop |
|
|
|
cable lock to your phone so that you can secure it to a desktop. For more |
|
|
|
information on locking your phone to the desktop, see Security Slots on Polycom |
|
|
|
Phones (Technical Bulletin 64654). |
|
|
|
|
|
|
Message Waiting Indicator |
Flashes red to indicate new messages. |
|
|
|
|
|
|
Home key |
Press |
from any screen to display Home view. From Home view, press |
|
|
|
||
|
to display other phone views. |
|
|
|
|
|
|
Screen |
The 3.5-inch diagonal screen is backlit. |
|
|
|
|
|
|
Navigation keys/Select key |
Scroll through displayed information or options. Select a field of displayed data. |
|
|
|
|
|
|
Headset key |
Enables you to place and receive calls through a headset. The key glows green |
|
|
|
when an analog headset is activated. |
|
|
|
|
|
|
Speakerphone key |
Enables you to place and receive calls using the speakerphone. The key glows |
|
|
|
green when activated. |
|
|
|
|
|
|
Mute key |
Mutes local audio during calls and conferences. The key glows red when |
|
|
|
activated. |
|
|
|
|
|
|
Volume keys |
Adjust the volume of the handset, headset, speaker, and phone’s ringer. |
|
|
|
|
|
|
Microphone |
Transmits sound to other phones. |
|
|
|
|
|
|
Web Info: Attaching Phone Hardware
For information on attaching phone hardware, including how to connect your phone to the network, see the Quick Start Guide for your phone, available by navigating to your phone from the Polycom Business Media Phones Web page.
Understanding Phone Views
Your phone has three main views: Home, Calls, and Lines view, which is the default view. Home view displays your messages, settings, and information. Lines view is your phone’s default phone view and displays your phone lines, your favorites, and conditional soft keys. In Calls view, you can see all your active and held calls.
To change views:
» For Home view, press  to display either Lines or Call view.
Polycom, Inc. |
11 |
Polycom VVX 400 and 410 Business Media Phones User Guide |
Version 5.0.0 |
|
|
Troubleshooting: Why Can’t I Access a Certain View?
The views you can access depend upon the number of calls your phone has, and whether your phone has an active call. If your phone is idle, you can access the Home and Lines view by pressing
 . If your phone has only one active call you can access Home and Lines view by pressing
  . If your phone has multiple calls, or one held call, you can access the Home, Lines, and Calls view by
pressing  .
.
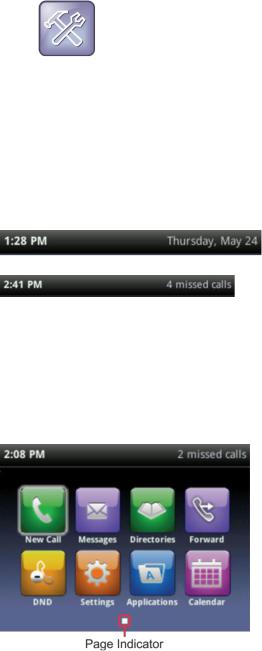
At the top of each view is a status bar, which shows the date and time and important phone messages, as shown next.
Figure 2: Viewing the Status Bar
Home View
You can display Home view by pressing  . At the bottom of Home view is a Page Indicator that shows how many pages of icons Home view displays, as shown next.
Figure 3: Viewing the Page Indicator
To view more menu options in Home view:
» Press the down or up arrow key to navigate the pages in Home view.
To select a menu option:
» Press the right or left arrow key to choose a menu option, and press Select.
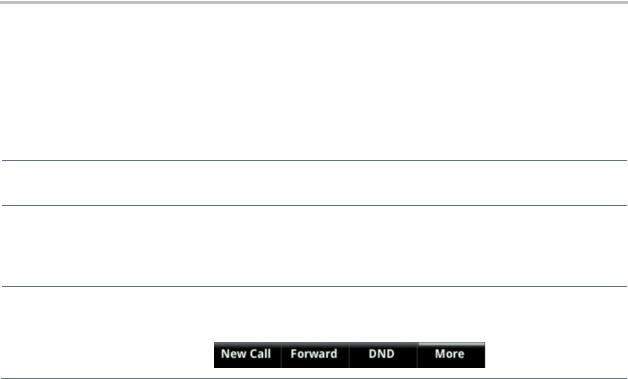
The following icons display in Home view on your phone:
New Call Displays the Dialer so you can place a call.
Messages Provides you with access your voicemail.
Polycom, Inc. |
12 |
Polycom VVX 400 and 410 Business Media Phones User Guide |
Version 5.0.0 |
Directories Enables you to access your Contact Directory, Favorites, Recent Calls list, Corporate Directory and Buddy Status List.
Forward Sets up forwarding options for incoming calls on your line.
DND Enables Do Not Disturb for your phone. When DND is enabled, your phone doesn’t ring and incoming calls go to voicemail.
Settings Provides you with access to phone features and settings you can use to customize your phone.
The following are additional icons available on your phone:
Applications Provides you with access to a menu of custom applications. See your administrator for information about any applications available for your phone.
Calendar Show a calendar with your meeting details. You can also join meetings from your phone using the calendaring feature.
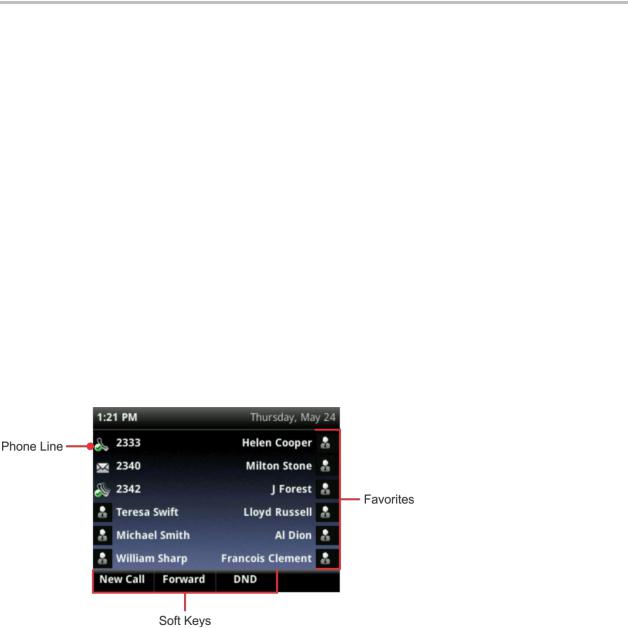
Lines View
Lines view is your phone’s default phone view and displays your phone lines, your favorites, and conditional soft keys, as shown next.
Figure 4: Viewing Lines View
Polycom, Inc. |
13 |
Polycom VVX 400 and 410 Business Media Phones User Guide |
Version 5.0.0 |
In Lines view, you can press a line key to access the Dialer and view the number of active or held calls on your phone, as shown below. In Lines view, the phone line indicates the number active and held calls on your line. If the phone line has an active call, the call color is dark green, as shown below. If the phone line has one or more held calls, the call color is dark blue, as shown next. The number of total calls is shown above the calls.
Figure 5: Viewing Active and Held Calls in Lines View
Troubleshooting: Why Can’t I Access the Idle Browser?
If your phone has calls, you can’t access the Idle Browser. To access the Main Browser, select
Applications from Home view. For information about the Browser, see Using the Browser
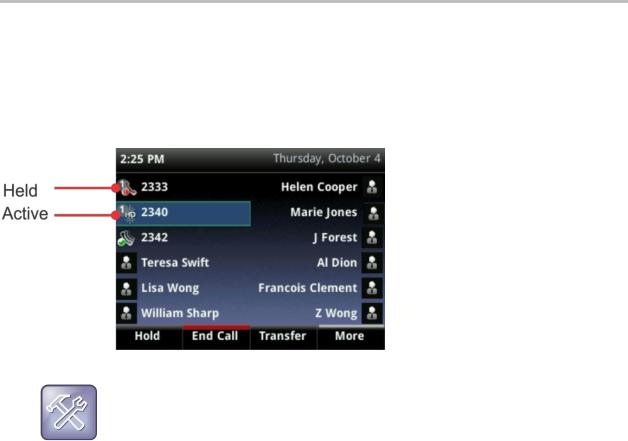
Calls View
You can access Calls view (shown next) if your phone has multiple calls in progress, or you have one held call. Use the up and down arrow keys to see all your calls. If your phone has multiple lines, calls display under the associated line.
The following colors indicate the call statuses on your phone:
Dark green Active call
Bright blue Incoming call
Dark blue Held call
Polycom, Inc. |
14 |

Polycom VVX 400 and 410 Business Media Phones User Guide |
Version 5.0.0 |
You can use the up and down arrow keys to highlight a call. When you select a call, available soft keys display for the call.
Figure 6: Viewing Calls View
Understanding Phone Icons and Status
Indicators
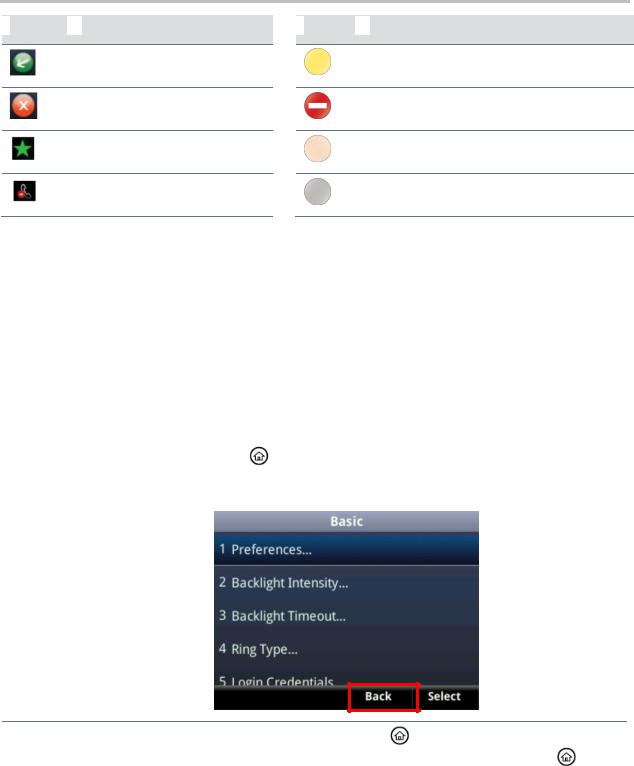
The VVX 400 and 410 has a number of icons that display on your phone screen. The following table displays the icons and indicators used on the VVX 400 and 410 phone screen.
Table 2: Icons Used on the VVX 400 and 410
 Icon
Icon  Description
Registered line
Unregistered line
Placing a call
Active call using Polycom HD
Voice
Held call
Incoming call
Active conference
Placed call
|
|
Icon |
Description |
|
|
|
|
|
|
|
Phone warning |
|
|
|
|
|
|
|
Login credentials invalid |
|
|
|
|
|
|
|
Shared line |
|
|
|
|
|
|
|
Shared line with a held call |
|
|
|
|
|
|
|
Call forwarding is enabled |
|
|
|
|
|
|
|
You have messages |
|
|
|
|
|
|
|
Presence status (Available) |
|
|
|
|
|
|
|
Presence status (Busy or In a Call) |
|
|
|
|
Polycom, Inc. |
15 |
Polycom VVX 400 and 410 Business Media Phones User Guide |
Version 5.0.0 |
 Icon
Icon  Description
Received call
Missed call
Favorite
Do Not Disturb enabled
 Icon
Icon  Description
Presence status (Away)
Presence status (Do Not Disturb)
Presence status (Offline)
Presence status (No information)
Navigating Your Phone Interface
Your phone has a number of keys and soft keys you can use to navigate menus and phone views on your phone. The following table shows you how to use keys and soft keys to perform tasks and navigate your phone.
Table 3: Navigating Your VVX 400 and 410 Phone
If you want to… |
Do this… |
|
|
|
|
|
|
Return to Home view from any |
Press |
. |
|
|
|
||
screen |
|
|
|
|
|
|
|
Return to the previous screen |
Press Back, as shown next. Or press the left arrow key. |
|
|
Switch phone views |
If you are in an active call, press |
to switch between the Home view, |
|
|
|||
|
Lines view, and Calls view. If you are not in an active call, press |
to |
|
|
switch between Home view and Lines view. |
|
|
|
|
|
|
Place a call |
Press Dial or use the right arrow key from a call list. |
|
|
|
|
||
Highlight calls in Calls view |
Use the up and down arrow keys to select a call. The soft keys, like Hold or |
||
|
Resume, apply to the highlighted call. |
|
|
|
|
|
|
Polycom, Inc. |
16 |
Polycom VVX 400 and 410 Business Media Phones User Guide Version 5.0.0
If you want to… |
Do this… |
|
|
Select a menu item or option |
Use the up and down arrow keys to highlight the menu item or option, and |
|
press Select. |
|
If the menu is numbered, press the dialpad key to enter the corresponding |
|
menu. For example, press 4 to enter the Backlight Timeout menu as shown |
|
above. |
|
Use * to page up and # to page down in the menus. |
Close an option box without selecting anything
Press the left arrow key or the Back soft key.
Select a soft key, menu item, or option
Use the up and down arrow keys to highlight the menu item or option. Press the appropriate soft key.
If an item in a list has a number next to it, press the corresponding number on the dialpad to select the item.
Select a soft key that’s not in view If a More soft key displays in the far-right of the soft key area (as shown next), additional soft keys are available. Press More to view the additional soft keys.
Entering and Updating Data Fields
You can enter information into text fields on your phone using the dialpad keys on the phone’s console.
You have two options on your phone for entering information: Mode and Encoding.
Mode Enables you to enter numerical and text characters in title case, lowercase, or uppercase.
Encoding Enables you to enter alphanumeric and special characters, including numbers, text, and characters in special languages.
The following table lists the available Mode and Encoding options on your phone.
Table 4: Mode and Encoding Options on VVX Phones
Options Available When You Select Mode |
|
|
Options Available When You Select Encoding |
|
|
|
|
Abc |
|
|
Abc |
|
|
|
|
ABC |
|
|
ABC |
|
|
|
|
abc |
|
|
abc |
|
|
|
|
123 |
123 |
||
|
|
|
|
|
|
|
ASCII |
|
|
|
|
|
|
|
Latin (to enter accented characters) |
|
|
|
|
|
|
|
Katakana (for Japanese characters) |
|
|
|
|
Polycom, Inc. |
17 |

Polycom VVX 400 and 410 Business Media Phones User Guide Version 5.0.0
 Options Available When You Select Mode
 Options Available When You Select Encoding
Unicode (to store characters as double bytes)
Cyrillic (for Russian characters)
Using the Dialpad Keys
You can use the dialpad keys on your phone console to enter field information. The following table shows you how to enter information in text fields using the dialpad and text options on your phone.
Table 5: Entering Information on the VVX Phones
If you want to… |
Do this… |
|
|
|
|
|
|
|
|
|
|
|
|
|
|
|
|
Enter numbers, or characters in |
Select Encoding or Mode, and select one of the alphabetic (Abc, ABC, or |
|||||||
uppercase, lowercase, or titlecase |
abc) options. |
|
|
|
|
|
||
mode |
|
|
|
|
|
|
|
|
|
|
|
||||||
Enter only numbers |
Select Encoding or Mode, and select the numeric (123) option. |
|
||||||
|
|
|
||||||
Enter text in a special language |
Select Encoding, and select one of the language options. |
|
||||||
|
|
|||||||
Enter a character |
Press a dialpad key repeatedly to view the character options and stop to |
|||||||
|
select. When the character you want to enter displays in the field, wait one |
|||||||
|
second, and enter the next character. |
|
||||||
|
|
|||||||
Enter a number |
Press a dialpad key repeatedly (depending what mode you’re in) to enter |
|||||||
|
the number that displays on that key. |
|
||||||
|
|
|||||||
Enter a special character |
Select Encoding, and select one of the alphabetic (Abc, ABC, or abc) |
|||||||
|
options. Then, press the 1, *, 0, or # key one or more times to enter one of |
|||||||
|
the following special characters: |
|
||||||
|
1 key: ! |
| |
‘ |
^ |
\ @ |
: 1 |
|
|
|
* key: . |
* |
- |
& |
% + ; ( ) |
|
||
|
0 key: / |
, |
_ |
$ |
~ |
= |
? 0 |
|
|
# key: # > < { |
} |
[ |
] “ ‘ |
|
|||
|
Note: You can’t access special characters when you’re in numerical (123) |
|||||||
|
mode. |
|
|
|
|
|
|
|
|
|
|||||||
Enter a space |
Select Encoding, and select one of the alphabetic (Abc, ABC, or abc) |
|||||||
|
options and then press the 0 key. |
|
||||||
|
Note: You can’t enter a space when you’re in numerical (123) mode. |
|
||||||
|
|
|||||||
Delete one or more characters |
Use the arrow keys to position the cursor to the right of the character(s) that |
|||||||
|
you want to delete and then press the Backspace soft key |
. |
||||||
|
|
|
|
|
|
|
|
|
Polycom, Inc. |
18 |
Polycom VVX 400 and 410 Business Media Phones User Guide |
Version 5.0.0 |
Registering the Phone
Your system administrator configures your phone with the necessary parameters so that the phone is registered and ready to set up before you receive your phone.
If your phone is not part of a large phone deployment, your phone is registered after you set up your phone. Make sure that you or your system administrator registers the phone before you set up and begin using your phone.
Web Info: : How to Register Your Phone
For detailed information on how to register your phone after you install it, see Registering Standalone Polycom Phones (Quick Tip 44011).
Configuring Your Phone Using the Web
Configuration Utility
This section explains how to update your phone’s settings using the phone’s menu commands. You can also update these settings remotely with the Polycom Web Configuration Utility.
The Web Configuration Utility enables you to view and configure your phone’s software features from a computer using any compatible web browser. The utility provides a browser-friendly view of the settings you can configure on your phone. Using the utility, you can perform many of the same updates from your computer that you can perform using your phone’s menu system.
Web Info: Using the Web Configuration Utility
For detailed information on accessing, navigating, and using the utility, see the Polycom Web Configuration Utility User Guide.
Before you begin using the Web Configuration Utility, you need to know the IP address of your phone and the user password to log in to the utility.
To find your phone’s IP address:
»From Home view, Select Settings > Status > Platform > Phone, and use the arrow keys to navigate to your phone’s IP address.
To access the Web Configuration Utility for your phone:
1Launch a Web browser from a computer on the same network as your phone.
2In the address bar of your web browser, enter the IP address of your phone and press the Enter. For example, if your phone’s IP address is 123.22.3.4, enter this information in the address bar.
Polycom, Inc. |
19 |

Polycom VVX 400 and 410 Business Media Phones User Guide |
Version 5.0.0 |
3From the Web Configuration Utility login screen, select User, enter the user password, and click Submit. The default user password is 123.
The Web Configuration Utility Home screen is displayed.
After you log into the Web Configuration Utility, you can begin setting up different features on your phone under Preferences.
Polycom, Inc. |
20 |
Using Basic Features
Now that you’re familiar with your phone’s user interface, you’re ready to perform basic phone tasks that that you can do on a daily basis. This chapter explains how to handle multiple calls at one time, how to manipulate incoming and active calls, and how to access directories and lists so you can perform tasks quickly and efficiently.
This chapter includes information about the following tasks:
Calling, answering, holding, and ending calls
Ignoring, rejecting, forwarding, and transferring calls
Setting up conference calls
Enabling Do Not Disturb
Listening to voicemail
Handling Directories, Recent Calls, and Favorites
Customizing ringtones
Controlling phone volume
Using headsets
Managing shared lines
Managing Call Activity
Your system administrator can set up your phone to have up to six lines with unique extension numbers, or the same extension number as other lines on your network. Your phone can manage a maximum of 24 active, incoming, and held calls at a time on all registered lines. However, you can only have one active call in progress with numerous other incoming calls or calls on hold.
You can place and answer calls using the following:
The handset
The speakerphone
A headset
To alternate between the handset, headset, and speakerphone:
»During a call, pick up the handset, press  , or press
  .
.
For example, if you’re using the handset, you can switch to headset mode by pressing  , or switch to speakerphone mode by pressing
  .
.
When you’re in speakerphone mode,  glows green. When you’re in headset mode,
  glows green if an analog headset is connected.
Polycom, Inc. |
21 |
Polycom VVX 400 and 410 Business Media Phones User Guide |
Version 5.0.0 |
Troubleshooting: Why Doesn’t the Speakerphone Work?
If your speakerphone doesn’t work, ask your system administrator if the speakerphone is disabled. You must handle calls using the handset or a headset. If your system administrator disables the
speakerphone on your phone, Handsfree mode disabled appears on the screen after you press  .
.
Power Tip: Setting Up the Phone to Automatically Use Your Headset for All Calls
If you frequently use a headset, you can make the headset the default call path. To set this up, see Enabling Headset Memory Mode.
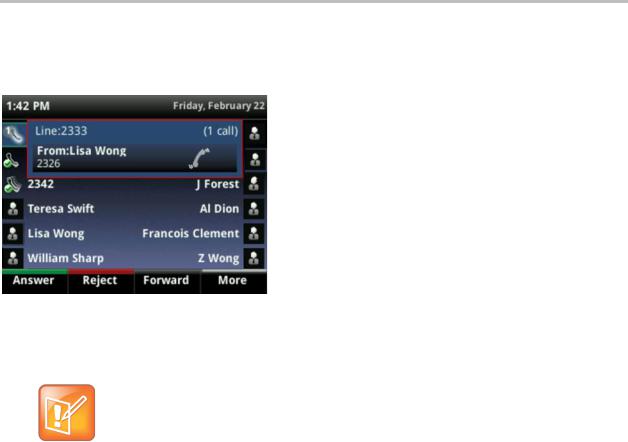
Answering Incoming Calls
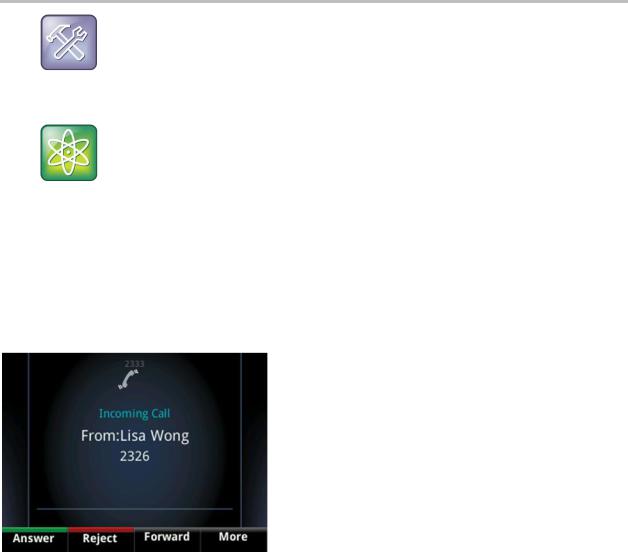
All incoming calls display in an Incoming Call window, as shown next.
Figure 7: Viewing the Incoming Call Window
You can answer incoming calls by:
Picking up the handset.
Pressing Answer. The call is answered using the speakerphone.
Pressing  . The
. The  is green when in use.
Pressing  . The
. The  is green when in use.
Pressing the line key of the incoming call. The line key of the incoming call blinks green and the call is answered using the speakerphone.
If you’re already in handset, speakerphone, or headset mode, press Answer, and the phone automatically uses the mode you’re in.
Polycom, Inc. |
22 |
Polycom VVX 400 and 410 Business Media Phones User Guide |
Version 5.0.0 |
If you don’t answer the call within 10 seconds, the Incoming Call window disappears, and Calls view displays, as shown next.
Figure 8: Viewing Incoming Calls in Calls View
To answer the call, pick up the handset, press  , press
  , or pressing the line key of the incoming call. From Calls view, you can also press Answer to use the speakerphone.
Note: Answering Calls When Your Phone is Locked
If your phone is locked, the way you answer calls is different. For more information on answering calls from a locked phone, see Calling and Answering from a Locked Phone.
Answering Additional Calls
If you are on an active call and you receive an incoming call on the same or a different line, a call waiting tone beeps, and the Incoming Call window displays.
To answer an incoming call:
»Press Answer.
The active call you are currently on is held.
If you don’t answer the incoming call within 10 seconds, the Incoming Call window disappears, and Calls view displays, as shown above.
Answering Calls on Shared Lines
If you share a line with another phone, you and another person can answer, hold, and resume calls on the same line. If you answer the call and hold it, anyone who shares your line can resume the held call.
For more information about shared lines, including what you can and can’t do with shared lines, see
Managing Shared Lines.
Polycom, Inc. |
23 |

Polycom VVX 400 and 410 Business Media Phones User Guide |
Version 5.0.0 |
Answering Calls Automatically
You can enable auto answer on your phone to answer calls automatically so that you don’t have to pick up the handset or press a key to answer calls. When you enable auto answer, your phone automatically answers incoming calls using the speakerphone. Ask your system administrator about enabling auto answer and setting how many times your phone rings before the call is answered.
If Auto Answer is enabled and you receive an incoming call while you’re in an active call, the incoming call is automatically answered when you end or hold the current call.
Your phone’s default setting mutes the microphone for all auto-answered calls so that the party calling you can’t hear you until you are ready to talk. The mute button,  , glows red when the microphone is muted. You can press
  to unmute the microphone when you are ready to talk.
To enable your phone to automatically answer calls:
1From Home view, select Settings > Basic > Preferences > Auto Answer.
2From the Auto Answer screen, do the following:
To enable your phone to automatically answer SIP calls, select Auto Answer SIP Calls and select Yes. The default setting is No.
To mute the microphone for all auto-answered calls so the incoming caller can’t hear you, select
Microphone Mute and select Yes. The default setting is Yes.
3Press Save.
After you have enabled auto answer, your phone answers all incoming calls after the set amount of default rings using the speakerphone.
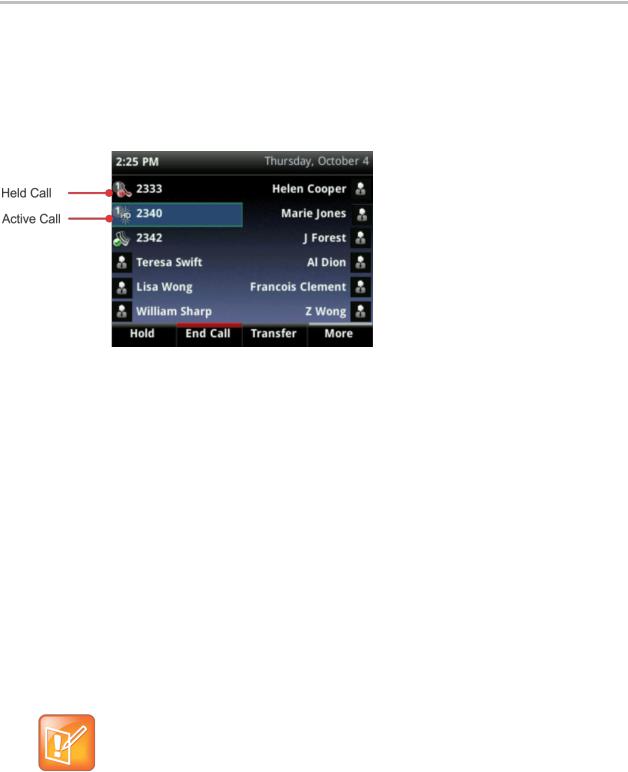
Managing Multiple Calls
You can manage multiple calls from the Calls and Lines views. Calls view displays all the calls for each phone line, as shown below. All the active and held calls for a line display under the associated phone line. Use the arrow keys to navigate between your lines and the calls on each line.
Figure 9: Managing Calls in Calls View
Polycom, Inc. |
24 |
Polycom VVX 400 and 410 Business Media Phones User Guide |
Version 5.0.0 |
To switch to Lines view from Calls view:
» Press More > Lines, or press  .
.
Lines view shows you each line on your phone, and how many calls each line has, as shown next. In the example below, line 2340 has one active call, and line 2333 has one held call.
Figure 10: Viewing Calls in Lines View
If you press a line key that doesn’t have an active call, the most recent call on that line becomes active. The current call is held.
To highlight a call, use the up and down keys to select the call. You can press one of the soft keys to hold, resume, end, or transfer the highlighted call, or set up a conference with the highlighted call.
Placing Calls
You can place a call using the handset, speakerphone, headset, or by pressing the line key of the number you want to call. You can dial the number first, and then choose a method to use by picking up the handset, pressing  , pressing
  , or pressing the line key of the person you want to call, or you can choose a method to use first, and dial the number.
You can place calls in these ways:
Manually, from the Dialer
Automatically, by tapping a favorite in Lines view
Automatically, from your Favorites list, Recent Calls list, or Contact Directory.
Note: Calling from a Locked Phone
If your phone is locked, see Calling and Answering from a Locked Phone for information on placing calls on a locked phone.
Polycom, Inc. |
25 |
Polycom VVX 400 and 410 Business Media Phones User Guide |
Version 5.0.0 |
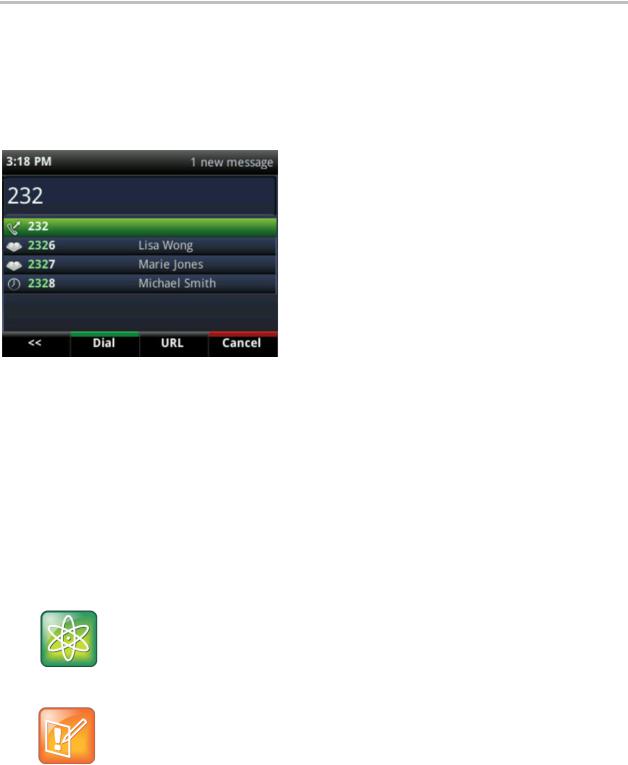
Calling from the Dialer
The Dialer displays a list of previously-placed calls. Either select an entry to automatically enter it or start entering a number. As you enter numbers, the Dialer displays a list of similar numbers, as shown next. Use the up and down arrow keys to select a match and automatically enter it.
Figure 11: Placing a Call Using the Dialer
To display the Dialer,
»Do one of the following:
From Home view, select New Call.
From Lines or Calls view, press New Call.
The New Call soft key doesn’t display if you have an active call.
If your phone is idle, start entering a phone number.
Pick up the handset, or press  or
or  . This method only works if you don’t have an active call.
In Lines view, press a line key that doesn’t have any calls.
Power Tip: Choosing URLs or Numbers Mode from the Dialer
To enter a URL in the Dialer, tap URL. To exit URL mode and enter numbers, tap Number.
Note: No New Call Icon when Maximum Calls Reached
The New Call soft key is not displayed when the maximum number of calls is reached (24).
Polycom, Inc. |
26 |

Polycom VVX 400 and 410 Business Media Phones User Guide |
Version 5.0.0 |
When you access the Dialer, an active call is held.
To call from the Dialer:
Enter the number, and then pick up the handset, press a line key, press  , or press
  .
.
If you’re already in handset, speakerphone, or headset mode, enter the number, and press Dial.
Note: Handling Automatically Placed Calls
Your administrator sets up your phone to automatically place the call after you enter a certain number of digits. If your phone doesn’t automatically place the call, press Send. If a call is placed before you enter all the digits, enter the phone number and press Send.
Placing Calls from Favorites, Recent Calls, and Directories
In addition to the Dialer, you can place calls from the Recent Calls list, Favorites list, or from your Directory. You can also call a favorite from the Lines view.
To call from the Recent Calls list:
1Access your Recent Calls list by doing one of the following:
From Home view, select Directories and select Recent Calls.
From Lines view, press the right arrow key for the Placed Calls list, the down arrow key for the Missed Calls list, or the left arrow key for the Received Calls list.
2From the Recent Calls list, select the person you want to call and press Dial.
To call from your Favorites list:
1Choose one of the following options:
From Home view, select Directories > Favorites.
From Line view, press the up arrow key to access the Favorites list.
2From your Favorites list, select the favorite you want to call and press Dial.
To call from your Directory:
1From Home view, select Directories and select Contact Directory.
2From your Directory, select the contact you want to call.
3Place the call by doing one of the following:
From the contact’s information screen, press Info, select the contact, and press Dial.
Select the contact and press Dial.
Polycom, Inc. |
27 |
Polycom VVX 400 and 410 Business Media Phones User Guide |
Version 5.0.0 |
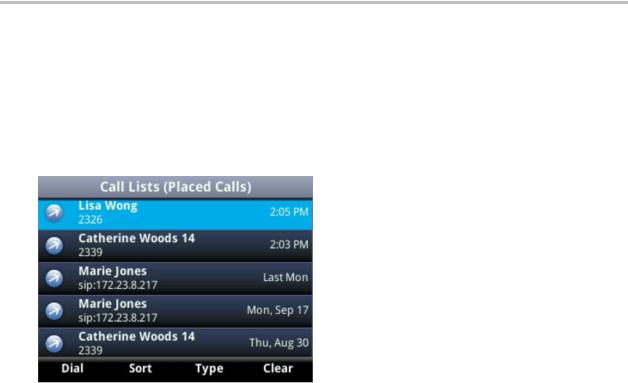
Redialing Numbers
To dial the last number you called, press the right arrow key for the Placed Calls list. The first number in the list is the last call you placed.
To redial a number:
»From the Placed Calls list (shown next), press Dial.
Use the up and down arrow keys to select the other previously placed calls.
Ending Calls
You can end an active call in the following ways:
Place the handset on the cradle.
From Lines or Calls view, press End Call.
In Calls view, highlight the call before you press End Call.
To end a held call:
» From Calls view, select the held call, and press Resume > End Call.
Using Headsets
You can connect an analog headset to your phone. If an analog headset is connected and in use,  glows green.
If you use a headset, you can set up your phone so that all calls use your headset (see Enabling Headset Memory Mode). If you use a headset that supports electronic hookswitch (EHS), you can press the hookswitch button to place, answer, and end calls. In addition, you can to mute calls and control volume from your headset.
For information about how to connect a headset to your phone, see the Quick Start Guide for your phone, which is available on the Polycom Business Media Phones web page.
For information about your headset’s features and how to sync your headset with your phone, see your headset’s documentation.
Polycom, Inc. |
28 |

Polycom VVX 400 and 410 Business Media Phones User Guide |
Version 5.0.0 |
For a list of supported headsets, see the Headset Compatibility List (Technical Bulletin 37477). For detailed information about how to use electronic hookswitch, see Using an Electronic Hookswitch (Technical Bulletin 35150). All of these documents are available on the Polycom Profiled UC Software Features and Polycom
support pages.
Enabling Headset Memory Mode
This feature is useful for full-time headset users. You can set up your phone so that all incoming and outgoing calls use your headset. At any time, you can switch to handset or speakerphone mode.
To use Headset Memory Mode, you must enable and activate Headset Memory Mode. When Headset Memory Mode is activated,  flashes either green for analog headsets or blue for USB or Bluetooth headsets.
To enable Headset Memory Mode:
1Select Settings from Home view, and select Basic > Preferences > Headset > Headset Memory.
2From the Headset Memory Mode screen, select Enabled.
3Press  .
.
To activate Headset Memory Mode:
»Press  twice.
The Headset key flashes to indicate that the phone is in Headset Memory Mode.
Now, whenever you answer a call, the call connects to your headset automatically.
If you switch to the speakerphone or the handset, you deactivate Headset Memory Mode. Calls no longer automatically go to your headset, unless you choose this mode. To have calls go to your headset again, activate Headset Memory Mode by pressing  twice.
Responding to Incoming Calls
When your phone rings, you can respond to incoming calls in one of the following ways:
Temporarily ignore the call before answering it.
Reject the call so it goes directly to voicemail.
Forward the call to another person.
Ignoring Incoming Calls
You can briefly ignore or silence a call to stop your phone from ringing. Even though the call shows as ignored, your phone still displays the incoming call notification so you can answer the call.
To ignore or silence a call:
»From the Incoming Call window, press Ignore for individual lines or Silence for shared lines. Your phone stops ringing, and the Incoming Call window is replaced with Home or Calls view.
Polycom, Inc. |
29 |
 Loading...