


O W N E R ’ S
M A N U A L
DSWPRO400
DSWPRO500
DSWPRO600
DIGITAL
POWERED
SUBWOOFERS
Product Disposal. Certain international, national and/or local laws and/or regulations may apply regarding the disposal of this product. For further detailed information, please contact the retailer where you purchased this product or the Polk Audio Importer/ Distributor in your country. A listing of Polk Audio Importer/Distributors can be found on the Polk Audio website www.polkaudio.com or by contacting Polk Audio at 5601 Metro Drive, Baltimore, Maryland 21215, USA. Phone: +1-410-358-3600;
in California: 1-800-377-7655.
WARNING: LISTEN CAREFULLY
IMPORTANT SAFETY INSTRUCTIONS
READ BEFORE OPERATING EQUIPMENT
1.Read these instructions.
2.Keep these instructions.
3.Heed all warnings.
4.Follow all instructions.
5.Do not use this apparatus near water.
6.Clean only with dry cloth.
7.Do not block any ventilation openings. Install in accordance with the manufacturer’s instructions.
8.Do not install near any heat sources such as radiators, heat registers, stoves, or other apparatus (including amplifiers) that produce heat.
9.Do not defeat the safety purpose of the polarized or grounding-type plug. A polarized plug has two blades with one wider than the other. A grounding type plug has two blades and a third grounding prong. The wide blade or the third prong are provided for your safety. If the provided plug does not fit into your outlet, consult an electrician for replacement of the obsolete outlet.
10.Protect the power cord from being walked on or pinched particularly at plugs, convenience receptacles, and the point where they exit from the apparatus.
11. Only use attachments/accessories specified by the manufacturer.
12. Use only with the cart, stand, tripod, bracket, or table specified by the manufacturer, or sold with the apparatus. When a cart is used, use caution when moving the cart/apparatus combination to avoid injury from tip-over.
13.Unplug this apparatus during lightning storms or when unused for long periods of time.
14.Refer all servicing to qualified service personnel. Servicing is required when the apparatus has been damaged in any way, such as power-supply cord or plug is damaged, liquid has been spilled or objects have fallen into the apparatus, the apparatus has been exposed to rain or moisture, does not operate normally, or has been dropped.
15.WARNING: To reduce the risk of fire or electric shock, this apparatus should not be exposed to rain or moisture and objects filled with liquids, such as vases, should not be placed on this apparatus.
16.To completely disconnect this equipment from the mains, disconnect the power supply cord plug from the receptacle.
17.The main plug of the power supply cord shall remain readily operable.
WICHTIGE SICHERHEITSHINWEISE
VOR BEDIENUNG DER GERÄTE DURCHLESEN
1.Lesen Sie diese Anweisungen durch
2.Behalten Sie diese Anweisungen.
3.Beachten Sie alle Warnhinweise.
4.Folgen Sie allen Anleitungen.
5.Verwenden Sie diese Geräte nicht in der Nähe von Wasser.
6.Reinigen Sie sie nur mit einem trockenen Tuch
7.Blockieren Sie keine Lüftungsöffnungen. Installieren Sie die Geräte entsprechend den Herstelleranweisungen.
8.Installieren Sie sie nicht in der Nähe von Wärmequellen wie Heizkörpern, Warmlufteintrittsöffnungen, Öfen oder anderen wärmeerzeugenden Geräten (einschließlich Verstärkern).
9.Sie dürfen die Sicherheitsfunktion polarisierter oder geerdeter Stecker nicht außer Kraft setzen. Ein polarisierter Stecker hat zwei Klinken, wobei eine dicker ist als die andere. Ein geerdeter Stecker hat zwei Klinken und einen dritten Erdungsstift. Die dicke Klinke oder der dritte Stift dienen Ihrer Sicherheit. Wenn der mitgelieferte Stecker nicht in Ihre Steckdose passt, sollten Sie die Steckdose durch einen Elektriker ersetzen lassen.
Ein polarisierter Stecker hat zwei Klinken, wobei eine dicker ist als die andere.
10.Vermeiden Sie, dass das Netzkabel belastet oder geknickt wird, vor allem bei Steckern, Zusatzsteckdosen, und beim Ausgang aus dem Gerät
11.Verwenden Sie ausschließlich vom Hersteller empfohlene Zusatzgeräte/Zubehör.
12. Verwenden Sie ausschließlich Wagen, Stände, Stative, Halterungen oder Tische, die von Hersteller empfohlen oder mit dem Gerät verkauft wurden.
Bei Verwendung eines Wagens sollten Sie vorsichtig sein, damit Wagen und Gerät nicht umkippen und Verletzungen verursachen.
Polk Audio loudspeakers and subwoofers are capable of playing at extremely high volume levels, which could cause serious or permanent hearing damage. Polk Audio, Inc. accepts no liability for hearing loss, bodily injury or property damage resulting from the misuse of its products.
Keep these guidelines in mind and always use your own good judgment when controlling volume:
•You should limit prolonged exposure to volumes that exceed 85 decibels(dB).
•You are responsible for knowing the local laws governing acceptable volume levels. For more about safe volume levels, go to: www.polkaudio.com/education/article/SPL/.
Or refer to the Occupational Health and Safety Administration (OSHA) guidelines at: www.osha.gov/dts/osta/otm/noise/standards_more.html.
AVERTISSEMENT: ÉCOUTEZ BIEN
Les haut-parleurs et subwoofers Polk Audio sont capables de générer des niveaux de pression sonores extrêmement élevés pouvant causer des dommages auditifs graves ou permanents. Polk Audio Inc. ne peut être tenue responsable de perte d’ouïe, de blessure ou de dommages matériaux causés par l’usage abusif de ses produits.
Tenez compte de recommandations suivantes et faites preuve de discernement lorsque vous contrôlez le volume:
•Limitez l’exposition prolongée à des niveaux sonores excédant 85 décibels (dB).
•Vous êtes tenu de connaître les lois locales régissant le volume sonore mobile.
Pour plus d’information sur les niveaux sécuritaires de pression sonore visitez:www.polkaudio.com/education/article/SPL/.
Ou référez-vous aux normes de la OSHA (Occupational Health and Safety Administration) à l’adresse web: http://www.osha.gov/dts/osta/otm/noise/standards_more.html.
2 Polk Audio Customer Service 800-377-7655 (Outside USA & Canada: 410-358-3600)

13.Trennen Sie dieses Gerät bei Gewittern vom Netz, oder wenn es längere Zeit nicht benutzt wird.
14.Lassen Sie alle Wartungen von geschulten Kundendiensttechnikern durchführen. Eine Wartung ist nötig, wenn das Gerät auf irgendeine Weise beschädigt wurde, z.B. durch Schäden am Netzkabel oder -stecker, durch Verschütten von Flüssigkeiten, durch das Hineinfallen von Objekten, durch Regen oder Feuchtigkeit, wenn es nicht richtig funktioniert oder wenn es fallengelassen wurde.
15.WARNUNG: Um die Gefahr eines Feuers oder Stromschlags zu verringern, ist dieses Gerät vor Regen oder Feuchtigkeit zu schützen, und mit Flüssigkeit gefüllte Gefäße, wie Vasen, sollten nicht auf diesem Gerät platziert werden.
16.Um dieses Gerät vollständig vom Netz zu trennen, ziehen Sie das Netzkabel aus der Steckdose.
17.Der Hauptstecker des Netzkabels sollte stets in gutem Betriebszustand sein.
IMPORTANTES INSTRUCCIONES DE SEGURIDAD
LEER ANTES DE HACER FUNCIONAR EL EQUIPO
1.Lea estas instrucciones.
2.Guarde estas instrucciones.
3.Respete todas las advertencias.
4.Siga todas las instrucciones.
5.No use este aparato cerca del agua.
6.Límpielo solamente con un paño seco.
7.No bloquee las aberturas de ventilación. Instale el aparato de acuerdo con las instrucciones del fabricante.
8.No lo instale cerca de fuentes de calor, tales como radiadores, rejillas de piso, cocinas u otros aparatos (incluso amplificadores) que producen calor.
9.No anule la seguridad implícita en el enchufe polarizado o con conexión a tierra. Los enchufes polarizados tienen dos patas, una más ancha que la otra. Los enchufes con conexión a tierra tienen dos patas iguales y una clavija de conexión a tierra. La pata ancha o la clavija de conexión a tierra han sido incorporadas al diseño por la seguridad del usuario. Si el enchufe no entra en el tomacorrientes, consulte a un electricista para que cambie el tomacorrientes obsoleto.
10.Evite que el cordón de alimentación sea pisado o aplastado, en particular cerca del enchufe, cerca del tomacorrientes y en el punto en que el cordón sale del aparato.
11. Use sólo los accesorios especificados por el fabricante.
12. Use el aparato solamente con el carrito, pedestal, trípode, soporte o mesa especificado por el fabricante o vendido con el aparato. Sea precavido cuando mueva el aparato en un carrito para evitar las lesiones que pueda producir un volcamiento.
13.Desenchufe el aparato durante tormentas eléctricas o cuando no lo use durante largos períodos de tiempo.
14.Encargue todo servicio del aparato al personal de servicio calificado. Se requiere servicio cuando el aparato ha sido dañado de alguna manera, tal como cuando se ha dañado el enchufe o el cordón de alimentación, han caído líquidos u objetos dentro del aparato o el aparato se ha dejado caer, ha dejado de funcionar normalmente o ha sido expuesto a la lluvia o a la humedad.
15.ADVERTENCIA. Para reducir el riesgo de incendio o de descarga eléctrica, este aparato no debe ser expuesto a la lluvia o a la humedad, y no se le deben colocar encima objetos llenos de líquido, tales como floreros.
16.Para desconectar completamente este equipo del tomacorrientes de CA de la pared, desenchufe del tomacorrientes el enchufe del cordón de alimentación.
17.Debe ser fácil manipular el enchufe del cordón de alimentación.
INSTRUÇÕES DE SEGURANÇA IMPORTANTES
LER ANTES DE USAR O EQUIPAMENTO
1.Leia estas instruções.
2.Guarde estas instruções.
3.Preste atenção a todos os avisos.
4.Siga todas as instruções.
5.Não use este aparelho perto de água.
6.Limpe apenas com um pano seco.
7.Não bloqueie as aberturas de ventilação. Instale de acordo com as instruções do fabricante.
8.Não instale próximo de quaisquer fontes de calor, tais como radiadores, saídas de ar quente, fogões ou outros aparelhos (incluindo amplificadores) que produzam calor.
9.Não anule a função de segurança do plugue polarizado ou aterrado. Um plugue polarizado tem dois pinos chatos, sendo um deles mais largo que o outro. Um plugue aterrado tem dois pinos chatos e um terceiro pino redondo de aterramento. O pino chato mais largo ou o terceiro pino redondo existem para sua segurança. Se o plugue fornecido não se encaixar na tomada, consulte um eletricista para trocar a tomada obsoleta.
10.Proteja o cabo de alimentação para que não seja pisoteado nem prensado, sobretudo no plugue, em tomadas posicionadas no piso e no ponto onde sai do aparelho.
11.Utilize apenas os acessórios especificados pelo fabricante.
12. Use apenas com o carrinho, tripé, suporte ou mesa especificado pelo fabricante ou vendido com o aparelho. Ao usar um carrinho, tenha cuidado ao movê-lo com o aparelho para evitar ferimentos causados por tropeções.
13. Desligue o aparelho da tomada durante tempestades elétricas ou quando ficar fora de uso por longos períodos de tempo.
14.Toda a manutenção deve ser realizada por pessoal de manutenção qualificado. É necessário prestar assistência técnica ao aparelho quando tiver sofrido danos de qualquer tipo, tais como danos ao cabo de alimentação ou ao plugue, derramamento de líquido ou queda de objetos sobre o aparelho, exposição do aparelho à chuva ou umidade, mal funcionamento ou queda do aparelho.
15. AVISO: Para reduzir o risco de incêndio ou choque elétrico, este aparelho não deve ser exposto à chuva ou à umidade. Objetos que contenham líquidos, como vasos, não devem ser colocados sobre este aparelho.
16.Para desconectar completamente este equipamento da tomada de CA de parede, desconecte o plugue do cabo de alimentação da tomada.
17.O plugue principal do cabo de alimentação deve ser mantido em boas condições de uso.
INFORMAZIONI IMPORTANTI PER LA SICUREZZA
LEGGERE PRIMA DI UTILIZZARE L'EQUIPAGGIAMENTO
1.Leggere queste istruzioni.
2.Conservare queste istruzioni.
3.Prestare attenzione alle avvertenze.
4.Seguire tutte le istruzioni
5.Non utilizzare questo apparato vicino all’acqua.
6.Pulire solo con un panno asciutto.
7.Non bloccare alcuna apertura per la ventilazione. Installare secondo le istruzioni fornite dal fabbricante.
8.Non installare vicino a fonti di calore come ad esempio radiatori, camini, stufe o altre apparecchiature che generino calore, inclusi gli amplificatori.
9.Non disabilitare la polarizzazione di spine di alimentazione con presa di massa. Una spina senza massa ha due terminali. Una spina con massa ha tre terminali. Il terminale di massa è presente per migliorare la sicurezza. Se la spina non può essere inserita nella presa, contattare un elettricista per sostituire la presa.
10.Evitare che il cavo dell’alimentazione venga calpestato o stretto, soprattutto in prossimità della spina o dell’involucro, o dove il cavo esce dall’apparato.
11. Utilizzare solo gli accessori forniti dal fabbricante.
12. Utilizzare solo con il carrello, cavalletto, podio, staffa o tavolo specificato dal fabbricante o venduto con l’apparato. Se viene usato un carrello, fare attenzione per evitare danni dovuti al ribaltamento del carrello stesso o dell’apparato.
13.Scollegare l’apparato durante i temporali o se non utilizzato per lunghi periodi di tempo.
14.Contattare personale di assistenza qualificato per qualsiasi intervento di assistenza. Ottenere assistenza se l’apparato è danneggiato in alcun modo, per esempio se si hanno danni alla spina o al cavo di alimentazione, se è stato versato del liquido, se l’apparato è stato esposto a pioggia o umidità, se non funziona normalmente o se è caduto.
15.AVVERTENZA: per evitare i rischi di incendio e di scossa elettrica, non esporre l’apparato alla pioggia o all’umidità e non posizionare sull'unità alcun contenitore contenente un liquido, come ad esempio un vaso.
16.Per scollegare completamente questa attrezzatura dalla presa di alimentazione c.a., scollegare il cavo di alimentazione dall’involucro.
17.La spina del cavo di alimentazione deve essere sempre facilmente accessibile.
WCONSIGNES DE SÉCURITÉ IMPORTANTES
ÀLIRE AVANT D’UTILISER L’ÉQUIPEMENT
1.Lire les présentes instructions.
2.Conserver ces instructions.
3.Respecter tous les avertissements.
4.Suivre toutes les instructions.
5.Ne pas utiliser cet appareil à proximité de l’eau.
6.Nettoyer avec un chiffon sec uniquement.
7.Ne pas obstruer les ouïes de ventilation. Installer conformément aux instructions du constructeur.
8.Ne pas installer à proximité de sources de chaleur telles que les radiateurs, les grilles de chauffage, les cuisinières et les autres appareils (notamment les amplificateurs) dégageant de la chaleur.
9.Ne pas neutraliser le dispositif de sécurité que constitue la fiche polarisée ou à broche de terre. Une fiche polarisée a une lame plus large que l’autre. Une fiche à broche de terre est munie de deux
lames et d’une troisième broche pour la terre. La lame large et la troisième broche sont prévues pour la sécurité de l’utilisateur. Si la fiche fournie ne rentre pas dans votre prise de courant, demander à un électricien de remplacer cette prise d’un type ancien.
10.Protéger le cordon d’alimentation en s’assurant qu’il ne risque pas d’être piétiné ou écrasé, en particulier près des fiches, des blocs multiprises et de son point de sortie de l’appareil.
11.Utiliser uniquement les accessoires préconisés par le constructeur.
12.Utiliser exclusivement avec le chariot, le support, le trépied, la console ou le bâti
recommandé par le fabricant ou vendu avec l’appareil. Lorsqu’un chariot est utilisé, faire preuve de prudence pour déplacer l’ensemble chariot/appareil afin d’éviter un renversement pouvant causer des blessures.
13. Débrancher cet appareil en cas d’orage ou lorsqu’il reste inutilisé pendant une longue durée.
14. Tout travail de dépannage doit être confié à un réparateur professionnel compétent. En cas de dommages, il faut faire réparer l’appareil, par exemple si la fiche ou le cordon d’alimentation a été endommagé, si un liquide a été renversé ou si un objet a pénétré à l’intérieur de l’appareil, si l’appareil a été exposé à la pluie ou à l’humidité, s’il ne fonctionne pas normalement ou s’il
a subi une chute.
15.AVERTISSEMENT : Pour réduire les risques d’incendie et de choc électrique, ne pas exposer cet appareil à la pluie ni à l’humidité, et ne pas poser dessus de récipient rempli de liquide, tel qu’un vase.
16.Pour isoler complètement cet équipement de l’alimentation secteur, débrancher son cordon d’alimentation de la prise de courant.
17.La fiche principale du cordon d’alimentation doit demeurer facile d’accès.
Customer Service Hours of Operation: Monday-Friday, 9AM-6PM EST |
polkcs@polkaudio.com |
3 |
ENGLISH
FIRST THINGS FIRST
Caution: Subwoofers are heavy. Exercise caution when unpacking your subwoofer.
Take Inventory
1 Subwoofer
1 Remote Control
1 Owner’s Manual
1 Power Cord
1 Registration Card
4 Rubber Foot Inserts
Please inspect your subwoofer carefully. Notify your Polk Audio dealer if you notice any damage or missing items. Keep the carton and packing material. It will do the best job of protecting your subwoofer if it needs to be transported.
Your system includes a detachable power cord that’s packaged separately from the subwoofer. Insert the female end into the receptacle on the amplifier plate and insert the AC plug into a wall outlet (or power strip) as per the safety instructions found on the inside cover of this manual. We do not recommend connecting the subwoofer’s AC power cord to your receiver’s switched outlet.
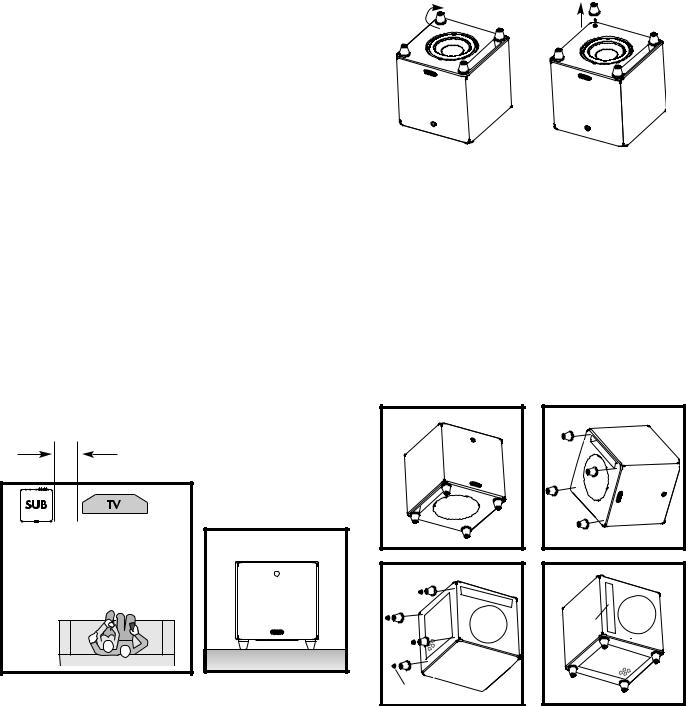
Feet/Carpet Spikes
DSWPRO Series subwoofers have removable feet. Each foot’s shaft is also a carpet spike, which allows you to place your subwoofer on a carpeted floor.
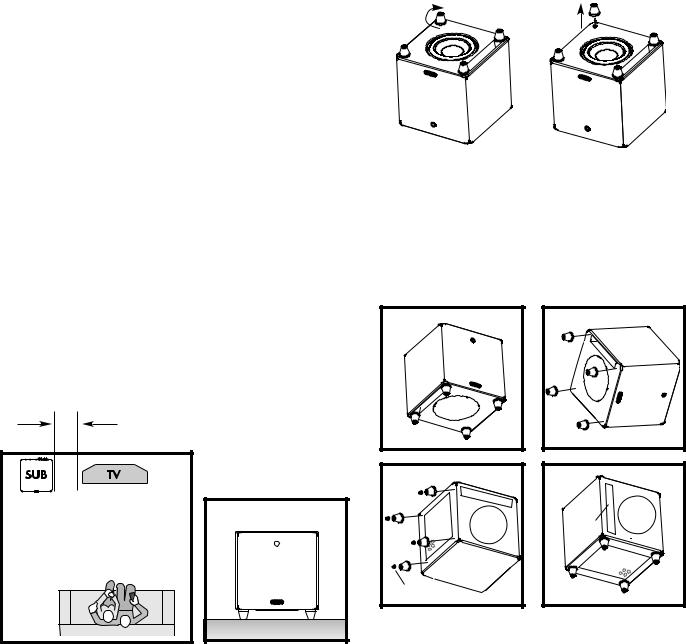
To remove the conical feet from the carpet spike, grasp a foot firmly and turn the foot clockwise while pulling up. Three complete turns should raise the foot
enough to allow you to place your fingertips under the foot and pull it off the spike.
PLACING YOUR SUBWOOFER IN A CABINET
DSWPRO Series subwoofers have removable feet, allowing you to place the subwoofer in a cabinet, thereby reorienting the subwoofer’s driver so that it faces into your listening room.
PLACING YOUR SUBWOOFER IN A ROOM
Your DSWPRO Series subwoofer is magnetically shielded for placement near video monitors. (LCD, DLP and Plasma televisions are not affected by magnetism.) Allow at least 18" (46cm) of space between your subwoofer and any tube television, but if you do notice video distortion or discoloration, immediately move the subwoofer away from the TV.
The Polk Room Optimizer (PRO™) feature lets you place your subwoofer anywhere in the room without compromising performance. When placing your subwoofer in the room, always place your subwoofer on its base, feet side down. If you can avoid it, do not place your subwoofer next to an open door.
18" - 24" (46cm - 61cm)
OK
We do recommend placing your subwoofer in different locations within your room to learn what produces the best sound quality based upon your listening preferences.
The PRO feature will tailor your subwoofer’s performance to its location in your room. Select one of the four buttons on your subwoofer’s remote control that indicates where you’ve placed your subwoofer in the room. (For more on this feature, see “Polk Room Optimizer.“)
For more information on subwoofer placement, go to
www.polkaudio.com/education/article.php?id=20.
Note: The remote control may not operate when the subwoofer is placed in a cabinet with the driver facing into the room. If this occurs, adding an IR repeater will enable the remote control to communicate with the subwoofer.
front
1. |
|
|
amp |
|
side |
|
rubber |
3. |
inserts |
2. |
driver
slot port
4.
Instructions For Placing Subwoofer In Cabinet:
1.With the subwoofer’s logo facing you, turn the sub on its side.
2.Unscrew the feet from the bottom of the subwoofer.
3.Reattach the feet in the threaded inserts located
on the amplifier side. Press rubber inserts into bottom of feet.
4.Turn the subwoofer onto its feet. Place the subwoofer in the cabinet so that the driver faces into the room.
Note: Grilles are available for DSWPRO Series subwoofers at your authorized Polk Audio dealer or at www.polkaudio.com.
4 Polk Audio Customer Service 800-377-7655 (Outside USA & Canada: 410-358-3600)
|
|
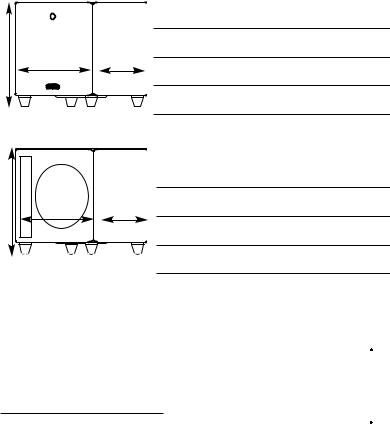
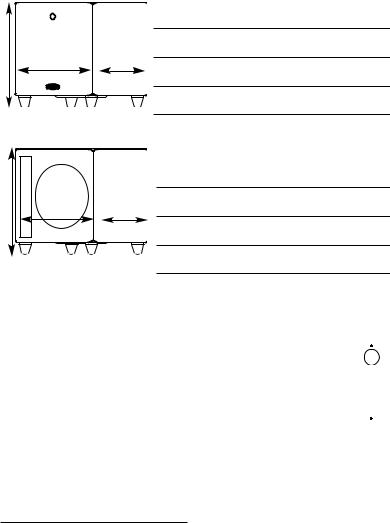
Downward Firing Dimensions |
|
|
|
DSWPRO400: 13 3/4" W x 13 3/4" D x 14 5/8" H |
|
H |
|
(34.9cm W x 34.9cm D x 37.2cm H) |
|
W |
D |
DSWPRO500: 15 1/2" W x 15 1/2" D x 16 1/8" H |
|
|
|
(39.4cm W x 39.4cm D x 41.0cm H) |
|
|
|
DSWPRO600: 16 1/2" W x 16 1/2" D x 17 1/8" H |
|
|
|
(41.9cm W x 41.9cm D x 43.5cm H) |
|
|
|
Forward Firing Dimensions |
|
|
|
(height with rubber foot inserts) |
|
H |
|
DSWPRO400: 13 3/4" W x 13" D x 15 7/8" H |
|
D |
(34.9cm W x 33.0cm D x 40.3cm H |
||
W |
|||
|
|
DSWPRO500: 15 1/2" W x 14 1/2" D x 17 5/8" H |
|
|
|
(39.4cm W x 36.8cm D x 44.8cm H |
|
|
|
DSWPRO600: 16 1/2" W x 15 1/2" D x 18 5/8" H |
|
|
|
(41.9cm W x 39.4cm D x 47.3cm H |
|
|
|
Note: Optional grille adds to depth (sold seperately). |
AC POWER CONNECTION AND AUTO ON/OFF
Dual Voltage Switch
DSWPRO Series subwoofers are equipped with either a dual voltage switch or an auto sensor.
DSWPRO400 |
Auto Sense |
DSWPRO500 |
Selectable |
DSWPRO600 |
Selectable |
WARNING: The correct voltage for your country has been set at the factory. Only use the voltage setting specified for your
country. Using an improper setting may damage your subwoofer.
Main Power Switch
Turn power on/off via the AC MAIN switch.
Standby/Auto/On Switch
Your DSWPRO Series subwoofer uses a 3-position power switch, which selects your subwoofer’s operational mode. The three modes are: Standby, Auto and On.
 Standby
With the switch in this position, the subwoofer will only turn on (become active) when the user presses the power button on the remote control. Once active the subwoofer will remain on regardless of whether an audio signal is present.
 Auto
Auto
In the “Auto” position, your subwoofer automatically turns on when it senses an audio signal and the LED located on the back of the subwoofer will be green.
We recommend the “Auto” mode if your subwoofer is always receiving power (i.e., if it's plugged into a wall outlet). When no signal is present, the subwoofer will enter a “waiting” state after 15 minutes and the LED will turn yellow.
 On
On
The subwoofer is always on and fully active in this mode. The LED on the back of the subwoofer will be green. This mode is best if the subwoofer is plugged into a switched power outlet. The remote control cannot be used to turn off the subwoofer.
Note: You may want to leave your subwoofer unplugged or the AC MAIN switch turned off during extended periods of non use, such as during a vacation.
Power Mode LED Colors and Their Meaning:
Green: Fully active
Yellow: Standby
Red: Protection
Customer Service Hours of Operation: Monday-Friday, 9AM-6PM EST |
polkcs@polkaudio.com |
5 |
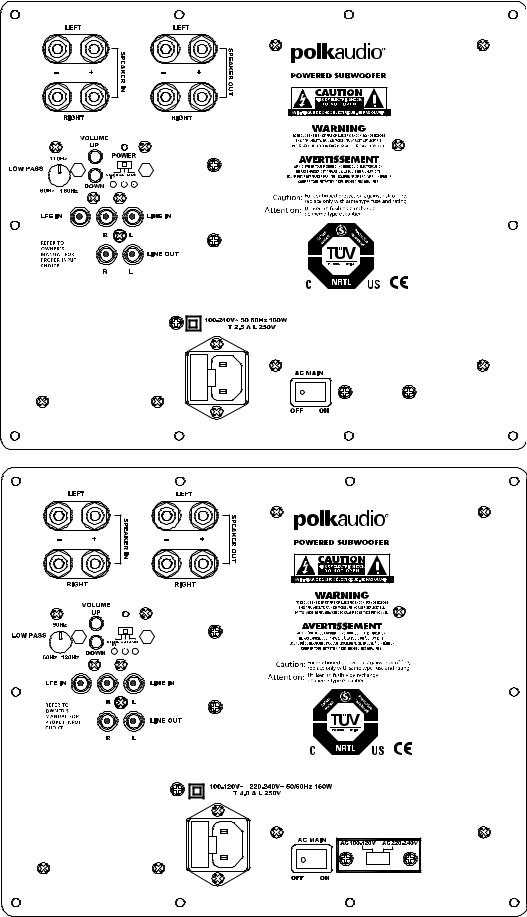
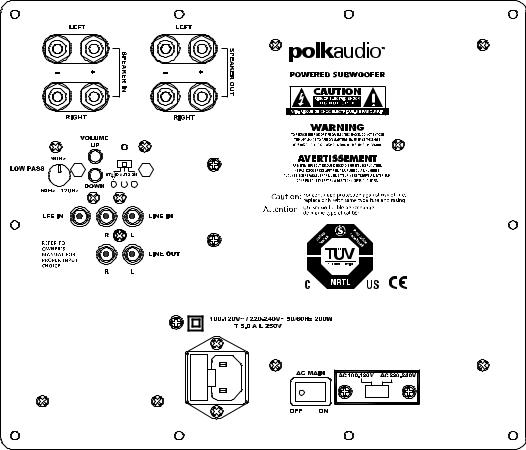
DSWPRO400 Amplifier
DSWPRO500 Amplifier
6 Polk Audio Customer Service 800-377-7655 (Outside USA & Canada: 410-358-3600)

DSWPRO600 Amplifier
Customer Service Hours of Operation: Monday-Friday, 9AM-6PM EST |
polkcs@polkaudio.com |
7 |

CONNECTING THE SUBWOOFER TO
THE SYSTEM—HOOKUP OPTIONS
IMPORTANT NOTE: USE ONLY ONE OF THESE OPTIONS.
NEVER COMBINE HOOKUP OPTIONS.
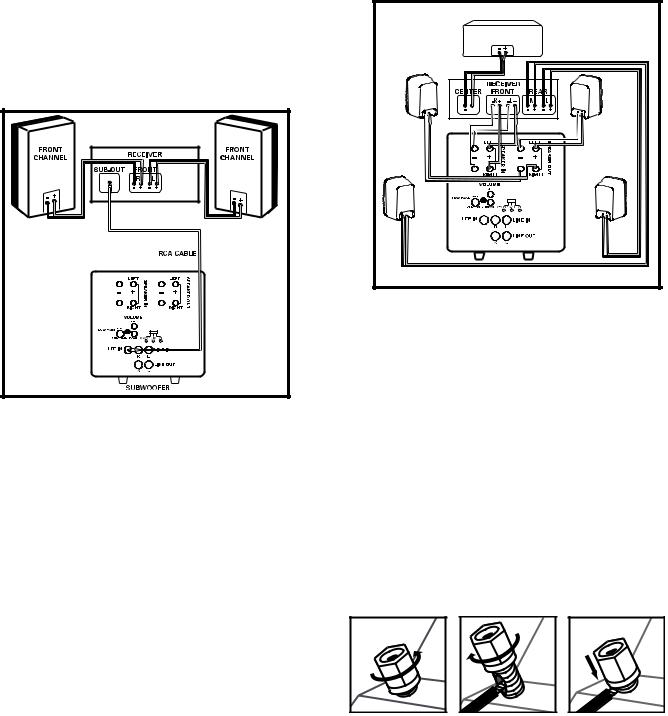
OPTION #1 Receivers that include a “SUB OUT” feature—
the most common hookup method with Dolby Digital® and DTS® receivers.
(Artwork not |
to scale) |
•Connect a single RCA cable from the “SUB OUT” of your receiver to the LFE input of the subwoofer. This connection method bypasses the subwoofer’s internal filter and relies on the filter built into your receiver. Make no other signal connections. Do not use speaker wire to make the connection to the subwoofer.
•Connect all other speakers directly to the receiver. Adjust your receiver’s speaker configurations as follows:
Front speakers = SMALL Center and Surrounds = SMALL
Subwoofer = ON, YES, or PRESENT
•Depending on your front speakers’ bass output capabilities, set the crossover frequency on the receiver to 80Hz for tower and bookshelf speakers (speakers with a woofer 5 1/4" in diameter or larger) and 100-120Hz for satellite speakers. Consult your receiver’s owner’s manual for instructions.
OPTION #2 Two channel or Dolby Pro Logic® receiver with no “SUB OUT.”
Use two-conductor 16 gauge or thicker speaker wires. See your Polk Audio dealer for wire recommendations.
Note: Do not use the line or LFE input in this configuration.
•Connect the left and right front speaker outputs of your receiver to the speaker level inputs of the subwoofer using speaker wire (see “Making Binding Post/Speaker Wire Connections” for detailed instructions).
•Connect the left and right front speakers using speaker wire from the speaker level outputs from the subwoofer.
•Connect the center channel speaker directly to the center channel output from your receiver.
•Connect the rear surround satellites directly to the rear or surround channel outputs from your receiver.
•Adjust your receiver’s speaker configurations as follows:
Front speakers = LARGE
Subwoofer = OFF or NO
Center and Surrounds = SMALL
(Artwork not |
to scale) |
Making Binding Post/Speaker Wire Connections
Note that one of the speaker input terminals on the rear of the subwoofer is marked red (+) and the other black (-). Make certain that you connect the wire from the red (+) terminal of your receiver to the red (+) terminal on your subwoofer and the wire from the black (-) terminal of the receiver to the black (-) terminal
on your subwoofer. Speaker wire has some indication (such as color coding, ribbing, or writing) on one of the two conductors to help maintain consistency.
Note: If your subwoofer doesn’t seem to produce much bass, it is most likely that one of the speaker wires is connected backwards. Double check all connections for correct polarity.
Strip 1/2" (12mm) of insulation from each of the two conductors on both ends to expose the bare wire. Twist the exposed wire of each conductor to form two un-frayed strands (one on each end).
Unscrew the binding post hex nuts several turns. Insert the exposed wire, ensuring that none of the bare wire ends touch each other, because contact could result in an electrical short and cause your receiver to turn off or malfunction.
With the speaker wire inserted into the binding post, turn the hex nut clockwise until it's snug.
8 Polk Audio Customer Service 800-377-7655 (Outside USA & Canada: 410-358-3600)
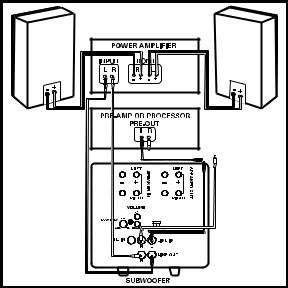
OPTION #3 Receivers with full-range (unfiltered) Left and Right “Pre Out” jacks (this is the least commonly used hookup)
(Artwork not |
to scale) |
•Connect the left and right preamp outputs from your receiver to the left and right LINE LEVEL inputs of the subwoofer. Do not use speaker wires.
•Connect the left and right LINE LEVEL outputs to the left and right inputs on the power amplifier.
•Adjust the settings on your receiver as follows:
Front speakers = LARGE
Subwoofer = OFF or NO
ADJUSTING YOUR SUBWOOFER
Note: When you set up your subwoofer for the first time, you will probably have to make adjustments several times before you hear what you personally like.
Don’t forget to turn the AC MAIN power switch on.
INITIAL SETTINGS
Your powered subwoofer offers a range of settings. The unit’s initial settings are as follows:
•Phase: 0
•Volume: 50% (20, on a scale from 0-40)
•PRO™ setting: mid-room
The settings that are best for you depend upon your subwoofer placement, electronics and personal taste. After you’ve become familiar with what the settings do, experiment with alternate options to find the method that works best for your system setup. You’ll find an informative article on “Subwoofer Positioning and Adjustment” in the set up section at: www.polkaudio.com/education/article.php?id=19.
POLK ROOM OPTIMIZER (PRO™)
Where you place your subwoofer in your room affects its response. DSWPRO Series subwoofers incorporate the Polk Room Optimizer ( PRO™) feature—four pushbutton room equalization presets that maximize your subwoofer’s performance
for typical room placements: “cabinet,” “corner,” “mid-wall” and “mid-room.”
A traditional subwoofer’s response is affected by its location in a room. The Polk Room Optimizer (PRO) feature allows you to place your DSWPRO Series subwoofer where you want it in your listening room. Based upon the four most common room placements for subwoofers, PRO maximizes sound quality for you, smoothing out the bass response that a particular room placement creates. You
simply choose the location you want and select the corresponding button on your subwoofer’s remote control.
FINE TUNING YOUR SUBWOOFER
•Volume: Adjust by ear using a wide variety of CDs and video sources. Adjust for deep, powerful bass without “boominess.”
•Low Pass Filter Control: NOTE: This control does not operate when the subwoofer is connected with Option #1 (LFE Input). This control, which is located on the back of the amplifier, adjusts the frequency range over which the subwoofer operates. When using smaller main speakers the upper range of the control will probably yield the best results. With larger speakers the lower end of the control range will probably sound best, but always let your ear be the final judge. If male vocals sound “thin,” turn this control up until the voice sounds rich but not “boomy.” If male vocals sound too “thick” or “chesty,” turn this control down until the voice sounds natural.
•4 Button Phase Control (0, 90, 180 and 270 degree settings): This control enables the subwoofer to blend more seamlessly with your main speakers. Sit in your favorite listening position. Using the subwoofer’s remote control, play music (not a movie) with a walking bass line. We recommend playing
jazz or country music. Now listen carefully for the point at which the subwoofer transitions to your main speakers. This is the crossover point, and this point should be below the frequency of a male human voice. Whichever phase setting sounds louder or fuller at the subwoofer’s crossover (transition) point is the optimum setting. If after trying all four possible phase settings you cannot
hear any difference, leave the phase setting at “0.”
Customer Service Hours of Operation: Monday-Friday, 9AM-6PM EST |
polkcs@polkaudio.com |
9 |
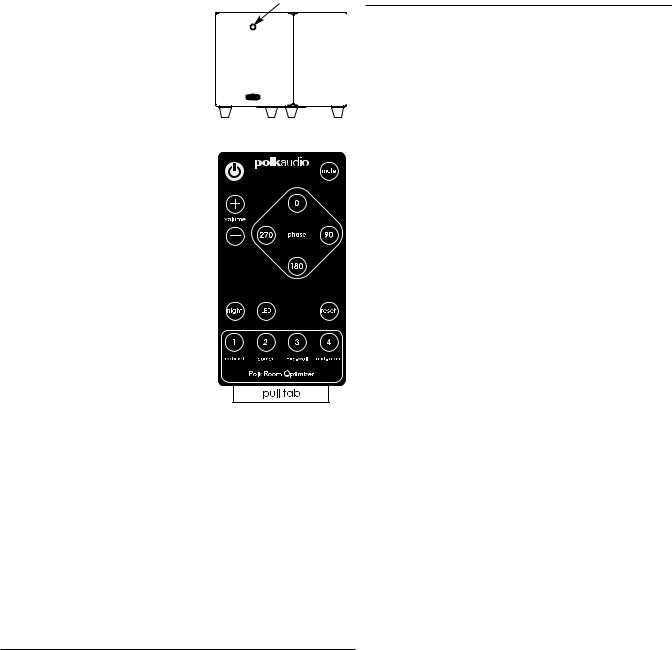
DSWPRO REMOTE CONTROL |
IR Receiver |
DSWPRO Series subwoofers come with a |
|
credit card sized remote control. All com- |
|
mands are sent to the subwoofer via IR |
|
control. The IR receiver is located on the |
|
front of the subwoofer when the subwoofer |
|
is in its downward firing configuration. |
|
The remote control has the |
|
following features: |
|
• Power |
|
• Volume |
|
• 4 Button Phase Control |
|
(0, 90, 180 and 270 degree settings) |
|
• 4 Button Polk Room Optimizer |
|
(PRO™) presets |
|
• Mute function |
|
•Night function allows you to hear low-level bass detail at lower volumes. If you have the volume at 30 and press “night,“ the volume is reduced by 50%, in this example to 15. Pressing “night“ a second time restores the volume to its original setting.
Pressing Volume+ (or Volume-) incrementally increases (or decreases) the volume in the normal manner and takes the subwoofer out of “night“ mode. Also, the LED shines at a reduced intensity when the subwoofer is in “night“ mode.
•Reset button restores the woofer’s settings to factory presets. Hold down for two (2) seconds.
•LED turns LED On/Off. The amplifier remains active.
Important: To activate the remote control for the first time, remove the plastic tab.
WHAT IS THAT BLINKING BLUE LIGHT?
Behind the logo badge on the front of your subwoofer there is a blue LED. The blue light blinks whenever you press a button on the subwoofer’s remote control. The light lets you know that the subwoofer has received the command and is enabling the function you’ve selected. The following table describes each button’s function and how the LED communicates to you:
VOLUME SETTINGS
|
Blue LED Indicator |
|
Volume Level |
Long Blinks |
Short Blinks |
40 |
4 |
0 |
39 |
3 |
9 |
38 |
3 |
8 |
37 |
3 |
7 |
36 |
3 |
6 |
35 |
3 |
5 |
34 |
3 |
4 |
33 |
3 |
3 |
32 |
3 |
2 |
31 |
3 |
1 |
30 |
3 |
0 |
29 |
2 |
9 |
28 |
2 |
8 |
27 |
2 |
7 |
26 |
2 |
6 |
25 |
2 |
5 |
24 |
2 |
4 |
23 |
2 |
3 |
22 |
2 |
2 |
21 |
2 |
1 |
20 |
2 |
0 |
19 |
1 |
9 |
18 |
1 |
8 |
17 |
1 |
7 |
16 |
1 |
6 |
15 |
1 |
5 |
14 |
1 |
4 |
13 |
1 |
3 |
12 |
1 |
2 |
11 |
1 |
1 |
10 |
1 |
0 |
9 |
0 |
9 |
8 |
0 |
8 |
7 |
0 |
7 |
6 |
0 |
6 |
5 |
0 |
5 |
4 |
0 |
4 |
3 |
0 |
3 |
2 |
0 |
2 |
1 |
0 |
1 |
0 |
0 |
0 |
Power |
LED is on when power is active and is off when power is |
|
not active. (Pressing the LED button on the remote will also |
|
turn the LED off.) |
Volume |
LED will blink a 2-digit code indicating volume setting from |
|
0 to 40 (i.e., if the volume is turned up to 28, the LED will |
|
flash two long blinks followed by eight short blinks). |
Mute |
LED blinks slowly when “mute” is selected. |
Phase |
0 degrees—1 blink; 90 degrees—2 blinks; |
|
180 degrees—3 blinks; 270 degrees—4 blinks. |
Night |
LED is on at a lower intensity; volume is reduced by 50%. |
PRO Presets |
Cabinet—1 blink; Corner—2 blinks; |
|
Mid-wall—3 blinks; Mid-room—4 blinks. |
Reset |
LED will blink 4 times. |
LED |
Turns LED on/off. The amplifier remains active |
10 Polk Audio Customer Service 800-377-7655 (Outside USA & Canada: 410-358-3600)
TROUBLESHOOTING
No sound coming from subwoofer. |
If hookup is “SUB OUT” to LFE, check |
|
and make sure your receiver is set to |
|
Subwoofer=YES. If hookup is via |
|
speaker wire, check that the polarity |
|
of the wires is correct. |
Subwoofer doesn’t sound right. |
Adjust volume, low pass filter, phase |
|
and PRO settings. |
The subwoofer is humming. |
There could be interference from a |
|
cable TV line. Disconnect the cable |
|
TV line from the cable box to see |
|
if the hum stops. A low-level hum |
|
is normal. |
Subwoofer has no power. |
Is the AC MAIN switch on? |
|
Check outlet; check fuse after |
|
unplugging the subwoofer. The fuse |
|
is located under the power cord |
|
receptacle. Fuse type and rating is |
|
found on the back panel. |
Remote control doesn’t work. |
Remove the plastic tab to activate |
|
the remote control’s battery or try |
|
replacing the battery. Ensure the |
|
IR sensor is not blocked. |
Power LED is red. |
Unplug subwoofer for 15 minutes, |
|
then plug back in. |
TECHNICAL ASSISTANCE AND SERVICE
If, after following these hook up directions, you experience difficulty, please double-check all wire connections. Should you isolate the problem to the subwoofer, contact the authorized Polk Audio dealer where you made your purchase, or call Polk Audio’s friendly Customer Service Department at 1-800-377-7655 (calls from US or CAN only), 410-358-3600 9am to 6pm EST, Monday through Friday.
You may also contact us via email: polkcs@polkaudio.com. For more detailed hook up information and manual updates, visit: www.polkaudio.com.
Specifications can be found on the DSWPRO webpages.
Go to www.polkaudio.com.
POWER RATINGS
Model |
Shipping Weight |
Power Rating |
DSWPRO400 |
34.6 lb. (15.7 kg) |
100V-240V~50/60 Hz 160W |
DSWPRO500 |
46.5 lb. (21.1 kg) |
100V-120V~/220V-240V~50/60 Hz 160W |
DSWPRO600 |
50.3 lb. (22.8 kg) |
100V-120V~/220V-240V~50/60 Hz 200W |
Customer Service Hours of Operation: Monday-Friday, 9AM-6PM EST |
polkcs@polkaudio.com |
11 |
PORTUGUÊS
PROCEDIMENTOS INICIAIS
Cuidado: Subwoofers são pesados. Tenha cuidado ao desembalar o subwoofer.
Verifique o conteúdo
1 Subwoofer
1 Controle Remoto
1 Manual do Proprietário
1 Cabo de Alimentação
1 Cartão de Registro
4 Pés de Borracha
Inspecione cuidadosamente o subwoofer. Notifique o revendedor da Polk Audio caso note algum dano ou caso estiver faltando algum componente. Guarde a caixa e o material de embalagem, pois são ideais para proteger a unidade, caso haja necessidade de transportá-la.
O sistema inclui um cabo de alimentação removível embalado separado da unidade. Insira a extremidade fêmea na tomada na placa do amplificador e insira o plugue de CA em uma tomada elétrica (ou filtro de linha), segundo as instruções fornecidas na contracapa deste manual. Não recomendamos conectar o cabo de alimentação de CA do subwoofer à tomada comutada do receiver.
Para obter mais informações sobre o posicionamento de subwoofers, visite o site http://www.polkaudio.com/education/article.php?id=20.
Pés/Espigões Para Pisos Acarpetados
Os subwoofers da série DSWPRO têm pés removíveis. A haste de cada pé é um espigão que permite que o subwoofer seja colocado sobre pisos acarpetados.
Para remover os pés cônicos do espigão para pisos acarpetados, segure cada um dos pés com firmeza e gire-o no sentido horário enquanto o puxa para cima. Três voltas completas devem elevar o pé o suficiente para permitir a inserção das pontas dos dedos no espaço criado e retirar o pé do espigão.
POSICIONAMENTO DO SUBWOOFER NO AMBIENTE
O subwoofer da série DSWPRO é blindado magneticamente, permitindo que
seja colocado próximo de monitores de vídeo. (Televisores de LCD, DLP e plasma não são afetados pelo magnetismo). Deixe pelo menos 46 cm de espaço entre o subwoofer e qualquer tipo de televisor de tubo. Entretanto, se notar distorção ou descoloração do vídeo, afaste imediatamente o subwoofer da TV.
O recurso Polk Room Optimizer (PRO™) permite que o subwoofer seja colocado em qualquer local no ambiente, sem prejudicar seu desempenho. Ao posicionar o subwoofer no ambiente, sempre o coloque com os pés da base para baixo. Se puder evitar, não coloque o subwoofer próximo de uma porta aberta.
18" - 24" (46cm - 61cm)
OK
Recomendamos colocar o subwoofer em locais diferentes do ambiente para determinar onde produz a melhor qualidade de som com base em suas preferências pessoais.
O recurso PRO adequará o desempenho do subwoofer ao local onde for colocado no ambiente. Pressione no controle remoto um dos quatro botões do subwoofer que indicam o local no ambiente onde foi colocado. (Para obter mais informações sobre este recurso, consulte “Polk Room Optimizer”).
COLOCAÇÃO DO SUBWOOFER EM UM GABINETE
Os subwoofers da série DSWPRO têm pés removíveis. Isto permite que o subwoofer seja colocado em um gabinete e seja reorientado para que fique voltado para o ambiente de audição.
Nota: Pode ser que o controle remoto não funcione quando o subwoofer for colocado em um gabinete com o alto-falante voltado para o ambiente. Se isso acontecer, basta adicionar um repetidor de infravermelho para permitir que o controle remoto se comunique com o subwoofer.
frente
1. |
|
|
lado do |
|
amplificador |
|
pés de |
3. |
borracha |
2. |
altoabertura falante
4.
Instruções Para Colocação do Subwoofer em um Gabinete:
1.Com o logotipo do subwoofer à sua frente, coloque o subwoofer de lado.
2.Desparafuse os pés da parte inferior do subwoofer.
3.Reinstale os pés nos orifícios roscados situados no lado do amplificador. Pressione os revestimentos de borracha nas partes inferiores dos pés.
4.Coloque o subwoofer apoiado sobre os pés. Coloque o subwoofer no gabinete de modo que o alto-falante fique voltado para o ambiente.
12 Polk Audio Customer Service 800-377-7655 (Outside USA & Canada: 410-358-3600)
|
|
Dimensões—Saída para baixo |
|
|
|
DSWPRO400: |
13 3/4" L x 13 3/4" P x 14 5/8" A |
H |
|
|
(34,9 cm L x 34,9 cm P x 37,2 cm A) |
W |
D |
DSWPRO500: |
15 1/2" L x 15 1/2" P x 16 1/8" A |
|
|
|
(39,4 cm L x 39,4 cm P x 41,0 cm A) |
|
|
DSWPRO600: |
16 1/2" L x 16 1/2" P x 17 1/8"A |
|
|
|
(41,9 cm L x 41,9 cm P x 43,5 cm A) |
|
|
Dimensões—Saída para frente |
|
|
|
(altura com pés de borracha) |
|
H |
|
DSWPRO400: 13 3/4" L x 13" P x 15 7/8" A |
|
D |
|
34,9 cm L x 33,0 cm P x 40,3 cm A) |
|
W |
|
||
|
|
DSWPRO500: 15 1/2" L x 14 1/2" P x 17 5/8" A |
|
|
|
|
(39,4 cm L x 36,8 cm P x 44,8 cm A) |
|
|
DSWPRO600: 16 1/2" L x 15 1/2" P x 18 5/8" A |
|
|
|
|
(41,9 cm L x 39,4 cm P x 47,3 cm A) |
|
|
Nota: A grade opcional aumenta a profundidade |
|
|
|
(vendida separadamente). |
|
Nota: Grades para os subwoofers da série DSWPRO podem ser adquiridas |
Standby (Prontidão) |
junto ao revendedor autorizado da Polk Audio ou no site www.polkaudio.com. |
Com a chave nesta posição, o subwoofer só ligará (ficará ativo) quando o |
|
usuário pressionar o botão de ligar no controle remoto. Depois de ativado, |
|
o subwoofer continuará ligado mesmo se não receber sinais de áudio. |
CONEXÃO DA ALIMENTAÇÃO DE CA E
FUNÇÃO LIGA/DESLIGA AUTOMÁTICA
Chave Seletora de Tensão Dupla
Os subwoofers da série DSWPRO estão equipados com uma chave seletora de tensão dupla ou um sensor automático.
DSWPRO400 |
Sensor automático |
DSWPRO500 |
Selecionável |
DSWPRO600 |
Selecionável |
ATENÇÃO: A tensão correta para o seu país foi configurada na fábrica. Só use a seleção de tensão especificada para seu país. O uso da tensão incorreta pode danificar o subwoofer.
Chave Liga/Desliga
Ligue e desligue a unidade com a chave de CA principal.
Chave Standby/Auto/On (Prontidão/Automático/Ligado)
O subwoofer da série DSWPRO tem uma chave de três posições utilizada para selecionar o modo de operação da unidade. Os três modos são: Standby (Prontidão), Auto (Automático) e On (Ligado).
 Auto
Auto
Na posição “Auto”, o subwoofer ligará automaticamente quando detectar um sinal de áudio e o LED situado atrás da unidade se acenderá na cor verde.
Recomendamos que o modo “Auto” seja usado se o subwoofer ficar sempre ligado (ou seja, conectado a uma tomada elétrica). Quando não houver sinal de áudio, o subwoofer entrará em um estado de “espera” depois de 15 minutos e o LED ficará amarelo.
 On (Ligado)
Neste modo, o subwoofer estará sempre ligado e totalmente ativo. O LED na parte posterior do subwoofer ficará aceso na cor verde. Este modo é a melhor opção se o subwoofer estiver ligado em uma tomada com interruptor. Não é possível usar o controle remoto para desligar o subwoofer.
Nota: Sugerimos que deixe o subwoofer desligado da tomada ou a chave liga/desliga principal desligada quando não for usado por muito tempo, como durante as férias.
Cores e Significados dos LEDs Indicadores do Modo de Operação:
Verde: Totalmente ativo Amarelo: Prontidão Vermelho: Proteção
Customer Service Hours of Operation: Monday-Friday, 9AM-6PM EST |
polkcs@polkaudio.com |
13 |

Amplificador DSWPRO400
Amplificador DSWPRO500
14 Polk Audio Customer Service 800-377-7655 (Outside USA & Canada: 410-358-3600)
Amplificador DSWPRO600
Customer Service Hours of Operation: Monday-Friday, 9AM-6PM EST |
polkcs@polkaudio.com |
15 |
OPÇÕES DE CONEXÃO DO SUBWOOFER AO SISTEMA
OBSERVAÇÃO IMPORTANTE: USE APENAS UMA DESTAS OPÇÕES. NUNCA COMBINE VÁRIAS OPÇÕES DE CONEXÃO.
OPÇÃO 1 Receivers que oferecem um recurso de “SUB OUT” (Saída sub)— o método de conexão mais comum com receivers Dolby Digital® e DTS®.
(Arte-final a |
não escalar) |
•Conecte um cabo RCA simples da saída “SUB OUT” do receiver para a entrada LFE do subwoofer. Este método de conexão ignora o filtro interno do subwoofer e utiliza o filtro embutido do receiver. Não faça nenhuma outra conexão de sinais. Não use cabo de caixa acústica para fazer a conexão ao subwoofer.
•Conecte todas as demais caixas acústicas diretamente ao receiver. Ajuste as configurações das caixas acústicas no receiver da seguinte maneira:
Caixas acústicas frontais = SMALL (PEQUENA) Canal central e surrounds = SMALL (PEQUENA)
Subwoofer = ON, YES ou PRESENT (LIGADA, SIM ou PRESENTE)
•Dependendo da capacidade de reprodução de graves das caixas acústicas frontais, ajuste a freqüência do crossover do receiver para 80 HZ para caixas acústicas tipo torre e de estante (unidades com um woofer de 5 1/4" de diâmetro ou mais) e 100-120 HZ para caixas acústicas satélite. Consulte
as instruções no manual do receiver.
OPÇÃO 2 Receiver de dois canais ou Dolby ProLogic® sem “SUB OUT” (Saída sub).
Use cabos para caixas acústicas com dois condutores de bitola 16 AWG ou maior. Consulte o revendedor da Polk Audio para se informar sobre os cabos recomendados.
Nota: Não use a entrada de linha ou LFE nesta configuração.
•Conecte as saídas das caixas acústicas frontais esquerda e direita do receiver às entradas para caixas acústicas do subwoofer usando cabos para caixas acústicas (consulte as instruções detalhadas em “Ligação dos cabos das caixas acústicas aos terminais de conexão”).
•Use cabos para caixas acústicas para conectar as caixas acústicas frontais esquerda e direita às saídas para caixas acústicas do subwoofer.
•Conecte a caixa acústica do canal central diretamente à saída do canal central do receiver.
•Conecte as caixas acústicas satélite surround traseiras diretamente às saídas do canal surround do receiver.
(Arte-final a |
não escalar) |
• Ajuste as configurações das caixas acústicas no receiver da seguinte maneira: Caixas acústicas frontais = LARGE (GRANDE)
Subwoofer = OFF ou NO (DESLIGADO ou NÃO) Canal central e surrounds = SMALL (PEQUENA)
Ligação dos Cabos das Caixas Acústicas aos Terminais de Conexão
Note que um dos terminais de entrada na parte traseira do subwoofer está marcado (+) em vermelho e o outro (-) em preto. Certifique-se de conectar o cabo do terminal (+) vermelho do receiver ao terminal (+) vermelho do subwoofer e o cabo do terminal (-) preto do receiver ao terminal (-) preto do subwoofer. O cabo para caixa acústica está marcado de alguma maneira (codificado por cores, faixas ou inscrições) em um dos dois condutores para ajudar a manter a coerência da conexão.
Nota: Se o subwoofer aparentemente não produzir um bom nível de graves, é bem provável que um dos cabos da caixa acústica tenha sido conectado de maneira invertida. Verifique novamente se a polaridade das conexões está correta.
Retire 12 mm do isolamento das duas extremidades de cada um dos dois condutores para expor a fiação. Torça a fiação exposta de cada condutor para que não fique desfiada (uma em cada extremidade).
Gire várias vezes as porcas hexagonais dos terminais de conexão para soltá-las. Insira o fio exposto no orifício, certificando-se de que as extremidades expostas não se toquem. Se elas se tocarem, poderá ocorrer um curto-circuito e o receiver poderá desligar ou ter problemas de funcionamento.
Com o cabo da caixa acústica inserido no terminal de conexão, gire a porca hexagonal no sentido horário até que fique firme.
16 Polk Audio Customer Service 800-377-7655 (Outside USA & Canada: 410-358-3600)
 Loading...