


OPERATING INSTRUCTIONS 35~57MM POWER ZOOM CAMERA
KM1200-E010
|
PRECAUTIONS & FEATURES |
|
|
|
|
||
Precautions |
|
|
|
|
|
|
|
Thank you for buying this compact camera. Before using, please read this manual |
|
|
FLASH |
AUTO FLASH/FILL-IN FLASH, RECYCLING TIME 6~10 SECONDS. |
|
||
carefully to ensure correct use. |
|
|
|
|
|||
|
|
|
|
|
|
||
* Store the camera in a cool, dry place. Don't expose the camera to heavy dust or water. |
RED-EYE REDUCTION |
AVAILABLE |
|
||||
* Do not attempt to disassemble the camera by yourself. |
|
|
|
||||
|
|
|
|
|
|||
* Turn off the power switch when the camera is not in use. |
|
|
FILM SPEED |
100/200/400 ISO |
|
||
* Avoid excessive force or impact caused by handling,bumping, or dropping. |
|
|
|
||||
* Don't break up the battery or throw it into fire. Keep the battery away from children. |
FILM REWIND |
POWER REWIND |
|
||||
|
|
|
|
|
|
||
|
|
|
|
|
|
|
|
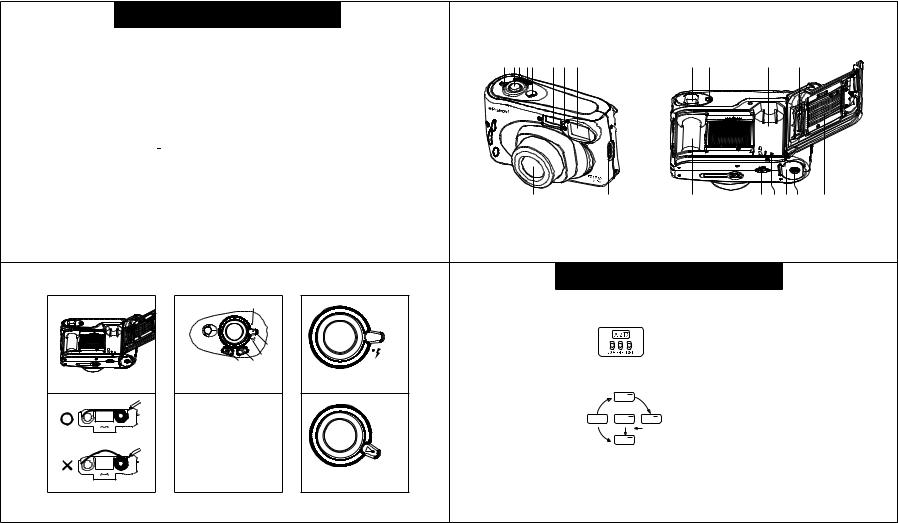
1.Selector Dial |
8.Viewfinder Window |
15.Film Take-up Spool |
FILM ADVANCE |
AUTOMATIC |
|
||
|
|
|
|||||
POWER SOUCE |
2-AA BATTERIES |
|
|||||
2.Shutter Release Button |
9.Lens |
16.Rewind Switch |
|
||||
3.Power Zoom button "T" |
10.Back Cover Latch |
17.Rewind Shaft |
|
|
|
||
DIMENSIONS |
120(L) X 70 (H) X 68 (D) MM |
|
|||||
4.Power Zoom button "W" |
11.Viewfinder Eyepiece |
|
|||||
18.Battery cover |
|
||||||
5.Frame Counter |
12.Flash Ready Led |
|
|
|
|||
19.Battery Cover Latch |
|
|
|
||||
6.Flash |
13.Film Chamber |
|
|
|
|||
20.Back Cover |
|
|
|
||||
7.Red-eye Reduction Lamp |
14.Film Check Window |
|
|
|
|||
|
|
|
|
|
|||
|
|
1 |
|
|
|
10 |
|

|
|
SPECIFICATION |
|
|
|
|
|
|
|
|
|
TYPE |
|
35 ~57mm COMPACT POWER ZOOM CAMERA |
|
|
|
|
|
LENS |
|
35mm ~57mm LENS 2 ELEMENTS (2P) F10.8 (w)~F14.3(T) |
|
|
|
|
|
FOCUSING |
|
FREE FOCUS |
|
|
|
|
|
SHUTTER |
|
MECHANICAL, SINGLE BLADE |
|
|
|
|
|
SHUTTER SPEED |
|
8 2 MS |
|
|
|
|
|
|
9 |
|
|
Fig1 |
Fig2 |
|
Fig3 |
|
|
A |
|
|
|
|
CK |
|
|
LOCK |
LO |
|
|
|
|
|
|
AUTO |
AUTO |
|
|
B |
|
|
E |
C |
|
|
D |
AUTO FLASH |
|
FI LM T IP |
S witch Wheel Panel |
||
|
A.Power Off |
|
|
|
B.Auto Flash |
|
CK |
|
|
|
|
|
C.Fill-in Flash |
|
LO |
|
|
|
|
|
D.Power Zoom Button "T" |
AUTO |
|
|
E. Power Zoom Button "W" |
|
|
|
|
|
FILL-IN FLASH |
|
3 |
|
|
1 23 45 |
6 |
7 |
8 |
11 |
12 |
13 |
14 |
|
9 |
|
|
10 |
15 |
|
16 17 1819 |
20 |
|
2
DATE IMPRINT
Date Imprint(Dateback model only)
Before imprinting date, set year, date and time using the buttons mentioned below.
No matter what date mode displayed, the sequence of blinking digit is always YEAR-> MONTH-> DAY. 1.Press the Mode button to select the desired model. The modes change in sequence as shown below.
|
" |
|
|
2 10'99 |
|
|
MTH D YR |
|
|
POWER ON/OFF |
|
-- -- -- |
'99"2 10 |
10"2'99 |
OFF |
YR MTH D |
D MTH YR |
10 5:25
D HR MIN
2.Press SELECT button to choose the digits to be set. The digits selected will blink. 3.Press SET button to set blinking digit.
Note: Time setting at time-mode, the displayed "DAY" can not be set. 4.Use the "---" mode when imprinting is not desired.
8

Rewinding / Unloading the Film
1.At the end of the film, push rewind switch in the direction of the arrow, then the film will automatically rewind.
2.When rewinding, the frame counter counts down. 3.It stops automatically when rewinding is completed.
4.Open the back cover and remove the film for processing. * To rewind the film in mid roll, push the rewind switch.
7
OPERATIONS
Attaching the Strap
Slide the small loop end of the strap through the strap eyelet and then pass the other end through the loop and tie the strap onto the strap eyelet.
Loading the Battery
The camera uses 2 AA batteries.
1.Turn off power by turning the select wheel to "LOCK".
2.Open the battery chamber cover by pushing it in the direction of the arrow marked on the cover. 3.Insert the batteries according to (+) and (-) polarity signs marked on the rear of the battery cover. 4.Close the battery chamber cover by pushing it until it latches.
5.The power supply of the camera is controlled by the power switch.
Turn on power by Turning the select wheel to "auto" or "  " and start taking pictures.
Note:
*Remove the battery when the camera without film is not in use for a long time.
*Always replace both batteries at the same time.
4
Loading the Film
1.Slide the back cover latch down as indicated by the arrow direction marked to open the back cover. Make sure no film is loaded in the camera by looking through the film check window.
2.Place the film cartridge into the film chamber and ensure it is fully inserted.
3.Pull the film leader across to the film tip located on the take-up spool and ensure the film lays flat. (Fig. 1) 4.Close the back cover with a click.
5.Keep depressing then releasing the shutter button until "1" appears in the frame counter located on the top of the camera.
You are ready for taking a picture now.
Taking Pictures
1.Rotate the Selector Dial to AUTO or  position from LOCK position. For detailed information about Auto flash and Fill-in flash, see page 6.
2.Frame the subject in the viewfinder and ensure the subject is at least 1.5m (5ft) from the camera. To zoom into the subject, press the "T" zoom power button on the top of the camera. To zoom out the subject, press the "W" zoom power button on the top of the camera.
3.Depress the shutter release button to take a picture. The frame counter will be updated.
Note:
¥After a flash, the camera takes approx. 8 seconds to recharge. The flash won't fire until the flash ready LED lights up again to indicate the completion of recharging.
¥You can press down the shutter release button to take a picture even when the flash ready LED doesn't light up in Auto or Fill-in flash mode.
¥If the flash charge time exceeds much longer that the normal(arppox. 8 seconds), the batteries need to be replaced for their exhausted power.
5
Auto flash
The camera uses an Automatic Sensor Flash System that is designed to measure ambient light intensity and then activate and fire the built-in flash when needed. (Fig.3) Depending on the film speed of the film used, the flash ranges within the following distance:
35mm |
|
57mm |
|
|
ISO |
Flash range |
ISO |
Flash range |
|
100 |
1.5-3.0m (5.3-10 ft) |
100 |
1.8-2.5m |
(6-8.2 ft) |
200 |
1.5-4.2m (5.3-12 ft) |
200 |
1.8-3.5m |
(6-10 ft) |
400 |
1.5-5.5m (5.3-14 ft) |
400 |
1.8-4.5m |
(6-12.7 ft) |
Fill-in Flash:
This camera comes with a Fill-in flash function too, with it you may get better picture in daylight shooting when subject is in shadow or backward to light source. Select flash mode to " " position, then depress the shutter button, the flash light will fire in any circumstance to provide extra exposure compensation. (Fig.3)
Red-eye Reduction
Shooting with flash in dark places, the subject's eyes may appear red in the picture. This phenomenon is known as "red-eye" and occurs when flash reflects back from the retina. This camera is equipped with a Red-eye Reduction device which can contract the pupils of the subject and reduce the chances of red-eye.
The Red-eye Reduction unit will automatically activate in the event of shooting with flash, it will light up and shine into the subject's eyes before the shutter releases.
Note: As there is a delay effect for the red-eye reduction lamp to function, please press the button and hold the camera steady until the shutter releases.
6
INSTRUCCIONES DE USO (SPANISH)
CAMARA DE 35 – 57 mm CON ZOOM ELÉCTRICO
KM1200-E010
|
|
PRECAUCIONES Y CARACTERISTICAS |
|
|
|
|
|||
Precauciones |
|
|
|
|
|
|
|
||
|
|
|
|
FLASH |
FLASH AUTOMÁTICO/FLASH MANUAL, TIEMPO DE RECARGA 6 ~ |
|
|||
Gracias por comprar esta cámara compacta. Antes de usarla, por favor lea atentamente este manual |
|
10 SEGUNDOS |
|
||||||
para asegurar el uso correcto. |
|
|
|
|
REDUCCIÓN DE OJOS |
DISPONIBLE |
|
||
* |
Guarde la cámara en un lugar fresco y seco. No exponga la cámara al polvillo o al agua. |
|
|||||||
ROJOS |
|
|
|||||||
* |
No intente desarmar la cámara Ud. mismo. |
|
|
|
|
||||
* |
Apague la cámara cuando no la utilice. |
|
|
VELOCIDAD DE LA |
100/200/400 ISO |
|
|||
* |
Evite los impactos o las fuerzas excesivas ocasionadas por el manipuleo, golpes o caídas. |
|
|||||||
PELICULA |
|
|
|||||||
* |
No destruya la batería ni la arroje al fuego.Mantenga la batería fuera del alcance de los niños. |
|
|
||||||
|
|
|
|||||||
1. |
Dial selector |
8. |
Ventana del Visor |
15. Carretel de recepción de la |
REBOBINADO DE LA |
ELÉCTRICO |
|
||
PELICULA |
|
|
|||||||
2. |
Botón de apertura del |
9. |
Lentes |
película |
|
|
|||
|
|
|
|||||||
|
obturador |
10. Traba de apertura de la tapa |
16. Perilla de rebobinado |
AVANCE DE LA |
AUTOMATICO |
|
|||
3. |
Botón "T" de encendido del |
|
trasera |
17. Eje de rebobinado |
|
||||
|
PELICULA |
|
|
||||||
|
Zoom |
11. Ocular del Visor |
18. Cubierta de la batería |
|
|
||||
|
|
|
|
||||||
4. |
Botón "W" de encendido del |
12. LED preparado del flash |
19. Traba de la cubierta de la |
FUENTE DE ENERGÍA |
2 PILAS AA |
|
|||
|
Zoom |
13. Recámara para la película |
|
||||||
|
batería |
|
|||||||
5. |
Contador de fotos |
14. Ventana para control de la |
20. Cubierta trasera |
DIMENSIONES |
120(L) X 70 (H) X 68 (P) MM |
|
|||
6. |
Flash |
|
película |
|
|||||
7. |
Lámpara de reducción de |
|
|
|
|
|
|
|
|
|
ojos rojos |
|
|
|
|
|
|
|
|
|
|
|
|
11 |
|
|
|
20 |
|
|
|
ESPECIFICACION |
|
|
|
|
|
|
|
|
|
TIPO |
|
CAMARA COMPACTA DE 35 – 57mm CON ZOOM ELÉCTRICO |
|
|
|
|
|
LENTES |
|
LENTES DE 35mm – 57 mm DE 2 ELEMENTOS (2P) F10.8 (w) – F 14.3 (T) |
|
|
|
|
|
FOCO |
|
FOCO LIBRE |
|
|
|
|
|
OBTURADOR |
|
HOJA SIMPLE, MECÁNICA |
|
|
|
|
|
VELOCIDAD DE |
|
8 2 MS |
|
OBTURACION |
|
|
|
|
|
|
|
19
Fig1 |
Extremo de la película |
Fig2
A
 LOCK
LOCK
 AUTO
AUTO
B
C
E D
Panel de la perilla de encendido
A.Apagar
B.Flash automático
C.Flash manual
D.Botón
T. del Zoom Eléctrico
E.Botón W del Zoom EléctricoDA
Fig3

 LOCK
LOCK


 AUTO
AUTO
FLASH AUTOMÁTICO
LOCK

 AUTO
AUTO
FLASH MANUAL
13
1 23 45 |
6 |
7 |
8 |
11 |
12 |
13 |
14 |
|
9 |
|
|
10 |
15 |
|
16 17 1819 |
20 |
|
12
IMPRESION DE LA FECHAI
Impresión de la fecha (sólo en el modelo con fecha)
Antes de imprimir la fecha, fije el año, la fecha y la hora utilizando los botones que se mencionan a continuación.
No importa cual es el modo que se utiliza, la secuencia de los dígitos que parpadean es siempre AÑO -> MES -> DIA.
1.Presione el botón Modo para seleccionar el modelo deseado. Los modos cambian en la secuencia que se muestra a continuación.
|
" |
|
|
2 10'99 |
|
|
MTH D YR |
|
|
POWER ON/OFF |
|
-- -- -- |
'99"2 10 |
10"2'99 |
OFF |
YR MTH D |
D MTH YR |
10 5:25
D HR MIN
2.Presione el botón de SELECCION para elegir los dígitos que desea fijar. Los dígitos seleccionados comenzarán a parpadear.
3.Presione el botón SET (fijar) para fijar los dígitos que parpadean.
Nota: Cuando fije la hora en el modo hora, no podrá fijar el ”DIA” que aparece. 4. Utilice el modo ”---” cuando no desee imprimir la fecha. Nompresi
18

Para rebobinar/sacar la película
1.Al finalizar la película, empuje la perilla de rebobinado en la dirección de la flecha. Así, la película se rebobinará automáticamente.
2.Cuando esté rebobinando, el contador contará regresivamente.
3.Se parará automáticamente cuando se complete el rebobinado.
4.Abra la cubierta posterior y saque la película para su procesamiento.
*Para rebobinar la película en la mitad del rollo, empuje la perilla de rebobinado.
17
OPERACIONES
Para agregar la correa
Pase el lazo pequeño de la correa a través del ojal de la misma y luego pase el otro extremo a través del lazo y ate la correa al ojal.
Para cargar la batería
La cámara utiliza 2 pilas AA.
1.Apague la coriente poniendo la perilla de selección en ”LOCK” (trabado).
2.Abra la cubierta de la recámara de la batería empujándola en la dirección de la flecha marcada sobre la cubierta.
3.Inserte las pilas de acuerdo con los signos de la polaridad (+) y (-) marcados en la parte posterior de la cubierta de la batería.
4.Cierre la recámara de la batería empujándola hasta que se trabe.
5.El suministro de energía de la recámara está controlado por la perilla de encendido.
Nota:
*Quite las pilas cuando no utilice la cámara sin película durante un largo tiempo.
*Cambie siempre las dos pilas al mismo tiempo.
14
Para cargar la película
1.Deslice la traba de la cubierta posterior hacia abajo como lo indica la flecha marcada para abrir la cubierta posterior. Asegúrese de que no haya una película dentro de la cámara, mirando a través de la ventana de control de la película.
2.Ponga el carretel de la película en la recámara para la película y asegúrese de que esté bien insertada.
3.Tire de la guía de la película hasta la punta de la película ubicada en el carretel de recepción y asegúrese de que la película quede plana (Fig 1)
4.Cierre la parte de atrás.
5.Mantenga el botón del obturador apretado y luego suéltelo hasta que aparezca ”1” en el cuadro del contador ubicado en la parte superior de la cámara.
Ud. ya está listo para tomar una fotografía.
Para tomar fotos
1.Gire el dial de selección hasta AUTO o hasta la posición  desde la posición LOCK. Para una información detallada sobre el Flash Automático y el Flash Manual, vea la página 6.
2.Encuadre el objeto en el visor y asegúrese de que el mismo esté a una distancia mínima de 1,5 m (5 pies) de la recámara. Para acercar el objeto con el zoom, presione el botón ”T” del zoom eléctrico en la parte superior de la recámara. Para alejar el objeto, presione el botón ”W” del zoom eléctrico en la parte superior de la cámara.
3.Presione el botón de apertura del obturador para tomar una foto. El contador se actualizará. 42.33.2.
Nota:
•Luego de un flash, la cámara toma aproximadamente unos 8 segundos para recargarse.El flash no se disparará hasta que el LED preparado del flash se encienda para indicar que la carga está completa.
•Ud. puede presionar el botón del obturador para tomar una foto aún cuando el LED preparado del flash no se encienda, tanto en el modo automático como manual del flash.
•Si el tiempo de carga del flash se extiende mucho más allá de lo normal (aproximadamente 8 segundos) se deben cambiar las pilas porque se agotaron.
15
Flash automático
La cámara utiliza un Sistema de Flash con Sensor Automático, diseñado para medir la intensidad de luz del ambiente y activar y disparar el flash incorporado cuando sea necesario. (Fig.3) De acuerdo con la velocidad de la película utilizada, el flash cubre las siguientes distancias:
35 mm |
|
57mm |
|
ISO |
Alcance del flash |
ISO |
Alcance del flash |
100 |
1.5-3.0 m (5.3-10 ft ) |
100 |
1.8-2.5 m (6-8.2 ft ) |
200 |
1.5-4.2 m (5.3-12 ft ) |
200 |
1.8-3.5 m (6-10 ft ) |
400 |
1.5-5.5 m (5.3-14 ft ) |
400 |
1.8-4.5 m (6-12.7 ft ) |
Flash Manual:
Esta cámara viene también con un flash manual incorporado. Con él Ud podrá tomar las mejores fotos disparando en la luz del día cuando el objeto esté en sombras o detrás de la fuente de luz. Seleccione el modo del flash en la posición "  ", luego presione el botón del obturador: el flash va a disparar en cualquier circunstancia para proporcionar una compensación extra en la exposición (Fig. 3)
Reducción de ojos rojos
Cuando se dispara con el flash en lugares oscuros, los ojos del sujeto pueden aparecer rojos en la foto. Este fenómeno es conocido como ”ojos rojos” y ocurre cuando el flash se refleja en la retina. Esta cámara está equipada con un dispositivo de Reducción de Ojos Rojos que puede contraer la pupila del sujeto y reducir las posibilidades de ojos rojos. La unidad de Reducción de Ojos Rojos se activará automáticamente en el caso en que dispare con el flash. Se encenderá y apagará en el ojo del sujeto antes de que se dispare el obturador.
Nota: Como hay un efecto de demora para que la lámpara de reducción de ojos rojos funcione, por favor presione el botón y mantenga la cámara firmemente hasta que el obturador se dispare.
16
 Loading...