


Contents
English |
1 |
Deutsch |
19 |
Español |
38 |
Français |
57 |
Italiano |
75 |
i
Polaroid ColorShot Parallel User’s Guide
System Requirements
•A PC-compatible computer with a parallel port.
•Microsoft Windows 95 (or later) operating system.
•16MB RAM (minimum); 32MB RAM (recommended).
•50MB free hard disk space (minimum).
•A VGA 800 x 600 color monitor, 256 colors minimum, 16-bit recommended (see Recommended Monitor Setting in the
Troubleshooting section for advice on setting your monitor).
•A CD-ROM drive, 2x speed (minimum); 4x or faster (recommended).
Install the Polaroid ColorShot
Hardware and Software
This section includes instructions for installing the Polaroid ColorShot printer using Microsoft’s plug and play feature.
If you are familiar with Microsoft’s Add a Printer program, you have the option of installing the ColorShot printer using this method. Refer to Add a Printer in the Troubleshooting section of this manual.
Before You Install the ColorShot
Hardware and Software
Note: If you know your CD-ROM drive letter, skip this section and go to Install the Polaroid ColorShot Hardware. If you do not know your CD-ROM drive letter, complete these steps before you begin the installation.
1.Turn on your computer.
2.Insert the Polaroid ColorShot CD into the CD-ROM drive.
Note: Leave the ColorShot CD in the drive until the installation is complete.
3.Double-click the My Computer icon on the desktop, and note the drive letter of the CD-ROM drive.
Revised 8/17/98 |
English • 1 |
Polaroid ColorShot Parallel User’s Guide
4.Turn off your computer.
Note: If you have more than one printer and only one parallel port on your computer, you can purchase a manual or automatic electronic switching device that allows you to connect both printers through the same parallel port. For more information, refer to Electronic Switching Devices in the Troubleshooting section of this manual.
Install the Polaroid ColorShot Hardware
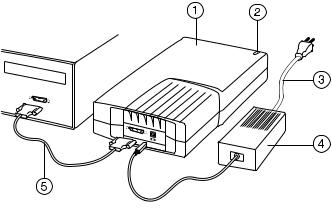
1.Printer
2.Power indicator light
3.Printer power cord
4.AC adapter
5.Printer interface cable
1.Place the ColorShot Parallel printer horizontally, on a flat surface near your computer.
Note: Do not position the printer vertically.
2.Make sure your computer is turned off.
3.Connect the printer power cord (3) to the AC adapter (4).
4.Connect the AC adapter (4) to the receptacle on the printer.
2 • English |
Revised 8/17/98 |
Polaroid ColorShot Parallel User’s Guide
5.Connect the power cord (3) to a grounded outlet.
Note: The printer power is now on. The green power indicator light (2) on the front of the printer should be on. There is no on/off switch.
6.Connect the printer interface cable (5) to the parallel port on the back of your computer.
7.Connect the other end of the printer interface cable to the parallel receptacle on the back of the printer.
Install the Polaroid ColorShot Software
1.Turn on your computer. The printer is detected as soon as you power on the system, and the New Hardware Found message box displays.
Note: If the New Hardware Found message box is not displayed, go to Add a Printer in the Troubleshooting section of this manual.
2.The system searches your floppy disk drive for the print driver software and displays the Insert Disk message box.
3.Click OK. The Copying Files dialog box opens.
4.In the Copy files from list box, delete the highlighted text and type the drive letter for your CD-ROM drive (for example, D:\ or E:\).
Note: If you have not yet inserted the Polaroid ColorShot CD into the CD drive, insert it now.
5.Click OK to begin the installation. The License Agreement displays.
6.Click Yes to proceed with the installation.
7.Click Finish when the Setup Complete dialog box displays.
Note: Be sure to view the Readme file for last-minute information about the printer and print driver.
Install the Free Image Editing Software
(MGI PhotoSuite)
MGI PhotoSuite is an easy-to-use image editing software package provided with the Polaroid ColorShot printer. Polaroid recommends that you install it, and then print two test images to get started.
Revised 8/17/98 |
English • 3 |
Polaroid ColorShot Parallel User’s Guide
Install MGI PhotoSuite
1.Insert the MGI PhotoSuite CD into your CD-ROM drive. The Installing MGI PhotoSuite window displays.
2.Click the appropriate language button for your installation. The Welcome window opens.
3.Click Next. The License Agreement displays.
4.Click Yes to continue with the installation.
5.Follow the rest of the installation instructions as applicable to your system.
MGI PhotoSuite Online Help
Refer to the MGI PhotoSuite online Help for instructions on operating the software. To access the Help:
1.Start MGI PhotoSuite. The MGI PhotoSuite Activity Guide window opens.
2.Select the Help button in the lower right corner of the window.
Note: You can also access the MGI PhotoSuite Help by selecting Contents from the Help menu on the MGI PhotoSuite main window.
Load Film into the Polaroid ColorShot Printer
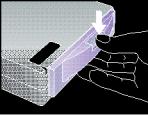
1.Press and hold down the door latch.
2.Pull open the film door.
3. Remove the Polaroid ColorShot film from the foil package.
4 • English |
Revised 8/17/98 |
Polaroid ColorShot Parallel User’s Guide
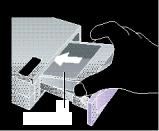
4.Insert the film into the tray, with the film cover facing up and the wide plastic border nearest the door.
Note: The film cover protects the light-sensitive material beneath it.
Film Cover
5. Slide the film tray in until it latches shut.
Configure the Print Driver
In order to begin using the Polaroid ColorShot printer, you must configure the Polaroid Colorshot print driver.
1.From the Start menu, select Settings.
2.Click on the Printers folder.
3.Double-click the ColorShot Printer icon inside the folder. The Polaroid ColorShot status box opens.
4.Select Properties from the Printer menu.
Set Printer Details
1.Click on the Details tab.
2.Select Polaroid Parallel ColorShot as the default printer.
Note: If you have a paper printer that you normally print to, do not select ColorShot as your default printer
Revised 8/17/98 |
English • 5 |
Polaroid ColorShot Parallel User’s Guide
Set Printer Graphics
1.Click on the Graphics tab.
2.Select Portrait as the default orientation. You can override this choice from within your image application when necessary.
Note: Leave the Intensity level at the center setting. You change this setting only when you need to compensate for speed variation in a film pack.
3.In the Copies box, click on the up or down arrows to select the number of copies to print.
4.Click the Using Preview check box to display a preview of your image on the screen before printing.
Set Device Options
1.Click on the drop-down arrow next to Film Type. A drop-down list of film types displays.
2.Select the appropriate film type from the list.
3.Check the IQA Technology box to activate Polaroid’s Image Quality Assurance enhancement software. IQA is designed to brighten colors in images that have not been previously enhanced (general photographic images that have been scanned or that have not had any color correction or image processing applied).
Note: Do use IQA Technology for images obtained from the Internet, or for images that have been color-corrected in an image-editing application.
Recommended Monitor Settings
Polaroid recommends that you adjust your monitor for the highest available resolution. To adjust your monitor settings:
1.Click the right mouse button anywhere on your desktop. A menu displays.
2.Select Properties. The Display Properties dialog box opens.
3.Select the Settings tab.
4.Set the Color palette to 16 bit or higher.
6 • English |
Revised 8/17/98 |
Polaroid ColorShot Parallel User’s Guide
5.Move the slide control under Display area to the right, to the highest resolution available; 800 x 600 is recommended.
6.Click OK.
Test the Printer
To learn how to use the Polaroid ColorShot printer, Polaroid recommends that you print two test images (portrait and landscape) using MGI PhotoSuite. The test images are located in the Samples folder in the ColorShot folder on your hard drive.
Print Portrait Test Image
1.Start the MGI PhotoSuite software. The MGI PhotoSuite selection window opens.
2.Click on Print Your Photos. The Open Image or Album dialog box displays.
3.Open the Colorshot Samples folder. It is located in the ColorShot folder on your system’s hard drive.
4.Double-click the image file kids.tif. The MGI PhotoSuite window opens with the image displayed.
5.Click Printer Setup on the File menu of the MGI PhotoSuite window.
6.Select Polaroid Parallel ColorShot as the printer.
7.Select Portrait as the Orientation.
8.Click OK.
9.Click the Print Preview icon on the MGI PhotoSuite window tool bar. The MGI PhotoSuite Preview window opens.
10.Click the Size to Fit button on the tool bar.
11.Click the Printer icon on the tool bar.
12.Click OK. If you have not configured the ColorShot print driver to display the Preview window, the image begins printing. If you have configured the print driver as Using Preview, the ColorShot Preview window opens.
13.Click the Printer icon to begin printing.
If this is your first print of the film pack, the printer ejects the film cover first. In a few moments, the printer ejects the image kids.tif.
Revised 8/17/98 |
English • 7 |
Polaroid ColorShot Parallel User’s Guide
Print Landscape Test Image
1.From the MGI PhotoSuite window file menu, select Open.
2.Open the ColorShot Samples folder. It is located in the ColorShot folder on your system’s hard drive.
3.Double-click the image file flowers.tif.
4.Click Printer Setup on the File menu of the MGI PhotoSuite window.
5.Select Landscape as the Orientation.
6.Follow steps 8 through 13 from the previous section Print Portrait Image.
In a few moments, the printer ejects the image flowers.tif.
Troubleshooting
If the printer is not operating properly, and you cannot resolve the problem with the information provided in this manual, contact Polaroid Technical Support, as described in the Technical Support section of this manual.
Add a Printer
If you are familiar with Microsoft’s Add a Printer program, use the following instructions to install the Polaroid ColorShot printer on your system.
1.Double-click the My Computer icon on the desktop.
2.Double-click the Printers folder icon.
3.Double-click the Add Printer icon. The Add Printer Wizard opens.
4.Follow the instructions as applicable to your system.
Uninstall the Polaroid ColorShot Software
The Polaroid ColorShot Parallel printer is a plug and play device. If for some reason you interrupt the installation process, your registry may be corrupted and you should uninstall the device before attempting to install it again.
Caution: If you are not familiar with deleting entries from your system registry, contact Polaroid Technical Support for help.
8 • English |
Revised 8/17/98 |
Polaroid ColorShot Parallel User’s Guide
Delete the ColorShot Printer
1.Double-click the My Computer icon on the desktop.
2.Double-click the Printers folder icon.
3.Click on the ColorShot icon.
4.Select Delete from the File menu.
5.Click Yes to All.
Delete ColorShot Entries From Your Registry
1.Make sure the ColorShot CD is in your CD-ROM drive.
2.From the Start menu, select Programs.
3.Click on Windows Explorer.
4.Click on your CD-ROM drive.
5.In the Contents folder, right-click on Parallel_Recover_PnP.Inf.
6.Choose Install.
This deletes all ColorShot entries from your system’s registry.
Electronic Switching Devices
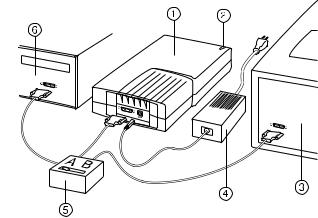
If you have more than one printer and only one parallel port on your computer, you can use a switching device that allows you to connect both printers through the same port. The following diagram illustrates how you connect a switching device to your computer and printers.
Contact your dealer or the nearest Polaroid office for information on available switching devices.
Revised 8/17/98 |
English • 9 |
Polaroid ColorShot Parallel User’s Guide
1.ColorShot printer
2.Power indicator light
3.Paper printer
4.AC adapter/power cord
5.Switching device
6.Computer parallel port
7.Interface cables
Operating Tips
This subsection provides some tips on printing images with the Polaroid ColorShot Parallel printer.
Increasing Printer Performance
To optimize the speed and performance of your printer:
•Increase the amount of RAM in your computer.
•Increase the available hard disk space.
•Decrease the size of your image files if possible. The larger the file, the longer it takes to print.
•Close other applications and documents that are open while you are trying to print.
10 • English |
Revised 8/17/98 |
Polaroid ColorShot Parallel User’s Guide
Previewing Before Printing
The format size of the paper is unique to a printer. Polaroid recommends you preview all prints before printing. The ColorShot print driver has a Preview window, as well as MGI PhotoSuite.
•There is a delay between selecting the Print function within an imaging application and seeing the ColorShot Preview window. The length of delay depends on your computer’s speed and on the size of the image file you are printing.
•If the ColorShot printer does not print, make sure you have not minimized the Preview window.
•If you do not see the entire image in the Preview window, make sure the margins are set to zero in Page Setup on the Preview window.
Loading a Partially Used Pack
If you load a partially used pack of film keep in mind the following points:
•The printer assumes a full pack is loaded, and the software gives you an incorrect picture count. You will have to keep track of the number of exposures manually.
•The top frame of a partially loaded pack of film acts as a film cover. It is ejected when you initiate the first print command.
Printing Scanned Photographs
Be sure to scan photographs at the resolution and dimensions of the output device.
•For the Polaroid ColorShot printer, the resolution is 160 dpi, for 3.625 inches by 3.0 inches.
•In your imaging application, check to make sure the aspect ratio is maintained when you resize a scanned image; otherwise, the image will be distorted.
Printing Digital Camera Photographs
If you have a choice of resolutions from a digital camera, select the best quality, or the resolution that is closest to the ColorShot resolution of 580 x 480.
Revised 8/17/98 |
English • 11 |
Polaroid ColorShot Parallel User’s Guide
Image File Size
For the best control over image size:
•Polaroid recommends that you resize your image in your imaging application before printing.
•When given a choice between .bmp, .tif, and .jpg image files, select .bmp over .tif, and .tif over .jpg. The compression is less in each case.
•If you must use .jpg, select the least compression or maximum quality.
•The Polaroid ColorShot printer does not print image files larger than 18MB.
Using Polaroid ColorShot Hardware and Software on Systems with Other Printers
In most instances, a standalone or network printer also will be connected to your computer. You should print a Polaroid ColorShot image file only when other printers are not printing.
Communication Errors
•If you encounter a Polaroid ColorShot Printer Communication error, make sure the cables are connected securely to the LPT port on the back of your computer and the ColorShot printer.
•If you encounter a Communications Port Not Supported error, the communications port that you selected is not supported by the ColorShot printer. You should select a different LPT port for your printer. You can change the port setting using the Details tab of the ColorShot Properties dialog box.
•In most instances, selecting the Retry button functions after most communication errors. However, on some occasions the jobs may be removed from the print queue.
Out of Memory Error
If you receive an Out of Memory error, the system is out of memory and cannot print. Close any other applications that you may have running and try printing again.
12 • English |
Revised 8/17/98 |
Polaroid ColorShot Parallel User’s Guide
Technical Support
From within the U.S.A., call 1-800-432-5355, Monday through Friday, 8 a.m. to 8 p.m., (Eastern Time) or fax to 1-781-386-9688. You can also write to Polaroid National Technical Support Operations, 201 Burlington Road, 1-2A Bedford, MA 01730.
In Canada, call 1-800-268-6970 or write to Polaroid Canada, 350 Carlingview Dr., Toronto, Ontario M9W 5G6. Fax: 416-675-3228.
You can also submit technical questions via electronic mail by connecting to the Polaroid site on the World Wide Web (http:// www.polaroid.com) and clicking Customer Support.
Polaroid Offices and Service Centers
Australia
Polaroid Australia Pty. Ltd.
13-15 Lyonpark Road
P.O. Box 163
North Ryde, NSW 2113
Tel.: (02) 950 7000
Fax: (02) 887 2209
Belgique/België
Polaroid (Belgium) N.V. - S.A. Rue Colonel Bourg 111 Kolonel Bourgstraat 111 1140 Bruxelles-1140 Brussel Tel.: 027143102 (Flemish) 027143106 (French)
Brasil
Polaroid do Brasil Ltda.
Av. Paulista, 1776/11º andar Cerqueira Cesar
São Paulo - Capital 01310-921
Tel.: 55.11.285.6411
Fax: 55.11.283.2625 288.6521 287.5393
Revised 8/17/98 |
English • 13 |
Polaroid ColorShot Parallel User’s Guide
Danmark
Polaroid a.s. Blokken 75 3460 Birkerød Tlf.: 80011887
Deutschland
Polaroid GmbH
Sprendlinger Landstrasse 109
63069 Offenbach
Tel.: 06995096056
España
Polaroid (España), S.A. Calle Orense 16 - 2ª planta. 28020-Madrid
Tno.: 913778103
France
Polaroid (France) S.A.
B.P. 7
78996-Elancourt Cédex
Tel.: 0141913810
Hong Kong
Polaroid (Far East) Ltd.
32/F Windsor House
311 Gloucester Road
Causeway Bay
Tel.: (852) 2894 0333
Italia
Polaroid (Italia) S.p.A.
Via Piave 11
21051 Arcisate (Varese)
Tel.: 0269633253
14 • English |
Revised 8/17/98 |
Polaroid ColorShot Parallel User’s Guide
Japan
Nippon Polaroid
Kabushiki Kaisha
Mori Building, No. 30
2-2 Toranomon 3-chome
Minato-ku, Tokyo (105)
Tel.: 81-3-3438-8811
Fax: 81-3-3433-3537
México
Polaroid de México S.A. de C.V.
Paseo de la Reforma 195-Piso 17
C.P. 06500 México, D.F.
Tel.: 703-1111
Fax: 566-0505
Del interior al 91 (800) 70-727
Ventas 91 (800) 70-747
Nederland
Polaroid Nederland B.V.
Zonnebaan 45
3606 CH Maarssen
P.O. Box 1219
3600 BE Maarssen
Tel.: 0204874534
New Zealand
Polaroid New Zealand Ltd.
Camera Services
24-26 Anzac Avenue
Auckland
Tel.: (09) 377 3773
Norge
Polaroid (Norge) A/S
Industriveien 8B, 1473 Skårer
Postboks 80, 1471 Skårer
Tlf.: 80011887
Revised 8/17/98 |
English • 15 |
Polaroid ColorShot Parallel User’s Guide
Österreich
Polaroid Ges.m.b.H. Eitnergasse 5A 1231 Wien
Tel.: 06607433
Portugal
Polaroid (España) S.A. Sucursal em Portugal Edificio Monumental
Avenue Praia da Vitória 71-A, 4ºB 1050 Lisboa
Tel.: 0505446017
Puerto Rico
Polaroid Caribbean Corporation Centro de Seguros
Ave. Ponce de León 701, Miramar, Santurce 00907 Tel.: (809) 725-6240 Fax: (809) 725-5462
Schweiz/Suisse/Svizzera
Polaroid AG Hardturmstrasse 133 8037 Zürich
Tel.: 018385329 (Deutsch) 018385348 (Français) 018385349 (Italiano)
Suomi
Polaroid Oy
Sinikalliontie 10
02630 Espoo
Puh.: 0800117008
16 • English |
Revised 8/17/98 |
Polaroid ColorShot Parallel User’s Guide
Sverige
Polaroid AB
Ekholmsvägen 36
Box 204
127 24 Skärholmen
Tel.: 084451231
U.K.
Polaroid (U.K.) Ltd. & Polaroid Export Operations Wheathampstead House Codicote Road Wheathampstead Hertfordshire AL4 8SF Tel.: 0181 308 6508 (U.K.) (44) 181 308 6593 (Export)
Revised 8/17/98 |
English • 17 |
Polaroid ColorShot Parallel User’s Guide
Limited Equipment Warranty
Polaroid Corporation warrants your Polaroid ColorShot printer against defects in manufacture for a period of one year from the date of purchase. To verify the warranty period, you should keep the sales receipt or other proof of purchase date.
Should this product, or any component or accessory included with it, become defective at any time during the warranty period, Polaroid Corporation will, at its discretion, either repair or replace this item, without charge, provided the product is returned prepaid and insured to a designated servicing location. Please return the product in its original packaging.
This Limited Warranty does not apply to product damage resulting from accident, incorrect installation, unauthorized modification, misuse or abuse.
Warning: Opening the printer housing voids the warranty.
Outside the U.S.A. and Canada, refer to the registration card for local warranty conditions.
THIS WARRANTY EXCLUDES ALL INCIDENTAL AND CONSEQUENTIAL DAMAGES AND DOES NOT AFFECT YOUR STATUTORY RIGHTS.
18 • English |
Revised 8/17/98 |
Polaroid ColorShot Parallel User’s Guide
Systemanforderungen
•PC-kompatibler Computer mit Parallelanschluß
•Betriebssystem Microsoft Windows 95 (oder höher)
•mind. 16 MB RAM; 32 MB RAM (empfohlen)
•mind. 50 MB freier Festplattenspeicher
•VGA-Farbmonitor (800 x 600), mindestens 256 Farben; 16 Bit empfohlen (Hinweise zum Einstellen Ihres Monitors finden Sie unter Empfohlene Monitor-Einstellung im Abschnitt Fehlerbeseitigung).
•CD-ROM-Laufwerk, mind. 2x; 4x oder schneller (empfohlen)
Installieren der Polaroid ColorShotHardund -Software
Dieser Abschnitt enthält Anweisungen zum Installieren des Polaroid ColorShot-Druckers mit Hilfe der Plug & Play-Funktion von Microsoft.
Wenn Sie mit dem Assistenten für die Druckerinstallation von Microsoft vertraut sind, können Sie den ColorShot-Drucker damit installieren. Informationen finden Sie unter Assistent für die Druckerinstallation im Abschnitt Fehlerbeseitigung dieses Handbuchs.
Bevor Sie die ColorShot-
Hardund -Software installieren
Hinweis: Wenn Sie den Laufwerksbuchstaben für Ihr CD-ROM- Laufwerk kennen, fahren Sie direkt mit Installieren der Polaroid ColorShot-Hardware fort. Wenn Ihnen der Laufwerksbuchstabe nicht bekannt ist, führen Sie vor Beginn der Installation die folgenden Schritte aus:
1. Schalten Sie Ihren Computer ein.
Deutsch • 19

Polaroid ColorShot Parallel User’s Guide
2.Legen Sie die CD-ROM für Ihren Polaroid ColorShot in das CD-ROM-Laufwerk ein.
Hinweis: Lassen Sie die ColorShot-CD im Laufwerk, bis die Installation abgeschlossen ist.
3.Doppelklicken Sie auf das Symbol Arbeitsplatz auf dem Desktop, und notieren Sie sich den Laufwerksbuchstaben des CD-ROM-Laufwerks.
4.Schalten Sie Ihren Computer aus.
Hinweis: Wenn Sie mehrere Drucker haben und Ihr Computer nur über einen Parallelanschluß verfügt, können Sie einen manuellen oder automatischen elektronischen Umschalter kaufen, mit dem Sie beide Drucker an denselben Parallelanschluß anschließen können. Weitere Informationen finden Sie unter Elektronische Umschalter im Abschnitt
Fehlerbeseitigung dieses Handbuchs.
Installieren der Polaroid ColorShot-Hardware
1.Drucker
2.Netz-LED
3.Netzkabel
4.Netzteil
5.Druckerkabel
20 • Deutsch
Polaroid ColorShot Parallel User’s Guide
1.Stellen Sie den ColorShot Parallel-Drucker waagerecht auf eine ebene Fläche in der Nähe des Computers.
Hinweis: Der Drucker darf nicht hochkant aufgestellt werden.
2.Achten Sie darauf, daß Ihr Computer ausgeschaltet ist.
3.Schließen Sie das Netzkabel (3) an das Netzteil (4) an.
4.Schließen Sie das Netzteil (4) an den entsprechenden Anschluß am Drucker an.
5.Stecken Sie das Netzkabel (3) in eine geerdete Steckdose.
Hinweis: Am Drucker liegt jetzt Spannung an. Die grüne NetzLED (2) an der Vorderseite des Druckers muß leuchten. Einen separaten Netzschalter gibt es nicht.
6.Schließen Sie das Druckerkabel (5) an den Parallelanschluß auf der Rückseite des Computers an.
7.Stecken Sie das andere Ende des Druckerkabels in den Parallelanschluß auf der Rückseite des Druckers.
Installieren der Polaroid ColorShot-Software
1.Schalten Sie Ihren Computer ein. Sobald das System eingeschaltet wird, wird der Drucker erkannt, und das Meldungsfeld Neue Hardware-Komponente gefunden wird angezeigt.
Hinweis: Wenn das Meldungsfeld Neue HardwareKomponente gefunden nicht angezeigt wird, lesen Sie unter
Assistent für die Druckerinstallation im Abschnitt
Fehlerbeseitigung dieses Handbuchs nach.
2.Das System sucht in Ihrem Diskettenlaufwerk nach der Druckertreiber-Software und zeigt das Meldungsfeld Diskette einlegen an.
3.Klicken Sie auf OK. Daraufhin wird das Dialogfeld Dateien werden kopiert geöffnet.
4.Löschen Sie den markierten Text aus dem Listenfeld Quelle, und geben Sie dann den Laufwerksbuchstaben Ihres CD-ROM- Laufwerks ein (z. B. D:\ oder E:\).
Hinweis: Legen Sie jetzt die Polaroid ColorShot-CD in das CD-ROM-Laufwerk ein, sofern dies noch nicht geschehen ist.
Deutsch • 21
Polaroid ColorShot Parallel User’s Guide
5.Klicken Sie auf OK, um den Installationsvorgang zu starten. Die Lizenzvereinbarung wird angezeigt.
6.Klicken Sie auf Ja, um die Installation fortzusetzen.
7.Wenn das Dialogfeld Setup beendet angezeigt wird, klicken Sie auf Fertig stellen.
Hinweis: Lesen Sie unbedingt die Readme-Datei mit den neuesten Informationen zum Drucker und Druckertreiber.
Installieren der kostenlosen Bildbearbeitungssoftware (MGI PhotoSuite)
MGI PhotoSuite ist ein einfach zu verwendendes Softwarepaket für die Bildbearbeitung, das im Lieferumfang des Polaroid ColorShotDruckers enthalten ist. Polaroid empfiehlt, nach der Installation der Software zunächst zwei Testbilder zu drucken.
Installieren von MGI PhotoSuite
1.Legen Sie die MGI PhotoSuite-CD in das CD-ROM-Laufwerk ein. Das Installationsfenster von MGI PhotoSuite wird angezeigt.
2.Klicken Sie auf die Schaltfläche zum Auswählen der für die Installation gewünschten Sprache. Das Begrüßungsfenster wird angezeigt.
3.Klicken Sie auf Next. Die Lizenzvereinbarung wird angezeigt.
4.Klicken Sie auf Yes, um die Installation fortzusetzen.
5.Befolgen Sie die weiteren Installationsanweisungen, soweit sie für Ihr System zutreffen.
MGI PhotoSuite-Online-Hilfe
In der MGI PhotoSuite-Online-Hilfe finden Sie Anweisungen für den Betrieb der Software. So rufen Sie die Hilfe auf:
1.Starten Sie MGI PhotoSuite. Das Fenster MGI PhotoSuite Activity Guide wird geöffnet.
2.Klicken Sie auf die Schaltfläche Help in der rechten unteren Ecke des Fensters.
Hinweis: Sie können die MGI PhotoSuite-Hilfe auch aufrufen, indem Sie im Hauptfenster von MGI PhotoSuite aus dem Menü Help die Option Contents auswählen.
22 • Deutsch

Polaroid ColorShot Parallel User’s Guide
Einlegen des Films in den Polaroid ColorShotDrucker
1.Drücken Sie die Filmladeverriegelung nach unten.
2.Ziehen Sie die Filmlade heraus.
3.Nehmen Sie den Polaroid ColorShot-Film aus der Folienverpackung.
4.Legen Sie den Film mit dem Filmdeckblatt nach oben und dem breiten Plastikrand an der Vorderkante der Filmlade ein.
Hinweis: Durch das Filmdeckblatt wird das darunterliegende lichtempfindliche Material geschützt.
Filmdeckblatt
5.Schieben Sie die Filmlade nach hinten, bis die Verriegelung einrastet.
Deutsch • 23
Polaroid ColorShot Parallel User’s Guide
Konfigurieren des Druckertreibers
Bevor Sie den Polaroid ColorShot-Drucker verwenden können, müssen Sie den Polaroid Colorshot-Druckertreiber konfigurieren.
1.Wählen Sie aus dem Menü Start die Option Einstellungen.
2.Klicken Sie auf den Ordner Drucker.
3.Doppelklicken Sie auf das Symbol des ColorShot-Druckers innerhalb des Ordners. Das Polaroid ColorShot-Statusfeld wird geöffnet.
4.Wählen Sie aus dem Menü Drucker die Option Eigenschaften.
Einstellen der Druckerdetails
1.Klicken Sie auf die Registerkarte Details.
2.Wählen Sie den Polaroid Parallel ColorShot als Standarddrucker aus.
Hinweis: Wenn Sie normalerweise mit einem Papierdrucker arbeiten, sollten Sie den ColorShot nicht als Standarddrucker definieren.
Einstellen der Druckergrafik
1.Klicken Sie auf die Registerkarte Grafik .
2.Wählen Sie Hochformat als Standardausrichtung aus. Diese Auswahl können Sie gegebenenfalls innerhalb Ihrer Bildbearbeitungsanwendung überschreiben.
Hinweis: Behalten Sie die Mittelstellung der Druckdichteeinstellung bei. Diese Einstellung ändern Sie nur, wenn Sie Empfindlichkeitsschwankungen in einer Filmpackung ausgleichen müssen.
3.Im Feld Exemplare klicken Sie auf die entsprechende Pfeilschaltfläche, um die Anzahl der zu druckenden Exemplare auszuwählen.
4.Zur Anzeige einer Druckvorschau müssen Sie das Kontrollkästchen Vorschau verwenden aktivieren.
24 • Deutsch
Polaroid ColorShot Parallel User’s Guide
Einstellen der Geräteoptionen
1.Klicken Sie auf den Dropdown-Pfeil neben Filmtyp. Ein Dropdown-Listenfeld der Filmtypen wird angezeigt.
2.Wählen Sie den entsprechenden Filmtyp aus der Liste.
3.Wählen Sie das Feld IQA-Technologie aus, um die IQASoftware (Image Quality Assurance) von Polaroid zu aktivieren. IQA dient zum Aufhellen der Farben in zuvor unbearbeiteten Bildern (allgemeine fotografische Aufnahmen, die eingescannt wurden oder bei denen keinerlei Farbkorrektur oder Bildbearbeitung durchgeführt wurde).
Hinweis: Verwenden Sie die IQA-Technologie für Bilder, die aus dem Internet heruntergeladen wurden oder für Bilder, die einer Farbkorrektur in einer Bildbearbeitungsanwendung unterzogen wurden.
Empfohlene Monitoreinstellungen
Stellen Sie am Monitor die höchstmögliche Auflösung ein. So führen Sie die Monitoreinstellungen aus:
1.Klicken Sie mit der rechten Maustaste auf eine beliebige Stelle des Desktops. Daraufhin wird ein Menü angezeigt.
2.Wählen Sie Eigenschaften. Daraufhin wird das Dialogfeld
Eigenschaften von Anzeige geöffnet.
3.Wählen Sie die Registerkarte Einstellungen.
4.Stellen Sie in unter Farbpalette 16 Bit oder mehr ein.
5. Stellen Sie mit dem Schieberegler unter Auflösung die höchstmögliche Auflösung ein (empfehlenswert sind 800 x 600 Pixel).
6. Klicken Sie auf OK.
Druckertest
Polaroid empfiehlt, zwei Testbilder (Hochund Querformat) mit Hilfe von MGI PhotoSuite zu drucken, um den Umgang mit dem Polaroid ColorShot-Drucker zu erlernen. Die Testbilder befinden sich im Ordner Samples innerhalb des Ordners ColorShot auf Ihrer Festplatte.
Deutsch • 25
Polaroid ColorShot Parallel User’s Guide
Drucken des Hochformat-Testbilds
1.Starten Sie die MGI PhotoSuite-Software. Das Auswahlfenster
MGI PhotoSuite wird geöffnet.
2.Klicken Sie auf Print Your Photos. Das Dialogfeld Open Image or Album wird angezeigt.
3.Öffnen Sie den Ordner Samples. Er befindet sich im Ordner ColorShot auf der Festplatte Ihres Systems.
4.Doppelklicken Sie auf die Bilddatei kids.tif. Das MGI PhotoSuiteFenster wird mit der angezeigten Datei geöffnet.
5.Klicken Sie im Menü File des MGI PhotoSuite-Fensters auf die Option Printer Setup.
6.Wählen Sie den Polaroid Parallel ColorShot als Drucker aus.
7.Wählen Sie Portrait als Ausrichtung aus.
8.Klicken Sie auf OK.
9.Klicken Sie in der Symbolleiste des MGI PhotoSuite-Fensters auf das Symbol Print Preview. Das Fenster MGI PhotoSuite Preview wird geöffnet.
10.Klicken Sie in der Symbolleiste auf die Schaltfläche Size to Fit.
11.Klicken Sie in der Symbolleiste auf das Druckersymbol.
12.Klicken Sie auf OK. Wenn Sie den ColorShot-Druckertreiber nicht zum Anzeigen des Vorschaufensters konfiguriert haben, wird das Bild gedruckt. Wenn der Druckertreiber für Using Preview konfiguriert ist, wird das Fenster ColorShot Preview geöffnet.
13.Klicken Sie auf das Druckersymbol, um den Druckvorgang zu starten.
Beim ersten Ausdruck mit einer neuen Filmpackung gibt der Drucker zunächst das Filmdeckblatt aus. Kurze Zeit später wird das Bild kids.tif ausgegeben.
26 • Deutsch
Polaroid ColorShot Parallel User’s Guide
Drucken des Querformat-Testbilds
1.Wählen Sie aus dem Menü File im MGI PhotoSuite-Fenster die Option Open.
2.Öffnen Sie den Ordner Samples. Er befindet sich im Ordner ColorShot auf der Festplatte Ihres Systems.
3.Doppelklicken Sie auf die Bilddatei flowers.tif.
4.Klicken Sie im Menü File des MGI PhotoSuite-Fensters auf die Option Printer Setup.
5.Wählen Sie Landscape als Ausrichtung aus.
6.Führen Sie die Schritte 8 bis 13 aus dem vorangegangenen Abschnitt, Drucken des Hochformat-Testbilds, aus.
Kurze Zeit später wird das Bild flowers.tif ausgegeben.
Fehlerbeseitigung
Wenn der Drucker nicht ordnungsgemäß arbeitet und Sie das Problem mit den in diesem Handbuch enthaltenen Informationen nicht lösen können, wenden Sie sich an den technischen Kundendienst von Polaroid wie im Abschnitt Technischer Kundendienst dieses Handbuchs angegeben.
Assistent für die Druckerinstallation
Wenn Sie mit dem Assistenten für die Druckerinstallation von Microsoft vertraut sind, installieren Sie den Polaroid ColorShotDrucker anhand folgender Anweisungen auf Ihrem System.
1.Doppelklicken Sie auf dem Desktop auf das Symbol
Arbeitsplatz.
2.Doppelklicken Sie auf das Symbol des Druckerordners.
3.Doppelklicken Sie auf das Symbol Assistent für die Druckerinstallation. Der Assistent für die Druckerinstallation wird angezeigt.
4.Befolgen Sie die weiteren Installationsanweisungen, soweit sie für Ihr System zutreffen.
Deutsch • 27
 Loading...