


AddressRight™ Printer
DA700, DA750
Operator Guide
US English Version
FCC Notice
This equipment has been tested and found to comply with the limits for Class A digital device, pursuant to Part 15 of the FCC Rules. These limits are designed to provide reasonable protection against interference when the equipment is operated in a commercial environment. This equipment generates, uses, and can radiate radio frequency energy and, if not installed and used in accordance with the user manuals, may cause harmful interference to radio communications. Operation of this equipment in a residential area is likely to cause harmful interference in which case the user will be required to correct the interference at this own
expense. Shielded cables must be used with this unit to insure compliance with Class A limits.
Safety EN60950 (IEC950)
This device passes conformity testing to standards for safety of electrical equipment (IECEE) CB scheme.
These materials and the related software are the confidential and proprietary property of Pitney Bowes Inc., and may not be lent, sold, hired out, or made available to others in any form, or be disposed of by way of trade in any form without the express written consent of Pitney Bowes, Inc.
Fourth edition, September, 2004 ©2004 Pitney Bowes Inc. All rights reserved.
This book may not be reproduced, in whole or in part in any fashion, or stored in a retrieval system of any type, or transmitted by any means, electronically or mechanically, without the express written consent of Pitney Bowes, Inc.
We have made every reasonable effort to insure the accuracy and usefulness of this manual, however we cannot assume responsibility for errors or omissions or liability for the misuse or misapplication of our products.
Envelope Designer™ Plus is a registered trademark and PB Supply Line is a service mark of Pitney Bowes Inc. Microsoft and Windows are trademarks or registered trademarks of Microsoft Corporation.

Table of Contents |
|
|
|
Chapter 1, DA700/DA750 Overview |
|
Welcome to the DA700/DA750...................................... |
1-2 |
Using This Guide........................................................... |
1-2 |
System Requirements................................................... |
1-4 |
Getting Help .................................................................. |
1-5 |
Online Help.............................................................. |
1-5 |
Phone Support......................................................... |
1-5 |
Before You Call........................................................ |
1-5 |
The World Wide Web............................................... |
1-6 |
Printer Options .............................................................. |
1-7 |
Ordering Supplies.......................................................... |
1-7 |
Chapter 2, Getting Started with the DA700/DA750 |
|
Unpacking the Printer.................................................... |
2-2 |
Package Contents ................................................... |
2-3 |
Choosing a Location for Your Printer............................. |
2-4 |
Important Safety Notes.................................................. |
2-4 |
Assembling the DA700/DA750...................................... |
2-5 |
1. Attach the Wire Frame to the Printer ................... |
2-6 |
2. Install the Sliding Fence ...................................... |
2-7 |
3. Position the Output Stacker Tray......................... |
2-8 |
4. Connect the Parallel Cable or Serial Cable......... |
2-9 |
5. Connect the Power Cord ..................................... |
2-11 |
Turning On the DA700/DA750 Printer........................... |
2-11 |
Install the Ink Jet Cartridges (Color & Black)................. |
2-12 |
Removing the Ink Jet Cartridges................................... |
2-13 |
Chapter 3, DA700/DA750 Features and Adjustments |
|
Printer Features............................................................. |
3-2 |
DA700/DA750 Throughput ...................................... |
3-3 |
Material Thickness................................................... |
3-4 |
Media Size............................................................... |
3-4 |
Approved Media Types............................................ |
3-4 |
Setting Up a Job............................................................ |
3-6 |
1. Set the Separator Gap......................................... |
3-9 |
2. Center the Wireframe under the Material ............ |
3-12 |
SV61027 Rev. D |
i |

Table of Contents
3. Set the Feed Angle.............................................. |
3-12 |
4. Set the Wire Frame Ramp................................... |
3-14 |
5. Position the Feed Fence...................................... |
3-15 |
6. Load Material....................................................... |
3-16 |
7. Adjust the Media Thickness Knob ....................... |
3-17 |
8. Adjust the Exit Rollers.......................................... |
3-19 |
9. Print a Test Piece................................................. |
3-21 |
Chapter 4, Using the DA700/DA750 With Your |
|
Computer |
|
Printer Driver Software.................................................. |
4-2 |
Selecting Printer Properties........................................... |
4-3 |
Using the Printer Properties Window ............................ |
4-4 |
Selecting the DA700/DA750 |
|
from a Windows Application ......................................... |
4-14 |
Envelope Designer™ Plus ............................................ |
4-15 |
Chapter 5, Printer Maintenance |
|
Preventive Maintenance................................................ |
5-2 |
Cleaning ........................................................................ |
5-2 |
Print Quality Problems................................................... |
5-2 |
Exit Rollers .................................................................... |
5-3 |
Sensor........................................................................... |
5-3 |
Print Head Shaft............................................................ |
5-3 |
Floor Assembly and Top Cover...................................... |
5-4 |
CMYK Printing............................................................... |
5-5 |
Chapter 6, Troubleshooting |
|
Problems and Solutions ................................................ |
6-2 |
Feed Problems ........................................................ |
6-2 |
Print Quality Problems............................................. |
6-3 |
Interface Problems .................................................. |
6-5 |
Motor Problems ....................................................... |
6-5 |
Barcode Problems................................................... |
6-6 |
Other Problems ....................................................... |
6-7 |
ii |
SV61027 Rev. D |

Table of Contents
Appendix A, Control Panel Menus |
|
|
Using the Control Panel ................................................ |
A-2 |
|
Using the Menus ........................................................... |
A-3 |
|
Using the Main Menu .................................................... |
A-5 |
|
Main Menu Diagram...................................................... |
A-6 |
|
1.Address Layout..................................................... |
A-7 |
|
2. |
Print Quality......................................................... |
A-11 |
3. |
Font Selection...................................................... |
A-13 |
4. |
Barcode ............................................................... |
A-15 |
5. Address Recovery ............................................... |
A-17 |
|
6. |
Clear Counter ...................................................... |
A-18 |
7. |
Job Settings......................................................... |
A-19 |
Using the Setup Menu................................................... |
A-21 |
|
Setup Menu Diagram .................................................... |
A-22 |
|
1. |
Heavy Media Mode.............................................. |
A-23 |
2. Test Print Head.................................................... |
A-24 |
|
3. |
Purge Print Head................................................. |
A-24 |
4. |
Lines Per Address ............................................... |
A-25 |
5. |
Communications.................................................. |
A-26 |
6. Hex Dump Mode.................................................. |
A-28 |
|
7. |
Language............................................................. |
A-31 |
8. |
Envelope Feed Delay .......................................... |
A-33 |
9. Auto Envelope Eject ............................................ |
A-34 |
|
10. ROM Revision Number...................................... |
A-35 |
|
Appendix B, Specifications |
|
|
Equipment Specifications.............................................. |
B-2 |
|
Material Specifications .................................................. |
B-9 |
|
Index |
|
|
Index to the Contents of this Manual............................. |
i-1 |
|
SV61027 Rev. D |
iii |

Table of Contents
This page is intentionally blank.
iv |
SV61027 Rev. D |
Chapter 1
The DA700/DA750
Color Printer Overview
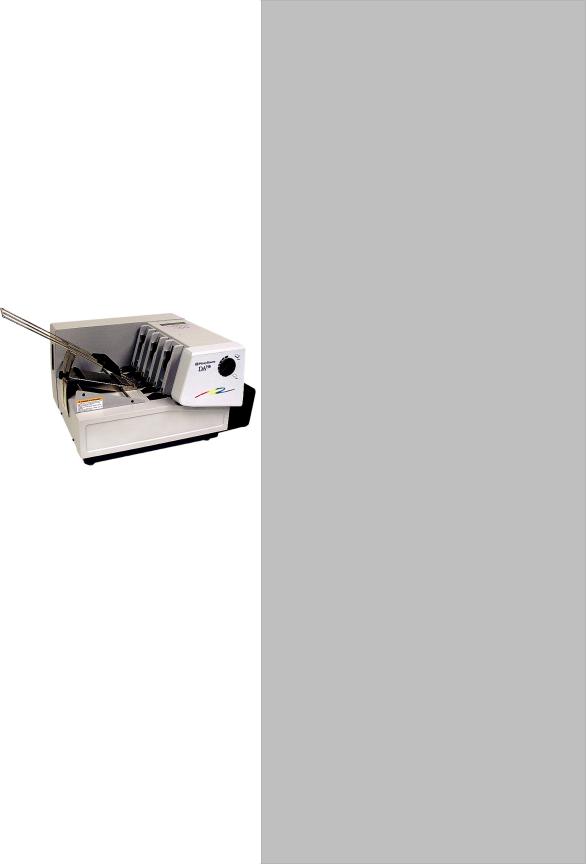
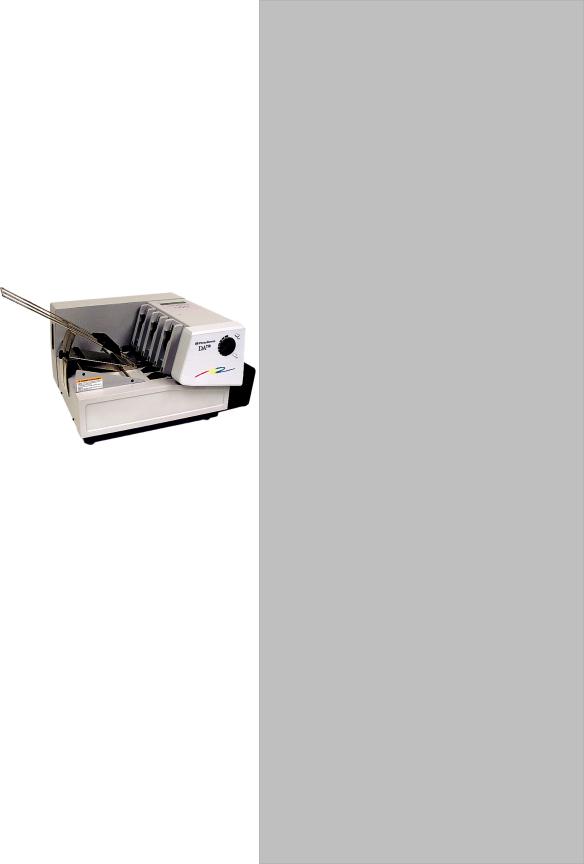
The Pitney Bowes DA700/DA750 is a versatile, easy-to-use desktop printer designed for addressing applications.
This chapter explains what's in this guide, and tells you how to order supplies and where to get more information about using your
DA700/DA750.
In this chapter: |
|
Welcome to the DA700/DA750 |
|
Color Ink Jet Printer.......................... |
1-2 |
Using This Guide.............................. |
1-2 |
System Requirements...................... |
1-4 |
Getting Help ..................................... |
1-5 |
Printer Options ................................. |
1-7 |
Ordering Supplies............................. |
1-7 |

1 • DA700/DA750 Printer - Overview
Welcome to the DA700/ DA750 Color Ink Jet Printer
The Pitney Bowes DA700/DA750 color ink jet printer is a desktop printer used to print addresses, graphics and other information, in color, on a wide range of material of various sizes, construction and composition. With the DA700/DA750 you can define the font, placement, print quality and bar code characteristics for your addresses.
This Operator Guide shows you how to:
•Set up the DA700/DA750 printer
•Connect it to your computer
•Define your envelope layout
•Print a test mail piece
•Send a mail job to the printer from your computer application.
Using This
Guide
Refer to this guide for information about printer setup, operation and troubleshooting. It is divided into the following chapters:
Chapter 1, Introduction
Contains an overview of the DA700/DA750 Operator Guide, information about ordering supplies and a list of help resources.
Chapter 2, Getting Started
Contains instructions for assembling your printer.
Chapter 3, DA700/DA750 Features and Adjustments Explains how to set up your printer to run a job.
1-2 |
SV61027 Rev. D |

DA700/DA750 Printer - Overview • 1
Using This Guide (continued)
Chapter 4, Using the DA700/DA750 With Your Computer
Contains instructions for installing the printer driver, selecting the printer from your software program and sending a mail job from your computer.
Chapter 5, Printer Maintenance
Describes how to keep the printer clean and functioning properly.
Chapter 6, Troubleshooting
Contains a list of possible problems and their solutions.
Appendix A, Control Panel Menus
Explains the Main Menu and Setup Menu options available on the DA700/DA750 control panel.
Appendix B, Specifications
Provides hardware and material specifications. Your printer will run at its best when your material conforms to our specifications.
SV61027 Rev. D |
1-3 |

1 • DA700/DA750 Printer - Overview
System
Requirements
To operate the DA700/DA750 with your computer, your system must meet the following requirements:
CPU |
Pentium II 233 MHZ or greater |
|
64 or more MB RAM recom- |
|
mended |
Operating System* |
Windows 98 (2nd Edition), |
|
Windows ME, Windows ME, |
|
Windows 2000, Windows XP |
Parallel Cable |
A parallel cable is supplied with |
|
your printer. If you choose to |
|
use another cable, make sure it |
|
isn't any longer than 10 feet. |
|
or |
Serial Cable |
To use the serial port, a serial |
|
cable of no more 15 feet in |
|
length is required. |
* Subject to change. |
|
1-4 |
SV61027 Rev. D |
DA700/DA750 Printer - Overview • 1
System Requirements (continued)
Below is a table of the Microsoft operating systems currently supported and the dates Pitney Bowes expects to stop providing support for the drivers that run on those systems.
|
|
Last Date Pitney Bowes |
|
|
|
|
supports drivers in- |
|
|
Microsoft Windows |
Microsoft’s “Not |
stalled with MS Windows |
Recommended |
|
Operating System |
Supported Date”* |
OS with AddressRight |
||
Replacement |
||||
|
|
and DocuMatch** |
||
|
|
|
||
98 and 98 (2nd ed.) |
June 30, 2006 |
July 31, 2006 |
Windows 2000 Pro or XP Pro |
|
Millennium (Me) |
June 30, 2006 |
July 31, 2006 |
Windows 2000 Pro or XP Pro |
|
NT 4.0 |
June 30, 2003 |
July 31, 2004 |
Windows 2000 Pro or XP Pro |
|
XP Home |
Dec 31, 2006 |
Dec 31, 2006 |
To be determined |
|
2000 Professional |
Mar 31, 2007 |
Mar 31, 2007 |
To be determined |
|
XP Professional |
Dec 31, 2008 |
Dec 31, 2008 |
To be determined |
*Source: Microsoft.com (posted 1/12/04)
**Dates subject to change, including any change due to Microsoft’s support cessation dates or if USPS changes requirements. Should dates change, they will be posted on our web site at www.pb.com/support.
Getting Help
As you use your printer, there may be times when you need help to solve a specific application problem, or you may want additional information about printer operation. Pitney Bowes provides several information resources.
Online Help
The DA700/DA750 Print Driver has a built-in help system. Click on Properties from Windows print dialog box. Right click on items in question for the "What's This" Help button.
If you're using Pitney Bowes programs such as Envelope Designer™ or SmartMailer™, press the F1 key while you're using the program to display information about the open screen. Select the Help menu to display a list of topics or search for a term. Refer to the documentation supplied with these programs for more information.
Phone Support
If you need technical support, call Pitney Bowes Technical Support at: (800) 522-0020.
SV61027 Rev. D |
1-5 |

1 • DA700/DA750 Printer - Overview
Getting Help (continued)
(Phone Support, continued)
Before You Call...
Please see Chapter 6, Troubleshooting, for a description of common problems and their solutions. If you need to call, please have the following information at hand:
•Model #: W707/W790
•Serial number: See back of unit.
•Nature of problem: What happens and when does it happen?
•The steps you've already taken to solve the problem and the results.
The World Wide Web
We encourage you to visit our web site at: http://www. pb.com\support\
1-6 |
SV61027 Rev. D |

DA700/DA750 Printer - Overview • 1
Printer Options
Ordering
Supplies
You'll find the latest information about our products and services as well as answers to frequently asked technical questions.
Pitney Bowes offers several very useful options for your DA700/DA750:
•Envelope Designer™ lets you create a professional looking envelope in a matter of seconds—you don't have to bother with the print driver or make manual
settings.
•The W853 Ink Dryer helps to eliminate smudging on difficult materials like glossy stock.
•The W760 Power Stacker holds up to 300 #10 envelopes. It helps maintain a neat stack in ZIP Code order when you run long jobs.
You can order supplies for your DA700/DA750 printer directly through the Pitney Bowes Supply LineSM. To place an order, call:
(800)243-7824 or
Visit our website at: www.pb.com\supplies\
The following supplies are available for your DA700/DA750 printer:
•Black Ink Cartridge (order number 660-1)
•Color Ink Cartridge (DA750 Only) (order number 660-5)
•4Pack of Black Ink Cartridges order number 660-9)
•Fast Drying Black Ink Cartridge (TBD)
SV61027 Rev. D |
1-7 |

1 • DA700/DA750 Printer - Overview
This page is intentionally blank.
1-8 |
SV61027 Rev. D |
Chapter 2
Getting Started with the DA700/DA750 Printer
This chapter explains how to unpack, assemble and connect your new printer.
In this chapter: |
|
Unpacking the Printer.................. |
2-2 |
Choosing a Location.................... |
2-4 |
Important Safety Notes................ |
2-4 |
Assembling the |
|
DA700/DA750 ............................. |
2-5 |
Attach the Wire Frame ................ |
2-6 |
Install the Sliding Fence .............. |
2-7 |
Position the Output Stacker......... |
2-8 |
Connect the Parallel or |
|
Serial Cable................................. |
2-9 |
Connect the Power Cord........... |
2-11 |
Turn the Printer On.................... |
2-11 |
Install the Ink Jet Cartridge ....... |
2-12 |
Remove the Ink Jet |
|
Cartridge.................................... |
2-13 |
2 • Getting Started with the DA700/DA750 Printer
Unpacking
the Printer
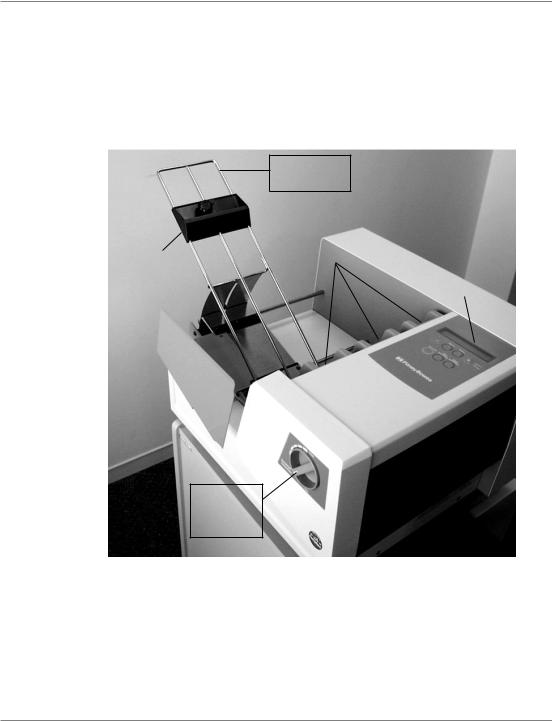
As you remove the DA700/DA750 contents from the box, note the components of the printer, labeled below.
Wire Frame
Assembly
|
|
H-Block |
|
|
Sliding |
|
Separators |
|
Control Panel |
|
|
|
(LCD Display and |
|
Fence |
|
|
|
|
|
|
|
Keypad) |
|
|
|
|
|
Media
Thickness
Knob
2-2 |
SV61027 Rev. D |

Getting Started with the DA700/DA750 Printer • 2
Unpacking the Printer (continued)
Package Contents
•DA700/DA750 Printer
•Output Stacker
•Wire Frame with Material Prop, Washer and Retaining Knob (Input Material Stacker assembled)
•Sliding Fence (long)
•Sliding Fence (short)
•Power Cord
•Parallel Cable
•Printer Operating Guide
•Printer Driver Software
•Ink Jet Cartridge (Black) (Black & Color for the DA750)
•Operator Training Guide
•POSTNETTM Certificate
•Installation Quality Report
•Print Head Shipment Holder (remove before turning unit on)
•Quick-Start Instructions
•Shipping Support
(remove before turning unit on)
SV61027 Rev. D |
2-3 |

2 • Getting Started with the DA700/DA750 Printer
Choosing a Location for Your Printer
Important
Safety Notes
Follow these guidelines and safety precautions when selecting a location for your printer:
•Place the printer on a table or other stable, level surface within the cable’s length (Parallel 10 feet max.; Serial 15 feet max.) of your computer.
•Allow for adequate space. The DA700/DA750 is 14.7 inches high, 16.2 inches wide and 21.7 inches deep, without the wire frame input stacker.
•Allow for adequate ventilation around the base and rear of the printer.
•Protect the printer from heat, dust and moisture. Avoid placing the printer in direct sunlight.
•To protect against electric shock, plug the machine into a properly grounded wall outlet.
•DO NOT use an adapter plug. Use of an adapter could compromise the ground and cause a possible shock hazard or damage to the equipment in the event of a short circuit.
•DO NOT remove the ground pin from the line cord.
•Avoid using outlets controlled by wall switches. Someone could accidently shut your printer off.
•The power cord wall plug is the primary means of disconnecting the machine from the AC power. The wall outlet should be near the machine and easily accessible.
•DO NOT route the power cord over sharp edges or trap it between pieces of furniture.
•Insure that there is no strain on the power cord where it passes between the equipment, walls or furniture.
•Be certain the area in front of the wall receptacle into which the machine is plugged is free from obstruction.
2-4 |
SV61027 Rev. D |

Getting Started with the DA700/DA750 Printer • 2
Important Safety Notes (continued)
Assembling the
DA700/DA750
•DO NOT remove covers. The machine covers serve to enclose hazardous parts. If the machine has been
dropped or has otherwise had the covers stressed in any way, report it to your Pitney Bowes Customer Service Representative.
•To reduce the risk of fire and/or electrical shock, do not attempt to disassemble this machine. If service is required, contact your Pitney Bowes Customer Service Representative.
•Keep fingers, loose clothing, jewelry and long hair away from the moving parts.
•Use only Pitney Bowes approved ink cartridges and cleaners. Read all instructions before attempting to operate the equipment.
•Follow any specific occupational safety and health standards for your workplace or area.
Once you’ve placed the printer in a suitable location, assemble the printer components in the following order:
NOTE: Do not plug the printer into the power source until you’ve completed steps 1-4.
1.Attach the wire frame input stacker (page 2-6).
2.Install the sliding fence (page 2-7).
3.Position the output stacker (page 2-8).
4.Connect the parallel or serial cable (page 2-9).
5.Attach the power cord and turn the printer ON (page 2-11).
SV61027 Rev. D |
2-5 |
2 • Getting Started with the DA700/DA750 Printer
Assembling the DA700/ DA750 (continued)
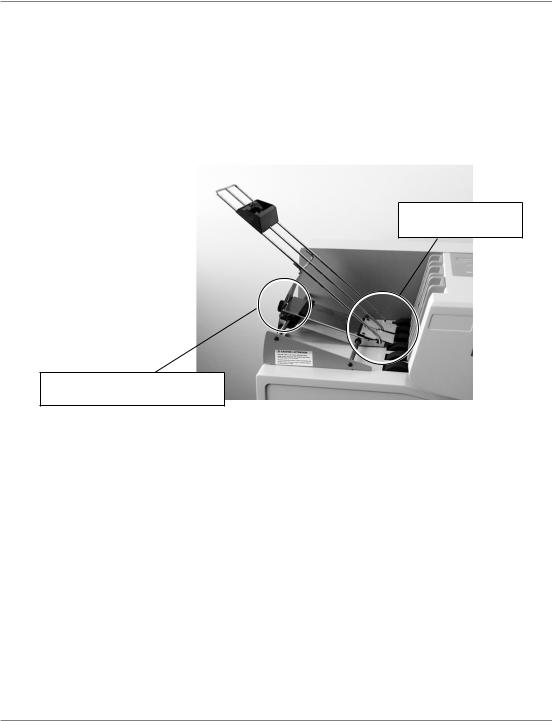
Attach the Wire Frame to the Printer.
1.Hook the bottom edge of the wire frame under the deflector. The wire frame slides between the feed rollers and the paper deflector. Make sure the front rod is engaged into the key slot bottom.
Slide bottom edge under here.
Insert the metal sheet into the height adjustment slot.
2.Rotate the wire frame and insert the curved metal sheet on the bottom of the frame into the height adjustment slot.
3.Adjust the angle of the wire frame so it’s positioned at about a 45 degree angle. Turn the lock knob on the side of the slide clockwise to hold the wire frame in position.
You can adjust both the height and side-to-side position of the wire frame to accommodate the size and type of the material you’re running. We talk about this in the next chapter.
2-6 |
SV61027 Rev. D |
Getting Started with the DA700/DA750 Printer • 2
Assembling the DA700/DA750 (continued)
Install the Sliding Fence
The DA700/DA750 has two fences—a long one and a short one. Use the short fence when printing material smaller than a #10 envelope. Use the long fence for larger material.
1.Slide the square edge of the sliding fence into the slots on the frame slide as shown below.
Insert Sliding Fence between Slide Guides and Feed Carriage.
2.The next chapter explains how to set the fence to the width of the material you’re running.
SV61027 Rev. D |
2-7 |
2 • Getting Started with the DA700/DA750 Printer
Assembling the DA700/ DA750 (continued)
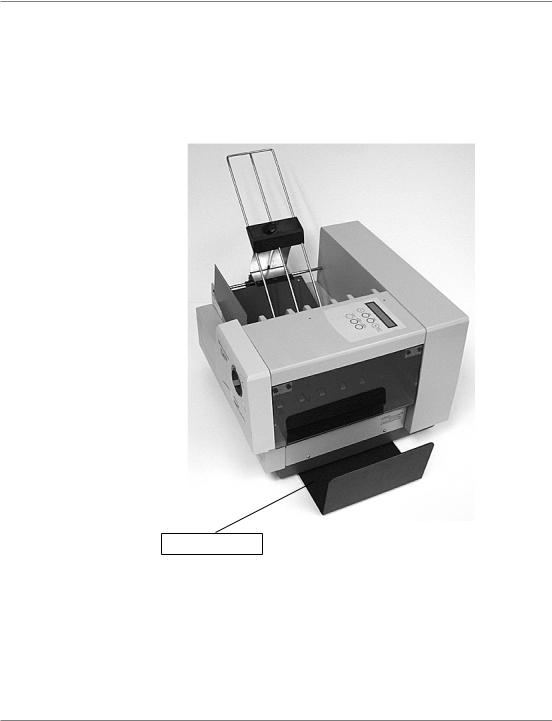
Position the Output Stacker Tray
Printed material is deposited in the output stacker tray. The tray can stack up to 150 #10 envelopes. Slide it into position under the back of the printer as shown below.
Stacker Tray
2-8 |
SV61027 Rev. D |
Getting Started with the DA700/DA750 Printer • 2
Connecting the DA700/DA750 to Your Computer
Connecting the Parallel Cable or Serial Cable
Use the parallel cable supplied to connect the DA700/DA750 to your computer, or use an approved serial cable. Each end of the parallel cable has a connector. One end is labeled “Printer” and the other is labeled “Computer.”
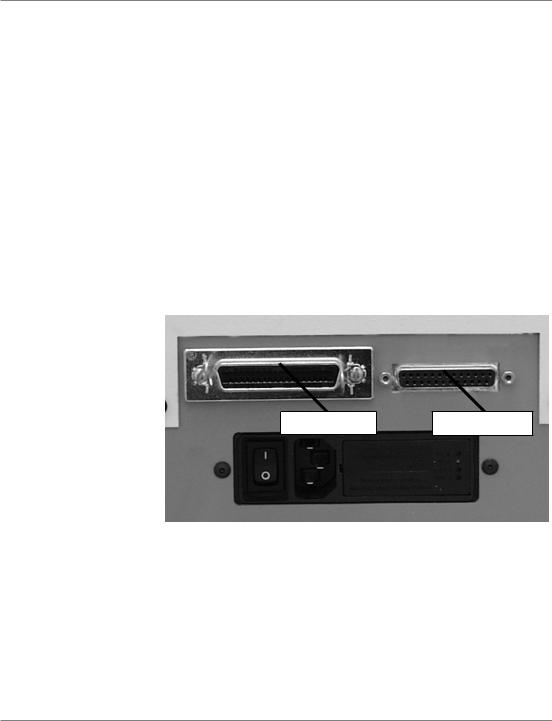
1.To connect the Parallel Cable (supplied) to the printer, align the end of the cable connector labeled “Printer” with the parallel port located on the right side of the printer’s interface panel, and push the cable connector into the port. The interface panel is located at the rear of the printer. It contains the main power switch, the parallel cable port, the serial port, the power receptacle and fuse.
Parallel Port |
Serial Port |
2.Secure the connector by snapping the two wire clips over the corresponding tabs on the connector.
SV61027 Rev. D |
2-9 |

2 • Getting Started with the DA700/DA750 Printer
Connecting the DA700/DA750 to Your Computer (continued)
3.Align the end of the cable connector labeled “Computer” with the printer port on your computer and push the cable connector into the port.
4.To connect a Serial Cable (not supplied) to the printer, align the 25-pin male connector end of the cable with the serial port on the left side of the printer’s interface. Attach the cable to the printer and the computer’s hex jack screws using the thumb screws in the connectors.
5.Initialize the printer’s communications port by sending data to either the parallel or serial port. To change from the serial port to the parallel port, or vice versa, the printer must be re-initiailized or manually changed through the setup menu.
2-10 |
SV61027 Rev. D |

Getting Started with the DA700/DA750 Printer • 2
Plugging in the
Power Cord
Turning on the DA700/DA750
Connecting the Power Cord
1.Connect the power cord to the printer at the interface panel, shown below.
Power Switch |
|
Power Receptacle |
|
|
|
2.Plug the power cord into a grounded outlet. Please review the safety information on pages 2-4 and 2-5.
Once you’ve connected the cable, press the printer’s power switch to the “|” (ON) position. The switch is located next to the power cord receptacle.
When you turn the printer on:
•The LCD menu displays that the printer is initializing and automatically displays “ON LINE”.
•The print head carriage moves to the right and parks in the maintenance station.
SV61027 Rev. D |
2-11 |
2 • Getting Started with the DA700/DA750 Printer
Installing and
Removing
the Ink Jet
Cartridge
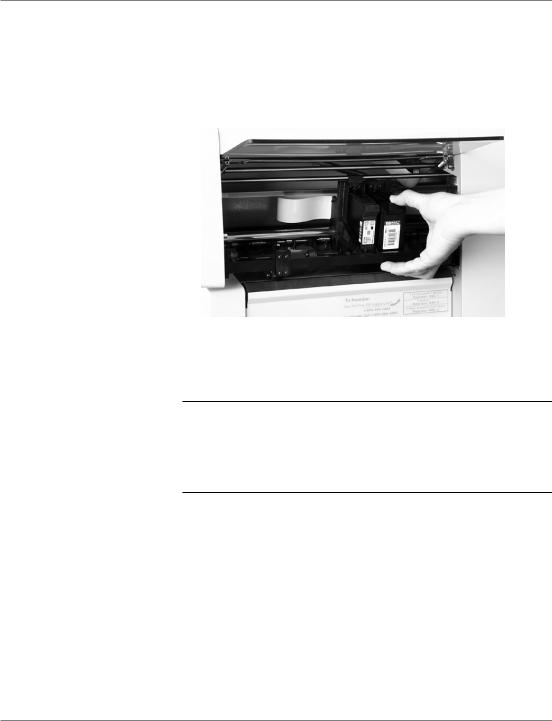
Install the Ink Jet Cartridges
The printer uses Ink Jet Cartridges for printing (DA750 uses color and black; DA700 uses black only). You must install a black and a color cartridge in the DA750 (a black only for the DA700) before you can print. To begin:
1.With the printer on, press the ON LINE key until the display reads OFF LINE.
2.Open the back cover of the printer.
3.Press the “Replace Print Cartridge” key on the control panel to move the carriage to the middle of the printer. Do not attempt to move the carriage by hand. Doing so can result in damage to the carriage assembly.
4.Remove the cartridge from its shipping container by peeling the top cover off. Be careful not to touch the gold contacts.
WARNING! The ink in the cartridge may be harmful if swallowed. Keep new and used cartridges out of reach of children. Discard empty cartridges immediately.
5.Gently remove the tape covering the ink nozzles on the print cartridge, being careful not to touch the copper nozzles.
2-12 |
SV61027 Rev. D |
Getting Started with the DA700/DA750 Printer • 2
Installing and Removing the Ink Jet Cartridge (continued)
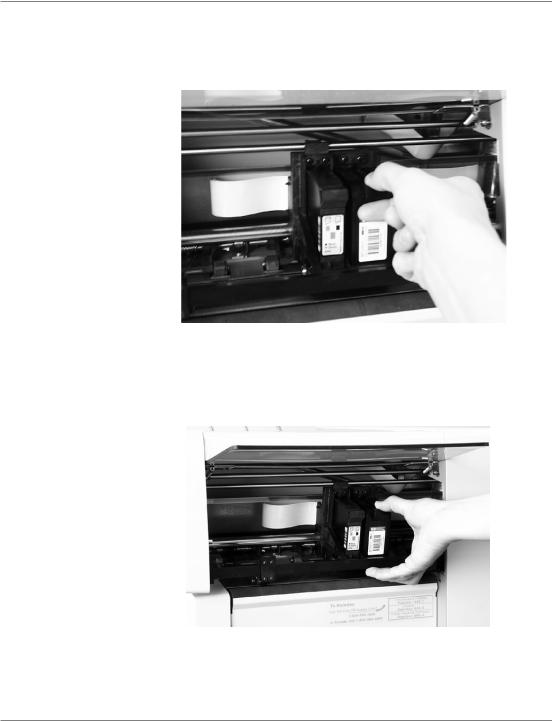
6.Gently insert the cartridge (color to the right, black to the left-DA750 only) into the carriage at approximately a 20 degree angle with copper strip to the bottom and in first. Press down on the cartridge until it is seated.
7.Push the cartridge forward (away from you) until it snaps in place.
IMPORTANT! When installing cartridges in the DA750, immediately perform the CMYK Printing Alignment procedure. See page 5-5 for instructions.
Removing the Ink Jet Cartridge
When you need to remove or replace the ink jet cartridges, follow these steps:
1.With the printer on, press the ON LINE key until the display reads OFF LINE.
2.Open the printhead cover of the printer.
SV61027 Rev. D |
2-13 |
2 • Getting Started with the DA700/DA750 Printer
Installing and Removing the Ink Jet Cartridge (continued)
3.Press the Replace Print Cartridge key on the control panel. This moves the carriage to the middle of the printer. Do not move the cartridge by hand.
4.To remove the ink jet cartridge, place your thumb on the grooved surface and press down slightly then tilt towards you until it pops loose.
5. Lift the print cartridge out of the cradle.
2-14 |
SV61027 Rev. D |

Chapter 3
DA700/DA750 Features
and Adjustments
In this chapter you'll learn about key features of the DA700/DA750 printer and how to adjust it to meet the requirements of your print jobs.
In this chapter: |
|
Printer Features........................... |
3-2 |
DA700/DA750 Throughput .......... |
3-3 |
Setting Up a Job.......................... |
3-6 |
Set the Separator Gap ................ |
3-9 |
Center the Wire Frame.............. |
3-11 |
Set the Feed Angle.................... |
3-12 |
Set the Wire Frame Ramp......... |
3-14 |
Position the Feed Fence ........... |
3-15 |
Load Material............................. |
3-16 |
Adjust Media |
|
Thickness Knob......................... |
3-17 |
Adjust Exit Rollers ..................... |
3-19 |
Print a Test Piece....................... |
3-21 |

3 • DA700/DA750 Features and Adjustments
Printer |
The DA700/DA750 has the following features: |
|
Features |
|
|
|
Speed (Throughput): |
Refer to chart on next page. |
|
Print Qualities: |
Draft, Letter, Executive |
|
Internal Fonts: |
13 (14 including Barcode) |
|
Optional Font Card |
|
|
Font Point Size: |
4 to 30 |
|
Material Thickness: |
0.003" to .250" |
Speed
Printer speed refers to the number of pieces of mail that can be processed in an hour. Printer speed depends on the number of characters per line, the number of lines, character size, font, interface, barcode, material size and graphics.
Print Qualities
The printer has three selectable print qualities: Draft (fastest speed), Letter (medium speed) and Executive (slowest speed).
Internal Fonts
A font is a set of characters (letters, numbers and symbols) that use the same typeface. The DA700/DA750 has thirteen (plus barcode) different typefaces: Courier, Sans Serif, Roman, Baxter, Ding bat, Hancock, Marina, Quincy, Silicon, Springer, Stencil, and Windmill. You can select these fonts from the printer control panel menus. If you set up a print job from your computer, you can use any font that is available from your software application.
3-2 |
SV61027 Rev. D |
 Loading...