


Operation Manual
CD RECEIVER
DEH-1050E
(B) Português Español English
ﺍﻟﻌﺮﺑﻴﺔ


 Contents
Thank you for buying this Pioneer product.
Please read through these operating instructions so you will know how to operate your model properly. After you have finished reading the instructions, keep this manual in a safe place for future reference.
Before You Start |
|
|
|||
About this unit |
3 |
|
|
||
Visit our website |
3 |
|
|
||
Protecting your unit from theft |
3 |
||||
– |
Removing the front panel |
3 |
|||
– |
Attaching the front panel |
3 |
|||
Operating this unit |
|
|
|||
What’s What |
4 |
|
|
|
|
– |
Head unit |
4 |
|
|
|
– |
LCD display |
4 |
|
|
|
Basic Operations |
5 |
|
|
||
– |
Turning the unit on and selecting a |
||||
|
source |
5 |
|
|
|
– |
Adjusting the volume |
5 |
|
||
– |
Turning the unit off 5 |
|
|
||
Tuner |
5 |
|
|
|
|
– |
Listening to the radio |
5 |
|
||
– |
Storing and recalling broadcast |
||||
|
frequencies |
5 |
|
|
|
– |
Tuning in strong signals |
6 |
|||
–Storing the strongest broadcast frequencies 6
Built-in Player |
6 |
|
|
|
|
|
– |
Playing a disc |
6 |
|
|
|
|
– |
Repeating play |
6 |
|
|
|
|
– |
Playing tracks in random order 6 |
|||||
– |
Scanning tracks of a CD |
|
6 |
|||
– |
Pausing disc playback |
7 |
|
|||
Audio Adjustments |
7 |
|
|
|
||
– |
Using balance adjustment |
7 |
||||
– |
Using the equalizer |
7 |
|
|
||
– |
Adjusting equalizer curves |
7 |
||||
– |
Adjusting loudness |
7 |
|
|
||
– |
Adjusting source levels |
8 |
||||
Other Functions |
8 |
|
|
|
|
|
– |
Adjusting initial settings |
|
8 |
|||
– |
Setting the clock 8 |
|
|
|
||
– |
Setting the FM tuning step |
8 |
||||
– |
Setting the AM tuning step 9 |
– |
Switching the auxiliary setting 9 |
 Additional Information
Error messages 10
Handling guideline of discs and player 10
Dual Discs 10
Specifications 12
 2
2 En
En
About this unit |
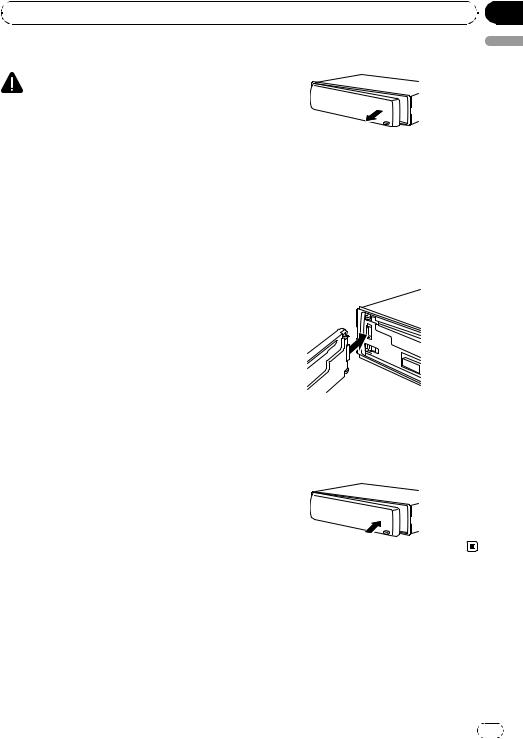
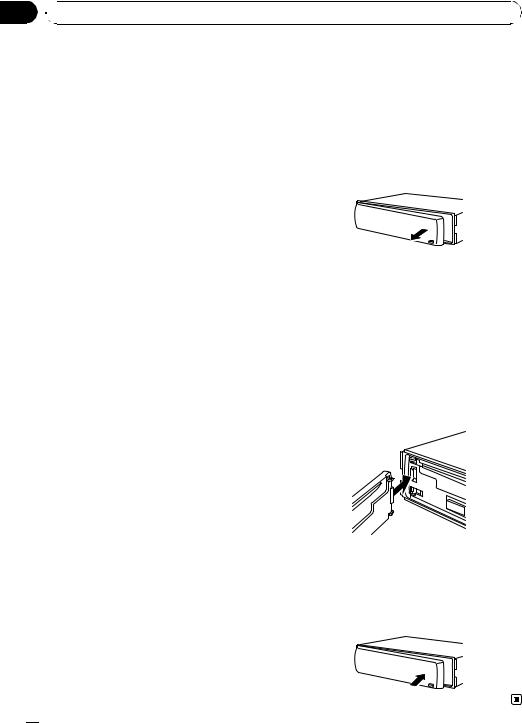
2 Grab the front panel and remove. |
||
|
CAUTION |
|
|
! Do not allow this unit to come into contact |
|
||
|
with liquids. Electrical shock could result. |
|
|
|
Also, damage to this unit, smoke, and over- |
|
|
|
heating could result from contact with liquids. |
3 Put the front panel into provided pro- |
|
! |
Keep this manual handy as a reference for op- |
||
tective case for safe keeping. |
|||
|
erating procedures and precautions. |
||
|
|
||
! Always keep the volume low enough so that |
Attaching the front panel |
||
|
you can hear sounds from outside the vehicle. |
||
! Protect this unit from moisture. |
1 Slide the front panel to the left until it |
||
! |
If the battery is disconnected or discharged, |
||
clicks. |
|||
|
the preset memory will be erased and must be |
||
|
Front panel and the head unit are jointed on |
||
|
reprogrammed. |
||
|
the left side. Make sure that the front panel |
||
! |
If this unit does not operate properly, contact |
|
|
|
Before You Start |
|
|
has been jointed to the head unit.
your dealer or nearest authorized Pioneer Service Station.
Visit our website
Visit us at the following site: http://pioneer.jp/group/index-e.html
!We offer the latest information about Pioneer Corporation on our website.
Protecting your unit from theft
The front panel can be detached to deter theft.
 Important
!Handle gently when removing or attaching the front panel.
!Avoid subjecting the front panel to excessive shocks.
!Keep the front panel out of direct sunlight and high temperatures.
2 Press the right side of the front panel until it is firmly seated.
# If you can’t attach the front panel to the head unit successfully, try again. Front panel may be damaged if you attach the front panel forcedly.
Section
01
English
Removing the front panel
1 Press DETACH to release the front panel.
En |
3 |
Section
02  Operating this unit
What’s What |
|
|
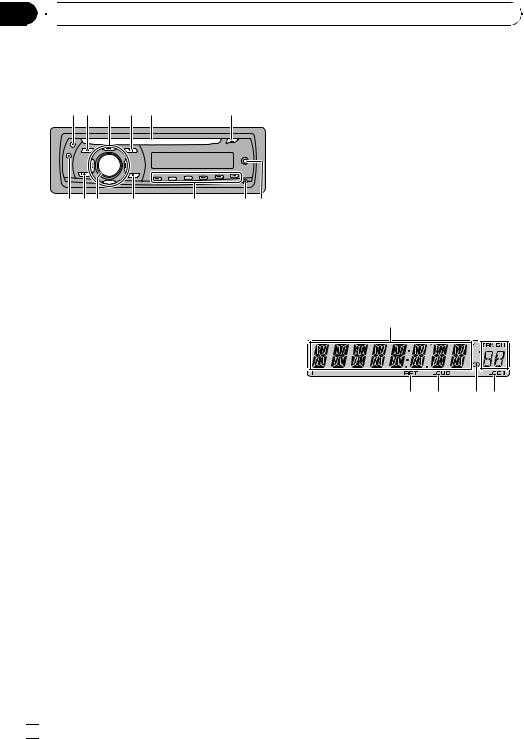
b SOURCE button, VOLUME |
|
||
Head unit |
|
|
|
This unit is turned on by selecting a source. |
||
|
|
|
Press to cycle through all the available |
|||
12 3 4 5 |
6 |
|
sources. |
|
||
|
Press and hold to recall the initial setting |
|||||
|
|
|
|
|||
|
|
|
|
menu when the sources are off. |
|
|
|
|
|
|
Rotate it to increase or decrease the vo- |
||
|
|
|
|
lume. |
|
|
|
|
|
|
c BAND button |
|
|
dcb |
a |
9 |
8 7 |
Press to select among three FM bands and |
||
one AM band and to cancel the control |
||||||
|
|
|
|
|||
1 CLOCK button |
|
|
mode of functions. |
|
||
|
|
|
|
|||
Press to change to the clock display. |
|
d PAUSE button |
|
|||
2 FUNCTION button |
|
|
Press to turn pause on or off. |
|
||
|
|
|
|
|||
Press to recall the function menu when op- |
LCD display |
|
||||
erating a source. |
|
|
|
|||
3 a/b/c/d buttons |
|
|
1 |
2 |
||
Press to perform manual seek tuning, fast |
|
|
||||
forward, reverse and track search controls. |
|
|
||||
Also used for controlling functions. |
|
|
|
|||
4 AUDIO button
Press to select various sound quality controls.
5CD loading slot
Insert a disc to play.
6EJECT button
Press to eject a CD from your built-in CD player.
7AUX input jack (3.5 mm stereo jack)
Use to connect an auxiliary equipment.
8DETACH button
Press to remove the front panel from the head unit.
9 1 to 6 buttons
Press for preset tuning.
a EQ button
Press to select various equalizer curves. Press and hold to turn loudness on or off.
3 4 5 6
1 Main display section
Shows the various information such as band, play time, and other setting.
!Tuner
Band and frequency are displayed.
!Built-in CD Player
Elapsed play time is displayed.
!Audio and initial setup
Function names and setup status are displayed.
2Preset number/track number indicator
Shows the track number or preset number.
3RPT indicator
Shows when repeat play is turned on.
4 LOUD indicator
Appears in the display when loudness is turned on.
 4
4 En
En

 Operating this unit
5 |
Stereo (5) indicator |
Tuner |
|
Shows when the selected frequency is |
Listening to the radio |
|
being broadcast in stereo. |
|
6 |
LOC indicator |
Important |
|
||
|
Shows when local seek tuning is on. |
If you are using this unit in North, Central or |
|
|
South America, reset the AM tuning step (see |
|
|
Setting the AM tuning step on page 9). |
Basic Operations
Turning the unit on and selecting a source
You can select a source you want to listen to. To switch to the built-in CD player, load a disc in the unit (refer to the next page).
% Press SOURCE to select a source.
Press SOURCE repeatedly to switch between the following sources:
Tuner—Built-in CD player—AUX
 Notes
Notes
!In the following cases, the sound source will not change:
—When there is no disc in the unit.
—When AUX (auxiliary input) is set to off (refer to page 9).
!AUX is set to on by default. Turn off the AUX when not in use (refer to Switching the auxiliary setting on page 9).
!When this unit’s blue/white lead is connected to the vehicle’s auto-antenna relay control terminal, the vehicle’s antenna extends when this unit’s source is turned on. To retract the antenna, turn the source off.
Adjusting the volume
% Use VOLUME to adjust the sound level.
Turning the unit off
% Press SOURCE and hold until the unit turns off.
1Press SOURCE to select the tuner.
2Press BAND to select a band.
Press BAND until the desired band (F1, F2, F3 for FM or AM) is displayed.
3To perform manual tuning, briefly press c or d.
4To perform seek tuning, press and hold c or d for about one second and release.
The tuner will scan the frequencies until a broadcast strong enough for good reception is
found.
# You can cancel seek tuning by briefly pressing
c or d.
# If you press and hold c or d you can skip stations. Seek tuning starts as soon as you release the button.
Storing and recalling broadcast frequencies
% When you find a frequency that you want to store in memory, press one of preset tuning buttons 1 to 6 and hold until the preset number stops flashing.
Memorized radio station frequency can be recalled by pressing the preset tuning button.
#Up to 18 FM stations, six for each of the three FM bands, and six AM stations can be stored in memory.
#You can also use a and b to recall radio station frequencies assigned to preset tuning buttons 1 to 6.
Section
02
English
En |
5 |

Section
02  Operating this unit
Tuning in strong signals
Local seek tuning lets you tune in only those radio stations with sufficiently strong signals for good reception.
1Press FUNCTION to select LOCAL.
2Press a or b to turn local seek tuning on or off.
3Press c or d to set the sensitivity. FM: LOCAL 1—LOCAL 2—LOCAL 3— LOCAL 4
AM: LOCAL 1—LOCAL 2
The LOCAL 4 setting allows reception of only the strongest stations, while lower settings let you receive progressively weaker stations.
2To perform fast forward or reverse, press and hold c or d.
3To skip back or forward to another track, press c or d.
 Notes
Notes
!Read the precautions with discs and player on page 10.
!If an error message such as ERROR-11 is displayed, refer to Error messages on page 10.
Repeating play
Repeat play lets you hear the same track over again.
1 Press FUNCTION to select RPT.
Storing the strongest broadcast frequencies
BSM (best stations memory) lets you automatically store the six strongest broadcast frequencies under preset tuning buttons 1 to 6. Once stored you can tune in to those frequencies with the touch of button.
!Storing broadcast frequencies with BSM may replace broadcast frequencies you have saved using buttons 1 to 6.
1Press FUNCTION to select BSM.
2Press a to turn BSM on.
Six strongest broadcast frequencies will be stored in the order of their signal strength.
# To cancel the storage process, press b.
Built-in Player
Playing a disc
1 Insert a CD into the CD loading slot.
Playback will automatically start.
#Be sure to turn up the label side of a disc.
#After a CD has been inserted, press SOURCE to select the built-in CD player.
#You can eject a CD by pressing EJECT.
2 Press c or d to select the repeat range. DSC – Repeat all tracks
TRK – Repeat just the current track
#If you perform track search or fast forward/reverse, repeat play is automatically cancelled.
#To return to the normal display, press BAND.
Playing tracks in random order
Random play lets you play back tracks on the CD in a random order.
1Press FUNCTION to select RDM.
2Press a or b to turn random play on or
off.
When random play is on, RDM appears in the
display.
# To return to the normal display, press BAND.
Scanning tracks of a CD
Scan play lets you hear the first 10 seconds of each track on the CD.
1 Press FUNCTION to select SCAN.
6 |
En |

|
Section |
Operating this unit |
02 |
|
|
2 Press a to turn scan play on.
SCAN appears in the display. The first 10 seconds of each track is played.
3 When you find the desired track press b to turn scan play off.
#If the display has automatically returned to the playback display, select SCAN again by pressing FUNCTION.
#After scanning of a CD is finished, normal playback of the tracks will begin again.
Pausing disc playback
Pause lets you temporarily stop playback of the disc.
1Press FUNCTION to select PAUSE.
2Press a or b to turn pause on or off.
# You can also turn pause on or off by pressing
PAUSE.
# To return to the normal display, press
BAND.
Audio Adjustments
Using balance adjustment
Fader/balance setting creates an ideal listening environment in all occupied seats.
1Press AUDIO to select FAD.
2Press a or b to adjust front/rear speaker balance.
FAD F15 to FAD R15 is displayed.
# FAD 0 is the proper setting when only two speakers are used.
3 Press c or d to adjust left/right speaker balance.
BAL L15 to BAL R15 is displayed.
# To return to the normal display, press BAND.
Using the equalizer
There are six stored equalizer settings such as
DYNAMIC, VOCAL, NATURAL, CUSTOM,
FLAT and POWERFUL that can easily be recalled at any time.
!CUSTOM is an adjusted equalizer curve that you create.
!When FLAT is selected no supplement or correction is made to the sound.
% Press EQ to select the equalizer.
Press EQ repeatedly to switch between the following equalizers:
DYNAMIC—VOCAL—NATURAL—CUSTOM
—FLAT—POWERFUL
Adjusting equalizer curves
You can adjust the currently selected equalizer curve setting as desired. Adjusted equalizer curve settings are memorized in CUSTOM.
Adjusting bass/mid/treble
You can adjust the bass/mid/treble level.
1Press AUDIO to select BASS/MID/ TREBLE.
2Press a or b to adjust the level.
+6 to –6 is displayed as the level is increased or decreased.
# To return to the normal display, press BAND.
Adjusting loudness
Loudness compensates for deficiencies in the lowand high-sound ranges at low volume.
1Press AUDIO to select LOUD.
2Press a or b to turn loudness on or off.
# You can also turn loudness on or off by pressing and holding EQ.
3Press c or d to select a desired level.
LOW (low)—HI (high)
# To return to the normal display, press BAND.
English
En |
7 |

Section
02  Operating this unit
Adjusting source levels
SLA (source level adjustment) lets you adjust the volume level of each source to prevent radical changes in volume when switching between sources.
!Settings are based on the FM volume level, which remains unchanged.
!The AM volume level can also be adjusted with source level adjustments.
1Compare the FM volume level with the level of the source you wish to adjust.
2Press AUDIO to select SLA.
3Press a or b to adjust the source volume.
SLA +4 to SLA –4 is displayed as the source
volume is increased or decreased.
# To return to the normal display, press
BAND.
Other Functions
Adjusting initial settings
Setting the clock
Use these instructions to set the clock.
1Press FUNCTION to select clock.
2Press c or d to select the segment of the clock display you wish to set.
Pressing c or d will select one segment of the clock display:
Hour—Minute
3Press a or b to set the clock.
Turning the clock display on or off
You can turn the clock display on or off.
!Even when the sources are off, the clock display appears on the display.
% Press CLOCK to turn the clock display on or off.
Each press of CLOCK turns the clock display on or off.
# The clock display disappears temporarily when you perform other operations, but the clock display appears again after 25 seconds.
Using the initial settings, you can customize various system settings to achieve optimal performance from this unit.
1Press SOURCE and hold until the unit turns off.
2Press SOURCE and hold until function name appears in the display.
3Press FUNCTION to select one of the initial settings.
Press FUNCTION repeatedly to switch between the following settings:
Clock—FM (FM tuning step)—AM (AM tuning step)—AUX (auxiliary input)
Use the following instructions to operate each particular setting.
#To cancel initial settings, press BAND.
#You can also cancel initial settings by holding down SOURCE until the unit turns off.
Setting the FM tuning step
The FM tuning step employed by seek tuning can be switched between 100 kHz, the preset step, and 50 kHz.
!If seek tuning is performed in 50 kHz steps, stations may be tuned in imprecisely. Tune in the stations with manual tuning or use seek tuning again.
1Press FUNCTION to select FM.
2Press c or d to select the FM tuning step.
Press c to select 50 (50 kHz). Press d to select 100 (100 kHz).
8 |
En |

 Operating this unit
Setting the AM tuning step
The AM tuning step can be switched between 9 kHz, the preset step, and 10 kHz. When using the tuner in North, Central or South America, reset the tuning step from 9 kHz (531 kHz to 1 602 kHz allowable) to 10 kHz (530 kHz to 1 640 kHz allowable).
1Press FUNCTION to select AM.
2Press c or d to select the AM tuning step.
Press c to select 9 (9 kHz). Press d to select
10(10 kHz).
Switching the auxiliary setting
It is possible to use auxiliary equipment with this unit. Activate the auxiliary setting when using auxiliary equipment connected to this unit.
1Press FUNCTION to select AUX.
2Press a or b to turn the auxiliary setting on or off.
Section
02
English
En |
9 |
Appendix

 Additional Information
Error messages |
|
! Do not use cracked, chipped, warped, or |
|||
When you contact your dealer or your nearest |
otherwise damaged discs as they may da- |
||||
mage the player. |
|||||
Pioneer Service Center, be sure to record the |
|||||
! Unfinalized CD-R/CD-RW disc playback is |
|||||
error message. |
|
||||
|
not possible. |
||||
|
|
|
|
||
|
|
|
|
! Do not touch the recorded surface of the |
|
|
Message |
Cause |
Action |
||
|
discs. |
||||
|
|
|
|
||
ERROR-11, 12, |
Dirty disc |
Clean disc. |
! Store discs in their cases when not in use. |
||
17, 30 |
|
|
! Avoid leaving discs in excessively hot envir- |
||
ERROR-11, 12, |
Scratched disc |
Replace disc. |
onments including under direct sunlight. |
||
17, 30 |
|
|
! Do not attach labels, write on or apply che- |
||
|
|
|
|
||
ERROR-10, 11, |
Electrical or me- |
Switch the ignition |
micals to the surface of the discs. |
||
12, 15, 17, 30, |
chanical |
key, or switch to a |
! To clean a CD, wipe the disc with a soft |
||
A0 |
|
different source, |
|||
|
cloth outward from the center. |
||||
|
|
|
then back to the |
||
|
|
|
CD player. |
! Condensation may temporarily impair the |
|
|
|
|
player’s performance. Leave it to adjust to |
||
ERROR-15 |
The inserted disc |
Replace disc. |
|||
|
|
does not contain |
|
the warmer temperature for about one |
|
|
|
any data |
|
hour. Also, wipe any dump discs with a soft |
|
ERROR-22, 23 |
The CD format |
Replace disc. |
cloth. |
||
|
|
cannot be played |
|
! Playback of discs may not be possible be- |
|
|
|
back |
|
cause of disc characteristics, disc format, |
|
CD-ROM |
CD-ROM is in- |
Replace disc. |
|||
recorded application, playback environ- |
|||||
|
|
serted |
|
ment, storage conditions and so on. |
|
|
|
|
|
||
|
|
|
|
! Text information may not be correctly dis- |
|
|
|
|
|
played depending on the recorded environ- |
|
Handling guideline of discs |
ment. |
||||
! Road shocks may interrupt disc playback. |
|||||
and player |
|
! Read the precautions with discs before |
|||
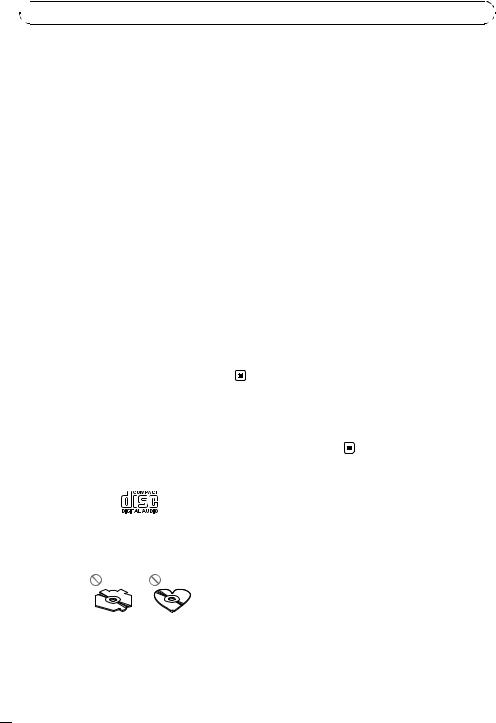
! Use only discs featuring following logo. |
using them. |
||||
|
|||||
Dual Discs
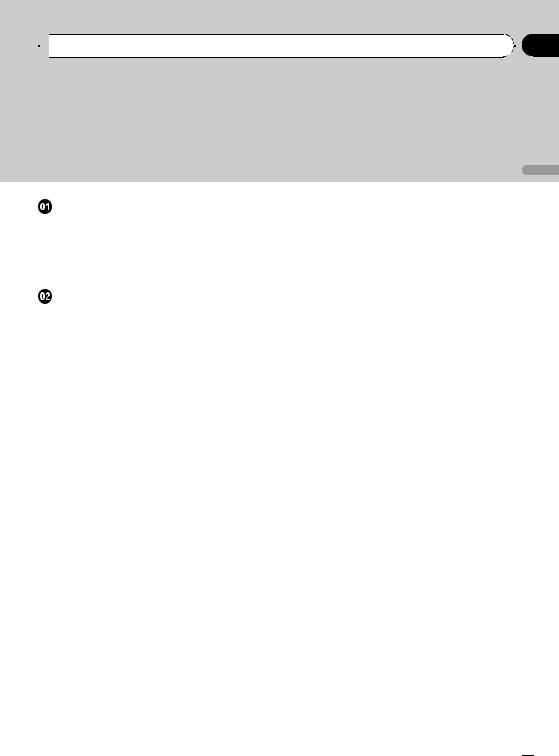
!Use only conventional, fully circular discs. Do not use shaped discs.
!Use 12-cm or 8-cm CD. Do not use an adapter when playing 8-cm CDs.
!Do not insert anything other than a CD into the CD loading slot.
!Dual Discs are two-sided discs that have a recordable CD for audio on one side and a recordable DVD for video on the other.
!Since the CD side of Dual Discs is not physically compatible with the general CD standard, it may not be possible to play the CD side with this unit.
 10
10 En
En
 Additional Information
!Frequent loading and ejecting of a Dual Disc may result in scratches on the disc. Serious scratches can lead to playback problems on this unit. In some cases, a Dual Disc may become stuck in the disc loading slot and will not eject. To prevent this, we recommend you refrain from using Dual Disc with this unit.
!Please refer to the information from the
disc manufacturer for more detailed information about Dual Discs.
Appendix
English
En  11
11

Appendix

 Additional Information
Specifications |
Signal-to-noise ratio |
65 dB (IEC-A network) |
|
|
|
||
General |
|
Note |
|
Rated power source ............... |
14.4 V DC |
Specifications and the design are subject to mod- |
|
|
(allowable voltage range: |
||
|
12.0 V to 14.4 V DC) |
ifications without notice due to improvements. |
|
Grounding system ................... |
Negative type |
|
|
Max. current consumption |
|
|
|
..................................................... |
10.0 A |
|
|
Dimensions (W × H × D): |
|
|
|
DIN |
|
|
|
Chassis ..................... |
178 × 50 × 162 mm |
|
|
Nose ........................... |
188 × 58 × 15 mm |
|
|
D |
|
|
|
Chassis ..................... |
178 × 50 × 162 mm |
|
|
Nose ........................... |
170 × 48 × 15 mm |
|
|
Weight .......................................... |
1.3 kg |
|
|
Audio |
|
|
|
Maximum power output ....... |
50 W × 4 |
|
|
Continuous power output ... |
22 W × 4 (50 Hz to 15 000 |
|
|
|
Hz, 5% THD, 4 W load, both |
|
|
|
channels driven) |
|
|
Load impedance ...................... |
4 W (4 W to 8 W allowable) |
|
|
Preout max output level ....... |
2.2 V |
|
|
Tone controls: |
|
|
|
Bass |
|
|
|
Frequency ................ |
100 Hz |
|
|
Gain ............................ |
±13dB |
|
|
Mid |
|
|
|
Frequency ................ |
1 kHz |
|
|
Gain ............................ |
±12 dB |
|
|
Treble |
|
|
|
Frequency ................ |
10 kHz |
|
|
Gain ............................ |
±12 dB |
|
|
CD player |
|
|
|
System .......................................... |
Compact disc audio system |
|
|
Usable discs .............................. |
Compact disc |
|
|
Signal-to-noise ratio ............... |
94 dB (1 kHz) (IEC-A net- |
|
|
|
work) |
|
|
Number of channels .............. |
2 (stereo) |
|
|
FM tuner |
|
|
|
Frequency range ...................... |
87.5 MHz to 108.0 MHz |
|
|
Usable sensitivity ..................... |
8 dBf (0.7 µV/75 W, mono, |
|
|
|
S/N: 30 dB) |
|
|
Signal-to-noise ratio ............... |
75 dB (IEC-A network) |
|
|
AM tuner |
|
|
|
Frequency range ...................... |
531 kHz to 1 602 kHz (9 kHz) |
|
|
|
530 kHz to 1 640 kHz (10 |
|
|
|
kHz) |
|
|
Usable sensitivity ..................... |
18 µV (S/N: 20 dB) |
|
|
 12
12 En
En
 Contenido
Gracias por haber comprado este producto Pioneer.
Lea con detenimiento estas instrucciones sobre el funcionamiento del aparato, para que pueda darle el mejor uso posible. Una vez que las haya leído, conserve este manual en un lugar seguro para consultarlo en el futuro.
Antes de comenzar |
|
|
|
|
|
||||
Acerca de esta unidad |
14 |
|
|
|
|||||
Visite nuestro sitio Web |
|
14 |
|
|
|
||||
Protección del producto contra robo |
14 |
||||||||
– |
Extracción de la carátula 14 |
|
|||||||
– |
Colocación de la carátula |
14 |
|
||||||
Utilización de esta unidad |
|
|
|
||||||
Qué es cada cosa |
15 |
|
|
|
|
|
|||
– |
Unidad principal |
15 |
|
|
|
||||
– |
Display LCD |
15 |
|
|
|
|
|
||
Funciones básicas |
16 |
|
|
|
|
|
|||
– |
Encendido de la unidad y selección de |
||||||||
|
una fuente |
|
16 |
|
|
|
|
|
|
– |
Ajuste del volumen |
16 |
|
|
|
||||
– |
Apagado de la unidad |
16 |
|
|
|||||
Sintonizador |
16 |
|
|
|
|
|
|
||
– |
Para escuchar la radio |
16 |
|
|
|||||
– Almacenamiento y recuperación de |
|||||||||
|
frecuencias |
17 |
|
|
|
|
|
||
– |
Sintonización de señales fuertes |
17 |
|||||||
– |
Almacenamiento de las frecuencias de |
||||||||
|
radio más fuertes |
|
17 |
|
|
|
|||
Reproductor incorporado |
17 |
|
|
|
|||||
– |
Reproducción de un disco |
17 |
|
||||||
– |
Repetición de reproducción |
18 |
|
||||||
– |
Reproducción de las pistas en orden |
||||||||
|
aleatorio |
18 |
|
|
|
|
|
||
– |
Exploración de las pistas de un CD 18 |
||||||||
– |
Pausa de la reproducción de un |
|
|||||||
|
disco |
18 |
|
|
|
|
|
|
|
Ajustes de audio |
|
19 |
|
|
|
|
|
||
– |
Uso del ajuste del balance |
19 |
|
||||||
– |
Uso del ecualizador |
19 |
|
|
|||||
– |
Ajuste de las curvas de |
|
|
|
|||||
|
ecualización |
19 |
|
|
|
|
|
||
– |
Ajuste de la sonoridad |
19 |
|
|
|||||
– |
Ajuste de los niveles de la fuente |
19 |
|||||||
Otras funciones |
20 |
|
|
|
|
|
|||
–Configuración de los ajustes iniciales 20
– |
Ajuste del reloj 20 |
|
– |
Ajuste del paso de sintonía de FM |
20 |
– |
Ajuste del paso de sintonía de AM |
21 |
–Cambio del ajuste de un equipo auxiliar 21
 Información adicional
Mensajes de error 22
Pautas para el manejo de discos y del reproductor 22
Discos dobles 23 Especificaciones 24
Español
Es  13
13
Sección
01  Antes de comenzar
Acerca de esta unidad |
! Mantenga la carátula fuera del alcance de la |
|
luz solar directa y no la exponga a altas tem- |
 PRECAUCIÓN
!No permita que esta unidad entre en contacto con líquidos, ya que ello puede producir una descarga eléctrica. Además, el contacto con líquidos puede causar daños en la unidad, humo y recalentamiento.
!Conserve este manual a mano para que pueda consultar los procedimientos de operación y las precauciones cuando sea necesario.
!Mantenga siempre el volumen lo suficientemente bajo como para que pueda escuchar los sonidos que provienen del exterior del vehículo.
!Proteja esta unidad de la humedad.
!Si se desconecta o se descarga la batería, la memoria preajustada se borrará y deberá ser reprogramada.
!Si esta unidad no funciona correctamente, contacte con su concesionario o el servicio
técnico oficial de Pioneer más próximo a su domicilio.
Visite nuestro sitio Web
Visítenos en el siguiente sitio: http://pioneer.jp/group/index-e.html
!En nuestro sitio Web ofrecemos la informa-
ción más reciente acerca de Pioneer Corporation.
peraturas.
Extracción de la carátula
1Presione DETACH para soltar la carátu-
la.
2Sujete la carátula y extráigala.
3Coloque la carátula en la carcasa protectora provista para guardarla de manera segura.
Colocación de la carátula
1 Deslice la carátula hacia la izquierda hasta que oiga un chasquido.
La carátula y la unidad principal quedan unidas por el lado izquierdo. Asegúrese de que la carátula haya quedado unida a la unidad principal.
Protección del producto contra robo
Se puede extraer la carátula como medida antirrobo.
 Importante
!Proceda con cuidado al retirar o colocar la carátula.
!Evite someter la carátula a impactos excesivos.
2 Presione el lado derecho de la carátula hasta que asiente firmemente.
# Si no puede fijar con éxito la carátula a la unidad principal, inténtelo de nuevo. Si aplica fuerza excesiva para fijar la carátula, ésta puede dañarse.
 14
14 Es
Es

 Utilización de esta unidad
Qué es cada cosa
Unidad principal
12 3 4 5 |
6 |
dcb a |
9 8 7 |
1 Botón CLOCK
Pulse este botón para cambiar a la visualización del reloj.
2 Botón FUNCTION
Presione este botón para acceder al menú de funciones al utilizar una fuente.
3 Botones a/b/c/d
Presione estos botones para utilizar los controles de sintonización por búsqueda manual, avance rápido, retroceso y búsqueda de pista. También se usan para controlar las funciones.
4 Botón AUDIO
Presione este botón para seleccionar los diversos controles de calidad del sonido.
5 Ranura de carga de CD
Introduzca el disco para reproducirlo.
a Botón EQ
Presione este botón para seleccionar las diversas curvas de ecualización.
Presione y mantenga presionado para activar o desactivar la sonoridad.
b SOURCE botón, VOLUME
Esta unidad se enciende al seleccionar una fuente. Presione este botón para visualizar todas las fuentes disponibles.
Mantenga presionado este botón para acceder al menú de ajustes iniciales si las fuentes están desactivadas.
Haga girar el control para aumentar o disminuir el volumen.
c Botón BAND
Presione este botón para seleccionar entre tres bandas FM y una banda AM, y para cancelar el modo de control de funciones.
d Botón PAUSE
Presione este botón para activar o desactivar la pausa.
Display LCD
1 2
3 4 5 6
Sección
02
Español
6 Botón EJECT
Presione este botón para expulsar un CD del reproductor de CD incorporado.
7Conector de entrada AUX (conector estéreo de 3,5 mm)
Utilícelo para conectar un equipo auxiliar.
8Botón DETACH
Presione este botón para extraer la carátula de la unidad principal.
9 Botones 1 a 6
Presione para la sintonización preajustada.
1 Sección principal del display
Muestra información variada, como la banda, el tiempo de reproducción y otros ajustes.
!Sintonizador
Se muestran la banda y la frecuencia.
!Reproductor de CD incorporado
Se muestra el tiempo de reproducción transcurrido.
!Configuración inicial y de audio
Se muestran los nombres de funciones y el estado de configuración.
Es 15

Sección
02  Utilización de esta unidad
2Indicador del número de presintonía/ número de pista
Muestra el número de pista o el número de presintonía.
3Indicador RPT
Aparece cuando la repetición de reproducción está activada.
4 Indicador LOUD
Aparece en el display cuando se activa la sonoridad.
5 Indicador de estéreo (5)
Aparece cuando la frecuencia seleccionada se está transmitiendo en estéreo.
6 Indicador LOC
Aparece cuando la sintonización por búsqueda local está activada.
Cambio del ajuste de un equipo auxiliar en la página 21).
!Si el cable azul/blanco de esta unidad está conectado al terminal de control del relé de la antena automática del vehículo, la antena se extiende cuando se enciende el equipo. Para retraer la antena, apague la fuente.
Ajuste del volumen
% Utilice VOLUME para ajustar el nivel de sonido.
Apagado de la unidad
% Mantenga presionado SOURCE hasta que se apague la unidad.
Funciones básicas
Encendido de la unidad y selección de una fuente
Puede seleccionar una fuente que desee escuchar. Para cambiar al reproductor de CD incorporado, cargue un disco en la unidad (consulte la página siguiente).
% Presione SOURCE para seleccionar una fuente.
Presione SOURCE repetidamente para cambiar entre las siguientes fuentes:
Sintonizador—Reproductor de CD incor- porado—AUX
 Notas
Notas
!En los siguientes casos, la fuente sonora no cambiará:
—Cuando no hay un disco cargado en la unidad.
—Cuando AUX (entrada auxiliar) está apagada (consulte la página 21).
!AUX está activada de forma predeterminada. Desactive AUX cuando no la utilice (consulte
Sintonizador
Para escuchar la radio
 Importante
Si se utiliza esta unidad en América del Norte, América Central o América del Sur, se deberá restablecer el paso de sintonía de AM (consulte
Ajuste del paso de sintonía de AM en la página 21).
1Presione SOURCE para seleccionar el sintonizador.
2Presione BAND para seleccionar una banda.
Presione BAND hasta que se visualice la banda deseada (F1, F2, F3 para FM o AM).
3Para utilizar la sintonización manual, presione brevemente c o d.
 16
16 Es
Es

|
Sección |
Utilización de esta unidad |
02 |
|
|
4 Para utilizar la sintonización por búsqueda, mantenga presionado c o d durante aproximadamente un segundo, y suelte el botón.
El sintonizador explorará las frecuencias hasta que encuentre una emisora con señales de suficiente intensidad como para asegurar una buena recepción.
#Se puede cancelar la sintonización por búsqueda presionando brevemente c o d.
#Si mantiene presionado c o d podrá saltar las emisoras. La sintonización por búsqueda comienza inmediatamente después de que suelte el botón.
Almacenamiento y recuperación de frecuencias
% Cuando encuentre la frecuencia que desea almacenar en la memoria, presione uno de los botones de ajuste de presintonías 1 a 6 y manténgalo presionado hasta que el número de presintonía deje de destellar.
Una frecuencia de emisora de radio memorizada se puede recuperar presionando el botón de ajuste de presintonías.
#Se pueden almacenar en la memoria hasta 18 emisoras FM, seis por cada una de las tres bandas FM, y seis emisoras AM.
#También se pueden usar a y b para llamar las frecuencias de las emisoras de radio asignadas a los botones de ajuste de presintonías 1 a 6.
3 Presione c o d para ajustar la sensibilidad.
FM: LOCAL 1—LOCAL 2—LOCAL 3— LOCAL 4
AM: LOCAL 1—LOCAL 2
El ajuste LOCAL 4 sólo permite recibir las emisoras con las señales más fuertes, mientras que los ajustes más bajos permiten recibir de manera progresiva las emisoras con las señales más débiles.
Almacenamiento de las frecuencias de radio más fuertes
La función BSM (memoria de las mejores emisoras) permite guardar automáticamente las seis frecuencias de las emisoras más fuertes en los botones de ajuste de presintonías 1 a 6. Una vez almacenadas, podrá sintonizar esas frecuencias pulsando un solo botón.
!Al almacenar frecuencias con la función BSM, se pueden reemplazar las frecuencias que ha almacenado con los botones 1 a 6.
1Presione FUNCTION para seleccionar BSM.
2Presione a para activar la función BSM.
Las seis frecuencias de las emisoras más fuertes se almacenarán en orden según la intensi-
dad de las señales.
# Para cancelar el proceso de almacenamiento, presione b.
Español
Sintonización de señales fuertes
La sintonización por búsqueda local le permite sintonizar sólo las emisoras de radio con señales lo suficientemente fuertes como para asegurar una buena recepción.
1Presione FUNCTION para seleccionar LOCAL.
2Presione a o b para activar o desactivar la sintonización por búsqueda local.
Reproductor incorporado
Reproducción de un disco
1 Introduzca un CD por la ranura de carga de CD.
La reproducción comenzará automáticamente.
Es  17
17
 Loading...