


In-Wall Speaker
Enceinte murale encastrable
S-IW631-LR S-IW831-LR S-IW651-LR S-IW851-LR
Register your product at
http://www.pioneerelectronics.com (US) http://www.pioneerelectronics.ca (Canada)
Operating Instructions Mode d’emploi

Thank you for buying this Pioneer product.
Please read through these operating instructions so you will know how to operate your model properly. After you have finished reading the instructions, put them away in a safe place for future reference.
Introduction
This speaker system is designed for in-wall installation. The design features provide for a wide range of placement and listening position options.
S-IW631-LR/S-IW831-LR only
Providing excellent sound quality, these models feature an adjustable tweeter to provide flexibility of placement in your listening area.
S-IW651-LR/S-IW851-LR only
This speaker system is designed with CST (Coherent Source Transducer) technology to assure excellent sound quality. CST sound delivery is extremely smooth and coherent. All sound - direct and reflected - arrives at the listening position with matched timbre.
This speaker system is also paintable so that they may be matched to your room decor.
Before you start
•The nominal impedance of this speaker system is 8 Ω. Connect the speaker system to an amplifier capable of driving an impedance of at least 8 Ω.
This product incorporates auto-resetting overload protection technology to help avoid damage to the speakers. However, please observe the following precautions:
•Do not supply amplification power to the speaker system in excess of the maximum permissible input, which could damage the speaker and cause a hazard from overheating.
•If using a graphic equalizer to boost sounds in the high-frequency range, do not use excessive amplifier volume.
•Do not try to force a low-powered amplifier to produce high sound levels as the amplifier’s harmonic distortion will be increased, and you may damage the speaker.
Caution: installation
•When installing the speakers, make sure that the wall/ceiling is strong enough to support the speakers.
•Improper installation of the speakers could cause them to fall and cause damage or injuries to persons nearby.
•Switch off and unplug your AV equipment and consult the instructions when connecting up components. Make sure you use the correct connecting cables.
•Keep magnetic objects such as screwdrivers or steel parts away from the tweeter and woofer speakers. Since the speakers use strong magnets, the objects may be attracted, causing injury or damaging the diaphragm.
•Do not install the speakers where they will be in direct sunlight, and avoid positioning them near heaters and air conditioners. This may cause warping and discoloration of the speaker and damage to the speakers.
•This speaker system is designed for home use only. To avoid electric shock hazard, do not place them outside, or in an overly humid area.
Caution: in use
•If the speakers stop emitting sound after receiving too large an input signal, turn down the volume control on the amplifier and wait a few seconds. The protection feature will be reset automatically.
For U.S. model
WARNING: Handling the cord on this product or cords associated with accessories sold with the product will expose you to chemicals listed on proposition 65 known to the State of California and other governmental entities to cause cancer and birth defect or other reproductive harm.
Wash hands after handling |
D36-P4_A_En |
•Pioneer is not responsible for any accidents or damage that result from improper installation, misuse, modification of the product, or natural disasters.
•This speaker system must be installed by a qualified technician as it involves such tasks as selecting a location for installation, drilling holes in walls/ceiling, wiring, and painting. Have the installer carefully follow the installation instructions.
•The installation technician must follow professional installation techniques to protect the speaker system against falling.
2
En
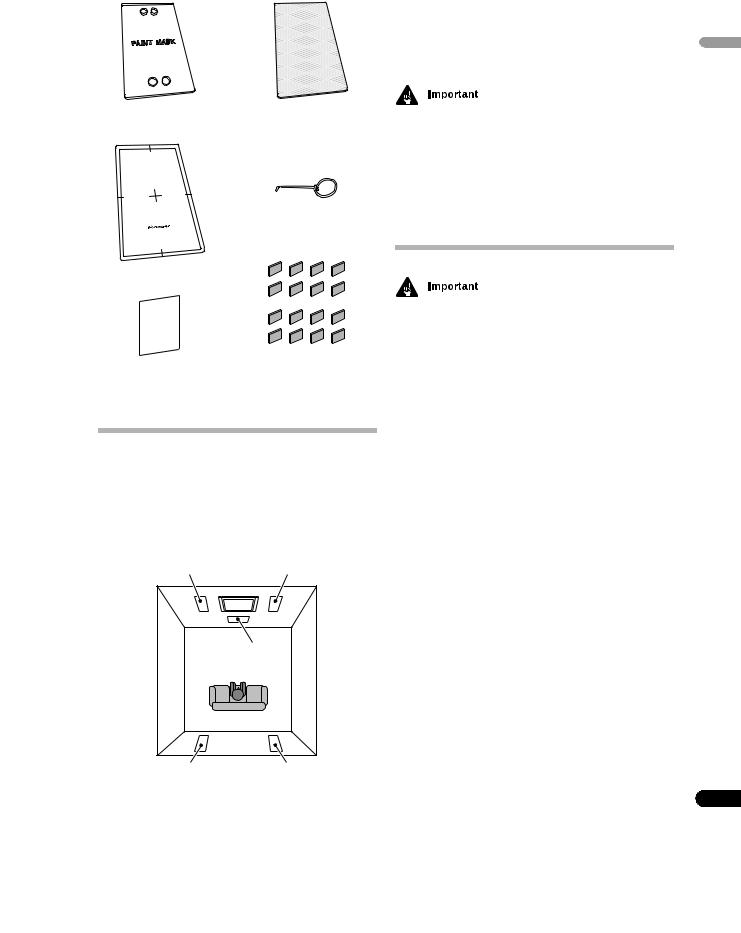
What’s in the box
Paint masks x 2 |
Grilles x 2 |
(Transparent) |
|
TEMPLATE |
|
GABARIT |
|
|
Grille removal tool x 1 |
•Place the left and right speakers equal distances from your listening position for good stereo imaging. Use speaker cables of the equal length for each speaker.
•Keep the speaker system at least 50 cm (20 in.) away from the edge of the wall or ceiling. If this is not possible, adjust the sound balance by using the speakers’ treble or bass level controls.
•This speaker system is not magnetically shielded. It should therefore not be placed near TVs or monitors that are sensitive to magnetic fields, as the interaction of magnetic materials can cause distortion of the colors on your TV screen. Magnetic storage media (such as floppy discs and tape or video cassettes) should also not be kept close to this speaker system.
Templates x 2
|
|
|
|
Operating instructions |
Butyl rubber tapes x 16 |
||
Installation
Standard surround setup
Sounds reproduced through speaker systems are easily affected in subtle ways by the conditions in the listening space. To assure optimum performance from this speaker system, give adequate consideration to the installation location before setup.
Use the graphic below as a guide to determine optimal speaker placement.
Front left |
Front right |
|
Center |
|
Listening position |
Rear left |
Rear right |
For the installer
•Give adequate consideration to the location of installation before the setup of this speaker system.
•Check the walls/ceiling to see if they are strong enough to withstand the weight of the speaker system.
•Installation is possible on walls from 6 mm (1/4 in.) to 25 mm (1 in.) thick.
•Check the walls/ceiling to confirm there is no wiring, plumbing, beams, studs or air conditioning systems that may interfere with installation.
•Pioneer disclaims any liability whatsoever for damage resulting from assembly, improper mounting, insufficient reinforcement, misuse of the product, acts of nature, etc.
English
3
En
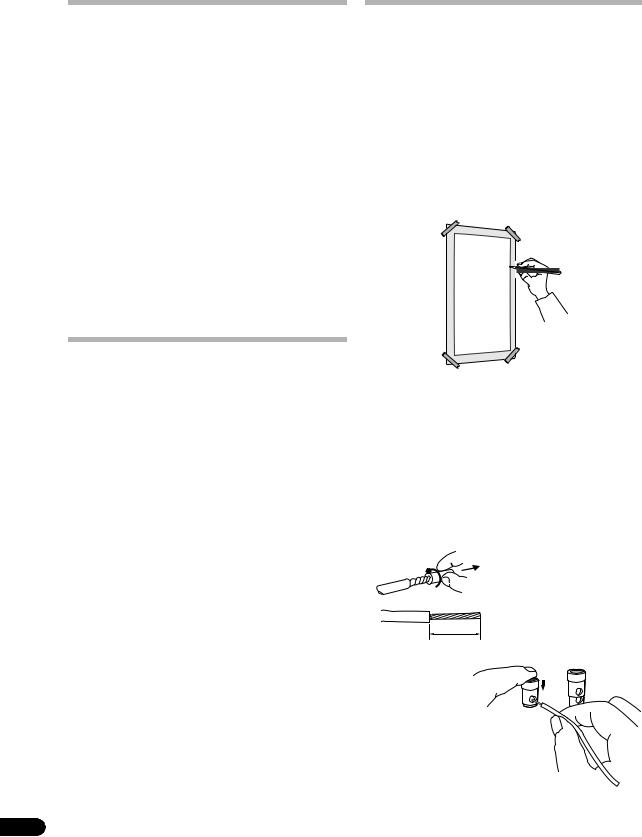
Painting the speakers
While the speaker and grille can be painted after it is installed, painting it beforehand is much easier.
It is recommended to use spray paint, as brushed paint may clog the holes in the grille and reduce the sound quality significantly.
1Remove the fabric scrim from the inside of the grille.
Carefully peel off the fabric scrim and lay it down flat so as not to get it wrinkled.
2Use the supplied paint mask to cover the speaker.
If you don’t have the paint mask, use paper and masking tape.
3Paint the speaker and grille the desired color.
As previously mentioned, it is strongly recommended that you paint before installation and that you use spray paint.
4 After the speaker and grille have dried completely, remove the paint mask and carefully replace the fabric scrim on the back of the grille.
Before installing
•Before installing the speakers, run the speaker cables to the installation location.
•To maximize sound quality, choose the correct speaker gauge cables from the table below.
If the resistance of the speaker cable is too high, the signal will be attenuated and the speakers’ frequency response will be degraded.
AWG |
feet |
|
|
16 or 14 |
less than 25 |
|
|
14 or 12 |
25 to 50 |
|
|
12 or 10 |
50 to 75 |
|
|
10 |
more than 75 |
|
|
mm2 |
meters |
1.5 to 2.5 |
less than 8 |
|
|
2.5 to 4 |
8 to 16 |
|
|
4 to 6 |
16 to 24 |
|
|
6 |
more than 24 |
|
|
4
How to install
Make sure you have read and understood all the information above, For the installer on page 3 and Before installing above.
1Once you have decided on the installation location, prepare the supplied template.
Cut out the inside of the template along the dotted line and discard the inner section.
2Attach the template (outer section) to the wall/ ceiling using tape.
Make sure the template is aligned properly.
3Trace a line onto the wall/ceiling, following the inner perimeter of the template.
4Cut a hole where you have drawn the outline.
Be careful when cutting the hole, and use a proper cutting tool.
5Pull the speaker cable through the hole that has been opened.
Be careful not to apply to much force when pulling on the speaker cable or bend the cable at sharp angles.
6Connect the cable wire to the speaker as shown below.
When connecting the speakers, be careful not to touch the diaphragms of the drivers.
Twist and pull off the protective shields on each wire.
10 mm (0.4 in.)
Insert the speaker cable wires into the holes while pressing down on the terminal posts on the speaker, and then release the terminal posts. For input terminal polarity, red is positive (+) and black is negative (–).
En
•After connecting the wires, pull lightly on them to make sure that the ends of the wires are securely connected to the terminals. Poor connections can create noise and interruptions in the sound.
•If the wires are pulled out of the terminal posts and the conductors come into contact with each other or surrounding devices, an excessive additional load may be placed on the amplifier. This may cause the amplifier to stop functioning, and may even cause it damage.
•Be careful to observe the correct polarity of the connections between the cables and the speaker. If the polarity (+, –) of one of the speakers (left or right) is reversed the stereo image will be severely degraded.
CAUTION
These speaker terminals carry HAZARDOUS LIVE voltage. To prevent the risk of electric shock when connecting or disconnecting the speaker cables, disconnect the power cord before touching any uninsulated parts.
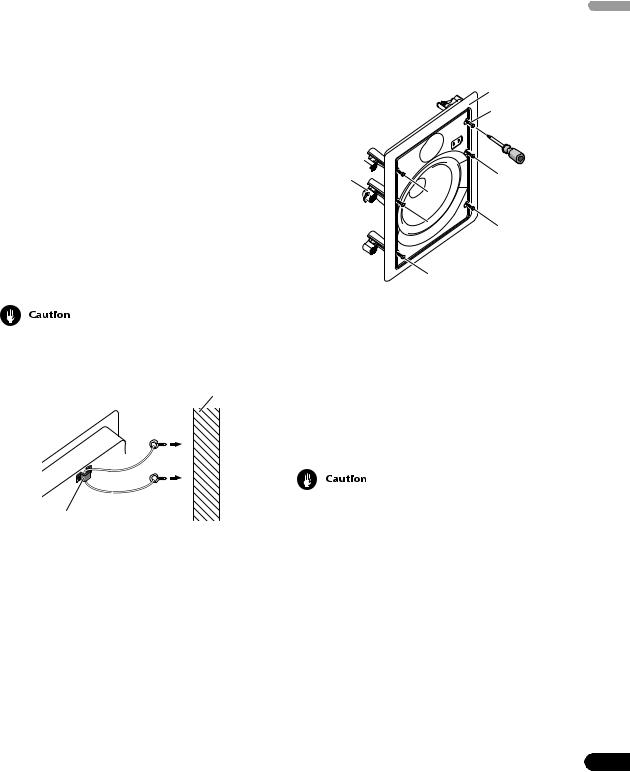
7 Where available, use the fixing bracket located on the back of the speaker system and attach a reinforced wire, such as stainless steel wire rope, to the studs or beams of the walls/ceiling.
•It is strongly recommended that you take double safe precautions to prevent the speaker from falling by accident.
Stud/beam
Fixing bracket  Reinforced wire
(not supplied)
•Put the reinforced wire through the fixing bracket and attach to the studs or beams. Make sure the stud/ beam that you are attaching it to is strong enough to support the weight of the speaker system.
8Place sound-absorbing material (such as fiberglass) around the speakers as necessary to improve sound quality.
Use only sound-absorbing materials that comply with regional safety regulations.
9Place the speaker into the hole you have cut.
Make sure the rotating clamps are turned inward.
•A Phillips screwdriver is required for loosening them.
•When using electric screwdrivers, first find out the minimum torque required for the installation of the speaker system. Begin by setting the electric screwdriver to its minimum torque and gradually raise the torque until the screw starts to rotate. Check what torque setting you are on at this point (this will be the minimum torque required for the setup). After confirming the torque, return the rotating clamps toward the inside by reversing the direction of rotation of the screws. When doing this, take care that the screws do not come all the way out.
Speaker frame
Screw
Rotating clamp 

10 Attach the speaker frame to the wall/ceiling, and tighten the screws lightly (temporary attachment).
At this point the rotating clamp will rotate so that the rotating clamp and frame are clamped on to the wall/ ceiling.
Gently try pulling the speaker forward and check that all of the rotating clamps have rotated outwards and are lightly clamping to the wall/ceiling.
11 Tighten the screws firmly using no more than the maximum torque specified.
Allowable maximum torque: 1.0 N m
•Screwing them in too tightly could break the rotating clamps, twist the frames, damage the walls/ceilings and make it difficult to attach the grille.
12 Make sure that the screws are not crooked and that there is no gap between the wall/ceiling and frame.
English
5
En
 Loading...