


SPX-HUD01
NavGate HUD
Installation and Quick Start Guide Manuel d’installation et de démarrage rapide Guida rapida all’avvio e di installazione Guía de instalación e iniciación rápida Installationsund Kurzanleitung Installatieen Snelstartgids
Руководство по установке и быстрому запуску
Русский Nederlands Deutsch Español Italiano Français English

Section
 Precautions
|
Precautions |
|
|
|
|
|
|
Preparation for installing the unit |
|
|||
|
|
|
|
|
|
|
|
|||||
|
For the operation manual |
2 |
|
|
When replacing the sun visor thickness |
|||||||
|
|
|
adjustment plate |
11 |
|
|
||||||
|
Information for users on collection and |
|
|
|
||||||||
|
|
|
|
|
|
|
||||||
|
disposal of old equipment and used |
|
|
Installing Main Unit |
|
|
||||||
|
batteries |
2 |
|
|
|
|
|
|
|
|||
|
|
|
|
|
|
After installation |
16 |
|
|
|||
|
Connection and installation |
3 |
|
|
|
|
||||||
|
|
|
Connecting the power cable to the cigarette |
|||||||||
|
About this unit |
|
4 |
|
|
|
|
|||||
|
|
|
|
|
|
socket |
16 |
|
|
|
||
|
Precautions for battery |
4 |
|
|
|
|
|
|
||||
|
|
|
|
|
|
|
|
|
||||
|
If you experience problems |
5 |
|
|
Setting your iPhone or Android device |
|||||||
|
|
|
|
|
|
|
|
|||||
|
Important safety information |
|
|
Connecting your iPhone or Android device |
||||||||
|
|
|
to the unit |
17 |
|
|
|
|||||
|
To avoid battery exhaustion |
6 |
|
|
|
|
|
|||||
|
|
|
Installing the navigation application |
17 |
||||||||
|
If the screen is hard to see |
6 |
|
|
||||||||
|
|
|
Starting the navigation application |
17 |
||||||||
|
Precautions for operation at high/low |
|
|
|||||||||
|
|
|
|
|
|
|
|
|||||
|
temperatures |
6 |
|
|
|
|
Display modes |
|
|
|
||
|
Notes on microSD memory cards |
6 |
|
|
|
|
||||||
|
|
|
|
|
|
|
||||||
|
Notes on iPhone |
6 |
|
|
|
|
When you finish with installation and |
|||||
|
Notes on Android devices |
6 |
|
|
||||||||
|
|
|
connection |
|
|
|
|
|||||
|
Copyrights |
7 |
|
|
|
|
|
|
|
|
|
|
|
|
|
|
|
|
Adjusting the display settings |
18 |
|
||||
|
Software updates |
7 |
|
|
|
|
|
|||||
|
|
|
|
|
– Position |
18 |
|
|
|
|||
|
Visit our website |
7 |
|
|
|
|
|
|
|
|||
|
|
|
|
|
– Zoom |
18 |
|
|
|
|||
|
Saved customer data |
7 |
|
|
|
|
|
|
||||
|
|
|
|
– Rotation |
19 |
|
|
|
||||
|
Notes on this unit |
7 |
|
|
|
|
|
|
|
|||
|
|
|
|
|
– Aspect Ratio |
19 |
|
|
||||
|
|
|
|
|
|
|
|
|
|
|||
|
Parts supplied |
|
|
|
|
|
– Geometric Correction |
19 |
|
|||
|
|
|
|
|
|
– White Balance |
19 |
|
|
|||
|
|
|
|
|
|
|
|
|
|
|||
|
Before connection |
|
|
|
|
Before driving |
|
|
|
|||
|
Precautions for connection |
8 |
|
|
|
|
|
|||||
|
|
|
Configuring the unit function |
|
|
|||||||
|
Connecting the power cable |
8 |
|
|
|
|
||||||
|
|
|
settings |
20 |
|
|
|
|||||
|
Preventing noise |
8 |
|
|
|
|
|
|
|
|||
|
|
|
|
|
Adjusting the angle of the combiner |
20 |
||||||
|
|
|
|
|
|
|
|
|||||
|
Precautions for installation |
|
|
|
When getting in and out of the |
|
|
|||||
|
|
|
|
vehicle |
20 |
|
|
|
||||
|
Before installing and securing unit |
|
9 |
|
|
|
||||||
|
|
Correct combiner position |
20 |
|
||||||||
|
When securing the unit |
9 |
|
|
|
|
||||||
|
|
|
|
Adjusting the display brightness |
20 |
|||||||
|
|
|
|
|
|
|
|
|||||
|
Connections |
|
|
|
|
|
|
|
|
|
|
|
|
Connection diagram |
9 |
|
|
|
|
|
|
|
|
||
|
Seting the size of the cigarette plug |
|
10 |
|
|
|
|
|
||||
|
When replacing cigarette plug fuse |
|
10 |
|
|
|
|
|
||||
|
Installation position |
|
|
|
|
|
|
|
|
|
||
|
Precautions for installing unit |
10 |
|
|
|
|
|
|
|
|||
|
Specified installation position |
10 |
|
|
|
|
|
|
|
|||
 Precautions
 Important
!For your safety, be sure to ask your dealer to install the unit to your vehicle, wire the cables, or change its installation location.
Installation, wiring, and disinstallation require special skills and experience. Incorrect installation, wiring, or disinstallation of the unit, or using parts other than those specified by the manufacturer may cause an accident, injury, or malfunction. In this case, Pioneer accepts no responsibility.
!To dealers
When you are finished with the installation and wiring, proceed to set up the connection with the navigation unit and adjust the display settings, etc.
When you are finished with all of the work, hand over this manual to your customer.
Thank you for purchasing this PIONEER product
To ensure proper use, please read through this manual before using this product. It is especially important that you read and observe WARNINGs and CAUTIONs in this manual. Please keep the manual in a safe and accessible place for future reference.
For the operation manual
This manual describes how to install and set up this unit. Operation of this unit is explained in the separate manual for the unit.
For details on the functions and operation of this unit, visit us at the following site: http://www.pioneer.eu/navgatehud
Information for users on collection and disposal of old equipment and used batteries
(Symbol for equipment)
(Symbol examples for batteries)
 2
2 Engb
Engb

 Precautions
These symbols on the products, packaging, and/or accompanying documents mean that used electrical and electronic products and batteries should not be mixed with general household waste.
For proper treatment, recovery and recycling of old products and used batteries, please take them to applicable collection points in accordance with your national legislation.
By disposing of these products and batteries correctly, you will help to save valuable resources and prevent any potential negative effects on human health and the environment which could otherwise arise from inappropriate waste handling.
For more information about collection and recycling of old products and batteries, please contact your local municipality, your waste disposal service or the point of sale where you purchased the items.
These symbols are only valid in the European Union.
For countries outside the European Union:
If you wish to discard these items, please contact your local authorities or dealer and ask for the correct method of disposal.
Connection and installation
 WARNING
!Use this unit with a 12-volt battery and negative earthing only.
Do not use the unit for a 24-volt vehicle. There is a risk of a fire or malfunction.
!Never install the unit and wire the cables to places where it will impair the performance of an airbag.
When installing the unit to a vehicle equipped with airbags, ask the vehicle manufacturer for precautions for the installation work. There is a risk of incorrect deployment of airbags, resulting in a fatal accident.
!Never install the unit to places where it will obstruct the driver’s vision, interfere with driving, or cause danger to the passengers. There is a risk of a traffic accident and injury.
!Never cut the insulation of the power cable of this unit to share the power with other devices.
Exceeding the current capacity of the power cable may result in a fire, electric shock, or malfunction.
!Never use the bolts and nuts of safety related parts such as the steering, brake systems and tank.
Using these may cause a brake failure, fire, or traffic accident.
!Do not install the unit to a sun visor whose shape is not supported by the unit. Installing the unit to a sun visor whose shape is not supported by the unit may cause an accident or malfunction.
!Do not install the unit to a defective sun visor.
Check if there are no defects on the sun visor before installation. Installation to a defective sun visor may cause the unit to fall, resulting in an accident or malfunction.
!Do not leave the unit in a place subject to direct sunlight.
Do not remove the combiner protection sheet before the installation is completed. The combiner may concentrate light into an intense beam, causing smoke or fire.
!For your safety, ask your dealer to install the unit and wire the cables, or change the installation location.
 Precautions
Installation, wiring, and disinstallation of the unit require special skills and experience. Incorrect installation, wiring, or disinstallation of the unit may cause serious damage to the vehicle.
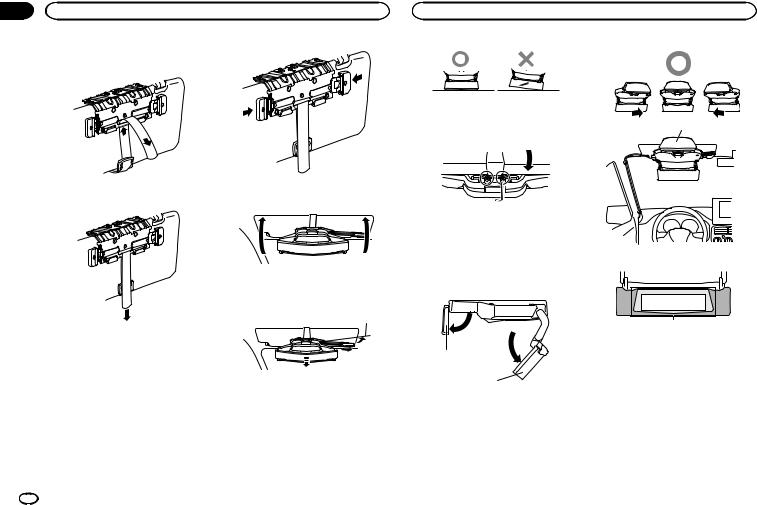
!Do not work in a place subject to direct sunlight.
Doing so may cause a burn injury or blindness.
!Disconnect the negative terminal of the battery before installation.
Short circuiting the positive and negative terminals may cause electric shock or injury.
!Check the location of the pipes, tank, electrical wiring, etc. before installation.
When installing the unit by drilling a hole in the vehicle body, be careful not to interfere with or contact the pipes, tank, electrical wiring, etc. Furthermore, protect the processed parts from rusting or the penetration of water.
!Use the supplied parts and secure them firmly.
Use of parts other than the supplied ones may cause damage to other parts in the unit or may not be able to firmly secure the unit. If the unit comes loose, it may interfere with driving, causing an accident and injury.
!Install the supplied parts as specified. If the supplied parts are not installed as
specified, the parts may come loose and drop off, resulting in an accident or malfunction.
!Use the supplied cables and connect them securely.
Use the supplied cables and connect them as specified. Use of cables other than the supplied ones may cause a fire or malfunction.
!Follow the instructions in this manual to connect and install the unit.
Failure to follow the instructions in this manual to connect and install the unit may cause a fire or accident.
!Secure the unit to sun visor with a fall prevention belt.
Failure to do so may cause the unit to fall, causing an accident and injury.
!Insulate an uninsulated part of the cable with tape, etc.
A short-circuit may cause a fire, electric shock, or malfunction.
!Wire the cables so that they do not get caught on the vehicle body, screws, or moving parts such as a seat rail.
A disconnection or short-circuit may cause a fire, electric shock, or malfunction.
!Wire and secure the cables so that they do not interfere with driving.
Failure to do so may cause the cables to get tangled around the steering wheel, gear stick, brake pedal, etc., causing an accident.
!When you are finished with the installation and wiring, check that the electric equipment works normally as it did before installing the unit.
Using the unit whilst other electric equipment does not work normally may cause a fire, electric shock, or traffic accident.
!Store small parts such as screws out of the reach of small children.
Should the parts be swallowed, consult a doctor immediately.
 CAUTION
!Never cut a cable part way along it.
If a fuse is connected to the cable, the protection circuit will not work, which may cause a fire.
!When connecting cables, make sure that the cables do not come into contact with hot areas of the vehicle body.
There is a risk of a fire or electric shock.
!Do not wire cables using extension cords. Doing so may cause the cable to overheat, resulting in a fire or electric shock.
Section
English
Engb  3
3

Section
 Precautions
|
! Do not install the unit in places subject to |
! If liquid or foreign matter should get inside |
|
||
|
conditions such as rain, water, condensation, |
this unit, turn off the power immediately and |
|
dust, and oily smoke. |
consult your dealer or the nearest authorised |
|
Doing so may cause smoke, fire, or malfunc- |
PIONEER Service Station. Do not use the |
|
tion. |
unit in this condition because doing so may |
|
! When wiring, do not allow the cables to |
result in fire, electric shock, or other failure. |
|
come into contact with metal parts. |
! Do not leave the remote control, etc. lying |
|
Allowing cables to come into contact with |
around. |
|
metal parts may damage the cables, causing |
When stopping the vehicle or turning a bend, |
|
a fire, electric shock, or malfunction. |
the remote control, etc. may roll toward your |
|
|
feet and get under the brake pedal, interfer- |
|
About this unit |
ing with driving and causing an accident. |
|
! Do not affix film or a seal to the combiner. |
|
|
WARNING |
Doing so may block the field of vision, caus- |
|
ing an accident. |
|
|
! Do not operate the menus whilst driving. It |
! Do not use the unit if there is an abnormality |
|
will divert your attention away from the safe |
or malfunction such as images not being |
|
operation of your vehicle and may cause a |
able to be displayed. |
|
serious traffic accident. Always observe traf- |
There is a risk of an unexpected accident, |
|
fic conditions and pedestrians to ensure that |
fire, or electric shock. |
|
you drive safely. |
! Do not allow children to hang on the unit or |
|
! Do not stare at the displayed image whilst |
apply force to it. |
|
driving. |
Doing so may cause an injury, vehicle defor- |
|
Failure to keep your eyes on the road ahead |
mation, or malfunction. |
|
may cause an accident. |
! When you hear thunder, do not touch the |
|
! Do not operate the sun visor whilst driving. |
unit. |
|
Doing so may cause a serious traffic acci- |
There is a risk of an electric shock caused by |
|
dent. Park your vehicle in a safe location and |
lightning. |
|
apply the hand brake before operating the |
! Do not disassemble or modify the unit. |
|
sun visor. |
There is a risk of an accident, fire, or electric |
|
! Do not insert your hand or fingers or a for- |
shock. |
|
eign object into a media slot. |
! Always obey the actual traffic regulations. |
|
Doing so may cause an injury, electric |
The unit contains traffic regulations data, but |
|
shock, fire, or malfunction. |
some of the data may differ from the actual |
|
! Do not allow this unit to come into contact |
traffic regulations due to changes to the traf- |
|
with liquids. |
fic regulations. Even when using the route |
|
Doing so may cause smoke, fire, or electric |
maps or voice guidance of the navigation, al- |
|
shock. Special attention is required in the |
ways obey the local traffic regulations and |
|
case of families with children. |
actual traffic signs when operating a vehicle. |
|
|
Failure to do so may cause an accident or re- |
|
|
sult in a violation of the road traffic laws. |
 Precautions
!This unit disables operation of the unit whilst the vehicle is in motion. Park the vehicle in a safe place and apply a hand brake before operating the menus of this unit.
!Replace the fuse with a new one of the specified capacity (ampere).
Using a fuse exceeding the specified capacity may cause a fire or malfunction.
!Before using the unit at nighttime or in a dark place such as in a tunnel, adjust the brightness of the unit properly so that it will not interfere with driving. Failure to do so may cause an accident.
 CAUTION
!Do not use the unit for any purpose other than use in a vehicle.
Doing so may cause smoke, fire, electric shock, or injury.
!Before driving, adjust the combiner angle and display brightness, and check if screws on the unit are not loose to prevent them from interfering with driving.
Failure to do so may cause an accident.
!When operating the sun visor or buttons whilst driving, pay sufficient attention to your driving.
Failure to do so may cause an accident.
!When getting in and out of your vehicle, be careful not to bang your head on the unit. Failure to do so may cause an injury.
!Be careful not to let hands or fingers get caught when you are closing the combiner or adjusting the angle.
Failure to do so may cause an injury.
Should the battery be swallowed, consult a doctor immediately.
!Install the battery according to the polarity (positive and negative) specified in this manual.
If the battery polarity is not correct, there is a risk of an injury or contamination of the environment due to the explosion of the battery or leakage of the battery fluid.
!If the battery leakage occurs and the battery fluid gets on your skin or clothes, wash it off with clean water. If the battery fluid gets into an eye, wash it out with clean water and consult a doctor immediately.
 CAUTION
!Do not short-circuit, disassemble, or heat the battery, or place it in fire or water.
Explosion of the battery or leakage of the battery fluid may cause a fire or injury.
!Do not charge a dry battery.
Explosion of the battery may cause an injury.
!Do not use a battery other than the specified one.
Explosion of the battery or leakage of the battery fluid may cause an injury or contamination of the environment.
!Replace a used battery immediately with a new one.
Leakage of the battery fluid may cause contamination of the environment.
!Do not store the remote control in high temperatures, high humidity, or direct sunlight. Failure to do so may cause remote control deformation, explosion of the battery, or leakage of the battery fluid.
Precautions for battery
 WARNING
!Keep the battery out of the reach of small children to prevent an accident from occurring.
 4
4 Engb
Engb

 Precautions
If you experience problems
 WARNING
If you notice smoke, a strange noise or smell, or any other abnormal signs from the unit, turn off the power immediately and consult your dealer or the nearest authorised PIONEER Service Station.
Using this unit in this condition may cause an accident, fire, or electric shock.
 Important safety information
!The unit does not work standalone. Connect the unit with an iPhone or Android device on which a navigation application is installed before using it.
Read the safety precautions described in the instruction manual of the product that is to be connected to this unit.
!Do not operate this unit whilst driving. It will divert your attention away from the safe operation of your vehicle and may cause a serious traffic accident. Always observe traffic conditions and pedestrians to ensure that you drive safely. Park your vehicle in a safe location and apply the hand brake before operating this unit.
!Do not operate the sun visor whilst driving. Doing so may cause a serious traffic accident. Park your vehicle in a safe location and apply the hand brake before operating the sun visor.
!Do not operate an iPhone or Android device whilst driving. Park your vehicle in a safe location and apply the hand brake before setting a route to your destination on an iPhone or Android device.
!All functions available in the unit do not in any way guarantee that your surroundings are safe. When driving, be sure to check that your surrounding is safe with your own eyes.
!The route information and voice guidance provided by a navigation application are for reference purposes only. Always obey the local traffic regulations and actual traffic signs when operating a vehicle. Failure to comply could result in a violation of road traffic laws and cause a serious traffic accident to occur. In addition, information relaying the distance to a vehicle in front of your vehicle, speed signs, and red light cameras displayed by this unit is for reference purposes only. Obey actual traffic signs and driving conditions.
!This unit is equipped with an interlock system that detects when the vehicle is moving and disables operation of the unit whilst the vehicle is in motion. Park the vehicle in a safe place and apply a hand brake before operating this unit.
!If you experience tiredness or discomfort whilst using this unit, stop use immediately and take a long break to recover properly. Continued use of the unit under such circumstances may have adverse effects on your physical condition.
!If you are short-sighted or far-sighted, have astigmatism or differing visual acuities between your left and right eyes, wear glasses, etc. to properly correct visual acuity before using this unit.
!Images displayed on the screen may be distorted momentarily when the displayed image switches. This is not a malfunction.
!Images will not be displayed on the screen if the GPS reception is lost.
!Images displayed on the screen may be distorted if an iPhone or Android device is under heavy load.
!Positioning accuracy depends on the performance of GPS on an iPhone or Android device connected to this unit.
!The direction along which a vehicle is travelling may not be displayed correctly if the GPS accuracy is low.
!Firmly secure an iPhone or Android device whilst driving. Do not let an iPhone or Android device fall onto the floor, where it may become jammed under the brake or accelerator pedal.
!Close the diffuser when not using the unit.
!When removing the unit from the sun visor and storing it, be sure to close the diffuser and combiner.
Do not leave the unit in places exposed to direct sunlight, such as on a dashboard. The diffuser or combiner may concentrate light into an intense beam, causing smoke or fire.
Section
01
02
English
Engb  5
5

Section
02  Important safety information
!The taillight of the vehicle in front may be reflected on the combiner.
!Pioneer accepts no responsibility for any fluctuations in the value or appraisal of the vehicle, etc.
To avoid battery exhaustion
!Be sure to keep the vehicle engine running whilst using this unit. Using this unit with the vehicle engine turned off can drain the battery.
Do not allow the vehicle engine to idle for longer than necessary whilst parked to minimize effects on the surrounding environment.
!If the unit does not turn off (the LED indicator on the cigarette plug of the power cable remains lit) when the vehicle engine is turned off, disconnect the power cable from the cigarette socket on the vehicle. Failure to do so will drain the vehicle battery.
If the screen is hard to see
!This unit has a range of angles that the images on the screen can be clearly seen. Adjust the angle of the combiner (page 20) and the display settings (page 18) when using this unit for the first time to optimise the visibility and clarity of displayed images. You can
adjust the display brightness using the  /
/  button (page 20).
!The display brightness differs depending on the viewing angle. Use the unit at the position where you can clearly see the displayed image.
Precautions for operation at high/low temperatures
!If the temperature is too high or too low for the unit to operate properly, the display brightness will be lowered or the projection of images will be stopped automatically to protect the unit parts. This is not a malfunction. Wait until the temperature returns to the proper temperature for the unit to operate.
!This unit will not operate properly if the temperature is too high or too low. Operate the unit within the specified operable temperature range.
For details, refer to the operation manual.
Notes on microSD memory cards
!This unit supports microSD memory cards and microSDHC memory cards. These types of storage media are collectively referred to as “SD memory card” in this guide.
!This unit does not support microSDXC memory cards.
!Pioneer does not guarantee the operation of all of the types of SD memory cards compatible with this unit.
!Do not eject an SD memory card or change the position of the ignition switch whilst the inserted SD memory card is being accessed. It may corrupt the data stored on the SD memory card. Pioneer accepts no liability for any damages arising in such cases.
!SD memory cards have a set lifespan. Even if an SD memory card has been used properly, data may not be able to be written to or deleted from the SD memory card correctly once the card has reached the end of its useful life.
 Important safety information
!Some SD memory cards may not be recognised by this unit even if the SD memory cards can be recognised by a computer. Formatting the SD memory cards using a dedicated formatter may resolve the problem. SD memory cards formatted using the standard formatting function on a computer do not comply with the SD standard. Problems such as that those cards cannot be read or written could occur. It is recommended that you use a dedicated formatter to avoid such problems. All of the data stored on an SD memory card will be deleted when the card is formatted. Back up any needed data beforehand as necessary. A dedicated formatter for SD memory cards can be obtained from the following site. https://www.sdcard.org/home/
(Valid as of June 2012)
!Pioneer cannot guarantee repair of an SD memory card with defects caused by the SD memory card being formatted. In addition, Pioneer accepts no liability for damages, costs or expenses arising from data loss or corruption occurring due to the SD memory card being formatted. Read the instruction manual for the formatter and follow the instructions given to format the SD memory card that you plan to use, accepting responsibility yourself for any problems that may occur.
Notes on iPhone
!For the iPhone models and iPhone software versions supported by this product, refer to the information on our website.
!The iPhone models compatible with this unit are collectively referred to as “iPhone” in this guide.
!Pioneer does not guarantee the operation of all of the types of iPhone models compatible with this unit.
!Pioneer accepts no liability for any data loss that may occur with use of an iPhone with this unit.
!Do not leave an iPhone in direct sunlight for long periods of time. It may cause the iPhone to malfunction.
!Do not leave an iPhone in high temperatures.
!For details on the iPhone, refer to the iPhone manuals.
Notes on Android devices
!For the Android devices supported by this product, refer to the information on our website.
!Compatibility with all Android devices is not guaranteed.
!Certain uses of an Android device may not be legal whilst driving in your jurisdiction, so you must be aware of and obey any such restrictions.
If in doubt as to a particular function, only perform it whilst the vehicle is parked.
No feature should be used unless it is safe to do so under the driving conditions you are experiencing.
!Pioneer accepts no liability for any data loss that may occur with use of an Android device with this unit.
!Do not leave an Android device in direct sunlight for long periods of time. It may cause the device to malfunction.
!Do not leave an Android device in high temperatures.
!For details on Android devices, refer to the Android device manuals.
 6
6 Engb
Engb

 Important safety information
Copyrights
Copyrights to the data and programmes included with this product are the property of Pioneer or of the third parties have granted rights to Pioneer to the use of such data or programmes under copyright. You shall not copy, modify or analyze any part or all of the data or programmes of this product in any form.
!Settings registered to this unit may be altered or deleted automatically by accident, due to unit malfunction, as part of the repair process, or whilst other procedures are being performed. Retain a list of important contents. Pioneer accepts no liability for damages or lost benefits arising from data loss in such cases.
!Pioneer does not provide a service to recover damaged or erased data.
Software updates
!An SD memory card with a capacity of at least 2 GB is required for saving the software update file.
!A microSD memory card containing the latest updated software version will be available once a year for customers do not have Internet access.
Details will be posted on the website.
Visit our website
Visit us at the following site:
http://www.pioneer.co.uk
!Register your product. We will keep the details of your purchase on file to help you refer to this information in the event of an insurance claim such as loss or theft.
!We offer the latest information about PIONEER CORPORATION on our website.
Saved customer data
!In cases where unit repairs are needed, etc., Pioneer accepts no responsibility for software updates performed by the customer.
Notes on this unit
!The operating history of this unit is recorded for performance improvement purposes. No customer information is obtained during the recording of this history. The recorded information can be shared with other facilities or subcontractors specified by Pioneer for data analysis only if permission from the customer is obtained in advance.
!Pioneer has tested and confirmed that projected images can be seen at a distance of 3 m from the front of the windscreen of the vehicle. However, distances may appear different depending on the driver’s seating height and seat position, the height and tilt of the vehicle’s ceiling, and the amount of ambient light.
!Pioneer does not guarantee that the product conforms to the particular purpose of a specific user.
!Unit specifications and designs are subject to change without prior notice for product improvement purposes. Pioneer does not accept or even acknowledge customer requests for product modification or exchange to accommodate specific customer needs for products that match the specifications and designs described herein.
!The screen images in this manual may differ from those for the actual product.
 Important safety information
!The screen display design is subject to change without prior notice for product improvement purposes.
Section
02
English
Engb  7
7
Section
03  Parts supplied
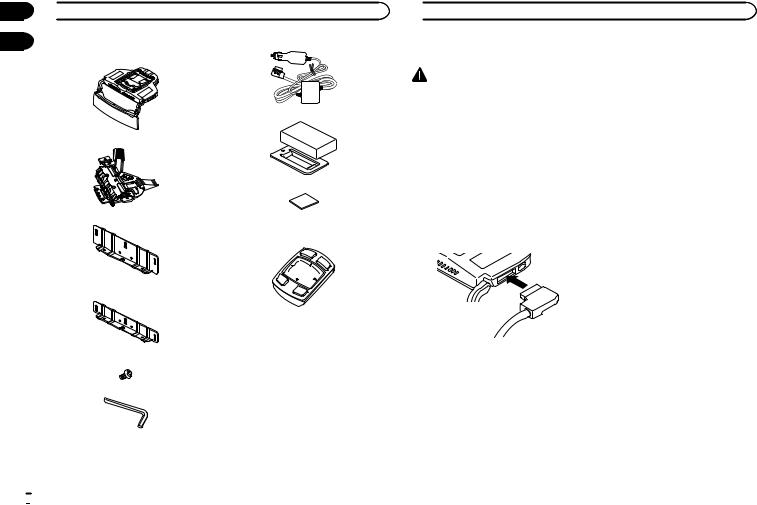
04
Head-up display unit:
Power cable x 1
Main unit x 1
Sun visor cushion x 1
Mounting bracket x 1
Sun visor thickness adjustment plate (large) x 1
Sun visor thickness adjustment plate (small) x 1
Double-sided tape x 1
HUD remote control:
Main unit x 1
(A lithium ion battery is preinstalled. Remove the insulation sheet before using the unit.)
Mounting screw x 6
Hexagonal spanner x 1
 Before connection
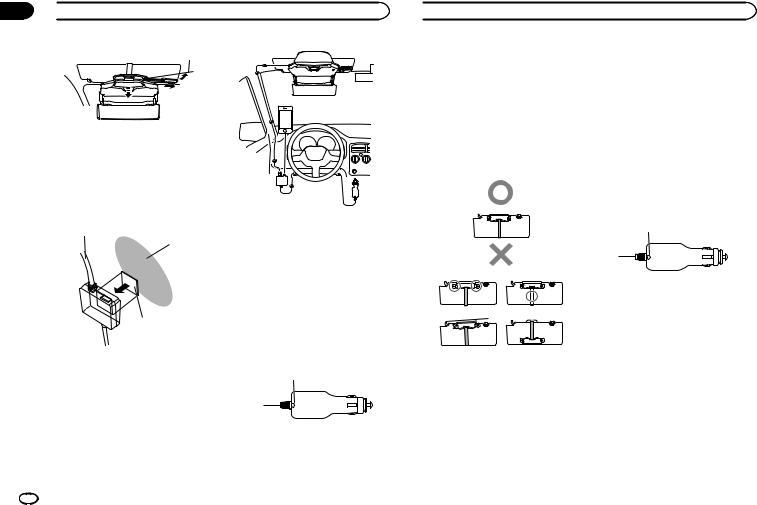
Precautions for connection |
! Do not tie the aerials together, stack them, or |
|
|
cross them over each other. |
|
CAUTION |
Noise received by the aerial and aerial cable |
|
reduces reception sensitivity. |
||
! Do not take accessory power from the CAN |
||
|
||
Bus interface, etc. Be sure to connect to the |
|
|
accessory power supply of the vehicle. |
|
!Install the supplied parts as specified. Use of parts other than the supplied ones may cause a malfunction.
Connecting the power cable
!Firmly connect the power cable by inserting it into the power connector on the unit. If the connector cannot be inserted smoothly, the orientation may not be correct. Check the orientation of the connector. Do not use force to push it in. Doing so may cause a malfunction.
Preventing noise
!To prevent noise, place the following items as far from an iPhone, an Android device, and other cables and cords as possible.
—Film aerial and aerial cable
—FM/AM aerial and its aerial cable
—GPS aerial and its aerial cable
—Beacon receiver and its aerial cable
—Power cable
Place the aerials as far from each other as possible.
 8
8 Engb
Engb
 Precautions for installation
 WARNING
!Secure the unit to sun visor with a fall prevention belt.
Failure to do so may cause the unit to fall, causing an accident and injury.
!When installing the unit to a vehicle equipped with airbags, never install the unit on the cover of an airbag or in a place where it will interfere with the deployment of an airbag. Doing so may prevent the airbag from deploying normally, or the deployed airbag may hit the unit, causing an accident and injury.
!Do not work in a place subject to direct sunlight. Doing so may cause a burn injury. Furthermore, there is a risk of blindness caused by exposure to sunlight reflected from the combiner. If the combiner is exposed to direct sunlight, close the combiner.
 CAUTION
!When installing the unit to a vehicle equipped with airbags, ask the vehicle manufacturer for precautions for the installation work. There is a risk of incorrect deployment of airbags, resulting in a fatal accident.
!A sun visor light and other optional accessories around the sun visor such as a card holder and sun visor mirror may not be able to be used after installing the unit. Check the accessories in the vehicle beforehand.
!The installation of the unit may leave marks on the surface of the sun visor.
!This unit is not supposed to be installed on the passenger seat.
!Parts, dust, etc. may fall on you whilst you are installing the unit. To prevent dust, etc. from getting into an eye, do not look up at the unit from directly below whilst installing the unit.
!The diffuser and combiner of the unit are delicate parts. Do not touch them with bare hands or cause a tool to come into contact with them whilst installing the unit.
!Do not leave the unit in a place subject to direct sunlight.
Do not remove the combiner protection sheet before the installation is completed. The combiner may concentrate light into an intense beam, causing smoke or fire.
!Never install the unit to a vehicle equipped with a sunroof or to a convertible. Sunlight may be reflected by the combiner and concentrated into an intense beam.
!Do not use the sun visor on the side window with this unit mounted on it.
Before installing and securing unit
First connect the unit temporarily to check that the unit works normally, and then install the unit. If the unit does not work normally, check if the connection is correct.
When securing the unit
!Recommended tightening torque for securing the unit with screws is from 0.36 N•m to 0.59 N•m.
!Before applying the double-sided tape to the connection box of the power cable, thoroughly wipe off any dirt from the surface to which the double-sided tape is to be applied.
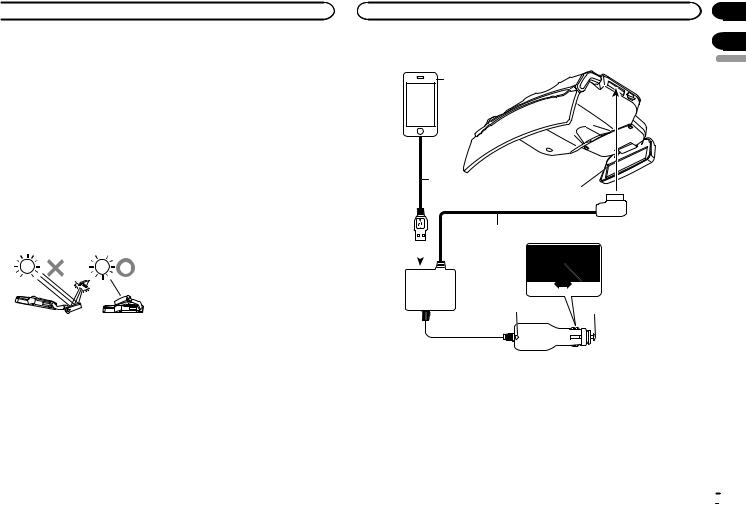
|
Section |
Connections |
05 |
|
06 |
Connection diagram |
English |
1 |
2
4
3
6
5 7
1iPhone or Android device
2USB cable
3Power cable
4To the power connector
5LED indicator
6Plug size switch
7To the cigarette socket
For iPhone users
!Use the cable (2) supplied with the iPhone. Do not leave the cable in the vehicle. The cable supplied with the iPhone is not designed for use in a vehicle.
For Android device users
!Use a USB-microUSB data communication cable (2) of 1 m or less. A charge cable cannot be used.
Engb  9
9

Section
06  Connections
07
Notes |
When replacing cigarette |
|
! The LED indicator on the cigarette plug lights |
plug fuse |
|
when the power is on, and turns off when the |
|
|
unit is turned off. |
1 Turn the plug counterclockwise to loosen |
|
If the LED indicator does not turn off when |
it. |
|
the vehicle engine is turned off, disconnect |
|
|
the power cable from the cigarette socket on |
1 |
|
the vehicle. Failure to do so will drain the ve- |
||
|
||
hicle battery. |
|
|
! For details on connecting an iPhone or |
|
|
Android device, refer to Setting your iPhone |
|
|
or Android device on page 17. |
|
|
Seting the size of the |
|
|
cigarette plug |
|
|
Set the cigarette plug size to L (large) or S |
1 Fuse (3 A) |
|
(small) according to the size of the cigarette |
2 Replace the fuse with a new one with |
|
socket on the vehicle. |
||
|
the same capacity. |
|
1 |
|
1 Plug size switch
 Installation position
Precautions for installing unit
 WARNING
!Use the supplied screws and install the unit as specified. Use of screws other than the supplied ones may cause damage to the unit.
!Secure the unit to the sun visor firmly using the supplied screws. Failure to do so may cause the unit to fall during driving, hitting a head and causing an injury.
!Read this manual fully and carefully, and install the unit correctly to abide by the safety standards.
Specified installation position
 CAUTION
Install the unit in the specified installation position to provide the driver with a safe field of vision and ensure the unit can perform its required functions. Installing the unit in a position other than the specified one may not meet the safety standards for road trucking vehicles, and the vehicle may fail a safety inspection, for example, due to a maintenance error.
1
2
1Main unit
2Power cable
10 Engb
 Preparation for installing the unit
 CAUTION
Do not install the unit to an unstable or defective sun visor. Doing so may cause the unit to fall, resulting in an accident or malfunction.
1 Check the sun visor.
Check the thickness of the sun visor to install the unit to.
The unit can be installed to sun visors that meet the following specifications.
|
T |
|
|
A |
|
|
Y |
|
|
H |
|
T: Thickness |
15 mm to 33 mm |
|
H: Height |
140 mm to 240 mm |
|
A: Distance between |
185 mm or more |
|
support points |
||
|
||
Y: Distance to the |
45 mm or more (recom- |
|
mirror, etc. |
mended) |
2 Check the sun visor thickness adjustment plate to be used.
The size of the sun visor thickness adjustment plate to be mounted to the mounting bracket differs depending on the sun visor thickness.
This unit comes with the sun visor thickness adjustment plate (medium) premounted.
Use the sun visor thickness adjustment plate of the size matching the sun visor thickness.
Sun Visor ThickSun visor thickness adness justment plate
15 mm to 20 mm
Sun visor thickness adjustment plate (small)
20 mm to 26.5 mm
Sun visor thickness adjustment plate (medium)
26.5 mm to 33 mm
Sun visor thickness adjustment plate (large)
When replacing the sun visor thickness adjustment plate
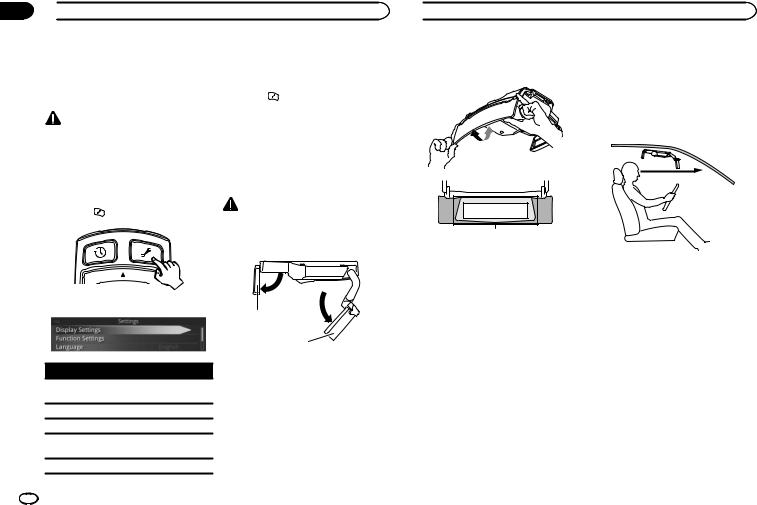
1 Pull the HUD lock lever, and slide it to the lock-release position.
1
2
1Lock-release position
2HUD lock lever
2 Remove the eight screws including longitudinal direction adjustment screws (shown in the illustration) on the mounting bracket, and then remove the sun visor thickness adjustment plate (medium).
If the longitudinal direction adjustment screws are removed, the longitudinal direction adjustment plate is removed from the sun visor thickness adjustment plate.
|
Section |
Preparation for installing the unit |
08 |
1 2
 3
3
4 Align the screw holes on the sun visor thickness adjustment plate with those on the mounting bracket, and tighten the remaining screws that were removed at the original positions.
English
1Sun visor thickness adjustment plate
2Longitudinal direction adjustment screws
3Longitudinal direction adjustment plate
3 Attach the longitudinal direction adjustment plate to the sun visor thickness adjustment plate to be used.
1
2
3
1Sun visor thickness adjustment plate
2Longitudinal direction adjustment screws
3Longitudinal direction adjustment plate
Engb 11

Section
09  Installing Main Unit
1 Align the HUD lock lever to the lock-re- lease position.
Pull the HUD lock lever, and slide it to the lockrelease position.
1
2
1Lock-release position
2HUD lock lever
!Do not hold the moving part on the mounting bracket when operating the HUD lock lever. If holding the moving part, the HUD lock lever cannot be moved.
1
3 Adjust the mounting bracket thickness.
Align the lines on the mounting bracket to the scale marks located at the left and right on the sun visor thickness adjustment plate according to the thickness of the sun visor, and then tighten three screws.
2

 1
1
1

1 Moving part
2 Release the lock plates on the mounting bracket.
Pull the lock plates on the mounting bracket to the left and right to release the lock.
1Mounting bracket
2Sun visor thickness adjustment plate
!The approximate figures for the scale marks on the sun visor thickness adjustment plate (medium) are as follows (the illustration shows the line on the mounting bracket is aligned to the scale mark of 22 mm).
1
2 
 3 4
3 4
1 20 mm
 Installing Main Unit
222 mm
324 mm
426 mm
4 Mount the mounting bracket to the sun visor.
Push the sun visor up to the horizontal position. Hold the left and right ends of lock plates on the mounting bracket, and mount the mounting bracket to the sun visor by pushing the mounting bracket all the way in.
!If the mounting bracket cannot be fully pushed in, the mounting bracket thickness needs to be increased. Remove the mounting bracket from the sun visor, return to step 3 and adjust the scale position, and then mount the mounting bracket to the sun visor again.
5 Push the sun visor down to the vertical position.
6 Lock the mounting bracket.
Push in the lock plates from the left and right firmly to lock the mounting bracket.
!If the lock plates cannot be fully pushed in, the mounting bracket thickness needs to be increased. Remove the mounting bracket from the sun visor, return to step 3 and adjust the scale position, and then mount the mounting bracket to the sun visor again.
7 Check that the mounting bracket is mounted securely.
Push the sun visor back to the horizontal position.
Push the mounting bracket back and forth to make sure that the mounting bracket is mounted securely.
!If the mounting bracket can be removed from the sun visor easily, the mounting bracket thickness needs to be decreased. Remove the mounting bracket from the sun visor, return to step 3 and adjust the scale position, and then mount the mounting bracket to the sun visor again.
8 Remove the mounting bracket.
Push the sun visor down to the vertical position and pull the lock plates to the left and right to release the lock.
Push the sun visor up to the horizontal position and remove the mounting bracket from the sun visor.
12 Engb

 Installing Main Unit
9 Check if the adjusted thickness of the mounting bracket is appropriate.
Push in the lock plates on the mounting bracket from the left and right firmly to lock it.
Check that the mounting bracket cannot be mounted to the sun visor easily whilst the lock plates are locked.
10 Mount the mounting bracket of which thickness was adjusted to the main unit.
Check that the diffuser and combiner of the main unit are closed, and align the HUD lock lever on the mounting bracket to the lock-re- lease position.
Main unit:
1
2
1Combiner
2Diffuser
Mounting bracket:
1
If the mounting bracket cannot be mounted to the sun visor easily, the thickness is correct.
!If the mounting bracket can be mounted to the sun visor easily whilst the lock plates are locked, the mounting bracket thickness is not appropriate.
Remove the mounting bracket from the sun visor, return to step 3 and adjust the scale position, and then mount the mounting bracket to the sun visor again.
2
1Lock-release position
2HUD lock lever
Secure the mounting bracket and main unit at four places at the front and back using the supplied mounting screws.
Main unit front:
1 2
1 Groove
 Installing Main Unit
2 Align the bosses with the groove.
Main unit back:
1 2
1Align the bosses with the groove.
2Groove
11Loosen the four mounting screws that were secured in step 10 one turn.
12Loosen the longitudinal direction adjustment screws on the unit one turn.
Main unit front:
13 Mount the unit to the sun visor.
Pull the lock plates on the mounting bracket to the left and right to release the lock.
Push the sun visor up to the horizontal position.
Hold the left and right ends of lock plates on the mounting bracket, and mount the unit to the sun visor by pushing the mounting bracket all the way in.
14 Push the sun visor down to the vertical position.
15 Secure the unit to sun visor with a fall prevention belt.
Pull the fall prevention belt forward from the back of the sun visor that was pushed down to the vertical position.
Section
09
English
Engb 13
Section |
|
|
09 |
Installing Main Unit |
Installing Main Unit |
Pass the fall prevention belt through as shown in the illustration.
Pull the fall prevention belt downward and secure it as it is pulled downward.
17 Push the sun visor up to the horizontal position.
18 Lock the main unit position.
Pull the HUD lock lever, and slide it to the lock position.
1
16 Lock the mounting bracket.
Push in the lock plates from the left and right firmly to lock the mounting bracket.
1 Lock position
The main unit slides forward and the unit position is locked.
19 Adjust the tilt of the main unit.
Adjust the angle to level the main unit.
Left Right Left
 Right
Right
Tilt the sun visor vertically about 20 degrees and firmly tighten the two mounting screws at the back of the main unit that were loosened in step 11.
!If the combiner protection sheet interferes with the adjustment, remove the protection sheet. Attach the combiner protection sheet again after the adjustment is finished.
20 Adjust the direction of the main unit.
Open the diffuser and combiner of the main unit.
1
2 
1Diffuser
2Combiner
Adjust the direction of the main unit to align the diffuser and combiner in the travelling direction.
1
1 Align the unit in the travelling direction
1 |
1 Adjust the combiner so that the diffuser can be displayed in the centre of the combiner.
!Be sure to adjust the main unit is to be aligned in the travelling direction.
21 Unlock the main unit position.
Pull the HUD lock lever, and slide it to the lockrelease position.
14 Engb
 Installing Main Unit
1
1 Lock-release position
The main unit slides backward and the unit position is unlocked.
22Remove the unit from the sun visor.
Close the diffuser and combiner of the main unit, and then push the sun visor down to the vertical position.
Pull the lock plates on the mounting bracket to the left and right to release the lock. Unlock the fall prevention belt. Push the sun visor up to the horizontal position, and then remove the mounting bracket from the sun visor.
!Be careful not to cause the unit to fall out.
23Firmly tighten the mounting screws at the front of the main unit.
Firmly tighten the two mounting screws at the front of the main unit that were loosened in step
11and the two longitudinal direction adjustment screws that were loosened in step 12.
!Align the HUD lock lever to the lock-release position before mounting the unit to the sun visor.
!If there is a gap between the vehicle’s ceiling and sun visor when the sun visor is in the horizontal position, attach the sun visor cushion to the fall prevention belt.
1 |
2 |
3 |
4 |
1Vehicle’s ceiling
2Sun visor
3Gap between the vehicle’s ceiling and sun visor
4No gap between the vehicle’s ceiling and sun visor
!When attaching a sun visor cushion, affix the sun visor cushion to the sun visor cushion holder, attach it to the fall prevention belt, and then secure the fall prevention belt.
2
1
3
1Fall prevention belt
2Sun visor cushion
3Sun visor cushion holder
24 Mount the unit to the sun visor.
Perform the operation from steps 13 to 17 to mount the unit to the sun visor.
 Installing Main Unit
1
2
1Sun visor cushion
2Fall prevention belt
25 Connect the power cable to the unit.
1
1 Power cable
26 Route the power cable.
Route the power cable so that the cable will not interfere with driving, and ensure the driver has a safe field of vision.
!Adjust the power cable so that it will not obstruct the driver’s vision.
!Route the cable so that it will not interfere with the backward and forward movement of the main unit when operating the HUD lock lever.
Route the power cable by fixing the points with clamps commercially available.
1
1Fix the cable with clamps commercially available.
!Do not affix or mount the cable to the windscreen.
!Do not route the power cable at the foot of the driver’s seat. There is a risk that the power cable gets trapped under the brake pedal and interferes with driving, resulting in a serious accident.
27 Lock the main unit position.
Pull the HUD lock lever, and slide it to the lock position.
Section
09
English
Engb 15
Section
09  Installing Main Unit
1
1 Lock position
The main unit slides forward and the unit position is locked.
28 Secure the power cable.
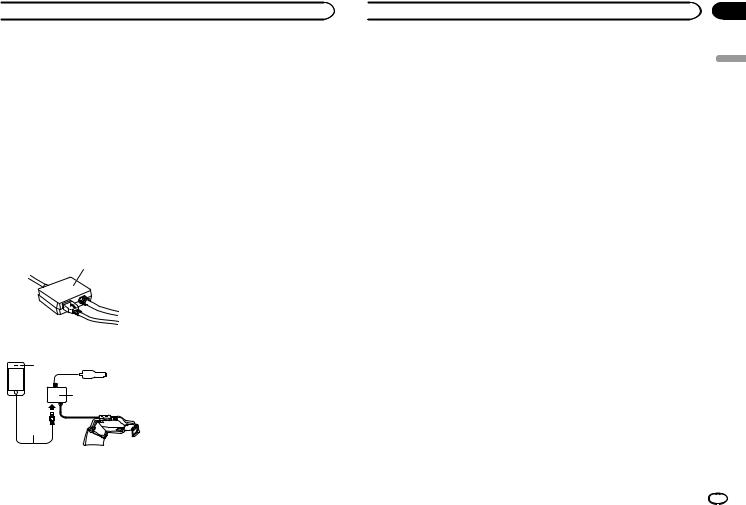
Attach the double-sided tape to the connection box of the power cable, and then attach the connection box to a location where the cable can be secured firmly.
1
2
3
1Power cable
2Dashboard side etc.
3Double-sided tape
Fix the cable with clamps commercially available.
!Never install the power cable in a location where the cable cannot be secured due to vehicle vibration, etc.
!If the cable cannot be secured with the supplied double-sided tape, secure it firmly using commercially available double-sided tape, etc.
!Firmly secure an iPhone or Android device in a holder commercially available.
!Insert the cigarette plug of the power cable into the cigarette socket on the vehicle with the LED indicator face-up so that the driver can see it.
The LED indicator on the cigarette plug lights green if the power is turned on.
1
1 LED indicator
For more details, refer to Connecting the power cable to the cigarette socket on page 16.
 Installing Main Unit
29 Remove the combiner protection sheet.
Check that the power cable is connected and routed correctly, and then remove the combiner protection sheet.
After installation
 CAUTION
!Check if the unit is installed correctly. In the following cases, return to step 1 and install the unit correctly.
1 2
3 4
1The lock plates are not fixed.
2The unit is not secured with a fall prevention belt.
3The unit is installed obliquely.
4Position of the unit is installed reversed.
!Close the diffuser when not using the unit.
!When removing the unit from the sun visor and storing it, be sure to close the diffuser and combiner.
Do not leave the unit in places exposed to direct sunlight, such as on a dashboard. The diffuser or combiner may concentrate light into an intense beam, causing smoke or fire.
Connecting the power cable to the cigarette socket
% Firmly connect the cigarette plug of the power cable by inserting it into the cigarette socket on the vehicle.
The LED indicator on the cigarette plug lights green if the power is turned on.
1
1 LED indicator
Notes
!Insert the cigarette plug of the power cable into the cigarette socket on the vehicle with the LED indicator face-up so that the driver can see it.
!If the LED indicator does not turn off when the vehicle engine is turned off, disconnect the power cable from the cigarette socket on the vehicle. Failure to do so will drain the vehicle battery.
16 Engb
 Setting your iPhone or Android device
Connecting your iPhone or Android device to the unit
For iPhone users
!Use the cable supplied with the iPhone. Do not leave the cable in the vehicle. The cable supplied with the iPhone is not designed for use in a vehicle.
For Android device users
!Use a USB-microUSB data communication cable of 1 m or less. A charge cable cannot be used.
1Connect the USB cable to your iPhone or Android device.
2Connect the other end of USB cable firmly to the connection box of the power cable.
1
1 Connection box of the power cable
Connection overview:
1


 2
2
3
4
1iPhone or Android device
2To the cigarette socket
3Connection box of the power cable
4 USB cable
Installing the navigation application
Install the navigation application to your iPhone or Android device before utilising this unit.
You can download the navigation application from iTunes App Store or Google Play.
For more details on navigation application, refer to the following site. http://www.pioneer.eu/navgatehud
Starting the navigation application
When you use the navigation application for the first time, start the application yourself. The application will start automatically from the next time the iPhone or Android device is connected to the unit.
 CAUTION
!For utilising the navigation application, you need to purchase the NavGate HUD Support first. Purchase the NavGate HUD Support in the application by following the instructions on the screen.
!The internet connection is required to purchase the NavGate HUD Support.
Notes
!For iPhone users
If the application does not start automatically when the iPhone is connected to the unit, tap “Allow” in the popup that appears on the iPhone.
!For Android device users
 Setting your iPhone or Android device
If the application does not start automatically when the Android device is connected to the unit, tap the application in the popup that appears on the Android device.
If you select the check box and then select the application in the popup, the popup will not appear from the next time.
Section
10
English
Engb 17
Section
11  Display modes
12
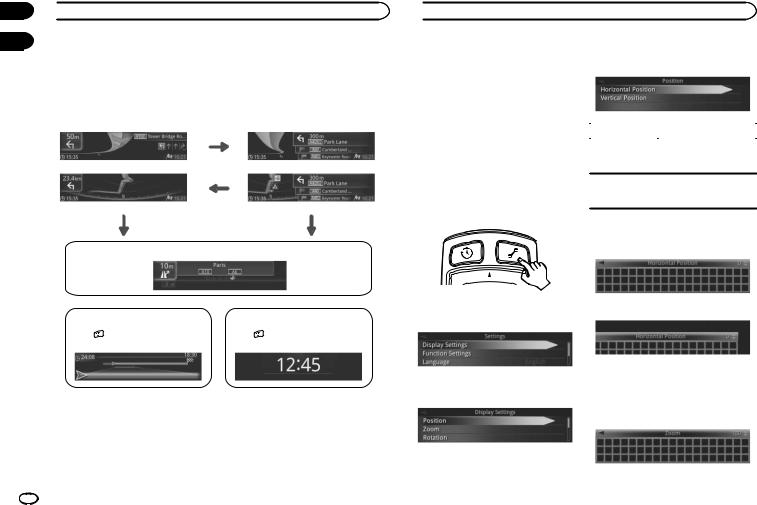
Five types of view are available for this unit: AR view (low speed mode and high speed mode), list view (low speed mode and high speed mode), junction view, route overview, and clock view.
If the communication between the unit and the navigation application is established, either of the following views appears.
|
AR view |
|
List view |
|
Low speed mode |
|
Low speed mode |
||
|
|
Press . |
||
High speed mode |
|
High speed mode |
||
|
|
Press . |
||
|
If a vehicle approaches a junction |
|
If a vehicle approaches a junction |
|
|
|
|
||
|
|
Junction view |
|
|
|
Route overview |
|
|
Clock view |
If the |
button is pressed |
|
If the |
button is pressed |
when a destination is specified: |
|
when a destination is not specified: |
||
 When you finish with installation and connection
Adjusting the display settings
When you finish with the installation and connection, turn on the unit (start the vehicle engine) and adjust the combiner angle so that the image can be seen.
Note
The screen may not be able to be seen clearly depending on the screen brightness and surrounding conditions. Adjust the screen brightness properly (refer to Adjusting the display brightness on page 20), or move the vehicle to a location where the display is more clearly visible, and then operate the unit.
1 Press the  button.
1 Press the a/b button to select a setting item, and then press the d button.
Setting item |
Description |
|
|
|
|
|
|
Horizontal Posi-
Select to adjust the horizon-
tion
tal position of the displayed image.
Select to adjust the vertical Vertical Position position of the displayed
image.
2 Press the a/b button to display the grid pattern in its entirety.
Ex.: When it is correctly adjusted
2 Press the a/b button to select Display |
Ex.: When it is not correctly adjusted |
Settings, and then press the d button. |
|
Notes
!The low speed mode of the AR view is displayed when a destination is not specified.
!For more details on the views, refer to the operation manual.
|
Zoom |
3 Press the a/b button to select a setting |
Adjust the size of the displayed image. |
item, and then press the d button. |
|
|
% Press the a/b button to display the grid |
|
pattern in its entirety. |
Position |
|
Adjust the position of the displayed image. |
|
18 Engb
When you finish with installation and connection |
|
When you finish with installation and connection |
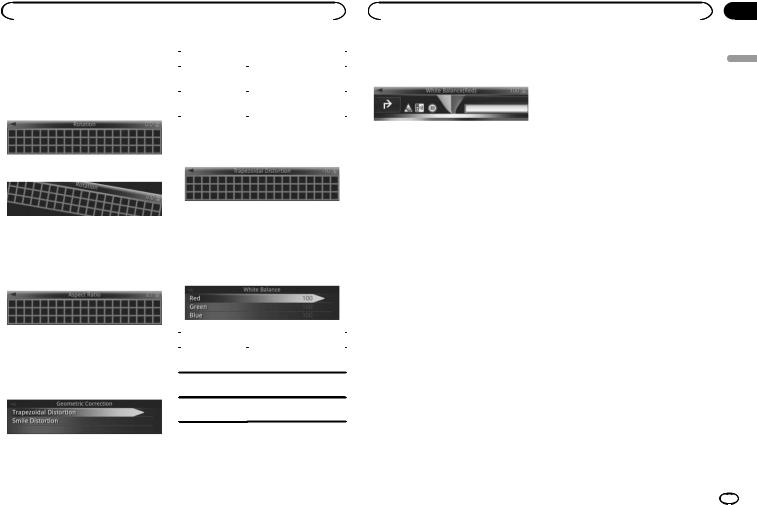
Rotation
Adjust the rotation of the displayed image.
% Press the a/b button to level the grid pattern.
Ex.: When it is correctly adjusted
Ex.: When it is not correctly adjusted
Setting item |
Description |
|
Trapezoidal Dis- |
Select to correct the trape- |
|
tortion |
zoidal distortion. |
|
Smile Distortion |
Select to correct the smile |
|
distortion. |
||
|
||
|
|
2 Press the a/b button to make the grid pattern rectangular.
Ex.: Adjusting the trapezoidal distortion
Aspect Ratio
Adjust the aspect ratio of the displayed image.
% Press the a/b button to make the grid pattern rectangular.
Geometric Correction
Correct the distortion of the displayed image.
1 Press the a/b button to select a setting item, and then press the d button.
White Balance
Adjust the white balance of the displayed image.
1 Press the a/b button to select a setting item, and then press the d button.
Setting item |
Description |
|
|
|
|
|
|
Red
Select to adjust the red tones.
Green
Select to adjust the green tones.
Blue
Select to adjust the blue tones.
2 Press the a/b button to adjust the brightness.
Ex.: Adjusting the red colour
Section
12
English
Engb 19
Section
13  Before driving
Configuring the unit |
Notes |
|
|||
function settings |
! Function Settings can only be set when the |
||||
communication with the navigation applica- |
|||||
Unit function settings can be configured from |
|||||
tion has been established. |
|||||
the Settings screen. |
|
! Press the |
button to close the Settings |
||
|
|
|
screen. |
|
|
CAUTION |
|
|
! For details, refer to the operation manual. |
||
|
|
|
|
||
! This unit disables operation of the unit whilst |
Adjusting the angle of the |
||||
the vehicle is in motion. Park the vehicle in a |
|||||
safe place and apply a hand brake before op- |
combiner |
|
|||
erating this unit. |
|
Adjust the angle of the combiner to the seat po- |
|||
! If the vehicle starts moving whilst setting the |
|||||
unit functions, the Settings screen will close |
sition. |
|
|||
automatically. |
|
|
|
|
|
% Press the |
button. |
CAUTION |
|||
Hold onto the edges of the combiner when ad- |
|||||
|
|
|
|||
|
|
|
justing the angle. |
||
|
|
|
1 Open the diffuser and combiner. |
||
The Settings screen appears. |
|
|
|||
|
|
|
1 |
|
|
|
|
|
|
2 |
|
|
|
|
1 Diffuser |
|
|
Menu |
|
Description |
2 Combiner |
|
|
Display Settings |
|
Adjust the display settings |
|
|
|
|
for projected images. |
|
|
||
|
|
|
|
||
Function Settings |
Set the function settings. |
|
|
||
Language |
|
Set the display language. |
|
|
|
About |
|
Confirm the unit software |
|
|
|
|
version and legal notices. |
|
|
||
|
|
|
|
||
Reset All Settings Restore the default settings.
 Before driving
2 Adjust the combiner angle so that the |
Correct combiner position |
|
whole diffuser can be reflected on the |
Before use, be sure to check that the lower end |
|
combiner. |
||
of the combiner is above your line of sight when |
||
|
||
|
you sit in the seat and look straight forward in |
|
|
the actual driving position. If the lower end of |
|
|
the combiner is below your line of sight, do not |
|
|
use the unit. Fold the combiner into the storage |
|
|
position to ensure field of vision for driving. |
1 |
1Adjust the combiner so that the diffuser can be displayed in the centre of the combiner.
When getting in and out of the vehicle
Be careful not to bang your head on the unit.
Adjusting the display brightness
The dimmer function on this unit adjusts the display brightness automatically according to the amount of ambient light.
The display brightness can be adjusted manually using the  /
/ button.
 CAUTION
Before using the unit at nighttime or in a dark place such as in a tunnel, adjust the brightness of the unit properly so that it will not interfere with driving. Failure to do so may cause an accident.
20 Engb
|
Section |
Before driving |
13 |
% Press the  /
/ button.
English
Note
Changing the brightness may also cause the display hue to change.
Engb 21
Section
 Précautions
|
Précautions |
|
|
|
|
|
Position d’installation |
|
|
|
||||
|
|
|
|
|
|
|
|
|
||||||
|
Remarque sur le manuel de |
|
|
|
Précautions d’installation de |
|
|
|
||||||
|
|
|
|
l’appareil |
31 |
|
|
|
|
|||||
|
fonctionnement |
22 |
|
|
|
|
|
|
|
|
||||
|
|
|
|
|
Position d’installation indiquée |
31 |
|
|||||||
|
Information à destination des utilisateurs |
|
||||||||||||
|
|
|
|
|
|
|
||||||||
|
sur la collecte et l’élimination des |
|
Préparation à l’installation de l’appareil |
|||||||||||
|
équipements et batteries usagés |
22 |
||||||||||||
|
Lors du remplacement de la plaque de |
|
||||||||||||
|
Connexion et installation |
23 |
|
|
|
|
||||||||
|
|
|
|
réglage d’épaisseur du pare-soleil |
31 |
|||||||||
|
Quelques mots sur cet appareil |
|
24 |
|
||||||||||
|
|
|
|
|
|
|
|
|
||||||
|
Précautions relatives à la batterie |
25 |
|
Installation de l’appareil principal |
|
|||||||||
|
Si vous rencontrez des problèmes |
25 |
|
|
||||||||||
|
|
Après l’installation |
37 |
|
|
|
||||||||
|
|
|
|
|
|
|
|
|
|
|
|
|||
|
Consignes importantes de sécurité |
|
Raccordement du câble d’alimentation à |
|||||||||||
|
|
l’allume-cigare |
37 |
|
|
|
||||||||
|
Pour éviter l’épuisement de la |
|
|
|
|
|
|
|||||||
|
|
|
|
|
|
|
|
|
|
|||||
|
batterie |
|
26 |
|
|
|
|
|
Réglage de votre iPhone ou |
|
|
|||
|
Si l’écran est difficile à consulter |
26 |
|
|
|
|||||||||
|
|
périphérique Android |
|
|
|
|||||||||
|
Précautions d’utilisation à des températures |
|
|
|
||||||||||
|
Raccordement de votre iPhone ou |
|
||||||||||||
|
élevées/faibles |
26 |
|
|
|
|
|
|||||||
|
|
|
|
|
périphérique Android à l’appareil |
37 |
||||||||
|
Remarques sur les cartes mémoire |
|
|
|||||||||||
|
|
|
Installation de l’application de |
|
|
|||||||||
|
SD |
26 |
|
|
|
|
|
|
|
|
||||
|
|
|
|
|
|
|
navigation |
37 |
|
|
|
|
||
|
Remarques sur l’iPhone |
26 |
|
|
|
|
|
|
|
|||||
|
|
|
|
Démarrage de l’application de |
|
|
||||||||
|
Remarques sur les périphériques |
|
|
|
|
|||||||||
|
|
|
navigation |
37 |
|
|
|
|
||||||
|
Android |
27 |
|
|
|
|
|
|
|
|
|
|||
|
|
|
|
|
|
|
|
|
|
|
|
|||
|
Droits d’auteur |
27 |
|
|
|
|
Modes d’affichage |
|
|
|
|
|||
|
Mises à jour logicielles |
27 |
|
|
|
|
|
|
|
|||||
|
|
|
|
|
|
|
|
|
|
|||||
|
Visitez notre site Web |
27 |
|
|
|
Lorsque l’installation et le raccordement |
||||||||
|
Données client enregistrées |
27 |
|
|
||||||||||
|
|
|
sont terminés |
|
|
|
|
|||||||
|
Remarques sur cet appareil |
27 |
|
|
|
|
|
|
||||||
|
|
|
Ajustement des réglages d’affichage |
39 |
||||||||||
|
|
|
|
|
|
|
|
|
||||||
|
Pièces fournies |
|
|
|
|
|
– Position |
39 |
|
|
|
|
||
|
|
|
|
|
|
– Zoom |
39 |
|
|
|
|
|||
|
|
|
|
|
|
|
|
|
|
|
|
|
||
|
Avant de procéder au raccordement |
|
– Rotation |
39 |
|
|
|
|
||||||
|
|
– Aspect Ratio |
39 |
|
|
|
||||||||
|
Précautions de raccordement |
28 |
|
|
|
|
||||||||
|
|
– Correction géométrique |
|
39 |
|
|||||||||
|
Connexion du câble d’alimentation |
28 |
|
|
||||||||||
|
– Balance des blancs |
39 |
|
|
||||||||||
|
Prévention contre le bruit |
28 |
|
|
|
|
|
|||||||
|
|
|
|
|
|
|
|
|
|
|||||
|
Précautions d’installation |
|
|
|
Avant de conduire |
|
|
|
|
|||||
|
|
|
|
Configuration des réglages de fonction de |
||||||||||
|
Avant d’installer et de fixer l’appareil |
29 |
||||||||||||
|
l’appareil |
40 |
|
|
|
|
||||||||
|
Lors de la fixation de l’appareil |
|
29 |
|
|
|
|
|
||||||
|
|
|
Réglage de l’angle du multiplexeur |
40 |
||||||||||
|
|
|
|
|
|
|
|
|
||||||
|
Connexions |
|
|
|
|
|
|
Lors de l’entrée et de la sortie du |
|
|
||||
|
|
|
|
|
|
|
véhicule |
41 |
|
|
|
|
||
|
Schéma de connexion |
30 |
|
|
|
|
|
|
|
|||||
|
|
|
|
Position appropriée du multiplexeur |
41 |
|||||||||
|
Réglage de la taille de la fiche allume- |
|
||||||||||||
|
|
Réglage de la luminosité d’affichage |
41 |
|||||||||||
|
cigare |
|
30 |
|
|
|
|
|
||||||
|
|
|
|
|
|
|
|
|
|
|
|
|
||
|
Lors du remplacement du fusible de la fiche |
|
|
|
|
|
|
|||||||
|
allume-cigare |
30 |
|
|
|
|
|
|
|
|
|
|
||
 Précautions
 Important
!Pour votre sécurité, demandez à votre revendeur d’installer l’appareil dans votre véhicule, de brancher les câbles ou de changer l’emplacement d’installation.
L’installation, le câblage et la désinstallation requièrent des compétences et une expérience spécifiques. L’installation, le câblage ou la désinstallation incorrect(e) de l’appareil ou l’utilisation de pièces autres que celles spécifiées par le fabricant peut provoquer un accident, des blessures ou un dysfonctionnement. Dans ce cas de figure, Pioneer décline toute responsabilité.
!À l’attention des revendeurs
Une fois l’installation et le câblage terminés, procédez à la configuration de la connexion avec l’unité de navigation et ajustez les réglages d’affichage, etc. Une fois toutes les opérations terminées, confiez ce mode d’emploi à votre client.
Nous vous remercions d’avoir acheté cet appareil PIONEER
Pour garantir une utilisation correcte, lisez bien ce mode d’emploi avant d’utiliser cet appareil. Il est particulièrement important que vous lisiez et respectiez les indications ATTENTION et PRÉCAUTION de ce mode d’emploi. Conservez-le dans un endroit sûr et facilement accessible pour toute consultation ultérieure.
Pour plus de détails sur les fonctions et le fonctionnement de cet appareil, visitez notre site : http://www.pioneer.eu/navgatehud
Information à destination des utilisateurs sur la collecte et l’élimination des équipements et batteries usagés
(Marquage pour les équipements)
(Exemples de marquage pour les batteries)
Remarque sur le manuel de fonctionnement
Ce manuel décrit comment installer et configurer cet appareil dans votre véhicule. Le fonctionnement de cet appareil est expliqué dans le manuel séparé de l’appareil.
22 Fr

 Précautions
Ces symboles qui figurent sur les produits, les emballages et/ou les documents d’accompagnement signifient que les équipements électriques et électroniques et batteries usagés ne doivent pas être jetés avec les déchets ménagers et font l’objet d’une collecte sélective.
Pour assurer l’enlèvement et le traitement appropriés des produits et batteries usagés, merci de les retourner dans les points de collecte sélective habilités conformément à la législation locale en vigueur.
En respectant les circuits de collecte sélective mis en place pour ces produits, vous contribuerez à économiser des ressources précieuses et à prévenir les impacts négatifs éventuels sur la santé humaine et l’environnement qui pourraient résulter d’une mauvaise gestion des déchets.
Pour plus d’information sur la collecte et le traitement des produits et batteries usagés, veuillez contacter votre municipalité, votre service de gestion des déchets ou le point de vente chez qui vous avez acheté ces produits.
Ces symboles ne sont valables que dans les pays de l’Union Européenne.
Pour les pays n’appartenant pas à l’Union Européenne :
Si vous souhaitez jeter ces articles, veuillez contacter les autorités ou revendeurs locaux pour connaître les méthodes d’élimination appropriées.
Connexion et installation
 ATTENTION
!Utilisez cet appareil uniquement avec une batterie de 12 V, avec pôle négatif à la masse. N’utilisez pas l’appareil dans un véhicule 24 volts.
Ceci pourrait entraîner un risque d’incendie ou de dysfonctionnement.
!N’installez jamais l’appareil ni ne branchez les câbles à un endroit où ils pourraient affecter la performance d’un airbag.
Lors de l’installation de l’appareil dans un véhicule équipé d’airbags, demandez au fabricant du véhicule les précautions à prendre pendant l’installation. Ceci pourrait entraîner un risque de déploiement incorrect des airbags, et dont un accident mortel.
!N’installez jamais l’appareil à un endroit où il obstrue la vision du conducteur, gêne sa conduite ou peut être dangereux pour les passagers.
Ceci pourrait entraîner un risque d’accident de la circulation et des blessures.
!Ne coupez jamais l’isolation du cordon d’alimentation de l’appareil pour raccorder d’autres appareils.
Un dépassement de la capacité de courant du cordon d’alimentation peut provoquer un incendie, un choc électrique ou un dysfonctionnement.
!N’utilisez jamais les boulons et écrous des pièces de sécurité comme la direction, le système de freinage et le réservoir.
Ceci pourrait provoquer une défaillance des freins, un incendie ou un accident de la circulation.
!N’installez pas l’appareil sur un pare-soleil dont la forme n’est pas adaptée à l’appareil. L’installation de l’appareil sur un pare-soleil dont la forme n’est pas adaptée à l’appareil peut provoquer un accident ou un dysfonctionnement.
!N’installez pas l’appareil sur un pare-soleil défectueux.
Avant l’installation, vérifiez que le pare-soleil ne présente aucun défaut. L’installation sur un pare-soleil défectueux pourrait provoquer la chute de l’appareil, d’où un accident ou un dysfonctionnement.
 Précautions
!N’exposez pas l’appareil à la lumière directe du soleil.
Ne retirez le film protecteur du multiplexeur qu’une fois l’installation terminée. Le multiplexeur peut concentrer la lumière dans un faisceau intense et ainsi générer de la fumée ou provoquer un incendie.
!Pour votre sécurité, demandez à votre revendeur d’installer l’appareil, de brancher les câbles ou de changer l’emplacement d’installation.
L’installation, le câblage et la désinstallation requièrent des compétences et une expérience spécifiques. L’installation, le câblage ou la désinstallation incorrect(e) de l’appareil peut endommager considérablement le véhicule.
!Ne procédez pas aux opérations dans un endroit exposé à la lumière directe du soleil. Ceci pourrait provoquer des brûlures ou des problèmes de vision.
!Déconnectez la borne négative de la batterie avant l’installation.
Un court-circuit des bornes positive et négative peut provoquer un choc électrique ou des blessures.
!Vérifiez l’emplacement des conduites, du réseau, câblage électrique, etc. avant l’installation.
Lors de l’installation de l’appareil en perçant un trou dans la carrosserie du véhicule, veillez à ne pas interférer avec ou à entrer en contact avec les conduites, le réservoir, le câblage électrique, etc. Protégez également les pièces traitées contre la rouille ou la pénétration d’eau.
!Utilisez les pièces fournies et fixez-les fermement.
L’utilisation de pièces autres que celles fournies peut endommager les autres pièces dans l’appareil et empêcher la fixation appropriée de l’appareil. Un relâchement de l’appareil peut affecter la conduite, et ainsi provoquer un accident et des blessures.
!Installez les pièces fournies comme indiqué. Si les pièces fournies ne sont pas installées comme indiqué, elles peuvent se relâcher et chuter, et ainsi provoquer un accident ou un dysfonctionnement.
!Utilisez les câbles fournis et raccordez-les fermement.
Utilisez les câbles fournis et raccordez-les comme indiqué. L’utilisation de câbles autres que ceux fournis peut provoquer un incendie ou un dysfonctionnement.
!Suivez les instructions de ce manuel pour raccorder et installer l’appareil.
Le non-respect des instructions de ce manuel pour raccorder et installer l’appareil peut provoquer un incendie ou un accident.
!Fixez l’appareil au pare-soleil à l’aide d’une sangle antichute.
Le non-respect de cette consigne peut provoquer une chute de l’appareil, d’où un risque d’accident et de blessure.
!Isolez les parties non isolées du câble à l’aide d’une bande, etc.
Un court-circuit peut provoquer un incendie, un choc électrique ou un dysfonctionnement.
!Acheminez les câbles de sorte qu’ils ne soient pas coincés dans la carrosserie du véhicule, des vis ou des pièces mobiles comme une ceinture.
Un débranchement ou un court-circuit peut provoquer un incendie, un choc électrique ou un dysfonctionnement.
!Branchez et fixez les câbles de sorte qu’ils ne gênent pas la conduite.
Le non-respect de cette consigne peut provoquer l’emmêlement des câbles autour du volant, du levier de vitesse, de la pédale de frein, etc., et ainsi provoquer un accident.
!Une fois l’installation et le câblage terminés, vérifiez que les équipements électriques fonctionnent comme avant l’installation de l’appareil.
Section
Français
Fr 23
Section
 Précautions
|
|
L’utilisation de l’appareil alors que les autres |
Quelques mots sur cet appareil |
|
|
|
|||
|
|
équipements électriques ne fonctionnent |
|
|
|
|
pas normalement peut provoquer un incen- |
ATTENTION |
|
|
|
die, un choc électrique ou un accident de la |
||
|
|
! N’utilisez pas les menus pendant la |
||
|
|
circulation. |
||
|
|
conduite. Ceci détournerait votre attention |
||
! |
Rangez les petites pièces comme les vis hors |
|||
d’une utilisation en toute sécurité de votre vé- |
||||
|
|
de portée des enfants. |
||
|
|
hicule et pourrait provoquer un accident |
||
|
|
En cas d’ingestion de pièces, consultez un |
||
|
|
grave de la circulation. Observez toujours les |
||
|
|
médecin immédiatement. |
||
|
|
conditions de circulation et les piétons pour |
||
|
|
|
||
|
|
|
une conduite en toute sécurité. |
|
|
|
PRÉCAUTION |
! Ne vous concentrez pas sur l’image affichée |
|
! |
Ne coupez jamais une partie de câble. |
pendant la conduite. |
||
Gardez toujours les yeux rivés sur la route au |
||||
|
|
Si un fusible est raccordé au câble, le circuit |
||
|
|
risque de provoquer un accident. |
||
|
|
de protection ne fonctionnera pas et peut |
||
|
|
! Ne manipulez pas le pare-soleil pendant la |
||
|
|
provoquer un incendie. |
||
|
|
conduite. Ceci pourrait provoquer un acci- |
||
! |
Lors du raccordement de câbles, vérifiez |
|||
dent grave de la circulation. Garez votre véhi- |
||||
|
|
qu’ils n’entrent pas en contact avec des |
||
|
|
cule dans un lieu sûr et serrez le frein à main |
||
|
|
zones chaudes de la carrosserie du véhicule. |
||
|
|
avant de manipuler le pare-soleil. |
||
|
|
Ceci pourrait entraîner un risque d’incendie |
||
|
|
! N’introduisez pas vos mains, doigts ou un |
||
|
|
ou de choc électrique. |
||
|
|
corps étranger dans un logement de sup- |
||
! |
Ne raccordez pas des câbles à l’aide de ral- |
|||
port. |
||||
|
|
longes. |
||
|
|
Ceci pourrait provoquer une blessure, un |
||
|
|
Ceci pourrait entraîner une surchauffe du |
||
|
|
choc électrique, un incendie ou un dysfonc- |
||
|
|
câble et provoquer un incendie ou un choc |
||
|
|
tionnement. |
||
|
|
électrique. |
||
|
|
! Ne mettez pas cet appareil en contact avec |
||
! |
N’installez pas l’appareil dans des endroits |
|||
des liquides. |
||||
|
|
exposés à la pluie, l’eau, la condensation, la |
||
|
|
Ceci pourrait provoquer de la fumée, un in- |
||
|
|
poussière et la fumée par exemple. |
||
|
|
cendie ou un choc électrique. Une attention |
||
|
|
Ceci pourrait provoquer de la fumée, un in- |
||
|
|
toute particulière s’adresse aux familles avec |
||
|
|
cendie ou un dysfonctionnement. |
||
|
|
des enfants. |
||
! |
Lors du câblage, veillez à ce que les câbles |
|||
! Si un liquide ou un corps étranger pénètre à |
||||
|
|
n’entrent pas en contact avec des pièces mé- |
||
|
|
l’intérieur de cet appareil, coupez immédiate- |
||
|
|
talliques. |
||
|
|
ment l’alimentation et consultez votre reven- |
||
|
|
Ce contact entre les câbles et des pièces mé- |
||
|
|
deur ou le Centre d’Entretien agréé par |
||
|
|
talliques peut endommager les câbles et pro- |
||
|
|
PIONEER le plus proche. N’utilisez pas l’ap- |
||
|
|
voquer un incendie, un choc électrique ou |
||
|
|
pareil dans cette situation parce que cela |
||
|
|
un dysfonctionnement. |
||
|
|
pourrait provoquer un incendie, une électro- |
||
|
|
|
||
|
|
|
cution ou une autre panne. |
|
 Précautions
!Ne posez pas la télécommande ou autre objet.
Lors de l’arrêt du véhicule ou dans un virage, la télécommande ou autre peut rouler sur vos pieds et se loger sous la pédale de frein, gênant ainsi la conduite et pouvant provoquer un accident.
!N’apposez pas de film ou de joint sur le multiplexeur.
Ceci pourrait obstruer le champ de vision et provoquer un accident.
!N’utilisez pas l’appareil en cas d’anomalie ou de dysfonctionnement comme l’impossibilité d’afficher des images.
Ceci peut provoquer un accident, un incendie ou un choc électrique.
!Ne laissez pas les enfants tenir l’appareil ou forcer dessus.
Ceci pourrait provoquer une blessure, endommager le véhicule ou un dysfonctionnement.
!En cas d’orage, ne touchez pas l’appareil. Un risque de choc électrique dû à la foudre est possible.
!Ne démontez ni ne modifiez l’appareil. Ceci peut provoquer un accident, un incendie ou un choc électrique.
!Respectez toujours les réglementations de la circulation routière en vigueur.
L’appareil contient des données de réglementations de la circulation routière dont certaines peuvent être différentes des réglementations en vigueur en raison de changements de réglementations. Même lors de l’utilisation des cartes routières ou du guidage vocal, respectez toujours les réglementations de la circulation routière locale et les panneaux de signalisation en vigueur lors de la conduite du véhicule. Le non-res- pect de ces réglementations peut provoquer un accident ou une infraction aux réglementations de la circulation routière.
!Cet appareil ne peut pas être utilisé lorsque le véhicule est en mouvement. Garez le véhicule dans un lieu sûr et serrez le frein à main avant d’utiliser les menus de cet appareil.
!Remplacez le fusible par un neuf de la capacité (ampères) spécifiée.
L’utilisation d’un fusible de capacité supérieure à la capacité spécifiée peut provoquer un incendie ou un dysfonctionnement.
!Avant d’utiliser l’appareil de nuit ou dans un endroit sombre comme un tunnel, réglez la luminosité de l’appareil de manière appropriée afin qu’elle ne gêne pas la conduite. Le non-respect de cette consigne peut provoquer un accident.
 PRÉCAUTION
!N’utilisez pas l’appareil à toute autre fin qu’une utilisation dans un véhicule.
Ceci pourrait provoquer de la fumée, un incendie, un choc électrique ou une blessure.
!Avant de conduire, réglez l’angle du multiplexeur et la luminosité d’affichage, puis vérifiez si les vis de l’appareil ne sont pas desserrées afin qu’il ne vous gêne pas pendant la conduite.
Le non-respect de cette consigne peut provoquer un accident.
!Lors de la manipulation du pare-soleil ou de boutons lors de la conduite, restez concentré sur la conduite.
Le non-respect de cette consigne peut provoquer un accident.
!Lors de l’entrée et de la sortie du véhicule, veillez à ne pas vous cogner la tête dans l’appareil.
Le non-respect de cette consigne peut provoquer une blessure.
!Veillez à ne pas vous coincer les mains ou les doigts lors de la fermeture du multiplexeur ou du réglage de l’angle.
Le non-respect de cette consigne peut provoquer une blessure.
24 Fr

 Précautions
Précautions relatives à la |
! Remplacez immédiatement une batterie usa- |
|
batterie |
gée par une neuve. |
|
Une fuite du liquide de la batterie peut provo- |
||
|
||
ATTENTION |
quer une pollution de l’environnement. |
|
! Ne rangez pas la télécommande dans des |
||
! Conservez la batterie hors de la portée des |
||
endroits à températures élevées, à humidité |
||
jeunes enfants pour éviter un accident. |
élevée ou en plein soleil. |
|
Au cas où la pile serait avalée, consultez im- |
Le non-respect de cette consigne peut provo- |
|
médiatement un médecin. |
quer une déformation de la télécommande, |
|
! Installez la batterie en respectant la polarité |
une explosion de la batterie ou une fuite du |
|
(bornes positive et négative) indiquée dans |
liquide de la batterie. |
|
ce manuel. |
|
|
Si la polarité de la batterie est incorrecte, |
Si vous rencontrez des |
|
ceci peut provoquer un risque de blessure ou |
||
de pollution de l’environnement en raison de |
problèmes |
|
l’explosion de la batterie ou d’une fuite du li- |
|
|
quide de la batterie. |
ATTENTION |
|
! En cas de fuite de batterie et si le liquide de |
||
Si vous remarquez de la fumée, un bruit étrange, |
||
la batterie entre en contact avec la peau ou |
||
une odeur ou tout autre signe anormal venant |
||
des vêtements, rincez abondamment à l’eau |
||
de l’appareil, coupez immédiatement l’alimenta- |
||
claire. Si du liquide de batterie entre en |
||
tion électrique et consultez votre revendeur ou le |
||
contact avec les yeux, rincez abondamment |
||
service après-vente PIONEER agréé le plus pro- |
||
à l’eau claire et consultez un médecin immé- |
||
che. |
||
diatement. |
||
L’utilisation de cet appareil dans ces conditions |
||
|
||
|
peut provoquer un accident, un incendie ou un |
|
PRÉCAUTION |
choc électrique. |
|
! Ne pas mettre en court-circuit, démonter ou |
|
|
chauffer la batterie, et ne la jetez pas au feu |
|
|
ou dans l’eau. |
|
|
Une explosion de la batterie ou une fuite du |
|
|
liquide de la batterie peut provoquer un in- |
|
|
cendie ou une blessure. |
|
|
! Ne chargez pas une batterie sèche. |
|
|
Une explosion de la batterie peut provoquer |
|
|
une blessure. |
|
|
! N’utilisez pas une batterie différente de celle |
|
|
indiquée. |
|
|
Une explosion de la batterie ou une fuite du |
|
|
liquide de la batterie peut provoquer une |
|
|
blessure ou une pollution de l’environne- |
|
|
ment. |
|
 Consignes importantes de sécurité
!L’appareil ne fonctionne pas de manière autonome. Raccordez-le à un iPhone ou un périphérique Android sur lequel une application de navigation est installée pour pouvoir l’utiliser.
Lisez les consignes de sécurité décrites dans le mode d’emploi du produit raccordé à cet appareil.
!N’utilisez pas cet appareil pendant la conduite. Ceci détournerait votre attention d’une utilisation en toute sécurité de votre véhicule et pourrait provoquer un accident grave de la circulation. Observez toujours les conditions de circulation et les piétons pour une conduite en toute sécurité. Garez votre véhicule dans un lieu sûr et serrez le frein à main avant d’utiliser cet appareil.
!Ne manipulez pas le pare-soleil pendant la conduite. Ceci pourrait provoquer un accident grave de la circulation. Garez votre véhicule dans un lieu sûr et serrez le frein à main avant de manipuler le pare-soleil.
!N’utilisez pas un iPhone ou périphérique Android pendant la conduite. Garez votre véhicule dans un lieu sûr et serrez le frein à main avant de définir votre itinéraire sur un iPhone ou périphérique Android.
!Toutes les fonctions disponibles dans l’appareil ne garantissent en aucun cas que votre environnement soit sûr. Lors de la conduite, vérifiez de vos propres yeux que l’environnement est sûr.
!Les informations routières et le guidage vocal proposés par une application de navigation sont donnés à titre de référence uniquement. Respectez toujours les réglementations de la circulation routière et les panneaux de signalisation en vigueur lors de la conduite d’un véhicule. Leur non-res- pect pourrait entraîner une infraction aux réglementations de la circulation routière et provoquer un accident grave. Les informations indiquant la distance entre votre véhi-
cule et le précédent, la limitation de vitesse et les caméras des feux rouges fournies par cet appareil sont également données à titre de référence uniquement. Respectez les panneaux de signalisation en vigueur et observez les conditions de circulation.
!Cet appareil est équipé d’un système d’interverrouillage qui détecte lorsque le véhicule est en mouvement et qui empêche l’utilisation de l’appareil lorsque le véhicule l’est effectivement. Garez le véhicule dans un lieu sûr et serrez le frein à main avant d’utiliser cet appareil.
!Si l’utilisation de cet appareil vous semble fatigante ou inconfortable, arrêtez de l’utiliser immédiatement et faites une longue pause pour bien récupérer. Une utilisation prolongée de l’appareil dans ces conditions peut nuire à votre condition physique.
!Si vous êtes myope ou hypermétrope, astigmate ou avez une acuité visuelle différente entre les deux yeux, portez des lunettes ou autres pour corriger votre acuité visuelle de manière appropriée afin d’utiliser cet appareil.
!Les images affichées à l’écran peuvent être temporairement déformées lors du changement d’image. Il ne s’agit pas d’un dysfonctionnement.
!Les images ne s’affichent pas à l’écran lorsque la réception GPS est perdue.
!Les images affichées à l’écran peuvent être déformées en cas de surcharge d’un iPhone ou périphérique Android.
!La précision de la localisation dépend des performances GPS de l’iPhone ou du périphérique Android raccordé à l’appareil.
!Le sens dans lequel le véhicule se déplace peut ne pas s’afficher correctement si la précision GPS est faible.
Section
01
02
Français
Fr 25

Section
02  Consignes importantes de sécurité
!Fixez fermement l’iPhone ou le périphérique Android pendant la conduite. Ne le laissez pas tomber sur le sol, où il risque de se retrouver coincé sous la pédale de frein ou d’accélérateur.
!Fermez l’afficheur lorsque vous n’utilisez pas l’appareil.
!Lors du retrait de l’appareil du pare-soleil et de son rangement, veillez à fermer l’afficheur et le multiplexeur.
Ne laissez pas l’appareil dans des endroits exposés à la lumière directe du soleil, sur le tableau de bord par exemple. L’afficheur ou le multiplexeur peut concentrer la lumière en un faisceau intense, et ainsi provoquer de la fumée ou un incendie.
!Le feu arrière du véhicule de devant peut être reflété sur le multiplexeur.
!Pioneer décline toute responsabilité quant aux variations de valeur ou de cote du véhicule, etc.
Pour éviter l’épuisement de la batterie
!Assurez-vous de faire tourner le moteur lors de l’utilisation de cet appareil. Utiliser cet appareil alors que le moteur est arrêté peut décharger la batterie.
Ne faites pas tourner le moteur du véhicule au ralenti plus longtemps que nécessaire lorsque vous êtes garé afin de réduire l’impact sur l’environnement.
!Si l’appareil ne s’éteint pas (l’indicateur DEL de la fiche allume-cigare du câble d’alimentation reste allumé) alors que le moteur du véhicule est arrêté, débranchez le câble d’alimentation de l’allume-cigare du véhicule. Le non-respect de cette consigne décharge la batterie.
Si l’écran est difficile à consulter
!Cet appareil offre divers angles afin de pouvoir consulter facilement les images affichées à l’écran. Réglez l’angle du multiplexeur (la page 40) et les réglages d’affichage (la page 39) lors de la première utilisation de l’appareil afin d’optimiser la visibilité et la netteté des images affichées. Vous pouvez régler la luminosité d’affichage à l’aide du bouton  /
/  (la page 41).
!La luminosité d’affichage varie en fonction de l’angle de vision. Utilisez l’appareil dans une position où vous pouvez clairement voir l’image affichée.
Précautions d’utilisation à des températures élevées/faibles
!Si la température est trop élevée ou trop faible pour que l’appareil puisse fonctionner correctement, la luminosité d’affichage est réduite et la projection d’images s’arrête automatiquement pour préserver les pièces de l’appareil. Il ne s’agit pas d’un dysfonctionnement. Patientez jusqu’à ce que la température redevienne appropriée pour permettre l’utilisation de l’appareil.
!Cet appareil ne fonctionne pas correctement si la température est trop élevée ou trop faible. Utilisez-le dans la plage de températures de fonctionnement indiquée.
Pour plus de détails, reportez-vous au mode d’emploi.
 Consignes importantes de sécurité
Remarques sur les cartes mémoire SD
!Cet appareil prend en charge les cartes mémoire microSD et microSDHC. Ces types de supports de stockage sont collectivement appelés “carte mémoire SD” dans ce manuel.
!Cet appareil ne prend pas en charge les cartes mémoire microSDXC.
!Pioneer ne garantit pas l’utilisation de tous les types de cartes mémoire SD compatibles avec l’appareil.
!N’éjectez pas une carte mémoire SD ou ne changez pas la position du contact lorsque la carte mémoire SD insérée est en cours de lecture. Ceci pourrait corrompre les données enregistrées sur la carte mémoire SD. Pioneer décline toute responsabilité quant aux dommages résultant de tels cas de figure.
!La durée de vie des cartes mémoire SD est prédéfinie. Même si une carte mémoire SD est utilisée de manière appropriée, il est possible que des données ne puissent pas être correctement enregistrées ou supprimées de la carte mémoire SD lorsque celle-ci a atteint sa durée de vie.
!Certaines cartes mémoire SD peuvent ne pas être reconnues par l’appareil même si elles le sont par un ordinateur. Le formatage d’une carte mémoire SD à l’aide d’un programme dédié peut permettre de résoudre ce problème. Une carte mémoire SD formatée à l’aide de la fonction de formatage standard d’un ordinateur n’est pas conforme à la norme SD. Des problèmes tels qu’une carte ne peut pas être lue ou écrite sont possibles. Il est alors recommandé d’utiliser un programme de formatage dédié pour éviter ces problèmes. Toutes les données enregistrées sur une carte mémoire SD seront supprimées lors du formatage de la carte. Veillez à
sauvegarder les données souhaitées avant de formater. Un programme de formatage dédié pour carte mémoire SD est disponible sur le site suivant. https://www.sdcard.org/home/
(Valide jusqu’en juin 2012)
!Pioneer ne garantit pas la réparation d’une carte mémoire SD présentant des défauts dus à son formatage. Pioneer décline également toute responsabilité quant aux dommages, coûts ou dépenses résultant de la perte ou de la corruption de données en raison du formatage de la carte mémoire SD. Lisez le mode d’emploi du programme de formatage, suivez les instructions relatives au formatage de la carte mémoire SD que vous souhaitez utiliser et acceptez l’entière responsabilité vis-à-vis de tout problème pouvant survenir.
Remarques sur l’iPhone
!Pour connaître les modèles d’iPhone et les versions logicielles de l’iPhone pris en charge par ce produit, consultez les informations sur notre site Web.
!Les modèles d’iPhone compatibles avec l’appareil sont collectivement appelés “iPhone” dans ce manuel.
!Pioneer ne garantit pas l’utilisation de tous les types de modèles d’iPhone compatibles avec l’appareil.
!Pioneer décline toute responsabilité quant à la perte de données résultant de l’utilisation d’un iPhone avec l’appareil.
!N’exposez pas un iPhone à la lumière directe du soleil pendant une période prolongée. Ceci pourrait provoquer un dysfonctionnement de l’iPhone.
!N’exposez pas un iPhone à des températures élevées.
!Pour plus de détails sur l’iPhone, reportezvous aux manuels correspondants.
26 Fr

 Consignes importantes de sécurité
Remarques sur les périphériques Android
!Pour connaître les périphériques Android pris en charge par ce produit, consultez les informations sur notre site Web.
!La compatibilité avec tous les périphériques Android n’est pas garantie.
!Certaines utilisations d’un périphérique Android pouvant ne pas être légales en conduisant dans votre juridiction, vous devez connaître de telles restrictions et les respecter.
En cas de doute sur une fonction donnée, ne l’utilisez que lorsque le véhicule est garé. Aucune fonctionnalité ne doit être utilisée tant qu’il n’est pas sûr de le faire dans les conditions de conduite rencontrées.
!Pioneer décline toute responsabilité quant à la perte de données résultant de l’utilisation d’un périphérique Android avec l’appareil.
!N’exposez pas un périphérique Android à la lumière directe du soleil pendant une période prolongée. Ceci pourrait provoquer un dysfonctionnement du périphérique.
!N’exposez pas un périphérique Android à des températures élevées.
!Pour plus de détails sur les périphériques Android, reportez-vous aux manuels du périphérique Android.
Droits d’auteur
Les droits d’auteur des données et programmes fournis avec ce produit sont la propriété de Pioneer ou des tiers auxquels Pioneer a accordé des droits d’utilisation de telles données ou programmes sous droits d’auteur. Vous ne devez pas copier, modifier ou analyser, sous quelque forme que ce soit, tout ou partie des données ou programmes de ce produit.
Mises à jour logicielles
!Une carte mémoire SD de 2 Go minimum est nécessaire pour l’enregistrement du fichier de mise à jour logicielle.
!Une carte mémoire microSD contenant la dernière version logicielle à jour est mise à disposition une fois par an pour les clients n’ayant pas d’accès Internet.
D’autres détails seront fournis sur le site Web.
Visitez notre site Web
Rendez-nous visite sur le site suivant : http://www.pioneer.fr
!Enregistrez votre produit. Nous conserverons les détails de votre achat dans nos fichiers pour vous aider à faire référence à ces informations pour une déclaration d’assurance en cas de perte ou de vol.
!Notre site Web fournit les informations les plus récentes sur PIONEER CORPORATION.
Données client enregistrées
!Au cas où une réparation ou autre de l’appareil serait nécessaire, Pioneer décline toute responsabilité quant aux mises à jour logicielles effectuées par le client.
!Les réglages enregistrés sur l’appareil peuvent être involontairement et automatiquement modifiés ou supprimés en raison d’un dysfonctionnement de l’appareil, dans le cadre d’une réparation, ou de l’exécution d’autres procédures. Conservez une liste du contenu important. Pioneer décline toute responsabilité quant aux dommages ou pertes de profits résultant d’une perte de données dans de tels cas de figure.
!Pioneer ne propose pas de service de récupération de données endommagées ou supprimées.
 Consignes importantes de sécurité
Remarques sur cet appareil
!L’historique d’utilisation de cet appareil est enregistré à des fins d’amélioration des performances. Aucune donnée client n’est accessible pendant l’enregistrement de l’historique. Les informations enregistrées peuvent être partagées avec d’autres sociétés ou sous-traitants désignés par Pioneer à des fins d’analyse de données uniquement et avec l’autorisation préalable du client.
!Pioneer a testé et vérifié que les images projetées sont visibles à une distance de 3 m de l’avant du pare-brise du véhicule. Les distances peuvent toutefois varier en fonction de la hauteur et de la position du siège conducteur, de la hauteur et de l’inclinaison du toit du véhicule et de la lumière ambiante.
!Pioneer ne garantit pas que le produit est conforme à l’usage particulier d’un utilisateur spécifique.
!Les caractéristiques et conceptions de l’appareil sont susceptibles d’être modifiées sans préavis à des fins d’amélioration du produit. Pioneer n’accepte et ne reconnaît aucune demande client de modification ou d’échange de produit afin de répondre à des besoins de produits spécifiques par rapport aux caractéristiques et conceptions décrites dans ce manuel.
!Les captures d’écran dans ce manuel peuvent être différentes de celles du produit.
!La conception de l’affichage à l’écran est susceptible d’être modifiée sans préavis à des fins d’amélioration du produit.
Section
02
Français
Fr 27
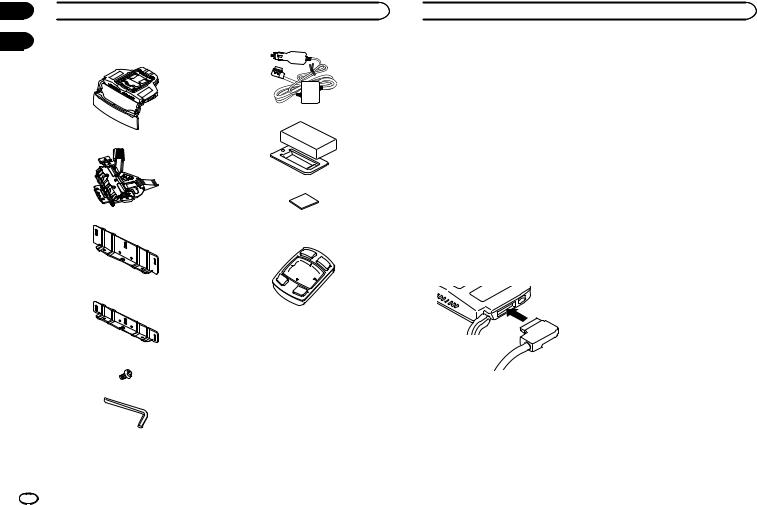
Section
03  Pièces fournies
04
Affichage tête haute :
1 câble d’alimentation
1 appareil principal
1 amortisseur de pare-soleil
1 support de montage
1 plaque de réglage d’épaisseur du pare-soleil (grande)
1 plaque de réglage d’épaisseur du pare-soleil (petite)
1 bande adhésive à double face
Télécommande de l’affichage tête haute :
1 appareil principal
(Un bloc de batteries au lithium-ion est préinstallé. Retirez le film protecteur avant d’utiliser l’appareil.)
6 vis de montage
1 clé hexagonale
 Avant de procéder au raccordement
Précautions de raccordement
 PRÉCAUTION
!N’utilisez pas l’alimentation accessoire depuis l’interface du bus CAN, etc. Veillez à raccorder à l’alimentation électrique accessoire du véhicule.
!Installez les pièces fournies comme indiqué. L’utilisation de pièces autres que celles fournies peut provoquer un dysfonctionnement.
—Récepteur de signaux de balise et son câble d’antenne
—Câble d’alimentation
Éloignez le plus possible les antennes les unes des autres.
!Ne fixez pas les antennes ensemble, ne les empilez pas ni ne les entrecroisez.
Le bruit reçu par l’antenne et le câble d’antenne affecte la sensibilité de réception.
Connexion du câble d’alimentation
!Raccordez fermement le câble d’alimentation en l’insérant dans le connecteur d’alimentation de l’appareil. Si l’insertion du connecteur s’avère être difficile, l’orientation peut ne pas être correcte. Vérifiez l’orientation du connecteur. Ne forcez pas son insertion. Ceci pourrait provoquer un dysfonctionnement.
Prévention contre le bruit
!Pour empêcher le bruit, éloignez le plus possible les éléments suivants d’un iPhone, périphérique Android et des autres câbles et cordons.
—Antenne film et câble d’antenne
—Antenne FM/AM et son câble d’antenne
—Antenne GPS et son câble d’antenne
28 Fr
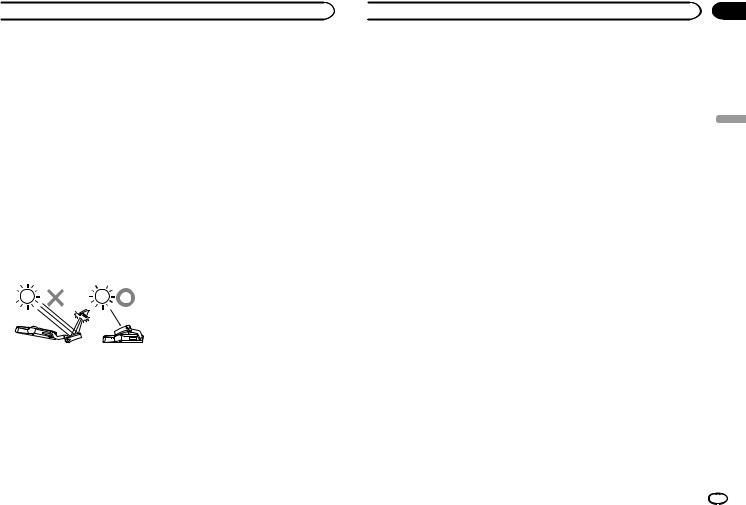
 Précautions d’installation
 ATTENTION
!Fixez l’appareil au pare-soleil à l’aide d’une sangle antichute.
Le non-respect de cette consigne peut provoquer une chute de l’appareil, d’où un risque d’accident et de blessure.
!Lors de l’installation de l’appareil dans un véhicule équipé d’airbags, ne l’installez jamais sur le couvercle d’un airbag ou dans un endroit où il pourrait affecter le déploiement d’un airbag. Ceci pourrait empêcher l’airbag de se déployer normalement, ou l’airbag déployé pourrait heurter l’appareil et ainsi provoquer un accident ou des blessures.
!Ne procédez pas aux opérations dans un endroit exposé à la lumière directe du soleil. Ceci pourrait provoquer une brûlure.
Un risque de cécité est également possible, dû à l’exposition à la lumière directe du soleil reflétée par le multiplexeur. Fermez le multiplexeur s’il est exposé à la lumière directe du soleil.
!N’exposez pas l’appareil à la lumière directe du soleil.
Ne retirez le film protecteur du multiplexeur qu’une fois l’installation terminée. Le multiplexeur peut concentrer la lumière dans un faisceau intense et ainsi générer de la fumée ou provoquer un incendie.
!N’installez jamais l’appareil dans un véhicule équipé d’un toit vitré ou ouvrant. La lumière du soleil peut être reflétée par le multiplexeur et concentrée pour former un faisceau intense.
!N’utilisez pas le pare-soleil latéral sur lequel cet appareil est installé.
 PRÉCAUTION
!Lors de l’installation de l’appareil dans un véhicule équipé d’airbags, demandez au fabricant du véhicule les précautions à prendre pendant l’installation. Ceci pourrait entraîner un risque de déploiement incorrect des airbags, et dont un accident mortel.
!L’utilisation de la lumière d’un pare-soleil et d’autres accessoires situés à proximité du pare-soleil (un porte-carte et un miroir par exemple) peut ne pas être possible après l’installation de l’appareil. Vérifiez les accessoires du véhicule avant l’installation.
!L’installation de l’appareil peut laisser des marques sur la surface du pare-soleil.
!Cet appareil n’est pas conçu pour être installé sur le siège passager.
!Des pièces, de la poussière, etc. peuvent tomber sur vous pendant l’installation de
l’appareil. Pour empêcher la pénétration de poussière, etc., dans l’œil, ne vous placez pas directement en dessous de l’appareil pendant son installation.
!L’afficheur et le multiplexeur de l’appareil sont des pièces fragiles. Ne les touchez pas les mains nues ni avec un outil pendant l’installation de l’appareil.
Avant d’installer et de fixer l’appareil
Raccordez tout d’abord l’appareil temporairement pour vérifier qu’il fonctionne normalement, puis installez-le. Si l’appareil ne fonctionne pas normalement, vérifiez si le raccordement est correct.
 Précautions d’installation
Lors de la fixation de l’appareil
!Un couple de serrage de 0,36 N•m à
0,59 N•m est recommandé pour la fixation des vis de l’appareil.
!Avant d’appliquer la bande adhésive à double face sur le boîtier de raccordement du câble d’alimentation, retirez toute trace de poussière sur la surface où la bande doit être appliquée.
Section
05
Français
Fr 29
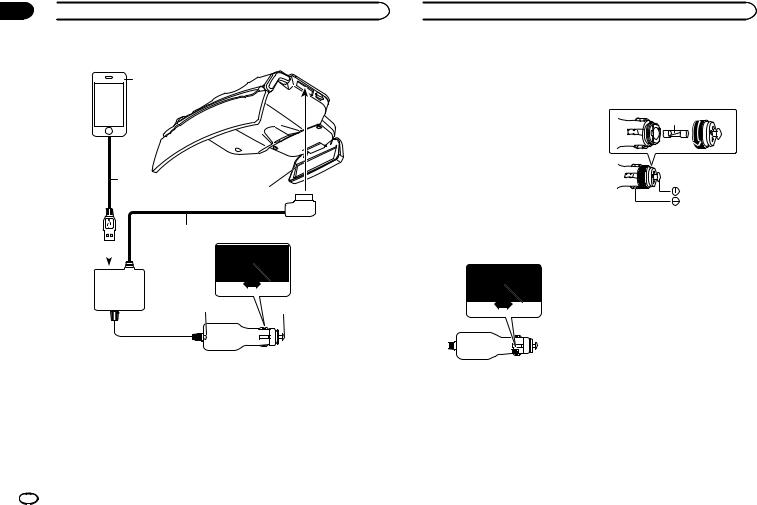
Section
06  Connexions
Schéma de connexion
1
2
4
3
6
5 7
1iPhone ou périphérique Android
2Câble USB
3Câble d’alimentation
4Vers le connecteur d’alimentation
5Indicateur DEL
6Changement de taille de fiche
7Vers l’allume-cigare
Pour les utilisateurs d’iPhone
!Utilisez le câble (2) fourni avec l’iPhone. Ne laissez pas le câble dans le véhicule. Le câble fourni avec l’iPhone n’est pas conçu pour être utilisé dans un véhicule.
Pour les utilisateurs d’un périphérique Android
!Utilisez un câble (2) de communication de données USB-microUSB de 1 m maximum. Un câble de charge ne peut pas être utilisé.
 Connexions
Remarques |
Lors du remplacement du |
|
! L’indicateur DEL de la fiche allume-cigare |
fusible de la fiche allume-cigare |
|
s’allume lorsque l’appareil est sous tension |
||
|
||
et s’éteint lorsque l’appareil est hors tension. |
1 Tournez la fiche dans le sens inverse des |
|
Si l’indicateur DEL ne s’éteint pas alors que |
aiguilles d’une montre pour la desserrer. |
|
le moteur du véhicule est arrêté, débranchez |
|
|
le câble d’alimentation de l’allume-cigare du |
1 |
|
véhicule. Le non-respect de cette consigne |
||
|
||
décharge la batterie du véhicule. |
|
|
! Pour plus de détails sur la connexion d’un |
|
|
iPhone ou périphérique Android, reportez- |
|
|
vous à la page 37, Réglage de votre iPhone ou |
|
|
périphérique Android. |
|
Réglage de la taille de la fiche allume-cigare
Réglez la taille de la fiche allume-cigare sur L (grand) ou S (petit) en fonction de la taille de l’allume-cigare du véhicule.
1 Fusible (3 A)
2 Remplacez le fusible par un neuf de capacité identique.
1
1 Changement de taille de fiche
30 Fr
 Loading...