


MEDIA CENTER RECEIVER
AUTORADIO MULTIMEDIA
RECEPTOR Y CENTRO DE COMUNICACIONES
MVH-P8200BT MVH-P8200
Español Français English
Operation Manual Mode d’emploi Manual de instrucciones


 Contents
Thank you for purchasing this PIONEER product.
To ensure proper use, please read through this manual before using this product. It is especially important that you read and observe WARNINGs and CAUTIONs in this manual. Please keep the manual in a safe and accessible place for future reference.
Precautions |
|
|
|
|
|
|
|
|
IMPORTANT SAFEGUARDS |
4 |
|
|
|||||
To ensure safe driving 4 |
|
|
|
|
||||
– |
Parking brake interlock |
5 |
|
|
||||
To avoid battery exhaustion |
5 |
|
|
|||||
Before You Start |
|
|
|
|
|
|||
MVH-P8200 |
6 |
|
|
|
|
|
|
|
Information to User |
6 |
|
|
|
|
|||
For Canadian model |
6 |
|
|
|
|
|||
About this unit 6 |
|
|
|
|
|
|||
Operating environment |
6 |
|
|
|
||||
After-sales service for Pioneer products |
7 |
|||||||
In case of trouble |
7 |
|
|
|
|
|||
Visit our website |
7 |
|
|
|
|
|
||
Resetting the microprocessor 7 |
|
|
||||||
Demo mode |
7 |
|
|
|
|
|
|
|
About this manual |
8 |
|
|
|
|
|||
Operating this unit |
|
|
|
|
|
|||
Head unit 9 |
|
|
|
|
|
|
|
|
Remote control |
9 |
|
|
|
|
|
||
Basic Operations |
10 |
|
|
|
|
|||
Use and care of the remote control |
11 |
|
||||||
Basic menu operations |
12 |
|
|
|
||||
– |
Menu operations identical for function |
|||||||
|
settings/audio adjustments/initial |
|
||||||
|
settings/lists |
12 |
|
|
|
|
||
Customizing menus |
12 |
|
|
|
|
|||
– |
Canceling a Registered Menu |
13 |
|
|||||
About guide information |
13 |
|
|
|||||
Using Bluetooth telephone |
13 |
|
|
|||||
– |
Setting up for hands-free phoning |
13 |
||||||
– |
Basic Operations |
14 |
|
|
|
|||
Radio |
14 |
|
|
|
|
|
|
|
– |
Basic Operations |
14 |
|
|
|
|||
– |
Storing and recalling stations |
14 |
|
|||||
– |
Using iTunes tagging |
15 |
|
|
||||
– |
Function settings |
15 |
|
|
|
|||
Playing moving images |
16 |
|
|
|
||||
– |
Basic Operations |
16 |
|
|
|
|
||
– |
Selecting and playing files from the |
|||||||
|
name list |
17 |
|
|
|
|
|
|
– |
Browsing for a video on the iPod |
17 |
||||||
– |
Playing DivXâ VOD content |
|
18 |
|
||||
– |
Function settings |
18 |
|
|
|
|
||
Playing audio |
21 |
|
|
|
|
|
|
|
– |
Basic Operations |
21 |
|
|
|
|
||
– |
Selecting and playing files/tracks from |
|||||||
|
the name list |
22 |
|
|
|
|
|
|
– |
Browsing for a song on the iPod |
22 |
||||||
– |
Function settings |
22 |
|
|
|
|
||
Playing still images |
24 |
|
|
|
|
|
||
– |
Basic Operations |
24 |
|
|
|
|
||
– |
Selecting and playing files from the |
|||||||
|
name list |
24 |
|
|
|
|
|
|
– |
Function settings |
24 |
|
|
|
|
||
– |
Introduction of operations for playback |
|||||||
|
of still images as a slideshow |
25 |
|
|||||
Bluetooth Telephone |
26 |
|
|
|
|
|||
– |
Connection menu operation |
26 |
|
|||||
– |
Phone menu operation |
27 |
|
|
|
|||
– |
Function and operation |
28 |
|
|
|
|||
Audio Adjustments |
29 |
|
|
|
|
|
||
System settings |
30 |
|
|
|
|
|
|
|
Entertainment settings |
31 |
|
|
|
|
|||
– |
Customizing the illumination color 32 |
|||||||
Initial Settings |
32 |
|
|
|
|
|
|
|
– |
Auto EQ (auto-equalizing) |
33 |
|
|||||
Other Functions 35 |
|
|
|
|
|
|
||
– |
Using an AUX source |
35 |
|
|
|
|||
– |
Using an external unit |
36 |
|
|
|
|||
– |
Using the PGM button |
36 |
|
|
|
|||
– |
Switching the display indication |
37 |
||||||
Detailed instructions |
|
|
|
|
|
|||
Changing the wide screen mode |
38 |
|
||||||
Setting the DivX subtitle file |
38 |
|
|
|
||||
Setting the aspect ratio |
38 |
|
|
|
|
|||
 2
2 En
En

 Contents
Displaying the DivXâ VOD registration |
|
|||||||
code |
39 |
|
|
|
|
|
|
|
Displaying the deactivation code 39 |
|
|||||||
Changing the picture adjustment |
39 |
|
||||||
Available accessories |
|
|
|
|
||||
HD Radioä tuner 40 |
|
|
|
|
||||
– |
Basic Operations |
40 |
|
|
|
|||
– |
Storing and recalling stations |
40 |
|
|||||
– |
Using iTunes tagging |
40 |
|
|
||||
– |
Function settings |
40 |
|
|
|
|||
XM tuner |
40 |
|
|
|
|
|
|
|
– |
Basic Operations |
41 |
|
|
|
|||
– |
Storing and recalling stations |
41 |
|
|||||
– |
Selecting an XM channel directly |
41 |
||||||
– |
Function settings |
41 |
|
|
|
|||
– |
Selecting a channel from a channel |
|||||||
|
category |
|
42 |
|
|
|
|
|
– |
Displaying the Radio ID 42 |
|
|
|||||
SIRIUS Satellite Radio tuner |
42 |
|
|
|||||
– |
Basic Operations |
42 |
|
|
|
|||
– |
Storing and recalling stations |
43 |
|
|||||
– |
Selecting a SIRIUS channel |
|
|
|||||
|
directly |
43 |
|
|
|
|
||
– |
Function settings |
43 |
|
|
|
|||
– |
Selecting a channel from a channel |
|||||||
|
category |
|
44 |
|
|
|
|
|
– |
Using the Instant Replay function |
44 |
||||||
Additional Information |
|
|
|
|
||||
Troubleshooting |
45 |
|
|
|
|
|||
Error messages |
45 |
|
|
|
|
|||
Understanding auto EQ error messages |
48 |
|||||||
Indicator list |
48 |
|
|
|
|
|||
Handling guideline 49
Compressed audio/video compatibility (USB, SD) 51
iPod compatibility 52 Sequence of audio files 52 Using the display correctly 53
English
– |
Handling the display 53 |
– |
Liquid crystal display (LCD) screen 53 |
– |
LED (light-emitting diode) |
|
backlight 53 |
– Fluorescent tube 53 Copyright and trademark 54 Specifications 56
En  3
3
Section |
|
|
|
|
||
01 |
Precautions |
|
|
|
||
|
IMPORTANT SAFEGUARDS |
|
WARNING |
|||
|
Please read all of these instructions regarding |
|
||||
|
! Do not attempt to install or service your |
|||||
|
your display and retain them for future refer- |
|
display by yourself. Installation or servi- |
|||
|
ence. |
|
cing of the display by persons without |
|||
1 |
Read this manual fully and carefully be- |
|
training and experience in electronic |
|||
|
|
fore operating your display. |
|
equipment and automotive accessories |
||
2 |
Keep this manual handy as a reference for |
|
may be dangerous and could expose you |
|||
|
|
operating procedures and safety informa- |
|
to the risk of electric shock or other |
||
|
|
tion. |
|
hazards. |
||
3 |
Pay close attention to all warnings in this |
|
|
|
||
|
|
manual and follow the instructions care- |
|
|
|
|
|
|
fully. |
To ensure safe driving |
|||
4 |
Do not allow other persons to use this sys- |
|||||
|
|
|
||||
|
|
tem until they have read and understood |
|
WARNING |
||
|
|
the operating instructions. |
! |
LIGHT GREEN LEAD AT POWER CON- |
||
5 |
Do not install the display where it may (i) |
|
NECTOR IS DESIGNED TO DETECT |
|||
|
|
obstruct the driver’s vision, (ii) impair the |
|
|||
|
|
|
PARKED STATUS AND MUST BE CON- |
|||
|
|
performance of any of the vehicle’s oper- |
|
|||
|
|
|
NECTED TO THE POWER SUPPLY SIDE |
|||
|
|
ating systems or safety features, includ- |
|
|||
|
|
|
OF THE PARKING BRAKE SWITCH. IM- |
|||
|
|
ing air bags, hazard lamp buttons or (iii) |
|
|||
|
|
|
PROPER CONNECTION OR USE OF |
|||
|
|
impair the driver’s ability to safely oper- |
|
|||
|
|
|
THIS LEAD MAY VIOLATE APPLICABLE |
|||
|
|
ate the vehicle. |
|
|||
|
|
|
LAW AND MAY RESULT IN SERIOUS IN- |
|||
6 |
Do not operate this display if doing so in |
|
||||
|
JURY OR DAMAGE. |
|||||
|
|
any way will divert your attention from |
|
|||
|
|
! |
To avoid the risk of damage and injury and the |
|||
|
|
the safe operation of your vehicle. Always |
|
potential violation of applicable laws, this unit |
||
|
|
observe safe driving rules and follow all |
|
|||
|
|
|
is not for use with video that is visible to the |
|||
|
|
existing traffic regulations. If you experi- |
|
|||
|
|
|
driver. |
|||
|
|
ence difficulty in operating the system or |
|
|||
|
|
! |
To avoid the risk of accident and the potential |
|||
|
|
reading the display, park your vehicle in a |
|
violation of applicable laws, no viewing of |
||
|
|
safe location and make necessary adjust- |
|
|||
|
|
|
front seat video should ever occur while the |
|||
|
|
ments. |
|
|||
|
|
|
vehicle is being driven. |
|||
7 |
Please remember to wear your seat belt at |
|
||||
! |
In some countries or states the viewing of |
|||||
|
|
all times while operating your vehicle. If |
|
images on a display inside a vehicle even by |
||
|
|
you are ever in an accident, your injuries |
|
|||
|
|
|
persons other than the driver may be illegal. |
|||
|
|
can be considerably more severe if your |
|
|||
|
|
|
Where such regulations apply, they must be |
|||
|
|
seat belt is not properly buckled. |
|
|||
|
|
|
obeyed. |
|||
8 |
Never use headphones while driving. |
|
||||
When you attempt to watch a video image |
||||||
9 |
To promote safety, certain functions are |
|||||
|
|
disabled unless the parking brake is on, |
while driving, the warning Viewing of front |
|||
|
|
and the vehicle is not in motion. |
seat video source while driving is strictly |
|||
10 |
Never set the volume of your display so |
prohibited. will appear on the front display. |
||||
|
|
high that you cannot hear outside traffic |
To watch a video image on the front display, |
|||
|
|
and emergency vehicles. |
park your vehicle in a safe place and apply the |
|||
|
|
|
parking brake. |
|||
 4
4 En
En

 Precautions
Parking brake interlock
Certain functions (video viewing and certain operations) offered by this unit could be dangerous and/or unlawful if used while driving. To prevent such functions from being used while the vehicle is in motion, there is an interlock system that senses when the parking brake is set. If you attempt to use the functions described above while driving, they will become disabled until you stop the vehicle in a safe place, and (1) apply the parking brake, (2) release the parking brake, and then (3) apply the parking brake again. Please keep the brake pedal pushed down before releasing the parking brake.
Operation
1Press M.C. to display the next page.
2Press M.C. to select OK.
To avoid battery exhaustion
Keep the vehicle engine running when using this unit to avoid draining the battery power.
!When no power is supplied to this unit, such as when the vehicle battery is being replaced, the microcomputer of this unit returns to its initial condition. We recommend that you transcribe the audio adjustment data.
 WARNING
Do not use with vehicles that do not feature an ACC position.
Section
01
English
En  5
5
Section |
|
|
|
|
02 |
|
Before You Start |
|
|
|
FCC ID: AJDK029 |
About this unit |
||
|
MODEL NO.: MVH-P8200BT |
The tuner frequencies on this unit are allo- |
||
|
IC: 775E-K029 |
cated for use in North America. Use in other |
||
|
This equipment complies with FCC/IC radiation |
areas may result in poor reception. |
||
|
exposure limits set forth for uncontrolled |
|
|
|
|
equipment and meets the FCC/IC radio fre- |
WARNING |
||
|
quency (RF) Exposure Guidelines in Supple- |
|||
|
Handling the cord on this product or cords asso- |
|||
|
ment C to OET65. This equipment has very low |
|||
|
ciated with accessories sold with the product |
|||
|
levels of RF energy that it deemed to comply |
|||
|
may expose you to chemicals listed on proposi- |
|||
|
without maximum permissive exposure evalua- |
|||
|
tion 65 known to the State of California and other |
|||
|
tion (MPE). But it is desirable that it should be |
|||
|
governmental entities to cause cancer and birth |
|||
|
installed and operated with at least 20 cm and |
|||
|
defect or other reproductive harm. Wash hands |
|||
|
more between the radiator and person’s body |
|||
|
after handling.. |
|||
|
(excluding extremities: hands, wrists, feet and |
|||
|
|
|
||
|
ankles). |
|
|
|
|
|
|
CAUTION |
|
|
This transmitter must not be co-located or oper- |
! Do not allow this unit to come into contact |
||
|
with liquids. Electrical shock could result. |
|||
|
ated in conjunction with any other antenna or |
|||
|
Also, damage to this unit, smoke, and over- |
|||
|
transmitter. |
|||
|
heating could result from contact with liquids. |
|||
|
|
|
||
|
|
|
! Keep this manual handy for future reference. |
|
|
MVH-P8200 |
! Always keep the volume low enough to hear |
||
|
This device complies with part 15 of the FCC |
outside sounds. |
||
|
Rules. Operation is subject to the following |
! Avoid exposure to moisture. |
||
|
two conditions: |
! If the battery is disconnected or discharged, |
||
|
(1) This device may not cause harmful interfer- |
any preset memory will be erased. |
||
|
ence, and (2) this device must accept any inter- |
|
|
|
|
ference received, including interference that |
Important (Serial number) |
||
|
may cause undesired operation. |
The serial number is located on the bottom of |
||
|
|
|
||
|
|
|
this unit. For your own security and convenience, |
|
|
|
|
be sure to record this number on the enclosed |
|
|
Information to User |
warranty card. |
||
|
|
|
||
|
Alteration or modifications carried out without |
Operating environment |
||
|
appropriate authorization may invalidate the |
|||
|
This unit should be used within the tempera- |
|||
|
user’s right to operate the equipment. |
|||
|
ture ranges shown below. |
|||
|
|
|
||
|
|
|
Operating temperature range: -10 °C to +60 °C |
|
|
|
|
(14 °F to 140 °F) |
|
|
For Canadian model |
EN300328 ETC test temperature: -20 °C and |
||
|
+55 °C (-4 °F and 131 °F) |
|||
|
|
|
||
|
This Class B digital apparatus complies with |
|
|
|
|
Canadian ICES-003. |
|
|
|
 6
6 En
En
 Before You Start
After-sales service for |
2 Receive updates on the latest products and |
||||
Pioneer products |
|
technologies. |
|||
3 Download owner’s manuals, order product |
|||||
|
|||||
Please contact the dealer or distributor from |
|
catalogues, research new products, and |
|||
where you purchased this unit for after-sales |
|
much more. |
|||
service (including warranty conditions) or any |
4 Your feedback is important in our continual ef- |
||||
other information. In case the necessary infor- |
|
fort to design and build the most advanced, |
|||
mation is not available, please contact the |
|
consumer-focused product in the industry. |
|||
companies listed below: |
|
Serial number |
|||
Please do not ship your unit to the companies |
|
|
|
|
|
at the addresses listed below for repair without |
|
|
|
|
|
advance contact. |
|
|
|
|
|
U.S.A. |
|
|
|
|
|
|
|
|
|
||
Pioneer Electronics (USA) Inc. |
|
|
|
|
|
CUSTOMER SUPPORT DIVISION |
Resetting the microprocessor |
||||
P.O. Box 1760 |
|||||
The microprocessor must be reset in the fol- |
|||||
Long Beach, CA 90801-1760 |
|||||
lowing situations: |
|||||
800-421-1404 |
|||||
! Before using this unit for the first time after |
|||||
CANADA |
|||||
installation |
|||||
Pioneer Electronics of Canada, Inc. |
|||||
! If the unit fails to operate properly |
|||||
CUSTOMER SATISFACTION DEPARTMENT |
|||||
! When strange or incorrect messages ap- |
|||||
300 Allstate Parkway |
|||||
pear on the display |
|||||
Markham, Ontario L3R 0P2 |
|||||
|
|
|
|
||
1-877-283-5901 |
|
|
|
|
|
905-479-4411 |
|
|
|
|
|
For warranty information please see the Lim- |
|
|
|
|
|
ited Warranty sheet included with this unit. |
|
|
|
|
|
|
|
|
|
||
|
|
|
|
|
|
Section
02
English
In case of trouble
Should this product fail to operate properly, please contact your dealer or nearest authorized Pioneer Service Station.
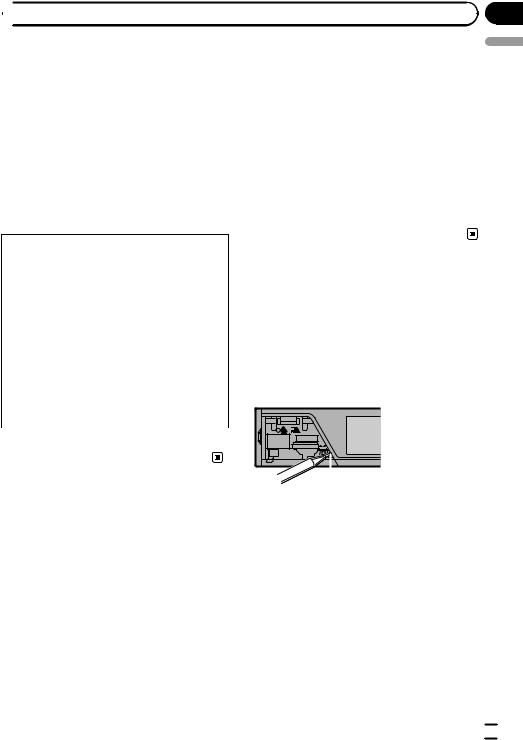
RESET button
1Remove the front panel.
2Press RESET with a pen tip or other pointed instrument.
Visit our website
Visit us at the following site: http://www.pioneerelectronics.com
1Register your product. We will keep the details of your purchase on file to help you refer to this information in the event of an insurance claim such as loss or theft.
Demo mode
 Important
Failure to connect the red lead (ACC) of this unit to a terminal coupled with ignition switch on/off operations may lead to battery drain.
En  7
7

Section
02  Before You Start
The demo automatically starts when the ignition switch is set to ACC or ON while the unit is turned off. Turning off the unit does not cancel demo mode. To cancel the demo mode, operate the function in the initial setting menu.
Operating the demo while the ignition switch is set to ACC may drain battery power.
Refer to Demonstration (demo display setting) on page 32.
About this manual
This manual describes operations of both MVH-P8200BT and MVH-P8200. Only MVHP8200BT features Bluetooth functions, so the explanations for those functions do not apply to MVH-P8200.
In the following instructions, USB memories, USB portable audio players, and SD memory cards are collectively referred to as “external storage devices (USB, SD).” If only USB memories and USB portable audio players are indicated, they are collectively referred to as “USB storage devices.”
In this manual, iPod and iPhone will be referred to as “iPod”.
 8
8 En
En

 Operating this unit
Head unit Remote control
Only for MVH-P8200.
Section
03
English
|
|
|
|
||
|
||
|
|
|
|
|
|
|
|
|
Part |
|
Part |
|
|
|
AUX input jack (3.5 |
|
|
|
mm stereo/video |
1 |
HOME |
5 |
jack) |
Microphone input |
|||
|
|
|
jack for auto EQ |
|
|
|
measurement |
|
|
|
|
2 |
SRC/OFF |
6 |
(back/display |
off) |
|||
|
|
|
|
3 |
MULTI-CONTROL |
7 |
Detach button |
|
(M.C.) |
|
|
|
|
|
SD memory card |
|
|
|
slot |
4 |
USB port |
8 |
Remove the front |
panel to access the |
SD memory card slot.
 CAUTION
Use an optional Pioneer USB cable (CD-U50E) to connect the USB audio player/USB memory as any device connected directly to the unit will protrude out from the unit and may be dangerous. Do not use unauthorized products.
Only for MVH-P8200BT.


|
Part |
Operation |
|
9 |
+/– (VO- |
Press to increase or decrease vo- |
|
|
LUME) |
lume. |
|
a |
MUTE |
Press to mute. Press again to un- |
|
mute. |
|||
|
|
||
|
|
|
|
|
|
Press to perform manual seek |
|
b |
a/b/c/d |
tuning, fast forward, reverse and |
|
track search controls. Also used |
|||
|
|
||
|
|
for controlling functions. |
|
|
|
|
|
c |
AUDIO |
Press to select an audio function. |
|
|
|
|
En  9
9
Section
03  Operating this unit
|
Part |
Operation |
|
|
|
Press to select different displays |
|
|
|
for the audio source. |
|
|
|
Press to select the basic screen or |
|
|
|
image screen for the video |
|
d |
DISP/SCRL |
source. |
|
! If the background setting on |
|||
|
|
||
|
|
the entertainment menu is |
|
|
|
turned off, you can switch be- |
|
|
|
tween the basic screen and |
|
|
|
image screen. |
|
|
|
|
|
e |
e |
Press to pause or resume play- |
|
back. |
|||
|
|
||
|
|
|
|
f |
FUNCTION |
Press to select functions. |
|
|
|
|
|
|
|
Press to display the list depending |
|
g |
LIST/ |
on the source. |
|
|
ENTER |
While in the operating menu, |
|
|
|
press to control functions. |
|
|
|
|
|
|
|
Press to select among three FM |
|
|
|
bands and one AM band. |
|
|
|
When playing external storage de- |
|
|
|
vices containing a mixture of var- |
|
|
|
ious media file types, press to |
|
|
|
switch between media file types |
|
h |
BAND/ES- |
to play. |
|
|
CAPE |
Music (compressed audio)— |
|
|
|
Video (DivX video files)—Photo |
|
|
|
(JPEG picture files) |
|
|
|
Press to return to the ordinary dis- |
|
|
|
play from the list/function menu. |
|
|
|
Press to cancel the initial setting |
|
|
|
menu. |
|
|
|
|
|
|
|
Move to perform manual seek |
|
|
|
tuning, fast forward, reverse and |
|
|
|
track search controls. Also used |
|
|
|
for controlling functions. |
|
i |
Thumb pad |
Functions are the same as M.C. |
|
|
|
except for volume control. |
|
|
|
Press to display the folder list, file |
|
|
|
list or preset channel list depend- |
|
|
|
ing on the source. |
|
|
|
|
|
j |
DIRECT |
Press to directly select the desired |
|
channel for XM/SIRIUS tuner. |
|||
|
|
||
|
|
|
|
k |
Clear |
Press to cancel the input number |
|
when 0 to 9 are used. |
|||
|
|
||
|
|
|
|
Part |
Operation |
|
|
|
Press to directly select the desired |
|
|
|
channel or preset tuning. Buttons |
|
|
0 to 9 but- |
1 to 6 can operate the preset tun- |
|
l |
ing. |
||
|
tons |
Press and hold one of the buttons |
|
|
|
||
|
|
1 to 6 to preset the desired sta- |
|
|
|
tion. |
|
|
|
|
|
m |
OFF |
Press to start talking on the |
|
|
HOOK |
phone while operating a phone. |
|
|
|
While operating the phone |
|
n |
ON HOOK |
source, press to end a call or re- |
|
|
|
ject an incoming call. |
|
|
|
|
|
|
|
Press to operate the prepro- |
|
o |
PGM |
grammed functions for each |
|
source. (Refer to Using the PGM |
|||
|
|
||
|
|
button on page 36.) |
|
|
|
|
Basic Operations
 Important
!Handle gently when removing or attaching the front panel.
!Avoid subjecting the front panel to excessive shock.
!Keep the front panel out of direct sunlight and high temperatures.
!To avoid damage to the device or vehicle interior, remove any cables and devices attached to the front panel before detaching it.
 10
10 En
En
 Operating this unit
Removing the front panel to protect your unit from |
Use and care of the remote |
||
theft |
control |
||
1 |
Press the detach button to release the front |
||
|
|||
|
panel. |
Using the remote control |
|
2 |
Grab the front panel and remove. |
||
1 Point the remote control in the direction of the |
|||
3 |
Always keep the detached front panel in a protec- |
||
front panel to operate. |
|||
|
tion device such as a protection case. |
||
|
When using for the first time, pull out the film |
||
|
|
||
Re-attaching the front panel |
protruding from the tray. |
||
1 Slide the front panel up until it clicks. |
Replacing the battery |
||
|
The front panel and the head unit are connected |
||
|
1 Slide the tray out on the back of the remote con- |
||
|
on the upper side. Make sure that the front panel |
||
|
trol. |
||
|
has been properly connected to the head unit. |
||
|
2 Insert the battery with the plus (+) and minus (–) |
||
|
|
||
|
|
poles aligned properly. |
|
|
|
Only for MVH-P8200. |
|
2 Press the lower side of the front panel until it is |
|
|
firmly seated. |
Only for MVH-P8200BT. |
|
If you can’t attach the front panel to the head unit |
||
|
||
successfully, try again. However, forcing the front |
|
|
panel into place may result in damage. |
|
|
Turning the unit on |
|
|
1 Press SRC/OFF to turn the unit on. |
|
|
Turning the unit off |
WARNING |
|
1 Press SRC/OFF and hold until the unit turns off. |
||
! Keep the battery out of the reach of children. |
||
Selecting a source |
||
Should the battery be swallowed, consult a |
||
1 Press SRC/OFF to cycle between: |
doctor immediately. |
|
XM (XM tuner)—SIRIUS (SIRIUS tuner)—Digital |
||
! Batteries (battery pack or batteries installed) |
||
Radio (HD Radio tuner)/Radio (tuner)—USB |
||
must not be exposed to excessive heat such |
||
(USB storage device)/iPod (iPod connected using |
||
USB input)—SD (SD memory card)—EXT1 (exter- |
as sunshine, fire or the like. |
|
nal unit 1)—EXT2 (external unit 2)—AUX (AUX) |
|
|
Adjusting the volume |
CAUTION |
|
1 Turn M.C. to adjust volume. |
! Use one CR2025 (3 V) lithium battery. |
|
|
||
|
! Remove the battery if the remote control is not |
|
Note |
used for a month or longer. |
|
|
! There is a danger of explosion if the battery is |
When this unit’s blue/white lead is connected to |
incorrectly replaced. Replace only with the |
|
the vehicle’s auto-antenna relay control terminal, |
||
same or equivalent type. |
||
the vehicle’s antenna extends when this unit’s |
||
! Do not handle the battery with metallic tools. |
||
source is turned on. To retract the antenna, turn |
||
! Do not store the battery with metallic objects. |
||
the source off. |
||
! If the battery leaks, wipe the remote control |
||
|
||
|
completely clean and install a new battery. |
Section
03
English
En  11
11
Section
03  Operating this unit
!When disposing of used batteries, comply with governmental regulations or environmental public institutions’ rules that apply in your country/area.
!“Perchlorate Material – special handling may apply.
See www.dtsc.ca.gov/hazardouswaste/ perchlorate. (Applicable to California, U.S.A.)”
 Important
!Do not store the remote control in high temperatures or direct sunlight.
!The remote control may not function properly in direct sunlight.
!Do not let the remote control fall onto the
floor, where it may become jammed under the brake or accelerator pedal.
Basic menu operations
You can operate source selection, list function, audio adjustment, etc., using HOME.
1Press HOME.
2Push M.C. up or down to change the menu option.
Home (home menu)—Custom (custom
menu)—Phone (phone menu)
# The phone menu is available only for MVHP8200BT.
3Turn M.C. to select the menu option.
After selecting, perform the following procedures.
Home (home menu)
Source (selecting a source)
1Press M.C. to display the setting mode.
2Use M.C. to select the desired source name. Turn to change the source. Press to select.
For the sources you can choose, refer to Selecting a source on the previous page.
List (operating a list menu)
1Press M.C. to display the list.
Press to display the folder list, file list or preset channel list depending on the source.
Audio (setting an audio menu)
1Press M.C. to display the audio menu. Refer to Audio Adjustments on page 29.
System (setting a system menu)
1Press M.C. to display the system menu. Refer to System settings on page 30.
Entertainment (setting an entertainment menu)
1Press M.C. to display the entertainment menu. Refer to Entertainment settings on page 31.
Custom (custom menu)
You can choose menus within each menu (Audio function menu, etc.) and register them to this custom menu.
Refer to Customizing menus on this page.
The custom menu is displayed.
1 Press M.C. to display the setting mode.
Phone (phone menu)
The phone menu is displayed.
Refer to Phone menu operation on page 27.
Menu operations identical for function settings/audio adjustments/initial settings/lists
Returning to the previous display
Returning to the previous list/category (the folder/category one level higher)
1 Press  .
.
Customizing menus
You can register frequently used menu items to a custom menu.
!The menu columns you can register are displayed in circular indicators.
 12
12 En
En
 Operating this unit
1Display menu columns to register.
2Push and hold M.C. right to register the menu column.
The menu columns you have registered are displayed in large, circular indicators.
3Display the custom menu and choose a registered menu.
Refer to Basic menu operations on the previous page.
 Note
Note
You can register up to 12 columns.
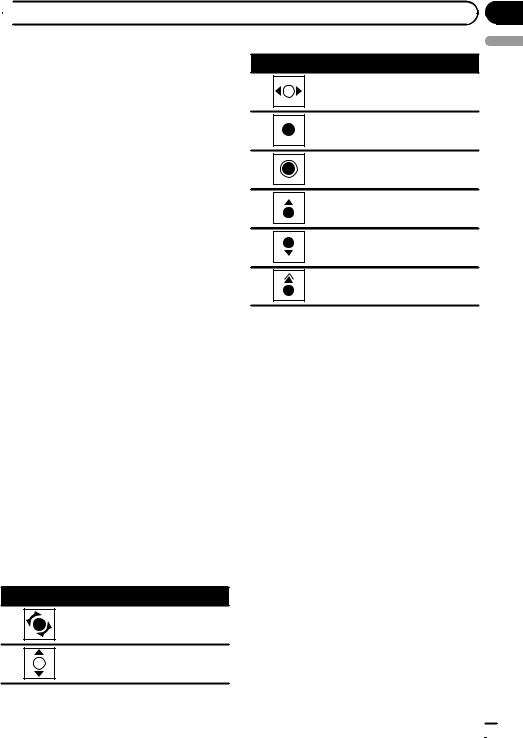
Operation
Push M.C. left or right.
Press M.C.
Press and hold M.C.
Push M.C. up.
Push M.C. down.
Section
03
English
Canceling a Registered Menu
1Display the custom menu and choose a registered menu.
Refer to Basic menu operations on the previous page.
2Push and hold M.C. right to cancel the registered menu.
About guide information
This unit displays guide information on how to use M.C. for each function.
1 Display the system menu.
Refer to Basic menu operations on the previous page.
2 Use M.C. to select the Guide Info.
Turn to change the menu option. Press to select.
Guide information is displayed.
Operation
Turn M.C.
Push M.C. up or down.
Push and hold M.C. up.
# Press M.C. to display the next page.
Using Bluetooth telephone
This function is available only for MVH-P8200BT.
 Important
!Since this unit is on standby to connect with your cellular phone via Bluetooth wireless technology, using it without the engine running can drain the battery power.
!Operations may vary depending on the kind of cellular phone.
!Advanced operations that require attention such as dialing numbers on the monitor, using the phone book, etc., are prohibited while driving. Park your vehicle in a safe place when using these advanced operations.
Setting up for hands-free phoning
Before you can use the hands-free phoning function you must set up the unit for use with your cellular phone.
En  13
13
Section
03 Operating this unit
1Connection
Operate the Bluetooth telephone connection menu. Refer to Connection menu operation on page 26.
2Function settings
Operate the Bluetooth telephone function menu. Refer to Phone menu operation on page 27.
Basic Operations
Making a phone call
1 Refer to Phone menu operation on page 27.
Answering an incoming call
1When a call is received, press M.C.
!You can also perform this operation by pushing M.C. up.
Ending a call 1 Press M.C.
Rejecting an incoming call
1 When a call is received, push M.C. down.
Answering a call waiting
1When a call is received, press M.C.
!You can also perform this operation by pushing M.C. up.
Switching between callers on hold 1 Push M.C. up.
Canceling call waiting 1 Push M.C. down.
Adjusting the other party’s listening volume
1Push M.C. left or right while talking on the phone.
Turning private mode on or off
1Push and hold M.C. up while talking on the phone.
 Notes
Notes
!If private mode is selected on the cellular phone, hands-free phoning may not be available.
!The estimated call time appears in the display
(this may differ slightly from the actual call time).
Radio
Basic Operations
1
 Radio
Radio
Local |
A-EQ |
|
|
16:54 |
||||||||
Text |
|
|
|
|
|
|
|
|
|
|||
Text |
|
|
|
|
|
|
|
|
|
|||
Text |
|
|
|
|
|
|
|
|
|
|||
|
|
|
|
|
|
|
|
|
|
|
|
|
|
FM1 |
|
P.CH |
|
2 |
|
|
87.9 |
MHz |
|||
32
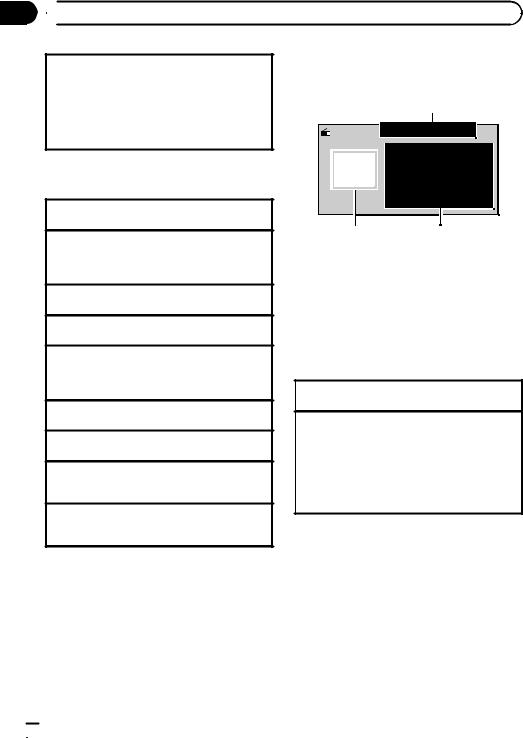
1Indicator display area
Refer to Indicator list on page 48.
2Text information area
!Song title
!Artist name
!Program service name
!Band/Preset number/Frequency indicator
3Source image display
Manual tuning (step by step) 1 Push M.C. left or right.
Seeking
1Push and hold M.C. left or right, and then release.
You can cancel seek tuning by pushing M.C. left or right.
While pushing and holding M.C. left or right, you can skip stations. Seek tuning starts as soon as you release M.C.
Storing and recalling stations
You can easily store up to six stations for each band as presets.
 14
14 En
En

|
Section |
Operating this unit |
03 |
Using the preset screen
1Push M.C. up or down to display the preset screen.
2Push M.C. up or down until the desired band (FM1, FM2, FM3 for FM or AM) is displayed.
3Use M.C. to store the selected frequency in the memory.
Turn to change the preset number. Press and hold to store.
4Use M.C. to select the desired station.
Turn to change the station. Press to select. You can also display the preset screen by pressing
HOME. Refer to Basic menu operations on page 12.
Using iTunes tagging
This function can be operated with the following iPod models.
—iPod 5th generation
—iPod nano 3rd generation
—iPod nano 4th generation
—iPod nano 5th generation
—iPod classic
—iPod classic 120GB
—iPod touch
—iPod touch 2nd generation
—iPhone
—iPhone 3G
However, tag information can be stored in this unit even while other iPod models are used.
The song information (tag) can be saved from the broadcasting station to your iPod. The songs will show up in a playlist called “Tagged playlist” in iTunes the next time you sync your iPod. Then you can directly buy the songs you want from the iTunes Store.
Storing the tag information to this unit
1Tune in to the broadcast station.
2Press and hold M.C. if  appears in the display while the desired song is broadcasting.
Storing the tagged information to your iPod
1Connect the iPod to this unit and transfer this unit’s tag information to the iPod.
!The tagged songs and the song that you can buy from the iTunes Store may be different.
Make sure to confirm the song before you |
English |
|
|
make the purchase. |
|
! If you cannot use this function normally, up- |
|
date your iPod firmware. |
|
! The tag information for up to 50 songs can be |
|
stored on this unit. |
|
Depending on the timing of when the tag in- |
|
formation is stored, the tag information for the |
|
song played before or after the currently play- |
|
ing song may also be stored. |
|
! If an SD is selected as the source while tag in- |
|
formation is being stored to this unit, the tag |
|
information will not be transferred to the iPod. |
|
! Tag information cannot be transferred to the |
|
iPod when a file on an SD device is being |
|
viewed as a slideshow. |
|
! While transferring the tag, you cannot select |
|
the SD source. |
|
Function settings
1Press M.C. to display the function menu.
2Turn M.C. to select the function.
After selecting, perform the following procedures to set the function.
BSM (best stations memory)
BSM (best stations memory) automatically stores the six strongest stations in the order of their signal strength.
1Press M.C. to turn BSM on. To cancel, press M.C. again.
Local (local seek tuning)
Local seek tuning lets you tune in to only those radio stations with sufficiently strong signals for good reception.
1Press M.C. to display the setting mode.
2Turn M.C. to select the desired setting.
FM: Off—Level1—Level2—Level3—Level4 AM: Off—Level1—Level2
The larger the setting number, the higher the signal level. The highest level setting allows reception of only the strongest stations; while lower settings let you receive progressively weaker stations.
3Press M.C. to confirm the selection.
En  15
15
Section
03  Operating this unit
Note |
Playing moving images |
Operation is complete even if the menu is cancelled before being confirmed.
Basic Operations
If an iPod with video capabilities is connected to this unit using an interface cable such as the CD-IU50V (sold separately), you can enjoy the video contents of the iPod as an iPod source. You need not change the AUX setting.
1 2 3
2345 |
|
7890 |
|
A-EQ |
|
|
|
16:54 |
Video
 Text
Text
 Text
Text
8888'88"  -8888'88"
4 5 6
You can switch to the basic screen or the image screen.
Refer to Display (display setting) on page 19.
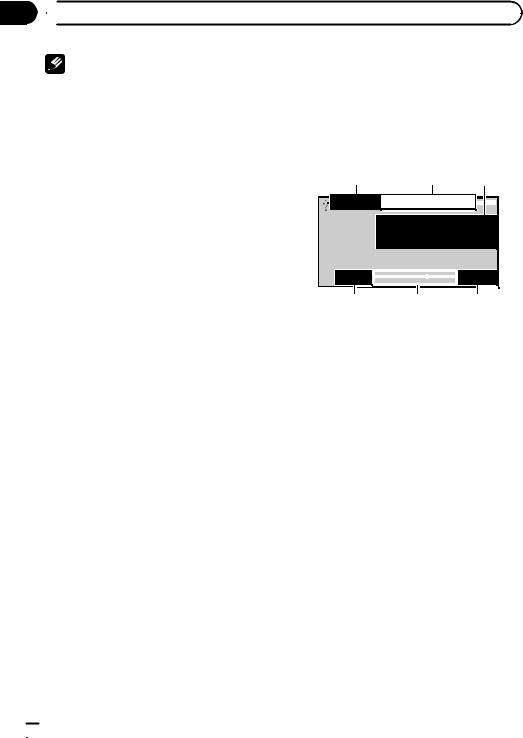
1File information area for the currently playing file
External storage device (USB, SD)
!Folder/file number indicator iPod
!Song number indicator
2Indicator display area
Refer to Indicator list on page 48.
3Text information area
External storage device (USB, SD)
!Folder name
!File name
iPod
!Song title
!Artist name
!Album title
4 Play time indicator
5 Scrubber bar
6 Remaining time indicator
 16
16 En
En
|
Section |
Operating this unit |
03 |
Playing files on a USB storage device
1Open the USB connector cover.
2Plug in the USB storage device using a USB cable.
Stopping playback of files on a USB storage device
1You may disconnect the USB storage device at anytime.
Playing files on an SD memory card
1Remove the front panel.
2Insert an SD memory card into the SD card slot. Insert it with the contact surface facing down and press the card until it clicks and completely locks.
3Re-attach the front panel.
Stopping playback of files on an SD memory card
1Remove the front panel.
2Press the SD memory card until it clicks. The SD memory card is ejected.
3Pull out the SD memory card.
4Re-attach the front panel.
Playing videos on an iPod
1Open the USB connector cover.
2With an interface cable (e.g., CD-IU50V), connect the iPod to a USB cable and AUX input using the iPod Dock Connector.
Selecting a folder
1 Push M.C. up or down.
Selecting a file (chapter) 1 Push M.C. left or right.
Fast forwarding or reversing
1 Push and hold M.C. left or right.
 Notes
Notes
!USB storage device that can be charged via USB will be recharged when plugged in and the ignition switch is set to ACC or ON.
!Disconnect USB storage devices from the unit when not in use.
!Incompatible text stored with the video image file may not be displayed or may be displayed incorrectly.
!Incompatible text saved on the iPod will not be displayed by the unit.
!If the ignition switch is set to ACC or ON, the iPod battery will be charged while connected.
!Disconnect headphones from the iPod before connecting to this unit.
!While the iPod is connected to this unit, the iPod cannot be turned on or off unless the control mode is set to iPod.
!The iPod will turn off about two minutes after the ignition switch is set to OFF.
!When playing external storage devices that contain a mixture of various media file types, switch between media file types when playing different files.
Refer to A/V Format (switching media file types) on page 19.
Selecting and playing files from the name list
1 Displaying the list menu.
Refer to Basic menu operations on page 12.
2 Use M.C. to select the desired file name (or folder name).
Changing the file or folder name 1 Turn M.C.
Playing
1 When a file is selected, press M.C.
Viewing a list of the files (or folders) in the selected folder
1 When a folder is selected, press M.C.
Changing the file or folder name (skip 100 items at once)
1 Push M.C. up or down.
Changing the file or folder name (automatically skip 100 items each time)
1 Push and hold M.C. up or down.
Browsing for a video on the iPod
1 Displaying the list menu.
Refer to Basic menu operations on page 12.
2 Use M.C. to select a category/video.
Changing the name of the video or category 1 Turn M.C.
Playing
1 When a video is selected, press M.C.
English
En  17
17
Section
03  Operating this unit
Viewing a list of the files (or folders) in the selected folder
1 When a category is selected, press M.C.
Searching the list by alphabet
1When a list for the selected category is displayed, push and hold M.C. left or right to switch to alphabet search mode.
2Turn M.C. to select a letter.
3Press M.C. to display the alphabetical list.
If alphabet search is aborted, Not Found is displayed.
Changing the name of the video (skip 100 items at once)
1 Push M.C. up or down.
Changing the name of the video (automatically skip 100 items each time)
1 Push and hold M.C. up or down.
 Note
Note
Depending on the number of files in the iPod, there may be a delay when displaying a list.
Playing DivXâ VOD content
Some DivX VOD (video on demand) content may only be playable a fixed number of times. When you attempt to play back this type of content saved on an external storage device, the remaining number of times it can be played is shown on-screen. You can then decide whether or not to play back the contents of the external storage device.
!If there is no limit to the number of times the DivX VOD content can be viewed, then you may insert the external storage device into your player and play the content as often as you like, and no message will be displayed.
!You can confirm the number of times that the content can be played by checking the number displayed after Remaining Views:.
registration code, refer to Displaying the DivXâ VOD registration code on page 39.
!DivX VOD content is protected by a DRM (Digital Rights Management) system. This restricts playback of content to specific, registered devices.
% If a message is displayed after inserting the external storage device containing DivX VOD content, use M.C. to select a desired mode.
Turn to change the mode. Press to select.
!Play – Playback of the DivX VOD content
!Next Play – Skip to the next file
!Stop – If you do not want to play the DivX VOD content
Function settings
1Press M.C. to display the function menu.
2Turn M.C. to select the function.
After selecting, perform the following procedures to set the function.
External storage device (USB, SD)
Play/Pause (play/pause)
1Press M.C. to display the setting mode.
2Turn M.C. to select the desired setting.
Play—Pause
3Press M.C. to confirm the selection.
Play Mode (repeat play)
1Press M.C. to display the setting mode.
2Turn M.C. to select a repeat play range.
!All – Repeat all files
!File – Repeat the current file
!Folder – Repeat the current folder
3Press M.C. to confirm the selection.
Stop (stopping playback)
1 Press M.C. to stop playback.
 Important
!In order to play DivX VOD content on this unit, you first need to register the unit with your DivX VOD content provider. For details on your
Time Search (time search)
1Press M.C. to display the setting mode.
2Turn M.C. to find the part you want to play.
3Press M.C. to confirm the selection.
 18
18 En
En

 Operating this unit
Wide Mode (switching the wide mode)
1Press M.C. to display the setting mode.
2Turn M.C. to select the desired setting.
Full (full)—Just (just)—Cinema (cinema)—Zoom (zoom)—Normal (normal)
For details about the settings, refer to Changing the wide screen mode on page 38.
3Press M.C. to confirm the selection.
Display (display setting)
You can switch to the basic screen or the image screen.
1Press M.C. to display the setting mode.
2Press M.C. to select the desired setting.
You can switch the audio language during playback when playing a file recorded with dialog in two or more languages.
1Press M.C. to display the setting mode.
2Turn M.C. to select the desired setting.
3Press M.C. to confirm the selection.
Subtitle Lang. (subtitle language settings)
You can switch subtitle language during playback when playing file recorded with subtitles in one or more languages.
1Press M.C. to display the setting mode.
2Turn M.C. to select the desired setting.
3Press M.C. to confirm the selection.
Section
03
English
A/V Format (switching media file types)
1Press M.C. to display the setting mode.
2Turn M.C. to select the desired setting.
Music (compressed audio)—Video (DivX video files)—Photo (JPEG picture files)
3Press M.C. to confirm the selection.
DivX® Subtitle (DivX subtitle file settings)
1Press M.C. to display the setting mode.
2Turn M.C. to select the desired setting.
Original (DivX subtitles) – Custom (DivX external subtitles)
For details about the settings, refer to Setting the DivX subtitle file on page 38.
3Press M.C. to confirm the selection.
TV Aspect (aspect ratio settings)
1Press M.C. to display the setting mode.
2Turn M.C. to select the desired setting.
16 : 9 – Letter Box – Pan Scan
For details about the settings, refer to Setting the aspect ratio on page 38.
3Press M.C. to confirm the selection.
DivX® VOD (DivXâ VOD registration code)
1Press M.C. to display the setting mode.
2Use M.C. to display the desired code.
Turn to change the menu option. Press to select.
Registration Code - Refer to Displaying the DivXâ VOD registration code on page 39.
Deactivation Code - Refer to Displaying the deactivation code on page 39.
Audio Lang. (audio language settings)
iPod
Pause (pause)
1 Press M.C. to pause or resume.
Shuffle Mode (shuffle)
1Press M.C. to display the setting mode.
2Turn M.C. to select your favorite setting.
!Songs – Play back songs in the selected list in random order.
!Albums – Play back songs from a randomly selected album in order.
!Off – Cancel random play.
3Press M.C. to confirm the selection.
Play Mode (repeat play)
!Refer to Play Mode (repeat play) on the previous page.
However, the repeat range is different from that of external storage devices.
!One – Repeat the current song
!All – Repeat all songs in the selected list
Control Mode (control mode)
This function is not compatible with the following iPod models.
!iPod nano 1st generation
!iPod 5th generation
This unit’s iPod function allows you to conduct operations from your iPod and listen to it using your car’s speakers.
1Press M.C. to select your favorite setting.
!iPod – This unit’s iPod function can be operated from the connected iPod.
!Audio – This unit’s iPod function can be operated from this unit.
En  19
19
Section
03  Operating this unit
Time Search (time search) |
— Subtitle Lang. (subtitle language |
|
settings) |
||
|
!Refer to Time Search (time search) on page 18.
Wide Mode (switching the wide mode)
!Refer to Wide Mode (switching the wide mode) on the previous page.
Display (display setting)
!Refer to Display (display setting) on the previous page.
ABC Search (alphabet search mode setting)
When this setting is on, you can switch to alphabet search mode by turning M.C. twice while using the browse function of the iPod. Refer to Searching the list by alphabet on page 18.
1Press M.C. to turn the setting for when M.C. is turned twice on or off.
 Notes
Notes
!Operation is complete even if the menu is cancelled before being confirmed.
!Switching the control mode to iPod pauses song playback. Operate the iPod to resume playback.
!The following functions are still accessible from the unit even if the control mode is set to iPod.
—Volume
—Fast forward/reverse
—Track up/down
—Pausing
!When the control mode is set to iPod, operations are limited as follows:
—Only Control Mode (control mode) and Pause (pause) functions are available.
—The browse function cannot be operated from this unit.
!You can select the following functions if the background setting on the entertainment menu is off.
—Wide Mode (switching the wide mode)
—Display (display setting)
—DivX® Subtitle (DivX subtitle file settings)
—TV Aspect (aspect ratio settings)
 20
20 En
En
 Operating this unit
Playing audio
Basic Operations
1 2 3

 2345
2345  7890
7890 
 S.Rtrv
 A-EQ
A-EQ 


 16:54
16:54
Music |
|
|
|
|
|
|
|
|
T |
ext |
|
|
|
|
|
|
|
|
|
|
T |
ext |
|
|
4 |
|
|||
|
|
|
|||
|
|
|
|
|
 Text
Text
8888'88"  8888'88"
5 6 7
1File information area for the currently playing file
External storage device (USB, SD)
!Folder/file number indicator iPod
!Song number indicator
2Indicator display area
Refer to Indicator list on page 48.
3Text information area
External storage device (USB, SD)
! Song title/artist name/album title—
folder/file name iPod
!Song title
!Artist name
!Album title
4Artwork/Source image display area iPod
!Artwork display or Source image display
External storage device (USB, SD)
!Source image display
5Play time indicator
6Scrubber bar
7Remaining time indicator
Playing songs on a USB storage device
1Open the USB connector cover.
2Plug in the USB storage device using a USB cable.
Stopping playback of songs on a USB storage device 1 You may disconnect the USB storage device at
anytime.
Section
03
|
|
English |
|
Playing songs on an SD memory card |
|||
|
|||
1 |
Remove the front panel. |
|
|
2 |
Insert an SD memory card into the SD card slot. |
|
|
|
Insert it with the contact surface facing down and |
|
|
|
press the card until it clicks and completely locks. |
|
|
3 |
Re-attach the front panel. |
|
|
Stopping playback of songs on an SD memory card
1Remove the front panel.
2Press the SD memory card until it clicks. The SD memory card is ejected.
3Pull out the SD memory card.
4Re-attach the front panel.
Playing songs on an iPod
1Open the USB connector cover.
2Connect an iPod to the USB cable using an iPod Dock Connector.
Selecting a folder
1 Push M.C. up or down.
Selecting a track (chapter) 1 Push M.C. left or right.
Fast forwarding or reversing
1 Push and hold M.C. left or right.
Notes
! USB storage device that can be charged via USB will be recharged when plugged in and the ignition switch is set to ACC or ON.
! Disconnect USB storage devices from the unit when not in use.
! Incompatible text stored with the audio file may not be displayed or may be displayed incorrectly.
! Incompatible text saved on the iPod will not be displayed by the unit.
! If the ignition switch is set to ACC or ON, the iPod battery will be charged while connected.
! Disconnect headphones from the iPod before connecting to this unit.
! While the iPod is connected to this unit, the iPod cannot be turned on or off unless the control mode is set to iPod.
! The iPod will turn off about two minutes after the ignition switch is set to OFF.
En  21
21
Section
03  Operating this unit
Selecting and playing files/ tracks from the name list
Operations are the same as those for moving images. (Refer to Selecting and playing files from the name list on page 17.)
The following operation is available.
Playing a song in the selected folder
1 When a folder is selected, press and hold M.C.
Browsing for a song on the iPod
Operations are the same as those for moving images. (Refer to Browsing for a video on the iPod on page 17.)
The following operation is available.
Playing a song in the selected category
1 When a category is selected, press and hold M.C.
1 Press M.C. to turn random play on or off.
Play Mode (repeat play)
!Refer to Play Mode (repeat play) on page 18.
Sound Retriever (sound retriever)
Automatically enhances compressed audio and restores rich sound.
1Press M.C. to display the setting mode.
2Turn M.C. to select the desired setting.
Off (off)—1—2
1 is effective for low compression rates, and 2 is effective for high compression rates.
3Press M.C. to confirm the selection.
Time Search (time search)
!Refer to Time Search (time search) on page 18.
Display (display setting)
You can switch to the desired text information.
!Refer to Display (display setting) on page 19.
However, the categories in the top tier are different from those for moving images.
!Video (video)
!Playlists (playlists)
!Artists (artists)
!Albums (albums)
!Songs (songs)
!Podcasts (podcasts)
!Genres (genres)
!Composers (composers)
!Audiobooks (audiobooks)
Function settings
1Press M.C. to display the function menu.
2Turn M.C. to select the function.
After selecting, perform the following procedures to set the function.
External storage device (USB, SD)
Pause (pause)
!Press M.C. to pause or resume.
Random (random play)
A/V Format (switching media file types)
!Refer to A/V Format (switching media file types) on page 19.
iPod
Pause (pause)
!Refer to Pause (pause) on page 19.
Shuffle All (shuffle all)
1Press M.C. to turn shuffle all on.
To turn off, set Shuffle Mode in the Function menu to off.
Shuffle Mode (shuffle)
!Refer to Shuffle Mode (shuffle) on page 19.
Play Mode (repeat play)
!Refer to Play Mode (repeat play) on page 18. However, the repeat range is different from that of external storage devices.
!One – Repeat the current song
!All – Repeat all songs in the selected list
Link Search (link search)
 22
22 En
En

|
Section |
Operating this unit |
03 |
You can play songs from the following lists.
•Album list of the currently playing artist
•Song list of the currently playing album
•Album list of the currently playing genre
1Press M.C. to display the setting mode.
2Turn M.C. to change the mode; press to select.
!Artists – Displays the album list of currently playing artist.
!Albums – Displays a song list from the album currently being played.
!Genres – Displays an album list from the genre currently being played.
3Use M.C. to select an album or song from the list. For more details about the selection operation,
refer to Browsing for a video on the iPod on page 17.
!If no related albums/songs are found, Not Found is displayed.
Control Mode (control mode)
!Refer to Control Mode (control mode) on page 19.
Audiobooks (audiobook speed)
The playback speed of audiobook can be changed.
1Press M.C. to display the setting mode.
2Turn M.C. to select your favorite setting.
!Faster – Playback at a speed faster than normal
!Normal – Playback at normal speed
!Slower – Playback at a speed slower than normal
3Press M.C. to confirm the selection.
Sound Retriever (sound retriever)
!Refer to Sound Retriever (sound retriever) on the previous page.
Time Search (time search)
!Refer to Time Search (time search) on page 18.
ABC Search (alphabet search mode setting)
!Refer to ABC Search (alphabet search mode setting) on page 20.
 Notes
Notes
!Operation is complete even if the menu is cancelled before being confirmed.
!Switching the control mode to iPod pauses song playback. Operate the iPod to resume playback.
!The following functions are still accessible from the unit even if the control mode is set to iPod.
—Volume
—Fast forward/reverse
—Track up/down
—Pausing
!When the control mode is set to iPod, operations are limited as follows:
—Only Control Mode (control mode) and Pause (pause) functions are available.
—The browse function cannot be operated from this unit.
English
En  23
23
Section
03  Operating this unit
Playing still images
When a USB/SD device that contains JPEG picture files is connected, this unit starts a slideshow from the first folder/picture on the device. The player displays the pictures in each folder in alphabetical order.
Basic Operations
1 2 3
|
|
|
|
|
|
|
|
|
|
|
2345 |
|
7890 |
|
A-EQ |
|
|
|
16:54 |
Photo |
Text |
|
|
|
|||||
|
|
|
|
|
|
|
|||
 Text
Text
You can switch to the basic screen or the image screen.
Refer to Display (display setting) on the next page.
1Folder/file number indicator
2Indicator display area
Refer to Indicator list on page 48.
3Text information area
!Folder name
!File name
Playing files on a USB storage device
1Open the USB connector cover.
2Plug in the USB storage device using a USB cable.
Stopping playback of files on a USB storage device
1You may disconnect the USB storage device at anytime.
Playing files on an SD memory card
1Remove the front panel.
2Insert an SD memory card into the SD card slot. Insert it with the contact surface facing down and press the card until it clicks and completely locks.
3Re-attach the front panel.
Stopping playback of files on an SD memory card
1Remove the front panel.
2Press the SD memory card until it clicks. The SD memory card is ejected.
3Pull out the SD memory card.
4Re-attach the front panel.
Selecting a folder
1 Push M.C. up or down.
Selecting a file
1 Push M.C. left or right.
Searching every 10 files
1 Push and hold M.C. left or right.
 Notes
Notes
!USB storage device that can be charged via USB will be recharged when plugged in and the ignition switch is set to ACC or ON.
!Disconnect USB storage devices from the unit when not in use.
!Incompatible text stored with the video image file may not be displayed or may be displayed incorrectly.
!When playing external storage devices that contain a mixture of various media file types, switch between media file types when playing different files.
Refer to A/V Format (switching media file types) on the next page.
Selecting and playing files from the name list
Operations are the same as those for moving images. (Refer to Selecting and playing files from the name list on page 17.)
Function settings
1Press M.C. to display the function menu.
2Turn M.C. to select the function.
After selecting, perform the following procedures to set the function.
 24
24 En
En
|
Section |
Operating this unit |
03 |
Pause (pause)
1 Press M.C. to pause or resume.
Random (random play)
!Refer to Random (random play) on page 22.
Play Mode (repeat play)
1Refer to Play Mode (repeat play) on page 18. However, the repeat range is different from that of moving images.
!All – Repeat all files
!Folder – Repeat the current folder
Capture (capturing an image in JPEG files)
You can capture image data and use it as wallpaper. Images can be stored and recalled easily in this unit.
!Only one image can be stored on this unit. Old images are overwritten with the new ones.
1Press M.C. to display the setting mode.
2Turn M.C. to select the desired setting.
3Press M.C. to confirm the selection.
Rotate (picture rotation)
1Press M.C. to display the setting mode.
2Press M.C. to rotate the displayed picture 90° clockwise.
Wide Mode (switching the wide mode)
!Refer to Wide Mode (switching the wide mode) on page 19.
Time Per Slide (slideshow interval time setting)
JPEG files can be viewed as a slide show on this unit. In this setting, the interval between each image can be set.
1Press M.C. to display the setting mode.
2Turn M.C. to select the desired setting.
!5sec – JPEG images switch at intervals of 5 seconds
!10sec – JPEG images switch at intervals of 10 seconds
!15sec – JPEG images switch at intervals of 15 seconds
!Manual – JPEG images can be switched manually
3Press M.C. to confirm the selection.
Display (display setting)
!Refer to Display (display setting) on page 19.
A/V Format (switching media file types)
!Refer to A/V Format (switching media file types) on page 19.
 Notes
Notes
!Operation is complete even if the menu is cancelled before being confirmed.
!You can select the following functions if the background setting on the entertainment menu is off.
—Capture (capturing an image in JPEG files)
—Rotate (picture rotation)
—Wide Mode (switching the wide mode)
—Display (display setting)
Introduction of operations for playback of still images as a slideshow
You can view still images saved to a USB/SD as a slideshow while listening to audio from another source.
For details about the settings, refer to
Slide Show (slide show viewing) on page 31.
Function settings
1Press M.C. to display the function menu.
2Turn M.C. to select the function.
After selecting, perform the following procedures to set the function.
Return (ending slideshow)
Ending the slideshow.
1 Press M.C. to end the slideshow.
Photo Selection (selecting photos)
English
En  25
25

Section
03  Operating this unit
1 |
Press M.C. to display the setting mode. |
Bluetooth Telephone |
|
|
|||
2 |
Select a file. |
This function is available only for MVH- |
|
|
The following operations are available. The operat- |
P8200BT. |
|
|
ing method is the same as that for the basic op- |
For details on basic operations after connect- |
|
|
erations. Refer to Basic Operations on page 24. |
||
|
ing to a cellular phone, refer to Using Blue- |
||
! |
Selecting a folder |
||
tooth telephone on page 13. |
|||
! |
Selecting a file |
||
! |
Searching every 10 files |
! PIN code is set to 0000 as the default. You |
can change this code. Refer to PIN Code
Pause (pause)
(PIN code input) on the next page.
!Refer to Pause (pause) on page 19.
Random (random play)
!Refer to Random (random play) on page 22.
Play Mode (repeat play)
!Refer to Play Mode (repeat play) on the previous page.
Capture (capturing an image in JPEG files)
!Refer to Capture (capturing an image in JPEG files) on the previous page.
Rotate (picture rotation)
!Refer to Rotate (picture rotation) on the previous page.
Wide Mode (switching the wide mode)
!Refer to Wide Mode (switching the wide mode) on the previous page.
Time Per Slide (slideshow interval time setting)
!Refer to Time Per Slide (slideshow interval time setting) on the previous page.
 Note
Note
When the USB or SD source is selected, this unit cannot view still images on USB/SD as a slideshow.
Connection menu operation
 Important
Be sure to park your vehicle in a safe place and apply the parking brake when performing this operation.
1 Display the phone menu.
Refer to Basic menu operations on page 12.
2 Use M.C. to select Connection.
Turn to change the menu option. Press to select.
3 Turn M.C. to select the function.
After selecting, perform the following procedures to set the function.
Device List (connecting or disconnecting a cellular phone from the device list)
1Press M.C. to display the setting mode.
2Turn M.C. to select the name of a device you want to connect.
3Press and hold M.C. to switch the BD address and device name.
4Press M.C. to connect the selected cellular phone.
While connecting, the circular indicator flashes. To complete the connection, check the device name (MVH-P8200BT) and enter the link code on your cellular phone. If the connection is established, a circular indicator appears next to the device name.
Delete Device (deleting a cellular phone from the device list)
 26
26 En
En
|
Section |
Operating this unit |
03 |
1Press M.C. to display the setting mode.
2Turn M.C. to select the name of a device you want to delete.
3Press M.C. to select the device you want to delete. Press and hold M.C. to switch the BD address and device name.
4Use M.C. to select Yes.
Turn to change the menu option. Press to select. To cancel, select No.
!While this function is in use, do not turn off the engine.
Add Device (connecting a new cellular phone)
1Press M.C. to start searching.
!To cancel, press M.C. while searching.
2Turn M.C. to select a device from the device list.
!If the desired device is not displayed, select
Search Again.
!If five devices are already paired, Memory Full is displayed and it is not possible to perform this operation. In this case, delete a paired device first.
3Press and hold M.C. to switch the BD address and device name.
4Press M.C. to connect the selected cellular phone.
While connecting, the circular indicator flashes. To complete the connection, check the device name (MVH-P8200BT) and enter the link code on your cellular phone. If the connection is established, a circular indicator appears next to the device name.
Special Device (setting a special device)
Bluetooth devices that are difficult to establish a connection with are called special devices. If your Bluetooth device is listed as a special device, select the appropriate one.
1Press M.C. to display the setting mode.
2Use M.C. to select a special device.
Turn to change the menu option. Press to select.
3Use a cellular phone to connect to this unit. While connecting, the circular indicator flashes. To complete the connection, check the device name (MVH-P8200BT) and enter the link code on your cellular phone. If the connection is established, a circular indicator appears next to the device name.
!If five devices are already paired, Memory Full is displayed and it is not possible to perform this operation. In this case, delete a paired device first.
|
English |
|
Auto Connect (connecting to a Bluetooth device |
||
|
||
automatically) |
|
|
1 Press M.C. to turn automatic connection on or |
|
|
off. |
|
|
|
|
|
Visibility (setting the visibility of this unit) |
|
|
|
|
To check the availability of this unit from other devices, Bluetooth visibility of this unit can be turned on.
1Press M.C. to turn the visibility of this unit on or off.
!While setting Special Device, Bluetooth visibility of this unit is turned on temporarily.
Device Information (BD (Bluetooth device) address display)
1Press M.C. to display the BD address and device name.
PIN Code (PIN code input)
To connect your cellular phone to this unit via Bluetooth wireless technology, you need to enter a PIN code on your phone to verify the connection. The default code is 0000, but you can change it with this function.
1Press M.C. to display the setting mode.
2Turn M.C. to select a number.
3Press M.C. to move the cursor to the next position.
4After inputting the PIN code (up to 8 digits), press
M.C.
The PIN code can be stored in the memory.
!When you press and hold M.C. in the same display, the PIN code you entered is stored in this unit.
!Pressing M.C. in the confirmation display returns you to the PIN code input display, and you can change the PIN code.
Phone menu operation
 Important
Be sure to park your vehicle in a safe place and apply the parking brake when performing this operation.
1 Display the phone menu.
Refer to Basic menu operations on page 12.
En  27
27
Section
03  Operating this unit
2 Turn M.C. to select the function.
After selecting, perform the following procedures to set the function.
Recent (recent call history)
You can make a phone call by selecting from dialed calls, received calls, and missed calls in this menu.
1Press M.C. to display Missed Calls (missed call history), Dialled Calls (dialed call history) or Received Calls (received call history).
2Use M.C. to select the desired list.
Turn to change the menu option. Press to select. To return to the previous display, push M.C. down.
3Press M.C. to make a call.
4When you find a phone number that you want to store in the memory, press and hold M.C. right.
Phone Book (phone book)
!The phone book in your cellular phone will be transferred automatically when the phone is connected to this unit.
!Depending on the cellular phone, the phone book may not be transferred automatically. In this case, operate your cellular phone to transfer the phone
book. The visibility of this unit should be on. Refer to Visibility (setting the visibility of this unit) on the previous page.
1Press M.C. to display the alphabetical list.
2Turn M.C. to select the first letter of the name you are looking for.
!Press and hold M.C. to select the desired character type.
alphabet–cyrillic alphabet
3Press M.C. to display a registered name list.
4Turn M.C. to select the name you are looking for.
5Press M.C. to display the phone number list.
6Use M.C. to select the phone number you want to call.
Turn to change the phone number. Press to select.
To return to the previous display, push M.C. down.
7Press M.C. to make a call.
8When you find a phone number that you want to store in the memory, press and hold M.C. right.
Preset Dial (preset phone numbers)
1Press M.C. to display the setting mode.
2Use M.C. to select the desired preset number. Turn to change the menu option. Press to select. To return to the previous display, push M.C. down.
3Press M.C. to make a call.
Phone Function (phone function)
 28
28 En
En
You can set Auto Answer and Ring Tone from this menu. For details, refer to Function and operation on this page.
Connection (phone connection)
Operate the Bluetooth telephone connection menu. Refer to Connection menu operation on page 26.
Function and operation
1 Display Phone Function.
Refer to Phone Function (phone function) on this page.
2Press M.C. to display the function menu.
3Turn M.C. to select the function.
After selecting, perform the following procedures to set the function.
Auto Answer (automatic answering)
1 Press M.C. to turn automatic answering on or off.
Ring Tone (ring tone select)
1 Press M.C. to turn the ring tone on or off.

 Operating this unit
Audio Adjustments |
You can adjust the currently selected equalizer curve |
||
1 Display the audio menu. |
setting as desired. Adjusted equalizer curve settings |
||
are stored in Custom1 or Custom2. |
|||
Refer to Basic menu operations on page 12. |
|||
! |
A separate Custom1 curve can be created for |
||
2 Turn M.C. to select the audio function. |
|
each source. If you make adjustments when a |
|
|
curve other than Custom2 is selected, the equali- |
||
After selecting, perform the following proce- |
! |
zer curve settings will be stored in Custom1. |
|
dures to set the audio function. |
A Custom2 curve that is common for all sources |
||
|
|
can be created. If you make adjustments when |
|
Fader/Balance (fader/balance adjustment) |
|
the Custom2 curve is selected, the Custom2 |
|
|
curve will be updated. |
||
|
|
||
1 Press M.C. to display the setting mode. |
1 |
Press M.C. to display the setting mode. |
|
2 Push M.C. up or down to adjust the front/rear |
2 |
Turn M.C. to select an equalizer curve. |
|
speaker balance. |
|
Powerful—Natural—Vocal—Custom1—Cus- |
|
Adjustment range (front/rear): Front 15 to Rear |
|
tom2—Flat—Super Bass |
|
15 |
|
! When Flat is selected no adjustments are |
|
3 Push M.C. left or right to adjust the left/right |
|
made to the sound. |
|
speaker balance. |
3 |
Push M.C. left or right to select the equalizer |
|
Adjustment range (left/right): Left 15 to Right 15 |
|
band to adjust. |
|
! Select F/R 0 when only using two speakers. |
|
40Hz—80Hz—200Hz—400Hz—1kHz—2.5kHz |
|
! When the rear output setting and preout setting |
|
—8kHz—10kHz |
|
are Subwoofer, you cannot adjust front/rear |
4 |
Push M.C. up or down to adjust the level of the |
|
speaker balance. |
|
equalizer band. |
|
|
|
Adjustment range: +12dB to –12dB |
|
Sonic Center Control (sonic center control) |
|
||
Loudness (loudness) |
|||
Sound that is suited for the listening position can ea- |
|||
Loudness compensates for deficiencies in the low- |
|||
sily be created with this function. |
|||
1 Press M.C. to display the setting mode. |
and high-frequency ranges at low volume. |
||
2 Push M.C. left or right to select a listening posi- |
1 |
Press M.C. to display the setting mode. |
|
tion. |
2 |
Turn M.C. to select the desired setting. |
|
Adjustment range: Left:7 to Right:7 |
|
Off (off)—Low (low)—Mid (mid)—High (high) |
|
|
3 |
Press M.C. to confirm the selection. |
|
Auto EQ (auto-equalizer on/off) |
|||
Subwoofer1 (subwoofer on/off setting) |
|||
The auto-equalizer is an equalizer curve created by |
|||
This unit is equipped with a subwoofer output which |
|||
auto EQ (refer to Auto EQ (auto-equalizing) on page |
|||
33). |
can be turned on or off. |
||
You can turn the auto-equalizer on or off. |
1 |
Press M.C. to turn subwoofer output on or off. |
|
1 Press M.C. to turn the auto-equalizer on or off. |
Subwoofer2 (subwoofer adjustment) |
||
You cannot use this function if auto EQ has not been |
|||
|
|
||
carried out. |
The cut-off frequency and output level can be ad- |
||
Graphic EQ (equalizer adjustment) |
justed when the subwoofer output is on. |
||
Only frequencies lower than those in the selected |
|||
|
range are outputted from the subwoofer. |
||
|
1 |
Press M.C. to display the setting mode. |
|
|
2 |
Turn M.C. to select the phase of subwoofer out- |
|
|
|
put. |
|
|
|
Normal (normal phase)—Reverse (reverse |
|
|
|
phase) |
|
|
3 |
Push M.C. up or down to adjust the output level |
|
|
|
of the subwoofer. |
|
|
|
Adjustment range: +6 to -24 |
|
|
4 |
Push M.C. left or right to select the cut-off fre- |
|
|
|
quency. |
|
|
|
50Hz—63Hz—80Hz—100Hz—125Hz |
|
En
Section
03
English
 29
29

Section
03  Operating this unit
Bass Booster (bass boost) |
System settings |
|||
1 |
Press M.C. to display the setting mode. |
1 |
Display the system menu. |
|
Refer to Basic menu operations on page 12. |
||||
2 |
Turn M.C. to adjust the level. |
|||
|
Adjustment range: 0 to +6 |
2 |
Turn M.C. to select the system function. |
|
3 |
Press M.C. to confirm the selection. |
|||
High Pass Filter (high pass filter adjustment)
After selecting, perform the following procedures to set the system function.
When you do not want low sounds from the subwoofer output frequency range to play from the front or rear speakers, turn on the HPF (high pass filter). Only frequencies higher than those in the selected range are output from the front or rear speakers.
1Press M.C. to display the setting mode.
2Turn M.C. to select the cut-off frequency.
Off (off)—50Hz—63Hz—80Hz—100Hz—125Hz
3Press M.C. to confirm the selection.
SLA (source level adjustment)
SLA (Source Level Adjustment) lets you adjust the volume level of each source to prevent radical changes in volume when switching between sources.
!When selecting FM as the source, you cannot switch to SLA.
!Settings are based on the FM volume level, which remains unchanged.
Before adjusting source levels, compare the FM volume level with the level of the source you wish to adjust.
!The AM volume level can also be adjusted with this function.
1Press M.C. to display the setting mode.
2Push M.C. up or down to adjust the source volume.
Adjustment range: +4 to –4
 Notes
Notes
!You cannot select Custom1 and Custom2 when using the auto-equalizer.
!Operation is complete even if the menu is cancelled before being confirmed.
Guide Info (guide information)
1Press M.C. to display the guide information. Refer to About guide information on page 13.
Clock ADJ (date and clock)
1Press M.C. to display the setting mode.
2Press M.C. to select the segment of the clock display you wish to set. Day—Month—Year—Hour—Minute—AM/PM
3Turn M.C. to set the date and time.
Picture ADJ (picture adjustment)
1Press M.C. to display the setting mode.
2Turn M.C. to select the function to be adjusted. Press to select.
Brightness—Contrast—Color—Hue—Dimmer
—Temperature—Black Level
For details about the settings, refer to Changing the picture adjustment on page 39.
When you select Black Level, press M.C. to turn the setting on or off.
3Turn M.C. to increase or decrease the level of the selected item.
Adjustment range: +24 to -24
!Dimmer can be adjusted from +48 to +1.
!Temperature can be adjusted from +3 to –3.
Caution Lang. (caution language settings)
You can switch the display language for the warning message of the parking brake interlock.
1Press M.C. to display the setting mode.
2Turn M.C. to select the desired setting.
English—Français—Español
3Press M.C. to confirm the selection.
System Lang. (menu language settings)
 30
30 En
En
 Loading...