


H:\PDF-OUT\127075007251\010COV_KM686UW.fm
 _127075007251_artwork.book Page 1 Thursday, November 24, 2016 10:34 AM
DIGITAL MEDIA RECEIVER ЦИФРОВОЙ МЕДИАРЕСИВЕР
Русский English
MVH-09UB MVH-09UBG
Owner’s Manual Руководство пользователя
MVH-09UB/MVH-09UBG 127075007251_(B6_Horizon)

H:\PDF-OUT\127075007251\020Chapter_EN.fm
 _127075007251_artwork.book Page 2 Thursday, November 24, 2016 10:34 AM
Table of Contents |
|
Before You Start ......................................................................... |
2 |
Getting Started .......................................................................... |
3 |
Radio ............................................................................................ |
5 |
USB/AUX ...................................................................................... |
5 |
Settings........................................................................................ |
7 |
FUNCTION settings .................................................................. |
7 |
AUDIO settings.......................................................................... |
7 |
SYSTEM settings ....................................................................... |
8 |
Connections/Installation.......................................................... |
9 |
Additional Information........................................................... |
12 |
About this manual:
•In the following instructions, a USB memory or USB audio player are referred to as “USB device”.
 Before You Start
Thank you for purchasing this PIONEER product
To ensure proper use, please read through this manual before using this product. It is especially important that you read and observe WARNINGs and CAUTIONs in this manual. Please keep the manual in a safe and accessible place for future reference.
If you want to dispose this product, do not mix it with general household waste. There is a separate collection system for used electronic products in accordance with legislation that requires proper treatment, recovery and recycling.
Private households in the member states of the EU, in Switzerland and Norway may return their used electronic products free of charge to designated collection facilities or to a retailer (if you purchase a similar new one).
For countries not mentioned above, please contact your local authorities for the correct method of disposal.
By doing so you will ensure that your disposed product undergoes the necessary treatment, recovery and recycling and thus prevent potential negative effects on the environment and human health.
 WARNING
•Do not attempt to install or service this product by yourself. Installation or servicing of this product by persons without training and experience in electronic equipment and automotive accessories may be dangerous and could expose you to the risk of electric shock, injury or other hazards.
•Do not attempt to operate the unit while driving. Make sure to pull off the road and park your vehicle in a safe location before attempting to use the controls on the device.
 CAUTION
•Do not allow this unit to come into contact with moisture and/or liquids. Electrical shock could result. Also, damage to this unit, smoke, and overheating could result from contact with liquids.
•Always keep the volume low enough to hear outside sounds.
2 En
MVH-09UB/MVH-09UBG 127075007251

H:\PDF-OUT\127075007251\020Chapter_EN.fm
 _127075007251_artwork.book Page 3 Thursday, November 24, 2016
If you experience problems
Should this unit fail to work properly, please contact your dealer or nearest authorized PIONEER Service Station.
10:34 AM
Purpose |
Operation |
Return to the previous display/list |
Press BAND/DIMMER . |
|
|
Return to the normal display from the |
Press and hold BAND/DIMMER . |
menu |
|
|
|
 Getting Started
Basic operation
MVH-09UB/09UBG
M.C. (multi-control) dial |
|
|
SRC (source)/OFF |
DISP (display) |
Display window |
|
BAND/DIMMER |
|
Detach button |
|
|
|
|
Frequently used operations |
|
||
|
|
|
|
Purpose |
Operation |
||
Turn on the power* |
Press SRC/OFF to turn on the power. |
||
|
|
|
Press and hold SRC/OFF to turn off the |
|
|
|
power. |
Adjust the volume |
Turn the M.C. dial. |
||
Select a source |
Press SRC/OFF repeatedly. |
||
Change the display information |
Press DISP repeatedly. |
||
|
|
|
|
*When this unit’s blue/white lead is connected to the vehicle’s auto-antenna relay control terminal, the vehicle’s antenna extends when this unit’s source is turned on. To retract the antenna, turn the source off.
Display indication
Indication Description
Appears when a lower tier of the menu or folder exists.
Appears when the  button is pressed.
Appears when the local seek tuning function is set (page 7).
Appears when random/shuffle play is set.
Appears when repeat play is set.
Detaching the front panel
Detach the front panel to prevent theft. Remove any cables and devices attached to the front panel and turn off the unit before detaching it.
Detach |
Attach |
 Important
• Avoid subjecting the front panel to excessive shock.
En 3
English
MVH-09UB/MVH-09UBG 127075007251
H:\PDF-OUT\127075007251\020Chapter_EN.fm
 _127075007251_artwork.book Page 4 Thursday, November 24, 2016 10:34 AM
•Keep the front panel out of direct sunlight and high temperatures.
•Always store the detached front panel in a protective case or bag.
Setup menu
When you turn the ignition switch to ON after installation, [SET UP :YES] appears in the display.
1Press the M.C. dial.
The setup menu disappears after 30 seconds of no operation. If you prefer not to set at this time, turn the M.C. dial to select [NO], then press to confirm.
2Turn the M.C. dial to select the options, then press to confirm.
To proceed to the next menu option, you need to confirm your selection.
Menu Item |
Description |
LANGUAGE |
Select the language to display the text |
[ENG](English), |
information from a compressed audio file. |
|
|
[РУС](Russian), |
|
[TUR](Turkish) |
|
|
|
CLOCK SET |
Set the clock. |
|
|
FM STEP |
Select the FM tuning step from 100 kHz or 50 kHz. |
[100], [50] |
|
|
|
3[QUIT :YES] appears when all the settings have been made.
To return to the first item of the setup menu, turn the M.C. dial to select [QUIT :NO], then press to confirm.
4 Press the M.C. dial to confirm the settings.
NOTES
•You can cancel the menu setting by pressing SRC/OFF.
•These settings can be made at any time from the SYSTEM settings (page 8) and INITIAL settings (page 4).
4 En
Canceling the demonstration display (DEMO OFF)
1 Press the M.C. dial to display the main menu.
2 Turn the M.C. dial to select [SYSTEM], then press to confirm.
3 Turn the M.C. dial to select [DEMO OFF], then press to confirm.
4 Turn the M.C. dial to select [YES], then press to confirm.
INITIAL settings
1 Press and hold SRC/OFF until the unit turns off.
2 Press the M.C. dial to display the main menu.
3 Turn the M.C. dial to select [INITIAL], then press to confirm.
4 Turn the M.C. dial to select an option, then press to confirm.
NOTE
The options vary depending on the unit.
Menu Item |
Description |
FM STEP |
Select the FM tuning step from 100 kHz or 50 kHz. |
[100], [50] |
|
|
|
MVH-09UB/MVH-09UBG 127075007251
H:\PDF-OUT\127075007251\020Chapter_EN.fm
 _127075007251_artwork.book Page 5 Thursday, November 24, 2016 10:34 AM
Menu Item |
Description |
|
SP-P/O MODE |
Select when there is a full-range speaker connected to |
|
|
[REAR/SUB.W] |
the rear speaker output leads and there is a subwoofer |
|
connected to the RCA output. |
|
|
|
|
|
|
|
|
[SUB.W/SUB.W] |
Select when there is a passive subwoofer connected |
|
|
directly to the rear speaker output leads and there is a |
|
|
subwoofer connected to the RCA output. |
|
|
|
|
[REAR/REAR] |
Select when there are full-range speakers connected to |
|
|
the rear speaker output leads and RCA output. If there is |
|
|
a full-range speaker connected to the rear speaker |
|
|
output leads, and the RCA output is not used, you may |
|
|
select either [REAR/SUB.W] or [REAR/REAR]. |
|
|
|
DIM SETTING |
Change the display brightness. |
|
|
[SYNC CLOCK], |
|
|
[MANUAL] |
|
|
|
|
SYSTEM RESET |
Select [YES] to initialize the unit settings. The unit will be |
|
|
[YES], [CANCEL] |
restarted automatically. |
|
|
(Some of the settings may be retained even after |
|
|
resetting the unit.) |
|
|
|
 Radio
Radio
The RDS (radio data system) function only works in areas that broadcast RDS signals for FM stations.
Receiving preset stations
3 Press a number button (1/  to 6/
to 6/  ).
).
TIP
The  /
/  buttons can be also used to select a preset station when [SEEK] is set to [PCH] in the FUNCTION settings (page 7).
Best stations memory (BSM)
The six strongest stations are stored on the number buttons (1/  to 6/
to 6/  ).
).
1 After selecting the band, press the M.C. dial to display the main menu.
2 Turn the M.C. dial to select [FUNCTION], then press to confirm.
3 Turn the M.C. dial to select [BSM], then press to confirm.
To seek a station manually
1After selecting the band, press  /
/  to select a station.
Press and hold  /
/  then release to seek an available station. Scanning stops when the unit receives a station. To cancel seek tuning, press
  /
/  .
.
NOTE
[SEEK] needs to be set to [MAN] in the FUNCTION settings (page 7).
To store stations manually
1While receiving the station you want to store, press and hold one of the number buttons (1/  to 6/
to 6/  ) until it stops flashing.
English
1 Press SRC/OFF to select [RADIO].
2Press BAND/DIMMER  to select the band from [F1], [FM2], [FM3], [MW] or [LW].
TIP
F1 is for advanced FM band.
 USB/AUX
Playing back
Disconnect headphones from the device before connecting it to the unit.
En 5
MVH-09UB/MVH-09UBG 127075007251

H:\PDF-OUT\127075007251\020Chapter_EN.fm
 _127075007251_artwork.book Page 6 Thursday, November 24, 2016 10:34 AM
SRC (source)/OFF |
USB port |
|||||||||||||||||||
|
|
|
|
|
|
|
|
|
|
|
|
|
|
|
|
|
|
|
|
|
|
|
|
|
|
|
|
|
|
|
|
|
|
|
|
|
|
|
|
|
|
|
|
|
|
|
|
|
|
|
|
|
|
|
|
|
|
|
|
|
|
|
|
|
|
|
|
|
|
|
|
|
|
|
|
|
|
|
|
|
|
|
|
|
|
|
|
|
|
|
|
|
|
|
|
|
|
|
|
|
|
|
|
|
|
|
|
|
|
|
|
|
|
|
|
|
|
|
|
|
|
|
|
|
|
|
|
|
|
|
|
|
|
|
|
|
|
|
|
|
|
|
|
|
|
|
M.C. (multi-control) dial |
AUX input jack (3.5 mm stereo jack) |
NOTE
Some Android devices connected via AOA 2.0 may not work properly or emit sounds due to their own software design, regardless of the OS version.
Basic operations
Purpose |
Operation |
|
|
|
Select a track |
Press |
or |
. |
|
|
|
|
|
|
Fast forward or reverse |
Press and hold |
or |
. |
|
|
|
|
|
|
Pause/resume playback |
Press 4/PAUSE. |
|
|
|
|
|
|
|
|
USB devices (including Android)
1 Open the USB port cover.
2 Plug in the USB.
NOTE
To automatically switch to [USB] source when a USB device is connected to the unit, set [USB AUTO] to [ON] in the SYSTEM settings (page 9).
 CAUTION
Use an optional Pioneer USB cable (CD-U50E) to connect the USB device as any device connected directly to the unit will protrude out from the unit, which could be dangerous.
Before removing the device, stop playback.
AOA connections
A device installed with Android OS 5.0 or later can be connected to the unit via AOA, using the cable supplied with the device.
AUX
1 Insert the stereo mini plug into the AUX input jack.
2 Press SRC/OFF to select [AUX] as the source.
NOTE
If [AUX] is set to [OFF] in the SYSTEM settings, [AUX] cannot be selected as a source (page 8).
Operations
You can make various adjustments in the FUNCTION settings (page 7).
Note that the following operations do not work for an AUX device. To operate an AUX device, use the device itself.
Purpose |
Operation |
|
|
|
Select a folder/album* |
Press 1/ |
or 2/ . |
|
|
|
|
|
|
|
Select a track/song (chapter) |
Press |
or |
. |
|
|
|
|
|
|
Fast forward or reverse |
Press and hold |
or |
. |
|
|
|
|
|
|
Listening to music on Android
This function is compatible with devices that have Android OS 5.0 or later installed and also support AOA (Android Open Accessory) 2.0.
1 Press SRC/OFF to select [ANDROID].
6 En
MVH-09UB/MVH-09UBG 127075007251
H:\PDF-OUT\127075007251\020Chapter_EN.fm
 _127075007251_artwork.book Page 7 Thursday, November 24, 2016 10:34 AM
Purpose |
Operation |
|
Search for a file from a list |
1 Press |
to display the list. |
|
2 Turn the M.C. dial to select the |
|
|
desired file (folder) name or |
|
|
category, then press to confirm. |
|
|
3 Turn the M.C. dial to select the |
|
|
desired file, then press to confirm. |
|
|
Playback starts. |
|
|
|
|
View a list of the files in the selected |
Press the M.C. dial when a folder/ |
|
folder/category* |
category is selected. |
|
|
|
|
Play a song in the selected folder/ |
Press and hold the M.C. dial when a |
|
category* |
folder/category is selected. |
|
|
|
|
Repeat play |
Press 6/ |
. |
|
|
|
Random/shuffle play |
Press 5/ |
. |
|
|
|
Pause/resume playback |
Press 4/PAUSE. |
|
|
|
|
* Compressed audio files only
 Settings
You can adjust various settings in the main menu.
1 Press the M.C. dial to display the main menu.
2Turn the M.C. dial to select one of the categories below, then press to confirm.
•FUNCTION settings (page 7)
•AUDIO settings (page 7)
•SYSTEM settings (page 8)
3 Turn the M.C. dial to select the options, then press to confirm.
FUNCTION settings
The menu items vary according to the source.
Menu Item |
Description |
|
|
||||||
BSM |
|
|
|
|
|
|
Store the six strongest stations on the |
||
|
|||||||||
|
|||||||||
|
|
|
|
|
|
|
|||
|
|
|
|
|
|
|
number buttons (1/ |
to 6/ ) |
|
|
|
|
|
|
|
|
automatically. |
|
|
|
|
|
|
|
|
|
|
|
|
LOCAL |
|
|
|
|
|
||||
|
|
|
|
||||||
|
|
|
|
||||||
F1/FM: [OFF], [LV1], [LV2], |
Restrict the tuning station according to the |
||||||||
[LV3], [LV4] |
signal strength. |
|
|||||||
MW/LW: [OFF], [LV1], [LV2] |
|
|
|
||||||
|
|
|
|
|
|
|
|
|
|
SEEK |
|
|
|
|
|
||||
|
|
|
|
||||||
|
|
|
|
||||||
[MAN], [PCH] |
Assign |
or |
buttons to seek the |
||||||
|
|
|
|
|
|
|
stations one by one (manual tuning) or |
||
|
|
|
|
|
|
|
select a station from the preset channels. |
||
|
|
|
|
|
|
|
|
|
|
AUDIO settings
Menu Item |
Description |
FADER*1 |
|
|
Adjust the front and rear speaker balance. |
|
|
BALANCE |
|
|
Adjust the left and right speaker balance. |
|
|
En 7
English
MVH-09UB/MVH-09UBG 127075007251
H:\PDF-OUT\127075007251\020Chapter_EN.fm
 _127075007251_artwork.book Page 8 Thursday, November 24, 2016
Menu Item |
Description |
|
EQ SETTING |
|
|
[SUPER BASS], [POWERFUL], |
You can also switch the equalizer by |
|
[NATURAL], [VOCAL], |
pressing |
repeatedly. |
[CUSTOM1], [CUSTOM2], |
|
|
[FLAT] |
|
|
Select an equalizer band and level for further customizing.
Equalizer band: [80HZ], [250HZ], [800HZ], [2.5KHZ], [8KHZ]
Equalizer level: [+6] to [–6]
LOUDNESS |
|
[OFF], [LOW], [MID], [HI] |
Compensate for clear sound at low volume. |
|
|
SUB.W*2 |
|
[NOR], [REV], [OFF] |
Select the subwoofer phase. |
|
|
SUB.W CTRL*2*3 |
|
Cut-off frequency: [50HZ], |
Only frequencies lower than those in the |
[63HZ], [80HZ], [100HZ], |
selected range are output from the |
[125HZ], [160HZ], [200HZ] |
subwoofer. |
Output level: [–24] to [+6] |
|
Slope level: [–12], [–24] |
|
|
|
BASS BOOST |
|
[0] to [+6] |
Select the bass boost level. |
|
|
HPF SETTING |
|
Cut-off frequency: [OFF], |
Only frequencies higher than the high-pass |
[50HZ], [63HZ], [80HZ], |
filter (HPF) cutoff are output from the |
[100HZ], [125HZ], [160HZ], |
speakers. |
[200HZ] |
|
Slope level: [–12], [–24] |
|
|
|
8 En
10:34 AM
Menu Item |
Description |
SLA |
|
[+4] to [–4] |
Adjust the volume level for each source |
|
except RADIO. |
|
Each of the below combinations are set to |
|
the same setting automatically. |
|
• USB, APP (Android) |
|
|
*1 Not available when [SUB.W/SUB.W] is selected in [SP-P/O MODE] in the INITIAL settings (page 5).
*2 Not available when [REAR/REAR] is selected in [SP-P/O MODE] in the INITIAL settings (page 5).
*3 Not available when [OFF] is selected in [SUB.W].
SYSTEM settings
You can also access to these menus when the unit is turned off.
Menu Item |
Description |
LANGUAGE |
|
[ENG](English), |
Select the language to display the text |
[РУС](Russian), [TUR](Turkish) |
information from a compressed audio file. |
|
|
CLOCK SET |
|
|
Set the clock (page 4). |
|
|
12H/24H |
|
[12H], [24H] |
Select the time notation. |
|
|
AUX |
|
[ON], [OFF] |
Set to [ON] when using an auxiliary device |
|
connected to the unit. |
|
|
MVH-09UB/MVH-09UBG 127075007251

H:\PDF-OUT\127075007251\020Chapter_EN.fm
 _127075007251_artwork.book Page 9 Thursday, November 24, 2016 10:34 AM
Menu Item |
Description |
USB AUTO |
|
[ON], [OFF] |
Select [ON] to automatically switch to [USB] |
|
source when a USB device/Android is |
|
connected to the unit. |
|
Select [OFF] when a USB device/Android is |
|
being connected to the unit just for |
|
charging. |
|
|
 Connections/Installation
Connections
 WARNING
•Use speakers over 50 W (output value) and between 4 Ω to 8 Ω (impedance value). Do not use 1 Ω to 3 Ω speakers for this unit.
•The black cable is ground. When installing this unit or power amp (sold separately), make sure to connect the ground wire first. Ensure that the ground wire is properly connected to metal parts of the car’s body. The ground wire of the power amp and the one of this unit or any other device must be connected to the car separately with different screws. If the screw for the ground wire loosens or falls out, it could result in fire, generation of smoke or malfunction.
Ground wire |
POWER AMP |
||
|
|
|
|
|
|
|
|
Other devices (Another electronic
Metal parts of
device in the car)
car’s body
*1 Not supplied for this unit
 Important
•When installing this unit in a vehicle without an ACC (accessory) position on the ignition switch, failure to connect the red cable to the terminal that detects operation of the ignition key may result in battery drain.
ACC position |
No ACC position |
•Use of this unit in conditions other than the following could result in fire or malfunction.
–Vehicles with a 12-volt battery and negative grounding.
–When speaker output is used by 4 channels, use speakers over 50 W (maximum input power) and between 4 Ω to 8 Ω (impedance value). Do not use 1 Ω to 3 Ω speakers for this unit.
–When rear speaker output is used by 2 Ω of subwoofer, use speakers over 70 W (maximum input power). * Please refer to connection for a connection method.
•To prevent a short-circuit, overheating or malfunction, be sure to follow the directions below.
–Disconnect the negative terminal of the battery before installation.
–Secure the wiring with cable clamps or adhesive tape. Wrap
En 9
English
MVH-09UB/MVH-09UBG 127075007251
H:\PDF-OUT\127075007251\020Chapter_EN.fm
 _127075007251_artwork.book Page 10 Thursday, November 24, 2016 10:34 AM
adhesive tape around wiring that comes into contact with metal parts to protect the wiring.
–Place all cables away from moving parts, such as the shift lever and seat rails.
–Place all cables away from hot places, such as near the heater outlet.
–Do not connect the yellow cable to the battery by passing it through the hole to the engine compartment.
–Cover any disconnected cable connectors with insulating tape.
–Do not shorten any cables.
–Never cut the insulation of the power cable of this unit in order to share the power with other devices. The current capacity of the cable is limited.
–Use a fuse of the rating prescribed.
–Never wire the negative speaker cable directly to ground.
–Never band together negative cables of multiple speakers.
•When this unit is on, control signals are sent through the blue/white cable. Connect this cable to the system remote control of an external power amp or the vehicle’s autoantenna relay control terminal (max. 300mA 12 V DC). If the vehicle is equipped with a glass antenna, connect it to the antenna booster power supply terminal.
•Never connect the blue/white cable to the power terminal of an external power amp. Also, never connect it to
10En
the power terminal of the auto antenna. Doing so may result in battery drain or a malfunction.
•The black cable is ground. Ground cables for this unit and other equipment (especially, high-current products such as power amps) must be wired separately. If they are not, an accidental detachment may result in a fire or malfunction.
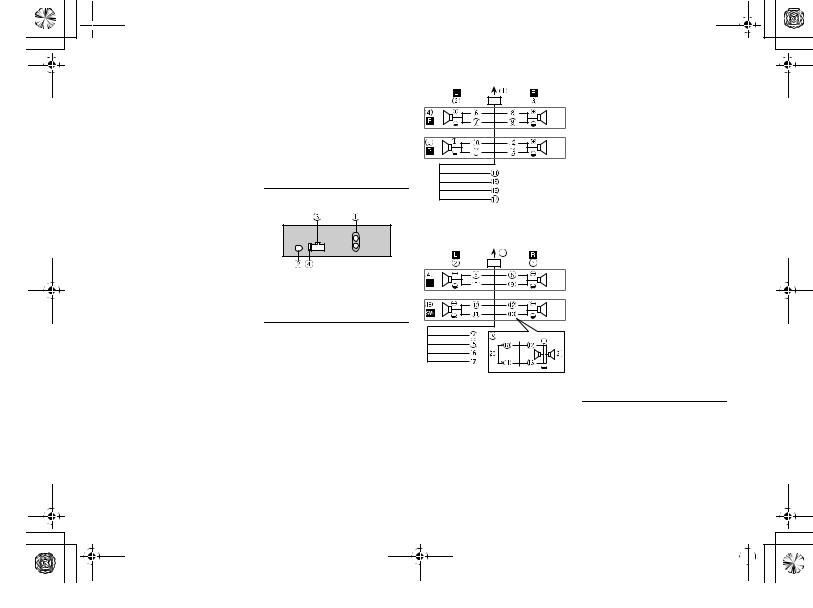
This unit
 Rear output or subwoofer output
 Antenna input
 Power cord input
  Fuse (10 A)
Power cord
Perform these connections when not connecting a rear speaker lead to a subwoofer.
Perform these connections when using a subwoofer without the optional amplifier.
 To power cord input
 Left
Left
 Right
Right
 Front speaker
 Rear speaker
 White
White
 White/black
 Gray
Gray
 Gray/black
 Green
Green
 Green/black
 Violet
 Violet/black
 Black (chassis ground) Connect to a clean, paint-free metal location.
 Yellow
Connect to the constant 12 V supply terminal.
 Red
Red
Connect to terminal controlled by the ignition switch (12 V DC).
 Blue/white
Connect to the system control terminal of the power amp or autoantenna relay control terminal (max. 300 mA 12 V DC).
 Subwoofer (4 Ω)
 When using a subwoofer of 2 Ω, be sure to connect the subwoofer to the violet and violet/black leads of this unit. Do not connect anything to the green and green/black leads.
 Not used.
  Subwoofer (4 Ω) × 2
NOTE
Change the initial menu of this unit. Refer to [SP-P/O MODE] (page 5). The subwoofer output of this unit is monaural.
Power amp (sold separately)
Perform these connections when using the optional amplifier.
MVH-09UB/MVH-09UBG 127075007251
H:\PDF-OUT\127075007251\020Chapter_EN.fm
 _127075007251_artwork.book Page 11 Thursday, November 24, 2016 10:34 AM
 System remote control Connect to blue/white cable.
 Power amp (sold separately)
 Connect with RCA cables (sold separately)
 To rear output or subwoofer output
  Rear speaker or subwoofer
Installation
 Important
•Check all connections and systems before final installation.
•Do not use unauthorized parts as this may cause malfunctions.
•Consult your dealer if installation requires drilling of holes or other modifications to the vehicle.
•Do not install this unit where:
–it may interfere with operation of the vehicle.
–it may cause injury to a passenger as a result of a sudden stop.
•Optimum
performance is obtained when the unit is installed at an angle of less than 60°.
•When installing, to ensure proper heat dispersal when using this unit, make sure you leave ample space behind the rear panel and wrap any
loose cables so they are not blocking the vents.
Leave ample 5 cm  space
space 


5 cm
DIN mount installation
1Insert the supplied mounting sleeve into the dashboard.
2Secure the mounting sleeve by using a screwdriver to bend the metal tabs (90°) into place.
 Dashboard
 Mounting sleeve
•Make sure that the unit is installed securely in place. An unstable installation may cause skipping or other malfunctions.
When not using the supplied mounting sleeve
1Line up the holes on the mounting bracket with the holes on the sides of the unit to attach the bracket.
2 |
Screw in one screw on each side to |
English |
|
hold the unit in place.
 Tapping screw (φ5 mm × 9 mm, not supplied with product)
 Mounting bracket
  Dashboard or console
Using the included bracket
Check to make sure that the included bracket matches your particular model of vehicle and then attach it to the unit as shown below.
 Screw
Screw
 Bracket
Removing the unit (installed with the supplied mounting sleeve)
1 Remove the trim ring.
 Trim ring
 Notched tab
•Releasing the front panel allows easier access to the trim ring.
•When reattaching the trim ring, point the side with the notched tab down.
2Insert the supplied extraction keys into both sides of the unit until they click into place.
3 Pull the unit out of the dashboard.
En 11
MVH-09UB/MVH-09UBG 127075007251
 Loading...