


English
Thank you for buying this Pioneer product.
Please read through these operating instructions before using your speaker system so you will know how to make the most of its performance. After you have finished reading the instructions, put them away in a safe place for future reference.
CAUTION
About compatibility
This product is designed exclusively for use with the flat screen TV. For more information on compatibility, please consult with your nearest Pioneer authorized dealer or service center.
About installation and setting
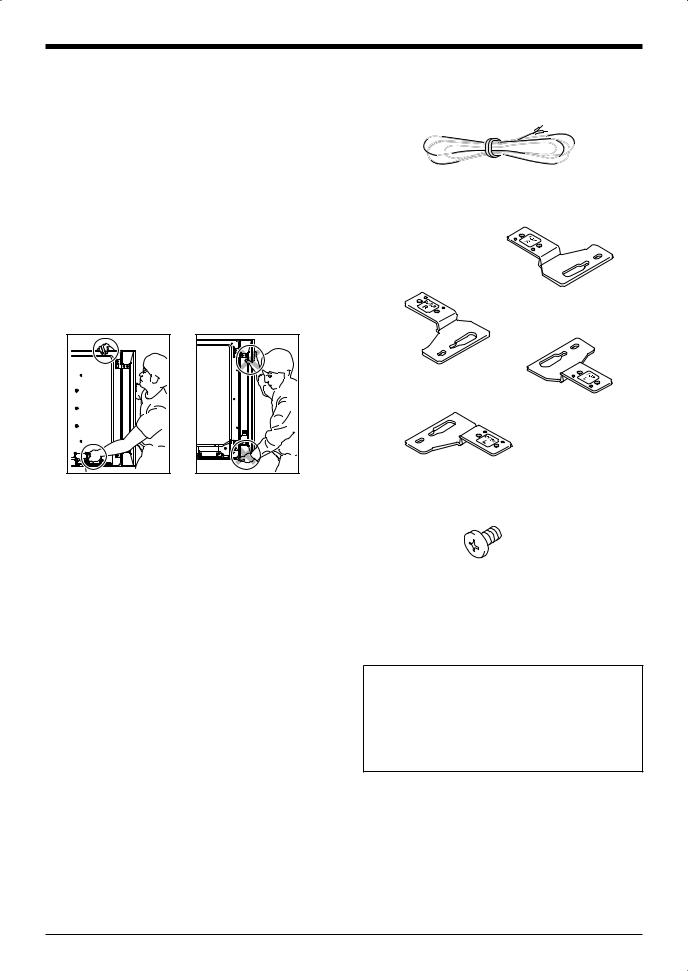
•Do not move the flat screen TV by holding these speakers or speaker brackets. This could result in injury or damage to the brackets. When moving the TV, hold by the top and handles.
CHECKING THE ACCESSORIES
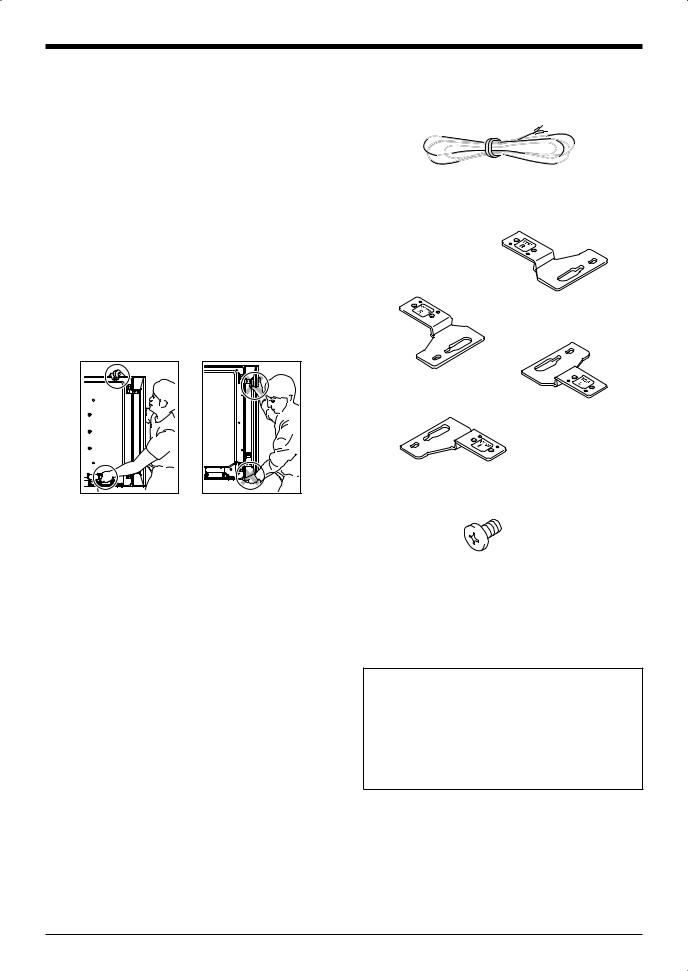
•Speaker Cables × 2
•Speaker Brackets × 4
for TOP-Right
for BOTTOM-Right
for TOP-Left
for BOTTOM-Left
•When installing the speaker, do not use any screws other than those supplied, otherwise the speaker may come off from the main unit and fall over.
•When installing the speaker, tighten the screws firmly.
•Please handle the speaker with sufficient care, as the grille net and the cabinet can become damaged or broken when they are subjected to strong external impacts.
•Placing a CRT computer screen or CRT monitor near to the speaker may result in interference or color distortion. If this happens, distance the monitor from the speaker.
•Do not attach these speakers to the wall or ceiling. They may fall off and cause injury.
About the input
•In order to prevent damage to the speaker system resulting from input overload, please observe the following precautions:
•Do not connect these speakers to anything other than the specified flat screen TV. Doing so may result in damage or fire.
•Be sure to turn the connected devices off and remove the power cord from the wall outlet beforehand when changing the connection or installation method.
•When using a tone control function to greatly emphasize treble sounds, do not use excessive amplifier volume.
•Speaker Mounting Screws (M5 × 10 mm : Black) × 16
•Operating Instructions (this document) × 1
Installation
•Consult your dealer if you encounter any difficulties with this installation.
•Pioneer is not liable for any damage resulting from improper installation, improper use, modification, or natural disasters.
2
English
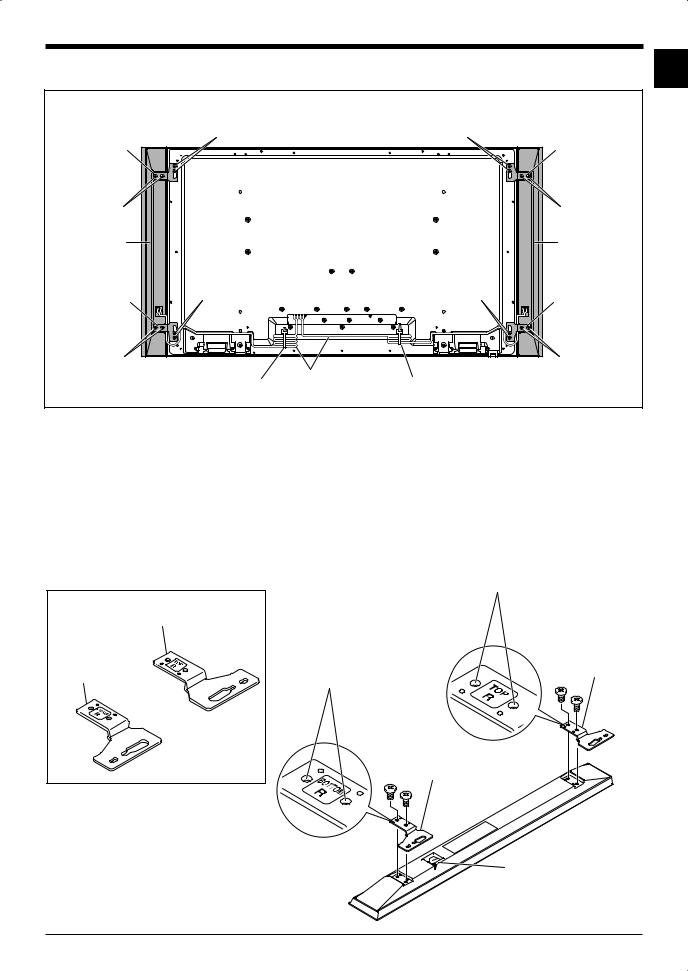
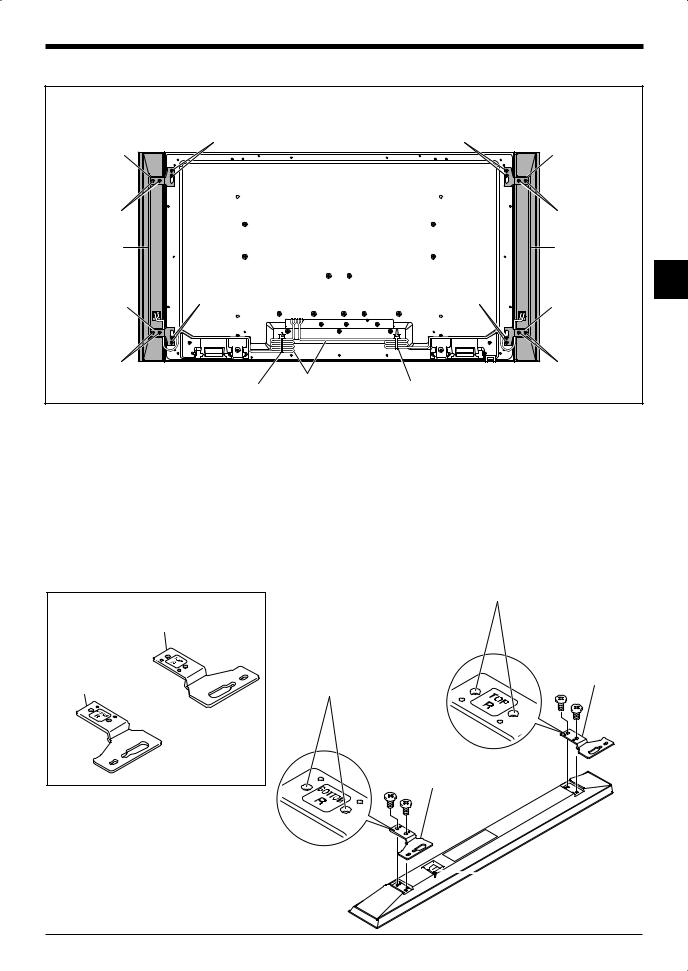
INSTALLATION ON THE FLAT SCREEN TV
Flat screen TV with the speaker installed
Speaker bracket (for TOP-Right)
Speaker mounting screw (M5 × 10 mm)
Speaker
Speaker bracket (for BOTTOM-Right)
Speaker mounting screw (M5 × 10 mm)
Speaker mounting |
Speaker mounting |
|
|
screw (M5 × 10 mm) |
screw (M5 × 10 mm) |
Speaker bracket |
|
|
|
||
|
|
(for TOP-Left) |
|
|
|
Speaker mounting |
|
|
|
screw (M5 × 10 mm) |
|
|
|
Speaker |
|
Speaker mounting |
Speaker mounting |
Speaker bracket |
|
screw (M5 × 10 mm) |
screw (M5 × 10 mm) |
||
(for BOTTOM-Left) |
|||
|
|
||
|
|
Speaker mounting |
|
Speaker cable |
|
screw (M5 × 10 mm) |
|
Cable clamp* |
|
||
Cable clamp* |
|
*: Accessories of the flat screen TV
When using the table top stand:
 NOTE:
NOTE:
Before attaching the speaker, please attach the KRP-TS01 series table top stand (or another Pioneer flat screen TV stand) to the flat screen TV.
1. Attaching the Speaker Brackets to the Speakers.
There are top and bottom speaker brackets for both the left and the right speaker. Attach the appropriate brackets to the top and the bottom on the back of the speakers using the supplied screws.
(It shows the attachment of the bracket on the right side. It is attached on the left side by the same procedure.)
|
Screw holes |
|
Speaker bracket |
|
|
(For TOP-Right) |
|
|
Speaker bracket |
Speaker bracket |
|
(For TOP-Right) |
||
(For BOTTOM-Right) |
||
Screw holes |
||
|
||
|
Speaker bracket |
|
|
(For BOTTOM-Right) |
English
Place the speaker so its terminals (bottom) are facing you.
3
English
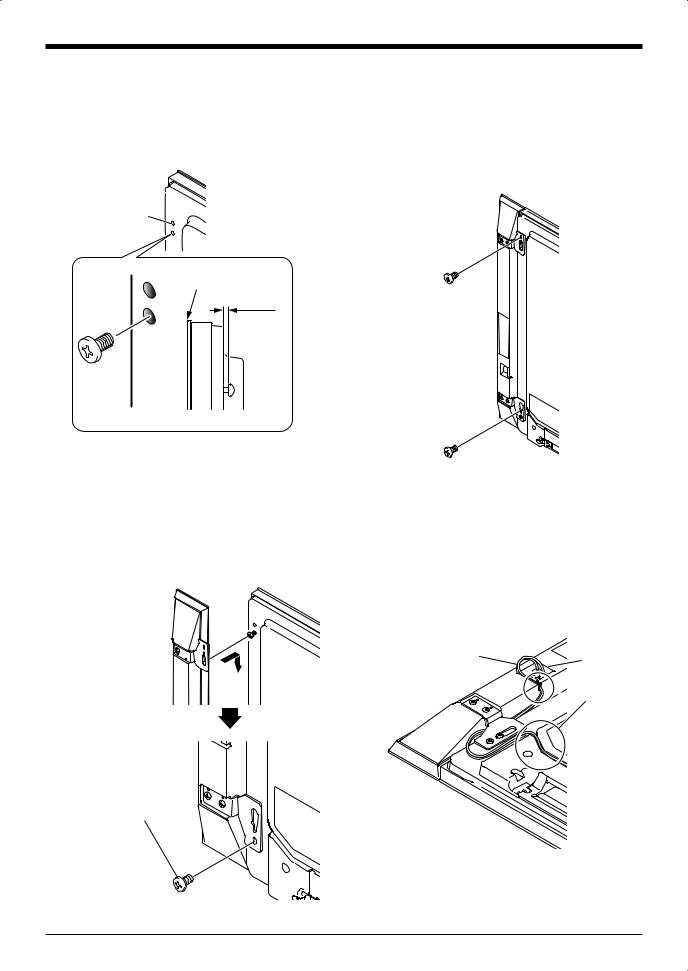
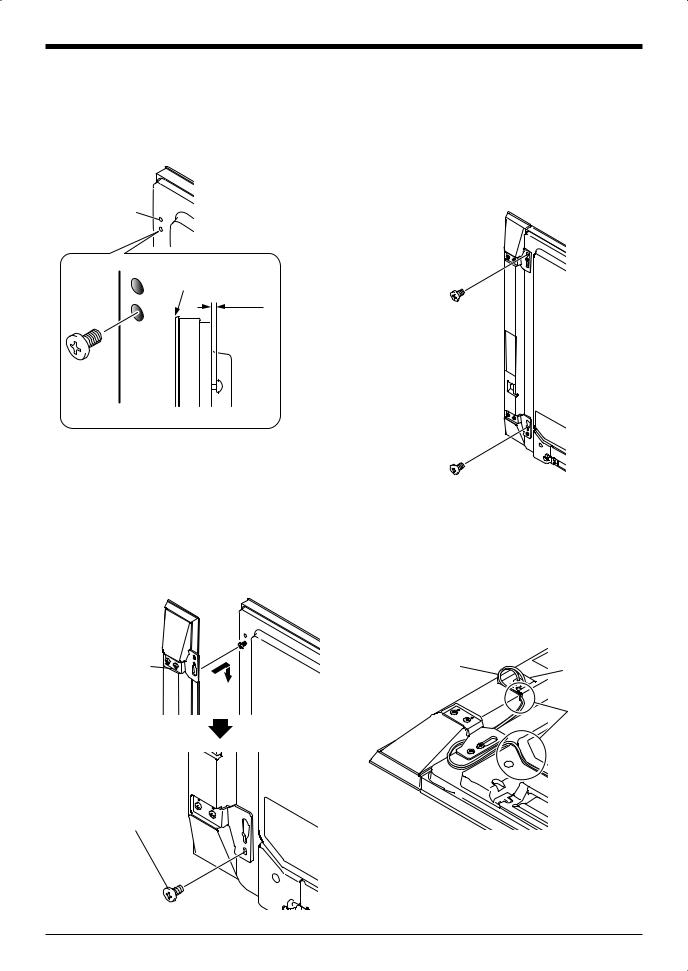
2.Screw an supplied screw into the speaker mounting hole (lower of the two) at the top, rear of the flat screen
TV.
Do not tighten it all the way yet. Leave it loose, with about 5 mm left to tighten.
Speaker |
|
|
Mounting |
Top, rear of flat |
|
Hole |
||
screen TV |
||
|
Top of flat screen TV
5 mm
Leave a space of about 5 mm
3.Hang the speaker bracket on the screw you installed at the top by passing the wide part over it and lowering into the slot; screw in the
lower screw temporarily.
After passing the wide part of the hole of the speaker bracket (top) over the screw, lower the speaker onto it.
After passing the wide part of the hole over the screw,  lower the speaker.
Tighten with the provided screw the bottom speaker bracket to the flat screen TV temporarily (one place bottom).
4.Adjust the position of the speaker and then tighten the upper and lower screws firmly.
5.Tighten the two screws, at the top and bottom for each speaker (total of four screws), thus fixing the speakers to the flat screen TV.
6.Pass the supplied speaker cable between the speaker and the flat screen TV (below the speaker bracket) from below.
7.Connect the speaker cables to the speaker (see next page).
8.Insert the cable in the groove on the speaker.
Speaker Cable |
Speaker |
|
|
|
Terminal |
 Insertion
in groove
9.Connect the other end of the speaker cables to the rear of flat screen TV (see next page).
4

English
Connecting the speaker |
Connecting the speaker cables |
||||||||||||||||
cables to the speaker. |
to the rear of flat screen TV. |
||||||||||||||||
Black |
|
|
|
|
|
|
Gray |
Gray |
|
|
Black |
Gray |
|||||
|
|
|
|
|
|
|
|
|
|
|
|
|
|
|
|||
|
|
|
|
|
|
|
|
|
|
|
|
|
|
|
|
|
|
|
|
|
|
|
|
|
|
|
|
|
|
|
|
|
|
|
|
|
|
|
|
|
|
|
|
|
|
|
|
|
|
|
|
|
|
|
|
|
|
|
|
|
|
|
|
|
|
|
|
|
|
|
|
|
|
|
|
|
|
|
|
|
|
|
|
|
|
|
|
|
|
|
|
|
|
|
|
|
|
|
|
|
|
|
|
|
|
|
|
Black |
Red |
Red |
Black |
Red |
|
|
|
|
|
Connect the cables correctly with |
Connect the cables correctly with respect to the |
|||
respect to the polarity of the speaker |
polarity of the flat screen TV speaker terminals, |
|||
terminals, that is, cable (Gray) to |
that is, cable (Gray) to terminals (Red) |
|||
terminals (Red) and cable (Black) |
and cable (Black) to terminals (Black). |
|||
to terminals (Black). |
|
|
|
|
English
Speaker terminal |
Speaker terminal |
Speaker terminal |
Speaker cable
 NOTE:
NOTE:
•Press the lever and insert the end of the cable.
• When you release the lever, it clamps onto the speaker cable.
 Caution
•Be sure to turn the connected devices off and remove the power cord from the wall outlet beforehand when changing the connection or installation method.
•If you insert the speaker cable too far so
that the insulation is touching the speaker terminal, you may not get any sound. Please insert it with showing the copper wire.
• Check if the end of the speaker cables are securely connected to the terminals by slightly tugging on the cable after making connections. Loose connections may result in sound dropouts or noise.
•If there is a short in the and cables caused by an exposed lead wire, excessive load may be applied to the flat screen TV, resulting in interrupted operation or malfunction.
•Incorrect connections of the speaker cable to the right or left of the flat screen TV terminals with respect to the polarity may result in insufficient stereo sound effects, delivering poor bass sounds or unstable sound image.
•Bundle the cable without pulling.
5
English
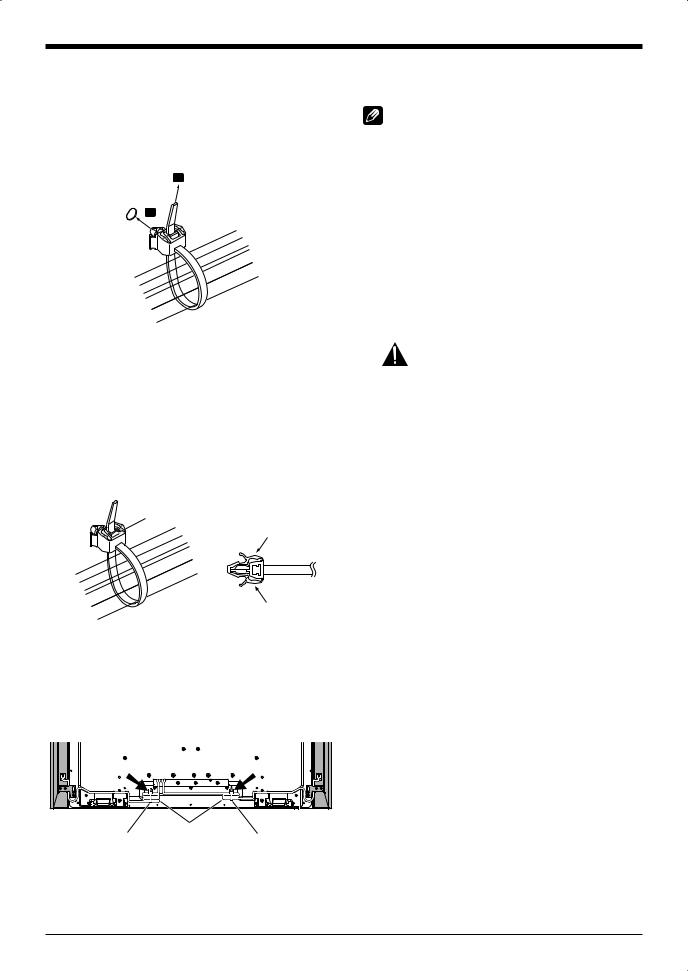
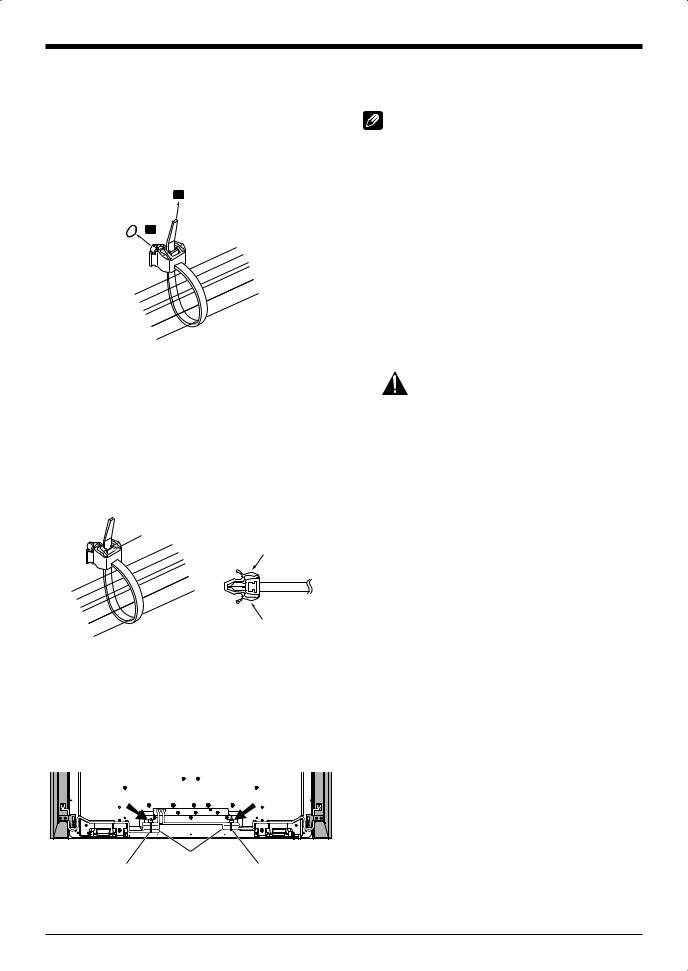
10. Bundling the cables. |
When using the hung on |
|
Follow the steps below to attach a cable clamp. |
wall unit: |
|
1 ) Thread the clamp band through the holder and |
||
|
||
bundle the cable(s) in the cable clamp. |
NOTE: |
|
2 ) Push and hold the levers then insert the hook into |
First lay the flat screen TV on top of a soft sheet etc., then |
|
an appropriate hole on the rear of the flat screen TV. |
||
attach the speakers. |
||
3 ) Pull up the clamp band to lock. |
||
|
||
1 |
1. Attach the speakers to the flat screen |
|
|
TV (See procedures 1 to 10 on pages |
|
2 |
3 to 6). |
|
|
Connect the other cables and power cord to the flat |
|
|
screen TV. |
4 ) Confirm that the cable clamp is seated firmly in the panel.
 NOTE:
NOTE:
Avoid pinching or creating pressure points when routing or bundling cables.
2.Place the flat screen TV on the mounting fittings of the hung on
wall unit.
For details, refer to the operating instructions supplied with the hung on wall unit.
Caution
Do not move the flat screen TV by holding these speakers or speaker brackets. This could result in injury or damage to the brackets. When moving the TV, hold by the top and handles.
To remove the clamp band, pull and hold the latch to release.
To remove the cable clamp, push and hold the levers then pull it out from the hole.
Latch
Lever
Lever
 NOTE:
NOTE:
The longer a clamp is in place, the better chance of deterioration. An older clamp is more easily damaged while being removed and may not be reusable.
Rear of flat screen TV
|
|
|
|
|
|
|
|
|
|
|
|
|
|
|
|
|
|
|
|
|
|
|
|
|
|
|
|
|
|
|
|
|
|
|
|
|
|
|
|
|
|
|
|
Cable clamp |
|
|
Speaker cable |
|
|
|
|
|||
|
|
|
|
|
Cable clamp |
|
|
|
|
|
6

English
CABINET MAINTENANCE
•Use a polishing cloth or dry cloth to wipe off dust and dirt.
•When the cabinet is very dirty, wipe with a soft cloth moistened with water-diluted cleanser; then wipe again with a dry cloth. Do not use furniture wax or cleaners.
They may damage the surface of the cabinet.
•Never use thinner, benzine, insecticide sprays and other chemicals on or near the cabinets, since these will corrode the surfaces.
•When a chemical cloth is used, read the cautions for the chemical cloth carefully.
SPECIFICATIONS
Cabinet............................................................. |
Bass-reflex type |
Used speaker (two-way system): |
|
Woofer (for low tones)................ |
4.8 cm × 13 cm cone type |
Tweeter (for high tones).................... |
2.5 cm semidome type |
Impedance............................................................................ |
6 Ω |
Frequency Range........................................ |
55 Hz to 30 000 Hz |
Sensitivity (1 m, 1 W)....................................................... |
80 dB |
Permissible input : |
|
Max. input ...................................................................... |
18 W |
Rated input ...................................................................... |
6 W |
Crossover frequency ........................................................ |
3 kHz |
External Dimensions |
|
...............................105 (W) mm × 876 (H) mm × 64 (D) mm |
|
Weight : |
|
Speaker (one piece)..................................................... |
1.75 kg |
Speakers (pair) with cables, brackets and screws.... 4.1 kg Accessory parts (for two speakers)
................................................................. Speaker Cables × 2
.................................................................... Speaker Brackets TOP-Left × 1 BOTTOM-Left × 1 TOP-Right × 1 BOTTOM-Right × 1
.................... Speaker Mounting Screws (M5 × 10 mm) × 16
..................................................... Operating Instructions × 1
NOTE:
Specifications and design subject to possible modification without notice, due to improvements.
English
If you want to dispose this product, do not mix it with general household waste. There is a separate collection system for used electronic products in accordance with legislation that requires proper treatment, recovery and recycling.
Private households in the member states of the EU, in Switzerland and Norway may return their used electronic products free of charge to designated collection facilities or to a retailer (if you purchase a similar new one).
For countries not mentioned above, please contact your local authorities for the correct method of disposal.
By doing so you will ensure that your disposed product undergoes the necessary treatment, recovery and recycling and thus prevent potential negative effects on the environment and human health.
7

Français
Merci pour votre achat de cet appareil Pioneer.
Veuillez lire attentivement la totalite de ce mode d’emploi avant d’utiliser vos enceintes acoustiques de façon à pouvoir en tirer le meilleur profit. Après lecture complète du livret d’instructions de fonctionnement, le ranger dans un endroit sûr afin de pouvoir vous y reporter facilement en cas de besoin lors de l’utilisation des l’enceintes acoustiques.
ATTENTION
À propos de la compatibilité
Ce produit a été conçu exclusivement en vue d’une utilisation avec le téléviseur à écran plat Pioneer. Pour de plus amples informations sur la compatibilité, veuillez vous adresser au distributeur ou au centre de service Pioneer agréé le plus proche.
À propos de l’installation et des réglages
•Ne déplacez pas le téléviseur à écran plat en le tenant par les enceintes ou les supports d’enceinte. Vous risqueriez de vous blesser ou d’endommager les supports. Pour déplacer le téléviseur, tenez-le par le haut et par les poignées.
•À l’installation des enceintes, utilisez uniquement les vis fournies, car d’autres pourraient se détacher de l’unité principale et entraîner la chute des enceintes.
•A l’installation des enceintes, serrez les vis à fond.
•Manipuler les enceintes avec suffisamment de soin, car autrement, l’enjoliveur frontal et le coffret risqueraient d’être endommagés ou hors d’usage en les soumettant à des chocs externes exagérés.
•La présence d’un écran d’ordinateur ou d’un moniteur à tube cathodique près des enceintes peut provoquer des interférences et une distorsion des couleurs. Si c’est le cas, éloignez l’écran par rapport aux enceintes.
•Ne fixez pas ces enceintes au mur ou au plafond. Elles risqueraient de tomber et de blesser quelqu’un.
À propos de l’entrée des signaux
•Afin d’éviter d’endommager les enceintes acoustiques, suite à une surcharge à l’entrée, veuillez observer les précautions suivantes:
•Ne raccordez pas ces enceintes à un appareil autre que le téléviseur à écran plat spécifié. Faute de quoi, des dégâts, voire un incendie pourraient en résulter.
•Prenez soin de mettre hors tension les appareils raccordés et de débrancher le cordon d’alimentation au niveau de la prise secteur avant de changer les connexions ou la méthode d’installation.
•Si vous utilisez une fonction de contrôle des tonalités pour accentuer fortement les aigus, n’élevez pas excessivement le volume sonore.
VÉRIFICATION DES
ACCESSOIRES
•Câbles de l’enceinte × 2
•Supports de l’enceinte × 4
Angle supérieur droit (TOP R)
Angle inférieur droit (BOTTOM R)
Angle supérieur gauche (TOP L)
Angle inférieur gauche (BOTTOM L)
•Vis de montage de l’enceinte (M5 × 10 mm : Noir) × 16
•Mode d’emploi (ce document) × 1
Installation
•En cas de difficultés, veuillez consulter votre revendeur.
•Pioneer ne saurait être tenu responsable d’aucun dommage résultant d’une installation ou d’une utilisation incorrecte de ce produit, de sa modification ou encore de catastrophes naturelles.
8

Français
INSTALLATION SUR LE TÉLÉVISEUR À ÉCRAN PLAT
Téléviseur à écran plat avec enceinte installée
Support de l’enceinte (angle supérieur droit)
Vis de montage de l’enceinte (M5 x 10 mm)
Enceinte
Support de l’enceinte (angle inférieur droit)
Vis de montage de l’enceinte (M5 x 10 mm)
Vis de montage |
Vis de montage |
de l’enceinte (M5 x 10 mm) |
de l’enceinte (M5 x 10 mm) |
Vis de montage |
Vis de montage |
de l’enceinte (M5 x 10 mm) |
de l’enceinte (M5 x 10 mm) |
Serre-câbles* |
Câble d’enceinte |
Serre-câbles* |
Support de l’enceinte (angle supérieur gauche)
Vis de montage de l’enceinte (M5 x 10 mm)
Enceinte
Support de l’enceinte (angle inférieur gauche)
Vis de montage de l’enceinte (M5 x 10 mm)
* : Accessoires du téléviseur à écran plat
Si vous utilisez un pied de table :
 REMARQUE :
Avant de poser l’enceinte, fixez le pied de table série KRP-TS01 (ou un autre pied de table de téléviseur à écran plat Pioneer) au téléviseur à écran plat.
1. Fixer les supports d’enceinte sur les enceintes.
Il y a des supports d’enceinte supérieurs et inférieurs pour les enceintes de droite et de gauche. Posez les bons supports en haut et en bas au dos des enceintes à l’aide des vis fournies.
(L’illustration montre la pose des supports de droite. Pour les supports de gauche, procédez de la même façon.)
Support de l’enceinte |
Trous de vis |
|
|
||
(angle supérieur droit) |
|
|
Support de l’enceinte |
Support de l’enceinte |
|
(angle supérieur droit) |
||
(angle inférieur droit) |
||
Trous de vis |
||
|
||
|
Support de l’enceinte |
|
|
(angle inférieur droit) |
Français
Placez l’enceinte de façon à avoir ses bornes (dessous) en face de vous.
9
Français
2.Vissez une vis fournie dans le trou de montage de l’enceinte (le plus bas des deux) situé en haut au dos du
téléviseur à écran plat.
Ne la serrez pas complètement tout de suite. Laissez du jeu, arrêtez-vous à environ 5 mm de la fin.
Trou de |
Angle supérieur arrière |
montage de |
|
l’enceinte |
du téléviseur à écran plat |
Haut du téléviseur à écran plat
5 mm
Laissez un espace d’environ 5 mm
3.Suspendez le support de l’enceinte sur la vis que vous avez installée en haut en passant la partie large pardessus la vis puis baissez le support dans la fente et vissez la vis du bas
provisoirement.
Une fois que vous avez passé la partie large du trou du support de l’enceinte (haut) par-dessus la vis, baissez l’enceinte.
Une fois que vous avez passé la partie large du trou du support sur la vis, baissez l’enceinte.
A l’aide de la vis fournie, fixez provisoirement le support d’enceinte inférieur sur le téléviseur à écran plat (un endroit en bas).
4.Ajustez la position de l’enceinte puis serrez complètement les vis du haut et du bas.
5.Serrez les deux vis, l’une en haut et l’autre en bas, pour chaque enceinte (total de quatre vis). C’est ainsi
que vous fixez les enceintes sur le téléviseur à écran plat.
6.Passez le câble d’enceinte fourni entre l’enceinte et le téléviseur à écran plat (en dessous du support de l’enceinte) en passant par le dessous.
7.Branchez les câbles d’enceinte sur les enceintes (voir page suivante).
8.Insérez le câble dans la rainure située sur l’enceinte.
Câble d’enceinte |
Borne |
|
d’enceinte |
Insertion dans la rainure
9.Branchez l’autre extrémité des câbles d’enceinte à l’arrière du téléviseur à écran plat (voir page suivante).
10
Français
Branchement des câbles d’enceinte sur l’enceinte.
Noir |
Gris |
Noir |
Rouge |
Brancher les câbles d’enceinte à l’arrière du téléviseur à écran plat.
Gris |
Noir |
Gris |
Rouge |
Noir |
Rouge |
Branchez les câbles correctement en |
Branchez les câbles correctement en |
|
respectant la polarité des bornes |
||
respectant la polarité des bornes d’enceintes |
||
d’enceintes, c’est à dire le câble |
||
du téléviseur à écran plat, c’est à dire le câble |
||
(gris) sur les bornes (rouge) et le |
(gris) sur les bornes (rouge) et le câble |
|
câble (noir) sur les bornes (noir). |
(noir) sur les bornes (noir). |
Borne d’enceinte |
Français
Borne d’enceinte |
Borne d’enceinte |
|
Câble d’enceinte |
 REMARQUE :
•Appuyez sur le levier et insérez l’extrémité du câble.
• Quand vous relâchez le levier, il se resserre autour du câble d’enceinte.
 Attention
•Pensez à mettre les appareils hors tension et à retirer le cordon d’alimentation de la prise murale avant de modifier les branchements ou l’installation.
•Si vous poussez le câble d’enceinte trop
loin et que l’isolant est en contact avec la borne d’enceinte, il est possible que vous n’obteniez aucun son. Une fois le câble inséré, vous devez toujours pouvoir voir le fil de cuivre.
• Vérifiez que les extrémités des câbles d’enceinte sont bien branchées sur les bornes en tirant légèrement sur le câble une fois les branchements effectués. Des câbles mal raccordés peuvent entraîner des interruptions du son ou du bruit.
•En cas de court-circuit dans les câbles et en raison d’un fil de sortie exposé, le téléviseur à écran plat risque de recevoir une charge excessive, ce qui provoquerait un arrêt de son fonctionnement ou des dysfonctionnements.
•Une erreur de polarité dans le raccordement du câble de l’enceinte sur les bornes droite ou gauche du téléviseur à écran plat peut se traduire par des effets stéréo insuffisants, des basses de mauvaise qualité ou une image sonore instable.
•Rassemblez les câbles sans les tirer.
11
Français
10. Relier les câbles. |
En cas d’utilisation de l’unité |
|
Suivez les étapes suivantes pour poser un serre-câbles. |
d’installation murale : |
|
1 ) Passez la languette du collier dans le support et |
||
|
||
placez le ou les câbles dans le serre-câbles. |
REMARQUE : |
|
2 ) Poussez et retenez les leviers puis insérez le crochet |
||
Tout d’abord, couchez le téléviseur à écran plat sur sa face |
||
dans un trou adapté au dos du téléviseur à écran |
||
plat. |
avant sur un morceau de tissu doux etc., puis installez les |
|
3 ) Tirez la languette du collier pour bloquer les câbles. |
enceintes. |
|
|
||
1 |
1. Fixez les enceintes sur téléviseur à |
|
|
écran plat (voir les procédures 1 à 10, |
|
2 |
pages 9 à 12). |
|
|
Branchez les autres câbles et le cordon d’alimentation |
|
|
sur le téléviseur à écran plat. |
4 ) Vérifiez que le serre-câbles est bien installé contre le panneau.
 REMARQUE :
Evitez de pincer ou de créer des points de pression sur les câbles lorsque vous les posez ou que vous les reliez.
Pour retirez la languette du collier, tirez le taquet pour dégager le tout.
Pour retirez le serre-câbles, poussez les leviers puis retirez-les du trou.
2.Placez le téléviseur à écran plat sur les ferrures de fixation de l’écran
mural.
Pour de plus amples informations, reportez-vous aux instructions d’utilisation fournies avec l’unité d’installation murale.
Attention
Ne déplacez pas le téléviseur à écran plat en le tenant par les enceintes ou les supports d’enceinte. Vous risqueriez de vous blesser ou d’endommager les supports. Pour déplacer le téléviseur, tenez-le par le haut et par les poignées.
Taquet
Levier
Levier
 REMARQUE :
Plus un collier reste longtemps en place, plus il risque de se détériorer. Les vieux colliers ont tendance à s’abîmer plus facilement lors de la dépose et vous risquez de ne pas pouvoir les réutiliser.
Arrière du téléviseur à écran plat |
|
Câble d’enceinte |
|
Serre-câbles |
Serre-câbles |
12
Français
ENTRETIEN DU COFFRET
•Utiliser un chiffon à polir ou un chiffon sec pour essuyer la poussière et éliminer les salissures.
•Si le coffret est très sale, le frotter avec un chiffon doux imbibé de liquide à nettoyer dilué d’eau. Ensuite, essuyer
ànouveau avec un chiffon sec. Ne pas utiliser de cire
àmeuble ou de produits de nettoyage corrosifs. Ils risqueraient d’endommager la surface du coffret.
•Ne jamais utiliser non plus de diluant, de benzine, d’insecticides en vaporisateur et autres produits chimiques sur le coffret ou à proximité, car ils risquent de corroder les surfaces.
•Si l’on utilise un chiffon chimique, lire et observer attentivement les précautions à prendre pour son usage adéquat.
SPECIFICATIONS
Coffret............................................................... |
Type bass-reflex |
Haut-parleurs utilisés (système à double voie) : |
|
Haut-parleur de graves...... |
Type à cône de 4,8 cm × 13 cm |
Haut-parleur d’aigus............... |
Type à semi-dôme de 2,5 cm |
Impédance ........................................................................... |
6 Ω |
Plage de fréquences.................................... |
55 Hz à 30 000 Hz |
Sensibilité (1 m, 1 W)....................................................... |
80 dB |
Entrée admissible : |
|
Entrée max. .................................................................... |
18 W |
Entrée nominale ............................................................. |
6 W |
Fréquence de recouvrement |
...........................................3 kHz |
Encombrement
.............................. 105 (L) mm × 876 (H) mm × 64 (P) mm
Poids : |
|
Enceinte (une pièce)................................................... |
1,75 kg |
Enceintes (la paire) avec câbles, supports et vis....... |
4,1 kg |
Pièces accessoires (Pour deux enceintes) |
|
........................................................... Câble de l’enceinte × 2
............................................................Supports de l’enceinte Angle supérieur gauche (TOP L) × 1 Angle inférieur gauche (BOTTOM L) × 1 Angle supérieur droit (TOP R) × 1 Angle inférieur droit (BOTTOM R) × 1
................Vis de montage de l’enceinte (M5 × 10 mm) × 16
.........................................Mode d’emploi (ce document) × 1
REMARQUE:
Les spécifications et la finition sont susceptibles d’être modifiées sans préavis en vue de l’amélioration.
Français
Publication de Pioneer Corporation. © 2008 Pioneer Corporation.
Tous droits de reproduction et de traduction réservés.
13
Deutsch
Wir danken Ihnen dafür, dass Sie sich für ein Produkt von
Pioneer entschieden haben.
Bitte lesen Sie vor der Verwendung Ihrer Lautsprecheranlage diese Anleitung aufmerksam durch, um die Vorzüge des
Systems optimal ausnützen zu können. Nachdem Sie die Bedienungsanleitung durchgelesen haben, bewahren Sie sie sorgfältig auf, um sich im Bedarfsfall jederzeit darauf beziehen zu können.
VORSICHT
Hinweis zur Kompatibilität
Dieses Produkt ist ausschließlich für den Gebrauch mit dem Flachbildfernseher von Pioneer bestimmt. Weitere
Informationen zur Kompatibilität bringen Sie bitte bei Ihrem autorisierten Pioneer-Händler oder einer Pioneer-
Kundendienststelle in Erfahrung.
Hinweise zur Installation und Einstellung
•Bewegen Sie den Flachbildfernseher nicht fort, indem
sie ihn am Lautsprecher oder an den LautsprecherHalterungen festhalten. Das kann zu Verletzungen oder zu Schäden an den Montageelementen führen. Halten Sie den Fernseher beim Fortbewegen oben und an den Handgriffen fest.
•Verwenden Sie zur Installation ausschließlich die Schrauben im Lieferumfang. Anderenfalls kann sich der Lautsprecher vom Flachbildfernseher lösen und herunterfallen.
•Achten Sie bei der Installation des Lautsprechers darauf, die Schrauben fest anzuziehen.
•Die Lautsprecher sind vorsichtig zu behandeln, da Ziergitter und Gehäuse durch starke Stöße und Erschütterungen verkratzt oder beschädigt werden können.
•Wenn ein CRT-Computer-Monitor oder ein CRT-Monitor in der Nähe des Lautsprechers aufgestellt wird, kann dies Bildrauschen oder Farbstörungen verursachen. In einem solchen Fall muss für einen größeren Abstand des Monitors vom Lautsprecher gesorgt werden.
•Bringen Sie die Lautsprecher nicht an der Wand oder an der Decke an, denn sie könnten herabfallen und
Verletzungen verursachen.
Hinweise zum Eingang
•Um eine Beschädigung des Lautsprechersystems durch ein zu starkes Eingangssignal zu vermeiden, müssen die folgenden Hinweise unbedingt beachtet werden:
•Schließen Sie diese Lautsprecher an nichts anderes als den angegebenen Flachbildfernseher an. Wird der
Lautsprecher in Verbindung mit irgendeinem anderen Gerät verwendet, besteht die Gefahr von Beschädigung und Brandausbruch.
•Achten Sie unbedingt darauf, alle angeschlossenen Geräte auszuschalten und den Netzstecker von der Netzsteckdose zu trennen, bevor die Anschlüsse geändert werden oder die Installation verändert wird.
•Bei Verwendung der Klangfarbenregelungs-Funktion eines Verstärkers zu einer starken Anhebung der Höhen darf die Lautstärke am Verstärker nicht auf einen übermäßig hohen Pegel eingestellt werden.
Prüfen des Zubehörs
•Lautsprecherkabel × 2
•Lautsprecher-Halterungen × 4
Für oben rechts
(TOP R)
Für unten rechts (BOTTOM R)
Für oben links (TOP L)
Für unten links (BOTTOM L)
•Lautsprecher-Montageschrauben (M5 × 10 mm : schwarz) × 16
•Bedienungsanleitung (dieses Dokument) × 1
Installation
•Wenn es bei dieser Installation zu Problemen kommen sollte, wenden Sie sich bitte an Ihren Händler.
•Pioneer haftet für keinerlei Schäden, die sich auf falsche Installation, unsachgemäßen Gebrauch, Modifikationen oder Naturkatastrophen zurückführen lassen.
14
Deutsch
INSTALLATION AM FLACHBILDFERNSEHER
Flachbildfernseher mit dem installierten Lautsprecher
LautsprecherHalterung
(für oben rechts)
LautsprecherMontageschraube (M5 x 10 mm)
Lautsprecher
LautsprecherHalterung
(für unten rechts)
LautsprecherMontageschraube (M5 x 10 mm)
Lautsprecher-Montageschraube |
Lautsprecher-Montageschraube |
|
|
(M5 x 10 mm) |
|
(M5 x 10 mm) |
Lautsprecher- |
|
|
|
|
|
|
|
Halterung |
|
|
|
(für oben links) |
|
|
|
Lautsprecher- |
|
|
|
Montageschraube |
|
|
|
(M5 x 10 mm) |
|
|
|
Lautsprecher |
Lautsprecher- |
|
Lautsprecher- |
|
Montageschraube |
|
Montageschraube |
Lautsprecher- |
(M5 x 10 mm) |
|
(M5 x 10 mm) |
|
|
Halterung |
||
|
|
|
|
|
|
|
(für unten links) |
|
|
|
Lautsprecher- |
|
|
|
Montageschraube |
|
Lautsprecherkabel |
|
(M5 x 10 mm) |
Kabelhalterung* |
Kabelhalterung* |
|
|
*: Zubehör des Flachbildfernsehers
Bei Verwendung des Tischständers:
 HINWEIS:
Bitte bringen Sie vor der Montage des Lautsprechers den Tischständer der Serie KRP-TS01 (oder einen anderen Ständer für einen Pioneer-Flachbildfernseher) am Flachbildfernseher an.
1. Anbringen der Lautsprecher-Halterungen an den Lautsprechern.
Es gibt obere und untere Lautsprecher-Halterungen für den rechten und den linken Lautsprecher. Befestigen Sie die jeweils vorgesehenen Halterungen unter Verwendung der mitgelieferten Schrauben oben und unten an der Rückseite der Lautsprecher.
(Die Abbildung zeigt die Befestigung der Halterung an der rechten Seite. Auf die gleiche Weise erfolgt die Befestigung auf der linken Seite.)
|
|
Schraublöcher |
|
Lautsprecher-Halterung |
|
|
|
(für oben rechts) |
|
|
|
|
|
Lautsprecher- |
|
Lautsprecher-Halterung |
|
Halterung |
|
|
(für oben rechts) |
||
(für unten rechts) |
Schraublöcher |
||
|
|||
|
|
Lautsprecher-Halterung |
|
|
|
(für unten rechts) |
Deutsch
 Positionieren Sie den Lautsprecher so, dass seine Kabelanschlüsse (unten) auf Sie gerichtet sind.
15
 Loading...