


CD RECEIVER
AUTORADIO CD
RADIO CD
DEH-P6100BT
Español Français English
Operation Manual Mode d’emploi Manual de instrucciones
 <YRD5281-A/S> <1>
Black plate (2,1)


 Contents
Thank you for purchasing this PIONEER product.
Please read through this manual before using the product for the first time, to ensure proper use. After reading, please keep the manual in a safe and accessible place for future reference.
Before You Start |
|
Information to User |
5 |
For Canadian model |
5 |
About this unit 5 |
|
About this manual |
6 |
After-sales service for Pioneer products 6
Visit our website |
|
6 |
|
|
|
||
Features |
7 |
|
|
|
|
|
|
Operating environment |
7 |
|
|
||||
Protecting your unit from theft |
7 |
|
|||||
– |
Removing the front panel |
7 |
|
||||
– |
Attaching the front panel |
8 |
|
||||
Resetting the microprocessor |
8 |
|
|||||
Use and care of the remote control |
8 |
||||||
– |
Installing the battery 8 |
|
|
||||
– |
Using the remote control |
9 |
|
||||
What’s what |
|
|
|
|
|
||
Head unit |
10 |
|
|
|
|
|
|
Remote control |
11 |
|
|
|
|||
Display indication |
12 |
|
|
|
|||
Basic Operations |
|
|
|
||||
Power ON/OFF |
14 |
|
|
|
|||
– |
Turning the unit on |
14 |
|
|
|||
– |
Turning the unit off |
14 |
|
|
|||
Selecting a source |
14 |
|
|
|
|||
Adjusting the volume 14 |
|
|
|||||
Tuner |
|
|
|
|
|
|
|
Basic Operations |
15 |
|
|
|
|||
Storing and recalling broadcast |
|
|
|||||
frequencies |
15 |
|
|
|
|||
– |
Using the remote control |
15 |
|
||||
Introduction to advanced operations |
15 |
||||||
Storing the strongest broadcast |
|
|
|||||
frequencies |
16 |
|
|
|
|||
Tuning in strong signals |
16 |
|
|
||||
Built-in CD Player |
|
|
|
||||
Basic Operations |
17 |
|
|
|
|||
2 |
En |
Displaying text information on disc |
17 |
|||
Selecting a track directly 18 |
|
|
|
|
Selecting tracks from the track title list 18 |
||||
Selecting files from the file name list |
18 |
|||
Introduction to advanced operations |
19 |
|||
Selecting a repeat play range |
19 |
|
||
Playing tracks in random order |
19 |
|
||
Scanning folders and tracks |
19 |
|
|
|
Pausing playback |
20 |
|
|
|
Using advanced sound retriever |
20 |
|
||
Entering disc titles |
20 |
|
|
|
 Playing songs on USB storage device
Basic Operations |
21 |
|
|
|
Displaying text information of an audio |
||||
file |
21 |
|
|
|
Selecting a track directly 21 |
|
|
||
Selecting files from the file name list |
21 |
|||
Introduction to advanced operations |
21 |
|||
– |
Function and operation |
21 |
|
|
Playing songs on iPod |
|
|
||
Basic Operations |
23 |
|
|
|
Browsing for a song 23 |
|
|
||
– Searching songs by category |
23 |
|||
– |
Searching by alphabet in the list 23 |
|||
Displaying text information on iPod |
24 |
|||
Introduction to advanced operations |
24 |
|||
– |
Function and operation |
24 |
|
|
Playing songs in a random order (shuffle) 24
Playing all songs in a random order (shuffle all) 25
Playing songs related to the currently playing song 25
Operating this unit’s iPod function from your iPod 25
Changing audiobook speed 26
 Using Bluetooth wireless technology
Connecting a Bluetooth device 27
<YRD5281-A/S>2
Black plate (3,1)
 Contents
English
– |
Introduction to connection |
|
||
|
operations 27 |
|
|
|
– |
Using a Bluetooth device to pair 28 |
|||
– |
Pairing from this unit |
28 |
|
|
– |
Disconnecting a Bluetooth device |
29 |
||
– |
Deleting a paired Bluetooth device |
29 |
||
– |
Connecting a paired Bluetooth device |
|||
|
and selecting a service 29 |
|
||
– |
Connecting to a Bluetooth device |
|
||
|
automatically 30 |
|
|
|
– |
Displaying system version for |
|
||
|
repair |
30 |
|
|
– |
Displaying BD (Bluetooth Device) |
|
||
|
address |
30 |
|
|
– |
Editing device name |
30 |
|
|
–Entering PIN code for Bluetooth wireless connection 31
Bluetooth Audio |
31 |
|
|
|
– |
Setting up for Bluetooth audio |
32 |
||
– |
Basic Operations 32 |
|
||
– |
Introduction to advanced |
|
||
|
operations |
32 |
|
|
– |
Playing songs on a Bluetooth audio |
|||
|
player 32 |
|
|
|
– |
Stopping playback |
32 |
|
|
Bluetooth Telephone 32 |
|
|
||
– |
Setting up for hands-free phoning 33 |
|||
– |
Making a phone call |
33 |
|
|
– |
Taking a phone call |
33 |
|
|
– |
Using the phone number list |
34 |
||
–Calling a number in the phone book 34
–Using the missed, received and dialed
|
call lists 35 |
– |
Introduction to advanced |
|
operations 35 |
– |
Transferring entries to the phone |
|
book 36 |
– |
Setting automatic answering 36 |
– |
Adjusting the intended party’s listening |
|
volume 36 |
– |
Switching the ring tone 37 |
–Making a call by entering phone number 37
– Setting the private mode |
37 |
|
|||||
Audio Adjustments |
|
|
|
|
|||
Introduction of audio adjustments |
38 |
||||||
Using balance adjustment |
38 |
|
|
||||
Using the equalizer |
38 |
|
|
|
|
||
– |
Recalling equalizer curves |
38 |
|||||
– |
Adjusting equalizer curves |
39 |
|||||
– |
Fine-adjusting equalizer curve |
39 |
|||||
Adjusting loudness |
39 |
|
|
|
|
||
Using subwoofer output |
40 |
|
|
||||
– |
Adjusting subwoofer settings |
40 |
|||||
Using the high pass filter |
40 |
|
|
||||
Boosting the bass |
|
41 |
|
|
|
|
|
Adjusting source levels |
41 |
|
|
|
|||
Initial Settings |
|
|
|
|
|
|
|
Adjusting initial settings |
42 |
|
|
||||
Selecting the language |
42 |
|
|
|
|||
Setting the date |
42 |
|
|
|
|
||
Setting the clock |
42 |
|
|
|
|
||
Switching the warning tone |
43 |
|
|
||||
Switching the auxiliary setting |
43 |
|
|||||
Setting the rear output and subwoofer |
|||||||
output 43 |
|
|
|
|
|
|
|
Switching the ever scroll |
44 |
|
|
||||
Activating the BT AUDIO source |
44 |
||||||
Resetting the Bluetooth wireless technology module 44
Updating the software about Bluetooth connection 44
 Other Functions
Using the AUX source 45
– About AUX1 (auxiliary device 1) and AUX2 (auxiliary device 2) 45
En |
3 |
<YRD5281-A/S>3
Black plate (4,1)


 Contents
–AUX1 (auxiliary device 1) source: 45
–AUX2 (auxiliary device 2) source: 45
– |
Selecting AUX as the source |
45 |
– |
Setting the AUX title 45 |
|
Turning the clock display on or off |
45 |
|
Switching the display indication and button illumination 45
SMS (Short Message Service) Reception
Notification Function |
46 |
Using the external unit |
46 |
–Selecting the external unit as the source 46
– |
Basic operation |
46 |
|
|
|
|
|
– |
Advanced operations |
46 |
|
|
|
||
Using the PGM button |
47 |
|
|
|
|
||
Available accessories |
|
|
|
|
|
||
XM tuner 48 |
|
|
|
|
|
||
– |
Listening to XM Satellite Radio |
48 |
|||||
– |
Switching the XM display |
48 |
|
|
|||
– |
Selecting an XM channel directly |
48 |
|||||
– |
Storing and recalling broadcast |
|
|||||
|
stations |
48 |
|
|
|
|
|
– |
Selecting the XM channel select |
|
|||||
|
mode |
48 |
|
|
|
|
|
– |
Displaying the Radio ID |
49 |
|
|
|||
SIRIUS Satellite Radio tuner |
49 |
|
|
||||
– |
Listening to SIRIUS Satellite Radio |
49 |
|||||
– |
Switching the SIRIUS display |
49 |
|
||||
– |
Selecting a SIRIUS channel |
|
|
||||
|
directly |
50 |
|
|
|
|
|
– |
Storing and recalling broadcast |
|
|||||
|
stations |
50 |
|
|
|
|
|
– |
Introduction of advanced |
|
|
|
|||
|
operations 50 |
|
|
|
|
|
|
–Selecting the SIRIUS channel select mode 50
– |
Using the Game Alert function |
50 |
– |
Displaying the Radio ID 52 |
|
– |
Using Instant Replay function |
52 |
HD Radioä tuner 52
4 |
En |
– |
Basic Operations |
52 |
|
|
– |
Storing and recalling broadcast |
|||
|
frequencies |
52 |
|
|
– |
Switching the display 52 |
|
||
– |
Introduction to advanced |
|
||
|
operations |
53 |
|
|
– |
Switching the seek mode |
53 |
||
– |
Switching the reception mode 53 |
|||
Multi-CD Player |
53 |
|
|
|
– |
Basic Operations |
53 |
|
|
– |
Using CD TEXT functions |
54 |
||
– |
Selecting a track directly |
54 |
||
– |
Introduction to advanced |
|
||
|
operations |
54 |
|
|
–Using compression and bass emphasis 55
– |
Using ITS playlists |
55 |
|
|
|||
– |
Using disc title functions |
56 |
|
||||
Additional Information |
|
|
|
||||
Troubleshooting |
57 |
|
|
|
|||
Error messages |
57 |
|
|
|
|||
Handling guideline of discs and player |
59 |
||||||
Dual Discs |
59 |
|
|
|
|
|
|
Compressed audio compatibility |
60 |
|
|||||
Handling guideline and supplemental |
|
||||||
information |
60 |
|
|
|
|
||
– |
Compressed audio files on the |
|
|||||
|
disc |
60 |
|
|
|
|
|
– |
USB audio player/USB memory |
60 |
|||||
Example of a hierarchy 61 |
|
|
|||||
– |
The sequence of audio files on the |
||||||
|
disc |
61 |
|
|
|
|
|
– |
The sequence of audio files on USB |
||||||
|
memory |
61 |
|
|
|
|
|
iPod compatibility |
62 |
|
|
|
|||
About handling the iPod |
62 |
|
|
||||
– |
About iPod settings |
62 |
|
|
|||
Bluetooth profiles |
62 |
|
|
|
|||
Copyright and trademark notice |
62 |
|
|||||
Specifications |
65 |
|
|
|
|
||
<YRD5281-A/S>4
Black plate (5,1)
 Before You Start
Information to User |
|
|
|
|
|
|
|
|
|
Alteration or modifications carried out without |
|
||
|
|
|
|
|
appropriate authorization may invalidate the |
|
|
|
|
|
|
|
|
|
FCC ID: AJDK023 |
|||||
|
|
|
|
user’s right to operate the equipment. |
|
|
|
MODEL NO.: DEH-P6100BT |
|
|
|
|
|
|
|
|
|
|
|
|
|
|
|
|
|
|
|
|
IC: 775E-K023 |
|
|
! This transmitter must not be co-located or op- |
||
|
This device complies with Part 15 of FCC Rules |
|
|
|||
|
|
|
|
erated in conjunction with any other antenna |
||
|
and RSS-Gen of IC Rules. Operation is subject |
|
|
|
||
|
|
|
|
or transmitter. |
||
|
to the following two conditions: (1) this device |
|
|
|
||
|
|
|
! This equipment complies with FCC/IC radia- |
|||
|
may not cause interference, and (2) this device |
|
|
|||
|
|
|
|
tion exposure limits set forth for uncontrolled |
||
|
must accept any interference, including inter- |
|
|
|
||
|
|
|
|
equipment and meets the FCC/IC radio fre- |
||
|
ference that may cause undesired operation of |
|
|
|
||
|
|
|
|
quency (RF) Exposure Guidelines in Supple- |
||
|
this device. |
|
|
|
||
|
|
|
|
ment C to OET65 and RSS-102 of the IC radio |
||
|
MADE IN CHINA |
|
|
|
||
|
|
|
|
frequency (RF) exposure rules. This equipment |
||
|
|
|
|
|
||
|
|
|
|
|
has very low levels of RF energy that it is |
|
|
This equipment has been tested and found to |
|
|
|
deemed to comply without testing of specific |
|
|
|
|
|
absorption ratio (SAR). |
||
|
comply with the limits for a class B digital de- |
|
|
|
||
|
|
|
|
|
|
|
|
vice, pursuant to Part 15 of the FCC Rules. |
|
|
|
|
|
|
These limits are designed to provide reason- |
|
|
For Canadian model |
||
|
able protection against harmful interference in |
|
|
|||
|
a residential installation. |
|
|
|
|
|
|
This equipment generates, uses and can radi- |
|
|
|
This Class B digital apparatus complies with |
|
|
ate radio frequency energy and, if not installed |
|
|
|
Canadian ICES-003. |
|
|
and used in accordance with the instructions, |
|
|
|
|
|
|
|
|
|
|
|
|
|
may cause harmful interference to radio com- |
|
|
|
|
|
|
munications. However, there is no guarantee |
|
|
|
|
|
|
that interference will not occur in a particular |
|
|
About this unit |
||
|
installation. |
|
|
|||
|
|
|
The tuner frequencies on this unit are allo- |
|||
|
If this equipment dose cause harmful interfer- |
|
|
|||
|
|
|
cated for use in North America. Use in other |
|||
|
ence to radio or television reception, which |
|
|
|||
|
|
|
areas may result in poor reception. |
|||
|
can be determined by turning the equipment |
|
|
|||
|
|
|
|
|
|
|
|
off and on, the user is encouraged to try to cor- |
|
|
|
|
|
|
rect the interference by one or more of the fol- |
|
|
|
WARNING |
|
|
lowing measures: |
|
|
Handling the cord on this product or cords asso- |
||
|
! Reorient or relocate the receiving antenna. |
|
|
ciated with accessories sold with the product |
||
|
! Increase the separation between the equip- |
|
|
may expose you to chemicals listed on proposi- |
||
|
ment and receiver. |
|
|
tion 65 known to the State of California and other |
||
|
! Connect the equipment into an outlet on a |
|
|
governmental entities to cause cancer and birth |
||
|
circuit different from that to which the re- |
|
|
defects or other reproductive harm. Wash hands |
||
|
ceiver is connected. |
|
|
after handling. |
||
|
! Consult the dealer or an experienced radio/ |
|
|
|
|
|
|
TV technician for help. |
|
|
|
|
|
|
|
|
|
|
|
|
Section
01
English
En |
5 |
<YRD5281-A/S>5
Black plate (6,1)
Section
01  Before You Start
CAUTION:
USE OF CONTROL OR ADJUSTMENT OR PERFORMANCE OF PROCEDURES OTHER THAN THOSE SPECIFIED HEREIN MAY RESULT IN HAZARDOUS RADIATION EXPOSURE.
CAUTION:
THE USE OF OPTICAL INSTRUMENTS WITH THIS PRODUCT WILL INCREASE EYE HAZARD.
 CAUTION
!Do not allow this unit to come into contact with liquids. Electrical shock could result. Also, damage to this unit, smoke, and overheating could result from contact with liquids.
!Keep this manual handy as a reference for operating procedures and precautions.
!Always keep the volume low enough so that you can hear sounds from outside the vehicle.
!Protect this unit from moisture.
!If the battery is disconnected or discharged, the preset memory will be erased and must be reprogrammed.
 Important (Serial number)
The serial number is located on the bottom of this unit. For your own security and convenience, be sure to record this number on the enclosed warranty card.
you read and observe WARNINGs and CAUTIONs in this manual.
After-sales service for Pioneer products
Please contact the dealer or distributor from where you purchased this unit for after-sales service (including warranty conditions) or any other information. In case the necessary information is not available, please contact the companies listed below:
Please do not ship your unit to the companies at the addresses listed below for repair without advance contact.
U.S.A.
Pioneer Electronics (USA) Inc. CUSTOMER SUPPORT DIVISION P.O. Box 1760
Long Beach, CA 90801-1760 800-421-1404
CANADA
Pioneer Electronics of Canada, Inc. CUSTOMER SATISFACTION DEPARTMENT 300 Allstate Parkway
Markham, Ontario L3R 0P2 1-877-283-5901 905-479-4411
For warranty information please see the Limited Warranty sheet included with this unit.
About this manual
This unit features a number of sophisticated functions ensuring superior reception and operation. All the functions have been designed for the easiest possible use, but many are not self-explanatory. This operation manual will help you benefit fully from this unit’s potential and to maximize your listening enjoyment. We recommend that you familiarize yourself with the functions and their operation by reading through the manual before you begin using this unit. It is especially important that
6 |
En |
Visit our website
Visit us at the following site: http://www.pioneerelectronics.com
1Register your product. We will keep the details of your purchase on file to help you refer to this information in the event of an insurance claim such as loss or theft.
2Receive updates on the latest products and technologies.
<YRD5281-A/S>6
|
Black plate (7,1) |
|
Section |
Before You Start |
01 |
3 Download owner’s manuals, order product |
player even if that data is lost while using this |
catalogues, research new products, and |
unit. |
much more. |
! Pioneer accepts no responsibility for data lost |
|
on the iPod even if that data is lost while |
|
using this unit. |
Features
English
This unit is compatible with a wide variety of file formats and media/storage devices.
File format compatibility
!WMA
!MP3
!AAC
!WAV
For details about compatibility, refer to Compressed audio compatibility on page 60.
Media/storage device compatibility
!CD/CD-R/CD-RW
!USB portable audio player/USB memory Make inquiries to the manufacturer about your USB portable audio player/USB memory. For details about the supported device, refer to
Specifications on page 65.
iPod compatibility
This unit can control and listen to songs on an iPod.
In this manual, iPod and iPhone will be referred to as iPod.
For details about the supported iPod, refer to iPod compatibility on page 62.
Hands-free phoning
This unit realizes effortless hands-free phoning with Bluetooth wireless technology.
Bluetooth audio player compatibility
When you use this unit with a Bluetooth audio player featuring Bluetooth wireless technology, you can control the Bluetooth audio player.
 CAUTION
!Pioneer accepts no responsibility for data lost on the USB memory/USB portable audio
Operating environment
This unit should be used within the temperature ranges shown below.
Operating temperature range: -10 °C to +60 °C (14 °F to 140 °F)
EN300328 ETC test temperature: -20 °C and +55 °C (-4 °F and 131 °F)
Protecting your unit from theft
The front panel can be detached to deter theft.
 Important
!Handle gently when removing or attaching the front panel.
!Avoid subjecting the front panel to excessive shock.
!Keep the front panel out of direct sunlight and high temperatures.
!Before detaching, be sure to remove the AUX/ USB cable and USB device from the front panel. If they are not removed, this unit, any connected devices or the vehicle interior may be damaged.
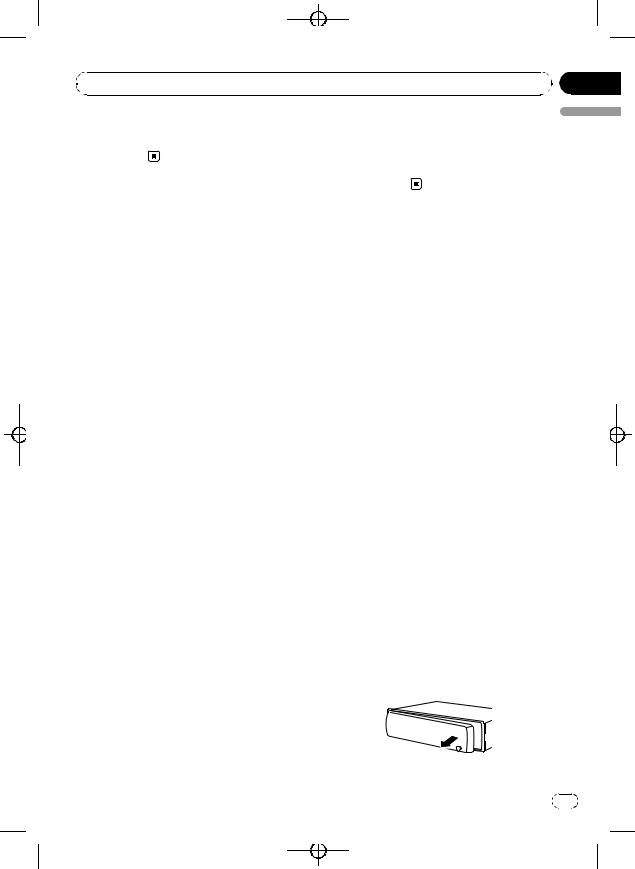
Removing the front panel
1Press  (detach) to release the front panel.
2Grab the front panel and remove.
En |
7 |
<YRD5281-A/S>7

Black plate (8,1)
Section
01  Before You Start
3 Put the front panel into the provided protective case for safe keeping.
2 Press RESET with a pen tip or other pointed instrument.
Attaching the front panel
1 Slide the front panel to the left until it clicks.
Front panel and the head unit are jointed on
the left side. Make sure that the front panel
RESET button
has been jointed to the head unit.
2 Press the right side of the front panel until it is firmly seated.
# If you can’t attach the front panel to the head unit successfully, try again. Front panel may be damaged if you attach the front panel forcedly.
Use and care of the remote control
Installing the battery
Slide the tray on the back of the remote control out and insert the battery with the plus (+) and minus (–) poles aligned properly.
Resetting the microprocessor
The microprocessor must be reset under the following conditions:
!Prior to using this unit for the first time after installation
!If the unit fails to operate properly
!When strange or incorrect messages appear on the display
1 Remove the front panel.
Refer to Removing the front panel on the previous page.
 8
8 En
En
 WARNING
! Keep the battery out of the reach of children. Should the battery be swallowed, consult a doctor immediately.
!Batteries (battery pack or batteries installed) shall not be exposed to excessive heat such as sunshine, fire or the like.
 CAUTION
!Use one CR2025 (3 V) lithium battery.
!Remove the battery if the remote control is not used for a month or longer.
!There is a danger of explosion if the battery is incorrectly replaced. Replace only with the same or equivalent type.
!Do not handle the battery with metallic tools.
!Do not store the battery with metallic objects.
!If the battery leaks, wipe the remote control completely clean and install a new battery.
<YRD5281-A/S>8

 Before You Start
!When disposing of used batteries, comply with governmental regulations or environmental public institutions’ rules that apply in your country/area.
!“Perchlorate Material – special handling may apply.
See www.dtsc.ca.gov/hazardouswaste/ perchlorate. (Applicable to California, U.S.A.)”
Using the remote control
Point the remote control in the direction of the front panel to operate.
!The remote control may not function properly in direct sunlight.
 Important
!Do not store the remote control in high temperatures or direct sunlight.
!Do not let the remote control fall onto the
floor, where it may become jammed under the brake or accelerator pedal.
Black plate (9,1)
Section
01
English
En |
9 |
<YRD5281-A/S>9
Black plate (10,1)
Section
02  What’s what
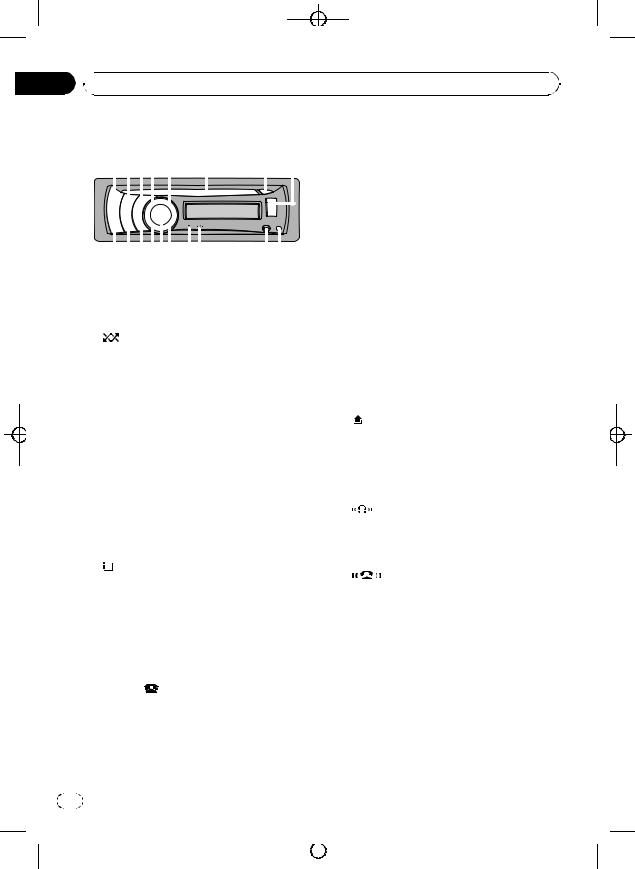
|
Head unit |
|
|
|
|
|
|
|
|
|
|
|
Press and hold to select TELEPHONE as a |
||||||||||||
|
|
|
|
|
|
|
|
source. |
|||||||||||||||||
|
|
|
|
|
|
|
|||||||||||||||||||
|
|
|
|
|
|
|
|
|
|
|
|
|
|
|
|
|
|
|
|
|
6 Disc loading slot |
||||
|
|
|
|
|
|
|
|
|
|
|
|
|
|
|
|
|
|
|
|
|
|
|
Insert a CD/CD-R/CD-RW to play. |
||
|
|
|
|
|
|
|
|
|
|
|
|
|
|
|
|
|
|
|
|
|
|
7 h (eject) button |
|||
|
|
|
|
|
|
|
|
|
|
|
|
|
|
|
|
|
|
|
|
|
|
||||
|
|
|
|
|
|
|
|
|
|
|
|
|
|
|
|
|
|
|
|
|
|
||||
|
|
|
|
|
|
|
|
|
|
|
|
|
|
|
|
|
|
|
|
|
|
|
Press to eject a CD/CD-R/CD-RW. |
||
|
|
|
|
|
|
|
|
|
|
|
|
|
|
|
|
|
|
|
|
|
|
|
|||
|
|
|
|
|
|
|
|
|
|
|
|
|
|
|
|
|
|
|
|
|
|
8 USB port |
|||
|
|
|
|
|
|
|
|
|
|
|
|
|
|
|
|
|
|
|
Use to connect a USB storage device and |
||||||
|
|
|
|
|
|
|
|
|
|
|
|||||||||||||||
|
|
|
|
|
|
|
|
an iPod. |
|||||||||||||||||
|
|
|
|
|
|
|
|
|
|
|
|
|
|
|
|
|
|
|
|
|
|
|
|||
|
1 SRC/OFF button |
|
|
|
|
|
|
|
! When connecting, open up the USB con- |
||||||||||||||||
|
|
Press to cycle through all the available |
|
|
nector lid. |
||||||||||||||||||||
|
|
sources. Press and hold to turn the unit off. |
|
! Use an optional Pioneer USB cable (CD- |
|||||||||||||||||||||
2 |
|
|
|
/iPod button |
|
|
|
|
|
|
|
|
U50E) to connect the USB audio player/ |
||||||||||||
|
|
|
|
|
|
|
|
|
|
|
USB memory to the USB port. Since the |
||||||||||||||
|
|
Press to turn random function on or off |
|
|
USB audio player/USB memory is pro- |
||||||||||||||||||||
|
|
while using CD or USB. |
|
|
|
|
|
|
|
|
jected forward from the unit, it is danger- |
||||||||||||||
|
|
While using an iPod, press to shuffle all |
|
|
ous to connect directly. |
||||||||||||||||||||
|
|
tracks. |
|
|
|
|
|
|
|
|
|
|
|
|
|
|
|
Do not use the unauthorized product. |
|||||||
|
|
Press and hold to switch the control mode |
|
|
(detach) button |
||||||||||||||||||||
|
|
while using an iPod. |
|
|
|
|
|
|
9 |
|
|||||||||||||||
|
|
For details, refer to Operating this unit’s iPod |
|
Press to remove the front panel from the |
|||||||||||||||||||||
|
|
function from your iPod on page 25. |
|
head unit. |
|||||||||||||||||||||
|
3 SW/BASS button |
|
|
|
|
|
|
a AUX input jack (3.5 mm stereo jack) |
|||||||||||||||||
|
|
Press to switch to subwoofer setting menu. |
|
Use to connect an auxiliary device. |
|||||||||||||||||||||
|
|
When operating subwoofer menu, press to |
b |
|
indicator |
||||||||||||||||||||
|
|
switch menu. |
|
|
|
|
|
|
|
|
|
|
|
||||||||||||
|
|
|
|
|
|
|
|
|
|
|
|
|
Lights up when your Bluetooth audio player |
||||||||||||
|
|
Press and hold to switch to bass boost |
|
||||||||||||||||||||||
|
|
|
is connected via Bluetooth wireless technol- |
||||||||||||||||||||||
|
|
menu. |
|
|
|
|
|
|
|
|
|
|
|
|
|
|
|||||||||
|
|
|
|
|
|
|
|
|
|
|
|
|
|
|
|
ogy. |
|||||||||
|
|
|
|
|
|
|
|
|
|
|
|
|
|
|
|
|
|
|
|
|
|
|
|||
4 |
|
|
|
/LIST button |
|
|
|
|
|
|
|
|
|
|
c |
|
|
indicator |
|||||||
|
|
|
|
|
|
|
|
|
|
|
|
|
|
|
|||||||||||
|
|
|
|
|
|
|
|
|
|
|
|
|
|
|
|||||||||||
|
|
|
|
|
|
|
|
|
|
|
|
|
|
|
|||||||||||
|
|
Press to display the track title list, folder list, |
|
|
|||||||||||||||||||||
|
|
|
|
||||||||||||||||||||||
|
|
|
Lights up when your cellular phone is con- |
||||||||||||||||||||||
|
|
file list or preset channel list depending on |
|
||||||||||||||||||||||
|
|
|
nected via Bluetooth wireless technology. |
||||||||||||||||||||||
|
|
the source. |
|
|
|
|
|
|
|
|
|
|
|
|
|
|
|||||||||
|
|
|
|
|
|
|
|
|
|
|
|
|
|
|
|
! When selecting a source other than |
|||||||||
|
|
Press and hold to switch to link play mode |
|
||||||||||||||||||||||
|
|
|
|
TELEPHONE, it flashes while using |
|||||||||||||||||||||
|
|
while using an iPod. |
|
|
|
|
|
|
|
|
|||||||||||||||
|
|
|
|
|
|
|
|
|
|
hands-free phoning. |
|||||||||||||||
|
|
For details, refer to Playing songs related to |
|
|
|||||||||||||||||||||
|
|
|
|
|
|
||||||||||||||||||||
|
|
the currently playing song on page 25. |
d MUTE/HOLD button |
||||||||||||||||||||||
|
|
|
|
|
|
|
|
|
|
|
|
|
|
|
|
|
|
|
|
|
|
||||
|
5 PHONE/ |
/BT MENU button |
|
|
|
|
|
|
|
Press to turn off the sound. To turn on the |
|||||||||||||||
|
|
|
|
|
|
|
|
sound, press again. |
|||||||||||||||||
|
|
Press to display the phone book list. While |
|
||||||||||||||||||||||
|
|
|
While talking on the phone, press to put the |
||||||||||||||||||||||
|
|
operating a phone call, press to end a call, |
|
||||||||||||||||||||||
|
|
|
call on hold. |
||||||||||||||||||||||
|
|
reject an incoming call or cancel making a |
|
||||||||||||||||||||||
|
|
|
|
|
|
||||||||||||||||||||
|
|
call. |
|
|
|
|
|
|
|
|
|
|
|
|
|
|
|
|
|
||||||
|
|
|
|
|
|
|
|
|
|
|
|
|
|
|
|
|
|
|
|
||||||
10 |
En |
|
|
|
|
|
|
|
|
|
|
|
|
|
|
|
|
|
|||||||
|
|
|
|
|
|
|
|
|
|
|
|
|
|
|
|
|
|
|
|
|
|
|
|
|
<YRD5281-A/S>10 |
|
|
|
|
|
|
|
|
|
|
|
|
|
|
|
|
|
|
|
|
|
|
|
|
||
|
|
|
|
|
|
|
|
|
|
|
|
|
|
|
|
|
|
|
|
|
|
|
|
||
|
|
|
|
|
|
|
|
|
|
|
|
|
|
|
|
|
|
|
|
|
|
|
|
|
|
Black plate (11,1)
 What’s what
e MULTI-CONTROL |
Remote control |
|||||||||||||||
Move to perform manual seek tuning, fast |
Operation is the same as when using the but- |
|||||||||||||||
forward, reverse and track search controls. |
||||||||||||||||
tons on the head unit. |
|
|
|
|
|
|
||||||||||
When a call comes in, press to answer the |
|
|
|
|
|
|
||||||||||
|
|
|
|
|
|
|
|
|
|
|
|
|
|
|
||
incoming call. |
|
|
|
|
|
|
||||||||||
Also used for controlling functions. |
|
|
|
|
|
|
|
|
|
|
|
|
|
|
|
|
Turn to increase or decrease the volume. |
|
|
|
|
|
|
|
|
|
|
|
|
|
|
|
|
|
|
|
|
|
|
|
|
|
|
|
|
|
|
|
||
! While using hands-free phoning, you can |
|
|
|
|
|
|
|
|
|
|
|
|
|
|
|
|
|
|
|
|
|
|
|
|
|
|
|
|
|
|
|
||
select END VOLUME and switch |
|
|
|
|
|
|
|
|
|
|
|
|
|
|
|
|
END VOLUME and PRIVATE in |
|
|
|
|
|
|
|
|
|
|
|
|
||||
|
|
|
|
|
|
|
||||||||||
FUNCTION by pressing |
|
|
|
|
|
|
|
|
|
|
|
|
|
|
||
MULTI-CONTROL. |
|
|
|
|
|
|
|
|
|
|
|
|
|
|
||
|
|
|
|
|
|
|
|
|
|
|
|
|||||
|
|
|
|
|
|
|
|
|
|
|
|
|
|
|||
|
|
|
|
|
|
|
|
|
|
|
|
|||||
f DISP/SCRL button |
|
|
|
|
|
|
|
|
|
|
|
|
||||
|
|
|
|
|
|
|
|
|
|
|
|
|
||||
Press to select different displays.
Press and hold to scroll through the text information.
Section
02
English
g S.Rtrv/SAT MODE button
Press to switch advanced sound retriever settings.
!When XM tuner or SIRIUS tuner is selected as the source, press to change the channel select mode.
!When SIRIUS tuner is selected as the source, press and hold to perform the Instant Replay mode.
h CLOCK/DISP OFF button
Press to change to the clock display.
Press and hold to turn the display indication and button illumination off or on.
i BAND/ESC button
Press to select among three FM bands and one AM band.
Press to return to the ordinary display when operating the menu.
j VOLUME buttons
Press to increase or decrease the volume.
kFUNCTION button
Press to select functions.
lThumb pad
Move to perform manual seek tuning, fast forward, reverse and track search controls. Also used for controlling functions.
Functions are the same as MULTI-CONTROL except for volume control.
m DIRECT button
Press to directly select the desired track. Press to enter a phone number while operating a phone source.
n CLEAR button
Press to cancel the input number when 0 to 9 are used.
o 0 to 9 buttons
Press to directly select the desired track or preset tuning. Buttons 1 to 6 can operate the preset tuning for the tuner.
Press to enter a phone number while operating a phone source.
En  11
11
<YRD5281-A/S>11
Black plate (12,1)
Section
02  What’s what
p  (off hook) button
Press to start talking on the phone while operating a phone source.
q  (on hook) button
While operating the phone source, press to end a call or reject an incoming call.
r  (mute) button
Press to turn off the sound. To turn on the sound, press again.
s PGM button
Press to operate the preprogrammed functions for each source. (Refer to Using the PGM button on page 47.)
t AUDIO button
Press to select an audio function.
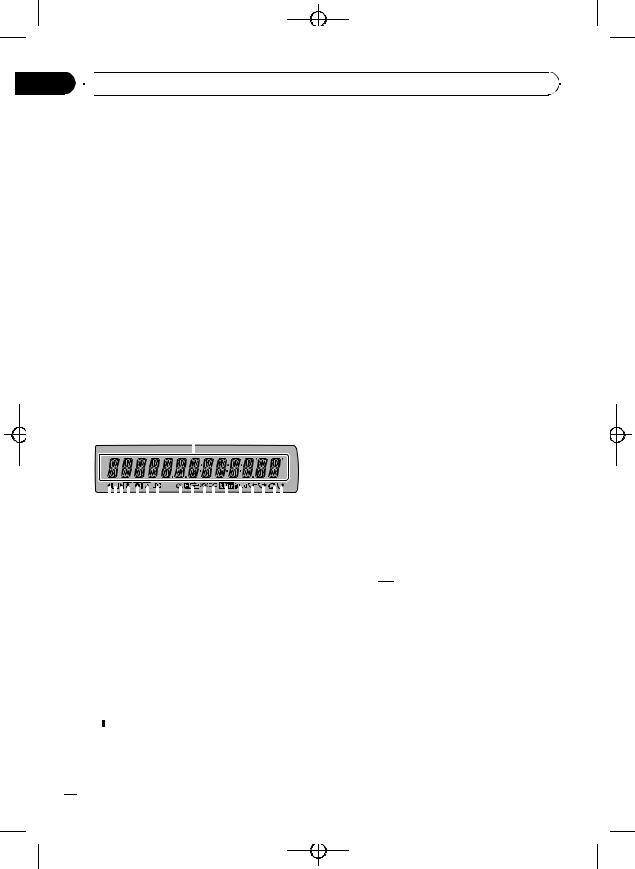
Display indication
|
|
|
|
|
|
|
|
|
|
|
|
|
|
|
|
|
|
||||
|
|
|
|
|
|
|
|
|
|
|
|
|
|
|
|
|
|
|
|
|
|
|
|
|
|
|
|
|
|
|
|
|
|
|
|
|
|
|
|
|
|
|
|
|
|
|
|
|
|
|
|
|
|
|
|
|
|
|
|
|
|
|
|
|
|
|
|
|
|
|
|
|
|
|
|
|
|
|
|
|
|
|
|
|
|||
|
|
|
|
|
|
|
|
|
|
|
|
|
|||||||||
|
|
|
|
|
|
|
|
|
|
|
|
|
|
|
|
|
|
|
|||
|
|
|
|||||||||||||||||||
1 Main display section
Displays band, frequency, elapsed playback time and other settings.
!Tuner
Band and frequency are displayed.
!Built-in CD player, USB storage device, iPod
Elapsed playback time and literal information are displayed.
2 c indicator
Appears when an upper tier of folder or menu exists.
3  (list) indicator
Appears when operating list function.
4 d indicator
Appears when a lower tier of folder or menu exists.
5  (artist) indicator
Appears when the disc (track) artist name is displayed on the main display section. Appears when artist search refinement on the iPod browsing function is in use.
6  (disc) indicator
Appears when the disc (album) name is displayed on the main display section. Appears when album search refinement on the iPod browsing function is in use.
7  (song) indicator
Appears when the track (song) name is displayed on the main display section. Appears when song search refinement on the iPod browsing function is in use.
8 LOC indicator
Appears when local seek tuning is on.
9 5 (stereo) indicator
Appears when the selected frequency is being broadcast in stereo.
a (folder repeat) indicator
Appears when folder repeat is on.
When repeat function is on, only is displayed.
b
 (folder random) indicator
Appears when folder random is on.
When random function is on, only
 is displayed.
c (shuffle) indicator
Appears when shuffle function is on while the iPod source is being selected.
d  (Sound Retriever) indicator
Appears when Sound Retriever function is on.
For details, refer to Using advanced sound retriever on page 20.
 12
12 En
En
<YRD5281-A/S>12
 What’s what
e  indicator
Appears when CONTROL (control mode) is set to IPOD.
For details about the control mode, refer to
Operating this unit’s iPod function from your iPod on page 25.
f  (received call) indicator
Appears when received call list is displayed while telephone source is being selected.
g  (dialled call) indicator
Appears when dialled call list is displayed while telephone source is being selected.
h  (auto answer) indicator
Shows when the automatic answering function is on (Refer to Setting automatic answering on page 36).
i  (missed call) indicator
Appears when there are missed call log. Appears when missed call list is displayed while telephone source is being selected.
Black plate (13,1)
Section
02
English
En  13
13
<YRD5281-A/S>13

|
|
|
|
|
Section |
|
|
|
|
Black plate (14,1) |
|
|
|
|
|
|
|
|
|
|
|||
|
|
|
|
|
|
|
|
|
|||
|
|
|
|
|
|
|
|
|
|
|
|
|
|
|
|
|
|
|
|
|
|
|
|
|
|
03 |
|
|
|
|
|
||||
|
|
Basic Operations |
|
|
|
||||||
|
|
|
|
|
|
|
|
|
|
|
|
|
|
|
|
|
|
Power ON/OFF |
! Auxiliary unit 1 is set to on by default. Turn off |
||||
|
|
|
|
|
|
Turning the unit on |
|
the auxiliary unit 1 when not in use (refer to |
|||
|
|
|
|
|
|
|
Switching the auxiliary setting on page 43). |
||||
|
|
|
|
|
|
% Press SRC/OFF to turn the unit on. |
! Charging the portable audio player using |
||||
|
|
|
|
|
|
|
car’s DC power source while connecting it to |
||||
|
|
|
|
|
|
|
|
|
|
||
|
|
|
|
|
|
Turning the unit off |
|
AUX input may generate noise. In this case, |
|||
|
|
|
|
|
|
|
stop charging. |
||||
|
|
|
|
|
|
% Press SRC/OFF and hold until the unit |
! External unit refers to a Pioneer product (such |
||||
|
|
|
|
|
|
|
as ones available in the future) that, although |
||||
|
|
|
|
|
|
turns off. |
|
||||
|
|
|
|
|
|
|
incompatible as a source, enables control of |
||||
|
|
|
|
|
|
|
|
|
|
||
|
|
|
|
|
|
|
|
|
|
basic functions with this unit. Two external |
|
|
|
|
|
|
|
Selecting a source |
|
units can be controlled with this unit. When |
|||
|
|
|
|
|
|
|
two external units are connected, the external |
||||
|
|
|
|
|
|
You can select a source you want to listen to. |
|
unit is automatically allocated to external unit |
|||
|
|
|
|
|
|
To switch to the built-in CD player, load a disc |
|
1 or external unit 2 by this unit. |
|||
|
|
|
|
|
|
in the unit. Refer to page 17. |
! When this unit’s blue/white lead is connected |
||||
|
|
|
|
|
|
% Press SRC/OFF repeatedly to switch be- |
|
to the vehicle’s auto-antenna relay control |
|||
|
|
|
|
|
|
|
terminal, the vehicle’s antenna extends when |
||||
|
|
|
|
|
|
tween the following sources. |
|
this unit’s source is turned on. To retract the |
|||
|
|
|
|
|
|
XM TUNER (XM tuner)—SIRIUS (SIRIUS |
|
antenna, turn the source off. |
|||
|
|
|
|
|
|
tuner)—HD RADIO (HD Radio tuner)— |
|
|
|
||
|
|
|
|
|
|
|
|
|
|||
|
|
|
|
|
|
TUNER (tuner)—COMPACT DISC (built-in CD |
|
|
|
||
|
|
|
|
|
|
player)—MULTI CD (multi-CD player)—USB |
Adjusting the volume |
||||
|
|
|
|
|
|
||||||
|
|
|
|
|
|
(USB storage device)/USB-IPOD (iPod con- |
|||||
|
|
|
|
|
|
% Turn MULTI-CONTROL to adjust the |
|||||
|
|
|
|
|
|
nected using USB input)—EXTERNAL (exter- |
|||||
|
|
|
|
|
|
nal unit 1)—EXTERNAL (external unit 2)— |
sound level. |
||||
|
|
|
|
|
|
AUX (auxiliary unit 1)—AUX (auxiliary unit 2) |
|
|
|
||
|
|
|
|
|
|
—BT AUDIO (Bluetooth audio) |
|
|
|
||
 Notes
Notes
!In the following cases, the sound source will not change.
—When no unit corresponding to the selected source is connected.
—When there is no disc or magazine in the player.
—When AUX (auxiliary input) is set to off (refer to page 43).
—When the BT AUDIO source is set to off (refer to Activating the BT AUDIO source on page 44).
!If the HD Radio tuner is connected to this unit, tuner source is skipped.
!When an USB storage device or iPod is not connected to the USB port of this unit, NO DEVICE is displayed.
 14
14 En
En
<YRD5281-A/S>14
Black plate (15,1)
 Tuner
Tuner
Basic Operations |
Using the remote control |
% Selecting a band Press BAND/ESC.
# Band can be selected from among FM1, FM2,
FM3 or AM.
%Manual tuning (step by step)
Push MULTI-CONTROL left or right.
%Seeking tuning
Push and hold MULTI-CONTROL left or right, and then release.
#You can cancel seek tuning by pushing
MULTI-CONTROL left or right.
#While pushing and holding MULTI-CONTROL left or right, you can skip stations. Seek tuning
starts as soon as you release
MULTI-CONTROL.
% When you find a frequency that you want to store in memory, press one of preset tuning buttons 1 to 6 and hold until the preset number stops flashing.
The number you have pressed will flash in the preset number indicator and then remain lit. The selected radio station frequency has been stored in memory.
The next time you press the same preset tuning button the radio station frequency is recalled from memory.
 Note
Note
You can also recall radio station frequencies assigned to preset tuning numbers by pushing MULTI-CONTROL up or down during the frequency display.
Section
04
English
Storing and recalling broadcast frequencies
You can easily store up to six broadcast frequencies for later recall.
!Six stations for each band can be stored in memory.
1 Press  /LIST.
Preset screen is displayed.
2Use MULTI-CONTROL to store the selected frequency in memory.
Turn to change the preset number. Press and hold to store.
3Use MULTI-CONTROL to select the desired station.
Turn to change the station. Press to select.
# You can also change the station by pushing
MULTI-CONTROL up or down.
# To return to the ordinary display, press
BAND/ESC or  /LIST.
# If you do not operate the list within about 30 seconds, the display automatically returns to the ordinary display.
Introduction to advanced operations
1Press MULTI-CONTROL to display the main menu.
2Use MULTI-CONTROL to select FUNCTION.
Turn to change the menu option. Press to select.
The function menu is displayed.
3Turn MULTI-CONTROL to select the function.
BSM (best stations memory)—LOCAL (local seek tuning)
 Note
Note
To return to the ordinary display, press
BAND/ESC.
En  15
15
<YRD5281-A/S>15

Black plate (16,1)
Section
04  Tuner
Tuner
Storing the strongest broadcast frequencies
BSM (best stations memory) lets you automatically store the six strongest broadcast frequencies.
1 Display the function menu.
Refer to Introduction to advanced operations on the previous page.
2Use MULTI-CONTROL to select BSM in the function menu.
3Press MULTI-CONTROL to turn BSM on.
The six strongest broadcast frequencies are
stored in the order of their signal strength.
# To cancel, press MULTI-CONTROL again.
Tuning in strong signals
Local seek tuning lets you tune in only those radio stations with sufficiently strong signals for good reception.
1 Display the function menu.
Refer to Introduction to advanced operations on the previous page.
2Use MULTI-CONTROL to select LOCAL in the function menu.
3Press MULTI-CONTROL to turn local seek tuning on.
# To turn local seek tuning off, press
MULTI-CONTROL again.
4 Push MULTI-CONTROL left or right to set the sensitivity.
FM: LEVEL1—LEVEL2—LEVEL3—LEVEL4 AM: LEVEL1—LEVEL2
Larger setting number is higher level. The highest level setting allows reception of only the strongest stations, while lower settings let you receive progressively weaker stations.
 16
16 En
En
<YRD5281-A/S>16
Black plate (17,1)
 Built-in CD Player
Basic Operations |
! There is sometimes a delay between starting |
|
% Inserting a CD/CD-R/CD-RW into the |
up disc playback and the sound being issued. |
|
When being read, FORMAT READ is dis- |
||
disc loading slot |
played. |
|
Playback will automatically start. |
! If an error message is displayed, refer to Error |
|
# When loading a CD/CD-R/CD-RW, face |
||
messages on page 57. |
||
the label side of a disc up. |
! Playback is carried out in order of file number. |
|
% Ejecting a CD/CD-R/CD-RW |
Folders are skipped if they contain no files. (If |
|
folder 01 (ROOT) contains no files, playback |
||
Press h (eject). |
||
commences with folder 02.) |
||
|
||
% Selecting a folder |
! You can eject the CD by pressing and holding |
|
Push MULTI-CONTROL up or down. |
h (eject) with eject position when the CD |
|
# You cannot select a folder that does not have |
loading or ejecting cannot operate properly. |
|
a compressed audio file recorded in it. |
|
Section
05
English
% Selecting a track
Push MULTI-CONTROL left or right.
% Fast forwarding or reversing
Push and hold MULTI-CONTROL left or right.
# When playing compressed audio, there is no sound on fast forward or reverse.
% Returning to root folder
Press and hold BAND/ESC.
# If folder 01 (ROOT) contains no files, playback commences with folder 02.
% Switching between compressed audio and CD-DA
Press BAND/ESC.
#This operation is available only when playing CD-EXTRA or MIXED-MODE CDs.
#If you have switched between compressed audio and CD-DA, playback starts at the first track on the disc.
 Notes
Notes
!The built-in CD player can play back audio CD and compressed audio recorded on a CDROM. (Please see the following section for files that can be played back. Refer to page 60.)
!Read the precautions for the player and discs in the following section. Refer to page 59.
!A disc has already been inserted, press SRC/OFF to select the built-in CD player.
Displaying text information on disc
% Press DISP/SCRL to select the desired text information.
For title entered CD
Play time—disc title
For CD TEXT discs
Play time—disc title—disc artist name—track title—track artist name
For WMA/MP3/AAC
Play time—folder name—file name—track title—artist name—album title—comment— bit rate—folder and file numbers
For WAV
Play time—folder name—file name—sam- pling frequency—folder and file numbers
 Notes
Notes
!You can scroll to the left of the title by pressing and holding DISP/SCRL.
!Audio CD that contains certain information such as text and/or number is CD TEXT.
!If the characters recorded on the audio file are not compatible with this unit, those characters will not be displayed.
!If specific information is not recorded on a disc, title or name is not displayed.
!The text information of some audio files may not be correctly displayed.
En  17
17
<YRD5281-A/S>17
Black plate (18,1)
Section
05  Built-in CD Player
!Depending on the version of iTunes used to write MP3 files onto a disc, comment information may not be correctly displayed.
!Depending on the version of Windows Mediaä Player used to encode WMA files, album
names and other text information may not be correctly displayed.
!When Ever Scroll is set to ON at the initial setting, text information scrolls continuously in
the display. Refer to Switching the ever scroll on page 44.
2 Use MULTI-CONTROL to select the desired track title.
Turn to change the track title. Press to play.
#You can also change the track title by pushing
MULTI-CONTROL up or down.
#To return to the ordinary display, press
BAND/ESC or  /LIST.
#If you do not operate the list within about 30
seconds, the display automatically returns to the ordinary display.
Selecting a track directly
When using the remote control, you can select a track directly by entering the desired track number.
When audio files are being played back, you can select track in the current folder.
1 Press DIRECT.
Track number input display appears.
2 Press 0 to 9 to enter the desired track number.
# You can cancel the input number by pressing
CLEAR.
3 Press DIRECT.
The track for the entered number will play.
 Note
Note
After entering the number input mode, if you do not perform an operation within about eight seconds, the mode is automatically canceled.
Selecting tracks from the track title list
Track title list lets you see the list of track titles on a CD TEXT disc and select one of them to play back.
1 Press  /LIST to switch to the track title list mode.
 18
18 En
En
Selecting files from the file name list
File name list lets you see the list of file names (or folder names) and select one of them to playback.
1Press  /LIST to switch to the file name list mode.
Names of files and folders appear in the display.
2Use MULTI-CONTROL to select the desired file name (or folder name).
Turn to change the name of file or folder.
—when a file is selected, press to play.
—when a folder is selected, press to see a list of files (or folders) in the selected folder.
—when a folder is selected, press and hold to
play a song in the selected folder.
#You can also play the file by pushing
MULTI-CONTROL right.
#You can also play a song in the selected folder by pushing and holding MULTI-CONTROL right.
#To return to the previous list (the folder one level higher), push MULTI-CONTROL left.
#To return to the ordinary display, press
BAND/ESC or  /LIST.
#If you do not operate the list within about 30
seconds, the display automatically returns to the ordinary display.
<YRD5281-A/S>18

Black plate (19,1)
 Built-in CD Player
Introduction to advanced |
# Performing track search or fast forward/re- |
|
operations |
verse during TRACK (track repeat) changes the |
|
repeat play range to disc/folder. |
||
|
||
1 Press MULTI-CONTROL to display the |
# When FOLDER (folder repeat) is selected, it is |
|
main menu. |
not possible to play back a subfolder of that |
|
2 Use MULTI-CONTROL to select |
folder. |
|
|
||
FUNCTION. |
|
|
Turn to change the menu option. Press to se- |
Playing tracks in random order |
|
lect. |
||
Tracks in a selected repeat range are played in |
||
The function menu is displayed. |
||
3 Turn MULTI-CONTROL to select the |
random order. |
|
% Press /iPod to turn random play on. |
||
function. |
||
REPEAT (repeat play)—RANDOM (random |
Tracks play in a random order. |
|
play)—SCAN (scan play)—PAUSE (pause)— |
# To turn random play off, press /iPod again. |
|
S.RTRV (advanced sound retriever)— |
Note |
|
TITLE INPUT (disc title input) |
||
Notes |
You can also turn this function on or off in the |
|
menu that appears by using |
||
|
||
! To return to the ordinary display, press |
MULTI-CONTROL. |
|
BAND/ESC. |
|
|
! If you do not operate functions except for |
Scanning folders and tracks |
|
TITLE INPUT within about 30 seconds, the dis- |
||
play automatically returns to the ordinary dis- |
Scan play searches the song within the se- |
|
play. |
||
lected repeat range. |
||
! When playing a compressed audio disc or CD |
||
|
||
TEXT disc, you cannot switch to disc title input |
1 Display the function menu. |
|
display. |
||
Refer to Introduction to advanced operations |
||
|
on this page. |
Section
05
English
Selecting a repeat play range
1 Display the function menu.
Refer to Introduction to advanced operations on this page.
2Use MULTI-CONTROL to select REPEAT in the function menu.
3Press MULTI-CONTROL to select the repeat range.
!DISC – Repeat all tracks
!TRACK – Repeat the current track
!FOLDER – Repeat the current folder
# If you select another folder during repeat play, the repeat play range changes to disc repeat.
2Use MULTI-CONTROL to select SCAN in the function menu.
3Press MULTI-CONTROL to turn scan play
on.
The first 10 seconds of each track is played.
4When you find the desired track press MULTI-CONTROL to turn scan play off.
#If the display has automatically returned to the playback display, select SCAN again by using
MULTI-CONTROL.
#After scanning of a disc (folder) is finished, normal playback of the tracks begins.
En  19
19
<YRD5281-A/S>19
|
|
|
Section |
|
|
|
Black plate (20,1) |
|||
|
|
|
|
|
|
|||||
|
|
|
|
|
|
|||||
|
|
|
|
|
|
|
|
|||
|
|
|
|
|
|
|
|
|||
|
05 |
|
|
|
|
|||||
|
Built-in CD Player |
|
|
|
||||||
|
|
|
|
|
|
|
|
|
|
|
|
|
|
|
Pausing playback |
4 Press DISP/SCRL to select the desired |
|||||
|
|
|
|
1 Display the function menu. |
character type. |
|||||
|
|
|
|
Press DISP/SCRL repeatedly to switch between |
||||||
|
|
|
|
Refer to Introduction to advanced operations |
||||||
|
|
|
|
the following character types: |
||||||
|
|
|
|
on the previous page. |
||||||
|
|
|
|
Alphabet—Numbers |
||||||
|
|
|
|
|
|
|
||||
|
|
|
|
2 Use MULTI-CONTROL to select PAUSE in |
5 Push MULTI-CONTROL up or down to |
|||||
|
|
|
|
the function menu. |
||||||
|
|
|
|
select a letter of the alphabet. |
||||||
|
|
|
|
|
|
|
||||
|
|
|
|
3 Press MULTI-CONTROL to turn pause |
6 Push MULTI-CONTROL left or right to |
|||||
|
|
|
|
on. |
||||||
|
|
|
|
move the cursor to the previous or next |
||||||
|
|
|
|
Playback of the current track pauses. |
||||||
|
|
|
|
character position. |
||||||
# |
To turn pause off, press MULTI-CONTROL |
|||||||||
|
|
|
||||||||
again.
Using advanced sound retriever
Advanced sound retriever function automatically enhances compressed audio and restores rich sound.
% Press S.Rtrv/SAT MODE repeatedly to select the desired setting.
OFF (off)—1—2
# 2 is more effective than 1.
 Note
Note
You can also perform this operation in the menu that appears by using MULTI-CONTROL.
Entering disc titles
Use the disc title input feature to store up to 48 CD titles in the unit. Each title can be up to 10 characters long.
1 Display the function menu.
Refer to Introduction to advanced operations on the previous page.
2Play the CD that you want to enter a title for.
3Use MULTI-CONTROL to select
TITLE INPUT in the function menu.
7Move the cursor to the last position by pushing MULTI-CONTROL right after entering the title.
When you push MULTI-CONTROL right one more time, the entered title is stored in memory.
8Press BAND/ESC to return to the playback display.
 Notes
Notes
!Titles remain in memory, even after the disc is removed from the unit, and are recalled when the disc is reinserted.
!After data for 48 discs are stored in the memory, data for a new disc overwrites the oldest one.
!If you connect a multi-CD player, you can input disc titles for up to 100 discs.
!When a multi-CD player that does not support
disc title functions is connected, you cannot enter disc titles in this unit.
 20
20 En
En
<YRD5281-A/S>20
|
Black plate (21,1) |
|
Section |
Playing songs on USB storage device |
06 |
For details about the supported device, refer to Specifications on page 65.
Basic Operations
% Selecting a folder
Push MULTI-CONTROL up or down.
% Fast forwarding or reversing
Push and hold MULTI-CONTROL left or right.
% Selecting a track
Push MULTI-CONTROL left or right.
% Returning to root folder
Press and hold BAND/ESC.
 Notes
Notes
!Optimum performance of this unit may not be obtained depending on the connected USB storage device.
!If folder 01 (ROOT) contains no files, playback commences with folder 02.
!When the USB portable audio player having battery charging function is connected to this unit and the ignition switch is set to ACC or ON, the battery is charged.
!You can disconnect the USB storage device anytime you want to finish listening to it.
!If you do not use an USB storage device, disconnect it from this unit.
!When the USB portable audio player/USB
memory is disconnected from this unit during playback, NO DEVICE is displayed.
Displaying text information of an audio file
The operation is the same as that of the builtin CD player.
Refer to Displaying text information on disc on page 17.
Selecting a track directly
The operation is the same as that of the builtin CD player.
Refer to Selecting a track directly on page 18.
Selecting files from the file name list
The operation is the same as that of the builtin CD player.
Refer to Selecting files from the file name list on page 18.
Introduction to advanced operations
1Press MULTI-CONTROL to display the main menu.
2Use MULTI-CONTROL to select FUNCTION.
Turn to change the menu option. Press to select.
The function menu is displayed.
3Turn MULTI-CONTROL to select the function.
REPEAT (repeat play)—RANDOM (random play)—SCAN (scan play)—PAUSE (pause)— S.RTRV (advanced sound retriever)
Function and operation
REPEAT, RANDOM, SCAN, PAUSE and
S.RTRV operations are basically the same as that of the built-in CD player.
English
En  21
21
<YRD5281-A/S>21
Black plate (22,1)
Section
06  Playing songs on USB storage device
Function name Operation
Refer to Selecting a repeat play range on page 19.
However, the repeat play ranges you can select are different from that of the built-in CD player. The repeat play ranges of the USB por-
REPEAT table audio player/USB memory are:
!TRACK – Repeat just the current file
!FOLDER – Repeat the current folder
!ALL – Repeat all files
RANDOM
Refer to Playing tracks in random order on page 19.
SCAN
Refer to Scanning folders and tracks on page 19.
PAUSE
Refer to Pausing playback on page 20.
S.RTRV
Refer to Using advanced sound retriever on page 20.
 Notes
Notes
!To return to the ordinary display, press
BAND/ESC.
!If you select another folder during repeat play, the repeat play range changes to ALL.
!If you perform track search or fast forward/reverse during TRACK, the repeat play range changes to FOLDER.
!When FOLDER is selected, it is not possible to play back a subfolder of that folder.
!After file or folder scanning is finished, normal playback of the files begins again.
 22
22 En
En
<YRD5281-A/S>22

|
Black plate (23,1) |
|
Section |
Playing songs on iPod |
07 |
For details about the supported iPod, refer to iPod compatibility on page 62.
Basic Operations
% Fast forwarding or reversing
Push and hold MULTI-CONTROL left or right.
% Selecting a track (chapter)
Push MULTI-CONTROL left or right.
 Notes
Notes
!When using an iPod, iPod Dock Connector to USB Cable (CD-IU50) is required.
!Read the precautions for iPod in the following section. Refer to page 62.
!If an error message is displayed, refer to Error messages on page 57.
!When the ignition switch is set to ACC or ON, the iPod’s battery is charged while the iPod is connected to this unit.
!While the iPod is connected to this unit, the iPod cannot be turned on or off.
!Before connecting the dock connector of this unit to the iPod, disconnect the headphones from the iPod.
!The iPod is turned off about two minutes after the ignition switch is set to OFF.
Browsing for a song
Operations to control an iPod with this unit is designed to be as close to the iPod as possible to make operation and song search easy.
!Depending on the number of files in the iPod, there may be a delay when displaying a list.
!If the characters recorded on the iPod are not compatible with this unit, those characters are not displayed.
Searching songs by category
1 Press  /LIST to switch to the browsing mode.
2 Use MULTI-CONTROL to select a cate- |
English |
|
|
gory. |
|
Turn to change the category. Press to select. |
|
PLAYLISTS (playlists)—ARTISTS (artists)— |
|
ALBUMS (albums)—SONGS (songs)— |
|
PODCASTS (podcasts)—GENRES (genres)— |
|
COMPOSERS (composers)—AUDIOBOOKS |
|
(audiobooks) |
|
List for the selected category is displayed. |
|
# You can start playback throughout the se- |
|
lected category by pressing and holding |
|
MULTI-CONTROL. You can also perform this op- |
|
eration by pushing and holding |
|
MULTI-CONTROL right. |
|
# You can also change the category by pushing |
|
MULTI-CONTROL up or down. |
|
# You can also select the category by pushing |
|
MULTI-CONTROL right. |
|
# To return to the previous category, push |
|
MULTI-CONTROL left. |
|
# To return to the top tier of categories, push |
|
and hold MULTI-CONTROL left. |
|
# To return to the ordinary display, press |
|
BAND/ESC. |
|
# If you do not operate the list within about 30 |
|
seconds, the display automatically returns to the |
|
ordinary display. |
|
3 Repeat step 2 to find a song you want |
|
to listen to. |
|
# When you select PODCASTS, an episode list |
|
is displayed. |
|
Searching by alphabet in the list
1Use MULTI-CONTROL to select a category.
Turn to change the category. Press to select.
2When a list for the selected category is
displayed, press  /LIST to switch to alphabet search mode.
ABC SEARCH is displayed.
3 Turn MULTI-CONTROL to select a letter of the alphabet.
En  23
23
<YRD5281-A/S>23
Black plate (24,1)
Section
07  Playing songs on iPod
4 Press MULTI-CONTROL to display the alphabetical list.
The list is displayed starting from the selected letter of the alphabet.
# If alphabet search fails, NOT FOUND is dis-
A-BOOKS (audiobook speed)—S.RTRV (advanced sound retriever)
Function and operation
played. |
REPEAT, PAUSE and S.RTRV operations are |
|
basically the same as that of the built-in CD |
|
player. |
Displaying text information on iPod
% Press DISP/SCRL to select the desired text information.
Play time—song title—artist name—album title—number of songs
 Notes
Notes
!If the characters recorded on the iPod are not compatible with this unit, those characters are not displayed.
!You can scroll the text information to the left by pressing and holding DISP/SCRL.
!When Ever Scroll is set to ON at the initial setting, text information scrolls continuously in
the display. Refer to Switching the ever scroll on page 44.
Introduction to advanced operations
1Press MULTI-CONTROL to display the main menu.
2Use MULTI-CONTROL to select FUNCTION.
Turn to change the menu option. Press to select.
The function menu is displayed.
3Turn MULTI-CONTROL to select the function.
REPEAT (repeat play)—SHUFFLE (shuffle)— SHUFFLE ALL (shuffle all)—LINK (link play)— CONTROL (control mode)—PAUSE (pause)—
Function name
REPEAT
Operation
Refer to Selecting a repeat play range on page 19.
However, the repeat play ranges you can select are different from that of the built-in CD player. The repeat play ranges of the iPod are:
!ONE – Repeat the current song
!ALL – Repeat all songs in the selected list
PAUSE
Refer to Pausing playback on page 20.
S.RTRV
Refer to Using advanced sound retriever on page 20.
 Notes
Notes
!To return to the ordinary display, press
BAND/ESC.
!If you do not operate functions within about 30 seconds, the display automatically returns to the ordinary display.
!When CONTROL is set to IPOD, only
CONTROL, PAUSE and S.RTRV can be operated.
Playing songs in a random order (shuffle)
1 Display the function menu.
Refer to Introduction to advanced operations on this page.
2 Use MULTI-CONTROL to select SHUFFLE in the function menu.
 24
24 En
En
<YRD5281-A/S>24

|
Black plate (25,1) |
|
Section |
Playing songs on iPod |
07 |
3 Press MULTI-CONTROL to select your favorite setting.
!SONGS – Play back songs in the selected list in random order.
!ALBUMS – Play back songs from a randomly selected album in order.
!OFF – Cancel random play.
Playing all songs in a random order (shuffle all)
! GENRES – Plays the album of currently playing genre.
SEARCHING flashes while searching the list and then the playback of the list starts.
# If the related albums/songs are not found, NOT FOUND is displayed.
 Note
Note
You can also turn this function on in the menu that appears by using MULTI-CONTROL.
English
% Press  /iPod to turn shuffle all on.
All songs on the iPod play randomly.
# To turn shuffle all off, set SHUFFLE in the FUNCTION menu to off.
 Note
Note
You can also turn this function on in the menu that appears by using MULTI-CONTROL.
Playing songs related to the currently playing song
Songs related to the currently playing song are played. You can play songs of the following lists.
—Album list of currently playing artist
—Song list of currently playing album
—Album list of currently playing genre
!Depending on the number of files in the iPod, there may be a delay when displaying a list.
1Press and hold  /LIST to switch to the link play mode.
2Use MULTI-CONTROL to select the desired mode.
Push MULTI-CONTROL left or right to change the mode; press to select.
!ARTISTS – Plays the album of currently playing artist.
!ALBUMS – Plays the song of currently playing album.
Operating this unit’s iPod function from your iPod
This function cannot be operated with the following iPod models.
—iPod nano first generation
—iPod fifth generation
This unit’s iPod function can be operated from your iPod. Sound can be heard from the car’s speakers, and operation can be conducted from your iPod.
1Press  /iPod and hold to switch the control mode.
Each pressing and holding 
 /iPod switches the control mode as follows:
!IPOD – This unit’s iPod function can be operated from the connected iPod.
!AUDIO – This unit’s iPod function can be operated from this unit.
2When you select IPOD, operate the connected iPod to select a song and play.
#Switching the control mode to IPOD pauses song playback. Operate the iPod to start playback.
#Even if the control mode is set to IPOD, following functions are available from this unit.
!Volume
!Fast forward/reverse
!Track up/down
!Pausing
!Switching the text information
En  25
25
<YRD5281-A/S>25

Black plate (26,1)
Section
07 Playing songs on iPod
 Notes
Notes
!You can also turn this function on or off in the menu that appears by using
MULTI-CONTROL.
!When the control mode is set to IPOD, operations are limited as follows:
—Functions other than CONTROL (control mode), PAUSE (pause) and S.RTRV (advanced sound retriever) cannot be selected.
—The volume can only be controlled from this unit.
Changing audiobook speed
While listening to an audiobook on iPod, playback speed can be changed.
1 Display the function menu.
Refer to Introduction to advanced operations on page 24.
2Use MULTI-CONTROL to select A-BOOKS in the function menu.
3Press MULTI-CONTROL to select your favorite setting.
!FASTER – Playback faster than normal speed
!NORMAL – Playback in normal speed
!SLOWER – Playback slower than normal speed
 26
26 En
En
<YRD5281-A/S>26

|
Black plate (27,1) |
|
Section |
Using Bluetooth wireless technology |
08 |
Connecting a Bluetooth device
Before using the Bluetooth audio player and Bluetooth telephone, you need to connect Bluetooth device to this unit. Please read the following section and connect correctly.
If you use Bluetooth device with this unit for the first time, read the following section.
!Using a Bluetooth device to pair on the next page
!Pairing from this unit on the next page
If your Bluetooth device has already been paired, read the following section.
!Connecting a paired Bluetooth device and selecting a service on page 29
If your Bluetooth device needs to be disconnected from this unit, read the following section.
!Disconnecting a Bluetooth device on page 29
Also, you can use other convenient functions listed below. You can use these functions when needed.
!Deleting a paired Bluetooth device on page 29
!Connecting a paired Bluetooth device and selecting a service on page 29
!Connecting to a Bluetooth device automatically on page 30
!Displaying system version for repair on page 30
!Displaying BD (Bluetooth Device) address on page 30
!Editing device name on page 30
!Entering PIN code for Bluetooth wireless connection on page 31
 Note
Note
Before you can use the devices featuring Bluetooth wireless technology, you may need to enter the PIN code into this unit. If your device requires a PIN code to establish a connection, look for the
code on the device or in its accompanying docu- |
English |
|
|
mentation. Refer to Entering PIN code for Blue- |
|
tooth wireless connection on page 31. |
|
Introduction to connection operations
1 Select BT AUDIO or TELEPHONE as a source.
To select BT AUDIO, press SRC/OFF. To select TELEPHONE, press and hold
PHONE/ /BT MENU.
2Press MULTI-CONTROL to display the main menu.
3Use MULTI-CONTROL to select CONNECTION.
Turn to change the menu option. Press to select.
The connection menu is displayed.
4Turn MULTI-CONTROL to select the function.
OPEN DEVICE (open a connection to the de- vice)—SEARCH DEVICE (search device)— DISCONNECT (disconnect device)— DELETE DEVICE (delete device)—
PAIRED DEVICE (service setting)— A.CONNECTION (automatic connection set- ting)—BT VER INFO (version information)— DEVICE INFO (device information)— DEVICE EDIT (editing the device name)— PINCODE INPUT (pin code input)
 Notes
Notes
!If a Bluetooth device is not connected to this unit yet, DISCONNECT function is not available.
!If a Bluetooth device is not paired with this unit yet, DELETE DEVICE and PAIRED DEVICE function is not available.
!To return to the ordinary display, press
BAND/ESC.
En  27
27
<YRD5281-A/S>27

Black plate (28,1)
Section
08  Using Bluetooth wireless technology
!If you do not operate functions except for
Open device, SEARCH DEVICE, DISCONNECT, DEVICE EDIT and
PINCODE INPUT within about 30 seconds, the display automatically returns to the ordinary display.
!If you do not operate OPEN DEVICE and SEARCH DEVICE within 30 seconds after the Bluetooth device is paired, the display automatically returns to the ordinary display.
Using a Bluetooth device to pair
1 Display the connection menu.
Refer to Introduction to connection operations on the previous page.
2 Use MULTI-CONTROL to select OPEN DEVICE.
# If there is previous connection log in this unit, you can select the Bluetooth device from
PAIRED DEVICE.
Refer to Connecting a paired Bluetooth device and selecting a service on the next page.
3 Push MULTI-CONTROL up or down to select the special device.
# Bluetooth devices that are difficult to establish connection is called special device. If your Bluetooth device is listed in the special device, select the appropriate one.
4 Press MULTI-CONTROL to open the connection.
READY will be displayed.
This unit is now on standby for connection from Bluetooth device.
# If five devices are already paired,
MEMORY FULL is displayed and it is not possible to perform the pairing operation. In this case, delete a paired device first. Refer to Deleting a paired Bluetooth device on the next page.
# Push MULTI-CONTROL left or right to display the device name, BD address and PIN code of this unit.
5 Use your Bluetooth device to establish connection.
Connection method is different depending on the Bluetooth device. See the manual of your Bluetooth device to establish connection.
When the connection is established, PAIRED is displayed.
#If the connection fails, ERROR is displayed. In this case, try again from the beginning.
#PIN code is set to 0000 as the default. You can change this code in the initial setting. Refer to Entering PIN code for Bluetooth wireless connection on page 31.
Pairing from this unit
1 Display the connection menu.
Refer to Introduction to connection operations on the previous page.
2Use MULTI-CONTROL to select SEARCH DEVICE.
3Push MULTI-CONTROL up or down to select a device.
4Press MULTI-CONTROL to start searching.
While searching, SEARCHING flashes. When available Bluetooth devices are found, device name or BD address (if names cannot be ob-
tained) is displayed.
# To cancel searching, press MULTI-CONTROL
again.
# If five devices are already paired,
MEMORY FULL is displayed and it is not possible to perform the pairing operation. In this case, delete a paired device first. Refer to Deleting a paired
Bluetooth device on the next page.
# If no device can be found, NOT FOUND is displayed. In this case, check the status of Bluetooth device and search again.
5Push MULTI-CONTROL up or down to select a device name you want to connect.
# If only one device was found, this step cannot be performed.
 28
28 En
En
<YRD5281-A/S>28

|
Black plate (29,1) |
|
Section |
Using Bluetooth wireless technology |
08 |
# Push MULTI-CONTROL left or right to display the device name and BD address.
6 Press MULTI-CONTROL to establish connection.
While connecting, PAIRING flashes. If the connection is established, PAIRED is displayed.
#If the connection fails, ERROR is displayed. In this case, try again from the beginning.
#PIN code is set to 0000 as the default. You can change this code in the initial setting. Refer to Entering PIN code for Bluetooth wireless connection on page 31.
Disconnecting a Bluetooth device
This function can be operated only when the Bluetooth wireless connection is being established.
1 Display the connection menu.
Refer to Introduction to connection operations on page 27.
2Use MULTI-CONTROL to select DISCONNECT.
3Push MULTI-CONTROL up or down to select a device.
# If only one device was found, this step cannot be performed.
4 Press MULTI-CONTROL to disconnect the Bluetooth wireless connection.
While disconnecting, DISCONNECTING flashes. If the Bluetooth wireless connection is terminated, DISCONNECTED is displayed.
# If multiple Bluetooth devices have been connected and you wish to disconnect them, press MULTI-CONTROL and then select the device. In this case, repeat operation from step 3.
Deleting a paired Bluetooth device
1 Display the connection menu.
Refer to Introduction to connection operations on page 27.
2 |
Use MULTI-CONTROL to select |
English |
|
||
DELETE DEVICE. |
|
|
3 |
Push MULTI-CONTROL up or down to |
|
select a device. |
|
|
#If only one device was found, this step cannot be performed.
#Push MULTI-CONTROL left to display the BD address.
#If device name cannot be obtained, BD address is displayed.
4When the device name is being displayed, push MULTI-CONTROL right to display DELETE YES.
Deleting device is now on standby.
# If you do not want to delete the device, push
MULTI-CONTROL left.
5Press MULTI-CONTROL to delete the device.
While deleting, DELETING flashes. After the device is deleted, DELETED is displayed.
Connecting a paired Bluetooth device and selecting a service
Bluetooth service of the paired device can be selected. You can choose a Bluetooth service from PHONE service, AVRCP service or A2DP service.
1 Display the connection menu.
Refer to Introduction to connection operations on page 27.
2Use MULTI-CONTROL to select PAIRED DEVICE.
3Push MULTI-CONTROL up or down to select a device.
#If only one device was found, this step cannot be performed.
#Push MULTI-CONTROL left or right to switch the BD address and device name.
#If device name cannot be obtained, BD address is displayed.
En  29
29
<YRD5281-A/S>29
Black plate (30,1)
Section
08  Using Bluetooth wireless technology
4Press MULTI-CONTROL to display the service select screen.
5Push MULTI-CONTROL up or down to select the service. PHONE—AVRCP—A2DP
#“*” is displayed on the connected service.
#Profile that is not compatible with the connected device cannot be selected.
6 Press MULTI-CONTROL to start or stop the selected service.
Connecting to a Bluetooth device automatically
It is possible to set the automatic connection between your Bluetooth device and this unit. If this function is set to on, connection between your Bluetooth device and this unit will take place automatically as soon as the two devices are less than a few meters apart.
! Initially, this function is set to on.
1 Display the connection menu.
Refer to Introduction to connection operations on page 27.
2Use MULTI-CONTROL to select A.CONNECTION.
3Press MULTI-CONTROL to turn automatic connection on.
If your Bluetooth device is ready for Bluetooth wireless connection, connection to this unit is
automatically established.
# To turn automatic connection off, press
MULTI-CONTROL again.
Displaying system version for repair
Should this unit fails to operate properly and you consult your dealer for repair, you may be asked to indicate the system versions of this unit and of Bluetooth module. You can display the versions and confirm them.
 30
30 En
En
1 Display the connection menu.
Refer to Introduction to connection operations on page 27.
2Use MULTI-CONTROL to select BT VER INFO.
The system (microprocessor) version of this unit is displayed.
3Push MULTI-CONTROL left to switch to the version of the Bluetooth module of this unit.
# Pushing MULTI-CONTROL right returns to the system version of this unit.
Displaying BD (Bluetooth Device) address
This unit displays the BD address of this unit.
1 Display the connection menu.
Refer to Introduction to connection operations on page 27.
2Use MULTI-CONTROL to select DEVICE INFO in the function menu.
3Push MULTI-CONTROL left to switch to the BD address.
12-digit hexadecimal string is displayed.
# Pushing MULTI-CONTROL right returns to the device name.
Editing device name
You can edit the device name.
The device name is set to PIONEER BT as default.
1 Display the connection menu.
Refer to Introduction to connection operations on page 27.
2Use MULTI-CONTROL to select DEVICE EDIT.
3Push MULTI-CONTROL up or down to select a letter of the alphabet.
# Device name can be up to 32 characters long.
<YRD5281-A/S>30
 Loading...