


Operation Manual
DVD RECEIVER
DVH-3250UB
English

 Contents
Thank you for purchasing this PIONEER product.
To ensure proper use, please read through this manual before using this product.
Please keep the manual in a safe and accessible place for future reference.
 Be sure to read this
!DVD video disc region numbers 4
!Handling guideline 32
Before You Start |
|
|
||
To ensure safe driving 4 |
|
|||
In case of trouble |
4 |
|
||
About this unit |
4 |
|
|
|
– |
DVD video disc region numbers 4 |
|||
Operating this unit |
|
|||
Head unit 5 |
|
|
|
|
Remote control |
6 |
|
|
|
– |
Using the remote control operation |
|||
|
mode switch |
7 |
|
|
– |
DVH mode operation |
7 |
||
– |
DVD mode operation |
8 |
||
– |
S-DVD mode operation |
8 |
||
Display indication 8
Basic Operations of this unit 9
Use and care of the remote control 9 Menu operations identical for function
settings/audio adjustments/initial settings/
lists 10 |
|
|
|
|
Tuner |
10 |
|
|
|
– |
Basic Operations |
10 |
|
|
– |
Storing and recalling stations |
10 |
||
– |
Function settings |
11 |
|
|
Built-in DVD player |
11 |
|
|
|
– |
Basic Operations |
11 |
|
|
– |
Basic playback controls 12 |
|
||
– |
Switching the media file type |
12 |
||
– |
PBC playback |
12 |
|
|
– |
Playing DivXâ VOD content |
13 |
||
– |
CM skip/CM back |
13 |
|
|
– |
Specifying title |
13 |
|
|
– |
Specifying track |
13 |
|
|
– |
Searching for the part you want to |
|
|||||||
|
play |
13 |
|
|
|
|
|
|
|
– |
Frame-by-frame playback |
14 |
|
||||||
– |
Slow motion playback |
14 |
|
|
|
||||
– |
Return to the specified scene |
14 |
|
||||||
– |
Automatic playback of DVDs |
14 |
|
||||||
– |
Displaying text information |
14 |
|
||||||
– Selecting and playing titles/files/tracks |
|||||||||
|
from the title/file name/track title |
|
|||||||
|
list |
15 |
|
|
|
|
|
|
|
– |
Advanced operations using special |
|
|||||||
|
buttons |
15 |
|
|
|
|
|
|
|
– |
Function settings |
17 |
|
|
|
|
|||
– |
Switching the information display |
18 |
|||||||
USB portable audio player/USB memory |
19 |
||||||||
– |
Basic Operations |
19 |
|
|
|
|
|||
– |
Switching the media file type |
19 |
|
||||||
– |
Selecting a file directly in the current |
||||||||
|
folder 20 |
|
|
|
|
|
|
||
– |
Displaying text information |
20 |
|
||||||
– |
Selecting files from the file name |
|
|||||||
|
list |
20 |
|
|
|
|
|
|
|
– |
Advanced operations using special |
|
|||||||
|
buttons |
20 |
|
|
|
|
|
|
|
– |
Function settings |
20 |
|
|
|
|
|||
– |
Switching the information display |
20 |
|||||||
Audio Adjustments |
20 |
|
|
|
|
|
|||
Setting up the DVD player |
22 |
|
|
|
|||||
– |
Introduction of DVD setup |
|
|
|
|||||
|
adjustments |
22 |
|
|
|
|
|
||
– |
Menu operations identical for DVD |
|
|||||||
|
setup adjustments |
22 |
|
|
|
||||
– |
Setting the subtitle language |
22 |
|
||||||
– |
Setting the audio language |
22 |
|
||||||
– |
Setting the menu language |
23 |
|
||||||
– |
Setting the on screen display |
|
|
||||||
|
language |
23 |
|
|
|
|
|
|
|
– |
Setting the character set |
23 |
|
|
|||||
– |
Setting the angle icon display 23 |
|
|||||||
 2
2 En
En

 Contents
– |
Setting the aspect ratio |
23 |
– |
Setting the slide show interval 24 |
|
– |
Setting parental lock 24 |
|
– |
Setting the DivX subtitle file 25 |
|
– |
Setting for digital output |
25 |
– |
Displaying the DivXâ VOD registration |
|
|
code 25 |
|
– |
Setting the down sampling output 26 |
|
Initial Settings 26 |
|
|
Using AUX1 and AUX2 source |
27 |
|
– |
About AUX1 and AUX2 |
27 |
–AUX1 source: 27
–AUX2 source: 27
Using an AUX source 28
Turning the clock display on or off 28 Using the PGM button 28
 Additional Information
Troubleshooting 29 Error messages 30 Handling guideline 32
Compressed audio compatibility (disc,
USB) 34 |
|
Sequence of audio files |
35 |
Copyright and trademark |
36 |
Language code chart for DVD 38
Specifications 39
En  3
3

Section
01  Before You Start
To ensure safe driving
 WARNING
!To avoid the risk of accident and the potential violation of applicable laws, the front DVD or TV (sold separately) feature should never be used while the vehicle is being driven. Also, rear displays should not be in a location where they are visibly distracting to the driver.
!In some countries or states the viewing of images on a display inside a vehicle even by persons other than the driver may be illegal. Where such regulations apply, they must be obeyed and this unit’s DVD features should not be used.
!NEVER install the display in a location that enables the driver to watch the DVD or Video CD while driving.
When you park your car in a safe place and apply the parking brake, the picture appears on the screen.
In case of trouble
Should this unit fail to operate properly, please contact your dealer or nearest authorized PIONEER Service Station.
About this unit
 CAUTION
!Do not allow this unit to come into contact with liquids. Electrical shock could result. Also, damage to this unit, smoke, and overheating could result from contact with liquids.
!“CLASS 1 LASER PRODUCT”
This product is a class 1 laser product classified under the Safety of laser products, IEC 60825-1:2007, but this product contains a laser diode higher than Class 1. To ensure continued safety, do not remove any covers or attempt to gain access to the inside of the product. Refer all servicing to qualified personnel.
!Always keep the volume low enough to hear outside sounds.
!Avoid exposure to moisture.
!If the battery is disconnected or discharged, any preset memory will be erased.
CAUTION:
USE OF CONTROL OR ADJUSTMENT OR PERFORMANCE OF PROCEDURES OTHER THAN THOSE SPECIFIED HEREIN MAY RESULT IN HAZARDOUS RADIATION EXPOSURE.
CAUTION:
THE USE OF OPTICAL INSTRUMENTS WITH THIS PRODUCT WILL INCREASE EYE HAZARD.
DVD video disc region numbers
Only DVD video discs with compatible region numbers can be played on this player. You can find the region number of the player on the bottom of this unit and in this manual (refer to
Specifications on page 39).
 4
4 En
En
|
Section |
Operating this unit |
02 |
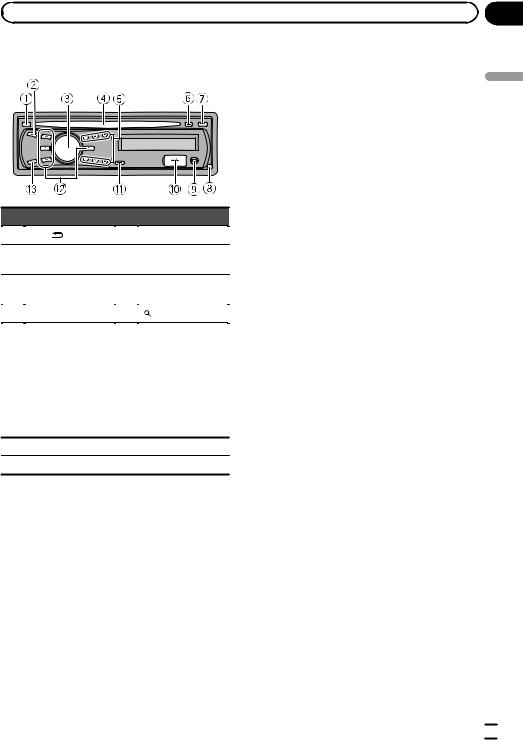
Head unit
unit this Operating
|
Part |
|
Part |
1 |
DISP/ /SCRL |
8 |
Detach button |
|
|
|
|
2 |
SRC/OFF |
9 |
AUX input jack (3.5 |
mm stereo jack) |
|||
|
|
|
|
3 |
MULTI-CONTROL |
a |
USB port |
|
(M.C.) |
|
|
4 |
Disc loading slot |
b |
(list) |
|
|
|
|
1 to 6
!1/S.Rtrv/DVD MENU
!2/PAUSE
5 ! 3/BOOKMARK c a/b/c/d
!4/AUDIO
!5/ /SUB TITLE
!6/ /ANGLE
6 h(eject) |
d BAND/ESC |
7 CLOCK
 CAUTION
Use an optional Pioneer USB cable (CD-U50E) to connect the USB audio player/USB memory as any device connected directly to the unit will protrude out from the unit and may be dangerous. Do not use unauthorized products.
 Note
Note
The function of DISP/ /SCRL is different depending on the setting of the display connection (refer to V.OUT (display connection) on page 27).
En  5
5

Section
02  Operating this unit
Remote control
|
|
|
|
|
|
|
|
|
|
|
|
|
|
|
|
||||
|
|
|
|
|
|
|
|||
|
|
|
|
|
|
|
|
||
|
|
|
|
|
|
|
|
|
|
|
|
|
|
|
|
|
|
|
|
|
|
|
|
|
|
|
|
|
|
|
|
|
|
|
|
|
|
|
|
|
|
|
|
|
|
|
|
|
|
|
|
|
|
|
|
|
|
|
|
|
|
|
|
|
|
|
|
|
|
|
|
|
|
|
|
|
|
|
|
|
|
|
|
|
|
|
|
|
|
|
|
|
|
|
|
|
|
|
|
|
Button names |
DVH mode |
|
DVD and S-DVD mode |
|
1 |
SOURCE |
Press to cycle through all the available sources. Press and hold to turn the source |
|||
off. |
|
|
|||
|
|
|
|
||
|
|
|
|||
2 |
ATT |
Press to quickly lower the volume level by about 90%. Press once more to return |
|||
to the original volume level. |
|
|
|||
|
|
|
|
||
|
|
|
|
|
|
3 |
VOLUME |
Press to increase or decrease volume. |
|
|
|
|
|
|
|||
|
AUDIO |
Press to change the audio language/audio system during DVD playback. |
|||
|
|
|
|||
4 |
SUBTITLE |
Press to change the subtitle language during DVD playback. |
|||
|
|
|
|||
|
ANGLE |
Press to change the viewing angle during DVD playback. |
|||
|
|
Press to turn the DVD auto-playback function on or off. |
|||
5 |
AUTO PLAY |
||||
6 |
RETURN |
Press to display the PBC (playback control) menu during PBC playback. |
|||
|
|
Press to operate the preprogrammed func- |
|
Press to turn the bookmark function |
|
|
|
|
|||
7 |
BOOKMARK |
tions for each source. (Refer to Using the |
|
on or off. For details, refer to Resume |
|
|
|
PGM button on page 28.) |
|
playback (Bookmark) on page 15. |
|
|
|
|
|
|
|
|
Remote control operation |
Switch the operation mode between DVD, S-DVD and DVH modes. Normally, set |
|||
8 |
to DVH. For details, refer to Using the remote control operation mode switch on |
||||
mode switch |
|||||
|
the next page. |
|
|
||
|
|
|
|
||
|
|
|
|||
9 |
CM BACK/CM SKIP |
Press to skip progressively backward/forward through the video playing. |
|||
|
|
|
|
|
|
 6
6 En
En

|
Section |
Operating this unit |
02 |
|
Button names |
DVH mode |
DVD and S-DVD mode |
||
10 |
DIRECT |
|
Press to select channels directly. |
Not used. |
|
|
|
|
|
|
|
11 |
A.MENU |
|
Press to select various sound quality controls. |
||
12 |
FUNC |
|
Press to select functions. |
|
|
|
|
|
|
|
|
|
|
|
Press 0 to 9 to input numbers. Buttons 1 |
Press to select a menu item on a |
|
|
|
|
to 6 can operate the preset tuning for the |
||
13 |
0 to 10, CLEAR |
video CD featuring PBC (playback |
|||
tuner. Press CLEAR to clear the input |
|||||
|
|
|
control). |
||
|
|
|
numbers. |
||
|
|
|
|
||
|
|
|
|
|
|
|
|
|
Press to select among three FM bands |
Press to switch between media file |
|
14 |
BAND |
|
and one AM band and to cancel control |
types. (Refer to Switching the media |
|
|
|
|
modes of functions. |
file type on page 12.) |
|
|
|
|
|
|
|
|
|
|
Press to turn the information display on or off when the video is displayed. |
||
15 |
DISP |
|
Depending on the selected source, pressing this button can switch the display in- |
||
|
|
|
dication. |
|
|
|
|
|
|||
|
PLAY/PAUSE (f) |
Press to switch sequentially between playback and pause. |
|||
|
|
|
|
||
|
REVERSE (m) |
Press to perform fast reverse. |
|
||
|
|
|
|
||
|
FORWARD (n) |
Press to perform fast forward. |
|
||
|
|
|
|||
|
PREVIOUS (o) |
Press to return to the previous track (chapter). |
|||
16 |
|
|
|
|
|
p |
) |
Press to go to the next track (chapter). |
|
||
|
NEXT ( |
|
|||
|
|
|
Press to move ahead one frame at a time during DVD/VideoCD playback. Press |
||
|
STEP (r/q) |
and hold for one second to activate slow playback. |
|||
|
If a DVD-VR disc contains a still image, press rwhile displaying a still image to |
||||
|
|
|
|||
|
|
|
switch to the next image or video. |
|
|
|
|
|
|
|
|
|
STOP (g) |
|
Not used. |
Press to stop playback. |
|
|
|
|
Functions are the same as M.C. on the |
|
|
|
|
|
head unit. |
Use to select a menu on the DVD |
|
|
Move the thumb pad |
Move to operate fast forward, reverse and |
|||
|
menu. |
||||
17 |
|
|
track search controls. Also used for con- |
||
|
|
|
|||
|
|
trolling functions. |
|
||
|
|
|
|
||
|
|
|
|
|
|
|
Click the thumb pad |
Click to display the track title list, folder |
Click to select a menu on the DVD |
||
|
list or file list depending on the source. |
menu. |
|||
|
|
|
|||
|
|
|
|
||
18 |
MENU |
|
Press to display the DVD menu during DVD playback. |
||
|
|
|
|
||
TOP MENU |
Press to return to the top menu during DVD playback. |
||||
|
|||||
|
|
|
|
|
|
unit this Operating
Using the remote control operation mode switch
There are three remote control operation modes on the remote control. If you want to operate this unit by remote control, turn the mode switch to DVH mode. In this case, both the head unit’s buttons and the remote control can control this unit.
DVH mode operation
When operating this unit by remote control, the mode is normally switched to DVH.
!The thumb pad on the remote control can perform the same operations as M.C. on the head unit.
En  7
7
Section
02  Operating this unit
DVD mode operation
Indicator Operation
If you switch the mode to DVD, the thumb pad and 0 to 10 operations are changed for the DVD player.
% When you want to operate the following functions, switch the mode to DVD:
!When operating the DVD menu by using the thumb pad. (Refer to Operating the DVD menu on page 15.)
!When operating the PBC menu by using 0 to 10. (Refer to PBC playback on page 12.)
!When specifying title or track by using 0 to 10. (Refer to Specifying title on page 13 and
Specifying track on page 13.)
!When operating the DVD setup menu by using the thumb pad. (Refer to Setting up the DVD player on page 22.)
S-DVD mode operation
When using the remote control with this unit, there is no need to switch to S-DVD mode.
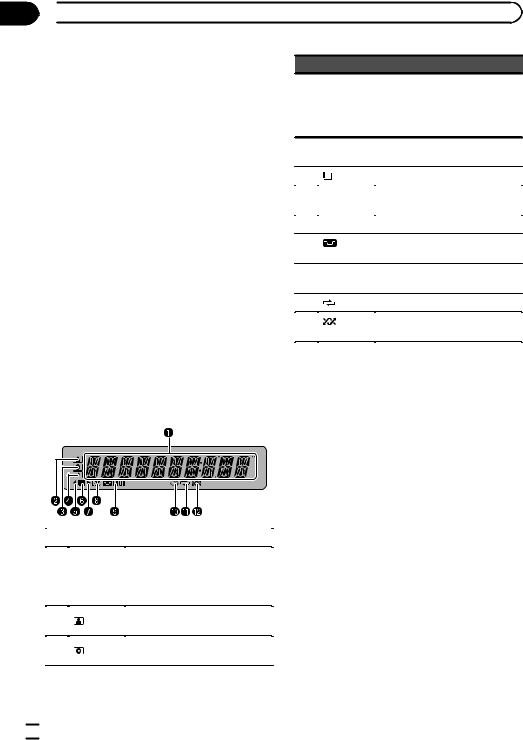
Display indication
|
Indicator |
Operation |
||
|
Main dis- |
! |
Tuner: band and frequency |
|
|
! |
Built-in DVD player and USB: |
||
1 |
play sec- |
|||
|
elapsed playback time and lit- |
|||
|
tion |
|
||
|
|
eral information |
||
|
|
|
||
|
|
|
||
2 |
(artist) |
The disc (track) artist name is dis- |
||
played. |
||||
|
|
|||
|
|
|
||
3 |
(disc) |
The disc (album) name is dis- |
||
played. |
||||
|
|
|||
|
|
|
|
|
The track (song) name is displayed.
4  (song) A playable file is displayed during viewing the file name list of disc and a USB storage device.
5 |
c |
An upper tier of folder or menu |
|||
exists. |
|||||
|
|
|
|
||
|
|
|
|
|
|
6 |
|
|
(list) |
The list function is operated. |
|
|
|
||||
|
|
||||
|
|
||||
|
|
|
|
|
|
7 |
d |
A lower tier of folder or menu ex- |
|||
ists. |
|||||
|
|
|
|
||
|
|
|
|
|
|
8 |
LOC |
The local seek tuning is on. |
|||
|
|
|
|
|
|
9 |
|
|
LOUD |
The loudness is on. |
|
(loudness) |
|||||
|
|
|
|
|
|
a |
5(stereo) |
The selected frequency is being |
|||
broadcasted in stereo. |
|||||
|
|
|
|
||
|
|
|
|
|
|
b |
|
|
(repeat) |
Track or folder repeat is on. |
|
|
|
|
|
|
|
c |
|
|
(ran- |
Random play is on. |
|
dom) |
|||||
|
|
|
|
|
|
 Note
Note
When you set the display connection (refer to
V.OUT (display connection) on page 27) to on, the indicators of 2 to 7 do not appear.
 8
8 En
En
|
Section |
Operating this unit |
02 |
Basic Operations of this unit
 Important
!Handle gently when removing or attaching the front panel.
!Avoid subjecting the front panel to excessive shock.
!Keep the front panel out of direct sunlight and high temperatures.
!To avoid damage to the device or vehicle interior, remove any cables and devices attached to the front panel before detaching it.
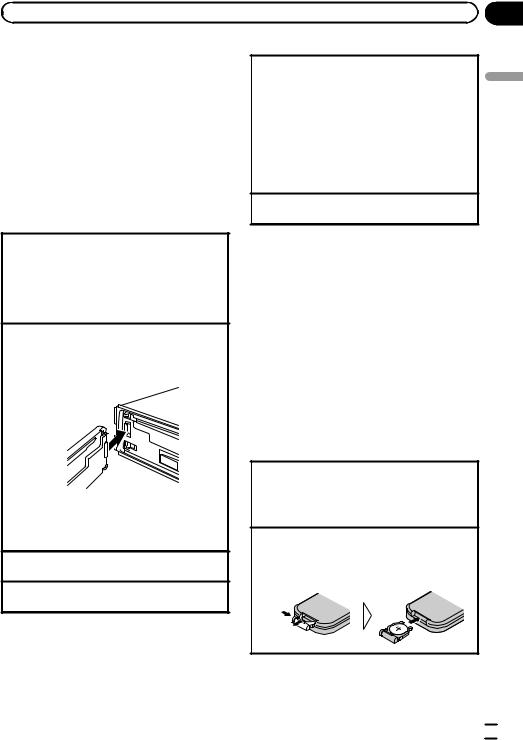
Removing the front panel to protect your unit from theft
1Press the detach button to release the front panel.
2Grab the front panel and remove.
3Put the front panel into the provided protective case for safe keeping.
Re-attaching the front panel
1Slide the front panel to the left until it clicks. Front panel and the head unit are connected on the left side. Make sure that the front panel has been properly connected to the head unit.
2Press the right side of the front panel until it is firmly seated.
If you can’t attach the front panel to the head unit successfully, try again. However, forcing the front panel into place may result in damage.
Turning the unit on
1 Press SRC/OFF to turn the unit on.
Turning the unit off
1 Press SRC/OFF and hold until the unit turns off.
Selecting a source
1Press SRC/OFF repeatedly to switch between the following sources:
For Southeast Asian models
TUNER (tuner)—DVD (built-in DVD player)—USB (USB storage device)—AUX1 (front AUX)—AUX2 (rear RCA)
For South American, Oceanian, Middle East Asian, South African models
TUNER (tuner)—DVD (built-in DVD player)—USB (USB storage device)—AUX (AUX)
Adjusting the volume
1 Turn M.C. to adjust volume.
 Notes
Notes
!Listening to the radio while connecting a USB storage device to this unit may generate noise. In this case disconnect the USB storage device.
!When this unit’s blue/white lead is connected to the vehicle’s auto-antenna relay control terminal, the vehicle’s antenna extends when
this unit’s source is turned on. To retract the antenna, turn the source off.
Use and care of the remote control
Using the remote control
1Point the remote control in the direction of the front panel to operate.
When using for the first time, pull out the film protruding from the tray.
Replacing the battery
1Slide the tray out on the back of the remote control.
2Insert the battery with the plus (+) and minus (–) poles aligned properly.
unit this Operating
En  9
9

Section
02  Operating this unit
 Important
!Do not store the remote control in high temperatures or direct sunlight.
!The remote control may not function properly in direct sunlight.
!Do not let the remote control fall onto the floor, where it may become jammed under the brake or accelerator pedal.
 WARNING
!Keep the battery out of the reach of children. Should the battery be swallowed, consult a doctor immediately.
!Batteries (battery pack or batteries installed) must not be exposed to excessive heat such as sunshine, fire or the like.
 CAUTION
!Use one CR2025 (3 V) lithium battery.
!Remove the battery if the remote control is not used for a month or longer.
!There is a danger of explosion if the battery is incorrectly replaced. Replace only with the same or equivalent type.
!Do not handle the battery with metallic tools.
!Do not store the battery with metallic objects.
!If the battery leaks, wipe the remote control completely clean and install a new battery.
!When disposing of used batteries, comply with governmental regulations or environmen-
tal public institutions’ rules that apply in your country/area.
Menu operations identical for function settings/audio adjustments/initial settings/lists
Returning to the previous display
Returning to the previous list (the folder one level higher)
1 Press DISP/ /SCRL.
Returning to the main menu
1 Press and hold DISP/ /SCRL.
Returning to the ordinary display Canceling the initial setting menu 1 Press BAND/ESC.
Tuner
 Important
If you are using this unit in North, Central or South America, reset the AM tuning step (refer to
AM STEP (AM tuning step) on page 26).
Basic Operations
Selecting a band
1Press BAND/ESC until the desired band (FM1, FM2, FM3 for FM or AM) is displayed.
Manual tuning (step by step) 1 Press cor d.
Seeking
1Press and hold cor d, and then release.
You can cancel seek tuning by briefly pressing c or d.
While pressing and holding cor d, you can skip stations. Seek tuning starts as soon as you release cor d.
Storing and recalling stations
You can easily store up to six stations for each band as presets.
 10
10 En
En
|
Section |
Operating this unit |
02 |
% When you find a station that you want to store in memory, press one of the preset tuning buttons (1/S.Rtrv/DVD MENU to 6/  /ANGLE) and hold until the preset number stops flashing.
Stored radio station frequency can be recalled by pressing the preset tuning button.
# You can also recall stored radio stations by pressing aor bduring the frequency display.
Function settings
1Press M.C. to display the main menu.
2Turn M.C. to change the menu option and press to select FUNCTION.
3Turn M.C. to select the function.
After selecting, perform the following procedures to set the function.
BSM (best stations memory)
BSM (best stations memory) automatically stores the six strongest stations in the order of their signal strength.
1Press M.C. to turn BSM on. To cancel, press M.C. again.
LOCAL (local seek tuning)
Local seek tuning lets you tune in to only those radio stations with sufficiently strong signals for good reception.
1Press M.C. to display the setting mode.
2Turn M.C. to select the desired setting.
FM: OFF—LEVEL 1—LEVEL 2—LEVEL 3—LEVEL 4
AM: OFF—LEVEL 1—LEVEL 2
The larger the setting number, the higher the signal level. The highest level setting allows reception of only the strongest stations; while lower settings let you receive progressively weaker stations.
3Press M.C. to confirm the selection.
 Note
Note
Operation is complete even if the menu is cancelled before being confirmed.
Built-in DVD player
Basic Operations
Playing a disc
1Insert the disc into the disc loading slot with the label side up.
If a disc has already been inserted, press SRC/ OFF to select DVD (built-in DVD player).
Ejecting a disc 1 Press h.
Selecting a folder
1Press aor b.
You cannot select a folder that does not have a compressed audio file, JPEG file or DivX file recorded in it.
Selecting a chapter/track/file
1Press cor d.
You can also skip back or forward to another chapter/track/file by pressing oor p. During PBC playback, a menu may be displayed if you perform these operations.
Fast forwarding or reversing
1Press and hold cor d.
When DVD, DivX disc or Video CD is playing, if you press and hold cor dfor five seconds, the icon mor nis highlighted. When this happens, fast reverse/fast forward continues even if you release cor d. To resume playback at a desired point, press f.
Returning to root folder
1 Press and hold BAND/ESC.
 Notes
Notes
!When the automatic playback function is on, this unit will cancel the DVD menu and automatically start playback from the first chapter of the first title. Refer to Automatic playback of DVDs on page 14.
!If you are playing a DVD or Video CD, a menu may appear. Refer to Operating the DVD menu on page 15 and PBC playback on the next page.
!When loading a CD/CD-R/RW containing JPEG picture files, this unit automatically starts a slideshow from the first folder/picture on the disc. The player displays the pictures in each folder in alphabetical order.
unit this Operating
En  11
11
Section
02  Operating this unit
!If the bookmark function is on, DVD playback resumes from the selected point. For more details, refer to Resume playback (Bookmark) on page 15.
!When you are watching a DVD and attempt to perform an operation, it may not be performed due to the programming on the disc. When
this happens, the unit indicates the button  on the screen.
Switching the media file type
When playing a disc containing a mixture of various media file types, such as DivX and MP3, you can switch between media file types to play.
!In case of DVD-R/RW/ROM, this unit does not
allow playback of audio data (CD-DA) and JPEG file.
1Press BAND/ESC to switch between media file types.
Basic playback controls
The table below shows the basic controls for playing discs. The following chapters cover other playback features in more details.
Button What it does
Starts playback, pauses a disc that’s playing or restarts a paused disc.
fStarts the slideshow, pauses the slideshow or restarts a paused disc.
gStops playback.
mPress and hold to perform fast reverse.
nPress and hold to perform fast forward. Skips to the start of the current track, chap-
o
ter or file, then to previous tracks/chapters/ files.
Displays the previous picture.
p
Skips to the next track, chapter or file.
Displays the next picture.
 Notes
Notes
!You may find with some DVD or Video CD discs that some playback controls do not work in certain parts of the disc. This is not a malfunction.
!If the remote control is set to DVH, gdoes not operate.
PBC playback
With Video CDs featuring PBC (playback control) function, you can operate a menu.
!This function is available for Video CD.
1When PBC menu is displayed, press 0 to 9 corresponding to a menu number to start playback. When the menu is two or more pages long, press oor pto switch between displays.
 Notes
Notes
!You can display the menu by pressing RETURN during PBC playback. For details, refer to the instructions provided with the disc.
!PBC playback of a Video CD cannot be canceled.
!During playback of Video CDs featuring PBC (Playback Control), PBC, search and time search functions cannot be used nor can you select the range for repeat play.
 12
12 En
En
 Loading...