


DVD Player
DV-266-S DV-366-S DV-366-K DV-466-S DV-466-K
Operating Instructions
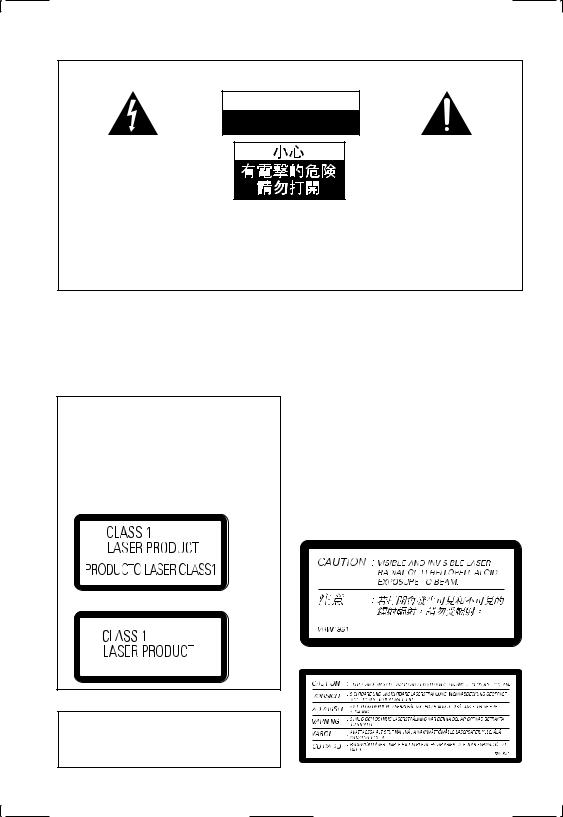
IMPORTANT
C A U T I O N
RISK OF ELECTRIC SHOCK
DO NOT OPEN
[Taiwanese model]
The lightning flash with arrowhead symbol, within an equilateral triangle, is intended to alert the user to the presence of uninsulated “dangerous voltage” within the product's enclosure that may be of sufficient magnitude to constitute a risk of electric shock to persons.
CAUTION:
TO PREVENT THE RISK OF ELECTRIC SHOCK, DO NOT REMOVE COVER (OR BACK). NO USER-SERVICEABLE PARTS INSIDE. REFER SERVICING TO QUALIFIED SERVICE PERSONNEL.
The exclamation point within an equilateral triangle is intended to alert the user to the presence of important operating and maintenance (servicing) instructions in the literature accompanying the appliance.
H002_En
WARNING: The apparatus is not waterproofs, to prevent fire or shocks hazard, do not
expose this apparatus to rain or moisture and do not put any water source near this
apparatus, such as vase, flower pot, cosmetics container and medicine bottle etc.
CAUTION
This product contains a laser diode of higher class than 1. To ensure continued safety, do not remove any covers or attempt to gain access to the inside of the product.
Refer all servicing to qualified personnel.
The following caution label appears on your unit.
Location: rear of the unit
[Central and South American model model]
[Expect PX model]
H018A_En
When disposing of used batteries, please comply with governmental regulations or environmental public instruction’s rules that apply in your country or area.
WARNING: BEFORE PLUGGING IN THE UNIT FOR THE FIRST TIME, READ THE FOLLOWING SECTION CAREFULLY. THE VOLTAGE OF THE AVAILABLE POWER SUPPLY DIFFERS ACCORDING TO COUNTRY OR REGION. BE SURE THAT THE POWER SUPPLY VOLTAGE OF THE AREA WHERE THIS UNIT WILL BE USED MEETS THE REQUIRED VOLTAGE (E.G., 230V OR 120V) WRITTEN ON THE REAR PANEL.
H041A_En
WARNING: NO NAKED FLAME SOURCES, SUCH AS LIGHTED CANDLE, SHOULD BE PLACED ON THE APPARATUS. IF NAKED FLAME SOURCES ACCIDENTALLY FALL DOWN, FIRE SPREAD OVER THE APPARATUS THEN MAY CAUSE FIRE.
H044_En
On the top of the player
[Except PX and Taiwanese model]

[For Australian model]
ENERGY STAR® and the ENERGY STAR certification mark are registered US marks.
K001C_En
[For PX model]
NOTE: This equipment has been tested and found to comply with the limits for a Class B digital device, pursuant to Part 15 of the FCC Rules. These limits are designed to provide reasonable protection against harmful interference in a residential installation. This equipment generates, uses, and can radiate radio frequency energy and, if not installed and used in accordance with the instructions, may cause harmful interference to radio communications. However, there is no guarantee that interference will not occur in a particular installation. If this equipment does cause harmful interference to radio or television reception, which can be determined by turning the equipment off and on, the user is encouraged to try to correct the interference by one or more of the following measures:
–Reorient or relocate the receiving antenna.
–Increase the separation between the equipment and receiver.
–Connect the equipment into an outlet on a circuit different from that to which the receiver is connected.
–Consult the dealer or an experienced radio/
TV technician for help.
Information to User
Alteration or modifications carried out without appropriate authorization may invalidate the user's right to operate the equipment.
CAUTION:
This product satisfies FCC regulations when shielded cables and connectors are used to connect the unit to other equipment. To prevent electromagnetic interference with electric appliances such as radios and televisions, use shielded cables and connectors for connections.
CAUTION
•Use of controls or adjustments or performance of procedures other than those specified herein may result in hazardous radiation exposure.
•The use of optical instruments with this
product will increase eye hazard.
Operating Environment H045_En
Operating environment temperature and humidity:
+5ºC – +35ºC (+41ºF – +95ºF); less than 85%RH (cooling vents not blocked)
Do not install in the following locations
÷Location exposed to direct sunlight or strong artificial light
÷Location exposed to high humidity, or poorly ventilated location
WARNING: Slot and openings in the cabinet are provided for ventilation and to ensure reliable operation of the product and to protect it from overheating, to prevent fire hazard, the openings should never be blocked and covered with items, such as newspapers, table-cloths, curtains, etc. Also do not put the apparatus on the thick carpet, bed, sofa, or fabric having a thick pile.
CAUTION: THE STANDBY/ON BUTTON IS SECONDARY CONNECTED AND THEREFORE DOES NOT SEPARATE THE UNIT FROM MAINS POWER IN STANDBY POSITION. THEREFORE INSTALL THE UNIT SUITABLE PLACES EASY TO DISCONNECT THE MAINS PLUG IN CASE OF THE ACCIDENT. THE MAINS PLUG OF UNIT SHOULD BE UNPLUGGED FROM THE WALL SOCKET WHEN LEFT UNUSED FOR A LONG PERIOD OF TIME.
H017B_En
This product is for general household purposes. Any failure due to use for other than household purposes (such as long-term use for business purposes in a restaurant or use in a car or ship) and which requires repair will be charged for even during the warranty period.
This product incorporates copyright protection technology that is protected by method claims of certain U.S. patents and other intellectual property rights owned by Macrovision Corporation and other rights owners. Use of this copyright protection technology must be authorized by Macrovision Corporation, and is intended for home and other limited viewing uses only unless otherwise authorized by Macrovision Corporation. Reverse engineering or disassembly is prohibited.
This product includes FontAvenue® fonts licenced by NEC corporation. FontAvenue is a registered trademark of NEC Corporation.

01
Thank you for buying this Pioneer product.
Please read through these operating instructions so that you will know how to operate your model properly. After you have finished reading the instructions, put them in a safe place for future reference.
Contents
01 Before you start
Features . . . . . . . . . . . . . . . . . . . . . . . . . . . 6 What’s in the box . . . . . . . . . . . . . . . . . . . . 7
Putting the batteries in the remote
control . . . . . . . . . . . . . . . . . . . . . . . . . . . . 7
Using the remote control . . . . . . . . . . . . . 7 Disc / content format playback
compatibility . . . . . . . . . . . . . . . . . . . . . . . 8
General disc compatibility . . . . . . . . . . . . 8 CD-R/RW compatibility . . . . . . . . . . . . . . 8 DVD-R/RW compatibility . . . . . . . . . . . . . 8 PC-created disc compatibility . . . . . . . . . 9
About WMA . . . . . . . . . . . . . . . . . . . . . . . 9
Compressed audio compatibility . . . . . . . 9 JPEG file compatibility . . . . . . . . . . . . . . 10
02 Connecting up
Rear panel connections . . . . . . . . . . . . . . 11
Easy connections . . . . . . . . . . . . . . . . . . . 12
Connecting using the S-video output . . . . 13 Connecting using the component video output . . . . . . . . . . . . . . . . . . . . . . . . . . . 14
Taiwanese model only: Connecting using the D1/D2 video output . . . . . . . . . . . . . . 14 Connecting to an AV receiver . . . . . . . . . . 15
03 Controls and displays
Front panel. . . . . . . . . . . . . . . . . . . . . . . . 17 Display . . . . . . . . . . . . . . . . . . . . . . . . . . . 19 Remote control . . . . . . . . . . . . . . . . . . . . 20
04 Getting started
Switching on . . . . . . . . . . . . . . . . . . . . . . . 22 Let’s Get Started . . . . . . . . . . . . . . . . . . . . 22
Using the on-screen displays. . . . . . . . . . .24 Setting up with the Setup Navigator . . . . .25
Playing discs . . . . . . . . . . . . . . . . . . . . . . . 27
Basic playback controls . . . . . . . . . . . . .29 Resume and Last Memory . . . . . . . . . . .30 DVD-Video disc menus . . . . . . . . . . . . . .30 Video CD/Super VCD PBC menus . . . . . .31
05 Playing discs
Introduction. . . . . . . . . . . . . . . . . . . . . . . . 32
Using the Disc Navigator to browse the contents of a disc . . . . . . . . . . . . . . . . . . . 32 Scanning discs . . . . . . . . . . . . . . . . . . . . . 33
Playing in slow motion . . . . . . . . . . . . . . .34 Frame advance/frame reverse . . . . . . . . . .34 Looping a section of a disc . . . . . . . . . . . .34
Using repeat play. . . . . . . . . . . . . . . . . . . . 35 Using random play . . . . . . . . . . . . . . . . . . 36
Creating a program list . . . . . . . . . . . . . . .37 Editing a program list . . . . . . . . . . . . . . .39 Other functions available from the program menu . . . . . . . . . . . . . . . . . . . . 39
Searching a disc . . . . . . . . . . . . . . . . . . . . 40 Switching subtitles . . . . . . . . . . . . . . . . . . 40
Switching DVD audio language . . . . . . . . .40 Switching VR format DVD-RW audio channel . . . . . . . . . . . . . . . . . . . . . . . . . . . 41
4

01
Switching audio channel when playing a Video CD/Super VCD . . . . . . . . . . . . . . . . 41 Zooming the screen . . . . . . . . . . . . . . . . . 41
Switching camera angles. . . . . . . . . . . . . 42 Displaying disc information . . . . . . . . . . . 42
06 Viewing JPEG discs
Viewing JPEG discs . . . . . . . . . . . . . . . . . 44
Using the JPEG Disc Navigator and Photo Browser . . . . . . . . . . . . . . . . . . . . . . . . . . 44 Zooming the screen . . . . . . . . . . . . . . . . . 45
07 Audio Settings menu
Audio DRC . . . . . . . . . . . . . . . . . . . . . . . . 46 Virtual Surround. . . . . . . . . . . . . . . . . . . . 46
08 Video Adjust menu
Video Adjust. . . . . . . . . . . . . . . . . . . . . . . 48
Creating your own presets . . . . . . . . . . . 48
09 Initial Settings menu
Using the Initial Settings menu . . . . . . . . 50 Digital Audio Out settings . . . . . . . . . . . . 50
Digital Out . . . . . . . . . . . . . . . . . . . . . . . 50 Dolby Digital Out . . . . . . . . . . . . . . . . . . 51 DTS Out . . . . . . . . . . . . . . . . . . . . . . . . . 51 96kHz PCM Out . . . . . . . . . . . . . . . . . . . 51 MPEG Out . . . . . . . . . . . . . . . . . . . . . . . 51
Video Output settings. . . . . . . . . . . . . . . . 52
TV Screen . . . . . . . . . . . . . . . . . . . . . . . 52 Component Out . . . . . . . . . . . . . . . . . . . 52 S-Video Out . . . . . . . . . . . . . . . . . . . . . . 53 Language settings . . . . . . . . . . . . . . . . . . 54 Audio Language . . . . . . . . . . . . . . . . . . 54 Subtitle Language . . . . . . . . . . . . . . . . . 54 DVD Menu Language. . . . . . . . . . . . . . . 55 Subtitle Display . . . . . . . . . . . . . . . . . . . 55 Display settings . . . . . . . . . . . . . . . . . . . . 56 OSD Language . . . . . . . . . . . . . . . . . . . 56 On Screen Display . . . . . . . . . . . . . . . . . 56 Angle Indicator . . . . . . . . . . . . . . . . . . . 56 Options . . . . . . . . . . . . . . . . . . . . . . . . . . 57
Parental Lock . . . . . . . . . . . . . . . . . . . . . 57
PhotoViewer . . . . . . . . . . . . . . . . . . . . . . . 59
010 Additional information
Taking care of your player and discs . . . . .60
Handling discs . . . . . . . . . . . . . . . . . . . . 60 Storing discs . . . . . . . . . . . . . . . . . . . . . . 60 Discs to avoid . . . . . . . . . . . . . . . . . . . . . 61
Cleaning the unit’s exterior . . . . . . . . . . .61 Cleaning the pickup lens. . . . . . . . . . . . .61 Problems with condensation. . . . . . . . . .61 Hints on installation . . . . . . . . . . . . . . . . 61
Moving the player . . . . . . . . . . . . . . . . . . 62 Power cable caution . . . . . . . . . . . . . . . . 62
Screen sizes and disc formats . . . . . . . . . .62
Widescreen TV users. . . . . . . . . . . . . . . . 62 Standard TV users . . . . . . . . . . . . . . . . . . 62 Resetting the player. . . . . . . . . . . . . . . . . . 63
Titles, chapters and tracks. . . . . . . . . . . . .63
DVD-Video regions . . . . . . . . . . . . . . . . . . 64
Selecting languages using the
language code list . . . . . . . . . . . . . . . . . . . 64 Language code list . . . . . . . . . . . . . . . . . . 65 Country code list . . . . . . . . . . . . . . . . . . . . 65 Glossary . . . . . . . . . . . . . . . . . . . . . . . . . . 66
Setting the TV system . . . . . . . . . . . . . . . . 68 Watching NTSC on a PAL TV
(MOD. PAL) . . . . . . . . . . . . . . . . . . . . . . . . 68
Taiwanese model only: Changing the on-screen display language to English . . .69
Specifications . . . . . . . . . . . . . . . . . . . . . . 70
5

01 Before you start
Chapter 1
Before you start
Features
24-bit/192kHz compatible DAC
This player is fully compatible with high sampling-rate discs, capable of delivering better-than-CD sound quality in terms of dynamic range, low-level resolution and highfrequency detail.
Excellent audio performance with Dolby*1 Digital and DTS*2 software
Logos: 1
When connected to a suitable AV amplifier or receiver, this player gives great surround sound with Dolby Digital and DTS discs.
Virtual Dolby Digital using SRS TruSurround*3
Logo: 
SRS TruSurround creates a realistic surround-sound effect from any Dolby Digital source using just two speakers. SRS TruSurround is a process approved by Dolby Laboratories for Virtual Dolby Digital sound. See
Virtual Surround on page 46.
PureCinema progressive scan
When connected to a progressive scancompatible TV or monitor using the component video outputs, you can enjoy extremely stable, flicker free images, with the same frame refresh rate as the original movie.
Picture zoom
While a DVD or Video CD/Super VCD is playing, you can zoom in on any part of the picture at up to 4x magnification for a closer look. See Zooming the screen on page 41.
MP3 and WMA compatibility
This player is compatible with CD-R, CD-RW and CD-ROM discs that contain MP3 or WMA audio tracks. See also Compressed audio compatibility on page 9.
Graphical on-screen displays
Setting up and using your DVD player is made very easy using the graphical on-screen displays.
Energy saving design
This player features an auto power-off function. If the player is not used for over 30 minutes, it automatically switches itself into standby.
This unit is designed to use 0.18 W of power when in standby mode (except for Taiwan model: 0.1 W).
*1 Manufactured under license from Dolby Laboratories. “Dolby” and the double-D symbol are trademarks of Dolby Laboratories.
*2 “DTS” and “DTS Digital Out” are registered trademarks of Digital Theater Systems, Inc.
*3 TruSurround, SRS and 
 symbol are trademarks of SRS Labs, Inc. TruSurround technology is incorporated under license from SRS Labs, Inc.
6
En
Before you start
What’s in the box
Please confirm that the following accessories are in the box when you open it.
•Remote control
•AA/R6P dry cell batteries x2
•Audio/video cable (red/white/yellow plugs)
•Power cable (Central and South American model x2)
•Operating instructions x2 (Central and South American model x3, Australian and PX model x1)
•Remote control overlay (Taiwanese model only) — Place the overlay on the remote control to be able to read the buttons in Chinese.
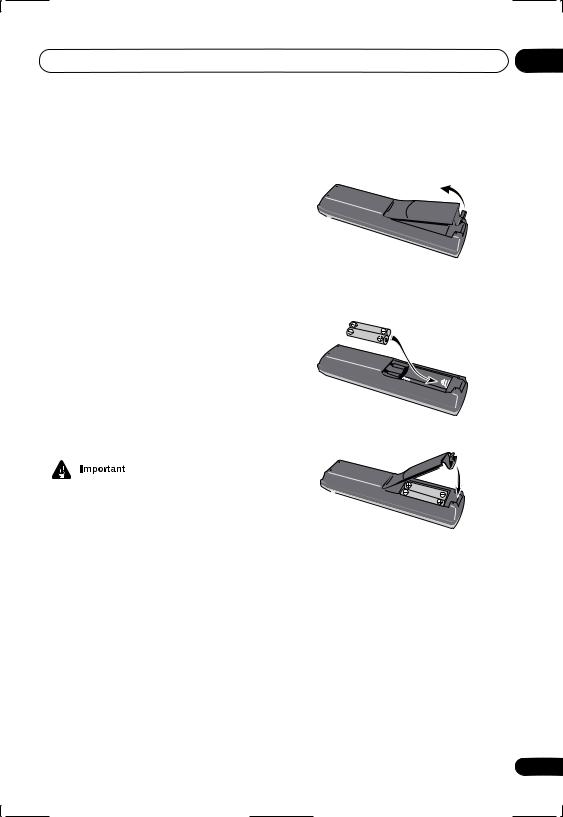
Putting the batteries in the remote control
01
1 Open the battery compartment cover on the back of the remote control.
2 Insert two AA/R6P batteries into the battery compartment following the indications ( , ) inside the compartment.
3 Close the cover.
Incorrect use of batteries can result in hazards such as leakage and bursting. Please observe the following:
•Don’t mix new and old batteries together.
•Don’t use different kinds of battery together—although they may look similar, different batteries may have different voltages.
•Make sure that the plus and minus ends of each battery match the indications in the battery compartment.
•Remove batteries from equipment that isn’t going to be used for a month or more.
•When disposing of used batteries, please comply with governmental regulations or environmental public instruction’s rules that apply in your country or area.
H048 En
Using the remote control
Keep in mind the following when using the remote control:
•Make sure that there are no obstacles between the remote and the remote sensor on the unit.
•The remote has a range of about 7m.
•Remote operation may become unreliable if strong sunlight or fluorescent light is shining on the unit’s remote sensor.
•Remote controllers for different devices can interfere with each other. Avoid using remotes for other equipment located close to this unit.
7
En
01 Before you start
•Replace the batteries when you notice a fall off in the operating range of the remote.
Disc / content format playback compatibility
General disc compatibility
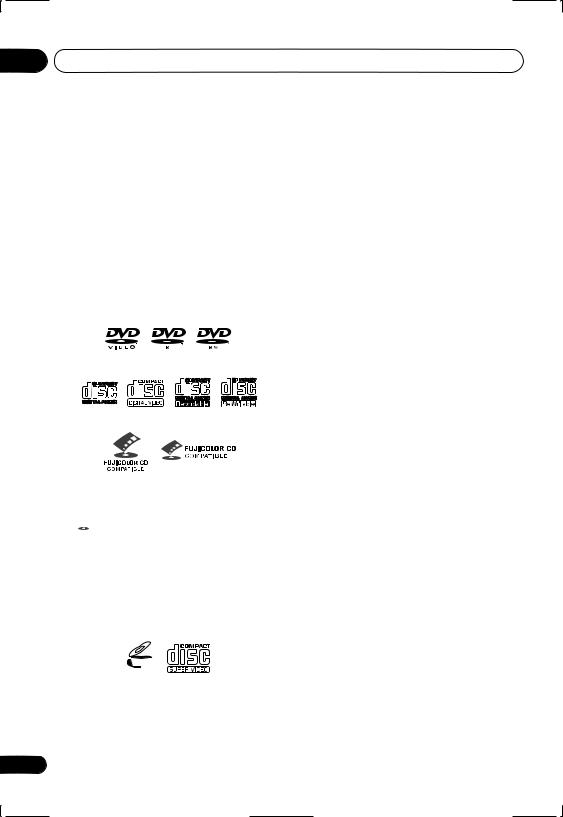
This player was designed and engineered to be compatible with software bearing one or more of the following logos:
DVD-Video DVD-R DVD-RW
Audio CD Video CD |
CD-R |
CD-RW |
Fujicolor CD
•KODAK Picture CD
• is a trademark of Fuji Photo Film Co. Ltd.
This player supports the IEC’s Super VCD standard. Compared to the Video CD standard, Super VCD offers superior picture quality, and allows two stereo soundtracks to be recorded. Super VCD also supports the widescreen size.
VIDEO

 CD
CD
Super Video CD (Super VCD)
Other formats, including but not limited to the following, are not playable in this player:
8
DVD-Audio / SACD / DVD-RAM
DVD-ROM / CD-ROM*
*Except those that contain MP3, WMA or JPEG. See also Compressed audio compatibility and JPEG file compatibility below.
DVD-R/RW and CD-R/RW discs (Audio CDs and Video CD/Super VCDs) recorded using a DVD recorder, CD recorder or personal computer may not be playable on this unit. This may be caused by a number of possibilities, including but not limited to: the type of disc used; the type of recording; damage, dirt or condensation on either the disc or the player’s pick-up lens. See below for notes about particular software and formats.
CD-R/RW compatibility
•This unit will play CD-R and CD-RW discs recorded in CD Audio or Video CD/Super VCD format, or as a CD-ROM containing MP3, WMA or JPEG files. However, any other content may cause the disc not to play, or create noise/distortion in the output.
•This unit cannot record CD-R or CD-RW discs.
•Unfinalized CD-R/RW discs recorded as CD Audio can be played, but the full Table of Contents (playing time, etc.) will not be displayed.
DVD-R/RW compatibility
•This unit will play DVD-R/RW discs recorded using the DVD-Video format that have been finalized using a DVD-recorder.
•This unit will play DVD-RW discs recorded using the Video Recording (VR) format.
•DVD-RW shows in the display when a VR format DVD-RW disc is loading.
En

Before you start |
01 |
•When playing a VR format DVD-RW discs that was edited on a DVD recorder, the screen may go momentarily black at edited points and/or you may see scenes from immediately before the edited point.
•This unit cannot record DVD-R/RW discs.
•Unfinalized DVD-R/RW discs cannot be played in this player.
PC-created disc compatibility
•If you record a disc using a personal computer, even if it is recorded in a “compatible format” as listed above, there will be cases in which the disc may not be playable in this machine due to the setting of the application software used to create the disc. In these particular instances, check with the software publisher for more detailed information.
•Check the DVD-R/RW or CD-R/RW software disc boxes for additional compatibility information.
About WMA
The Windows Media™ logo printed on the box indicates that this player can playback WMA data.
WMA is short for Windows Media Audio and refers to an audio compression technology developed by Microsoft Corporation. WMA data can be encoded by using Windows Media Player version 8 (or less) or Windows Media Player for Windows XP.
Windows Media, and the Windows logo are trademarks, or registered trademarks of Microsoft Corporation in the United States and/or other countries.
Compressed audio compatibility
•This unit will play CD-ROM, CD-R, and CD-RW discs containing files saved in the MPEG-1 Audio Layer 3 (MP3) or Windows Media Audio (WMA) format with a sampling rate of 32*, 44.1 or 48kHz. Incompatible files will not play and the message Can’t play this format will be displayed (NO PLAY in the front panel display).
*This unit will not play 32kHz WMA files encoded at 20kbps.
•Fixed bit-rate MP3 files are recommended. Variable bit-rate (VBR) MP3 files are playable, but playing time may not be shown correctly.
•This player is compatible with WMA data encoded using Windows Media Player version 8 (or less) or Windows Media Player for Windows XP.
•This player is not compatible with loss- less-encoding or variable bit-rate (VBR) WMA files.
•WMA files encoded with DRM (Digital Rights Management) copy protection will not play and the message Can’t play this format will be displayed (NO PLAY in the front panel display).
9
En

01 Before you start
•The CD-ROM used to compile your WMA/ MP3 files must be ISO 9660 Level 1 or 2 compliant. CD physical format: Mode1, Mode2 XA Form1. Romeo and Joliet file systems are both compatible with this player.
•Use CD-R or CD-RW media for recording your files. The disc must be finalized (i.e. the session must be closed) in order to play in this unit. This player is not compatible with multi-session discs. Only the first session of a multi-session disc will be recognized.
•This player only plays tracks that are named with the file extension .mp3,
.MP3, .wma, or .WMA.
•When naming MP3 and WMA files, add the corresponding file name extension (.mp3 or .wma). Files are played according to the file extension. To prevent noise and malfunctions, do not use these extensions for other kinds of files.
•This player can recognize up to 999 files (WMA/MP3/JPEG) and up to 499 folders. If a disc exceeds these limits, only files and folders up to these limits will be playable. Files and folders are read/displayed in alphabetical order. Note that if the file structure is very complex, you may not be able to read/play all files on the disc.
•Folder and track names (excluding the file extension) are displayed.
•There are many different recording bitrates available to encode MP3 files. This unit was designed to be compatible with all of them. Audio encoded at 128Kbps should sound close to regular CD Audio quality. This player will play lower bit-rate files, but please note that the sound quality becomes noticeably worse at lower bit-rates.
JPEG file compatibility
•Baseline JPEG and EXIF 2.1* still image files up to 8 mega-pixels are supported (maximum vertical and horizontal resolution is 5120 pixels). (*File format used by digital still cameras)
•The CD-ROM used to compile your JPEG files must be ISO 9660 Level 1 or 2 compliant. CD physical format: Mode1, Mode2 XA Form1. Romeo and Joliet file systems are both compatible with this player.
•This player only displays files that are named with the file extension .jpg or
.JPG.
10
En
Connecting up |
02 |
Chapter 2
Connecting up
Rear panel connections
1 |
2 |
3 |
4 |
DIGITAL AUDIO OUT |
|
AUDIO OUT |
|
Y |
|
PB |
VIDEO OUT |
COAXIAL |
|
L |
D1 /D2 |
|
|
R |
|
OPTICAL |
|
PR |
|
S |
|
COMPONENT VIDEO OUT |
|
VIDEO OUT
|
|
|
|
|
|
|
|
Taiwanese model |
|
8 |
7 |
6 |
5 |
|
|||||
|
|
|
|
|
|
|
3 AUDIO OUT L / R |
||
|
|
|
|
|
|
|
|||
|
|
|
|
|
|
|
This pair of analog audio outputs connects to |
||
|
|
|
|
|
|
|
|||
• When connecting this player up to your |
your TV, AV receiver or stereo system. Even if |
||||||||
you are connecting up one of the digital |
|||||||||
|
TV, AV receiver or other components, |
||||||||
|
outputs, we still recommend you connect |
||||||||
|
make sure that all components are |
||||||||
|
these jacks. |
||||||||
|
switched off and unplugged. |
||||||||
|
Use the supplied audio/video cable when |
||||||||
1 DIGITAL AUDIO OUT – COAXIAL |
|||||||||
connecting these jacks. Match the colors of |
|||||||||
This is a digital audio output for connection to |
|||||||||
the jacks and cables for correct stereo sound. |
|||||||||
a PCM, Dolby Digital, DTS and/or MPEG- |
|||||||||
4 |
AC IN |
||||||||
compatible AV receiver that has a coaxial |
|||||||||
digital input. |
|
|
|
Connect the supplied power cable here, then |
|||||
Connect using a commercially available |
plug into a power outlet. |
||||||||
|
|
||||||||
coaxial digital audio cable. |
5 |
VIDEO OUT D1/D2 (Taiwanese model |
|||||||
2 COMPONENT VIDEO OUT |
only) |
||||||||
Use to connect this player to a TV with a D |
|||||||||
This is a high quality video output for connec- |
|||||||||
video input. |
|||||||||
tion to a TV, monitor or AV receiver that has |
|||||||||
|
|
||||||||
component video inputs. |
6 |
VIDEO OUT |
|||||||
Connect using a commercially available |
This is a standard video output that you can |
||||||||
three-way component video cable. Be careful |
connect to your TV or AV receiver using the |
||||||||
to match the colors of the jacks and cables for |
supplied audio/video cable. |
||||||||
correct connection. |
|
|
|
||||||
11
En
02 Connecting up
7 S (S-video output)
This is an S-video output that you can use instead of the video output described in 5 above.
8 DIGITAL AUDIO OUT – OPTICAL
This is a digital audio output for connection to a PCM, Dolby Digital, DTS and/or MPEGcompatible AV receiver that has an optical digital input.
Connect using a commercially available optical digital audio cable.
•You may find it useful to have the manuals supplied with your other components handy when connecting this player.
•If you come across any unfamiliar terms in this section of the manual, turn to the Glossary on page 66.
Easy connections
The setup described here is a basic setup that allows you to play discs using just the cables supplied with the player. In this setup, stereo audio is played through the speakers in your TV.
A/V IN
TV
DIGITAL AUDIO OUT |
AUDIO OUT |
Y |
PB |
COAXIAL |
L |
|
R |
OPTICAL |
PR |
S |
COMPONENT VIDEO OUT |
|
VIDEO OUT |
 To power outlet
12
En
Connecting up |
02 |
•This player is equipped with copy protection technology. Do not connect this player to your TV via a VCR using AV cables, as the picture from this player will not appear properly on your TV. (This player may also not be compatible with some combination TV/VCRs for the same reason; refer to the manufacturer for more information.)
•When connecting to your TV as shown above, do not set the Component Out setting (page 52) to Progressive.
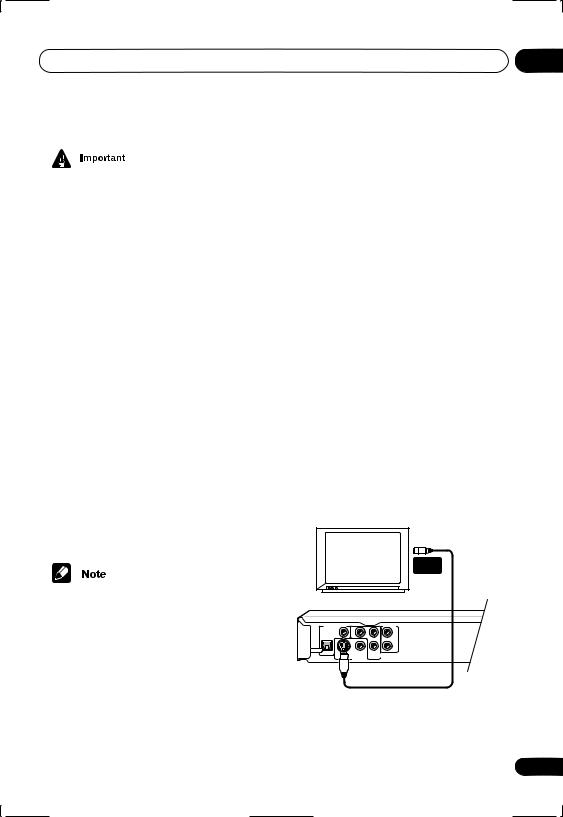
1 Connect the VIDEO OUT and AUDIO OUT L/R jacks to a set of A/V inputs on your TV.
Use the supplied audio/video cable, connecting the red and white plugs to the audio outputs and the yellow plug to the video output. Make sure you match up the left and right audio outputs with their corresponding inputs for correct stereo sound.
See below if you want to use a component or S-video cable for the video connection.
2 Connect the supplied AC power cable to the AC IN inlet, then plug into a power outlet.
•Before unplugging the player from the power outlet, make sure you first switch it into standby using either the front panel
STANDBY/ON button, or the remote control, and wait of the -OFF- message to disappear from the player’s display.
•For the above reasons, do not plug this player into a switched power supply found on some amplifiers and AV receivers.
•When TV System is set to AUTO or NTSC, and playing an NTSC disc only: When
Component Out (page 52) is set to Progressive, there is no video output from the VIDEO OUT (composite) and S (S-video) jacks. If you want to display video on more than one monitor simultaneously, make sure that it is set to Interlace. Switch the player to standby then, using the front panel controls, press
STANDBY/ON while pressing
to switch the player back to Interlace.
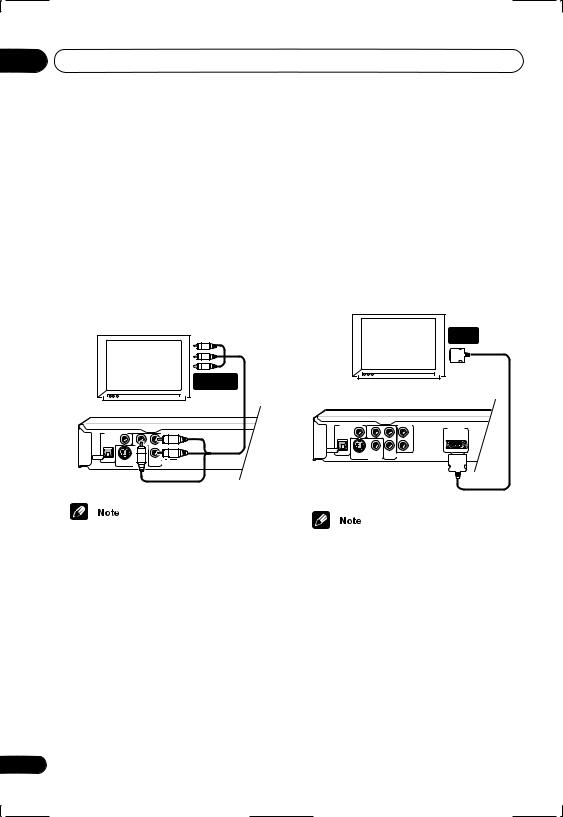
Connecting using the S-video output
If your TV (or other equipment) has an S-video input, you can use this instead of the standard (composite) output for a better quality picture.
• Use an S-video cable (not supplied) to connect the S-VIDEO OUT to an S-video input on your TV (or monitor or AV receiver).
Line up the small triangle above the jack with the same mark on the plug before plugging in.
|
S-VIDEO |
|
IN |
TV |
|
Y |
AUDIO OUT |
PB |
|
COAXIAL |
L |
|
R |
OPTICAL |
PR |
S |
COMPONENT VIDEO OUT |
VIDEO OUT |
|
13
En
02 Connecting up
Connecting using the component video output
You can use the component video output instead of the standard video out jack to connect this player to your TV (or other equipment). This should give you the best quality picture from the three types of video output available.
• Use a component video cable (not supplied) to connect the COMPONENT VIDEO OUT jacks to a component video input on your TV, monitor or AV receiver.
|
COMPONENT |
|
VIDEO IN |
TV |
|
Y |
AUDIO OUT |
PB |
|
COAXIAL |
L |
|
R |
OPTICAL |
PR |
S |
COMPONENT VIDEO OUT |
VIDEO OUT |
|
Taiwanese model only: Connecting using the D1/D2 video output
If your TV is equipped with a D type video input, you can use a D video cable to connect this player to your TV.
• Use a D video cable (not supplied) to connect the VIDEO OUT D1/D2 jacks to a D type video input on your TV, monitor or AV receiver.
D VIDEO
INPUT
TV
Y |
AUDIO OUT |
|
PB |
VIDEO OUT |
|
COAXIAL |
L |
D1 /D2 |
|
R |
|
OPTICAL |
PR |
|
S |
COMPONENT VIDEO OUT |
|
VIDEO OUT |
|
|
Taiwanese model
•To set up the player for use with a progressive scan TV, see Component Out on page 52.
•The D video output on this player outputs only NTSC video.
14
En
Connecting up
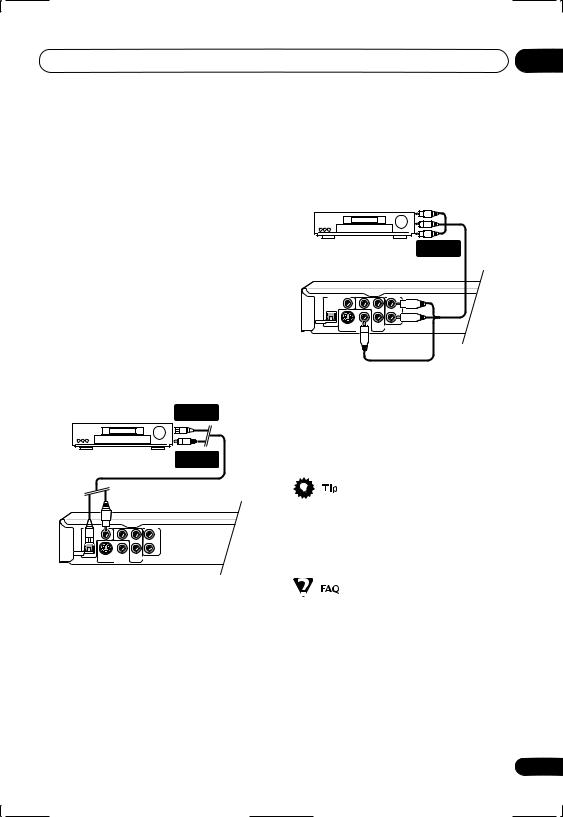
Connecting to an AV receiver
To enjoy multichannel surround sound you need to connect this player to an AV receiver using a digital output. This player has both coaxial and optical digital jacks; use whichever is convenient.
In addition to a digital connection, we recommend also connecting using the stereo analog connection.
You’ll probably also want to connect a video output to your AV receiver. You can use any of the video outputs available on this player (the illustration shows a standard (composite) connection).
1 Connect one of DIGITAL AUDIO OUT jacks on this player to a digital input on your AV receiver.
DIGITAL IN (OPTICAL)
AV receiver |
DIGITAL IN |
|
(COAXIAL) |
02
2 Connect the analog AUDIO OUT L/R and VIDEO OUT jacks on this player to a set of analog audio and video inputs on your AV receiver.
AV receiver |
AUDIO/ |
|
VIDEO IN |
Y |
AUDIO OUT |
PB |
|
COAXIAL |
L |
|
R |
OPTICAL |
PR |
S |
COMPONENT VIDEO OUT |
|
VIDEO OUT |
The diagram shows standard video connections, but you can alternatively use the S-video or component video connections if they’re available.
3 Connect the AV receiver’s video output to a video input on your TV.
Y |
AUDIO OUT |
PB |
|
COAXIAL |
L |
|
R |
OPTICAL |
PR |
S |
COMPONENT VIDEO OUT |
VIDEO OUT
•You usually have to connect the same kind of video cable between your DVD player and AV receiver, and between your AV receiver and TV.
This enables you to listen to multichannel surround sound.
For an optical connection, use an optical cable (not supplied) to connect the OPTICAL DIGITAL AUDIO OUT jack to an optical input on your AV receiver.
For a coaxial connection, use a coaxial cable (similar to the supplied video cable) to connect the COAXIAL DIGITAL AUDIO OUT jack to a coaxial input on your AV receiver.
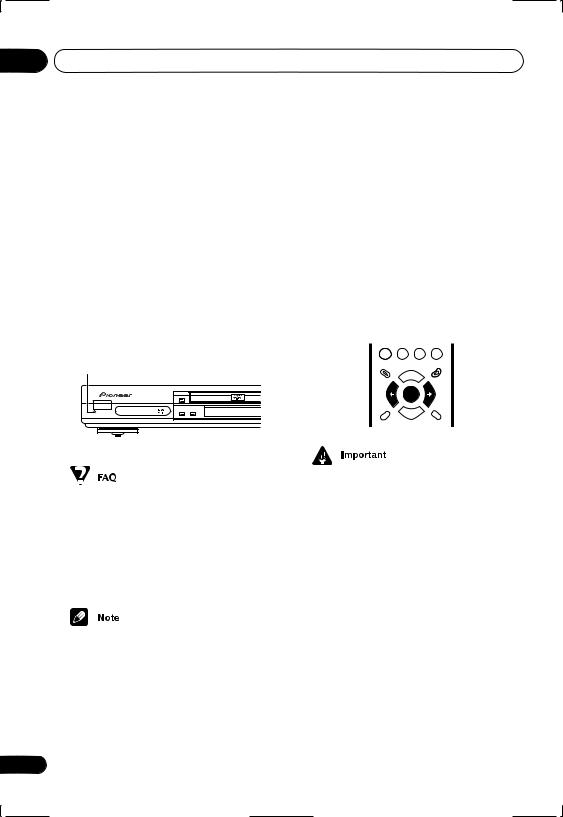
•My TV doesn’t have any inputs to connect the DVD player. How can I watch DVDs?
If your TV has no inputs you can’t use this player with it.
15
En

02 Connecting up
•My VCR is already connected to my TV, so there aren’t any spare inputs. What should I do?
If all your TV’s inputs are already in use, you can buy a video input selector from an electronics store, which effectively gives you more inputs.
•My TV only has one input for the sound. What should I plug it into?
If you don’t mind mono sound, you can buy a stereo RCA-to-mono RCA cable from an electronics store. Connect the stereo end to this player and the mono end to your TV.
If you want stereo sound, connect this player to your amplifier or stereo system using a stereo audio cable.
•I connected the DVD player to my AV receiver, and although the sound is fine, there’s no picture. What did I do wrong?
Make sure that the correct video input is selected on your TV.
Also make sure that the type of video connection from the DVD player to your AV receiver is the same as that from the receiver to your TV. Most AV receivers won’t convert from one kind of connection to another.
16
En

Controls and displays |
03 |
Chapter 3
Controls and displays
Front panel
1 |
16 |
|
13 |
3 |
|
4 |
|
14 |
7 |
8 |
9 |
|
|
|
|
|
|
OPEN/ |
|
|
TOP MENU |
|
MENU |
|
|
|
|
|
|
CLOSE |
|
|
|
|
|
|
|
|
|
|
|
|
|
|
HOME |
ENTER |
RETURN |
|
|
|
|
|
|
|
|
|
MENU |
|
|
STANDBY/ON |
|
|
|
|
|
|
|
|
|
|
|
DV-266-s |
|
|
15 |
12 |
5 |
6 |
|
|
11 |
|
10 |
1 |
|
|
2 |
3 |
|
4 |
|
|
7 |
8 |
9 |
|
|
|
|
|
|
|
|
|
TOP MENU |
|
MENU |
|
|
|
FL DIMMER |
|
|
OPEN/CLOSE |
|
|
HOME |
ENTER |
RETURN |
|
|
|
|
|
|
|
MENU |
|
|||
|
|
|
|
|
|
|
|
|
|
||
STANDBY/ON |
|
|
|
|
|
|
|
|
|
|
|
DV-366-s |
|
16 |
15 |
14 |
13 |
12 |
5 |
6 |
11 |
|
10 |
DV-366-K |
|
|
|||||||||
1 |
|
|
|
3 |
|
4 |
|
|
5 |
6 |
|
|
|
|
|
|
|
OPEN/CLOSE |
|
|
|
|
|
STANDBY/ON |
|
|
|
|
|
|
|
|
|
|
|
DV-466-s |
|
|
|
|
|
|
|
|
|
|
|
DV-466-K |
|
|
|
14 |
13 |
|
|
15 |
12 |
|
16 |
17
En

03 Controls and displays
1 STANDBY/ON
Press to switch the player on or into standby.
2 FL DIMMER
Press to dim or brighten the display.
3Disc tray
4OPEN/CLOSE
Press to open or close the disc tray.
5
Press to pause playback. Press again to restart.
6
Press to start or resume playback.
7 TOP MENU
Press to display the top menu of a DVD disc.
8 ENTER & cursor buttons
Use to navigate on-screen displays and menus. Press ENTER to select an option or execute a command.
9 MENU
Press to display a DVD disc menu, or the Disc Navigator if a VR format DVD-RW, CD, Video CD/Super VCD, MP3, WMA or JPEG disc is loaded.
10 RETURN
Press to return to a previous menu screen.
11 HOME MENU
Press to display (or exit).
12
Press to stop the disc (you can resume playback by pressing (play)).
13 Remote control sensor
The remote control has a range of up to about 7m.
14 Display
See page 19 for a description of the display.
15and
•Press and hold for fast reverse/forward scanning.
•Press to jump to the previous/next chapter or track.
16


This mark indicates compatibility with DVD-RW discs recorded on a DVD recorder in Video Recording mode.
18
En
Controls and displays |
03 |
Display
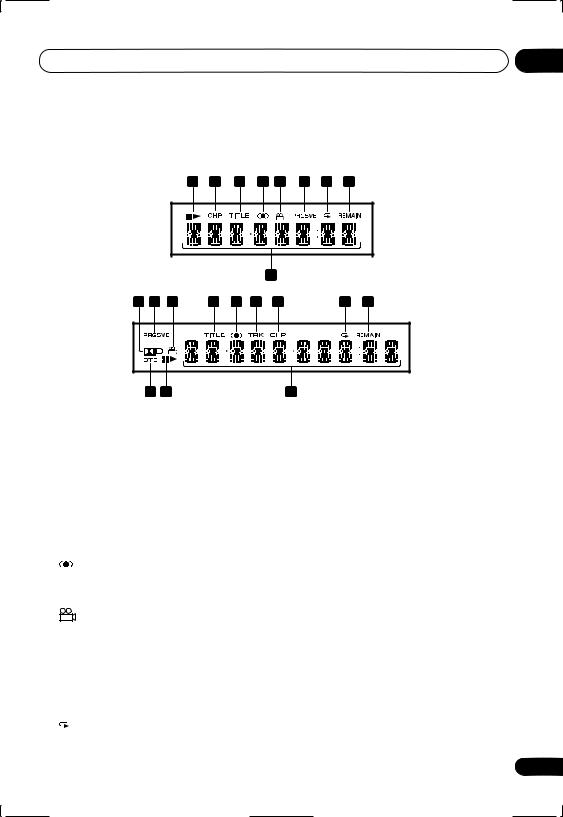
|
|
1 |
2 |
3 |
4 |
5 |
6 |
7 |
8 |
|
|
|
DV-266-s |
|
|
|
9 |
|
|
|
|
|
|
|
|
|
|
|
|
|
|
|
10 |
6 |
5 |
3 |
4 |
11 |
2 |
|
|
7 |
8 |
12 |
1 |
9 |
DV-366-s/ DV-366-K/ DV-466-s/ DV-466-K
1 and
Indicates whether a disc is playing or paused.
2 CHP
Indicates that the character display is showing a DVD chapter number.
3 TITLE
Indicates that the character display is showing a DVD title number.
4
Lights when 2V/SRS TruSurround is selected.
5
Lights during multi-angle scenes on a DVD disc.
6 PRGSVE
Lights when the player is set to output progressive scan video (see Component Out on page 52).
7
Lights in any of the repeat play modes.
8 REMAIN
Indicates that the character display is showing the disc or title/chapter/track remain time.
9Character display
102 D
Lights when a Dolby Digital soundtrack is playing.
11 TRK
Indicates that the character display is showing a CD or Video CD/Super VCD track number.
12 DTS
Lights when a DTS soundtrack is playing.
19
En
03 Controls and displays
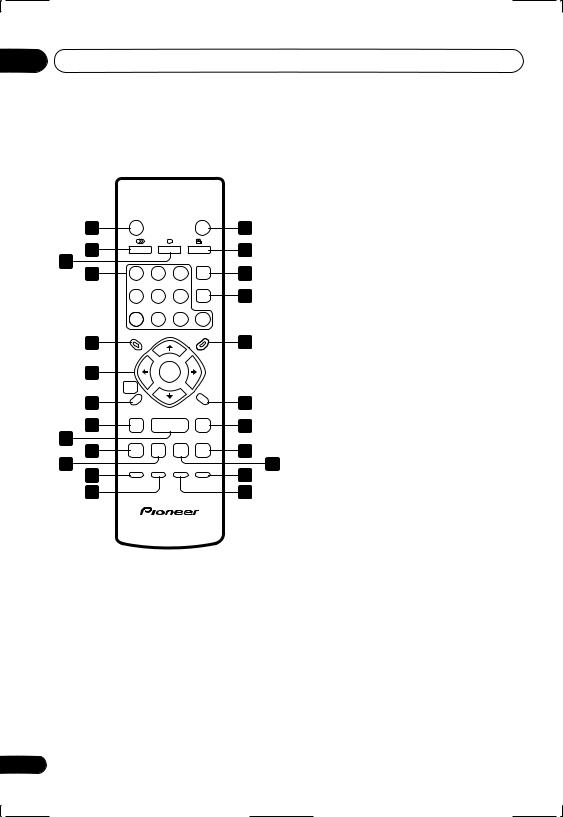
Remote control
|
STANDBY/ON |
|
|
OPEN/CLOSE |
|
1 |
|
|
|
|
14 |
2 |
AUDIO |
SUBTITLE |
ANGLE |
15 |
|
3 |
1 |
2 |
3 |
|
16 |
4 |
CLEAR |
||||
|
4 |
5 |
6 |
ENTER |
17 |
|
7 |
8 |
9 |
0 |
|
5 |
TOP MENU |
|
|
MENU |
18 |
|
|
|
|
||
6 |
|
ENTER |
|
|
|
|
HOME |
|
|
RETURN |
|
|
MENU |
|
|
|
|
7 |
|
|
|
|
19 |
8 |
|
|
|
|
20 |
9 |
|
|
|
|
|
10 |
|
|
|
|
21 |
11 |
PLAY MODE |
SURROUND |
ZOOM |
DISPLAY |
23 |
12 |
|
|
|
|
|
13 |
|
|
|
|
24 |
20
1 STANDBY/ON
Press to switch the player on or into standby.
2 AUDIO
Press to select the audio channel or language (see Switching DVD audio language on
page 40).
3 SUBTITLE
Press to select a subtitle display (see
Switching subtitles on page 40).
4Number buttons
5TOP MENU
Press to display the top menu of a DVD disc.
6 ENTER & cursor buttons
Use to navigate on-screen displays and menus. Press ENTER to select an option or execute a command.
7 HOME MENU
Press to display (or exit) the on-screen display.
22 |
8 |
and |
|
Use for reverse slow motion playback, frame |
|||
|
|||
reverse and reverse scanning.
9
Press to start or resume playback.
10
Press to jump to the beginning of the current chapter or track, then to previous chapters/ tracks.
11
Press to pause playback; press again to restart.
12 PLAY MODE
Press to display the Play Mode menu. (You can also get to the Play Mode menu by pressing HOME MENU and selecting Play Mode).
En
Controls and displays |
03 |
13 SURROUND
Press to activate/switch off 2V/SRS TruSurround.
14 OPEN/CLOSE
Press to open or close the disc tray.
15 ANGLE
Press to change the camera angle during DVD multi-angle scene playback (see
Switching camera angles on page 42).
16 CLEAR
Press to clear a numeric entry.
17 ENTER
Use to select menu options, etc. (works exactly the same as the ENTER button in 6 above).
18 MENU
Press to display a DVD disc menu, or the Disc Navigator if a VR format DVD-RW, CD, Video CD/Super VCD, MP3, WMA or JPEG disc is loaded.
19 RETURN
Press to return to a previous menu screen.
20 and
Use for forward slow motion playback, frame advance and forward scanning.
21
Press to jump to the next chapter or track.
22
Press to stop the disc (you can resume playback by pressing (play)).
23 DISPLAY
Press to display information about the disc playing (see Displaying disc information on page 42).
24 ZOOM
Press to change the zoom level (see Zooming the screen on page 41).
21
En
04 Getting started
Chapter 4
Getting started
Switching on
After making sure that everything is connected properly and that the player is plugged in, press STANDBY/ON on the front panel, or on the remote control to switch the player on.
Also, switch on your TV and make sure that it is set to the input you connected the DVD player to.
STANDBY/ON |
FL DIMMER |
STANDBY/ON |
DV-366-S/ DV-366-K
Let’s Get Started
When you switch on the player for the first time, you should see a welcome screen displayed on your TV. From here you can let the player know what kind of TV you have, then either use the Setup Navigator to make more settings, or jump right in and start playing some discs.
ENTER
GUIDE |
RETURN |
•My DVD player switches on but there is nothing displayed on my TV.
Make sure that the TV is set to the correct video input (not a TV channel). For example, if you connected this player to the VIDEO 1 inputs on your TV, switch your TV to VIDEO 1.
•This player features a screen saver and an auto power off function. If the player is stopped and no button is pressed for five minutes, the screen saver starts. If the disc tray is closed but no disc is playing and no control is pressed for 30 minutes, the player automatically goes into standby.
22
•For customers in Taiwan: The default onscreen menu language is Traditional Chinese. Use the instructions below to complete the Let’s Get Started setup, then see page 69 for instructions on changing the on-screen display language to English.
En
 Loading...