


DVD Player
Lecteur DVD
DV-420V-K
Register Your Product on
http://www.pioneerelectronics.com (US) http://www.pioneerelectronics.ca (Canada)
Enregistrez votre produit sur:
http://www.pioneerelectronics.com (États-Unis) http://www.pioneerelectronics.ca (Canada)
Operating Instructions Mode d’emploi
Thank you for buying this Pioneer product.
Please read through these operating instructions so you will know how to operate your model properly.
After you have finished reading the instructions, put them away in a safe place for future reference.
IMPORTANT
CAUTION
RISK OF ELECTRIC SHOCK
DO NOT OPEN
The lightning flash with arrowhead symbol, within an equilateral triangle, is intended to alert the user to the presence of uninsulated “dangerous voltage” within the product’s enclosure that may be of sufficient magnitude to constitute a risk of electric shock to persons.
CAUTION:
TO PREVENT THE RISK OF ELECTRIC SHOCK, DO NOT REMOVE COVER (OR BACK). NO USER-SERVICEABLE PARTS INSIDE. REFER SERVICING TO QUALIFIED SERVICE PERSONNEL.
The exclamation point within an equilateral triangle is intended to alert the user to the presence of important operating and maintenance (servicing) instructions in the literature accompanying the appliance.
D3-4-2-1-1_A1_En
IMPORTANT NOTICE
THE SERIAL NUMBER FOR THIS EQUIPMENT IS LOCATED IN THE REAR.
PLEASE WRITE THIS SERIAL NUMBER ON YOUR ENCLOSED WARRANTY CARD AND KEEP IN A SECURE AREA. THIS IS FOR YOUR SECURITY.
D1-4-2-6-1*_A1_En
NOTE:
This equipment has been tested and found to comply with the limits for a Class B digital device, pursuant to Part 15 of the FCC Rules. These limits are designed to provide reasonable protection against harmful interference in a residential installation. This equipment generates, uses, and can radiate radio frequency energy and, if not installed and used in accordance with the instructions, may cause harmful interference to radio communications. However, there is no guarantee that interference will not occur in a particular installation. If this equipment does cause harmful interference to radio or television reception, which can be determined by turning the equipment off and on, the user is encouraged to try to correct the interference by one or more of the following measures:
—Reorient or relocate the receiving antenna.
—Increase the separation between the equipment and receiver.
—Connect the equipment into an outlet on a circuit different from that to which the receiver is connected.
—Consult the dealer or an experienced radio/TV technician for help.
D8-10-1-2_A1_En
Information to User
Alterations or modifications carried out without appropriate authorization may invalidate the user’s right to operate the equipment.
D8-10-2_A1_En
CAUTION
This product satisfies FCC regulations when shielded cables and connectors are used to connect the unit to other equipment. To prevent electromagnetic interference with electric appliances such as radios and televisions, use shielded cables and connectors for connections.
D8-10-3a_A1_En
This Class B digital apparatus complies with Canadian ICES-003.
D8-10-1-3_A1_En
WARNING
To prevent a fire hazard, do not place any naked flame sources (such as a lighted candle) on the equipment.
2 En

1)Read these instructions.
2)Keep these instructions.
3)Heed all warnings.
4)Follow all instructions.
5)Do not use this apparatus near water.
6)Clean only with dry cloth.
7)Do not block any ventilation openings. Install in accordance with the manufacturer’s instructions.
8)Do not install near any heat sources such as radiators, heat registers, stoves, or other apparatus (including amplifiers) that produce heat.
9)Do not defeat the safety purpose of the polarized or grounding type plug. A polarized plug has two blades with one wider than the other. A grounding type plug has two blades and a third grounding prong. The wide blade or the third prong are provided for your safety. If the provided plug does not fit into your outlet, consult an electrician for replacement of the obsolete outlet.
10)Protect the power cord from being walked on or pinched particularly at plugs, convenience receptacles, and the point where they exit from the apparatus.
11)Only use attachments/accessories specified by the manufacturer.
12)Use only with the cart, stand, tripod, bracket, or table specified by the manufacturer, or sold with the apparatus. When a cart is used, use caution when moving the cart/apparatus combination to avoid injury from tip over.
13)Unplug this apparatus during lightning storms or when unused for long periods of time.
14)Refer all servicing to qualified service personnel. Servicing is required when the apparatus has been damaged in any way, such as power supply cord or plug is damaged, liquid has been spilled or objects have fallen into the apparatus, the apparatus has been exposed to rain or moisture, does not operate normally, or has been dropped.
P1-4-2-2_En
CAUTION
This product is a class 1 laser product, but this product contains a laser diode higher than Class 1. To ensure continued safety, do not remove any covers or attempt to gain access to the inside of the product. Refer all servicing to qualified personnel.
The following caution label appears on your unit. Location: inside of the unit
CLASS 1
LASER PRODUCT
English
D3-4-2-1-8*_C_En
VENTILATION CAUTION
When installing this unit, make sure to leave space around the unit for ventilation to improve heat radiation (at least 10 cm at top, 10 cm at rear, and 10 cm at each side).
WARNING
Slots and openings in the cabinet are provided for ventilation to ensure reliable operation of the product, and to protect it from overheating. To prevent fire hazard, the openings should never be blocked or covered with items (such as newspapers, table-cloths, curtains) or by operating the equipment on thick carpet or a bed.
WARNING
This equipment is not waterproof. To prevent a fire or shock hazard, do not place any container filled with liquid near this equipment (such as a vase or flower pot) or expose it to dripping, splashing, rain or moisture.
Operating Environment
Operating environment temperature and humidity: +5 °C to +35 °C (+41 °F to +95 °F); less than 85 %RH (cooling vents not blocked)
Do not install this unit in a poorly ventilated area, or in locations exposed to high humidity or direct sunlight (or strong artificial light)
D3-4-2-1-7c*_A1_En
3
If the AC plug of this unit does not match the AC outlet you want to use, the plug must be removed and appropriate one fitted. Replacement and mounting of an AC plug on the power supply cord of this unit should be performed only by qualified service personnel. If connected to an AC outlet, the cut-off plug can cause severe electrical shock. Make sure it is properly disposed of after removal.
The equipment should be disconnected by removing the mains plug from the wall socket when left unused for a long period of time (for example, when on vacation).
CAUTION
The STANDBY/ON switch on this unit will not completely shut off all power from the AC outlet. Since the power cord serves as the main disconnect device for the unit, you will need to unplug it from the AC outlet to shut down all power. Therefore, make sure the unit has been installed so that the power cord can be easily unplugged from the AC outlet in case of an accident. To avoid fire hazard, the power cord should also be unplugged from the AC outlet when left unused for a long period of time (for example, when on vacation).
This product is for general household purposes. Any failure due to use for other than household purposes (such as long-term use for business purposes in a restaurant or use in a car or ship) and which requires repair will be charged for even during the warranty period.
POWER-CORD CAUTION
Handle the power cord by the plug. Do not pull out the plug by tugging the cord and never touch the power cord when your hands are wet as this could cause a short circuit or electric shock. Do not place the unit, a piece of furniture, etc., on the power cord, or pinch the cord. Never make a knot in the cord or tie it with other cords. The power cords should be routed such that they are not likely to be stepped on. A damaged power cord can cause a fire or give you an electrical shock. Check the power cord once in a while. When you find it damaged, ask your nearest PIONEER authorized service center or your dealer for a replacement.
Wash hands after handling
This product contains mercury. Disposal of this material may be regulated due to environmental considerations. For disposal or recycling information, please contact your local authorities or the Electronics Industries Alliance : www.eiae.org.
K057_En
4 En
Selecting fine audio equipment such as the unit you’ve just purchased is only the start of your musical enjoyment. Now it’s time to consider how you can maximize the fun and excitement your equipment offers. This manufacturer and the Electronic Industries Association’s Consumer Electronics Group want you to get the most out of your equipment by playing it at a safe level. One that lets the sound come through loud and clear without annoying blaring or distortion-and, most importantly, without affecting your sensitive hearing.
Sound can be deceiving. Over time your hearing “comfort level” adapts to higher volumes of sound. So what sounds “normal” can actually be loud and harmful to your hearing. Guard against this by setting your equipment at a safe level BEFORE your hearing adapts.
To establish a safe level:
•Start your volume control at a low setting.
•Slowly increase the sound until you can hear it comfortably and clearly, and without distortion.
Once you have established a comfortable sound level:
• Set the dial and leave it there.
Taking a minute to do this now will help to prevent hearing damage or loss in the future. After all, we want you listening for a lifetime.
We Want You Listening For A Lifetime
Used wisely, your new sound equipment will |
|
provide a lifetime of fun and enjoyment. Since |
English |
Consumer Electronics Group recommend you avoid |
|
hearing damage from loud noise is often |
|
undetectable until it is too late, this manufacturer |
|
and the Electronic Industries Association’s |
|
prolonged exposure to excessive noise. This list of |
|
sound levels is included for your protection. |
|
Decibel
Level Example
30 Quiet library, soft whispers
40 Living room, refrigerator, bedroom away from traffic
50 Light traffic, normal conversation, quiet office
60 Air conditioner at 20 feet, sewing machine
70 Vacuum cleaner, hair dryer, noisy restaurant
80Average city traffic, garbage disposals, alarm clock at two feet.
THE FOLLOWING NOISES CAN BE DANGEROUS UNDER CONSTANT EXPOSURE
90 Subway, motorcycle, truck traffic, lawn mower
100 Garbage truck, chain saw, pneumatic drill
120 Rock band concert in front of speakers, thunderclap
140 Gunshot blast, jet plane
180 Rocket launching pad
Information courtesy of the Deafness Research Foundation.
S001_En
En 5

Contents
Before you start |
|
What’s in the box...................................................... |
7 |
Loading the batteries in the remote control........... |
7 |
Playable discs.............................................................. |
8 |
Playable files................................................................ |
9 |
Part Names and Functions |
|
Front Panel................................................................ |
11 |
Remote control........................................................ |
12 |
Front Panel Display................................................ |
13 |
Connections |
|
Connecting using an audio/video cable......... |
14 |
Connecting using an HDMI cable..................... |
14 |
Connecting using a component video |
|
cable............................................................................. |
17 |
Connecting using a digital audio cable.......... |
17 |
Playback |
|
Playing discs or files.............................................. |
18 |
Playing files stored on USB devices.............. |
23 |
Recording audio CD tracks on USB |
|
devices........................................................................ |
23 |
Playing using the Disc Navigator..................... |
24 |
Playing using the Play Mode function............ |
25 |
Adjusting the audio................................................ |
27 |
Adjusting the picture quality.............................. |
28 |
Changing the Settings (Initial Settings) |
|
Operating the Initial Settings menu................ |
29 |
Additional information |
|
Troubleshooting....................................................... |
36 |
Language Code Table and Country/ |
|
Area Code Table..................................................... |
43 |
Cautions on use....................................................... |
44 |
Handling discs........................................................... |
45 |
Specifications........................................................... |
47 |
6 En
Before you start
What’s in the box
Remote Control
Audio/video cable
AA batteries (R6) x 2
Warranty card
Operating instructions (this document)
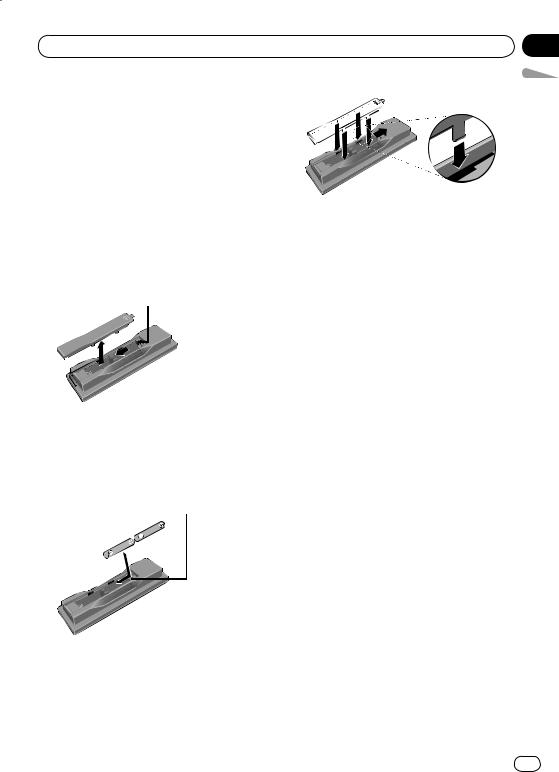
Loading the batteries in the remote control
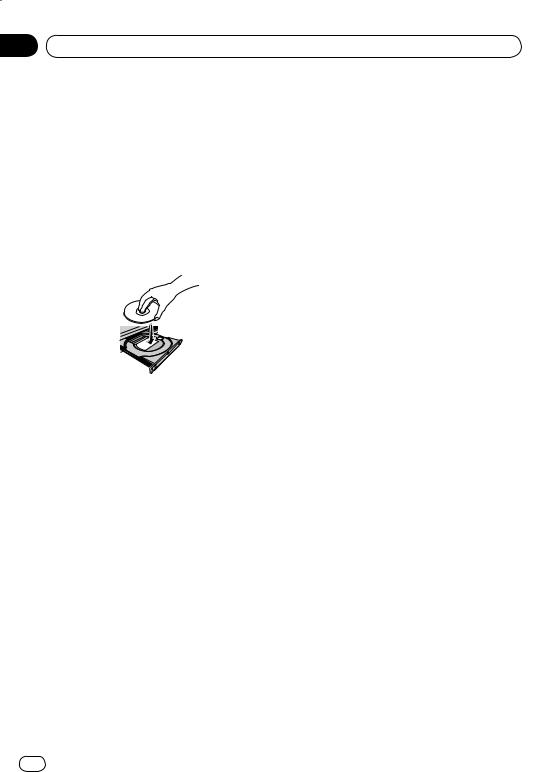
1 Open the back cover.
Press lightly on this part and slide into the direction of the arrow.
2 Insert the included batteries (two size AA batteries).
Insert the batteries in the proper direction, as indicated by the and marks inside the case.
Insert one at a time from the top.
3 Close the back cover.
Close the cover securely (a click should be heard).
Section
01
English
 Notes
Notes
Do not use any batteries other than the ones specified. Also, do not use a new battery together with an old one.
When loading the batteries into the remote control, set them in the proper direction, as indicated by the polarity marks ( and ).
Do not heat batteries, disassemble them, or throw them into flames or water.
Batteries may have different voltages, even if they are the same size and shape. Do not use different types of batteries together.
To prevent leakage of battery fluid, remove the batteries if you do not plan to use the remote control for a long period of time (1 month or more). If the fluid should leak, wipe it carefully off the inside of the case, then insert new batteries. If a battery should leak and the fluid should get on your skin, flush it off with large quantities of water.
When disposing of used batteries, please comply with governmental regulations or environmental public instruction’s rules that apply in your country/area.
WARNING
Do not use or store batteries in direct sunlight or other excessively hot place, such as
inside a car or near a heater. This can cause batteries to leak, overheat, explode or catch fire. It can also reduce the life or performance of batteries.
En 7
Section
01 Before you start
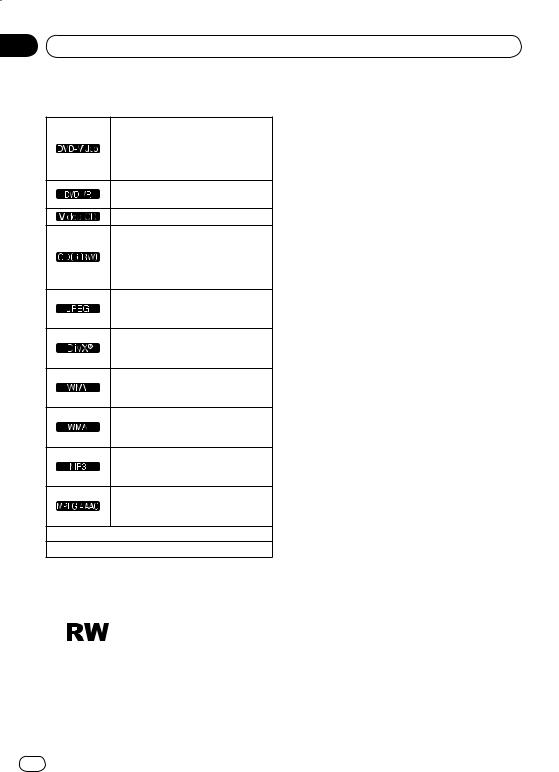
Playable discs
Commercially available DVD Video discs
DVD-R/-RW/-R DL and DVD+R/ +RW/+R DL discs recorded in the Video mode and finalized
DVD-R/-RW/-R DL discs recorded in the VR mode
Video CDs
Commercially available audio CDs
CD-R/-RW/-ROM discs contain ing music recorded in the CD-DA format
JPEG files recorded on DVD-R/-RW/ -R DL discs, CD-R/-RW/-ROM discs or USB devices
DivX video files recorded on DVD-R/ -RW/-R DL discs, CD-R/-RW/-ROM discs or USB devices
WMV files recorded on DVD-R/-RW/ -R DL discs, CD-R/-RW/-ROM discs or USB devices
WMA files recorded on DVD-R/-RW/ -R DL discs, CD-R/-RW/-ROM discs or USB devices
MP3 files recorded on DVD-R/-RW/ -R DL discs, CD-R/-RW/-ROM discs or USB devices
MPEG-4 AAC files recorded on DVD-R/-RW/-R DL discs, CD-R/-RW/ -ROM discs or USB devices
Fujicolor CD
KODAK Picture CD
 is a trademark of DVD Format/Logo Licensing Corporation.
 is a trademark of FUJIFILM Corporation.


This label indicates playback compatibil ity with DVD-RW discs recorded in VR for mat (Video Recording format). However, for discs recorded with a record-only-once encrypted program, playback can only
be achieved using a CPRM compatible device.
 Notes
Notes
This player conforms to NTSC standards. Discs marked “NTSC” on the disc label, package or jacket can be played. Discs recorded in PAL are converted to NTSC for playback.
This player does not support multisession discs or multiborder recording.
Multisession/multiborder recording is a method in which data is recorded on a single disc in two or more sessions/borders. A “session” or “border” is one recording unit, consisting of a complete set of data from lead-in to lead-out.
Discs that cannot be played
DVD Audio discs
DVD-RAM discs
SACDs
CD-G
Blu-ray discs
HD DVDs
Discs that have not been finalized
Discs recorded with packet writing
About region numbers
DVD player and DVD Video discs are assigned region numbers according to the region in which they are sold. This player’s region number(s) is (are) as shown below.
DVD Video: 1
Discs not including these numbers cannot be played.
Discs playable on this player are as shown below.
DVDs: 1 (including 1) and ALL
Regarding copy protected CDs
This player is designed to conform to the specifications of the audio CD format. This player does not support the playback or func tion of discs that do not conform to these specifications.
8 En
Before you start
About playing DualDiscs
A DualDisc is a new two-sided disc, one side of which contains DVD content — video, audio, etc. — while the other side contains non-DVD content such as digital audio material.
The DVD side of a DualDisc can be played on this player (excluding any DVD-Audio content).
The non-DVD, audio side of the disc is not compatible with this player.
It is possible that when loading or eject ing a DualDisc, the opposite side to that being played will be scratched. Scratched discs may not be playable.
For more detailed information on the DualDisc specification, please refer to the disc manufacturer or disc retailer.
Playing discs created on computers or BD/DVD recorders
It may not be possible to play discs recorded using a computer due to the application settings or computer’s environment settings. Record discs in a format playable on this player. For details, contact the dealer.
It may not be possible to play discs recorded using a computer or a BD/DVD recorder, if burn quality is not good due to characteristics of the disc, scratches, dirt on the disc, dirt on the recorder’s lens, etc.
Playable files
Only discs recorded in ISO9660 Level 1, Level 2 and Joliet can be played.
Files protected by DRM (Digital Rights Management) cannot be played.
Section
01
Supported video file formats |
English |
|
|
Windows Media™ Video (WMV) |
|
Resolution: Up to 720 x 480 pixels
This player supports files encoded using Windows Media Player 9 Series.
This player does not support Advanced Profile.
Windows Media is either a registered trademark or trademark of Microsoft Corporation in the United States and/or other countries.
This product includes technology owned by Microsoft Corporation and cannot be used or distributed without a license from Microsoft Licensing, Inc.
DivX
DivX is a media technology created by DivX, Inc. DivX media files contain image data.
DivX files may also include such advanced playback functions as menu screens and selection of multiple subtitle languages/audio tracks.
Plays DivX® video, including premium content
DivX® is a registered trademark of DivX, Inc., and is used under license.
Displaying external subtitle files
The font sets listed below are available for external subtitle files. You can see the proper font set on-screen by setting the
Subtitle Language on page 33 to match the subtitle file.
This player supports the following lan guage groups:
En 9

Section |
|
|
01 |
Before you start |
|
|
|
|
|
|
Afrikaans (af), Basque (eu), Catalan |
|
|
(ca), Danish (da), Dutch (nl), English |
|
|
(en), Faroese (fo), Finnish (fi), French |
|
Group 1 |
(fr), German (de), Icelandic (is), Irish |
|
|
(ga), Italian (it), Norwegian (no), Portu |
|
|
guese (pt), Rhaeto-Romanic (rm), Scot |
|
|
tish (gd), Spanish (es), Swedish (sv) |
|
|
Albanian (sq), Croatian (hr), Czech (cs), |
|
Group 2 |
Hungarian (hu), Polish (pl), Romanian |
|
|
(ro), Slovak (sk), Slovenian (sl) |
|
|
Bulgarian (bg), Byelorussian (be), |
|
Group 3 |
Macedonian (mk), Russian (ru), Ser |
|
|
bian (sr), Ukrainian (uk) |
|
Group 4 |
Hebrew (iw), Yiddish (ji) |
|
Group 5 |
Turkish (tr) |
Some external subtitle files may be dis played incorrectly or not at all.
For external subtitle files the following subtitle format filename extensions are supported (please note that these files are not shown within the disc navigation menu): .srt, .sub, .ssa, .smi
The filename of the movie file has to be repeated at the beginning of the filename for the external subtitle file.
The number of external subtitle files which can be switched for the same movie file is limited to a maximum of 10.
Supported image file formats
JPEG
Resolution: Up to 3 072 x 2 048 pixels
This player supports baseline JPEG.
This player supports Exif Ver.2.2.
This player supports JPEG HD. Images are output with a high resolution of 720p or 1 080i.
This player does not support progressive JPEG.
Supported audio file formats
This player does not support VBR (Variable Bit Rate).
This player does not support lossless encoding.
Windows Media Audio (WMA)
Sampling frequencies: 32 kHz, 44.1 kHz and 48 kHz
Bit rate: Up to 192 kbps
This player supports files encoded using Windows Media Player Ver. 7/7.1, Windows Media Player for Windows XP and Windows Media Player 9 Series.
MPEG-1 Audio Layer 3 (MP3)
Sampling frequencies: 32 kHz, 44.1 kHz and 48 kHz
MPEG-4 Advanced Audio Coding
(MPEG-4 AAC)
Sampling frequencies: 44.1 kHz and 48 kHz
This player supports files encoded using iTunes.
Depending on the version of iTunes used for encoding, it may not be possible to play some files.
Apple and iTunes are trademarks of Apple Inc., registered in the U.S. and other countries.
Playable file extensions
Video files
.divx .avi .wmv
Files not containing DivX video signals cannot be played, even if they have the extension “.avi”.
Image files
.jpg .jpeg
Audio files
.wma .mp3 .m4a
10 En
Part Names and Functions
Front Panel
1 |
2 |
3 |
4 |
5 |
6 |
7 |
8 |
9 |
17 |
16 |
15 |
14 |
13 |
12 |
11 |
10 |
Section
02
English
1STANDBY/ON (page 18)
2HDMI (page 14)
This lights when the device connected to the HDMI terminal is recognized.
3Remote control sensor
Point the remote control to this, then operate it within a distance of approxi mately 7 m (23 ft.).
Reception of remote control signals may be poor when exposed to direct sunlight or strong artificial light from a fluorescent bulb, etc.
4Disc tray
5OPEN/CLOSE (page 18)
6Front panel display (page 13)
7TOP MENU
Press to display the top menu of the DVD Video.
8MENU
Press to display the menu screen or Disc Navigator.
9/ / /
Use these to select items, change set tings and move the cursor.
ENTER
Use this to implement the selected item or enter a setting that you have changed.
ARETURN
Press to return to the previous screen.
BHOME MENU
Press to display/hide the Home Menu.
CUSB port (type A) (page 23)
DDVD/USB (page 23)
E(page 18)
F(page 18)
G(page 18)
H/ (page 20)
En 11
Section |
|
|
|
|
|
|
|
02 |
Part Names and Functions |
||||||
|
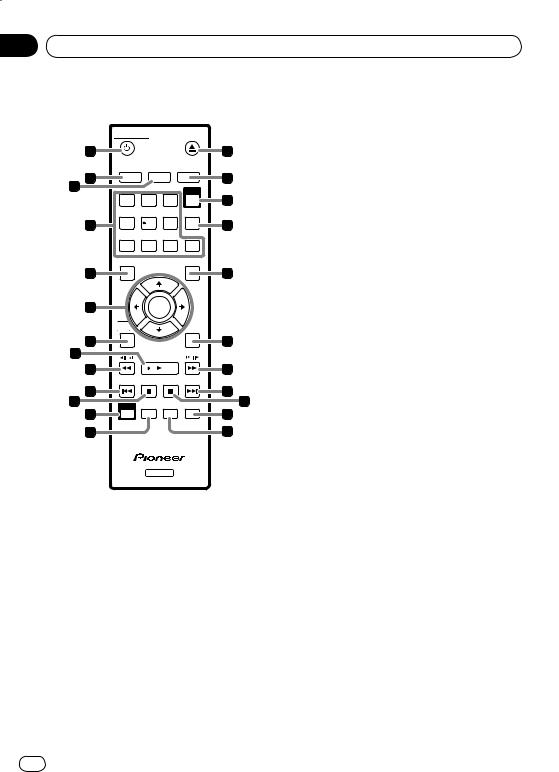
Remote control |
|
|
|
|||
|
|
STANDBY/ON |
|
OPEN/CLOSE |
|
|
|
|
1 |
|
|
|
|
14 |
|
|
|
AUDIO |
SUBTITLE |
ANGLE |
|
|
|
|
2 |
|
|
|
|
15 |
|
|
3 |
|
|
|
DVD/ |
|
|
|
|
|
|
|
|
|
|
|
|
1 |
2 |
3 |
USB 16 |
|
|
|
4 |
4 |
5 |
6 |
CLEAR |
17 |
|
|
|
|
|
|
|
|
|
|
|
7 |
8 |
9 |
0 |
|
|
|
|
TOP MENU |
|
|
MENU |
|
|
|
5 |
|
|
|
|
18 |
|
|
6 |
|
ENTER |
|
|
|
|
|
|
HOME |
|
|
|
|
|
|
|
MENU |
|
|
RETURN |
|
|
|
7 |
|
|
|
|
19 |
|
|
8 |
|
PLAY |
|
|
|
|
|
9 |
|
|
|
|
20 |
|
|
|
PREV |
PAUSE |
STOP |
NEXT |
|
|
|
10 |
|
|
|
|
21 |
|
|
11 |
USB |
PLAY MODE |
ZOOM |
DISPLAY |
|
22 |
|
12 |
23 |
|
||||
|
REC |
|
|
|
|
||
|
13 |
|
|
|
|
24 |
|
DVD
1STANDBY/ON (page 18)
2AUDIO (page 20)
3SUBTITLE (page 21)
4Number buttons (0 to 9)
Use these to specify and play the title, chapter, track or file you want to view/ listen to. Also use them to select items on menu screens, etc.
5TOP MENU
Press to display the top menu of the DVD Video.
6/ / /
Use these to select items, change set tings and move the cursor.
ENTER
Use this to implement the selected item or enter a setting that you have changed.
7HOME MENU
Press to display/hide the Home Menu.
8PLAY (page 18)
9/ / (page 19)
APREV (page 20)
BPAUSE (page 18)
CUSB REC (page 23)
DPLAY MODE (page 25)
EOPEN/CLOSE (page 18)
FANGLE (page 21)
GDVD/USB (page 23)
HCLEAR
Press to clear the selected item. Use this for example if you input the wrong number.
IMENU
Press to display the menu screen or Disc Navigator.
JRETURN
Press to return to the previous screen.
K/ / (page 19)
LNEXT (page 20)
MSTOP (page 18)
NDISPLAY (page 22)
OZOOM (page 21)
12 En
Part Names and Functions
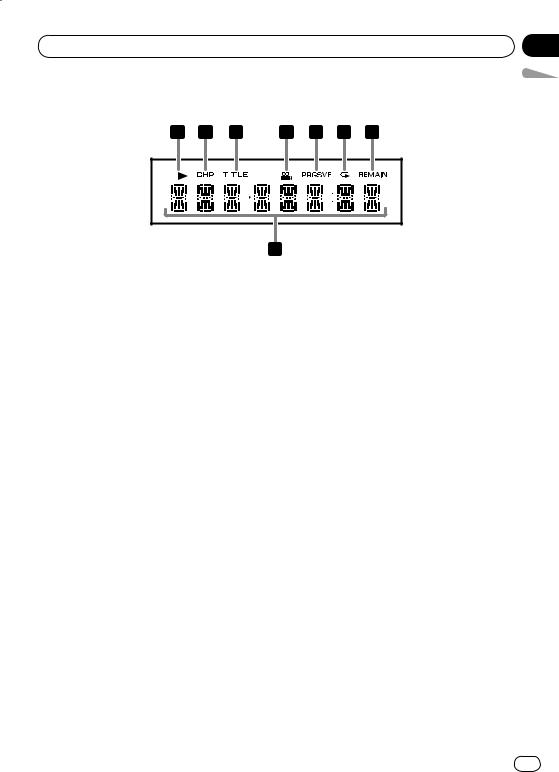
Front Panel Display
|
1 |
2 |
3 |
4 |
5 |
6 |
7 |
|
|
|
|
|
|
|
|
|
|
|
|
|
|
|
|
|
|
|
|
|
|
|
|
8
Lights when playback is paused.
Lights during playback.
2CHP
Lights when the chapter number is displayed.
3TITLE
Lights when the title number is displayed.
4 (page 21)
Lights when switched to a different angle (DVD Video only).
5PRGSVE (page 32)
Lights when Component Out is set to
Progressive.
6 (page 25)
Lights when in the Repeat Play mode.
7REMAIN
Lights when the remaining time of the currently playing title, chapter or track is displayed.
8Counter display
Displays the title, chapter, track or file number, the elapsed time, etc.
Section
02
English
En 13
Section
03Connections
Be sure to turn off the power and unplug the power cord from the power outlet whenever making or changing connections.
Connect the power cord after all the connections between devices have been completed.
Connect the player’s video output directly to the TV.
This player supports analog copy protec tion technology. Therefore the picture may not be displayed properly if con nected to a TV via a DVD recorder/video deck or when playing the player’s out put material that is recorded by a DVD recorder/ video deck. Furthermore, the picture may not be displayed properly due to the copy protection when the player
is connected to a TV with a built-in video deck. For details, contact the manufac turer of your TV.
Connecting using an audio/ video cable
Player’s rear panel
Yellow
VIDEO OUT |
DIGITAL |
AUDIO OUT |
PB |
AUDIO OUT |
|
|
COAXIAL |
|
White
|
PR |
Y |
HDMI OUT |
COMPONENT VIDEO OUT S-VIDEO OUT |
|
An S-Video cable  (commercially
  available) can also be
  used for
connection.
To S-video input terminal
 Red
Red
Audio/video cable (included)
To audio/video input terminals 
TV
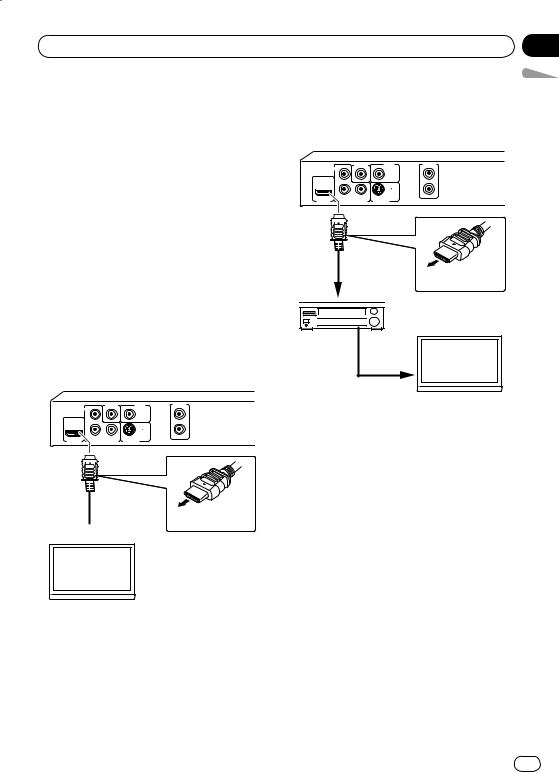
Connecting using an HDMI cable
By using an HDMI cable, digital signals can be transferred to an HDMI-compatible TV on a single cable with no loss of picture or sound quality. After connecting, make the player’s resolution and HDMI color settings according to the HDMI-compatible TV. Also refer to the HDMI-compatible TV’s operating instructions.
HDMI, the HDMI Logo and HighDefinition Multimedia Interface are trade marks or registered trademarks of HDMI Licensing, LLC.
14 En
Connections
 Notes
Notes
This player’s interface is designed based on the High-Definition Multimedia Interface specification.
When an HDMI-compatible device is connected, the resolution is displayed on the front panel display.
The resolution of the video signals output from the player’s HDMI OUT terminal
is changed manually. Change the
HDMI Resolution setting (page 32). Settings for two units can be stored in the memory.
This player is designed for connection to HDMI-compatible devices. It may not operate properly if connected to DVI devices.
Connecting to a TV
Player’s rear panel
|
|
VIDEO OUT |
DIGITAL |
AUDIO OUT |
|
PB |
|
AUDIO OUT |
L |
|
|
|
COAXIAL |
|
|
PR |
Y |
|
R |
HDMI OUT |
COMPONENT VIDEO OUT |
S-VIDEO OUT |
|
|
HDMI cable (commercially available)
Match the direction of the plug to the terminal and insert straight.
 terminal
TV
|
Section |
|
03 |
amplifier |
English |
Connecting to an AV receiver or |
|
Player’s rear panel |
|
|
|
VIDEO OUT |
DIGITAL |
|
PB |
|
AUDIO OUT |
|
|
|
COAXIAL |
|
PR |
Y |
|
HDMI OUT |
COMPONENT VIDEO OUT |
S-VIDEO OUT |
|
HDMI cable (commercially available)
terminal |
|
AV receiver |
From HDMI |
or amplifier |
output |
HDMI cable |
terminal |
|
|
(commercially |
|
available) To HDMI input |
|
|
terminal |
AUDIO OUT
L
R
Match the direction of the plug to the terminal and insert straight.
TV
About video/audio signals output from the HDMI OUT terminal
Video signals (resolution of) that can be output from the player’s HDMI OUT terminal
720 x 480 pixel progressive or interlaced video
1 280 x 720 pixel progressive video
1 920 x 1 080 pixel progressive or inter laced video
Audio signals that can be output from the player’s HDMI OUT terminal
44.1 kHz to 96 kHz, 16-bit/20-bit/24-bit 2-channel linear PCM audio (including 2-channel downmixing)
Dolby Digital 5.1-channel audio
DTS 5.1-channel audio
MPEG audio
En 15
Section
03Connections
Manufactured under license from Dolby Laboratories. Dolby and the
double-D symbol are trademarks of Dolby Laboratories.
Manufactured under license under U.S. Patent #: 5,451,942 & other U.S. and worldwide patents issued & pending. DTS and DTS Digital Out are registered trade marks and the DTS logos and Symbol are trademarks of DTS, Inc. © 1996-2008 DTS, Inc. All Rights Reserved.
About KURO LINK function
The functions listed below can be used when a Pioneer KURO LINK compatible Flat Panel TV or AV system (AV receiver or amplifier, etc.) is connected to the player using an HDMI cable.
Refer to the operating instructions of the Flat Panel TV, etc.
To use the KURO LINK function
The KURO LINK function operates when KURO LINK is set to On for all devices connected to the HDMI OUT terminal.
Once connections and the settings of all the devices are finished, be sure to check that the player’s picture is output to the Flat Panel TV. (Also check after changing the connected devices and reconnecting HDMI cables.) The KURO LINK function may not operate properly if the player’s picture is not properly output to the Flat Panel TV.
Use High Speed HDMI™ cables when using the KURO LINK function. The KURO LINK function may not operate properly if other HDMI cables are used.
For some models, the KURO LINK function may be referred to as “HDMI Control”.
The KURO LINK function does not work with devices of other brands, even if con nected using an HDMI cable.
What the KURO LINK function can do
Operating the player with the Flat Panel TV’s remote control.
Such player operations as starting and stopping playback and displaying the menus can be performed from the Flat Panel TV. For details on the functions that can be operated, see the Flat Panel TV’s operating instructions.
The player’s playback picture is displayed on the Flat Panel TV’s screen. (Auto-select function)
The input switches automatically on the Flat Panel TV and AV system (AV
receiver or amplifier, etc.) when playback is started on the player or the Home Menu or the Disc Navigator is displayed. When the input is switched, the playback picture, the Home Menu or the Disc Navigator appears on the Flat Panel TV.
The power of the Flat Panel TV turns on automatically. (Simultaneous power function)
When playback on the player is started or the Home Menu or Disc Navigator is
displayed, if the Flat Panel TV’s power was off, its power turns on automatically.
16 En
Connections
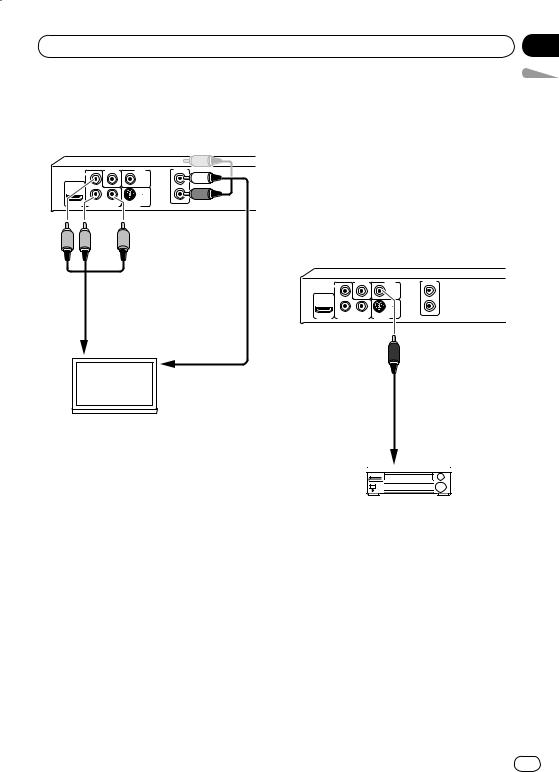
Connecting using a component video cable
Player’s rear panel
|
|
VIDEO OUT |
DIGITAL |
AUDIO OUT |
|
PB |
|
AUDIO OUT |
|
|
|
|
COAXIAL |
|
|
PR |
Y |
|
R |
HDMI OUT |
COMPONENT VIDEO OUT |
S-VIDEO OUT |
|
|
Audio/video cable (included)
Component cable or three video cables (commercially available)
Section
03
Connecting using a digital |
English |
|
|
audio cable |
|
Connect an AV receiver or amplifier, etc., compatible with Dolby Digital or DTS audio to one of the DIGITAL AUDIO OUT COAXIAL terminals.
For instructions on connecting the AV receiver or amplifier to the TV and speak ers, refer to the AV receiver or amplifier’s operating instructions.
Player’s rear panel
|
|
VIDEO OUT |
DIGITAL |
AUDIO OUT |
|
PB |
|
AUDIO OUT |
L |
|
|
|
COAXIAL |
|
|
PR |
Y |
|
R |
HDMI OUT |
COMPONENT VIDEO OUT |
S-VIDEO OUT |
|
|
To component video input terminals
|
|
Coaxial digital cable |
To audio |
|
(commercially |
input terminals |
|
available) |
TV |
|
|
|
|
To coaxial |
|
|
|
|
|
digital audio |
|
|
input terminal |
|
|
AV receiver or amplifier |
En 17
Section
04 Playback
Playing discs or files
Before starting, turn the TV’s power on and switch the TV’s input.
The player’s screen display language can be changed (OSD Language on page 33).
1Turn the power on. Press STANDBY/ON.
2Open the disc tray and load the disc. Press OPEN/CLOSE.
Set the disc with the printed side facing up.
3 Starts playback.
Press PLAY.
To pause, press PAUSE during playback.
To stop, press STOP during playback.
To turn the power off, press
STANDBY/ON.
 Notes
Notes
Some discs start playing automatically when they are loaded.
For some discs, black bars may be displayed along the top and bottom of the TV screen.
If the menu screen appears
For some discs, the menu screen appears automatically when playback starts. The con tents of the menu screen and how the screen is operated differ from disc to disc.
18 En
Playback
Various playback functions
It may not be possible to use some of these functions, depending on the type of disc or file.
Section
04
English
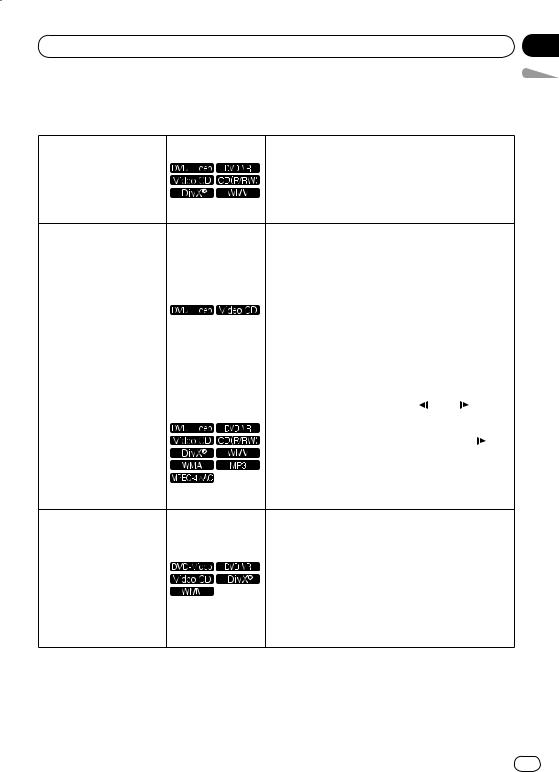
When STOP is pressed during playback, the point at which playback was stopped is stored in the memory.
Starting playback from where |
|
When PLAY is pressed, playback resumes from the |
|
|
point at which it was stopped. |
||
it was stopped (Resume Play) |
|
||
|
To cancel the resume play, press STOP while play |
||
|
|||
|
|
back is stopped. |
Resume Play may not possible for certain discs.
The player stores the point at which ejected DVD Video discs (for up to five discs) and Video CDs (for one disc) were stopped. When the disc is reloaded and PLAY is pressed, playback starts from the point at which the disc was stopped before it was ejected.
To cancel the last memory setting, press STOP
Storing the stop point for |
|
while playback is stopped. |
|
|
ejected discs (Last Memory) |
|
If you do not want the player to store the point at which |
||
|
|
playback was stopped, press OPEN/CLOSE during |
||
|
|
playback to eject the disc. |
|
|
|
For some discs, the point at which playback was |
|||
|
|
stopped cannot be stored. When the limit for the |
||
|
|
number of discs for which the stop point can be stored |
||
|
|
is exceeded, the older settings are overwritten. |
||
|
|
During playback, press / / |
or / |
/ . |
|
The speed changes each time the button is pressed. |
|||
|
|
The speed steps differ according to the disc or file. |
||
Forward and reverse scan |
|
With DVD Video and DVD VR discs, when / / |
||
|
is pressed once during playback, the picture and |
|||
ning |
|
|||
|
sound are played at about 1.4 times the regular speed. |
|||
|
|
|||
|
|
Note that the sound may not be output or may be |
||
|
|
broken. |
|
|
To resume normal playback, press PLAY.
While playback is paused, press / / or /
or / /
/
.
The picture moves a frame forward or backward each time the button is pressed.
Frame-by-frame forward/ |
|
To resume normal playback, press PLAY. |
|
No sound is produced during frame-by-frame forward/ |
|||
frame-by-frame reverse play |
|||
|
reverse play. |
||
|
|
||
The picture may shake during frame-by-frame reverse play.
Frame-by-frame reverse play is not possible for Video CDs and video files.
En 19
Section
04
Playback
|
|
|
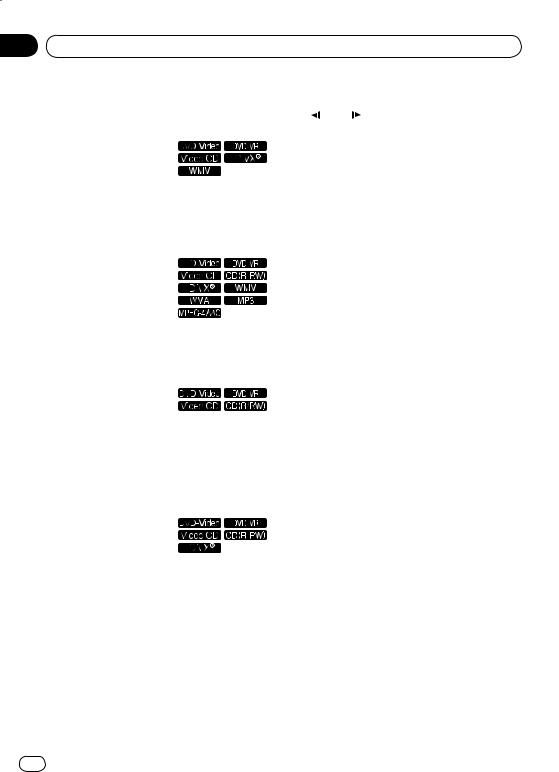
While playback is paused, press and hold in / |
||
|
|
|
/ |
or / |
/ . |
|
|
Press and hold the button until Slow is displayed on |
|||
|
|
|
the TV screen. |
|
|
Playing in slow motion |
|
The speed changes each time the button is pressed. |
|||
|
|
The speed steps differ according to the disc or file. |
|||
|
|
|
|||
|
|
|
To resume normal playback, press PLAY. |
||
|
|
No sound is output during slow motion playback. |
|||
|
|
Reverse playback in slow motion is not possible for |
|||
|
|
|
Video CDs and video files. |
||
|
|
|
During playback, press PREV or NEXT. |
||
|
|
|
When NEXT is pressed, playback skips ahead to |
||
|
|
|
the beginning of the next title, chapter, track or file. |
||
|
|
|
When PREV is pressed, playback skips back to |
||
|
|
|
the beginning of the currently playing title, chapter, |
||
Skipping content |
|
|
track or file. When pressed twice, playback skips back |
||
|
|
|
to the previous title, chapter, track or file. It is not |
||
|
|
|
possible to return to previous titles, chapters, groups, |
||
|
|
|
tracks or files during random play. |
||
|
|
Operation is different during PBC playback of Video |
|||
|
|
|
CDs. Check the disc’s jacket, etc. |
||
|
|
Use the number buttons (0 to 9) to input the number |
|||
|
|
|
of the title, chapter or track you want to play, then |
||
Playing specific titles, chap |
|
|
press ENTER. |
|
|
|
Playback starts automatically 2 seconds after the |
||||
ters or tracks |
|
||||
|
|
number is input. |
|||
|
|
|
|||
|
|
For DVD Video chapter searching, only chapters |
|||
|
|
|
within the currently playing title can be specified. |
||
|
|
For discs or files including multiple audio streams/ |
|||
|
|
|
channels, the audio stream/channel can be switched |
||
|
|
|
during playback. |
||
|
|
During playback, press AUDIO. |
|||
|
|
The audio stream/channel switches each time the |
|||
|
|
|
button is pressed. |
||
Switching the audio stream/ |
|
The types of audio streams/channels depend on the |
|||
|
|
disc or file. |
|
||
channel |
|
|
|
||
|
For some DVD Videos, the audio stream/channel is |
||||
|
|
||||
|
|
|
switched using a menu screen. |
||
|
|
The picture may stop momentarily when the audio |
|||
|
|
|
stream/channel is switched. |
||
|
|
If the Resume Play or Last Memory setting has been |
|||
|
|
|
canceled, the Audio Language setting is restored |
||
|
|
|
(page 33). |
|
|
20 En
Playback
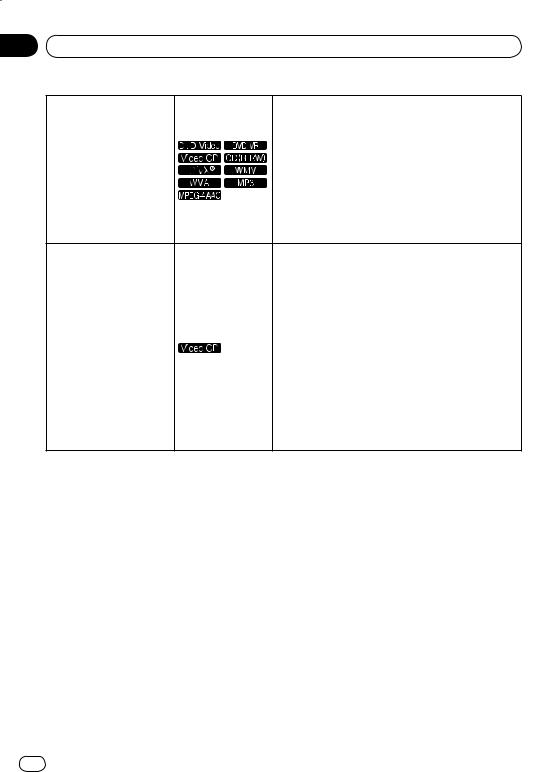
On DVD Video or DivX discs containing subtitles in multiple languages, the subtitle can be switched dur ing playback.
During playback, press SUBTITLE.
The subtitle switches each time the button is pressed.
The recorded subtitles depend on the disc or file.
Switching the subtitle |
–/– is displayed if the disc or file does not contain any |
|
subtitles. |
For some DVD Videos, the subtitle is switched using a menu screen.
If the Resume Play or Last Memory setting has been canceled, the Subtitle Language setting is restored (page 33).
On DVD Video discs containing multiple angles, the angle can be switched during playback.
During playback, press ANGLE.
Changing the angle |
For some DVD Videos, the angle is switched using a |
|
menu screen. |
||
(Multi-Angle) |
||
The mark appears on the TV screen at scenes for |
||
|
||
|
which there are multiple angles. If you do not want the |
|
|
mark to be displayed, set Angle Indicator to Off |
|
|
(page 33). |
|
|
Press ZOOM. |
|
The zoomed area is displayed. |
|
|
|
Use / / / to move the zoom area. |
|
|
The magnification (2x 4x normal) changes each |
Zooming on the image |
|
time the button is pressed. |
|
When playing slideshows of JPEG files, the zoomed |
|
|
|
area is not displayed. |
|
When a JPEG file is zoomed, normal slideshow play |
|
|
|
back can be resumed by pressing PLAY. |
|
|
When playing a slideshow, press one of / / / . |
|
|
When is pressed, the image is inverted vertically. |
|
|
When is pressed, the image is inverted horizontally. |
Rotating (inverting) the |
|
When is pressed, the image is rotated 90° counter |
image |
|
clockwise. |
|
|
When is pressed, the image is rotated 90° clock |
|
|
wise. |
|
|
To return to the normal slideshow, press PLAY. |
Section
04
English
En 21
Section
04
Playback
During playback, press DISPLAY.
The elapsed time, amount remaining, etc., is dis played.
For some discs and files, the contents displayed
|
switch each time the button is pressed. |
Viewing the disc’s or file’s |
To turn the information off, press DISPLAY again until |
information |
it turns off. |
|
Some information is not displayed during PBC play |
|
back of Video CDs. To display such information, can |
|
cel PBC playback (see below). |
If On Screen Display is set to Off, no information is displayed when DISPLAY is pressed (page 33).
Playing Video CDs using their menu screens is called PBC (playback control) playback. The contents dis played and operations differ from disc to disc. Also refer to the operating guide included with the disc.
To display the menu screen, load a PBC playbackcompatible disc then press PLAY.
To start PBC playback, use the number buttons (0
Playing Video CDs from their |
|
to 9) while the menu screen is displayed to select the |
|
|
track, then press ENTER. |
||
menu screen (PBC playback) |
|
||
To return to the menu screen, press RETURN during |
|||
|
|||
|
|
playback. |
|
|
|
To switch pages, press PREV or NEXT. |
|
|
To play the disc without displaying the menu screen |
||
|
|
(with PBC off), use the number buttons (0 to 9) |
|
|
|
while playback is stopped to select the track, then |
|
|
|
press ENTER (or select the track using PREV and |
|
|
|
NEXT while playback is stopped). |
|
22 En

Playback
Playing files stored on USB devices
The player may not recognize the USB device, may not play files or may not sup ply power to the USB device. For details, see When a USB device is connected on page 42.
Pioneer does not support that all files recorded on all USB devices will play or that power will be supplied to the USB device. Also note that Pioneer will accept no responsibility whatsoever for loss of files on USB devices caused by connec tion to this player.
1Turn the power on. Press STANDBY/ON.
2Switching the input to the USB mode. Press DVD/USB.
USB MODE is displayed on the front panel display.
3Connecting USB devices.
The Disc Navigator appears automatically.
Player’s front panel
 To USB port
USB device
4 Starts playback.
Use / / / to select the file, then press
ENTER.
Turn the power off before removing the USB device.
The input will remain in the USB mode the next time the power is turned on. To return to the DVD mode, press DVD/USB (or pressOPEN/CLOSE to open the disc tray).
Section
04
Recording audio CD tracks |
English |
|
|
on USB devices |
|
The tracks of audio CDs loaded in the player can be recorded on a USB device connected to the USB port.
It may not be possible to record tracks of audio CDs on a USB device. For details, see When a USB device is connected on page 42.
Recording all the tracks
1Load the audio CD.
If playback starts automatically, pressSTOP to stop playback.
2Display the CD -> USB Rec screen.
Press USB REC.
 CD –> USB Rec
|
|
|
Track 1–13 |
|
Select Track |
|
Track01 |
01:43 |
|
Bitrate |
128kbps |
Track02 |
03:17 |
|
|
|
|
Track03 |
04:18 |
|
|
|
Track04 |
04:59 |
|
|
|
Track05 |
04:20 |
Start |
|
|
Track06 |
04:38 |
Selected Track |
13 |
Track07 |
04:40 |
|
Total Time |
055:07 |
Track08 |
04:11 |
|
|
|
|
|
|
3 Start recording.
Use / / / to select Start, then press
ENTER.
Selecting the track(s) to be recorded
1Load the audio CD.
If playback starts automatically, pressSTOP to stop playback.
2Display the Home Menu.
Press HOME MENU.
3 Select CD -> USB Rec.
Use / / / to select, then press ENTER.
En 23
Section |
|
|
|
|
|
|
|
|
04 |
Playback |
|
|
|||||
|
|
|
|
|
|
|
|
|
|
|
|
|
CD –> USB Rec |
Track 1–13 |
|
||
|
|
|
|
|
||||
|
|
|
|
|
|
|
|
|
|
|
Select Track |
Individual |
Track01 |
01:43 |
|||
|
|
Bitrate |
Select All |
Track02 |
03:17 |
|||
|
|
|
|
|
|
All Clear |
Track03 |
04:18 |
|
|
|
|
|
|
|
Track04 |
04:59 |
|
|
|
|
|
|
|
Track05 |
04:20 |
|
|
Start |
|
|
Track06 |
04:38 |
||
|
|
Selected Track |
00 |
Track07 |
04:40 |
|||
|
|
Total Time |
000:00 |
Track08 |
04:11 |
|||
|
|
|
|
|
|
|
|
|
4Select Select Track Individual the track(s) you want to record.
Use / / / to select.
Individual: Select 1 track at a time.
Select All: Select all the tracks.
All Clear: Deselect all the tracks.
5Select Bitrate (transfer rate).
Use / / / to select, then press ENTER.
Select 128kbps, 192kbps or 320kbps.
6 Start recording.
Use / / / to select Start, then press
ENTER.
 Notes
Notes
CD -> USB Rec can only be selected when the audio CD is stopped.
When recording is completed, a folder named “PIONEER” is automatically created on the USB device. The recorded tracks are stored in this folder.
Playing using the Disc
Navigator
Playing discs
1 Display the Home Menu.
Press HOME MENU.
2 Select Disc Navigator.
Use / / / to select, then press ENTER.
3Select the type of Disc Navigator.
Use / to select, then press ENTER.
The Disc Navigator is displayed.
The contents displayed on the Disc Navigator differ from disc to disc.
4Playing specific titles, chapters or tracks.
Use / / / to select, then press ENTER.
To switch pages, press PREV or
NEXT.
Press RETURN to return to the previous screen.
Press HOME MENU to exit the Disc Navigator.
 Notes
Notes
The Disc Navigator cannot be displayed for some DVD Video discs.
The Disc Navigator cannot be displayed during PBC playback of Video CDs. To display such information, cancel PBC playback (page 22).
Playing files
1Display the Home Menu. Press HOME MENU.
2Select Disc Navigator.
Use / / / to select, then press ENTER.
3 Select the folder.
Use / to select, then press ENTER.
4 Select and play the file.
Use / to select, then press ENTER.
When JPEG files are played, the files switch automatically (slideshow playback).
24 En
Playback
Press to return to the previous screen. (It is also possible to return to the previ ous screen by selecting  -- then pressing
ENTER.)
Press HOME MENU to exit the Disc Navigator.
 Note
Note
When a disc contains both audio files and JPEG files, they can be played simultaneously. To do so, first select the audio file, then select the JPEG file.
Playing using the Play Mode function
The Play Mode function may not work for some discs or files.
Display the Play Mode screen.
During playback, press PLAY MODE.
It is also possible to display the Home Menu by selecting Play Mode from the home menu then pressing ENTER.
The Play Mode screen cannot be displayed during PBC playback of Video CDs. In this case, cancel PBC playback (page 22).
Playing a specific section repeatedly (A-B Repeat Play)
The specified section within a single title or track is played repeatedly.
1Display the Play Mode screen.
During playback, press PLAY MODE.
2Select A-B Repeat.
Use / to select, then press ENTER or .
Section
04
3 |
Select the point at which you want to |
English |
|
||
start A-B Repeat play. |
|
|
Use / to select A (Start Point), then |
|
|
press ENTER. |
|
|
4 |
Select the point at which you want to |
|
stop A-B Repeat play.
Use / to select B (End Point), then press
ENTER.
A-B repeat play starts.
To cancel A-B repeat play, select Off, then press ENTER.
Playing repeatedly (Repeat
Play)
1Display the Play Mode screen.
During playback, press PLAY MODE.
2Select Repeat.
Use / to select, then press ENTER or .
3 Select the type of Repeat play.
Use / to select, then press ENTER or . Repeat play starts.
To cancel repeat play, select Repeat Off, then press ENTER. (Repeat play is canceled automatically when playback is stopped.)
The types of repeat play available depend on the disc and file.
Playing in random order (Random Play)
1Display the Play Mode screen. Press PLAY MODE.
2Select Random.
Use / to select, then press ENTER or .
En 25
Section
04 Playback
3 Select the type of Random play.
Use / to select, then press ENTER or . Random play starts.
To cancel random play, select Random Off, then press ENTER. (Random play is can celed automatically when playback is stopped.)
The types of random play available depend on the disc and file.
 Note
Note
The same title, chapter or track may be played twice during random play.
Playing in the desired order (Programmed Play)
1Display the Play Mode screen. Press PLAY MODE.
2Select Program.
Use / to select, then press ENTER or .
3 Select Create/Edit.
Use / to select, then press ENTER.
The Create/Edit screen differs according to the disc or file.
4 Select the title, chapter, track or file to be played.
Use / / / to select, then press ENTER.
To add to a program, first select the place in the program (the program step), next select the title, chapter or track, then press ENTER (files are added at the end of program).
Press RETURN to return to the previous screen. If you return to the previous screen when inputting it, the settings you have programmed are cleared.
To delete a step, highlight it and press
CLEAR.
5 Starts playback.
Press PLAY.
To play a program that has already been set, select Playback Start from the program screen, then press ENTER.
To resume normal playback, select Playback Stop from the program screen, then press ENTER. The program remains in the memory.
To cancel the entire program, select Program Delete from the program screen, then press ENTER.
 Notes
Notes
Programs can be played repeatedly. During programmed play, select Program Repeat from Repeat on the Play Mode screen (page 25).
Programs cannot be played in random order (random play is not possible during programmed play).
Playing by specifying a number or time (Search Mode)
This function allows you to specify the title, chapter or track number or time to be played.
1Display the Play Mode screen. Press PLAY MODE.
2Select Search Mode.
Use / to select, then press ENTER or .
3 Select the type of Search Mode.
Use / to select, then press ENTER.
The types of search mode available depend on the disc and file.
4 Input the number of the title, chapter or track or the time you want to play.
Use the number buttons (0 to 9) to input, then press ENTER. (For example, to specify 1 hour and 4 minutes (64 minutes), input 6, 4, 0 and 0.)
Playback starts.
26 En

Playback
 Notes
Notes
For some DVD Videos, the number or time can be specified using a menu screen.
For video files, only the time can be specified (only Time Search (time searching) is possible).
Time searching (Time Search) is not possible on DVD+R/+RW discs.
Adjusting the audio
1Display the Home Menu. Press HOME MENU.
2Select Audio Settings.
Use / / / to select, then press ENTER.
3 Change the settings.
Use / / / to select, then press ENTER.
Press RETURN to return to the previous screen.
4 Enter the changes. Press HOME MENU.
The changed settings are stored in the memory.
 Notes
Notes
The effect may be weak for some discs or files.
These settings also affect the sound output from the DIGITAL AUDIO OUT COAXIAL terminals and the HDMI OUT terminal.
Note that there is no effect when Dolby Digital, DTS or MPEG audio signals are being output.
Section
04
Audio Settings parameters |
English |
|
|
||
|
|
|
Parameters (settings) |
|
|
|
WMA, MP3 and MPEG-4 AAC |
|
|
audio is played with high |
|
|
sound quality. This is only |
|
Sound |
valid for files with the exten |
|
Retriever |
sion ‘.wma’, ‘.mp3’ or ‘.m4a’. |
|
(High/Low/Off) |
The effect depends on the |
|
|
file. Try different settings, and |
|
|
choose the one providing the |
|
|
good effect. |
|
Equalizer (Off/ |
|
|
Rock/Pop/Live/ |
Select according to the genre of |
|
Dance/Techno/ |
music to be listened to. |
|
Classic/Soft) |
|
|
|
A surround sound field with |
|
|
a sense of presence can be |
|
Virtual |
created with two speakers. |
|
Surround |
When set to On, linear PCM |
|
(On/Off) |
audio signals of 96 kHz or |
|
|
greater are converted to 48 |
|
|
kHz. |
|
|
This makes loud sounds |
|
|
weaker and weak sounds |
|
|
louder. Change the setting |
|
|
for example when watching |
|
|
movies late at night. |
|
Audio DRC |
This setting only affects Dolby |
|
(High/Medium/ |
Digital sound. |
|
Low/Off) |
The effect depends on the vol |
|
|
ume of the connected TV, AV |
|
|
receiver or amplifier, speak |
|
|
ers, etc. Try different settings, |
|
|
and choose the one providing |
|
|
the strongest effect. |
|
Dialog (High/ |
Change this setting if the sound of |
|
Medium/Low/ |
dialogs is low and the dialogs are |
|
Off) |
hard to hear. |
|
The factory default settings are indicated in italic.
About Sound Retriever function
When audio data is removed during the compression process, sound quality often degrades. The Sound Retriever function automatically enhances compressed audio and restores CD quality sound.
En 27

Section
04 Playback
Adjusting the picture quality
1Display the Home Menu. Press HOME MENU.
2Select Video Adjust.
Use / / / to select, then press ENTER.
3 Change the settings.
Use / / / to select, then press ENTER.
Press RETURN to return to the previous screen.
4 Enter the changes. Press HOME MENU.
The changed settings are stored in the memory.
 Notes
Notes
The effect depends on the connected TV, the disc or the file.
The settings affect the video signals output from the HDMI OUT terminal.
Video Adjust parameters
Parameters (settings)
Sharpness |
|
|
(Fine/Standard/ |
Adjusts the picture’s sharpness. |
|
Soft) |
|
|
Brightness |
Adjusts the picture’s brightness. |
|
(-20 to 20) |
||
|
||
Contrast |
Adjusts the ratio of the brightness |
|
of the brightest and darkest por |
||
(-16 to 16) |
||
tions of the picture. |
||
|
||
Gamma (-3 to 3) |
Adjusts the look of the dark por |
|
tions of the picture. |
||
Hue (green 9 to |
Adjusts the balance between |
|
red 9) |
green and red. |
|
|
Adjusts the density of the colors. |
|
Chroma Level |
This setting is effective for sources |
|
(-9 to 9) |
with many colors, such as car |
|
|
toons. |
The factory default settings are indicated in italic.
Brightness, Contrast, Gamma, Hue and
Chroma Level are set to 0 upon purchase.
28 En

|
Section |
Changing the Settings (Initial Settings) |
05 |
Operating the Initial Settings menu
Initial Settings cannot be selected during playback. Stop the disc first.
1Display the Home Menu. Press HOME MENU.
2Select Initial Settings.
Use / / / to select, then press ENTER.
3 Select the item and change the setting.
Use / / / to select, then press ENTER.
 Notes
Notes
HDMI Out, HDMI Resolution and
HDMI Color can only be set when the player is connected to an HDMI-compatible device using an HDMI cable.
Digital Audio Out and Component Out cannot be set when the player is connected to an HDMI-compatible device using an HDMI cable.
Restoring all the settings to the defaults
1Turn the player’s power off. Press STANDBY/ON.
2Press STANDBY/ON while pressing .
Use the buttons on the player’s front panel.
English
Setting the Component Out and
HDMI Resolution settings back to their defaults
1Turn the player’s power off. Press STANDBY/ON.
2Press STANDBY/ON while pressing
.
Use the buttons on the player’s front panel. The power turns on.
En 29
 Loading...