


Operation Manual
CD RDS RECEIVER
DEH-X8500DAB
DEH-X8500BT
DEH-X7500SD
English


 Contents
Thank you for purchasing this PIONEER product.
To ensure proper use, please read through this manual before using this product. It is especially important that you read and observe WARNINGs and CAUTIONs in this manual. Please keep the manual in a safe and accessible place for future reference.
Before you start |
|
|
|
|
|
Specifications 40 |
||
About this unit |
3 |
|
|
|
|
|
||
If you experience problems 3 |
|
|
|
|||||
About this manual |
3 |
|
|
|
|
|||
Using this unit |
|
|
|
|
|
|
||
Head unit 4 |
|
|
|
|
|
|
|
|
Optional remote control |
4 |
|
|
|
||||
Set up menu |
5 |
|
|
|
|
|
|
|
Basic operations |
6 |
|
|
|
|
|
||
Frequently used menu operations |
7 |
|
||||||
DAB (Digital Audio Broadcasting) |
7 |
|
||||||
Tuner |
10 |
|
|
|
|
|
|
|
CD/CD-R/CD-RW and external storage |
|
|||||||
devices (USB, SD) |
13 |
|
|
|
|
|||
iPod |
16 |
|
|
|
|
|
|
|
Using Bluetooth wireless technology |
18 |
|||||||
Using smartphone applications |
22 |
|
|
|||||
Audio adjustments |
24 |
|
|
|
|
|||
Using different entertainment displays |
25 |
|||||||
Selecting the illumination color |
26 |
|
|
|||||
Customizing the illumination color |
27 |
|||||||
About MIXTRAX |
27 |
|
|
|
|
|
||
MIXTRAX menu |
27 |
|
|
|
|
|
||
System menu |
29 |
|
|
|
|
|
||
Set up menu |
30 |
|
|
|
|
|
|
|
System menu |
31 |
|
|
|
|
|
||
Using an AUX source 31 |
|
|
|
|||||
If an unwanted display appears |
31 |
|
|
|||||
Additional information |
|
|
|
|
||||
Troubleshooting |
32 |
|
|
|
|
|
||
Error messages |
32 |
|
|
|
|
|
||
Handling guidelines |
35 |
|
|
|
|
|||
Compressed audio compatibility (disc, USB, |
||||||||
SD) |
36 |
|
|
|
|
|
|
|
iPod compatibility |
37 |
|
|
|
|
|||
Sequence of audio files |
38 |
|
|
|
||||
Bluetooth profiles |
39 |
|
|
|
|
|||
Copyright and trademark |
39 |
|
|
|
||||
 2
2 En
En
|
Section |
Before you start |
01 |
If you want to dispose this product, do not mix it with general household waste. There is a separate collection system for used electronic products in accordance with legislation that requires proper treatment, recovery and recycling.
Private households in the member states of the EU, in Switzerland and Norway may return their used electronic products free of charge to designated collection facilities or to a retailer (if you purchase a similar new one).
For countries not mentioned above, please contact your local authorities for the correct method of disposal.
By doing so you will ensure that your disposed product undergoes the necessary treatment, recovery and recycling and thus prevent potential negative effects on the environment and human health.
 CAUTION
!Do not allow this unit to come into contact with liquids. Electrical shock could result. Also, damage to this unit, smoke, and overheating could result from contact with liquids.
!The Pioneer CarStereo-Pass is for use only in Germany.
!Always keep the volume low enough to hear outside sounds.
!Avoid exposure to moisture.
!If the battery is disconnected or discharged, any preset memory will be erased.
Note
Function setting operations are completed even if the menu is canceled before the operations are confirmed.
If you experience problems
Should this unit fail to work properly, please contact your dealer or nearest authorized PIONEER Service Station.
start you Before
About this unit
The tuner frequencies on this unit are allocated for use in Western Europe, Asia, the Middle East, Africa and Oceania. Use in other areas may result in poor reception. The RDS (radio data system) function only works in areas that broadcast RDS signals for FM stations.
CAUTION
This product is a class 1 laser product classified under the Safety of laser products, IEC 60825-1:2007.
About this manual
!In the following instructions, USB memories, USB portable audio players, and SD memory cards are collectively referred to as “external storage devices (USB, SD)”. If only USB memories and USB portable audio players are indicated, they are collectively referred to as “USB storage devices”.
!In this manual, iPod and iPhone will be referred to as “iPod”.
En  3
3

Section
02  Using this unit
Head unit
DEH-X8500DAB and DEH-X8500BT
1 |
2 |
3 4 |
5 6 |
7 |
8 9 a b |
cd |
|
DEH-X7500SD |
|
|
|
1 |
2 |
3 4 |
5 6 |
7 |
8 9 a b |
cd |
|
Head unit (front panel open)
e
|
Part |
|
Part |
1 |
SRC/OFF |
8 |
MULTI-CONTROL |
(M.C.) |
|||
2 |
LEVER |
9 |
/DISP |
3 |
(list) |
a |
MIX (MIXTRAX) |
4 |
Disc loading slot |
b |
/ (up/down) |
|
|
|
AUX input jack |
5 |
h (eject) |
c |
(3.5 mm stereo |
|
|
|
jack) |
|
Part |
|
Part |
|
DEH-X8500DAB |
|
|
|
and DEH-X8500BT |
|
|
6 |
(phone) |
d |
Detach button |
|
|||
|
DEH-X7500SD |
|
|
|
CLOCK |
|
|
|
|
|
|
|
|
|
SD memory card |
|
|
|
slot |
7 BAND/ (iPod) |
e |
Remove the front |
|
panel to access the |
|||
SD memory card slot.
 CAUTION
!Use a Pioneer USB cable when connecting a USB storage device. Connecting a USB storage device directly may be dangerous because it may stick out.
!Do not use unauthorized products.
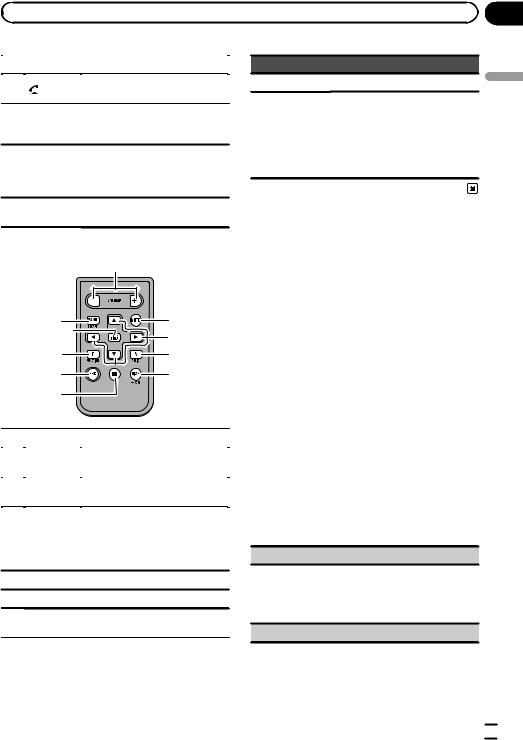
Optional remote control
The remote control CD-SR110 and CD-R320 are sold separately.
Remote controller buttons marked with the same numbers as on the unit work in the same way as the corresponding unit button, regardless of button name.
CD-SR110 (for DEH-X8500DAB and DEH-
X8500BT)
|
6 |
f |
g |
|
h |
|
i |
|
7 1 |
 4
4 En
En
|
Section |
Using this unit |
02 |
Part |
Operation |
|
f |
Press to start talking to the caller |
|
while using the phone. |
||
|
||
|
|
Press to end a call, reject an in- g  coming call, or reject a call wait-
ing while on another call.
Press to perform manual seek
h a/b/c/d
tuning, fast forward, reverse and track search controls. Also used for controlling functions.
i VOLUME
Press to increase or decrease volume.
CD-R320 (for DEH-X7500SD)
j
7q |
k |
|
l |
p |
m |
1 |
n |
o |
|
|
Part |
Operation |
|
j |
VOLUME |
Press to increase or decrease vo- |
|
lume. |
|||
|
|
||
|
|
|
|
k |
MUTE |
Press to mute. Press again to un- |
|
mute. |
|||
|
|
||
|
|
|
Press to perform manual seek tuning, fast forward, reverse and
l a/b/c/d track search controls.
Also used for controlling functions.
mAUDIO Press to select an audio function.
nDISP/SCRL Press to select different displays.
o |
e |
Press to pause or resume play- |
|
back. |
|||
|
|
||
|
|
|
Part Operation
p FUNCTION Press to select functions.
Press to display the disc title, track title, folder, or file list de-
LIST/
pending on the source.
q ENTER Press to display the list depending on the source.
While in the operating menu, press to control functions.
Set up menu
When you turn the ignition switch to ON after installation, set up menu appears on the display.
You can set up the menu options below.
1After installation of this unit, turn the ignition switch to ON.
Set up appears.
2Turn M.C. to switch to YES.
#If you do not use the unit for 30 seconds, the set up menu will not be displayed.
#If you prefer not to set up at this time, turn M.C. to switch to NO.
If you select NO, you cannot set up in the set up menu.
3Press M.C. to select.
4Follow these steps to set the menu.
To proceed to the next menu option, you need to confirm your selection.
Language select (multi-language)
1Turn M.C. to select the desired language.
English—Français—Italiano—Español— Deutsch—Nederlands—РУССКИЙ
2Press M.C. to confirm the selection.
Calendar (setting the date)
unit this Using
En  5
5
Section
02  Using this unit
1Turn M.C. to change the year.
2Press M.C. to select day.
3Turn M.C. to change the day.
4Press M.C. to select month.
5Turn M.C. to change the month.
6Press M.C. to confirm the selection.
Clock (setting the clock)
1Turn M.C. to adjust hour.
2Press M.C. to select minute.
3Turn M.C. to adjust minute.
4Press M.C. to confirm the selection.
FM step (FM tuning step)
1Turn M.C. to select the FM tuning step. 50kHz (50 kHz)—100kHz (100 kHz)
2Press M.C. to confirm the selection.
Contrast (display contrast setting)
1Turn M.C. to adjust the contrast level.
0 to 15 is displayed as the level is increased or decreased.
2Press M.C. to confirm the selection. Quit appears.
5 To finish your settings, turn M.C. to select YES.
# If you prefer to change your setting again, turn M.C. to switch to NO.
6 Press M.C. to select.
Notes
!You can set up the menu options from the system menu. For details about the settings, refer to System menu on page 29.
!You can cancel set up menu by pressing SRC/
OFF.
Basic operations
 Important
!Handle the front panel with care when removing or attaching it.
!Avoid subjecting the front panel to excessive shock.
!Keep the front panel out of direct sunlight and high temperatures.
!To avoid damaging the device or vehicle interior, remove any cables and devices attached to the front panel before detaching it.
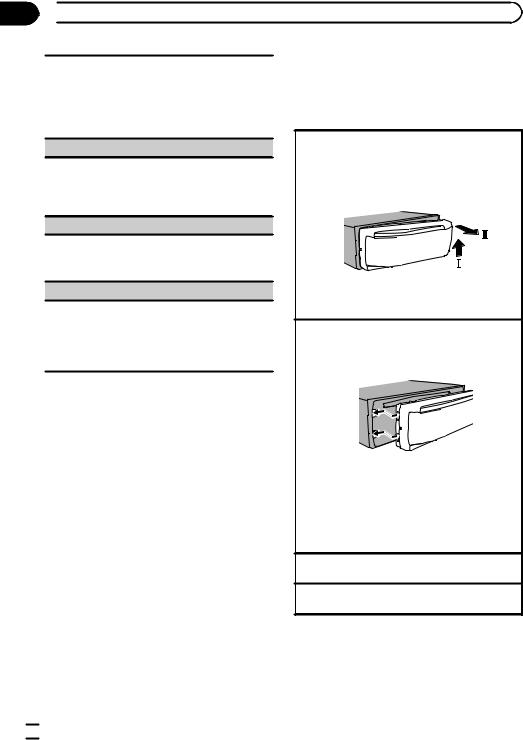
Removing the front panel to protect your unit from theft
1Press the detach button to release the front panel.
2Push the front panel upward (M) and then pull it toward (N) you.
3Always store the detached front panel in a protective case or bag.
Re-attaching the front panel
1Slide the front panel to the left.
Make sure to insert the tabs on the left side of the head unit into the slots on the front panel.
2Press the right side of the front panel until it is firmly seated.
If you cannot attach the front panel to the head unit successfully, make sure that you are placing the front panel onto the head unit correctly. Forcing the front panel into place may result in damage to the front panel or head unit.
Turning the unit on
1 Press SRC/OFF to turn the unit on.
Turning the unit off
1 Press and hold SRC/OFF until the unit turns off.
 6
6 En
En
|
Section |
Using this unit |
02 |
Selecting a source
1Press SRC/OFF to cycle between: DEH-X8500DAB
DAB (digital audio broadcasting)—TUNER (tuner)—CD (CD player)—USB1 (USB1)/iPod1 (iPod1)—Apps1 (Smartphone App1)—USB2 (USB2)/iPod2 (iPod2)—Apps2 (Smartphone App2)—SD (SD memory card)—AUX (AUX)—BT Audio (BT audio)
DEH-X8500BT
TUNER (tuner)—CD (CD player)—USB1 (USB1)/ iPod1 (iPod1)—Apps1 (Smartphone App1)— USB2 (USB2)/iPod2 (iPod2)—Apps2 (Smartphone App2)—SD (SD memory card)—AUX (AUX)—BT Audio (BT audio)
DEH-X7500SD
TUNER (tuner)—CD (CD player)—USB (USB)/ iPod (iPod)—Apps (Smartphone App)—SD (SD memory card)—AUX (AUX)
Adjusting the volume
1 Turn M.C. to adjust the volume.
Frequently used menu operations
Returning to the previous display
Returning to the previous list/category (the folder/category one level higher)
1 Press  /DISP.
Returning to the ordinary display 1 Press BAND/ .
.
Returning to the ordinary display from the list/category
1 Press BAND/ .
.
Selecting a function or list
1 Turn M.C. or LEVER.
!In this manual, “Turn M.C.” is used to describe the operation used to select a function or list.
unit this Using
 CAUTION
For safety reasons, park your vehicle when removing the front panel.
Notes
!When this unit’s blue/white lead is connected to the vehicle’s auto-antenna relay control terminal, the vehicle’s antenna extends when this unit’s source is turned on. To retract the antenna, turn the source off.
!When there are two USB storage devices connected to this unit and you want to switch between them for playback, disconnect communications for the USB storage device first before proceeding.
!If connecting both USB1 (USB storage device1)/iPod1 (iPod connected using USB input1) and USB2 (USB storage device2)/ iPod2 (iPod connected using USB input2) at the same time, use a Pioneer USB cable (CD-
U50E) in addition to the regular Pioneer USB cable.
DAB (Digital Audio
Broadcasting)
Only for DEH-X8500DAB
To receive DAB signals, connect a DAB antenna (AN-DAB1) sold separately to the unit.
DAB stands for Digital Audio Broadcasting and has the following features:
!High sound quality (nearly as high as for CDs, although it may be reduced in some cases in order to allow more services to be broadcast)
!Interference-free reception
Note
Some stations perform broadcast testing.
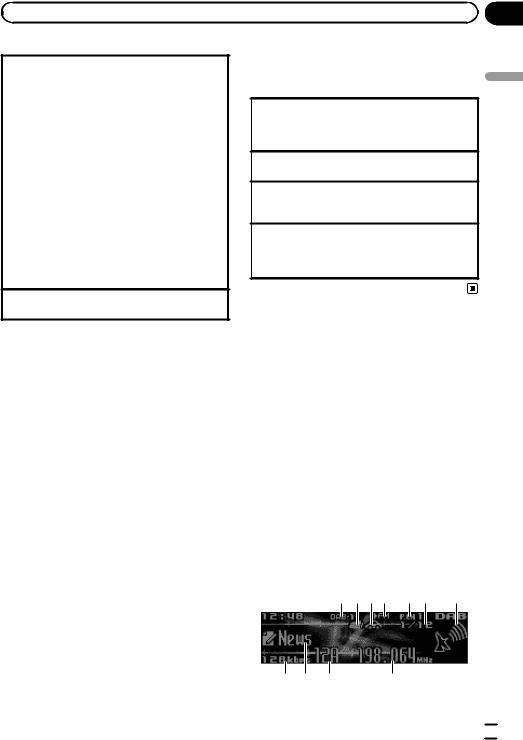
Basic operations
1 234 5 6 |
7 |
8 9 a |
b |
En  7
7
Section
02  Using this unit
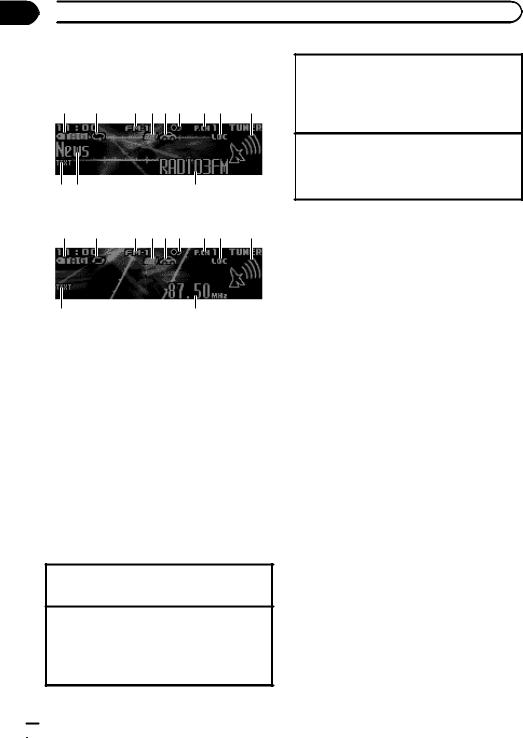
1Band indicator
2News indicator
3Traffic Announce indicator
4FM-LINK indicator
This displays while S.FOLLOW is searching for another FM broadcast station broadcasting the same content.
5Preset number indicator
6Service availability indicator
7Signal level indicator
8Bit rate indicator
9Text information indicator
aChannel indicator
bFrequency indicator
Selecting a band
1Press BAND/ until the desired band (DAB-1, DAB-2, or DAB-3) is displayed.
Manual tuning (step by step) 1 Turn LEVER.
Ensemble
Service |
Turn LEVER to the right. |
||
|
|
Primary Service Component |
|
|
|
||
Service |
|
||
Primary Service Component
Secondary Service Component
Secondary Service Component
Turn LEVER to the left.
Some individual services in an ensemble may be further subdivided into Service Components. The main Service Component is called the Primary Service Component, and any auxiliary Service Components are called Secondary Service Components.
Seeking
1 Turn and hold down LEVER.
Pausing
You can use the pause function to temporarily stop listening to a DAB.
% Press and hold M.C. to pause or resume.
!This unit stores recent broadcasts to memory automatically. The memory capacity of this unit will vary depending on the bit rate of the Service Component used. The ap-
proximate memory capacity is five minutes for 192 kbps.
!If the duration that a selection is paused exceeds the length of the memory capacity, playback will resume from the beginning of the selection in memory.
This function is disabled while time shift is on. For more details about time shift, refer to Listening to a recent broadcast (time shift) on this page.
Switching the display
Selecting the desired text information
% Press  /DISP.
Service label/channel and frequency—PTY label/channel and frequency—ensemble label/channel and frequency—dynamic label/ channel and frequency
Notes
!For more details about PTY list, refer to PTY list on page 11.
!This function is disabled while pausing. For more details about pausing, refer to Pausing on this page.
!Depending on the band, text information can be changed.
Listening to a recent broadcast (time shift)
You can navigate through recent broadcasts from the selected Service Component.
1Press and hold  /DISP to switch to time shift mode.
Press and hold again to resume the live broadcast.
2Turn LEVER to adjust the playback point.
!Turn LEVER to the left to skip back one minute.
!Turn LEVER to the right to skip forward one minute.
 8
8 En
En
|
Section |
Using this unit |
02 |
This unit stores recent broadcasts to memory automatically. The memory capacity of this unit will vary depending on the bit rate of the Service Component used. The approximate memory capacity is five minutes for 192 kbps. Stored selections that are older than what can be stored in the memory will not be available.
Selecting a Service Component
You can select a Service Component from the following service list.
1Press  (list) to switch to the service list mode.
2Turn M.C. to change the service list and press to select.
Once selected, the following Service Component functions can be adjusted.
SERVICE (service label)
You can select a Service Component from the list of all components.
1Turn M.C. to select a Service Component.
2Press M.C. to receive a broadcast from the se-
lected Service Component.
Using alphabet search
1Press  (list).
2Turn M.C. to select a letter.
3Press M.C. to display the alphabetical list.
4Turn M.C. to select a Service Component.
5Press M.C. to receive a broadcast from the selected Service Component.
PROGRAM TYPE (PTY label)
You can select a Service Component from PTY information.
1Turn M.C. to scroll to the desired PTY information and press it to select.
NEWS/INFO—POPULAR—CLASSICS—OTHERS
2Turn M.C. to select a Service Component.
3Press M.C. to receive a broadcast from the selected Service Component.
ENSEMBLE (ensemble label)
You can select a Service Component from the relevant ensemble.
1Turn M.C. to scroll to the desired ensemble and press it to select.
2Turn M.C. to select a Service Component.
3Press M.C. to receive a broadcast from the selected Service Component.
PCH LIST (setting preset channels)
You can store your favorite Service Components as presets and recall them later on.
1Turn M.C. to select a preset channel.
2Press and hold M.C. to store the Service Component as a preset.
3Press M.C. to recall the preset channel.
!You can tune the channel up or down manually by pressing  or
or  .
.
Updating service list information
You can receive updates to the service list.
% Press and hold down  (list).
To cancel, press and hold  (list) again.
Function settings
1Press M.C. to display the main menu.
2Turn M.C. to change the menu option and press to select FUNCTION.
Once selected, the function below can be adjusted.
S.FOLLOW (alternative Service Component search)
If the tuner cannot get good reception, the unit will automatically search for another ensemble that supports the same Service Component. If no alternative Service Component can be found or reception remains poor, this function will automatically switch to an identical FM broadcast.
1Press M.C. to turn alternative Service Component search on or off.
unit this Using
En  9
9
Section
02  Using this unit
Tuner
Basic operations
1 |
2 |
3 456 7 8 |
9 |
a b |
c |
RDS
Switching preset stations 1 Turn LEVER.
!Select Preset (preset channel) under Tuning Mode to use this function. For details about the settings, refer to Tuning Mode (LEVER tuning setting) on page 13.
Seeking
1Turn and hold down LEVER.
!While turning and holding down LEVER, you can skip stations. Seek tuning starts as soon as you release LEVER.
1 |
2 |
3 456 7 8 |
9 |
a |
d |
Non-RDS or MW/LW
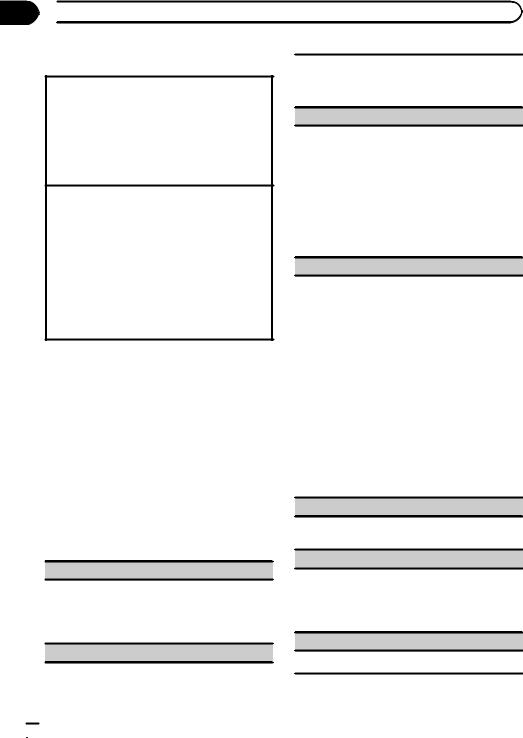
1TAG indicator
2Tags transferring indicator
3Band indicator
4News indicator
5Traffic Announce indicator
65 (stereo) indicator
7Preset number indicator
8LOC indicator
Appears when local seek tuning is on.
9Signal level indicator
aTEXT indicator
Shows when the radio text is received.
bPTY label indicator
cProgram service name
dFrequency indicator
Selecting a band
1Press BAND/ until the desired band (FM-1, FM- 2,FM-3 for FM or MW/LW) is displayed.
Manual tuning (step by step) 1 Turn LEVER.
!Select Manual (manual tuning) under Tuning Mode to use this function. For details about the settings, refer to Tuning Mode (LEVER tuning setting) on page 13.
Using PI Seek
If the tuner cannot find a suitable station, or the reception status deteriorates, the unit automatically searches for a different station with the same programming. During the search, PI SEEK is displayed and the sound is muted.
Using Auto PI Seek for preset stations
When preset stations cannot be recalled, the unit can be set to perform PI Seek during preset recall.
!The default setting for Auto PI Seek is off. Refer to Auto PI (auto PI seek) on page 29.
Storing and recalling stations for each band
1 Press  (list).
The preset screen is displayed.
2Use M.C. to store the selected frequency in the memory.
Turn to change the preset number. Press and hold to store.
3Use M.C. to select the desired station.
Turn to change the station. Press to select.
# All stations stored for FM bands can be re-
called from each independent FM band.
# You can tune the channel up or down manually by pressing  or
or  .
.
 10
10 En
En
|
Section |
Using this unit |
02 |
Switching the RDS display
RDS (radio data system) contains digital information that helps search for the radio stations.
% Press  /DISP.
PTY/program service name (frequency)—artist name/song title
Notes
!If the program service name cannot be acquired, the broadcast frequency is displayed instead. If the program service name is detected, the program service name will be displayed.
!Depending on the band, text information can be changed.
PTY list
News&Inf (news and information)
News (News), Affairs (Current affairs), Info (Information), Sport (Sports), Weather (Weather), Finance (Finance)
Popular (popular)
Pop Mus (Popular music), Rock Mus (Rock music), Easy Mus (Easy listening), Oth Mus (Other music), Jazz (Jazz), Country (Country music), Nat Mus (National music), Oldies (Oldies music), Folk mus (Folk music)
Classics (classics)
L. Class (Light classical), Classic (Classical)
Others (others)
Educate (Education), Drama (Drama), Culture (Culture), Science (Science), Varied (Varied), Children (Children’s), Social (Social affairs), Religion (Religion), Phone In (Phone in), Touring (Travel), Leisure (Leisure), Document (Documentaries)
Using iTunes tagging
This function can be performed with the following iPod models.
—iPod touch 4th generation
—iPod touch 3rd generation
—iPod touch 2nd generation
—iPod touch 1st generation
—iPod classic 160GB
—iPod classic 120GB
—iPod classic
—iPod nano 6th generation
—iPod nano 5th generation
—iPod nano 4th generation
—iPod nano 3rd generation
—iPhone 4S
—iPhone 4
—iPhone 3GS
—iPhone 3G
—iPhone
However, tag information can be stored in this unit even while other iPod models are used.
The song information (tag) can be saved from the broadcasting station to your iPod. The songs will show up in a playlist called “Tagged playlist” in iTunes the next time you sync your iPod. Then you can directly buy the songs you want from the iTunes Store.
!The tagged songs and the song that you can buy from the iTunes Store may be different. Make sure to confirm the song before you make the purchase.
Storing the tag information to this unit
1Tune in to the broadcast station.
2Press and hold M.C. if TAG is indicated in the display while desired song is broadcasting.
!While storing the tag data on this unit, TAG flashes.
Storing the tagged information to your iPod DEH-X8500DAB and DEH-X8500BT
1Switch the source to iPod.
The tag transfer screen is displayed.
2Turn M.C. to switch to YES.
3Press M.C. to select.
Tagged information is transferred to your iPod.
!You can also transfer tagged information using
Tags transfer. For details, refer to Tags transfer
(Tags transfer) on page 18.
!Tags transfer will stop if the source is changed from iPod1 to iPod2, or from iPod2 to iPod1
while tagged information is being transferred. DEH-X7500SD
1The tag information on this unit is transferred to the iPod automatically when an iPod is connected.
unit this Using
En  11
11
Section
02  Using this unit
Using radio text
Displaying radio text
You can display the currently received radio text and the three most recent radio texts.
1Press and hold down  (list) to display radio text.
!When no radio text is received, NO TEXT appears in the display.
2Turn LEVER left or right to recall the three most recent radio texts.
3Press  or
or  to scroll.
Storing and recalling radio text
You can store data from up to six radio text transmissions to the RT Memo 1 to RT Memo 6 keys.
1Display the radio text you want to store in the memory.
2Press  (list).
The preset screen is displayed.
3Use LEVER to store the selected radio text. Turn it to change the preset number. Press and hold down M.C. to store.
4Use LEVER to select the desired radio text.
Turn it to change the radio text. Press M.C. to select.
!The tuner automatically stores the three latest radio text broadcasts received, replacing the oldest text with the newest text.
Function settings
1Press M.C. to display the main menu.
2Turn M.C. to change the menu option and press to select FUNCTION.
3Turn M.C. to select the function.
Once selected, the following functions can be adjusted.
!If MW/LW band is selected, only BSM, Local and Tuning Mode are available.
BSM (best stations memory)
BSM (best stations memory) automatically stores the six strongest stations in the order of their signal strength.
1Press M.C. to turn BSM on. To cancel, press M.C. again.
Regional (regional)
When Alternative FREQ is used, the regional function limits the selection of stations to those broadcasting regional programs.
1 Press M.C. to turn the regional function on or off.
Local (local seek tuning)
Local seek tuning allows you to tune in to only those radio stations with sufficiently strong signals for good reception.
1Press M.C. to display the setting mode.
2Press M.C. to turn local on or off.
3Turn M.C. to select the desired setting. FM: Level 1—Level 2—Level 3—Level 4 MW/LW: Level 1—Level 2
The highest level setting allows reception of only the strongest stations, while lower levels allow the reception of weaker stations.
PTY search (program type selection)
You can tune in to a station using PTY (program type) information.
1Turn LEVER left or right to select the desired setting.
News&Inf—Popular—Classics—Others
2Press M.C. to begin the search.
The unit searches for a station broadcasting that type of program. When a station is found, its program service name is displayed.
PTY (program type ID code) information is listed in the following section. Refer to PTY list on the previous page.
To cancel the search, press M.C. again.
The program of some stations may differ from that indicated by the transmitted PTY.
If no station is broadcasting the type of program you searched for, Not found is displayed for about two seconds and then the tuner returns to the original station.
Traffic Announce (traffic announcement standby)
1Press M.C. to turn traffic announcement standby on or off.
Alternative FREQ (alternative frequencies search)
When the tuner cannot get a good reception, the unit automatically searches for a different station in the same network.
1Press M.C. to turn the alternative frequencies search on or off.
News interrupt (news program interruption)
1 Press M.C. to turn the NEWS function on or off.
 12
12 En
En
|
Section |
Using this unit |
02 |
Tuning Mode (LEVER tuning setting)
You can assign a function to the LEVER on the unit. Select Manual (manual tuning) to tune up or down manually or select Preset (preset channel) to switch between preset channels.
1 Press M.C. to select Manual or Preset.
CD/CD-R/CD-RW and external storage devices (USB, SD)
Basic operations
DEH-X8500DAB and DEH-X8500BT
12 3
4 |
5 |
6 |
7 |
DEH-X7500SD
12 3
4 |
6 |
7 |
5 |
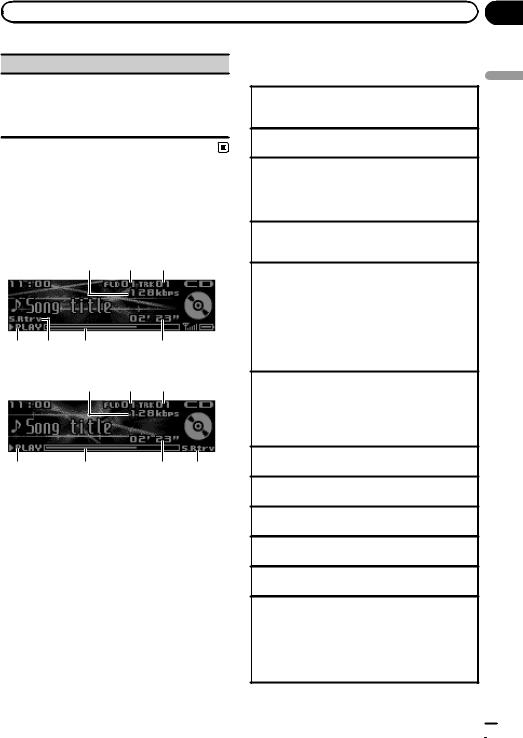
1Bit rate/sampling frequency indicator Shows the bit rate or sampling frequency of the current track (file) when the compressed audio is playing.
!When playing back VBR (variable bit rate)-recorded AAC files, the average bit rate value is displayed. However, depending on the software used to decode AAC files, VBR may be displayed.
2Folder number indicator
Shows the current folder number when playing a compressed audio file.
3Track number indicator
4PLAY/PAUSE indicator
5S.Rtrv indicator
Appears when Sound Retriever function is on.
6Song time (progress bar)
7Play time indicator
Playing a CD/CD-R/CD-RW
1Insert the disc into the disc loading slot with the label side up.
Ejecting a CD/CD-R/CD-RW
1 Press h (eject).
Playing songs on a USB storage device
1Use a Pioneer USB cable to connect the USB storage device to the unit.
!Plug in the USB storage device using the USB cable.
Stopping playback of files on a USB storage device
!You may disconnect the USB storage device at any time.
Playing songs on an SD memory card
1Remove the front panel.
2Insert an SD memory card into the SD card slot. Insert it with the contact surface facing down, and press on the card until it clicks and completely locks into place.
3Re-attach the front panel.
4Press SRC/OFF to select SD as the source. Playback will start.
Stopping playback of files on an SD memory card
1Remove the front panel.
2Press on the SD memory card until it clicks. The SD memory card is ejected.
3Pull out the SD memory card.
4Re-attach the front panel.
Selecting a folder 1 Press  or
or  .
.
Selecting a track 1 Turn LEVER.
Fast forwarding or reversing
1 Turn and hold down LEVER to the right or left.
Returning to root folder
1 Press and hold BAND/ .
.
Switching between compressed audio and CD-DA 1 Press BAND/ .
.
Switching between playback memory devices
You can switch between playback memory devices on USB storage devices with more than one Mass Storage Device-compatible memory device.
1 Press BAND/ .
.
!You can switch between up to 32 different memory devices.
unit this Using
En  13
13

Section
02  Using this unit
Notes
!When playing compressed audio, there is no sound during fast forward or reverse.
!Disconnect USB storage devices from the unit when not in use.
!If there are two USB storage devices connected to this unit, the device connected to the input of the selected source is the one that is operated.
!Disconnect communications for the USB storage device before switching to operation of the other device.
2 Use M.C. to select the desired file name (or folder name).
Changing the file or folder name 1 Turn M.C.
Playing
1 When a file or track is selected, press M.C.
Viewing a list of the files (or folders) in the selected folder
1 When a folder is selected, press M.C.
Playing a song in the selected folder
1 When a folder is selected, press and hold M.C.
Operations using the MIXTRAX button
Turning MIXTRAX on or off
You can use this function when USB or SD is selected as the source.
1 Press MIX to turn MIXTRAX on or off.
!For more details about MIXTRAX, refer to About MIXTRAX on page 27.
!For more details about MIXTRAX functions, refer to MIXTRAX menu on page 27.
Switching the display
Selecting the desired text information
% Press /DISP.
Notes
!Depending on the version of iTunes used to write MP3 files to a disc or media file types, incompatible text stored within an audio file may be displayed incorrectly.
!Text information items that can be changed depend on the media.
Selecting and playing files/ tracks from the name list
This function is available when OFF is selected in Music browse. For details, refer to
Music browse (music browse) on page 29.
1 Press  (list) to switch to the file/track name list mode.
Browsing for a song
You can use this function when USB or SD is selected as the source.
This function is available when USB memory,
USB memory1, USB memory2 or SD card is selected in Music browse. For details, refer to
Music browse (music browse) on page 29.
1Press  (list) to switch to the top menu of the list search.
2Use M.C. to select a category/song.
Changing the name of the song or category
1Turn M.C.
Artists (artists)—Albums (albums)—Songs
(songs)—Genres (genres)
Playing
1 When a song is selected, press M.C.
Viewing a list of songs in the selected category 1 When a category is selected, press M.C.
Playing a song in the selected category
1 When a category is selected, press and hold M.C.
Searching the list by alphabet
1When a list for the selected category is displayed, press  to switch to alphabet search mode.
2Turn M.C. to select a letter.
3Press M.C. to display the alphabetical list.
 14
14 En
En
 Loading...