


CD RDS RECEIVER
AUTORADIO CD RDS
REPRODUCTOR DE CD CON RECEPTOR RDS
DEH-S5000BT
DEH-S5010BT Owner’s Manual
Mode d’emploi DEH-S4000BT Manual de instrucciones
DEH-S4010BT
Español Français English
 Important (Serial number)
The serial number is located on the bottom of this unit. For your own security and convenience, be sure to record this number on the enclosed warranty card.
 Important (Numéro de série)
Le numéro de série se trouve au bas de cet appareil. Pour votre sécurité et votre commodité, veillez à noter ce numéro sur la carte de garantie fournie.
 Importante (Número de serie)
El número de serie se encuentra en la parte inferior de esta unidad. Por su propia seguridad y comodidad, asegúrese de anotar este número en la tarjeta de garantía que se adjunta.

Table of Contents |
|
Before You Start ....................................................................................... |
3 |
Getting Started ........................................................................................ |
5 |
Radio....................................................................................................... |
11 |
CD/USB/iPhone/AUX............................................................................ |
12 |
Bluetooth ............................................................................................... |
15 |
App Mode .............................................................................................. |
20 |
Pandora® ................................................................................................ |
21 |
Spotify® .................................................................................................. |
23 |
Using Pioneer ARC APP ....................................................................... |
25 |
Audio Adjustments .............................................................................. |
27 |
Settings .................................................................................................. |
28 |
FUNCTION settings ............................................................................... |
28 |
AUDIO settings ...................................................................................... |
30 |
SYSTEM settings .................................................................................... |
32 |
ILLUMINATION settings........................................................................ |
35 |
MIXTRAX settings.................................................................................. |
36 |
Connections/Installation .................................................................... |
38 |
Additional Information ....................................................................... |
44 |
About this manual:
•In the following instructions, a USB memory or USB audio player are referred to as “USB device”.
•When an iPhone is connected to the unit, the source name on the unit appears as [iPod]. Please note that this unit supports only iPhones (iPhone 5 or later) regardless of the source name (for details, refer to page 50).
-2 -
English

 Before You Start
Thank you for purchasing this PIONEER product
To ensure proper use, please read through this manual before using this product. It is especially important that you read and observe WARNINGs and CAUTIONs in this manual. Please keep the manual in a safe and accessible place for future reference.
FCC ID: EW4C95
MODEL NO.: DEH-S5000BT/DEH-S5010BT/DEH-S4000BT/DEH-S4010BT IC: 4250A-C95
This device complies with Part 15 of FCC Rules and Industry Canada licence-exempt RSS standard(s). Operation is subject to the following two conditions: (1) this device may not cause interference, and
(2) this device must accept any interference, including interference that may cause undesired operation of this device.
This transmitter must not be co-located or operated in conjunction with any other antenna or transmitter.
The Bluetooth antenna cannot be removed (or replaced) by user.
This equipment complies with FCC/IC radiation exposure limits set forth for an uncontrolled environment and meets the FCC radio frequency (RF) Exposure Guidelines and RSS-102 of the IC radio frequency (RF) Exposure rules. This equipment has very low levels of RF energy that it deemed to comply without maximum permissive exposure evaluation (MPE). But it is desirable that it should be installed and operated keeping the radiator at least 20cm or more away from person’s body (excluding extremities: hands, wrists, feet and ankles).
Alteration or modifications carried out without appropriate authorization may invalidate the user’s right to operate the equipment.
Note
This equipment has been tested and found to comply with the limits for a Class B digital device, pursuant to Part 15 of the FCC Rules. These limits are designed to provide reasonable protection against harmful interference in a residential installation. This equipment generates, uses and can radiate radio frequency energy and, if not installed and used in accordance with the instructions, may cause harmful interference to radio communications. However, there is no guarantee that interference will not occur in a particular installation. If this equipment does cause harmful interference to radio or television reception, which can be determined by turning the equipment off and on, the user is encouraged to try to correct the interference by one or more of the following measures:
–Reorient or relocate the receiving antenna.
–Increase the separation between the equipment and receiver.
–Connect the equipment into an outlet on a circuit different from that to which the receiver is connected.
–Consult the dealer or an experienced radio/TV technician for help.
The Safety of Your Ears is in Your Hands
Get the most out of your equipment by playing it at a safe level—a level that lets the sound come through clearly without annoying blaring or distortion and, most importantly, without affecting your sensitive hearing. Sound can be deceiving.
English
- 3 -
Over time, your hearing “comfort level” adapts to higher volumes of sound, so what sounds “normal” can actually be loud and harmful to your hearing. Guard against this by setting your equipment at a safe level BEFORE your hearing adapts.
ESTABLISH A SAFE LEVEL:
•Set your volume control at a low setting.
•Slowly increase the sound until you can hear it comfortably and clearly, without distortion.
• Once you have established a comfortable sound level, set the dial and leave it there.
BE SURE TO OBSERVE THE FOLLOWING GUIDELINES:
•Do not turn up the volume so high that you can’t hear what’s around you.
•Use caution or temporarily discontinue use in potentially hazardous situations.
•Do not use headphones while operating a motorized vehicle; the use of headphones may create a traffic hazard and is illegal in many areas.
 WARNING
•Do not attempt to install or service this product by yourself. Installation or servicing of this product by persons without training and experience in electronic equipment and automotive accessories may be dangerous and could expose you to the risk of electric shock, injury or other hazards.
•Do not attempt to operate the unit while driving. Make sure to pull off the road and park your vehicle in a safe location before attempting to use the controls on the device.
CAUTION:
USE OF CONTROL OR ADJUSTMENT OR PERFORMANCE OF PROCEDURES OTHER THAN THOSE SPECIFIED HEREIN MAY RESULT IN HAZARDOUS RADIATION EXPOSURE.
CAUTION:
THE USE OF OPTICAL INSTRUMENTS WITH THIS PRODUCT WILL INCREASE EYE HAZARD.
 CAUTION
•Do not allow this unit to come into contact with moisture and/or liquids. Electrical shock could result. Also, damage to this unit, smoke, and overheating could result from contact with liquids.
•Always keep the volume low enough to hear outside sounds.
•This product is evaluated in moderate and tropical climate condition under the Audio, video and similar electronic apparatus - Safety requirements, IEC 60065.
CAUTION
This product is a class 1 laser product classified under the Safety of laser products, IEC 60825-1:2007.
English
After-sales service for Pioneer products
Please contact the dealer, distributor from where you purchased this unit or the authorized PIONEER Service Station for after-sales service or any other information. In case the necessary information is not available, please contact the companies listed below:
Please do not ship your unit to the companies at the addresses listed below for repair without contacting them in advance.
- 4 -
U.S.A. and CANADA
Pioneer Electronics (USA) Inc. CUSTOMER SUPPORT DIVISION P.O. Box 1760
Long Beach, CA 90801-1760 800-421-1404
For warranty information please see the Limited Warranty sheet included with this unit.
 Getting Started
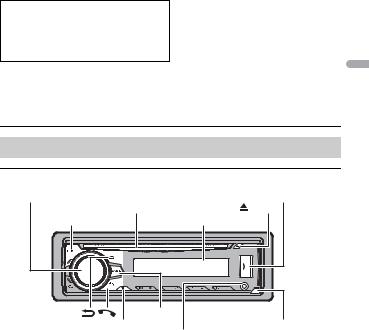
Basic operation
DEH-S5000BT/S5010BT
M.C. (multi-control) dial |
|
|
USB port |
Disc loading slot |
|
|
(eject) |
|
|
||
SRC (source)/OFF |
Display window |
||
BAND/ |
BASS |
|
Detach button |
DISP (display) |
|
|
AUX input jack (3.5 mm stereo jack) |
|
English
- 5 -

DEH-S4000BT/S4010BT |
|
M.C. (multi-control) dial |
USB port |
(eject) |
Disc loading slot |
SRC (source)/OFF |
Display window |
|
English |
BASS |
BAND/ |
|
Detach button |
DISP (display) |
|
|
|
|
AUX input jack (3.5 mm stereo jack) |
||
Remote Control |
|
|
|
|
|
VOLUME +/– |
|
|
/ |
MUTE |
|
|
|
|
|
SRC (source) |
DISP (display) |
||
Frequently used operations |
|
|
|
The available buttons vary depending on the unit. |
|
|
|
Purpose |
|
Operation |
|
Head Unit |
|
Remote Control |
|
|
|
||
Turn on the power* |
Press SRC/OFF to turn on |
Press SRC to turn on the |
|
|
the power. |
|
power. |
|
Press and hold SRC/OFF to |
Press and hold SRC to turn |
|
|
turn off the power. |
|
off the power. |
- 6 -
Purpose |
|
|
Operation |
||
|
|
|
|
|
|
|
|
Head Unit |
|
Remote Control |
|
Adjust the volume |
Turn the M.C. dial. |
|
Press VOLUME + or –. |
||
|
|
|
|
|
Press MUTE to mute the |
|
|
|
|
|
unit. Press MUTE again or |
|
|
|
|
|
press VOLUME + or – to |
|
|
|
|
|
unmute. |
|
|
|
|
||
Select a source |
Press SRC/OFF repeatedly. |
|
Press SRC repeatedly. |
||
|
|
|
|
||
Change the display |
Press DISP repeatedly. |
|
Press DISP repeatedly. |
||
information |
|
|
|
|
|
|
|
|
|
|
|
Return to the previous |
Press BAND/ |
. |
|
Press / to select the |
|
display/list |
|
|
|
|
next/previous folder. |
|
|
|
|
||
Return to the normal display |
Press and hold BAND/ |
. |
– |
||
from the menu |
|
|
|
|
|
|
|
|
|
|
|
|
|
|
|
||
Change the display |
Press and hold BAND/ |
. |
– |
||
brightness |
|
|
|
|
|
|
|
|
|
|
|
|
|
|
|
|
|
Answering a call |
Press |
. |
|
|
Press . |
|
|
|
|
|
|
Ending a call |
Press |
. |
|
|
Press . |
|
|
|
|
|
|
Boost the bass level |
Press BASS. |
|
|
– |
|
|
|
|
|
|
|
*When this unit’s blue/white lead is connected to the vehicle’s auto-antenna relay control terminal, the vehicle’s antenna extends when this unit’s source is turned on. To retract the antenna, turn the source off.
Display indication
Indication |
Description |
|
Appears when a lower tier of the menu or folder exists. |
|
|
|
Appears when the button is pressed. |
|
|
BASS |
Appears when the BASS button is pressed or [HI]/[LOW] is selected in |
|
[D.BASS] (page 31). |
|
|
|
Appears when random/shuffle play is set (except when BT AUDIO is |
|
selected as the source). |
|
|
|
Appears when repeat play is set (except when BT AUDIO is selected as the |
|
source). |
|
|
|
Appears when a Bluetooth connection is made (page 15). |
|
|
English
- 7 -
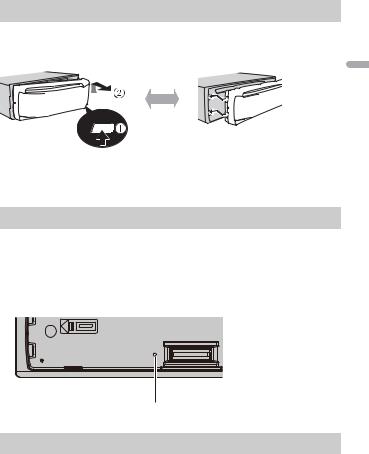
Detaching the front panel
Detach the front panel to prevent theft. Remove any cables and devices attached to the front panel and turn off the unit before detaching it.
Detach |
Attach |
English
 Important
•Avoid subjecting the front panel to excessive shock.
•Keep the front panel out of direct sunlight and high temperatures.
•Always store the detached front panel in a protective case or bag.
Resetting the microprocessor
The microprocessor must be reset in the following situations:
–Before using this unit for the first time after installation
–If the unit fails to operate properly
–When strange or incorrect messages appear on the display
1
2
Remove the front panel (page 8).
Press the RESET button with a pointed instrument longer than 8 mm.
RESET button
Preparing the remote control
Remove the insulation sheet before use.
- 8 -
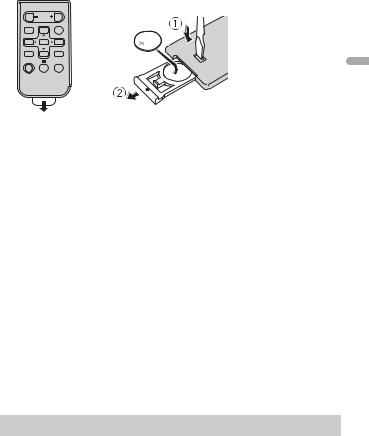
How to replace the battery
English
Insert the CR2025 (3 V) battery with the plus (+) and minus (–) poles orientated properly.
 WARNING
•Do not ingest the battery, Chemical Burn Hazard.
(The remote control supplied with) This product contains a coin/button cell battery. If the coin/ button cell battery is swallowed, it can cause severe internal burns in just 2 hours and can lead to death.
Keep new and used batteries away from children.
If the battery compartment does not close securely, stop using the product and keep it away from children.
If you think batteries might have been swallowed or placed inside any part of the body, seek immediate medical attention.
•Do not expose the battery or remote control to excessive heat such as direct sunlight or fire.
 CAUTION
•There is a potential danger of explosion if the battery is incorrectly replaced. When replacing the battery, replace it with the same type.
•Do not handle or store the battery with metallic tools or objects.
•If the battery leaks, remove the battery and wipe the remote control completely clean. Then install a new battery.
•When disposing of used batteries, please comply with governmental regulations or environmental public institutions’ rules that apply in your country/area.
•“Perchlorate Material - special handling may apply.
See www.dtsc.ca.gov/hazardouswaste/perchlorate. (Applicable to California, U.S.A.)”
 Important
•Do not store the remote control in high temperatures or direct sunlight.
•Do not let the remote control fall onto the floor, where it may become jammed under the brake or accelerator pedal.
Setup menu
When you turn the ignition switch to ON after installation, the setup menu appears in the display.
- 9 -

1Turn the M.C. dial to select the options, then press to confirm.
To proceed to the next menu option, you need to confirm your selection.
Menu Item |
Description |
LANGUAGE |
Select the language to display the text information from a |
[ENG](English), |
compressed audio file. |
|
|
[ESP](Spanish), |
|
[FRA] (Canadian |
|
French) |
|
|
|
CLOCK SET |
Set the clock. |
|
1 Turn the M.C. dial to adjust the hour, then press to confirm. |
|
The indicator moves to the minute setting automatically. |
|
2 Turn the M.C. dial to adjust the minute, then press to confirm. |
|
|
2[QUIT :YES] appears when all the settings have been made.
To return to the first item of the setup menu, turn the M.C. dial to select [QUIT :NO], then press to confirm.
3 Press the M.C. dial to confirm the settings.
NOTE
These settings can be made at any time from the SYSTEM settings (page 32).
Canceling the demonstration display (DEMO OFF)
1 Press the M.C. dial to display the main menu.
2 Turn the M.C. dial to select [SYSTEM], then press to confirm.
3 Turn the M.C. dial to select [DEMO OFF], then press to confirm.
4 Turn the M.C. dial to select [YES], then press to confirm.
INITIAL settings
1 Press and hold SRC/OFF until the unit turns off.
2 Press the M.C. dial to display the main menu.
3 Turn the M.C. dial to select [INITIAL], then press to confirm.
4 Turn the M.C. dial to select an option, then press to confirm.
NOTE
The options vary depending on the unit.
English
- 10 -
Menu Item |
Description |
|
REAR-SP |
Select when there is a full-range speaker connected to the rear |
|
|
[FUL] |
speaker output leads. |
|
|
|
|
|
|
|
[SW] |
Select when there is a subwoofer connected directly to the rear |
|
|
speaker output leads without any auxiliary amplifier. |
|
|
|
SP-P/O MODE |
Select when there is a full-range speaker connected to the rear |
|
|
[REAR/SUB.W] |
speaker output leads and there is a subwoofer connected to the |
|
RCA output. |
|
|
|
|
|
|
|
|
[SUB.W/SUB.W] |
Select when there is a passive subwoofer connected directly to |
|
|
the rear speaker output leads and there is a subwoofer |
|
|
connected to the RCA output. |
|
|
|
|
[REAR/REAR] |
Select when there are full-range speakers connected to the rear |
|
|
speaker output leads and RCA output. If there is a full-range |
|
|
speaker connected to the rear speaker output leads, and the |
|
|
RCA output is not used, you may select either [REAR/SUB.W] or |
|
|
[REAR/REAR]. |
|
|
|
SYSTEM UPDATE |
Select [SYSTEM INFO] to confirm the latest system information |
|
|
[SYSTEM INFO], [S/ |
on the unit. |
|
W UPDATE] |
Select [S/W UPDATE] to update the unit to the latest software |
|
and initialize the unit settings. For details on the latest software |
|
|
|
|
|
|
and updating, visit our website. |
|
|
|
SYSTEM RESET |
Select [YES] to initialize the unit settings. The unit will be |
|
|
[YES], [NO] |
restarted automatically. |
|
|
|
|
|
|
 Radio
Radio
The tuner frequencies on this unit are allocated for use in North America. Use in other areas may result in poor reception.
Receiving preset stations
1 Press SRC/OFF to select [RADIO].
2 Press BAND/  to select the band from [FM1], [FM2], [FM3] or [AM].
3 Press a number button (1/  to 6/
to 6/  ).
).
NOTE
You can select a preset channel by pressing  and turning the M.C. dial.
English
- 11 -

TIP
The  /
/  buttons can be also used to select a preset station when [SEEK] is set to [PCH] in the FUNCTION settings (page 28).
Best stations memory (BSM)
The six strongest stations are stored on the number buttons (1/  to 6/
to 6/  ).
).
1 After selecting the band, press the M.C. dial to display the main menu.
2 Turn the M.C. dial to select [FUNCTION], then press to confirm.
3 Turn the M.C. dial to select [BSM], then press to confirm.
To seek a station manually
1After selecting the band, press  /
/  to select a station.
Press and hold  /
/  then release to seek an available station. Scanning stops when the unit receives a station. To cancel seek tuning, press
  /
/  .
.
NOTE
[SEEK] needs to be set to [MAN] in the FUNCTION settings (page 28).
To store stations manually
1While receiving the station you want to store, press and hold one of the number buttons (1/  to 6/
to 6/  ) until it stops flashing.
NOTE
You can select a preset channel by pressing  and turning the M.C. dial. After selecting a channel, press and hold the M.C. dial to store a station.
 CD/USB/iPhone/AUX
Playing back
Disconnect headphones from the device before connecting it to the unit.
CD
1 Insert a disc into the disc loading slot with the label side up.
To eject a disc, stop playback first then press  .
.
English
- 12 -

USB devices (including Android™)/iPhone
1 Open the USB port cover.
2 Plug in the USB device/iPhone using an appropriate cable.
NOTE
To automatically switch to [USB] source when a USB device/iPhone is connected to the unit, set [USB AUTO] to [ON] in the SYSTEM settings (page 33).
 CAUTION
Use an optional Pioneer USB cable (CD-U50E) to connect the USB device as any device connected directly to the unit will protrude out from the unit, which could be dangerous.
Before removing the device, stop playback.
AOA connections
For details on AOA connection, see page 25.
MTP connection
A device installed with Android OS 4.0 or later can be connected to the unit via MTP, using the cable supplied with the device. However, depending on the connected device and the numbers of the files in the device, audio files/songs may not be able to be played back via MTP. Note that MTP connection is not compatible with WAV file formats and FLAC file formats, and cannot be used with the MIXTRAX function.
NOTE
If you use an MTP connection, [PHONE CONNECT] needs to be set to [USB MTP] in the SYSTEM settings (page 33).
AUX
1 Insert the stereo mini plug into the AUX input jack.
2 Press SRC/OFF to select [AUX] as the source.
NOTE
If [AUX] is set to [OFF] in the SYSTEM settings, [AUX] cannot be selected as a source (page 32).
Operations
You can make various adjustments in the FUNCTION settings (page 28).
Note that the following operations do not work for an AUX device. To operate an AUX device, use the device itself.
Purpose |
Operation |
|
|
|
Select a folder*1 |
Press 1/ |
or 2/ . |
|
|
|
|
|
|
|
Select a track/song (chapter) |
Press |
or |
. |
|
|
|
|
|
|
Fast forward or reverse*2 |
Press and hold |
or |
. |
|
|
|
|
|
|
English
- 13 -

Purpose |
Operation |
|
|
Search for a file from a list (CD/USB only) |
1 Press |
to display the list. |
|
|
2 Turn the M.C. dial to select the desired |
||
|
file (folder) name or category, then press |
||
|
to confirm. |
|
|
|
3 Turn the M.C. dial to select the desired |
||
|
file, then press to confirm. |
||
|
Playback starts. |
||
|
|
||
View a list of the files in the selected folder/ |
Press the M.C. dial when a folder/category |
||
category*1 |
is selected. |
|
|
|
|
||
Play a song in the selected folder/ |
Press and hold the M.C. dial when a folder/ |
||
category*1 |
category is selected. |
||
|
|
|
|
Repeat play |
Press 6/ |
. |
|
|
|
|
|
Random/shuffle play |
Press 5/ |
. |
|
|
|
|
|
Pause/resume playback |
Press 4/PAUSE. |
|
|
|
|
||
Return to root folder (CD/USB only)*1 |
Press and hold 1/ . |
||
|
|
|
|
Switch between compressed audio and CD- |
Press BAND/ |
. |
|
DA (CD only) |
|
|
|
|
|
|
|
*1 Compressed audio files only
*2 When you use the fast forward or reverse function while playing a VBR file, the playback time may be not correct.
About MIXTRAX (USB/iPhone only)
The MIXTRAX function creates a non-stop mix of your music library, accompanied by illumination effects. For details on MIXTRAX settings, see page 36.
NOTES
•iPhone needs to be connected with Pioneer ARC APP via USB for using this function (page 25).
•This function is not compatible with an Android device connected via MTP.
•Depending on the file/song, sound effects may not be available.
•Turn the MIXTRAX function off if the illumination effects it produces interfere with driving.
1 Press 3/MIX to turn MIXTRAX on/off.
English
- 14 -

 Bluetooth
Bluetooth connection
 Important
If ten or more Bluetooth devices (e.g. a phone and separate audio player) are connected, they may not work properly.
1Turn on the Bluetooth function of the device.
If you make a Bluetooth connection from the device, proceed to step 6.
2 Press  to display the phone menu.
3 Turn the M.C. dial to select [BT SETTING], then press to confirm.
4Turn the M.C. dial to select [ADD DEVICE], then press to confirm.
The unit starts to search for available devices, then displays them in the device list.
•To cancel searching, press the M.C. dial.
•If the desired device is not in the list, select [RE-SEARCH].
•If there is no device available, [NOT FOUND] appears in the display.
5Turn the M.C. dial to select a device from the device list, then press to confirm.
Press and hold the M.C. dial to switch the displayed device information between the Bluetooth device address and device name.
If you make a Bluetooth connection from the unit, proceed to step 7.
6 Select [Pioneer BT Unit] shown in the device display.
7Make sure the same 6-digit number appears on this unit and the device, then select “Yes” on the device.
NOTES
•[DEVICE FULL] appears if the unit has already been paired with ten other devices. In this case, delete one of the paired devices. See [DEL DEVICE] in the Bluetooth settings (page 16).
•Depending on the device, the PIN code is required in step 7. In this case, input [0000].
TIP
The Bluetooth connection can be also made by detecting the unit from the Bluetooth device. To do so, [VISIBLE] in the Bluetooth settings needs to be set to [ON]. For details on Bluetooth device operations, refer to the operating instructions supplied with the Bluetooth device.
English
- 15 -

Bluetooth settings
Menu Item |
Description |
|
DEVICELIST |
Display the list of paired Bluetooth devices. “*” appears on the |
|
|
device name when the Bluetooth connection is established. |
|
|
When no device is selected in the device list, this function is not |
|
|
available. |
|
|
|
|
DEL DEVICE |
Delete the device information. |
|
[DELETE YES], |
|
|
[DELETE NO] |
|
|
|
|
|
ADD DEVICE |
Register a new device. |
|
|
If ten devices are already paired, this function is not available. |
|
|
You can check the number of paired devices on the [DEVICELIST] |
|
|
setting. |
|
|
|
|
A.CONN |
Select [ON] to connect to a Bluetooth device automatically. |
|
[ON], [OFF] |
|
|
|
|
|
VISIBLE |
Select [ON] so that a Bluetooth device can detect the unit when |
|
[ON], [OFF] |
the unit is connected via Bluetooth to another device. |
|
|
||
|
|
|
PIN CODE |
Change the PIN code. |
|
|
1 Press the M.C. dial to display the setting mode. |
|
|
2 Turn the M.C. dial to select a number. |
|
|
3 Press the M.C. dial to move the cursor to the next position. |
|
|
4 After inputting the PIN code, press and hold the M.C. dial. |
|
|
After inputting the PIN code, pressing the M.C. dial returns you |
|
|
to the PIN code input display, and you can change the PIN code. |
|
|
|
|
DEV. INFO |
Switch the device information on the display between the |
|
|
device name and Bluetooth device address. |
|
|
|
|
A.PAIRING |
Select [ON] to pair the unit and iPhone or Android device |
|
[ON], [OFF] |
automatically when an iPhone or Android device is connected |
|
to the unit via USB. (This function may not be available |
||
|
||
|
depending on the version of iOS you are using.) |
|
|
• When you are using an Android device, this function is |
|
|
available in the following situations: |
|
|
– Your device has Android OS 4.4 or later installed. |
|
|
– Be sure to turn on the Bluetooth function of the device and confirm |
|
|
that the device is not connected to the unit via Bluetooth. |
|
|
– [P.APP AUTO ON] needs to be set to [ON] (page 33). |
|
|
– Pioneer ARC APP needs to be installed on your Android device and |
|
|
[PHONE CONNECT] needs to be set to [APP CONTROL] (page 25). |
|
|
– A confirmation button should be pressed on the caution window |
|
|
displayed on Pioneer ARC APP after a connection with the Pioneer |
|
|
ARC APP is made. |
|
|
|
English
- 16 -

Bluetooth telephone
First, make a Bluetooth connection with the Bluetooth telephone (page 15). Up to two Bluetooth telephones can be connected simultaneously.
 Important
•Leaving the unit on standby to connect to your phone via Bluetooth while the engine is not running can drain the vehicle’s battery.
•Be sure to park your vehicle in a safe place and apply the parking brake before operation.
To make a phone call
1Press  to display the phone menu.
When two phones are connected, a phone name appears first then a phone menu will display. To switch to another phone, press  again.
2Turn the M.C. dial to select [RECENTS] or [PHONE BOOK], then press to confirm.
If you select [PHONE BOOK], proceed to step 4.
3Turn the M.C. dial to select [MISSED], [DIALED] or [RECEIVED], then press to confirm.
4Turn the M.C. dial to select a name or phone number, then press to confirm.
The phone call starts.
To answer an incoming call
1 Press  when a call is received.
TIP
When two phones are connected to the unit via Bluetooth and there is an incoming call while one phone is being used for a call, a message will appear in the display. To answer that incoming call, you need to end the existing call.
Basic operations
Purpose |
Operation |
|
|
End a call |
Press |
. |
|
|
|
|
|
Reject an incoming call |
Press and hold |
when a call is received. |
|
|
|
|
|
Switch between the current caller |
Press the M.C. dial. |
|
|
and a caller on hold |
|
|
|
|
|
|
|
Cancel a caller on hold |
Press and hold |
. |
|
|
|
||
Adjust the volume of the caller’s |
Turn the M.C. dial during the call. |
||
voice (When private mode is on, |
|
|
|
this function is not available.) |
|
|
|
|
|
|
|
English
- 17 -

Purpose |
Operation |
|
Turn the private mode on or off |
Press BAND/ |
during the call. |
|
|
|
To preset phone numbers
1 Select a phone number from a phone book or call history.
2Press and hold one of the number buttons (1/  to 6/
to 6/  ).
).
The contact is stored in the selected preset number.
To make a call using a preset number, press one of the number buttons (1/  to 6/
to 6/  ), then press the M.C. dial.
Voice recognition (Only for iPhone)
This function is only available when an iPhone equipped with voice recognition is connected to the unit via Bluetooth.
1 |
Press and hold |
to activate the voice recognition mode. |
2 |
Press the M.C. dial and then talk into the microphone to input voice commands. |
|
To exit the voice recognition mode, press BAND/  .
.
NOTE
For details on the voice recognition features, refer to the manual supplied with your iPhone.
Phone menu
Menu Item |
Description |
||
RECENTS |
Display the missed call history. |
||
|
[MISSED] |
|
|
|
|
|
|
|
[DIALED] |
Display the dialed call history. |
|
|
|
|
|
|
[RECEIVED] |
Display the received call history. |
|
|
|
||
PHONE BOOK |
Display the contacts in your phone. Set [VISIBLE] in the |
||
|
|
Bluetooth settings to [ON] to browse the contacts via this unit. |
|
|
|
||
PRESET 1-6 |
Recall the preset phone numbers. You can also recall the preset |
||
|
|
phone numbers by pressing one of the number buttons (1/ |
|
|
|
to 6/ |
). |
|
|
||
A.ANSR* |
Select [ON] to answer an incoming call automatically. |
||
|
[ON], [OFF] |
|
|
|
|
||
R.TONE |
Select [ON] if the ring tone does not come out from the car |
||
|
[ON], [OFF] |
speakers. Depending on the connected phone, this function |
|
|
may not work. |
||
|
|
||
|
|
|
|
English
- 18 -
Menu Item |
Description |
PB INVT |
Invert the order of names in the phone book (name view). |
|
|
BT SETTING |
You can adjust various settings for Bluetooth connections. For |
|
details on Bluetooth settings, see page 16. |
|
|
*If two phones are connected, this function does not work on incoming calls that are received while one of the phones is being used for a call.
Bluetooth audio
 Important
•Depending on the Bluetooth audio player connected to this unit, the available operations will be limited to the following two levels:
–A2DP (Advanced Audio Distribution Profile) can only play back songs on your audio player.
–AVRCP (Audio/Video Remote Control Profile) can perform functions such as playback, pause, select song, etc.
•The sound of the Bluetooth audio player will be muted when the phone is in use.
•When the Bluetooth audio player is in use, you cannot connect to a Bluetooth telephone automatically.
•Depending on the type of Bluetooth audio player you have connected to this unit, operation and information displayed may vary based on availability and functionality.
1 Make a Bluetooth connection with the Bluetooth audio player.
2 Press SRC/OFF to select [BT AUDIO] as the source.
3 Press BAND/  to start playback.
Basic operations
You can make various adjustments in the FUNCTION settings (page 28).
Purpose |
Operation |
|
|
|
|
Fast forward or reverse |
Press and hold |
or |
. |
||
|
|
|
|
|
|
Select a track |
Press |
or |
. |
|
|
|
|
|
|
|
|
Repeat play* |
Press 6/ |
. |
|
|
|
|
|
|
|
|
|
Random play* |
Press 5/ |
. |
|
|
|
|
|
|
|
||
Pause/resume playback |
Press 4/PAUSE. |
|
|
||
|
|
|
|
|
|
Search for a file from a list |
1 |
Press |
to display a list. |
|
|
|
2 |
Turn the M.C. dial to select the desired |
|||
|
|
folder name, then press to confirm. |
|||
|
3 |
Turn the M.C. dial to select the desired |
|||
|
|
file, then press to confirm. |
|
||
|
Playback starts. |
|
|
||
|
|
|
|
|
|
English
- 19 -

Purpose |
Operation |
|
Switch the Bluetooth device name in the |
Press 1/ |
or 2/ . |
device list according to the connection |
|
|
order |
|
|
|
|
|
* Depending on the connected device, these operations may not be available.
 App Mode
You can enjoy listening to an application on an iPhone/Android device via the unit. In some cases, you can control an application by using the unit.
For details on compatible devices, visit our website.
 Important
Use of third party apps may involve or require the provision of personally identifiable information, whether through the creation of a user account or otherwise, and for certain applications, the provision of geolocation data.
ALL THIRD PARTY APPS ARE THE SOLE RESPONSIBILITY OF THE PROVIDERS, INCLUDING WITHOUT LIMITATION COLLECTION AND SECURITY OF USER DATA AND PRIVACY PRACTICES. BY ACCESSING THIRD PARTY APPS, YOU AGREE TO REVIEW THE TERMS OF SERVICE AND PRIVACY POLICIES OF THE PROVIDERS. IF YOU DO NOT AGREE WITH THE TERMS OR POLICIES OF ANY PROVIDER OR DO NOT CONSENT TO THE USE OF GEOLOCATION DATA WHERE APPLICABLE, DO NOT USE THAT THIRD PARTY APP.
For iPhone users
This function is compatible with iPhones installed with iOS 6.0 or later.
For Android device users
This function is compatible with devices that have Android OS 2.3 or later installed.
NOTE
PIONEER IS NOT LIABLE FOR ANY THIRD PARTY APPS OR CONTENT, INCLUDING WITHOUT LIMITATION THEIR ACCURACY OR COMPLETENESS. THE CONTENT AND FUNCTIONALITY OF SUCH APPS ARE THE SOLE RESPONSIBILITY OF THE APP PROVIDER.
Playback of an application via the unit
1Connect this unit with the mobile device.
•iPhone via USB (page 13)
•iPhone/Android device via Bluetooth (page 15)
2 Press the M.C. dial to display the main menu.
3 Turn the M.C. dial to select [SYSTEM], then press to confirm.
4Turn the M.C. dial to select [PHONE CONNECT], then press to confirm.
-20 -
English
5Turn the M.C. dial to select one of the below, then press to confirm.
•Select [IPHONE] for iPhone.
•Select [ANDROID] for Android device.
6Turn the M.C. dial to select one of the below.
•Select [WIRED] for the USB connection.
•Select [BLUETOOTH] for the Bluetooth connection.
NOTE
When the connection setting is changed, a message that lets you know that the connection setting had been changed will appear in the display. Press the M.C. dial and turn the M.C. dial to select [SRC OFF :YES], then press to confirm. The unit turns off automatically and the setting is executed.
7 Press SRC/OFF to select [APP].
8 Operate the mobile device to start up the application.
NOTE
When you connect a mobile device other than iPhone/Android device, select [OTHERS] in the [PHONE CONNECT] menu and select [WIRED] (for the USB connection) or [BLUETOOTH] (for the Bluetooth connection). Depending on your mobile device, it may not operate correctly.
Basic operations
You can make various adjustments in the FUNCTION settings (page 28).
Purpose |
Operation |
|
|
|
Select a track |
Press |
or |
. |
|
|
|
|
|
|
Fast forward or reverse |
Press and hold |
or |
. |
|
|
|
|
|
|
Pause/resume playback |
Press BAND/ |
. |
|
|
|
|
|
|
|
 Pandora®
Pandora internet radio is a music service not affiliated with Pioneer. More information is available at http://www.pandora.com.
The Pandora mobile application is available for iPhone and Android phones. Please visit www.pandora.com/everywhere/mobile for the latest compatibility information.
Listening to Pandora
Update the firmware of the Pandora application to the latest version before use.
1 Connect this unit with the mobile device.
English
- 21 -

|
• iPhone via USB (page 13) |
|
||
|
• iPhone/Android device via Bluetooth (page 15) |
|
||
|
If you choose a USB connection, proceed to step 6. |
|
||
2 |
Press SRC/OFF to select [PANDORA]. |
|
||
3 |
Press and hold 1/ |
to display [PHONE CONNECT]. |
English |
|
4 |
Turn the M.C. dial to select one of the below, then press to confirm. |
|||
|
||||
• Select [IPHONE] for iPhone.
• Select [ANDROID] for Android device.
5Turn the M.C. dial to select [BLUETOOTH] for iPhone/Android device via Bluetooth.
NOTE
When the connection setting is changed, a message that lets you know that the connection setting had been changed will appear in the display. Press the M.C. dial and turn the M.C. dial to select [SRC OFF :YES], then press to confirm. The unit turns off automatically and the setting is executed.
6 Press SRC/OFF to select [PANDORA].
7 Launch the Pandora application on the mobile device and start playback.
NOTE
When you connect a mobile device other than iPhone/Android device, select [OTHERS] in the [PHONE CONNECT] menu and select [WIRED] (for the USB connection) or [BLUETOOTH] (for the Bluetooth connection). Depending on your mobile device, it may not operate correctly.
Basic operations
You can make various adjustments in the FUNCTION settings (page 28).
Purpose |
Operation |
|
Skip a track |
Press |
. |
|
|
|
Switch between Shuffle and the |
Press |
(list), then turn the M.C. dial to select the |
station |
Shuffle or the desired station. |
|
|
|
|
Change the sort order |
Press |
(list), then select one of the following. |
|
[ABC]: Sort the items in the list alphabetically. |
|
|
[DATE]: Sort the items in the list in order of the |
|
|
dates on which the items were created. |
|
|
|
|
Play |
When Shuffle or the station is selected, press the |
|
|
M.C. dial. |
|
|
|
|
- 22 -
Purpose |
Operation |
|
|
|
Delete a station |
1 |
When the station is selected, press and hold the |
||
|
|
M.C. dial. |
|
|
|
|
[DELETE YES] appears. |
|
|
|
2 |
Press the M.C. dial. |
|
|
|
To cancel, press BAND/ |
in step 1. |
||
|
|
|
|
|
Pause/resume playback |
Press 4/PAUSE. |
|
|
|
|
|
|
|
|
Thumbs Up |
Press 1/ . |
|
|
|
|
|
|
|
|
Thumbs Down |
Press 2/ . |
|
|
|
|
|
|
|
|
Create a new station based on the |
Press and hold 5/ |
. |
|
|
track currently being played |
|
|
|
|
|
|
|
||
Create a new station based on the |
Press and hold 6/ . |
|
||
artist currently being played |
|
|
|
|
|
|
|
|
|
Store the track information currently |
1 |
Press and hold 3/MIX. |
|
|
being played in your Pandora |
|
[BOOKMARK] appears. |
|
|
account. |
2 |
Press the M.C. dial. |
|
|
|
|
|
|
|
NOTE
Some functions of Pandora may not be operated from the unit.
 Spotify®
Spotify is a music streaming distribution service not affiliated with Pioneer. More information is available at http://www.spotify.com.
The Spotify application is available for compatible smartphones, please visit https:// support.spotify.com/ for the latest compatibility information.
To enjoy Spotify as you drive, first download the Spotify app to your iPhone or Android device. You can download it on the iTunes App Store or Google Play™. Choose a free account or a paid Premium account, either in the app or at spotify.com. A Premium account gives you more features, like offline listening.
 Important
•This product incorporates Spotify software which is subject to 3rd party licenses found here: www.spotify.com/connect/third-party-licenses.
•For information on the countries and regions where Spotify can be used, take a look at https:// www.spotify.com/us/select-your-country/.
Listening to Spotify
Update the firmware of the Spotify application to the latest version before use.
English
- 23 -

1Connect this unit with the mobile device.
•iPhone via USB (page 13)
•iPhone/Android device via Bluetooth (page 15)
If you choose a USB connection, proceed to step 6.
2 Press SRC/OFF to select [SPOTIFY].
3 Press and hold 1/  to display [PHONE CONNECT].
4Turn the M.C. dial to select one of the below, then press to confirm.
•Select [IPHONE] for iPhone.
•Select [ANDROID] for Android device.
5Turn the M.C. dial to select [BLUETOOTH] for iPhone/Android device via Bluetooth.
NOTE
When the connection setting is changed, a message that lets you know that the connection setting had been changed will appear in the display. Press the M.C. dial and turn the M.C. dial to select [SRC OFF :YES], then press to confirm. The unit turns off automatically and the setting is executed.
6 Press SRC/OFF to select [SPOTIFY].
7 Launch the Spotify application on the mobile device and start playback.
NOTE
When you connect a mobile device other than iPhone/Android device, select [OTHERS] in the [PHONE CONNECT] menu and select [WIRED] (for the USB connection) or [BLUETOOTH] (for the Bluetooth connection). Depending on your mobile device, it may not operate correctly.
Basic operations
You can make various adjustments in the FUNCTION settings (page 28).
NOTE
The available operations may vary according to the type of contents (track/album/artist/playlist/radio) you want to play.
Purpose |
Operation |
|
|
|
Skip a track |
Press |
or |
. |
|
|
|
|
|
|
Search for a track from a list |
1 |
Press |
(list) to display the list. |
|
|
2 |
Turn the M.C. dial to select the desired |
||
|
|
category, then press to confirm. |
||
|
3 |
Turn the M.C. dial to select the desired |
||
|
|
file, then press to confirm. |
||
|
|
Playback starts. |
|
|
|
|
|
||
Pause/resume playback |
Press 4/PAUSE. |
|
||
|
|
|
|
|
English
- 24 -

Purpose |
Operation |
|
|
Thumbs Up (Only for radio) |
Press 1/ . |
|
|
|
|
|
|
Thumbs Down (Only for radio) |
Press 2/ . |
|
|
|
|
|
|
Random play (Only for track/album/artist/ |
Press 5/ |
. |
|
playlist) |
|
|
|
|
|
|
|
Repeat play (Only for track/album/artist/ |
Press 6/ |
. |
|
playlist) |
|
|
|
|
|
|
|
Start a radio channel based on the song |
1 Press and hold 5/ |
to start a radio. |
|
currently being played. |
2 Press the M.C. dial. |
|
|
|
• This function may not be available |
||
|
depending on the selected song. |
||
|
|
|
|
NOTE
Some functions of Spotify may not be operated from the unit.
 Using Pioneer ARC APP
You can operate the unit from Pioneer ARC APP installed on an iPhone/Android device. In some cases, you can control aspects of the application, such as source selection, pause, etc., by using the unit.
For details on what operations are available on the application, see the application’s help section.
 WARNING
Do not attempt to operate the application while driving. Make sure to pull off the road and park your vehicle in a safe location before attempting to use the controls on the application.
For iPhone users
This function is compatible with iPhones (iPhone 5 or later) installed with iOS 8.0 or later. You can download Pioneer ARC APP on iTunes App Store.
For Android device users
This function is compatible with devices that have Android OS 4.1 or later installed and also support AOA (Android Open Accessory) 2.0.
You can download Pioneer ARC APP on Google Play.
NOTE
Some Android devices connected via AOA 2.0 may not work properly or emit sounds due to their own software design, regardless of the OS version.
English
- 25 -

Making a connection with Pioneer ARC APP
1Connect this unit with the mobile device.
•iPhone/Android device via USB (page 13)
•iPhone/Android device via Bluetooth (page 15)
2 Press the M.C. dial to display the main menu.
3 Turn the M.C. dial to select [SYSTEM], then press to confirm.
4 Turn the M.C. dial to select [PHONE CONNECT], then press to confirm.
5 Turn the M.C. dial to select one of the below, then press to confirm.
• Select [IPHONE] for iPhone.
• Select [ANDROID] for Android device.
NOTE
When the connection setting is changed, a message that lets you know that the connection setting had been changed will appear in the display. Press the M.C. dial and turn the M.C. dial to select [SRC OFF :YES], then press to confirm. The unit turns off automatically and the setting is executed.
6Turn the M.C. dial to select one of the below.
When [IPHONE] is selected in step 5
•Select [WIRED] for the USB connection.
•Select [BLUETOOTH] for the Bluetooth connection.
When [ANDROID] is selected in step 5
•Select [APP CONTROL] for the USB connection.
•Select [BLUETOOTH] for the Bluetooth connection.
When you select the USB connection, Pioneer ARC APP on the Android device starts automatically if [ON] is selected in [P.APP AUTO ON] (page 33).
NOTE
If Pioneer ARC APP has not been installed on your Android device yet, a message that prompts you to install the application will appear on your Android device. Select [OFF] in [P.APP AUTO ON] to clear the message (page 33).
7 Press SRC/OFF to select any source.
8Launch Pioneer ARC APP on the mobile device via USB connection. Press and hold M.C. dial via Bluetooth connection.
NOTE
When you connect a mobile device other than iPhone/Android device, select [OTHERS] in the [PHONE CONNECT] menu and select [WIRED] (for the USB connection) or [BLUETOOTH] (for the Bluetooth connection). Depending on your mobile device, it may not operate correctly.
English
- 26 -
Listening to music on Android
1 Press SRC/OFF to select [ANDROID].
Basic operations
Purpose |
Operation |
|
|
|
Select a track |
Press |
or |
. |
|
|
|
|
|
|
Fast forward or reverse |
Press and hold |
or |
. |
|
|
|
|
|
|
Pause/resume playback |
Press 4/PAUSE. |
|
|
|
|
|
|
|
|
 Audio Adjustments
You can also make various adjustments in the AUDIO settings (page 30).
Adjusting the cut-off frequency value and the slope value
You can adjust the cut-off frequency value and the slope value of each speaker. The following speakers can be adjusted.
[FRONT], [REAR], [SUBWOOFER]
NOTE
[SUBWOOFER] can only be selected when [ON] is selected in [SUBWOOFER] (page 30).
1 Press the M.C. dial to display the main menu.
2 Turn the M.C. dial to select [AUDIO], then press to confirm.
3 Turn the M.C. dial to select [CROSSOVER], then press to confirm.
4Turn the M.C. dial to select the speaker unit (filter) to be adjusted, then press to confirm.
5Turn the M.C. dial to select [HPF] or [LPF] according to the speaker unit (filter), then press to confirm.
6Turn the M.C. dial to select an appropriate cut-off frequency for the speaker unit (filter) selected in step 4, then press to confirm.
[25HZ] to [250HZ]
-27 -
English

7Turn the M.C. dial to select an appropriate slope for the speaker unit (filter) selected in step 4.
[–6] to [–24] (if you choose [FRONT] or [REAR]) [–6] to [–36] (if you choose [SUBWOOFER])
 Settings
You can adjust various settings in the main menu.
1 Press the M.C. dial to display the main menu.
2Turn the M.C. dial to select one of the categories below, then press to confirm.
•FUNCTION settings (page 28)
•AUDIO settings (page 30)
•SYSTEM settings (page 32)
•ILLUMINATION settings (page 35)
•MIXTRAX settings (page 36)
3 Turn the M.C. dial to select the options, then press to confirm.
FUNCTION settings
The menu items vary according to the source.
Menu Item |
Description |
|
|
||||||
BSM |
|
|
|
|
|
|
Store the six strongest stations on the number |
||
|
|||||||||
|
|||||||||
|
|
|
|
|
|
|
|||
|
|
|
|
|
|
|
buttons (1/ |
to 6/ |
) automatically. |
|
|
|
|
|
|
|
|
|
|
LOCAL |
|
|
|
|
|
||||
|
|
|
|
||||||
|
|
|
|
||||||
FM: [OFF], [LV1], [LV2], [LV3], [LV4] |
Restrict the tuning station according to the |
||||||||
AM: [OFF], [LV1], [LV2] |
signal strength. |
|
|||||||
|
|
|
|
|
|
|
|
|
|
SEEK |
|
|
|
|
|
||||
|
|
|
|
||||||
|
|
|
|
||||||
[MAN], [PCH] |
Assign |
or |
buttons to seek the stations |
||||||
|
|
|
|
|
|
|
one by one (manual tuning) or select a station |
||
|
|
|
|
|
|
|
from the preset channels. |
||
SAVE 
Store the information about the song currently being played to your music list on Spotify.
English
- 28 -
Menu Item |
Description |
UNSAVE |
|
|
|
|
Remove the song information stored in [SAVE].
SEL DEVICE 


|
Connect a Bluetooth device in the list. |
|||
|
|
|
|
|
S.RTRV |
|
|
|
|
|
|
|
|
|
|
|
|
|
|
[1] (effective for low compression |
Enhance compressed audio and restore rich |
|||
rates), |
sound. |
|||
[2] (effective for high |
|
|
|
|
compression rates), |
|
|
|
|
[OFF] |
|
|
|
|
|
|
|
|
|
BOOKMARK |
|
|
|
|
|
Store the track information currently being |
|||
|
played in your Pandora account. |
|||
|
|
|
|
|
NEW STATION |
|
|
|
|
[FROM TRACK], [FROM ARTIST] |
Create a new station based on the track or artist |
|||
|
currently being played. |
|||
PAUSE 
Pause or resume playback.
PLAY 
Start playback.
STOP 
Stop playback.
English
- 29 -

AUDIO settings
Menu Item |
Description |
EQ SETTING |
|
[SUPER BASS], [POWERFUL], |
Select or customize the equalizer curve. |
[NATURAL], [VOCAL], [CUSTOM1], |
• When you select a setting other than |
[CUSTOM2], [FLAT] |
[CUSTOM1] and [CUSTOM2], you can also |
|
customize the equalizer curve by pressing and |
Select an equalizer band and |
holding the M.C. dial, then store the |
level for further customizing. |
customized equalizer curve in [CUSTOM1]. |
Equalizer band: [50HZ] to |
|
[12.5kHZ] |
|
Equalizer level: [–6] to [+6] |
|
|
|
FADER*1*2 |
|
|
Adjust the front and rear speaker balance. |
|
|
BALANCE |
|
|
Adjust the left and right speaker balance. |
|
|
SUBWOOFER |
|
[ON], [OFF] |
Set to [ON] when using a subwoofer speaker. |
|
|
SUBWOOFER*3*4 |
|
[NOR], [REV] |
Select the subwoofer phase. |
|
|
SPEAKER LEVEL |
|
Types of speaker: [FRONT L], |
Select a speaker unit (filter) and adjust the |
[FRONT R], [REAR L], [REAR R], |
output level. |
[SUBWOOFER] |
• Each value you have adjusted changes when |
Output level: [–24] to [10] |
you change the [POSITION] setting (page 30). |
|
|
CROSSOVER |
|
|
Select a speaker unit (filter) to adjust the HPF or |
|
LPF cut-off frequency and the slope for each |
|
speaker unit. |
|
For details on the [CROSSOVER] setting, see |
|
page 27. |
|
|
POSITION |
|
[OFF], [FRONT LEFT] (front seat |
Select a listening position to adjust the speakers' |
left), [FRONT RIGHT] (front seat |
output levels automatically and add a delay time |
right), [FRONT] (front seats), [ALL] |
that corresponds to the number and locations of |
|
occupied seats. |
|
|
English
- 30 -
 Loading...