


CD RECEIVER
RADIO CD
CD PLAYER
DEH-2150UBG DEH-2150UB
English
Español
(B) Português
Owner’s Manual Manual de instrucciones Manual do proprietário


 Contents
Thank you for purchasing this PIONEER product.
Please read through this manual before using the product for the first time, to ensure proper use. After reading, please keep the manual in a safe and accessible place for future reference.
Before You Start |
|
|
|
|
|
|||
About this unit 4 |
|
|
|
|
|
|||
Portable audio player compatibility |
4 |
|||||||
Visit our website |
4 |
|
|
|
|
|
||
Protecting your unit from theft |
4 |
|
||||||
– |
Removing the front panel |
4 |
|
|||||
– |
Attaching the front panel |
4 |
|
|||||
Use and care of the remote control |
5 |
|||||||
– |
Installing the battery |
5 |
|
|
||||
– |
Using the remote control |
5 |
|
|||||
Operating this unit |
|
|
|
|
|
|||
What’s what 6 |
|
|
|
|
|
|
||
– |
Head unit |
6 |
|
|
|
|
|
|
– |
Remote control |
7 |
|
|
|
|
||
– |
Display indication |
7 |
|
|
|
|||
Basic Operations |
8 |
|
|
|
|
|
||
– |
Power ON/OFF |
8 |
|
|
|
|
||
– |
Selecting a source |
8 |
|
|
|
|||
– |
Adjusting the volume |
8 |
|
|
||||
Tuner |
8 |
|
|
|
|
|
|
|
– |
Basic Operations |
8 |
|
|
|
|||
– |
Storing and recalling broadcast |
|||||||
|
frequencies |
9 |
|
|
|
|
|
|
– |
Introduction to advanced |
|
|
|||||
|
operations |
9 |
|
|
|
|
|
|
– |
Storing the strongest broadcast |
|||||||
|
frequencies |
9 |
|
|
|
|
|
|
– |
Tuning in strong signals |
9 |
|
|||||
Built-in CD Player |
10 |
|
|
|
|
|
||
– |
Basic Operations |
10 |
|
|
|
|||
– |
Displaying text information on disc 10 |
|||||||
– |
Selecting tracks from the track title |
|||||||
|
list |
11 |
|
|
|
|
|
|
– |
Selecting files from the file name |
|||||||
|
list |
11 |
|
|
|
|
|
|
– |
Introduction to advanced |
|
|
|||||
|
operations |
11 |
|
|
|
|
|
|
– |
Selecting a repeat play range |
12 |
||||||
– |
Playing tracks in random order 12 |
– |
Scanning folders and tracks 12 |
– |
Pausing playback 12 |
– |
Using Sound Retriever 12 |
Playing songs on USB portable audio player/
USB memory |
12 |
|
|
|
|
|
|
||
– |
Basic Operations |
12 |
|
|
|
||||
– |
Displaying text information of an audio |
||||||||
|
file |
13 |
|
|
|
|
|
|
|
– |
Selecting files from the file name |
|
|||||||
|
list |
13 |
|
|
|
|
|
|
|
– |
Introduction to advanced |
|
|
||||||
|
operations |
13 |
|
|
|
|
|
|
|
Audio Adjustments |
14 |
|
|
|
|
||||
– |
Introduction of audio adjustments |
14 |
|||||||
– |
Using balance adjustment |
14 |
|
||||||
– |
Using the equalizer |
14 |
|
|
|
||||
– |
Adjusting equalizer curves |
14 |
|
||||||
– |
Adjusting loudness |
15 |
|
|
|
||||
– |
Adjusting source levels |
15 |
|
|
|||||
Initial Settings |
15 |
|
|
|
|
|
|
||
– |
Adjusting initial settings |
15 |
|
||||||
– |
Setting the clock |
15 |
|
|
|
|
|||
– |
Setting the FM tuning step |
16 |
|
||||||
– |
Setting the AM tuning step |
16 |
|
||||||
– |
Switching the auxiliary setting 16 |
|
|||||||
Other Functions |
16 |
|
|
|
|
|
|
||
– |
Using the AUX source |
16 |
|
|
|||||
– |
Turning the clock display on or off |
17 |
|||||||
Connections |
|
|
|
|
|
|
|
||
Connection diagram |
19 |
|
|
|
|
||||
Installation |
|
|
|
|
|
|
|
||
DIN front/rear mount |
|
20 |
|
|
|
|
|||
– |
DIN Front-mount |
20 |
|
|
|
|
|||
– |
DIN Rear-mount |
21 |
|
|
|
|
|||
Additional Information |
|
|
|
|
|||||
Error messages |
22 |
|
|
|
|
|
|
||
2 |
En |

 Contents
English
Handling guideline of discs and player |
23 |
||||
Dual Discs |
23 |
|
|
|
|
Compressed audio compatibility |
24 |
|
|||
Handling guideline and supplemental |
|
||||
information |
24 |
|
|
||
– |
Compressed audio files on the |
|
|||
|
disc |
24 |
|
|
|
– |
USB audio player/USB memory |
24 |
|||
Example of a hierarchy 25 |
|
|
|||
– |
The sequence of audio files on the |
||||
|
disc |
25 |
|
|
|
– |
The sequence of audio files on USB |
||||
|
memory |
25 |
|
|
|
Copyright and trademark notice |
26 |
|
|||
Specifications |
27 |
|
|
||
En |
3 |

Section
01  Before You Start
About this unit |
http://pioneer.jp/group/index-e.html |
|
|
! We offer the latest information about |
|
CAUTION |
Pioneer Corporation on our website. |
|
|
||
|
!Do not allow this unit to come into contact with liquids. Electrical shock could result.
Also, damage to this unit, smoke, and over- |
Protecting your unit from |
||||||
heating could result from contact with liquids. |
theft |
||||||
! “CLASS 1 LASER PRODUCT” |
|||||||
The front panel can be detached to deter theft. |
|||||||
This product contains a laser diode of higher |
|||||||
class than 1. To ensure continued safety, do |
|
|
|||||
not remove any covers or attempt to gain ac- |
Important |
||||||
cess to the inside of the product. Refer all ser- |
! Handle gently when removing or attaching |
||||||
vicing to qualified personnel. |
|||||||
the front panel. |
|||||||
! Keep this manual handy as a reference for op- |
|||||||
! Avoid subjecting the front panel to excessive |
|||||||
erating procedures and precautions. |
|||||||
shock. |
|||||||
! Always keep the volume low enough so that |
|||||||
! Keep the front panel out of direct sunlight and |
|||||||
you can hear sounds from outside the vehicle. |
|||||||
high temperatures. |
|||||||
! Protect this unit from moisture. |
|||||||
! Before detaching, be sure to remove the AUX/ |
|||||||
! If the battery is disconnected or discharged, |
|||||||
USB cable and USB device from the front |
|||||||
the preset memory will be erased and must be |
|||||||
panel. Otherwise, this unit, connected device |
|||||||
reprogrammed. |
|||||||
or vehicle interior may be damaged. |
|||||||
! Should this unit fail to operate properly, please |
|||||||
|
|
||||||
contact your dealer or nearest authorized |
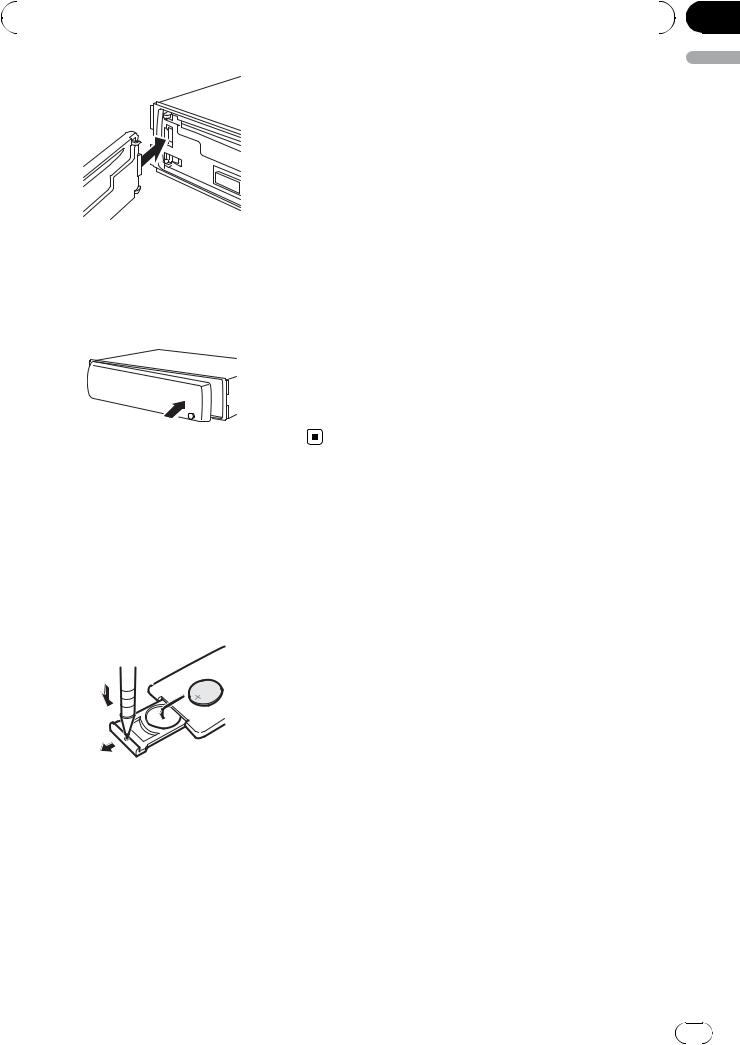
Removing the front panel |
||||||
PIONEER Service Station. |
|
|
|
|
|||
|
|||||||
|
|||||||
|
|
|
|
|
1 Press (detach) to release the front |
||
Portable audio player |
panel. |
||||||
2 Grab the front panel and remove. |
|||||||
compatibility |
|||||||
|
|
||||||
Inquire at the manufacturer about your USB |
|
|
|||||
portable audio player/USB memory. |
|
|
|||||
|
|
||||||
This unit corresponds to the following. |
|
|
|||||
— USB MSC (Mass Storage Class) compliant |
|
|
|||||
|
|
||||||
portable audio player and memory |
3 Put the front panel into the provided |
||||||
— WMA, MP3 and WAV file playback |
|||||||
protective case for safe keeping. |
|||||||
|
|
|
|
|
|||
CAUTION |
Attaching the front panel |
||||||
Pioneer accepts no responsibility for data lost on |
|||||||
the USB portable audio player/USB memory even |
1 Slide the front panel to the left until it |
||||||
if that data is lost while using this unit. |
|
|
clicks. |
||||
|
|||||||
|
|||||||
|
|
|
|
|
Front panel and the head unit are jointed on |
||
Visit our website |
the left side. Make sure that the front panel |
||||||
has been jointed to the head unit. |
|||||||
Visit us at the following site: |
|
|
|||||
4 |
En |
|
Section |
Before You Start |
01 |
|
|
2 Press the right side of the front panel until it is firmly seated.
# If you can’t attach the front panel to the head unit successfully, try again. Front panel may be damaged if you attach the front panel forcedly.
Use and care of the remote control
Installing the battery
Slide the tray on the back of the remote control out and insert the battery with the plus (+) and minus (–) poles aligned properly.
 WARNING
!There is a danger of explosion if the battery is incorrectly replaced. Replace only with the same or equivalent type.
!Do not handle the battery with metallic tools.
!Do not store the battery with metallic objects.
!If the battery leaks, wipe the remote control completely clean and install a new battery.
!When disposing of used batteries, comply with governmental regulations or environmental public institutions’ rules that apply in your country/area.
Using the remote control
Point the remote control in the direction of the front panel to operate.
!The remote control may not function properly in direct sunlight.
 Important
!Do not store the remote control in high temperatures or direct sunlight.
!Do not let the remote control fall onto the
floor, where it may become jammed under the brake or accelerator pedal.
English
Keep the battery out of the reach of children. Should the battery be swallowed, consult a doctor immediately.
 CAUTION
!Use one CR2025 (3 V) lithium battery.
!Remove the battery if the remote control is not used for a month or longer.
En |
5 |
Section
02  Operating this unit
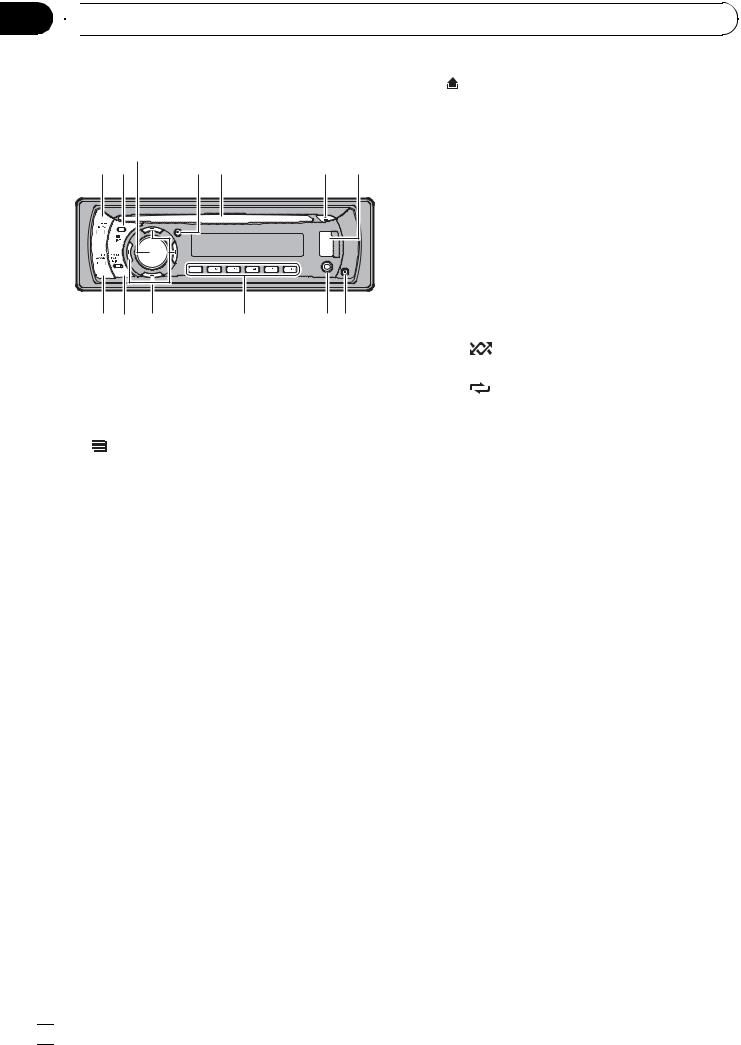
What’s what |
|
8 |
(detach) button |
|||
Head unit |
|
|
Press to remove the front panel from the |
|||
|
|
head unit. |
||||
|
3 |
|
|
9 AUX input jack (3.5 mm stereo jack) |
||
|
1 2 |
4 5 |
6 7 |
|||
|
Use to connect an auxiliary device. |
|||||
|
|
|
|
|||
|
|
|
|
a 1 to 6 buttons |
||
|
|
|
|
Press for preset tuning. Also used for con- |
||
|
|
|
|
trolling functions. |
||
|
|
|
|
! 1/S.Rtrv can be used to control S.RTRV |
||
|
|
|
|
|
(sound retriever). |
|
|
d c b |
a |
98 |
! 2/PAUSE can be used to control PAUSE |
||
|
|
(pause). |
||||
|
|
|
|
|
||
1 SRC/OFF button |
|
! |
5/ |
can be used to control RANDOM |
||
|
This unit is turned on by selecting a source. |
! |
(random). |
|||
|
Press to cycle through all the available |
6/ can be used to control REPEAT (re- |
||||
|
sources. |
|
|
|
peat). |
|
2 |
/LIST button |
|
b a/b/c/d buttons |
|||
|
Press to display the disc title list, track title |
Press to perform manual seek tuning, fast |
||||
|
list, folder list or file list. |
|
forward, reverse and track search controls. |
|||
|
|
|
|
Also used for controlling functions. |
||
3 MULTI-CONTROL |
|
! |
When operating menus |
|||
|
Turn to increase or decrease the volume. |
|
— Pressing a is the same function as |
|||
|
Also used for controlling functions. |
|
|
turning MULTI-CONTROL right. |
||
4 CLOCK button |
|
|
— Pressing b is the same function as |
|||
|
|
|
turning MULTI-CONTROL left. |
|||
|
Press to change to the clock display. |
|
|
|||
|
|
— Pressing c is the same function as |
||||
|
|
|
|
|
||
5 Disc loading slot |
|
|
|
pressing DISP/BACK/SCRL. |
||
|
|
— Pressing and holding c is the same |
||||
|
Insert a disc to play. |
|
|
|||
|
|
|
|
function as pressing and holding |
||
|
|
|
|
|
|
|
6 h (eject) button |
|
|
|
DISP/BACK/SCRL. |
||
|
Press to eject a disc. |
|
|
— Pressing d is the same function as |
||
7 USB port |
|
|
|
|
pressing MULTI-CONTROL. |
|
|
|
|
— Pressing and holding d is the same |
|||
|
Use to connect a USB audio player/USB |
|
|
function as pressing and holding |
||
|
memory. |
|
|
|
|
MULTI-CONTROL. |
|
! When connecting, open up the USB con- |
! |
When operating lists |
|||
|
nector lid. |
|
|
|
— Pressing a is the same function as |
|
|
! Use a USB cable to connect the USB |
|
|
turning MULTI-CONTROL left. |
||
|
audio player/USB memory to the USB |
|
— Pressing b is the same function as |
|||
|
port. Since the USB audio player/USB |
|
|
turning MULTI-CONTROL right. |
||
|
memory is projected forward from the |
|
— Pressing c is the same function as |
|||
|
unit, it is dangerous to connect directly. |
|
|
pressing DISP/BACK/SCRL. |
||
|
Pioneer CD-U50E USB cable is also avail- |
|
|
|
||
able. For details, consult your dealer.
 6
6 En
En

Operating this unit
—Pressing and holding c is the same function as pressing and holding
DISP/BACK/SCRL.
—Pressing d is the same function as pressing MULTI-CONTROL.
—Pressing and holding d is the same function as pressing and holding
MULTI-CONTROL.
c DISP/BACK/SCRL button
Press to select different displays.
Press and hold to scroll through the text information.
Press to return to the previous display when operating the menu.
Press and hold to return to the main menu when operating the menu.
d BAND/ESC button
Press to select among three FM bands and one AM band.
Press to return to the ordinary display when operating the menu.
g AUDIO button
Press to select an audio function.
h e button
Press to turn pause on or off.
i FUNCTION button
Press to select functions.
Press and hold to recall the initial setting menu when the sources are off.
j LIST/ENTER button
Press to display the disc title list, track title list, folder list or file list depending on the source.
While in the operating menu, press to control functions.
Display indication
12 3
Section
02
English
Remote control
Operation is the same as when using the buttons on the head unit.
e |
d


 f j
f j 

 b
b
i


 g 1
g 1


 c h
c h
e VOLUME buttons
Press to increase or decrease the volume.
f MUTE button
Press to turn off the sound. To turn on the sound, press again.
57 |
9 |
abc |
d |
4 6 8 |
|
|
|
1  (disc) indicator
Appears when the disc (album) name is displayed on the main display section.
2  (artist) indicator
Appears when the disc (track) artist name is displayed on the main display section.
3 Main display section
Displays band, frequency, elapsed playback time and other settings.
!Tuner
Band and frequency are displayed.
!Built-in CD player and USB
Elapsed playback time and literal information are displayed.
4  (song) indicator
Appears when the track (song) name is displayed on the main display section.
En  7
7

Section
02  Operating this unit
Also, appears when a playable audio file is selected while operating the list.
5 c indicator
Appears when an upper tier of folder or menu exists.
6  (folder) indicator
Appears when operating list function.
7 d indicator
Appears when a lower tier of folder or menu exists.
8 LOC indicator
Appears when local seek tuning is on.
9  LOUD (loudness) indicator
Appears when loudness is on.
a 5 (stereo) indicator
Appears when the selected frequency is being broadcast in stereo.
b  (repeat) indicator
Shows when track repeat is turned on. Also, shows when folder repeat is on.
c 
 (random) indicator
Shows when random play is on.
d  (Sound Retriever) indicator
Appears when Sound Retriever function is on.
Selecting a source
You can select a source you want to listen to.
% Press SRC/OFF repeatedly to switch between the following sources.
TUNER (tuner)—CD (built-in CD player)—USB (USB)—AUX (AUX)
 Notes
Notes
!In the following cases, the sound source will not change.
—When there is no disc in the unit.
—When AUX (auxiliary input) is set to off (refer to page 16).
!When the USB portable audio player/USB memory is not connected to the USB port of this unit, NO DEVICE is displayed.
!AUX is set to on by default. Turn off the AUX when not in use (refer to Switching the auxiliary setting on page 16).
!Charging the portable audio player using car’s DC power source while connecting it to AUX input may generate noise. In this case, stop charging.
!When this unit’s blue/white lead is connected to the vehicle’s auto-antenna relay control terminal, the vehicle’s antenna extends when this unit’s source is turned on. To retract the antenna, turn the source off.
Adjusting the volume
Basic Operations
Power ON/OFF
% Turn MULTI-CONTROL to adjust the sound level.
Turning the unit on
% Press SRC/OFF to turn the unit on.
Turning the unit off
% Press SRC/OFF and hold until the unit turns off.
Tuner
Basic Operations
%Select a band
Press BAND/ESC.
# Press BAND/ESC until the desired band (F1, F2, F3 for FM or AM) is displayed.
%Manual tuning (step by step)
Press c or d.
8 |
En |

|
Section |
Operating this unit |
02 |
|
|
% Seek tuning
Press and hold c or d, and then release.
#You can cancel seek tuning by briefly pressing c or d.
#While pressing and holding c or d, you can skip stations. Seek tuning starts as soon as you release c or d.
Storing and recalling broadcast frequencies
You can easily store up to six broadcast frequencies for later recall.
!Six stations for each band can be stored in memory.
% When you find a frequency that you want to store in memory, press one of preset tuning buttons 1 to 6 and hold until the preset number stops flashing.
Memorized radio station frequency can be recalled by pressing the preset tuning button.
# You can also recall radio station frequencies assigned to preset tuning numbers by pressing a or b during the frequency display.
!To return to the ordinary display, press
BAND/ESC.
!If you do not operate functions within about 30 seconds, the display automatically returns to the ordinary display.
Storing the strongest broadcast frequencies
BSM (best stations memory) automatically stores the six strongest broadcast frequencies in the order of their signal strength.
1 Use MULTI-CONTROL to select BSM in the function menu.
2 Press MULTI-CONTROL to turn BSM on.
# To cancel, press MULTI-CONTROL again.
Tuning in strong signals
Local seek tuning lets you tune in only those radio stations with sufficiently strong signals for good reception.
1 Use MULTI-CONTROL to select LOCAL in the function menu.
English
Introduction to advanced operations
1 Press MULTI-CONTROL to display the main menu.
2 Use MULTI-CONTROL to select FUNCTION.
Turn to change the menu option. Press to select.
3 Turn MULTI-CONTROL to select the function.
BSM (best stations memory)—LOCAL (local seek tuning)
 Notes
Notes
!To return to the previous display, press
DISP/BACK/SCRL.
!To return to the main menu, press and hold
DISP/BACK/SCRL.
2 Press MULTI-CONTROL to display the setting mode.
3 Turn MULTI-CONTROL to select the desired setting.
FM: OFF—LEVEL 1—LEVEL 2—LEVEL 3— LEVEL 4
AM: OFF—LEVEL 1—LEVEL 2
The LEVEL 4 setting allows reception of only the strongest stations, while lower settings let you receive progressively weaker stations.
4 Press MULTI-CONTROL to determine the selection.
# Even if the menu has been cancelled before determination, operation is settled.
En |
9 |
 Loading...