


High power CD player with RDS tuner
Syntoniseur RDS et lecteur de CD, “Puissance élevée”
Operation Manual
DEH-1430R
DEH-1400R
DEH-1400RB
Mode d’emploi
English
Español
Italiano Français Deutsch
Nederlands

Contents
Pioneer product.
instructions so you will know how to oper- finished reading the instructions, put them
Before You Start
About this unit 2 About this manual 2 Precautions 2
In case of trouble 2 What’s what 3
Protecting your unit from theft 4
•Removing the front panel 4
•Attaching the front panel 4
Power ON/OFF
Turning the unit on 4
Selecting a source 4
Turning the unit off 4
Tuner
Listening to the radio 5 Storing and recalling broadcast
frequencies 6
Tuning in strong signals 6 Storing the strongest broadcast
frequencies 6
RDS
Introduction of RDS operation 7 Switching the RDS display 7 Receiving PTY alarm broadcasts 7 Selecting alternative frequencies 8
•Using PI Seek 8
•Using Auto PI Seek for preset stations 8
•Limiting stations to regional programming 8
Receiving traffic announcements 9
• Responding to the TP alarm 9 PTY list 10
Built-in CD Player
Playing a CD 11
Repeating play 12
Pausing CD playback 12
Audio Adjustments
Introduction of audio adjustments 12 Using balance adjustment 13
Using the equalizer 13
•Recalling equalizer curves 13
•Adjusting equalizer curves 14 Adjusting loudness 14
Front image enhancer (FIE) 14 Adjusting source levels 15
Initial Settings
Adjusting initial settings 15
Setting the FM tuning step 16
Switching Auto PI Seek 16
Additional Information
Cellular telephone muting 16 CD player and care 16 CD-R/CD-RW discs 17
Understanding built-in CD player error messages 17
Specifications 18
1 En
Before You Start
About this unit
This product complies with the EMC Directives (89/336/EEC, 92/31/EEC) and CE Marking Directive (93/68/EEC).
The tuner frequencies on this unit are allocated for use in Western Europe, Asia, the Middle East, Africa and Oceania. Use in other areas may result in improper reception. The RDS function operates only in areas with FM stations broadcasting RDS signals. 
About this manual
This unit features a number of sophisticated functions ensuring superior reception and operation. All the functions have been designed for the easiest possible use, but many are not selfexplanatory. This operation manual will help you benefit fully from this product’s potential and to maximize your listening enjoyment.
We recommend that you familiarize yourself with the functions and their operation by reading through the manual before you begin using this unit. It is especially important that you read and observe precautions on this page and in other sections. 
Precautions
• A CLASS 1 LASER PRODUCT label is affixed |
English |
|||
to the bottom of this unit. |
||||
|
|
|
||
|
CLASS 1 |
|
||
|
|
|
||
|
LASER PRODUCT |
|
|
|
• The Pioneer CarStereo-Pass is for use only in |
Español |
|||
Germany. |
||||
• Keep this manual handy as a reference for |
||||
operating procedures and precautions. |
||||
• Always keep the volume low enough so you |
||||
|
||||
can hear sounds outside of the car. |
|
|||
• Protect this product from moisture. |
|
|||
• If the battery is disconnected or discharged, |
|
|||
the preset memory will be erased and must be |
Deutsch |
|||
reprogrammed. |
||||
|
|
|
||
In case of trouble |
|
|||
Should this product fail to operate properly, |
Français |
|||
contact your dealer or nearest authorized |
||||
|
||||
Pioneer Service Station. |
|
|||
|
|
|
Italiano |
|
|
|
|
Nederlands |
|
|
|
En |
2 |
|

Before You Start
1
4
5
8 9
What’s what
1VOLUME button
Press to increase or decrease the volume.
2CD EJECT button
Press to eject a CD from your built-in CD player.
3AUDIO button
Press to select various sound quality controls.
4TA button
Press to switch traffic announcements function on or off.
5EQ button
Press to select various equalizer curves.
65/∞/2/3 buttons
Press to do manual seek tuning, fast forward, reverse and track search controls. Also used for controlling functions.
2 3
6
7
0 - =
7LOUDNESS button
Press to switch loudness function on or off.
8SOURCE button
This unit is switched on by selecting a source. Press to cycle through all of the available sources.
91–6 (PRESET TUNING) buttons
Press for preset tuning.
0 LOCAL/BSM button
-BAND button
Press to select among two FM or MW/LW bands.
=DETACH button
Press to remove the front panel from the head unit. 
3 En
Before You Start |
Power ON/OFF |
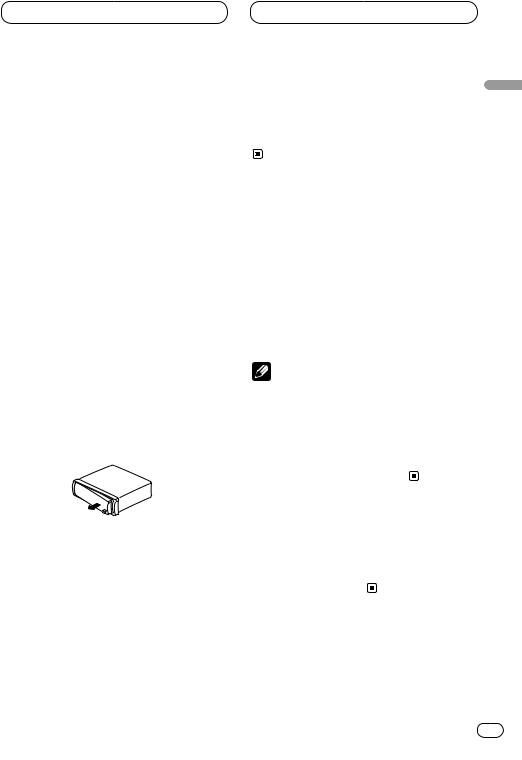
Protecting your unit from theft
The front panel can be detached from the head unit and stored in the protective case provided to discourage theft.
 Important
•Never use force or grip the display and the buttons tightly when removing or attaching.
•Avoid subjecting the front panel to excessive shocks.
•Keep the front panel out of direct sunlight and high temperatures.
Removing the front panel
1Press DETACH to release the front panel.
Press DETACH and the right side of the panel is released from the head unit.
2Grab the front panel and remove.
Grab the right side of the front panel and pull away to the left. The front panel will be detached from the head unit.
3 Put the front panel into the protective case provided for safe keeping.
Attaching the front panel
1Place the front panel flat against the head unit.
2Press the front panel into the face of the head unit until it is firmly seated. 
Turning the unit on
Press SOURCE to turn the unit on. |
English |
|
|
When you select a source the unit is turned on. |
|
Selecting a source |
Español |
|||
|
||||
You can select a source you want to listen to. To |
|
|||
switch to the built-in CD player, load a disc in |
|
|||
this unit (refer to page 11). |
|
|||
Press SOURCE to select a source. |
Deutsch |
|||
Press SOURCE repeatedly to switch between |
||||
|
||||
the following sources: |
|
|||
Built-in CD player—Tuner |
|
|||
|
|
Notes |
|
|
|
|
|
||
|
|
|
|
|
• When no disc is set in this product, built-in |
|
|||
|
CD player source will not change. |
Français |
||
|
nal, the car’s antenna extends when this |
|||
• When this unit’s blue/white lead is connected |
|
|||
|
to the car’s auto-antenna relay control termi- |
|
||
|
unit’s source is switched on. To retract the |
|
||
|
antenna, switch the source off. |
|
||
Turning the unit off |
Italiano |
|||
|
||||
Press SOURCE and hold for at least one sec- |
|
|||
ond to turn the unit off. |
|
|||
|
|
|
Nederlands |
|
En 4

Tuner
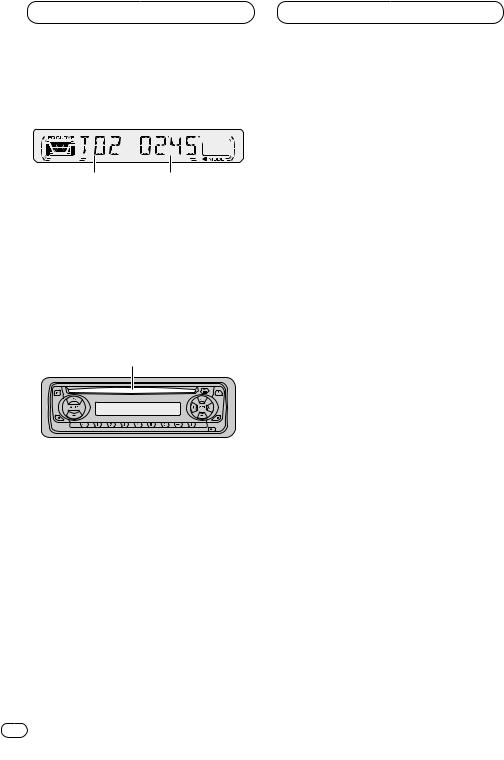
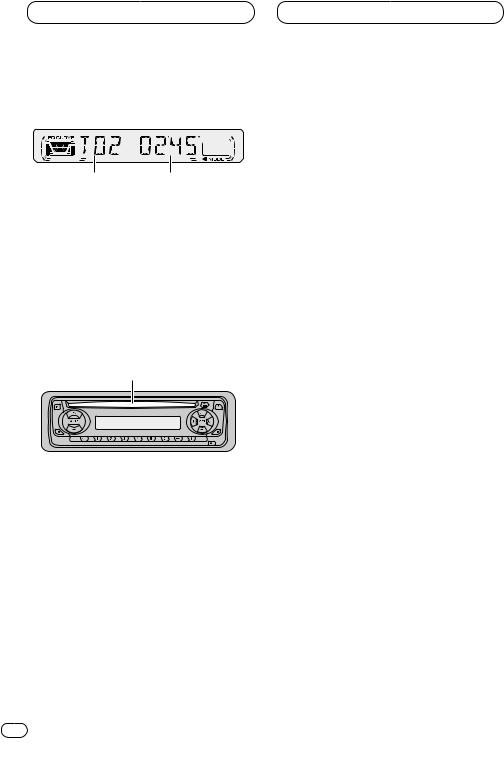
Listening to the radio
12 3 4
This unit’s AF (alternative frequencies search) function can be switched on and off. AF should be off for normal tuning operation (refer to page 8).
1BAND indicator
Shows which band the radio is tuned to, MW, LW or FM.
2FREQUENCY indicator
Shows to which frequency the tuner is tuned.
3STEREO ( ) indicator
Shows that the frequency selected is being broadcast in stereo.
4PRESET NUMBER indicator
Shows what preset has been selected.
1Press SOURCE to select the tuner.
2Use VOLUME to adjust the sound level.
When you press VOLUME up/+, the volume is raised and when pressed down/–, the volume is lowered.
3Press BAND to select a band.
Press BAND until the desired band is displayed,
F1, F2 for FM or MW/LW.
4To perform manual tuning, press 2 or 3 with quick presses.
The frequencies move up or down step by step.
5To perform seek tuning, press and hold 2 or 3 for about one second and release.
The tuner will scan the frequencies until a broadcast strong enough for good reception is found.
• You can cancel seek tuning by pressing either 2 or 3 with a quick press.
• If you press and hold 2 or 3 you can skip broadcasting stations. Seek tuning starts as soon as you release the buttons.
 Note
Note
•When the frequency selected is being broadcast in stereo the STEREO ( ) indicator will light. 
5 En

Tuner
Storing and recalling broadcast frequencies
If you press any of the PRESET TUNING buttons you can easily store up to six broadcast frequencies for later recall with the touch of a button.
When you find a frequency that you want to store in memory press a PRESET TUNING button and hold until the preset number stops flashing.
The number you have pressed will flash in the PRESET NUMBER indicator and then remain lit. The selected radio station frequency has been stored in memory.
The next time you press the same PRESET TUNING button the radio station frequency is recalled from memory.
 Notes
Notes
•Up to 12 FM stations, 6 for each of the two FM bands, and 6 MW/LW stations can be stored in memory.
•You can also use 5 and ∞ to recall radio station frequencies assigned to PRESET TUNING buttons. 
Tuning in strong signals
Local seek tuning lets you tune in only those radio stations with sufficiently strong signals for good reception.
1Press LOCAL/BSM to turn local seek tuning on.
Local seek sensitivity (LOC) appears in the display.
2When you want to return to normal seek tuning, press LOCAL/BSM to turn local seek tuning off. 
Storing the strongest broadcast frequencies
BSM (best stations memory) lets you automatically store the six strongest broadcast frequencies under PRESET TUNING buttons 1–6 and once stored there you can tune in to those frequencies with the touch of a button.
Press and hold LOCAL/BSM for about two seconds to turn BSM on.
BSM begins to flash. While BSM is flashing the six strongest broadcast frequencies will be stored under PRESET TUNING buttons in order of their signal strength. When finished, BSM stops flashing.
• To cancel the storage process, press
LOCAL/BSM.
 Note
Note
•Storing broadcast frequencies with BSM may replace broadcast frequencies you have saved using PRESET TUNING. 
En
English
Español
Italiano Français Deutsch
Nederlands
6

RDS
Introduction of RDS operation
1 2 3 4
RDS (radio data system) is a system for providing information along with FM broadcasts. This inaudible information provides such features as program service name, program type, traffic announcement standby and automatic tuning, intended to aid radio listeners in finding and tuning in to a desired station.
1AF indicator
Shows when AF (alternative frequencies search) function is on.
2TA indicator
Shows when TA (traffic announcement standby) function is on.
3TP indicator
Shows when a TP station is tuned in.
4Program service name
Shows the type of broadcast program.
 Notes
Notes
•RDS service may not be provided by all stations.
•RDS functions like AF and TA are only active when your radio is tuned to a RDS station. 
Switching the RDS display
When you tune in a RDS station its program service name is displayed. If you want to know the frequency you can.
Press and hold EQ for about two seconds repeatedly to switch between the following settings:
Program service name—PTY information— Frequency
PTY (program type ID code) information is listed on page 10.
• PTY information and the frequency of the current station appears on the display for eight seconds. 
Receiving PTY alarm broadcasts
PTY alarm is a special PTY code for announcements regarding emergencies such as natural disasters. When the tuner receives the radio alarm code, ALARM appears on the display and the volume adjusts to the TA volume. When the station stops broadcasting the emergency announcement, the system returns to the previous source.
• An emergency announcement can be cancelled by pressing TA. 
7 En

RDS
Selecting alternative frequencies
If you are listening to a broadcast and the reception becomes weak or there are other problems, the unit will automatically search for a different station in the same network which is broadcasting a stronger signal.
• AF is on as a default.
1Press and hold TA for about two seconds to turn AF on.
AF is displayed.
2Press and hold TA for about two seconds to turn AF off.
 Notes
Notes
•Only RDS stations are tuned in during seek tuning or BSM when AF is on.
•When you recall a preset station, the tuner may update the preset station with a new frequency from the station’s AF list. (This is only available when using presets on the F1 band.) No preset number appears on the display if the RDS data for the station received differs from that for the originally stored station.
•Sound may be temporarily interrupted by another program during a AF frequency search.
•When the tuner is tuned to a non-RDS station the AF indicator flashes.
•AF can be switched on or off independently for each FM band.
Using PI Seek
If the unit fails to find a suitable alternative frequency, or if you are listening to a broadcast and the reception becomes weak, the unit will automatically search for a different station with the same programming. During the search, PI SEEK is displayed and the output is muted. The muting is discontinued after completion of the PI seek, whether or not a different station is found.
Using Auto PI Seek for preset stations
When present stations cannot be recalled, as when travelling long distances, the unit can be set to perform PI Seek during preset recall.
•The default setting for Auto PI Seek is off. See
Switching Auto PI Seek on page 16.
Limiting stations to regional programming
When AF is used to automatically retune frequencies, the regional function limits the selection to stations broadcasting regional programs.
Press and hold BAND for about two seconds to turn the regional function on/off.
 Notes
Notes
•Regional programming and regional networks are organized differently depending on the country (i.e., they may change according to the hour, state or broadcast area).
•The preset number may disappear on the display if the tuner tunes in a regional station which differs from the originally set station.
•REG can be turned on or off independently for each FM band. 
En
English
Español
Italiano Français Deutsch
Nederlands
8

RDS
Receiving traffic announcements
TA (traffic announcement standby) lets you receive traffic announcements automatically, no matter what source you are listening to. TA can be activated for both a TP station (a station that broadcasts traffic information) or an enhanced other network’s TP station (a station carrying information which cross-references TP stations).
1Tune in a TP or enhanced other network’s TP station.
When you are tuned into a TP or enhanced other network’ s TP station the TP indicator will light.
2Press TA to turn traffic announcement standby on.
Press TA and the TA indicator appears in the display. The tuner will standby for traffic announcements.
• To turn traffic announcements standby off, press TA again.
3Use VOLUME to adjust the TA volume when a traffic announcement begins.
When you press VOLUME up/+, the volume is raised and when pressed down/–, the volume is lowered.
The newly set volume is stored in memory and recalled for subsequent traffic announcements.
4Press TA while a traffic announcement is being received to cancel the announcement.
The tuner returns to the original source but remains in the standby mode until TA is pressed again.
 Notes
Notes
•The system switches back to the original source following traffic announcement reception.
•Only TP and enhanced other network’s TP stations are tuned in during seek tuning or BSM when TA is on.
Responding to the TP alarm
When a TP or enhanced other network’s TP station is lost due to a weak signal the TP indicator is extinguished and a series of short beeps, about five seconds long, sound to remind you to select another TP or enhanced other network‘s TP station.
When listening to the tuner, tune in another TP or enhanced other network’s TP station.
• When listening to sources other than the tuner the unit will automatically seek out a TP station with the strongest signal after about 10or about 30-second delay. The delay is about 10 seconds if TA is on and 30 seconds if TA and AF are on. 
9 En
RDS
PTY list
Specific |
Type of program |
|
|
NEWS |
News |
AFFAIRS |
Current affairs |
INFO |
General information and advice |
SPORT |
Sports |
WEATHER |
Weather reports/meteorological information |
FINANCE |
Stock market reports, commerce, trading, etc. |
POP MUS |
Popular music |
ROCK MUS |
Contemporary modern music |
EASY MUS |
Easy listening music |
OTH MUS |
Non categorized music |
JAZZ |
Jazz |
COUNTRY |
Country music |
NAT MUS |
National music |
OLDIES |
Oldies music, golden oldies |
FOLK MUS |
Folk music |
L. CLASS |
Light classical music |
CLASSIC |
Serious classical music |
EDUCATE |
Educational programs |
DRAMA |
All radio plays and serials |
CULTURE |
National or regional culture |
SCIENCE |
Nature, science and technology |
VARIED |
Light entertainment |
CHILDREN |
Children’s |
SOCIAL |
Social affairs |
RELIGION |
Religion affairs or services |
PHONE IN |
Phone in |
TOURING |
Travel programs, not for announcements about traffic problems |
LEISURE |
Hobbies and recreational activities |
DOCUMENT |
Documentaries |
|
|
English
Español
Italiano Français Deutsch
Nederlands
En 10
Built-in CD player
Playing a CD
12
1 TRACK NUMBER indicator
Shows the track currently playing.
2PLAY TIME indicator
Shows the elapsed playing time of the current track.
1 Insert a CD into the CD loading slot.
Playback will automatically start.
CD loading slot
• You can eject a CD by pressing CD EJECT.
2After a CD has been inserted, press SOURCE to select the built-in CD player.
3Use VOLUME to adjust the sound level.
When you press VOLUME up/+, the volume is raised and when pressed down/–, the volume is lowered.
4To perform fast forward or reverse, press and hold 2 or 3.
5To skip back or forward to another track, press 2 or 3.
Pressing 3 skips to the start of the next track. Pressing 2 once skips to the start of the current track. Pressing again will skip to the previous track.
 Notes
Notes
•The built-in CD player plays one, standard, 12-cm or 8-cm (single) CD at a time. Do not use an adapter when playing 8-cm CDs.
•Do not insert anything other than a CD into the CD loading slot.
•If you cannot insert a disc completely or if after you insert a disc the disc does not play, check that the label side of the disc is up. Press CD EJECT to eject the disc, and check the disc for damage before inserting the disc again.
•If the built-in CD player does not operate properly, an error message such as ERROR-14 may be displayed. Refer to Understanding built-in CD player error messages on page 17. 
11 En
Built-in CD player |
Audio Adjustments |
Repeating play
Repeat play lets you hear the same track over again.
1 Press 5 to turn repeat play on.
RPT appears in the display. The track presently playing will play and then repeat.
2 Press 5 to turn repeat play off.
The track presently playing will continue to play and then play the next track.
 Note
Note
•If you perform track search or fast forward/reverse, repeat play is automatically cancelled. 
Pausing CD playback
Pause lets you temporarily stop playback of the CD.
1 Press 6 to turn pause on.
PAUSE appears in the display. Play of the current track pauses.
2 Press 6 to turn pause off.
Play will resume at the same point that you turned pause on. 
Introduction of audio |
|
||||||||||
adjustments |
|
|
|
English |
|||||||
|
|
|
|
|
|
|
|
|
|
||
|
|
|
|
|
|
|
|
|
|
||
|
|
|
|
|
|
|
|
|
|
||
|
|
|
|
|
|
|
|
|
|||
|
|
|
|
|
|
||||||
|
|
|
|
|
|
|
|||||
|
1 |
2 |
|
Español |
|||||||
|
|
|
|
|
|
|
|
|
|
||
1 AUDIO display |
|
|
|
||||||||
|
|
|
|
||||||||
|
Shows the audio adjustments status. |
|
|||||||||
2 LOUD indicator |
|
|
|
|
|||||||
|
Appears in the display when loudness is |
|
|||||||||
|
turned on. |
|
|
|
Deutsch |
||||||
names. |
|
|
|
||||||||
Press AUDIO to display the audio function |
|
||||||||||
Press AUDIO repeatedly to switch between the |
|
||||||||||
following audio functions: |
|
|
|
|
|||||||
FAD (balance adjustment)—EQ-L (equalizer)— |
|
||||||||||
LOUD (loudness)—FIE (front image |
Français |
||||||||||
enhancer)—SLA (source level adjustment) |
|||||||||||
|
|||||||||||
• When selecting the FM tuner as the source, |
|
||||||||||
you cannot switch to SLA. |
|
|
|
|
|||||||
• To return to the display of each source, press |
|
||||||||||
BAND. |
|
|
|
|
|||||||
|
|
|
Note |
|
|
|
Italiano |
||||
|
|
|
|
|
|
||||||
|
|
|
|
|
|
|
|
|
|
||
• If you do not operate the audio function within |
|||||||||||
|
|||||||||||
|
about 30 seconds, the display is automatically |
|
|||||||||
|
returned to the source display. |
|
|||||||||
|
|
|
|
|
|
|
|
|
|
Nederlands |
|
En 12

Audio Adjustments
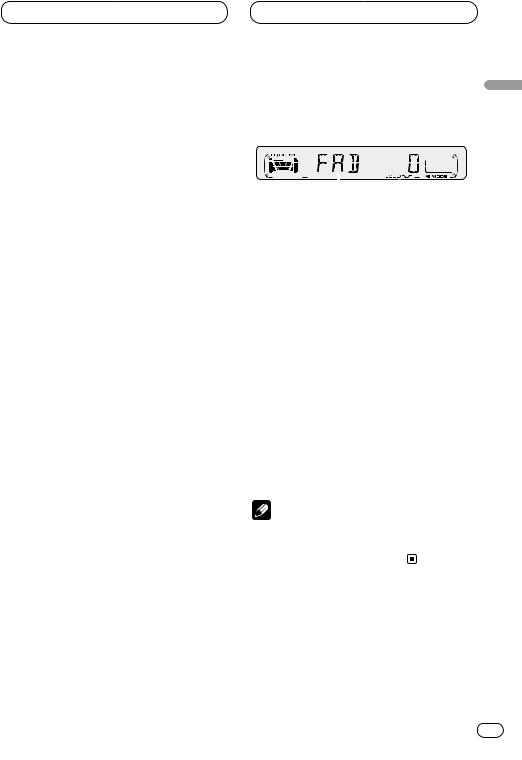
Using balance adjustment
You can select a fader/balance setting that provides an ideal listening environment in all occupied seats.
1 Press AUDIO to select FAD.
Press AUDIO until FAD appears in the display.
• If the balance setting has been previously adjusted, BAL will be displayed.
2Press 5 or ∞ to adjust front/rear speaker balance.
Each press of 5 or ∞ moves the front/rear speaker balance towards the front or the rear.
• FAD F15 – FAD R15 is displayed as the front/rear speaker balance moves from front to rear.
• FAD 0 is the proper setting when only two speakers are used.
3Press 2 or 3 to adjust left/right speaker balance.
When you press 2 or 3, BAL 0 is displayed. Each press of 2 or 3 moves the left/right speaker balance towards the left or the right.
• BAL L 9 – BAL R 9 is displayed as the left/right speaker balance moves from left to right. 
13 En
Using the equalizer
The equalizer lets you adjust the equalization to match car interior acoustic characteristics as desired.
Recalling equalizer curves
There are six stored equalizer curves which you can easily recall at any time. Here is a list of the equalizer curves:
Display |
Equalizer curve |
|
|
SPR-BASS |
Super bass |
|
|
POWERFUL |
Powerful |
|
|
NATURAL |
Natural |
|
|
VOCAL |
Vocal |
|
|
CUSTOM |
Custom |
|
|
EQ FLAT |
Flat |
|
|
•CUSTOM is an adjusted equalizer curve that you create.
•When EQ FLAT is selected no supplement or correction is made to the sound. This is useful to check the effect of the equalizer curves by switching alternatively between EQ FLAT and a set equalizer curve.
Press EQ to select the equalizer.
• If the equalizer has been previously set to an equalizer curve other than POWERFUL then the title of that previously selected equalizer curve will be displayed, such as SPR-BASS,
NATURAL, VOCAL, CUSTOM, or EQ FLAT. 
Audio Adjustments
Adjusting equalizer curves
You can adjust the currently selected equalizer curve setting as desired. Adjusted equalizer curve settings are memorized in CUSTOM.
1Press AUDIO to select the equalizer mode.
Press AUDIO until EQ-L/EQ-M/EQ-H appears in the display.
2Select the band you want to adjust with
2/3.
EQ-L (low) —EQ-M (mid) —EQ-H (high)
3 Press 5 or ∞ to adjust the equalizer curve.
Each press of 5 or ∞ increases or decreases the equalizer curve respectively.
•+6 – –6 is displayed as the equalizer curve is increased or decreased.
•The actual range of the adjustments are different depending on which equalizer curve is selected.
 Note
Note
•If you make adjustments when a curve other than CUSTOM is selected, the newly adjusted curve will replace the previous curve. Then a new curve with CUSTOM appears on the display while selecting the equalizer curve. 
Adjusting loudness
Loudness compensates for deficiencies in the lowand high-sound ranges at low volume.
1 Press AUDIO to select LOUD.
Press AUDIO until LOUD appears in the display.
2 Select LOUD on or off with 5/∞.
3 Select the desired level with 2/3. |
English |
|||
|
||||
LOW (low) —MID (mid) —HI (high) |
|
|||
|
|
Note |
|
|
|
|
|
||
|
|
|
|
|
• You can also switch LOUD on or off by press- |
|
|||
|
ing the LOUDNESS. |
Español |
||
Front image enhancer (FIE) |
||||
|
||||
The F.I.E. (Front Image Enhancer) function is a |
|
|||
simple method of enhancing front imaging by |
Deutsch |
|||
cutting midand high-range frequency output |
||||
|
||||
from the rear speakers, limiting their output to |
|
|||
low-range frequencies. You can select the fre- |
|
|||
quency you want to cut. |
|
|||
|
|
Precaution |
|
|
|
|
|
||
|
|
|
|
|
• When the F.I.E. function is deactivated, the |
Français |
|||
|
before disengaging F.I.E. to prevent a sudden |
|||
|
rear speakers output sound of all frequencies, |
|
||
|
not just bass sounds. Reduce the volume |
|
||
|
increase in volume. |
|
||
1 Press AUDIO to select FIE.
Press AUDIO until FIE appears in the display. |
Italiano |
|||
2 Select FIE on or off with 5/∞. |
||||
|
||||
3 Select the desired frequency with 2/3. |
|
|||
100—160—250 (Hz) |
|
|||
|
|
Notes |
Nederlands |
|
|
|
|||
|
|
|
||
|
levels until they are balanced. |
|||
• After switching the F.I.E. function ON, select |
|
|||
|
the Fader/Balance mode in the Audio Menu, |
|
||
|
and adjust front and rear speaker volume |
|
||
• Switch the F.I.E. function OFF when using a 2- |
|
|||
|
speaker system. |
|
||
|
|
En |
14 |
|

Audio Adjustments |
Initial Settings |
Adjusting source levels |
Adjusting initial settings |
SLA (Source level adjustment) lets you adjust the volume level of each source to prevent radical changes in volume when switching between sources.
•Settings are based on the volume level of the FM tuner, which remains unchanged.
1Compare the FM tuner volume level with the level of the source you wish to adjust.
2Press AUDIO to select SLA.
Press AUDIO until SLA appears in the display.
3 Press 5 or ∞ to adjust the source volume.
Each press of 5 or ∞ increases or decreases the source volume.
• SLA +4 – SLA –4 is displayed as the source volume is increased or decreased.
 Notes
Notes
•Since the FM tuner volume is the control, it is not possible to apply source level adjustments to the FM tuner.
•The MW/LW tuner volume level can also be adjusted with source level adjustments. 
Initial settings lets you perform initial set up of different settings for this unit.
1Press SOURCE and hold until the unit turns off.
2Press AUDIO and hold until STEP appears in the display.
Press AUDIO repeatedly to switch between the following settings:
STEP—A-PI
Use the following instructions to operate each particular setting.
•To cancel initial settings, press BAND.
•You can also cancel initial settings by holding down AUDIO until the unit turns off. 
15 En
Initial Settings
Setting the FM tuning step
Normally the FM tuning step employed by seek tuning is 50 kHz. When AF or TA are on the tuning step automatically changes to 100 kHz. It may be preferable to set the tuning step to 50 kHz when AF is on.
1 Press AUDIO to select STEP.
Press AUDIO repeatedly until STEP appears in the display.
2 Select the FM tuning step with 2/3.
Pressing 2/3 will switch the FM tuning step between 50 kHz and 100 kHz while AF or TA is on. The selected FM tuning step will appear in the display.
 Note
Note
•The tuning step remains at 50 kHz during manual tuning. 
Switching Auto PI Seek
The unit can automatically search for a different station with the same programming, even during preset recall.
1 Press AUDIO to select A-PI.
Press AUDIO repeatedly until A-PI appears in the display.
2 Select A-PI on or off with 5/∞.
Pressing 5/∞ will switch A-PI between on and off and that status will be displayed. 
Additional Information
Cellular telephone muting
Sound from this unit is muted automatically |
English |
|
|
||
when a call is made or received using a con- |
|
|
nected cellular telephone. |
|
|
• The sound is turned off, MUTE is displayed |
|
|
and no audio adjustments, except volume |
|
|
control, are possible. Operation returns to |
|
|
normal when the phone call is ended. |
Español |
|
CD player and care |
||
|
•Use only CDs that have the Compact Disc Digital Audio mark as shown below.
COMPACT |
Deutsch |
|
DIGITAL AUDIO |
|
|
• Use only normal, round CDs. If you insert |
|
|
irregular, non-round, shaped CDs they may |
|
|
jam in the CD player or not play properly. |
|
|
• Check all CDs for cracks, scratches or warped |
Français |
|
|
||
discs before playing. CDs that have cracks, |
|
|
scratches or are warped may not play prop- |
|
|
erly. Do not use such discs. |
Italiano |
|
• Avoid touching the recorded (non-printed |
||
|
||
side) surface when handling the disc. |
|
|
• Store discs in their cases when not in use. |
|
|
• Keep discs out of direct sunlight and do not |
|
|
expose the discs to high temperatures. |
|
|
• Do not attach labels, write on or apply chemi- |
|
|
cals to the surface of the discs. |
Nederlands |
|
|
En 16

Additional Information
•To clean dirt from a CD, wipe the disc with a soft cloth outward from the center of the disc.
•If the heater is used in cold weather, moisture may form on components inside the CD player. Condensation may cause the CD player to not operate properly. If you think that condensation is a problem turn off the CD player for an hour or so to allow the CD player to dry out and wipe any damp discs with a soft cloth to remove the moisture.
•Road shocks may interrupt CD playback. 
CD-R/CD-RW discs
•CD-R (CD-Recordable) and CD-RW (CDRewritable) discs recorded on CD-R/CD-RW units other than a music CD recorder may not play properly on this CD player.
•Music CD-R/CD-RW discs, even recorded on a music CD recorder, may not play properly on this CD player due to differing disc characteristics, scratches or dirt on the disc. Dirt or condensation on the lens inside this unit may also prevent playback.
•Read the precautions with CD-R/CD-RW discs before using them. 
Understanding built-in CD player error messages
When problems occur during CD play an error message may appear on the display. If an error message appears on the display refer to the table below to see what the problem is and the suggested method of correcting the problem. If the error cannot be corrected, contact your dealer or your nearest Pioneer Service Center.
Message |
Cause |
Action |
|
|
|
ERROR-11, 12, |
Dirty disc |
Clean disc. |
17, 30 |
|
|
|
|
|
ERROR-11, 12, |
Scratched disc |
Replace disc. |
17, 30 |
|
|
|
|
|
ERROR-14 |
Blank disc |
Check the disc. |
|
|
|
ERROR-10, 11, |
Electrical or |
Turn the ignition |
12, 14, 17, 30, |
mechanical |
ON and OFF, or |
A0 |
|
switch to a |
|
|
different source, |
|
|
then back to the |
|
|
CD player. |
|
|
|
HEAT |
CD player over- |
Turn off the CD |
|
heated |
player until the |
|
|
CD player cools |
|
|
down. |
|
|
|
17 En

Additional Information
Specifications
General
Power source ...................... |
14.4 V DC (10.8 – 15.1 V |
|
allowable) |
Grounding system .............. |
Negative type |
Max. current consumption |
|
............................................. |
10.0 A |
Dimensions (W × H × D): |
|
(DIN) |
|
Chassis ................ |
178 × 50 × 157 mm |
Nose ..................... |
188 × 58 × 19 mm |
Weight ................................. |
1.3 kg |
Audio
Maximum power output ..... |
45 W × 4 |
Continuous power output ... |
25 W × 4 (DIN 45324, |
|
+B=14.4 V) |
Load impedance ................. |
4 Ω (4 – 8 Ω allowable) |
Preout max output level/output impedance |
|
............................................. |
2.2 V/1 kΩ |
Equalizer (3-Band Equalizer): |
|
(LOW) .......................... |
Level: ±12 dB |
(MID) ........................... |
Level: ±12 dB |
(HIGH) ......................... |
Level: ±12 dB |
Loudness contour |
|
(LOW) .......................... |
+3.5 dB (100 Hz), |
|
+3 dB (10 kHz) |
(MID) ........................... |
+10 dB (100 Hz), |
|
+6.5 dB (10 kHz) |
(HIGH) ......................... |
+11 dB (100 Hz), |
|
+11 dB (10 kHz) |
|
(volume : –30 dB) |
|
|
CD player
System ................................ |
Compact disc audio |
|
system |
Usable discs ....................... |
Compact disc |
Signal format: |
|
Sampling frequency ... |
44.1 kHz |
Number of quantization bits |
|
..................................... |
16; linear |
Frequency characteristics |
|
............................................. |
5 – 20,000 Hz (±1 dB) |
Signal-to-noise ratio ........... |
94 dB (1 kHz) (IEC-A |
|
network) |
Dynamic range ................... |
92 dB (1 kHz) |
Number of channels .......... |
2 (stereo) |
FM tuner
Frequency range ................. |
87.5 – 108 MHz |
Usable sensitivity ............... |
9 dBf (0.8 µV/75 Ω, mono, |
|
S/N: 30 dB) |
50 dB quieting sensitivity ... |
15 dBf (1.5 µV/75 Ω, mono) |
Signal-to-noise ratio ........... |
70 dB (IEC-A network) |
Distortion ............................ |
0.3% (at 65 dBf, 1 kHz, |
|
stereo) |
Frequency response ........... |
30 – 15,000 Hz (±3 dB) |
Stereo separation ............... |
40 dB (at 65 dBf, 1 kHz) |
MW tuner
Frequency range ................. |
531 – 1,602 kHz (9 kHz) |
Usable sensitivity ............... |
18 µV (S/N: 20 dB) |
Selectivity ............................ |
50 dB (±9 kHz) |
LW tuner
Frequency range ................. |
153 – 281 kHz |
Usable sensitivity ............... |
30 µV (S/N: 20 dB) |
Selectivity ............................ |
50 dB (±9 kHz) |
 Note
Note
•Specifications and the design are subject to possible modifications without notice due to improvements. 
English
Español
Italiano Français Deutsch
Nederlands
En 18

Contenido
Antes de empezar
Acerca de este producto 2 Acerca de este manual 2 Precauciones 2
En caso de problemas 2 Qué es cada cosa 3
Protección del producto contra robo 4
•Extracción del panel delantero 4
•Colocación del panel delantero 4
Encendido y Apagado
Encendido del sistema 4
Selección de una fuente 4
Apagado del sistema 4
Sintonizador
Audición de radio 5
Almacenaje y llamada de frecuencias 6 Sintonía de señales fuertes 6 Almacenaje de las frecuencias de radio
más fuertes 6
RDS
Introducción a la operación RDS 7 Cambio de la visualización RDS 7 Recepción de transmisiones de alarma
PTY 7
Selección de frecuencias alternativas 8
•Uso de la búsqueda PI 8
•Uso de la búsqueda PI para emisoras preajustadas 8
•Limitación de las emisoras para programación regional 8
Recepción de anuncios de tráfico 9
• Respuesta a la alarma TP 9 Lista PTY 10
1 Sp
este producto Pioneer.
sobre la operación de modo que su modelo. Una vez que haya leído las
para consultarlas en el futuro.
Lector de CD incorporado
Reproducción de un CD 11 Repetición de reproducción 12 Pausa de la reproducción de CD 12
Ajustes de audio
Introducción a los ajustes de audio 12 Uso del ajuste del equilibrio 13
Uso del ecualizador 13
•Llamada de las curvas de ecualización 13
•Ajuste de las curvas de ecualización 14 Ajuste de la sonoridad 14
Mejorador de imagen delantera (FIE) 14 Ajuste de los niveles de la fuente 15
Ajustes iniciales
Configuración de los ajustes iniciales 15
Ajuste del paso de sintonía de FM 16 Cambio de la búsqueda PI automática 16
Informaciones adicionales
Silenciamiento de teléfono celular 16 Lector de CD y cuidados 16
Discos CD-R/CD-RW 17 Comprensión de los mensajes de error
del lector de CD incorporado 17 Especificaciones 18
Antes de empezar
Acerca de este producto
Este producto cumple con las Directivas EMC (89/336/CEE, 92/31/CEE) y Directiva de Marcación CE (93/68/CEE).
Las frecuencias del sintonizador en este producto se han repartidas para uso en Europa Occidental, Asia, Oriente Medio, Africa y Oceanía. El uso en otras áreas puede resultar en una recepción incorrecta. Las funciones RDS funcionan solamente en áreas con emisoras FM que transmiten señales RDS. 
Acerca de este manual
Este producto viene con diversas funciones sofisticadas que aseguran una recepción y operación superior. Todas las funciones han sido proyectadas para facilitar su uso al máximo, pero muchas funciones requieren explicación. El propósito de este manual de instrucciones es ayudarle a beneficiarse completamente del potencial del producto y maximizar su disfrute de audición.
Se recomienda familiarizarse con las funciones y operaciones leyendo con detención el manual antes de usar el producto. Es especialmente importante leer y observar las precauciones en esta página y en otras secciones. 
Precauciones
• Se fija una etiqueta CLASS 1 LASER PRODUCT |
English |
|||
en la parte inferior de este producto. |
||||
|
|
|
||
|
CLASS 1 |
|
||
|
|
|
||
|
LASER PRODUCT |
|
|
|
• El CarStereo-Pass Pioneer es para uso |
Español |
|||
solamente en Alemania. |
||||
• Mantenga este manual a mano como una |
||||
referencia para los procedimientos de |
||||
operación y precaución. |
||||
|
||||
• Siempre mantenga el volumen suficiente- |
|
|||
mente bajo de modo que pueda escuchar los |
|
|||
sonidos fuera del coche. |
|
|||
• Proteja este producto de la humedad. |
Deutsch |
|||
• Si se desconecta o se descarga la batería, la |
||||
memoria preajustada se borrará y se debe |
||||
reprogramarla. |
||||
En caso de problemas |
Français |
|
Cuando este producto no funciona correcta- |
||
|
||
mente, comuníquese con su concesionario o |
|
|
centro de servicio Pioneer autorizado. |
|
|
|
Italiano |
|
|
Nederlands |
|
Sp 2 |
|
Antes de empezar
1
4
5
8 9
Qué es cada cosa
1Botón VOLUME
Presione para aumentar o disminuir el volumen.
2Botón CD EJECT
Presione para expulsar un CD desde el lector de CD incorporado.
3Botón AUDIO
Presione para seleccionar los diversos controles de calidad del sonido.
4Botón TA
Presione para activar o desactivar la función de anuncio de tráfico.
5Botón EQ
Presione para seleccionar las varias curvas del ecualizador.
6Botones 5/∞/2/3
Presione para los controles de sintonía de búsqueda manual, avance rápido, inversión y búsqueda musical. También se usan para controlar las funciones.
2 3
6
7
0 - =
7Botón LOUDNESS
Presione para activar o desactivar la función de sonoridad.
8Botón SOURCE
Esta unidad se enciende por la selección de una fuente. Presione para cambiar a través de todas las fuentes disponibles.
9Botones 1–6 (PRESET TUNING)
Presione para la sintonía preajustada.
0 Botón LOCAL/BSM
-Botón BAND
Presione para seleccionar entre dos bandas FM o una banda MW/LW.
=Botón DETACH
Presione para extraer el panel delantero de la unidad principal. 
3 Sp
Antes de empezar |
Encendido y Apagado |
Protección del producto contra robo
El panel delantero se puede extraer de la unidad principal y se almacenar en su caja protectora proveída como una medida antirrobo.
 Importante
•Nunca presione ni agarre la pantalla y los botones con fuerza excesiva al extraer o colocar el panel delantero.
•Evite sujetar el panel delantero a impactos excesivos.
•Mantenga el panel delantero fuera del alcance de los rayos de luz del sol o alta temperaturas.
Extracción del panel delantero
1Presione DETACH para soltar el panel delantero.
Presione DETACH y el lado derecho del panel se suelta de la unidad principal.
2Agarre el panel delantero y extráigalo.
Agarre el lado derecho del panel delantero y tire del panel hacia la izquierda. El panel delantero sale de la unidad principal.
3 Coloque el panel delantero en su caja protectora proveída para almacenamiento seguro.
Colocación del panel delantero
1Coloque el panel delantero de modo plano contra la unidad principal.
2Presione el panel delantero hacia la cara de la unidad principal hasta que se asiente firmemente. 
Encendido del sistema
Presione SOURCE para encender el sistema. |
English |
|||
|
||||
Cuando se selecciona una fuente, la unidad se |
|
|||
encende. |
|
|||
Selección de una fuente |
Español |
|||
|
||||
Puede seleccionar la fuente que desea |
|
|||
escuchar. Para cambiar al lector de CD incorpo- |
|
|||
rado, coloque un disco en el sistema (refiérase |
|
|||
a la página 11). |
Deutsch |
|||
Presione SOURCE para seleccionar una |
||||
|
||||
fuente. |
|
|||
Presione SOURCE repetidamente para cambiar |
|
|||
entre las siguientes fuentes: |
|
|||
Lector de CD incorporado—Sintonizador |
|
|||
|
|
Notas |
Français |
|
|
|
|||
|
|
|
||
|
no cambia. |
|||
• Cuando no hay un disco cargado en este pro- |
|
|||
|
ducto, la fuente del lector de CD incorporado |
|
||
• Cuando se conecta el cable azul/blanco de |
|
|||
|
este producto al terminal de control de relé de |
|
||
|
antena automática del automóvil, la antena |
|
||
|
del automóvil se extiende cuando se enciende |
Italiano |
||
|
el producto. Para retraer la antena, cambie a |
|||
|
|
|||
|
otra fuente. |
|
||
Apagado del sistema |
Nederlands |
|||
Presione SOURCE durante por lo menos un |
||||
|
||||
segundo para apagar el sistema. |
|
|||
Sp 4

Sintonizador
Audición de radio
1 Presione SOURCE para seleccionar el sintonizador.
12 3 4
La función AF (búsqueda de frecuencias alternativas) de este producto se puede activar y desactivar. Se debe desactivar la función AF para la operación de sintonía normal (refiérase a la página 8).
1Indicador BAND
Visualiza cuál banda la radio está sintonizada: MW, LW o FM.
2Indicador FREQUENCY
Visualiza la frecuencia en que el sintonizador está sintonizado.
3Indicador STEREO ( )
Visualiza que la frecuencia seleccionada está siendo transmitida en estéreo.
4Indicador PRESET NUMBER
Visualiza la emisora preajustada seleccionada.
2Utilice VOLUME para ajustar el nivel de sonido.
Presione VOLUME + para aumentar el volumen, y VOLUME – para disminuir el volumen.
3Presione BAND para seleccionar una banda.
Presione BAND hasta que se visualice la banda deseada: F1, F2 para FM o MW/LW.
4Para realizar la sintonía manual, presione 2 o 3 rápidamente.
Las frecuencias se desplazan hacia arriba o hacia abajo paso por paso.
5Para realizar la sintonía por búsqueda, presione 2 o 3 durante aproximadamente un segundo y suelte.
El sintonizador explorará las frecuencias hasta que encuentre una emisora con suficiente intensidad para una buena recepción.
• Se puede cancelar la sintonía por búsqueda presionando 2 o 3 rápidamente.
• Si mantiene presionado 2 o 3, puede saltar las emisoras. La sintonía por búsqueda empieza así que se suelta el botón.
 Nota
Nota
•Cuando la frecuencia seleccionada está siendo transmitida en estéreo, el indicador STEREO ( ) se ilumina. 
5 Sp

Sintonizador
Almacenaje y llamada de frecuencias
Si se presiona uno de los botones PRESET TUNING, se puede fácilmente almacenar hasta seis frecuencias de emisoras para una llamada subsiguiente con la presión de un botón.
Cuando encuentre una frecuencia que desea almacenar en la memoria, presione un botón PRESET TUNING hasta que el número preajustado pare de destellar.
El número seleccionado destellará en el indicador PRESET NUMBER y permanecerá iluminado. La frecuencia de la emisora seleccionada ha sido almacenada en la memoria.
Cuando presione el mismo botón PRESET TUNING en la próxima vez, la frecuencia de la emisora se llamará de la memoria.
 Notas
Notas
•Hasta 12 emisoras FM, 6 para cada una de las dos bandas FM, y 6 emisoras MW/LW se pueden almacenar en la memoria.
•También se puede usar 5 y ∞ para llamar a las frecuencias de radio designadas a los botones PRESET TUNING. 
Sintonía de señales fuertes
La sintonía por búsqueda local le permite sin- |
English |
|||
|
||||
tonizar solamente las emisoras con señales |
|
|||
suficientemente fuertes para una buena recep- |
|
|||
ción. |
|
|||
1 Presione LOCAL/BSM para activar la sin- |
|
|||
tonía por búsqueda local. |
Español |
|||
La sensibilidad de búsqueda local (LOC) |
||||
|
||||
aparece en la pantalla. |
|
|||
2 Cuando desee volver a la sintonía por |
|
|||
búsqueda normal, presione LOCAL/BSM para |
|
|||
desactivar la sintonía por búsqueda local. |
|
|||
Almacenaje de las frecuencias de |
Deutsch |
|||
|
||||
radio más fuertes |
|
|||
La función BSM (memoria de las mejores |
|
|||
emisoras) le permite almacenar automática- |
Français |
|||
pueden sintonizar con la presión de un botón. |
||||
mente las seis emisoras más fuertes bajo los |
|
|||
botones PRESET TUNING 1–6. Después de |
|
|||
almacenadas, las emisoras más fuertes se |
|
|||
Presione LOCAL/BSM durante aproximada- |
|
|||
mente dos segundos para activar la función |
|
|||
BSM. |
Italiano |
|||
almacenan en los botones PRESET TUNING en |
||||
BSM comienza a destellar. Mientras BSM está |
|
|||
destellando, las seis emisoras más fuertes se |
|
|||
el orden de las señales más fuertes. Cuando se |
|
|||
completa la operación, BSM para de destellar. |
|
|||
• Para cancelar el proceso de almacenaje, pre- |
|
|||
sione LOCAL/BSM. |
Nederlands |
|||
|
|
Nota |
||
|
|
|||
|
|
|
||
|
|
|
|
|
• Almacenar las emisoras más fuertes con |
|
|||
|
BSM puede reemplazar las emisoras almace- |
|
||
|
nadas usando PRESET TUNING. |
|
||
|
|
Sp |
6 |
|

RDS
Introducción a la operación RDS
1 2 3 4
RDS (sistema de datos de radio) es un sistema para proveer informaciones con las transmisiones FM. Estas informaciones inaudibles proveen funciones como nombre del servicio de programa, tipo de programa, espera por anuncio de tráfico y sintonía automática, con el propósito de ayudar los oyentes de radio a encontrar y sintonizar una emisora deseada.
1Indicador AF
Visualiza cuando la función AF (búsqueda de frecuencias alternativas) está activada.
2Indicador TA
Visualiza cuando la función TA (espera por anuncio de tráfico) está activada.
3Indicador TP
Visualiza cuando una emisora TP está sintonizada.
4Nombre de servicio de programa
Visualiza el tipo de programa que está siendo transmitido.
 Notas
Notas
•El servicio RDS puede no se proveer por todas las emisoras.
•Las funciones RDS como AF y TA son activas solamente cuando la radio está sintonizada a una emisora RDS. 
Cambio de la visualización RDS
Cuando se sintoniza una emisora RDS, se visualiza su nombre de servicio de programa. Se puede saber la frecuencia en que está.
Presione EQ durante aproximadamente dos segundos repetidamente para cambiar entre los siguientes ajustes:
Nombre de servicio de programa—Información PTY—Frecuencia
La información PTY (código de identificación de tipo de programa) se enumera en la página 10.
• La información PTY y la frecuencia de la emisora actual aparecen en la pantalla durante ocho segundos. 
Recepción de transmisiones de alarma PTY
La alarma PTY es un código PTY especial para anuncio de emergencias tales como desastres naturales. Cuando el sintonizador recibe el código de alarma de radio, aparece ALARM en la pantalla y el volumen se ajusta al volumen TA. Cuando la emisora deja de transmitir el anuncio de emergencia, el sistema vuelve a la fuente precedente.
• Un anuncio de emergencia se puede cancelar presionando TA. 
7 Sp

RDS
Selección de frecuencias alternativas
Si está escuchando a una transmisión y la recepción se pone débil o ocurren otros problemas, la unidad busca automáticamente una emisora diferente en la misma red que esté transmitiendo una señal más fuerte.
• Normalmente se deja la función AF activada.
1Presione TA durante aproximadamente dos segundos para activar la función AF. AF se visualiza.
2Presione TA durante aproximadamente dos segundos para desactivar la función AF.
 Notas
Notas
•Solamente las emisoras RDS se sintonizan durante la búsqueda de sintonía o BSM cuando la función AF está activada.
•Cuando se llama a una emisora preajustada, el sintonizador puede actualizar la emisora preajustada con una nueva frecuencia de la lista AF de emisoras. (Eso es solamente disponible cuando se usan los preajustes en la banda F1.) No se visualiza ningún número preajustado en la pantalla si los datos RDS para la emisora recibida difieren de los datos para la emisora almacenada originalmente.
•El sonido puede se interrumpir temporalmente por otro programa durante la búsqueda de frecuencia AF.
•Cuando el sintonizador está sintonizado a una emisora no RDS, el indicador AF destella.
•La función AF se puede activar y desactivar independientemente para cada banda FM.
Uso de la búsqueda PI
Si la unidad falla para encontrar una frecuencia alternativa apropiada, o si usted está escuchando a una transmisión y la recepción se pone débil, la unidad buscará automáticamente
una emisora diferente con la misma progra- |
|
|||
mación. Durante la búsqueda, se visualiza PI |
English |
|||
SEEK y la salida se silencia. El silenciamiento |
||||
|
||||
termina después de la búsqueda PI, si se |
|
|||
encuentra o no una emisora diferente. |
|
|||
Uso de la búsqueda PI para emisoras |
|
|||
preajustadas |
Español |
|||
Cuando no se pueden llamar a las emisoras |
||||
|
||||
preajustadas, cuando se viaja largas distancias, |
|
|||
se puede ajustar la unidad para realizar la |
|
|||
búsqueda PI durante la llamada de emisoras |
|
|||
preajustadas. |
|
|||
• El ajuste predefinido para la búsqueda PI es |
|
|||
|
desactivado. Consulte Cambio de la búsqueda |
Deutsch |
||
|
PI automática en la página 16. |
|||
|
|
|||
Limitación de las emisoras para pro- |
|
|||
gramación regional |
|
|||
Cuando se usa AF para resintonizar frecuencias |
|
|||
automáticamente, la función regional limita la |
Français |
|||
selección para emisoras que transmiten progra- |
||||
|
||||
mas regionales. |
|
|||
Presione BAND durante aproximadamente |
|
|||
dos segundos para activar/desactivar la fun- |
|
|||
ción regional. |
|
|||
|
|
Notas |
Italiano |
|
|
|
|||
|
|
|
||
• La programación regional y redes regionales |
||||
|
se organizan diferentemente dependiendo del |
|
||
|
país (o sea, pueden cambiar de acuerdo a la |
|
||
|
hora, estado o área de transmisión). |
|
||
• El número preajustado puede desaparecer de |
Nederlands |
|||
|
la pantalla si el sintonizador sintoniza una |
|||
|
emisora regional que difiere de la emisora |
|||
|
ajustada originalmente. |
|||
• REG se puede activar o desactivar independi- |
||||
|
entemente para cada banda FM. |
|||
|
|
Sp |
8 |
|

RDS
Recepción de anuncios de tráfico
La función TA (espera por anuncio de tráfico) le permite recibir anuncios de tráfico automáticamente, independientemente de la fuente que esté escuchando. La función TA se puede activar tanto para una emisora TP (una emisora que transmite informaciones de tráfico) como para una emisora TP de otra red realzada (una emisora que provee informaciones que hace referencias a emisoras TP).
1Sintonice una emisora TP o emisora TP de otra red realzada.
Cuando se está sintonizado en una emisora TP o emisora TP de otra red realzada, el indicador TP se ilumina.
2Presione TA para activar la espera por anuncio de tráfico.
Presione TA y el indicador TA aparecerá en la pantalla. El sintonizador espera por anuncios de tráfico.
• Para desactivar la espera por anuncio de tráfico, presione TA de nuevo.
3Utilice VOLUME para ajustar el volumen TA cuando comienza un anuncio de tráfico.
Presione VOLUME + para aumentar el volumen y VOLUME – para disminuir el volumen.
El nuevo volumen ajustado se almacena en la memoria y se usa para los anuncios de tráfico subsecuentes.
4Presione TA mientras un anuncio de tráfico está siendo recibido para cancelar el anuncio.
El sintonizador vuelve a la fuente original pero permanece en el modo de espera hasta que se presione TA de nuevo.
 Notas
Notas
•El sistema cambia de nuevo ala fuente original después de la recepción de anuncio de tráfico.
•Solamente las emisoras TP y emisoras TP de otra red realzada se sintonizan durante la búsqueda de sintonía o BSM cuando la función TA está activada.
Respuesta a la alarma TP
Cuando una emisora TP o TP de otra red realzada se pierde debido a una señal débil, el indicador TP desaparece y una serie de tonos cortos suenan durante aproximadamente cinco segundos para que seleccione otra emisora TP o TP de otra rede realzada.
Cuando escucha al sintonizador, sintonice otra emisora TP o TP de otra red realzada.
• Cuando escucha a fuentes diferentes del sintonizador, la unidad busca automáticamente una emisora TP con la señal más fuerte después de un retardo de aproximadamente 10 o 30 segundos. El retardo es de aproximadamente 10 segundos si la función TA está activada, y de 30 segundos si las funciones TA y AF están activadas. 
9 Sp

RDS
Lista PTY
Específico |
Tipo de programa |
|
|
NEWS |
Noticias |
AFFAIRS |
Temas de actualidad |
INFO |
Información general y consejos |
SPORT |
Programas deportivos |
WEATHER |
Informes del tiempo/Información meteorológica |
FINANCE |
Informes del mercado de valores, comercio, operaciones de compraventa, |
|
etc. |
POP MUS |
Música popular |
ROCK MUS |
Música moderna contemporánea |
EASY MUS |
Música “fácil de escuchar” |
OTH MUS |
Música sin categoría |
JAZZ |
Jazz |
COUNTRY |
Música campera |
NAT MUS |
Música nacional |
OLDIES |
Música antigua, programas basados en la “Edad de Oro” |
FOLK MUS |
Música folklórica |
L. CLASS |
Música clásica ligera |
CLASSIC |
Música clásica seria |
EDUCATE |
Programas educacionales |
DRAMA |
Todas las obras y seriales de radio |
CULTURE |
Cultura nacional y regional |
SCIENCE |
Naturaleza, ciencia y tecnología |
VARIED |
Entretenimiento ligero |
CHILDREN |
Programas para niños |
SOCIAL |
Temas sociales |
RELIGION |
Programas o servicios de asuntos religiosos |
PHONE IN |
Programas basados en teléfono |
TOURING |
Programas de viaje, sin anuncios de problemas de tráfico |
LEISURE |
Pasatiempos favoritos y a actividades recreativas |
DOCUMENT |
Programas documentales |
|
|
English
Español
Italiano Français Deutsch
Nederlands
Sp 10
Lector de CD incorporado
Reproducción de un CD
12
1 Indicador TRACK NUMBER
Visualiza la pista que está siendo reproducida actualmente.
2Indicador PLAY TIME
Visualiza el tiempo transcurrido de reproducción de la pista actual.
1 Coloque un CD en la abertura para CD.
La reproducción comenzará automáticamente.
Abertura para CD
• Se puede expulsar un CD presionando CD EJECT.
2Después colocar un CD, presione SOURCE para seleccionar el lector de CD incorporado.
3Utilice VOLUME para ajustar el nivel de sonido.
Presione VOLUME + para aumentar el volumen, y VOLUME – para disminuir el volumen.
4Para realizar el avance rápido o retroceso, mantenga presionado 2 o 3.
5Para saltar hacia atrás o hacia adelante para otra pista, presione 2 o 3.
Presionar 3 salta al inicio de la próxima pista. Presionar 2 una vez salta al inicio de la pista actual. Presionar de nuevo salta a la pista precedente.
 Notas
Notas
•El lector de CD incorporado reproduce un CD estándar, de 12 o 8 cm (simple) a la vez. No utilice un adaptador para reproducir discos de 8 cm.
•No coloque nada que no sea un CD en la abertura para CD.
•Si no se puede insertar un disco completamente o si después de insertar un disco, el disco no se reproduce, compruebe que el lado de la etiqueta del disco está hacia arriba. Presione CD EJECT para expulsar el disco, y verifique si no hay daños en el disco antes de insertarlo de nuevo.
•Si el lector de CD incorporado no funciona apropiadamente, un mensaje de error como ERROR-14 puede aparecer. Consulte
Comprensión de los mensajes de error del lector de CD incorporado en la página 17. 
11 Sp
 Loading...