


COMPACT DISC PLAYER
CDJ-1000MK2
Operating Instructions

NOTE: THE NO USER-SERVICEABLE PARTS COMPARTMENT WARNING IS LOCATED ON THE APPLIANCE BOTTOM.
2 |
<DRB1339> |
En |
[For U.S. model] |
|
IMPORTANT NOTICE |
H006AEn |
The serial number for this equipment is located in the rear panel. Please write this serial number on your enclosed warranty card and keep it in a secure area. This is for your security.
WARNING:
Handling the cord on this product or cords associated with accessories sold with the product will expose you to lead, a chemical known to the State of California and other governmental entities to cause cancer and birth defects or other reproductive harm.
Wash hands after handling
3
<DRB1339>
En
Thank you for buying this Pioneer product.
Please read through these operating instructions so you will know how to operate your model properly. After you have finished reading the instructions, put them away in a safe place for future reference.
In some countries or regions, the shape of the power plug and power outlet may sometimes differ from that shown in the explanatory drawings. However the method of connecting and operating the unit is the same.
CONTENTS |
|
CAUTIONS REGARDING HANDLING .............................................................. |
4 |
FEATURES ............................................................................................................... |
6 |
CONNECTIONS ...................................................................................................... |
7 |
PANEL FACILITIES ............................................................................................... |
9 |
Top Panel ........................................................................................................ |
9 |
Display .......................................................................................................... |
10 |
Jog Dial Display ............................................................................................ |
10 |
DISC LOADING / UNLOADING ....................................................................... |
11 |
DJ PLAYER OPERATION ................................................................................... |
11 |
Auto Cueing .................................................................................................. |
11 |
Starting Playback ......................................................................................... |
11 |
Stopping Playback ....................................................................................... |
12 |
To Pause Play ............................................................................................... |
12 |
Track Cueing ................................................................................................ |
12 |
Fast-Forward / Fast-Reverse ........................................................................ |
12 |
Cue Point Settings ........................................................................................ |
12 |
Changing Playback Speed ........................................................................... |
13 |
Applying Master Tempo ............................................................................... |
13 |
Jog Dial Functions ....................................................................................... |
13 |
Mixing Different Tracks ............................................................................... |
13 |
ADVANCED OPERATIONS ................................................................................ |
14 |
Scratch Play .................................................................................................. |
14 |
How to Spin .................................................................................................. |
14 |
How to Brake ................................................................................................ |
14 |
Hot Cue ......................................................................................................... |
14 |
Loop Playback .............................................................................................. |
14 |
Reversing Playback ...................................................................................... |
15 |
Fader Start Playback .................................................................................... |
15 |
Relay Play Using Two Players ..................................................................... |
15 |
Wave Display ................................................................................................. |
15 |
About the CD TEXT ...................................................................................... |
15 |
USING CUE POINTS / LOOP POINTS MEMORY ....................................... |
16 |
Using Internal Memory ............................................................................... |
16 |
Using a Multimedia Card ............................................................................ |
16 |
Copying MMC Data ...................................................................................... |
17 |
Copying Data in the Internal Memory ....................................................... |
17 |
TROUBLESHOOTING ......................................................................................... |
18 |
SPECIFICATIONS .................................................................................. |
Back cover |
4
<DRB1339>
En
BEFORE OPERATIONS
CAUTIONS REGARDING HANDLING
Location
Install the player in a well-ventilated location where it will not be exposed to high temperatures or humidity.
Do not install the player in a location which is exposed to direct sunlight, or near stoves or radiators. Excessive heat can adversely affect the cabinet and internal components. Installation of the player in a damp or dusty environment may aiso result in a malfunction and can be hazardous. Avoid installation near cookers etc., where the player may be exposed to oily smoke, steam or heat.
Installation guidelines
÷Placing and using the compact disc player for long periods on heat-generating sources such as amplifiers or near spotlights, etc. will affect product performance. Avoid placing the player on heat-generating sources.
÷Install this compact disc player as far as possible away from tuners and TV sets. A compact disc player installed in close proximity to such equipment may cause noise or degradation of the picture.
÷Noise may be noticeable when an indoor antenna is used. In such cases, make use of an outdoor antenna or turn off power to the compact disc player.
÷When the unit is used in a loud-sound environment, e.g., near a speaker, sound skip may occur. Install the unit away from the speaker or reduce the listening volume.
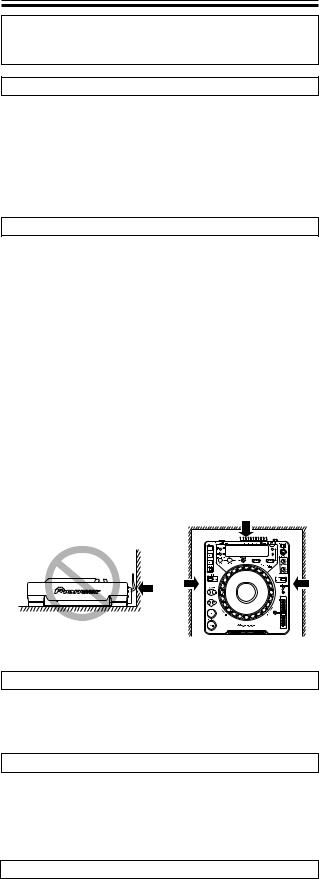
÷Place this unit on a level surface and a stable platform.
÷Be sure the player, including its audio and power supply cords, does not touch vibrating materials. Any cause of vibration other than the insulators may cause the disc to skip. Take special care when using the player while it is installed in a carrying case.
¶Please be sure to leave a space to allow for heat radiation.
Do not place on or against vibrating materials!
About the Carrying Case
Since the upper surface of the jog dial incorporates a switch mechanism, do not allow pressure to be applied to the jog dial when placing the unit in the carrying case.
Cleaning the player
To clean the PLAYER wipe with a polishing or a soft, dry cloth. For stubborn dirt, moisten a soft cloth with a weak solution of neutral detergent (diluted in five to six parts water), wring the cloth well, and wipe away the dirt. Use a dry cloth to wipe the surface dry. Do not use volatile liquids such as benzene or thinner which will damage the unit.
CD lens cleaner
The player’s pickup lens should not become dirty in normal use. If for some reason, the lens becomes soiled and malfunctions, contact your nearest PIONEER authorized service center. Lens cleaners for CD players are commercially available, but special care should be exercised in their use as some may cause damage to the lens.
BEFORE OPERATIONS: CAUTIONS REGARDING HANDLING
Storing discs
÷Discs are made of the same kinds of plastic used for conventional analog audio records. Be careful not to allow discs to warp. Always store discs in their cases vertically, avoiding locations with high heat, humidity, or extremely low temperatures. Avoid leaving discs in cars; the interior of a car in direct sunlight can become extremely hot.
÷Always read and abide by the precautionary notes listed on disc labels.
Condensation
When this unit is brought into a warm room from previously cold surroundings or when the room temperature rises sharply, condensation may form inside the unit and impair its performance. In such cases, allow the unit to stand for about an hour or raise the room temperature gradually.
Cleaning and handling compact discs
÷The presence of fingerprints or smudges on the surface of the disc will not directly affect the recorded signals, but, depending on the degree of contamination, the brightness of the light reflected from the signal surfaces may be reduced causing degradation of sound quality. Always keep your discs clean by wiping them gently with a soft cloth from the inner edge toward the outer edge.
÷If a disc becomes very dirty, dampen a soft cloth with water, (be sure to wring it out well) and wipe the away dirt gently. Remove any water drops with another soft, dry cloth.
÷Do not use record cleaning sprays or anti-static agents on discs. Never clean discs with benzene, thinner, or other volatile solvents or damage to the disc surface may result.
÷ With this player, use only those discs which
display the mark shown right (Optical au- ' dio digital discs).
÷SACD hybrid discs cannot be played.
÷When holding discs, do not touch their signal surfaces. Hold by the edges, or by one edge and the center hole.
÷Do not affix gummed labels or tape to the disc surface. Also, do not scratch or damage the label.
÷Discs rotate at high speeds inside the player. Do not use damaged, cracked or warped discs.
Do not play a CD with a special shape
Do not play a CD having other shape than a circular disc, such as heart shaped disc. Otherwise malfunction may occur.
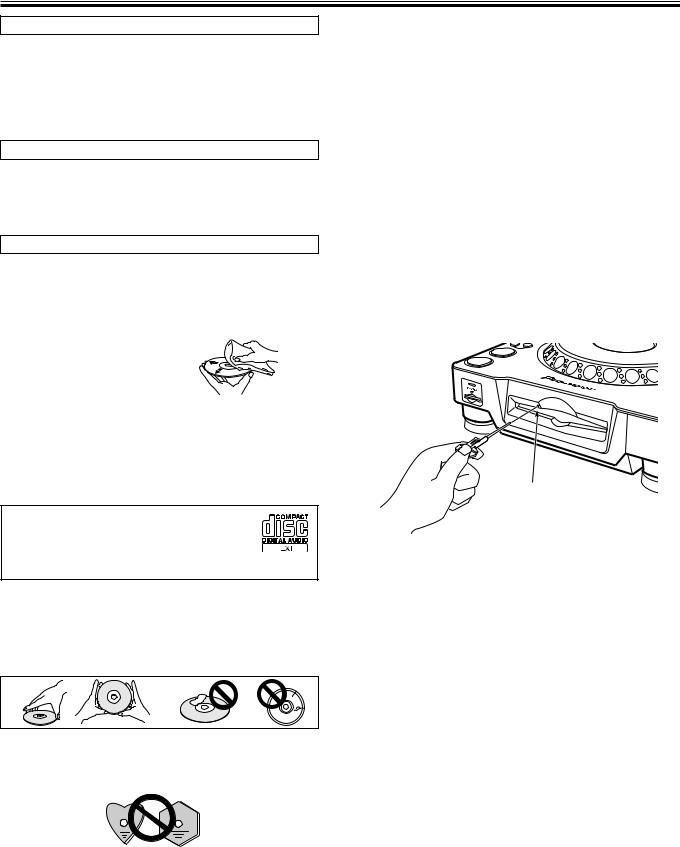
FORCED DISC EJECTION
If the eject button does not function or the disc cannot be removed, pushing the pin provided into the forced ejection hole on the front panel will enable the disc to be removed.
When performing forced ejection, be sure to follow the precautions below.
1Be sure to turn OFF the power of the CD player, and check that the disc has stopped rotating. It takes about 60 seconds for the disc to stop rotating after the
power has been turned OFF.
If forced ejection is performed while the disc is rotating;
¶As the disc will be ejected outside the CD player rotating, it may hit your finger and cause injuries.
¶As the disc will be rotating with the clamp unstable, it may be scratched.
For the above reasons, never attempt to eject the disc forcibly while it is rotating.
2 Always use the pin provided (Do not use other objects). The provided pin is found in a groove in the bottom surface of the player.
When the provided forced eject pin is inserted fully into the forced eject hole on the front panel, the loaded disc is ejected about 5-10 mm from the loading slot, making it possible to remove it by hand.
Forced ejection hole
5
<DRB1339>
En

BEFORE OPERATIONS
FEATURES
The CDJ-1000MK2 compact disc player is designed for use by DJs providing all the functions and performance required in disco clubs while offering performance, sound quality and functionality superior to any analog player.
JOG DIAL
The large 206 mm diameter Jog dial enables better handling than an analog turntable.
PITCH BEND
This function changes the music tempo depending on direction of Jog dial rotation and speed of movement.
SCRATCH PLAY
In the VINYL mode when the surface of the Jog dial is pressed playback is discontinued and then continues according to the direction and speed the dial is rotated. You can also adjust the startup when the Jog dial is touched and released to create new DJ techniques.
FRAME SEARCH
Moves the disc from pause position in frame increments (1/75 sec) when the Jog dial is rotated in pause mode.
SUPER FAST SEARCH
You can search the disc faster than normal search or track search by holding down a MANUAL SEARCH button or TRACK SEARCH button as you turn the Jog dial.
CUE
BACK CUE
After storing the Cue point in memory, press the CUE button while playing the unit to go back to the Cue point and start over.
AUTO CUE
Auto cue automatically locates the song’s start point even if it differs from the track’s frame, allowing the player to start instantly at a press of the PLAY button.
CUE POINT SAMPLER
The sound from the memorized cue point can be reproduced by one touch, which can be used as the start point check and the sampler.
REAL TIME SEAMLESS LOOP
This function simplifies setting and releasing loops. This function lets you set a loop while you are playing a track. A loop can also be set at the end of the track so that the track does not stop. In addition, an ADJUST mode has been added to enable one-touch adjustments to Loop-in and Loop-out points and facilitate loop operation.
RELOOP
Allows you to replay a loop any number of times.
Press the RELOOP button after releasing loop play to return to the loop start point. Clever use of on and off in combination with the rhythm make it possible to create new sound effects.
ON JOG DISPLAY
The center of the jog dial displays information regarding disc status, cue point position, sound memory status, Jog dial touch-detection, and VINYL mode.
WAVE DISPLAY
This display makes it possible to find the breakpoint between tracks in advance and use it as mix point or end point in the same way as you can on an analog record by checking the position of the needle in the groove.
CUE/LOOP MEMORY
This unit can store cue points of each disc in internal memory or on a Multimedia Card (MMC) (sold separately) that can be recalled for each disc.
HOT CUE
Provides instant start from any of three pre-selected hot cue points (A, B or C).
REVERSE PLAY
Set the DIRECTION switch to its forward position ([REV] position) to play the music backwards.
TEMPO CONTROL
100 mm high-precision slider coupled with a 0.02% increment digital display (within a ±6% range) allows exact control of speed to make tempo adjustments easy and accurate.
TEMPO CONTROL RANGE
The maximum variable range can be set to four variable ranges: ±6%, ±10%, ±16% and ±100% (WIDE) to facilitate adjustment.
TEMPO CONTROL RESET
Resets the tempo to 0% regardless of slider position.
MASTER TEMPO
Changes music tempo without changing pitch.
6
<DRB1339>
En
PLAYING ADDRESS
This bar graph provides a visual representation of track playback progress that enables you to see current playback position just like you can on an analog record by checking needle position. The length of the bar shows current position and a flashing bar provides advance notice of track end.
SLOT IN
Discs are loaded directly without opening doors or trays, making track selection that much faster.
FADER START
Quick start and back cue can be performed using the fader function on DJ mixers DJM-500, DJM-600, DJM-300 and DJM-3000 (all mixers are sold separately).
MULTI READ
CD-R, CD-RW discs can be replayed. (However, due to certain special characteristics of some discs, recorders as well as dirty or damaged discs, some discs may not replay properly.)
CD TEXT
CD TEXT informations are displayed if the CD includes the CD TEXT information.
 Loading...