


Operation Manual
SPH-DA210
AppRadio
Be sure to read Important Information for the User first!
Important Information for the User includes important information that you must understand before using this product.
English

Contents
Thank you for buying this Pioneer product.
Please read through these instructions so you will know how to operate your model properly. After you have finished reading the instructions, keep this document in a safe place for future reference.
01 |
Introduction |
|
|
|
Manual overview.......................................... |
5 |
|
|
|
How to use this manual............................. |
5 |
|
|
Conventions used in this manual.............. |
5 |
|
|
Terms used in this manual......................... |
5 |
|
|
iPhone / iPod compatibility........................ |
6 |
|
|
Android™ device compatibility.................. |
6 |
|
To ensure safe driving................................. |
7 |
|
|
Protecting the LCD panel and screen....... |
7 |
|
|
Notes on internal memory.......................... |
7 |
|
|
|
Before removing the vehicle battery.......... |
7 |
02 |
About AppRadio |
|
|
|
Features....................................................... |
8 |
|
|
|
Checking part names and functions......... |
8 |
|
|
Inserting and ejecting a disc..................... |
9 |
|
|
Adjusting the LCD panel angle.................. |
9 |
|
|
Connecting and disconnecting mobile |
|
|
|
devices...................................................... |
10 |
|
|
Available sources and conditions............ |
13 |
|
|
Demonstration images............................. |
13 |
03 |
Basic operation |
|
|
|
Home screen............................................. |
14 |
|
|
|
Reading the screen.................................. |
14 |
|
|
Scrolling the Home screen...................... |
14 |
|
|
Using the touch panel keys...................... |
14 |
|
Touch panel keys common to each |
|
|
|
function.................................................. |
16 |
|
|
Setting the clock....................................... |
16 |
|
|
Audio source control................................ |
16 |
|
04 |
Using the radio |
|
|
|
Starting procedure.................................... |
18 |
|
|
Reading the screen................................... |
18 |
|
|
Using the touch panel keys...................... |
18 |
|
|
Using the functions................................... |
19 |
|
|
|
Storing the strongest broadcast |
|
|
|
frequencies............................................... |
19 |
|
|
Recalling broadcast frequencies............. |
19 |
|
|
Tuning in to strong signals...................... |
19 |
05 Playing iPod music and video |
|
|
Starting procedure.................................... |
20 |
|
Reading the screen................................... |
20 |
|
Using the touch panel keys...................... |
21 |
|
Using the functions .................................. |
22 |
|
|
Narrowing down song (episode) or |
|
|
video sources with the list........................ |
22 |
|
Repeating playback.................................. |
22 |
|
Random play (shuffle).............................. |
23 |
|
Changing the audiobook speed............... |
23 |
|
Selecting song (episode) or video |
|
|
sources from the playlist screen.............. |
23 |
|
Changing the wide screen mode............. |
24 |
06 Using Pandora® internet radio |
|
|
Starting procedure.................................... |
25 |
|
Reading the screen................................... |
25 |
|
Using the touch panel keys...................... |
26 |
|
Using the function ................................... |
26 |
|
|
Selecting a Pandora station from the |
|
|
list.............................................................. |
26 |
07Viewing/operating mobile device applications
Using Apps/MirrorLink source................. |
27 |
|
AppRadio Mode........................................ |
27 |
|
|
MirrorLink mode....................................... |
29 |
|
App Mode.................................................. |
30 |
08Registering and connecting a Bluetooth device
Preparing communication devices......... |
31 |
|
Registering your Bluetooth devices......... |
31 |
|
|
Searching for nearby Bluetooth |
|
|
devices...................................................... |
31 |
|
Pairing from your Bluetooth devices....... |
33 |
Deleting a registered device..................... |
33 |
|
Connecting a registered |
|
|
Bluetooth device manually................... |
34 |
|
Setting the Bluetooth auto connect |
|
|
function.................................................. |
35 |
|
Disconnecting a Bluetooth device .......... |
35 |
|
Switching product visibility...................... |
36 |
|
2 En

Contents
|
Changing a PIN code................................ |
36 |
|
|
Displaying Bluetooth device address...... |
37 |
|
09 |
Using the Bluetooth audio player |
|
|
|
Starting procedure.................................... |
38 |
|
|
Reading the screen................................... |
38 |
|
|
Using the touch panel keys...................... |
39 |
|
10 |
Playing audio CDs |
|
|
|
Starting procedure.................................... |
40 |
|
|
Reading the screen................................... |
40 |
|
|
Using the touch panel keys...................... |
40 |
|
|
Using the functions................................... |
41 |
|
|
|
Selecting a track from the list.................. |
41 |
|
|
Repeating playback.................................. |
41 |
|
|
Random play............................................. |
41 |
|
|
Selecting the target data to be played..... |
41 |
|
|
Setting the sound retriever function........ |
41 |
11 |
Playing music files on ROM |
|
|
|
Starting procedure.................................... |
42 |
|
|
Reading the screen................................... |
42 |
|
|
Using the touch panel keys...................... |
42 |
|
|
Using the functions................................... |
43 |
|
|
|
Selecting a file from the list..................... |
43 |
|
|
Repeating playback.................................. |
43 |
|
|
Random play............................................. |
43 |
|
|
Selecting the target data to be played..... |
44 |
|
|
Setting the sound retriever function........ |
44 |
12 Playing DVD-Video |
|
||
|
Starting procedure.................................... |
45 |
|
|
Reading the screen................................... |
45 |
|
|
Using the touch panel keys...................... |
45 |
|
|
Using the functions................................... |
46 |
|
|
|
Searching for a specific scene and |
|
|
|
starting playback from a specified time |
|
|
|
(Direct search).......................................... |
46 |
|
|
Changing the wide screen mode............. |
47 |
|
|
Frame-by-frame playback ........................ |
47 |
|
|
Slow motion playback............................... |
47 |
|
|
Operating the disc menu......................... |
47 |
|
|
Selecting the DVD menu by touch |
|
|
|
panel keys................................................. |
48 |
|
Repeating playback.................................. |
48 |
|
Changing the audio language |
|
|
(multi-audio).............................................. |
48 |
|
Changing the subtitle language.............. |
49 |
|
Changing the audio output...................... |
49 |
|
Changing the viewing angle |
|
|
(Multi-angle).............................................. |
49 |
|
Resuming playback (Bookmark).............. |
49 |
13 Using hands-free phoning |
|
|
Starting procedure.................................... |
50 |
|
Reading the screen................................... |
50 |
|
Using the touch panel keys...................... |
50 |
|
Adjusting the phone volume.................... |
51 |
|
Making a phone call.................................. |
51 |
|
|
Direct dialing............................................ |
51 |
|
Calling a number in the phone book....... |
51 |
|
Selecting a number using alphabet |
|
|
search mode............................................. |
52 |
|
Dialing from the history............................ |
52 |
Answering an incoming call.................... |
53 |
|
Using advanced functions........................ |
53 |
|
|
Answering a call automatically................ |
53 |
|
Switching the ring tone............................ |
53 |
|
Storing a phone number.......................... |
53 |
|
Using the preset dial lists........................ |
54 |
|
Inverting the names.................................. |
54 |
|
Setting the private mode.......................... |
54 |
|
Adjusting the other party’s listening |
|
|
volume....................................................... |
54 |
Using the voice recognition function |
|
|
(for iPhone)............................................ |
55 |
|
Notes for hands-free phoning.................. |
55 |
|
|
General notes............................................ |
55 |
|
Registration and connection.................... |
55 |
|
Making and receiving calls...................... |
56 |
|
The received call history and the dialed |
|
|
number history.......................................... |
56 |
|
Phone book transfers............................... |
56 |
En 3

Contents
14 Customizing preferences |
|
|
Customizing the video setup settings..... |
57 |
|
|
Setting the top-priority subtitle |
|
|
languages.................................................. |
57 |
|
Setting the top-priority audio |
|
|
languages.................................................. |
57 |
|
Setting the top-priority menu |
|
|
languages.................................................. |
57 |
|
Setting the angle icon display.................. |
58 |
|
Setting the aspect ratio............................ |
58 |
|
Setting the parental lock.......................... |
58 |
|
Setting the auto play................................ |
59 |
Customizing the audio settings............... |
59 |
|
|
Using fader/balance adjustment............. |
59 |
|
Using the equalizer................................... |
60 |
|
Adjusting loudness................................... |
61 |
|
Using the subwoofer output..................... |
61 |
|
Enhancing bass (Bass Booster)............... |
62 |
|
Using the high pass filter......................... |
62 |
|
Adjusting source levels............................ |
62 |
Customizing the system settings............. |
63 |
|
|
Setting the type of the mobile device |
|
|
to be connected........................................ |
63 |
|
Setting the rear output............................. |
63 |
|
Setting the RCA output............................ |
64 |
|
Selecting the system language................ |
64 |
|
Setting the keyboard layout...................... |
65 |
|
Switching the ever scroll function........... |
65 |
|
Clearing Bluetooth memory..................... |
65 |
|
Updating Bluetooth connection |
|
|
software..................................................... |
66 |
|
Displaying the Bluetooth system |
|
|
version....................................................... |
66 |
|
Setting the rear view camera................... |
66 |
|
Setting the video signal............................ |
67 |
|
Adjusting the picture................................ |
67 |
|
Setting the clock mode............................ |
68 |
|
Selecting the background display........... |
68 |
|
Restoring the default settings.................. |
68 |
|
Checking the connections of leads......... |
69 |
|
Switching the App launch assist |
|
|
function (for iPhone)................................ |
69 |
|
Displaying the firmware version.............. |
70 |
|
Updating the firmware version................ |
70 |
Customizing the favorites menu.............. |
70 |
|
|
Registering menu items........................... |
70 |
Removing menu items............................. |
71 |
|
Turning off the screen............................... |
71 |
|
Appendix |
|
|
Troubleshooting........................................ |
72 |
|
Positioning technology............................. |
77 |
|
|
Positioning by GPS................................... |
77 |
Handling large errors................................ |
77 |
|
|
When positioning by GPS is |
|
|
impossible................................................. |
77 |
|
Conditions likely to cause noticeable |
|
|
positioning errors..................................... |
77 |
Handling and care of discs...................... |
80 |
|
|
Built-in drive and care.............................. |
80 |
|
Ambient conditions for playing a disc..... |
80 |
|
AVCHD recorded discs............................. |
80 |
|
Playing DualDisc...................................... |
80 |
Detailed information for playable |
|
|
media ..................................................... |
81 |
|
|
Compatibility............................................. |
81 |
|
Media compatibility chart........................ |
82 |
|
Example of a hierarchy............................. |
83 |
Language code chart for DVDs................ |
84 |
|
Setting list.................................................. |
85 |
|
|
Video Setup settings................................. |
85 |
|
Audio settings........................................... |
85 |
|
System settings........................................ |
85 |
|
Other settings........................................... |
85 |
4 En

Introduction
Manual overview
•Before using this product, be sure to read Important Information for the User (a separate manual), which contains warnings, cautions, and other important information that you should note.
•The screens shown in the examples may differ from actual screens.
Actual screens may be changed without notice for performance and function improvements.
How to use this manual
Finding the operation procedure for what you want to do
When you have decided what you want to do, you can find the page you need from the Contents.
Finding customizable settings
If you want to look up the settings of this product, refer to Setting list at the end of the manual.
Conventions used in this manual
Before moving on, take a few minutes to read the following information about the conventions used in this manual. Familiarity with these conventions will help you greatly as you learn how to use your new equipment.
•Buttons on this product are described in bold lettering:
e.g.)
Press the Home button to display the Home screen.
•Menu items, screen titles, and functional components are described in bold with double quotation marks “ ”:
e.g.)
Set “Dimmer” to “OFF”.
|
|
Chapter |
|
|
01 |
• Touch panel keys that are available on the |
Introduction |
|
• Extra information, alternatives and other |
||
screen are described in bold in brackets |
|
|
[ ]: |
|
|
e.g.) |
|
|
Tap [Radio] on the Home screen. |
|
|
notes are presented in the following for- |
|
|
mat: |
|
|
e.g.) |
|
|
If the home location has not been stored |
|
|
yet, set the location first. |
|
|
• Functions of other keys on the same |
|
|
screen are indicated with at the begin- |
|
|
ning of the description: |
|
|
e.g.) |
|
|
■ If you touch [OK], the entry is deleted. |
|
|
• References are indicated like this: |
|
|
e.g.) |
|
|
Ü For details, refer to Answering a call |
|
|
automatically on page 53. |
|
|
Terms used in this manual |
|
|
“iPhone” |
|
|
In this manual, iPod and iPhone are |
|
|
referred to as iPhone. |
|
|
“Android™ device” |
|
|
In this manual, each Android mobile device is |
|
|
referred to as Android device. |
|
|
“MirrorLink™ device” |
|
|
In this manual, each device that supports |
|
|
MirrorLink |
connection is referred to as |
|
MirrorLink device.
“Mobile device”
In this manual, all of “iPhone”, “Android device” and “MirrorLink device” are generically referred to as mobile device.
En 5

Chapter
01 Introduction
iPhone / iPod compatibility
This product supports only the following iPhone models and iPhone software versions. Others may not work correctly.
Made for
•iPhone 5: iOS 6.0
•iPhone 4S: iOS 6.0
•iPhone 4: iOS 6.0
•iPhone 3GS: iOS 4.3.3
•iPod touch (5th generation): iOS 6.0
•iPod touch (4th generation): iOS 5.1.1
•iPod touch (3rd generation): iOS 5.1.1
•iPod touch (2nd generation): iOS 4.2.1
•iPod classic 160GB (2009): Ver. 2.0.4
•iPod classic 120GB: Ver. 2.0.1
•iPod classic 80GB: Ver. 1.1.2
•iPod classic 160GB (2007): Ver. 1.1.2
•iPod nano (6th generation): Ver. 1.2
•iPod nano (5th generation): Ver. 1.0.2
•iPod nano (4th generation): Ver. 1.0.4
•iPod nano (3rd generation): Ver. 1.1.3
Operation methods may vary depending on the iPhone models and the software version of iPhone.
Depending on the software version of the iPhone, it may not be compatible with this equipment.
For details about iPhone compatibility with this product, refer to the information on our website.
This manual applies to the following iPod models.
iPod with 30-pin connector
•iPod touch 4th generation
•iPod touch 3rd generation
•iPod touch 2nd generation
•iPod classic 160GB
•iPod classic 120GB
•iPod classic 80GB
•iPod nano 6th generation
•iPod nano 5th generation
•iPod nano 4th generation
•iPod nano 3rd generation
•iPhone 4S
•iPhone 4
•iPhone 3GS
iPod with Lightning connector
•iPod touch 5th generation
•iPhone 5
Android™ device compatibility
Operation methods may vary depending on the Android devices and the software version of Android OS.
Depending on the version of the Android OS, it may not be compatible with this equipment.
Compatibility with all Android devices is not guaranteed.
For details about Android device compatibility with this product, refer to the information on our website.
6 En

Introduction
To ensure safe driving
Certain functions (such as viewing of app based visual content and certain touch panel key operations) offered by this product could be dangerous and/or unlawful if used while driving. To prevent such functions from being used while the vehicle is in motion, there is an interlock system that senses when the parking brake is set. If you attempt to use the functions described above while driving, they will become disabled until you stop the vehicle in a safe place, and apply the parking brake. Please keep the brake pedal pushed down before releasing the parking brake.
Protecting the LCD panel and screen
Do not allow direct sunlight to fall on the LCD screen when this product is not being used. Extended exposure to direct sunlight can result in LCD screen malfunction due to the resulting high temperatures.
When using a cellular phone, keep the antenna of the cellular phone away from the LCD screen to prevent disruption of the video in the form of spots, colored stripes, etc.
To protect the LCD screen from damage, be sure to tap the touch panel keys with your finger only and gently touch the screen.
Notes on internal memory
Before removing the vehicle battery
If the battery is disconnected or discharged, all stored memory (except the registered Bluetooth device list) will be erased and must be reprogrammed.
Chapter
01
Introduction
En 7

Chapter
02 About AppRadio
Features
Listening to the radio
You can listen to the radio using this product.
Playing iPod music and video
You can play and operate audio sources and video sources with the iPhone connected.
Viewing/operating mobile device applications
With the App Mode, you can view the screen image currently displayed on the mobile device with this product’s display.
When an iPhone with 30-pin connector is connected, the screen image of the application currently used is displayed with the
App Mode.
With the AppRadio Mode and the MirrorLink mode, you can not only view the screen image but also operate AppRadio compatible applications of the mobile device via the display with multi-touch gestures like tapping, dragging, scrolling, and flicking.
Voice recognition function
You can use the voice recognition function when an iPhone is connected via the Bluetooth® wireless technology.
Hands-free phoning
You can control the Bluetooth connection of the mobile device, and make a call using the incoming or outgoing call histories, transferred phone book, or by dialing.
Using the Bluetooth audio player
You can play and operate audio sources with the audio device connected via Bluetooth profile(s) (A2DP/AVRCP).
Displaying the rear view camera image
You can display what is behind the vehicle if a rear view camera (e.g. ND-BC6) (sold separately) is connected to the system.
Mixing audio output
You can mix the audio output of an application with the audio output of the other sources (radio, iPod, Bluetooth audio or disc) in the
AppRadio Mode or the MirrorLink mode.
8 En
Checking part names and functions
|
|
|
|
|
|
|
|
|
|
|
|
|
|
|
|
|
|
|
|
|
|
|
|
|
|
|
|
|
|
|
|
|
|
|
|
|
|
|
|
|
2 |
3 4 5 6 |
|
||||
Available buttons will light according to the connected device.
1Eject button
•Press the Eject button to adjust the LCD panel angle.
•Press and hold the Eject button to insert or eject a disc.
2 Volume (+/–) button
3Home button
•Press the Home button to display the Home screen.
In the AppRadio Mode and the
MirrorLink mode, when you press the Home button, the Application menu screen is displayed. To display the main Home screen, press the Home button again.
•Press the Home button twice, the audio source control keys will be displayed onscreen.
•Press and hold the Home button to launch the voice recognition function when an iPhone is connected via the Bluetooth wireless technology.
4 LCD screen
5 Menu button (for Android devices and
MirrorLink devices)
•Press the Menu button to display the menu screen. The Menu button is available while running the AppRadio app or other supported applications.
•The Menu button may be disabled by some models of the connected MirrorLink device.
About AppRadio
6 Back button (for Android devices and
MirrorLink devices)
•Press the Back button to return the previous screen. The Back button is available while running the AppRadio app or other supported applications.
•The Back button may be disabled by some models of the connected MirrorLink device.
Inserting and ejecting a disc
 WARNING
•Keep hands and fingers clear of this product when opening, closing, or adjusting the LCD panel.
Be especially cautious of children’s hands and fingers.
•Do not use with the LCD panel left open. If the LCD panel is left open, it may result in injury in the event of an accident.
 CAUTION
•Do not open or close the LCD panel by force. This may cause a malfunction.
•Do not operate this product the LCD panel has completely opened or closed. If this product is operated while the LCD panel is opening or closing, the LCD panel may stop at that angle for safety.
•Do not place a glass or can on the open LCD panel. Doing so may break this product.
•Do not insert anything other than a disc into the disc-loading slot.
1Press and hold the Eject button to open the LCD panel and eject the disc-loading slot .
2Insert or remove a disc.
3Press the Eject button to retract the disc-loading slot and close the LCD panel.
Chapter
02
Adjusting the LCD panel angle
WARNING |
About |
|
|
||
Keep hands and fingers clear of the product |
|
|
when opening, closing, or adjusting the LCD |
AppRadio |
|
panel. Be especially cautious of children’s |
||
|
||
hands and fingers. |
|
|
CAUTION |
|
Do not open or close the LCD panel by force. This may cause a malfunction.
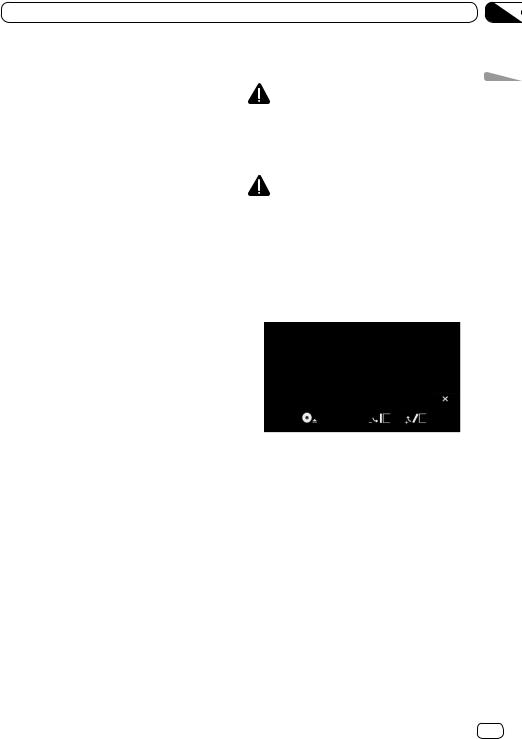
1 Press the Eject button to display the flap menu screen.
2 Tap  or
or  to adjust the angle.
The angle can be adjusted on a level of zero to five both for the tilt down and up positions.
3 Tap  to close the flap menu screen.
You can also insert and eject a disc by tapping  on the flap menu screen.
En 9

Chapter
02 About AppRadio
Connecting and disconnecting mobile devices
 WARNING
Certain uses of a mobile device may not be legal while driving in your jurisdiction, so you must be aware of and obey any such restrictions.
If in doubt as to a particular function, only perform it while the car is parked. No feature should be used unless it is safe to do so under the driving conditions you are experiencing.
 CAUTION
•To prevent data loss and damage to the mobile device, never remove it from this product while data is being transferred.
•If data loss or corruption occurs on the mobile device for any reason, it is usually not possible to recover the data. Pioneer accepts no liability for damages, costs or expenses arising from data loss or corruption.
•For safety reasons, never operate this product or mobile devices while driving. To operate this product or mobile devices, stop the vehicle in a safe place, apply the parking brake and operate them according to law.
Connect your iPhone with Lightning connector
Using the following cable and adapter enables you to connect your iPhone to this product.
•HDMI/USB interface for iPod / iPhone (CD-IH202) (sold separately)
•Lightning to USB Cable (CD-IU52) (sold separately)
•Lightning Digital AV Adapter (Apple Inc. products) (sold separately)
ÜFor connecting iPhone with Lightning connector, refer to Installation Manual.
[iPod] is disabled when an iPhone with Lightning connector is connected. Please use the CarMediaPlayer to play music or videos in the AppRadio Mode.
For details about the CarMediaPlayer, refer to the information on our website.
1Set “App Connection Settings” to “iPhone (Digital AV)” before connecting your iPhone with Lightning connector.
ÜFor detailed procedures, refer to Setting the type of the mobile device to be connected on page 63.
2Unlock your iPhone and then connect the iPhone to this product.
The [Apps] icon on the Home screen changes to the active state for iPhone, and you are now ready to view the screen image of the iPhone (App Mode).
ÜFor details of the App Mode, refer to Chapter 7.
3Register your iPhone with Lightning connector and connect it to this product via the Bluetooth wireless technology.
ÜFor detailed procedures, refer to Registering your Bluetooth devices on page 31.
The [Apps] icon on the Home screen changes to the state for the AppRadio Mode, and you are now ready to use the AppRadio Mode.
ÜFor details of AppRadio Mode, refer to Chapter 7.
10 En
About AppRadio
When you make hands-free phoning or use your iPhone with Lightning connector as a Bluetooth audio device, you must make the Bluetooth connection, but do not have to make the wired connection. The Bluetooth audio sound may not output sometimes when iPhone is wired.
Disconnecting your iPhone
 Pull out the iPhone cable after checking that no data is being accessed, and disconnect Bluetooth connection.
Connect your iPhone with 30-pin connector
Using the separately sold USB interface cable for iPod / iPhone (CD-IU201N) enables you to connect your iPhone to this product.
Connection via a USB hub is not possible.
1 Set “App Connection Settings” to “Others” before connecting your iPhone with 30-pin connector.
ÜFor detailed procedures, refer to Setting the type of the mobile device to be connected on page 63.
2 Unlock your iPhone and then connect the iPhone to this product.
The [Apps] and [iPod] icons on the Home screen change to active, and you are now ready to use the AppRadio Mode and to play iPod contents.
ÜFor details of AppRadio Mode, refer to Chapter 7.
ÜFor detailed procedure of playing iPod contents, refer to Chapter 5.
When you make hands-free phoning or use your iPhone with 30-pin connector as a Bluetooth audio device, you must make the Bluetooth connection, but do not have to make the wired connection. The Bluetooth audio sound may not output sometimes when iPhone is wired.
ÜFor detailed procedures, refer to Registering your Bluetooth devices on page 31.
Chapter
02
Disconnecting your iPhone |
|
||
Pull out the iPhone cable after check- |
About |
||
ing that no data is being accessed. |
|||
|
|||
Connect your Android device (HDMI |
AppRadio |
||
connection/MHL connection) |
|||
|
|||
Using the separately sold App Connectivity Kit |
|
||
(CD-AH200) enables you to connect your |
|
||
Android |
device to this product. |
|
|
1 Set “App Connection Settings” to “Others” before connecting your Android device.
ÜFor detailed procedures, refer to Setting the type of the mobile device to be connected on page 63.
2Unlock your Android device and connect the Android device to this product.
The [Apps] icon on the Home screen changes to the active state for Android device, and you are now ready to view the screen image of the Android device (App Mode).
ÜFor details of App Mode refer to Chapter 7.
The cable connection method varies depending on your device.
ÜFor details, refer to the App Connectivity Kit (CD-AH200) manual.
Follow the next procedure only when you use the AppRadio Mode.
3Register your Android device and connect it to this product via the Bluetooth wireless technology.
ÜFor detailed procedures, refer to Registering your Bluetooth devices on page 31.
The [Apps] icon on the Home screen changes to the state for the AppRadio Mode, and you are now ready to use the AppRadio Mode.
ÜFor details of AppRadio Mode, refer to Chapter 7.
En 11
Chapter
02About AppRadio
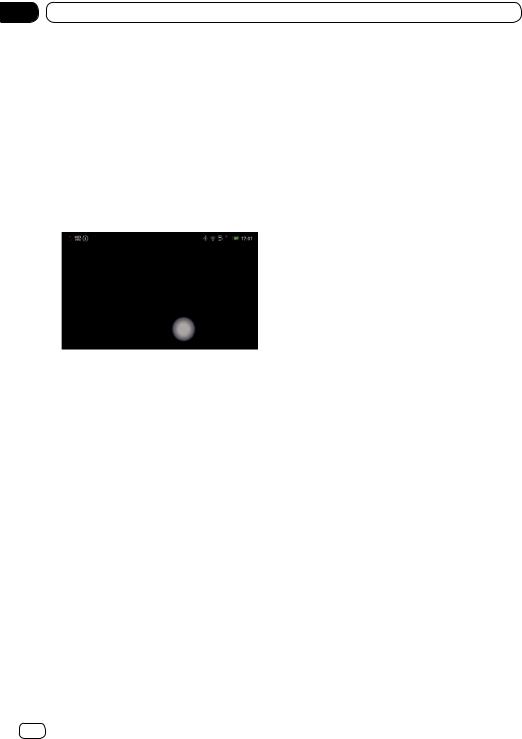
When you use the AppRadio Mode, you must make the Bluetooth connection with Serial Port Profile (SPP) from this product.
When you make hands-free phoning or use your Android device as a Bluetooth audio device, you must make the Bluetooth connection, but do not have to make the wired connection. The Bluetooth audio sound may not output sometimes when Android device is wired.
When an Android device is first connected to this product, touch the white dot to activate the connection.
Disconnecting your Android device
 Pull out the cables after checking that no data is being accessed, and disconnect Bluetooth connection.
Connect your MirrorLink device
Using the separately sold USB interface cable for MirrorLink (CD-MU200) you to connect your MirrorLink device to this product.
ÜFor connecting MirrorLink device, refer to
Installation Manual.
1 Set “App Connection Settings” to “Others” before connecting your MirrorLink device.
ÜFor detailed procedures, refer to Setting the type of the mobile device to be connected on page 63.
2 Unlock your MirrorLink device and then connect the device to this product.
The [MirrorLink] icon on the Home screen changes to the active state for MirrorLink device, and you are now ready to use the MirrorLink mode.
ÜFor details of MirrorLink, refer to Chapter 7.
When you make hands-free phoning or use your MirrorLink device as a Bluetooth audio device, you must make the Bluetooth connection, but do not have to make the wired connection. The Bluetooth audio sound may not output sometimes when MirrorLink device is wired.
ÜFor detailed procedures, refer to Registering your Bluetooth devices on page 31.
Disconnecting your MirrorLink device
 Pull out the USB cable after checking that no data is being accessed.
12 En

About AppRadio
Available sources and conditions
The available sources varies according to conditions as follows.
Sources |
Conditions |
Radio |
Always available. |
iPod |
Available only when an iPod or |
|
iPhone with 30-pin connector is con- |
|
nected to this product. |
Apps |
Available only when an iPhone or |
|
Android device is connected to this |
|
product. |
|
The state of the [Apps] icon varies |
|
according to the connected device |
|
and its state. |
|
Ü For details, refer to Using the touch |
|
panel keys on page 14. |
MirrorLink |
Available only when a MirrorLink |
|
device is connected to this product. |
Pandora® |
Available only when an iPhone or |
|
Android device with the Pandora |
|
application installed is connected. |
Bluetooth |
Always available. When you listen to |
(Bluetooth |
music, you must connect an audio |
Audio) |
device to this product via Bluetooth |
|
profiles (A2DP/ AVRCP). |
Disc |
Available only when a playable disc is |
|
inserted. |
Phone |
Available only when your mobile de- |
|
vice is connected to this product with |
|
Bluetooth wireless technology. |
Demonstration images
If you do not operate this product for 30 seconds while displaying the OFF screen, demonstration images are displayed.
When you turn the ignition switch off (ACC OFF) and then turn it on again (ACC ON), the demonstration images will not be displayed.
If you reset the system, the demonstration images will be displayed again.
Chapter
02
AppRadio About
En 13

Chapter
03 Basic operation
Home screen
The Home screen is the main screen that allows access to your entertainment sources, apps, settings and more.
Reading the screen
Page one
Using the touch panel keys
Page one
7
 6
6
Page two
Day of the week indicatorCurrent time
Scroll area
Current source indicator
The current source indicator appears under the startup menu icon on the Home screen. When mixing sources, the indicators appear below both menu icons.
Scrolling the Home screen
 Display the second page by flicking the scroll area on the Home screen.
When you scroll the Home screen, flick the scroll area on the Home screen.
Radio
Displays the radio source screen.
ÜFor details, refer to Chapter 4.
iPod
Displays the iPod source screen.
ÜFor details, refer to Chapter 5.
3 Apps/MirrorLink
Turns into the AppRadio Mode, the
MirrorLink mode or the App Mode. The icon state changes as follows:
Icons States
Appears when your iPhone with Lightning connector is connected via the supplied cable. This icon shows to be ready to start the App Mode for iPhone.
Appears when your iPhone with Lightning connector is connected via the supplied cable and processing the Bluetooth connection.
This icon shows to be ready to start the AppRadio Mode for iPhone.
•Appears when your iPhone with Lightning connector is connected via the supplied cable and Bluetooth wireless connection is established.
•Appears when your iPhone with 30-pin connector is connected via the separately sold USB interface cable for iPod / iPhone (CD-IU201N).
Appears when your Android device is connected via the separately sold App Connectivity Kit. This icon shows to be ready to start the App Mode for Android device.
14 En
Basic operation
Appears when your Android device is connected via the separately sold App Connectivity Kit and processing the Bluetooth connection.
Appears when your Android device is connected via the separately sold App Connectivity Kit and Bluetooth wireless connection (SPP) is established.
This icon shows to be ready to start the AppRadio Mode for Android device.
Appears when your MirrorLink device is connected via the supplied cable for MirrorLink. This icon shows to be ready to start the MirrorLink mode.
ÜFor details of Apps/MirrorLink, refer to Chapter 7.
When two devices of iPhone, Android or MirrorLink are connected simultaneously, the preference of the connected devices is the following order: iPhone with Lightning connector or Android device, MirrorLink device, and iPhone with 30-pin connector.
Pandora® internet radio
Displays the Pandora application screen when an iPhone or Android device with the Pandora application installed is connected. Ü For details, refer to Chapter 6.
5Bluetooth
Displays the Bluetooth audio source screen.
ÜFor details, refer to Chapter 9.
6 Phone
Displays the phone menu screen.
When Bluetooth connection is established, a Bluetooth icon is displayed on this icon.
ÜFor details, refer to Chapter 13.
7Clock adjustment
Adjusts the current date and time.
ÜFor details, refer to Setting the clock on page 16.
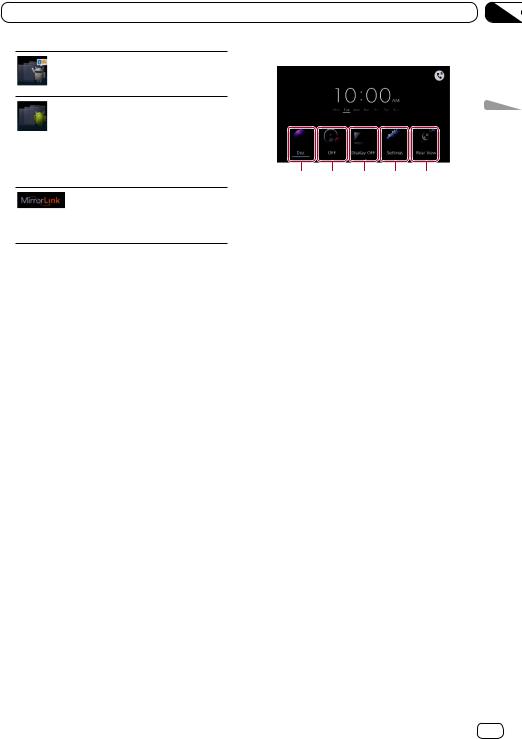
Page two
8 9 0 - ^
8Disc
Displays the disc screen when a playable disc is inserted.
ÜFor details, refer to Chapter 10, Chapter 11 and Chapter 12.
9OFF
Turns the source off.
0Display OFF
Turns the screen off.
ÜFor details, refer to Turning off the screen on page 71.
-Settings
Displays the settings menu screen.
ÜFor details, refer to Chapter 14.
^ Rear View
Displays the rear view camera image.
ÜFor details, refer to Setting the rear view camera on page 66.
Chapter
03
operation Basic
En 15
Chapter
03 Basic operation
Touch panel keys common to each function
The touch panel keys for operations common to each function are described below.
E.g. “Connection” screen


Returns to the previous screen.
Returns to the previous list/category (the folder/category one level higher).
Returns to the top category menu screen.
Scrolls through the list and allows you to view the remaining items.
The selected item is highlighted.
Setting the clock
1Touch and hold the current time or week indicator on the Home screen.
2Tap the item to set.
3Tap  or
or  to set the current date and time.
Initially, the clock is set to 12-hour format. You can change the time format.
ÜFor details, refer to Setting the clock mode on page 68.
Audio source control
When you press the Home button twice, the audio source control keys will be displayed on-screen. Using these keys, you can operate the audio source currently playing in the background without leaving the screen currently displayed.
|
|
|
|
1In AppRadio Mode/MirrorLink mode:
Selects whether to mix the audio output of the application in the AppRadio Mode or the MirrorLink mode with the audio output of the tuner, iPod*, Bluetooth audio or disc.
The icon state changes as follows.
Icons |
Conditions |
MIX Radio |
Appears when the radio audio |
|
source is mixed. |
MIX iPod* |
Appears when the iPod audio |
|
source is mixed. |
MIX |
Appears when the Bluetooth |
BT Audio |
audio source is mixed. |
MIX Disc |
Appears when the disc audio |
|
source is mixed. |
*The iPod audio source cannot be mixed in the AppRadio Mode when an iPhone is connected.
When the icon is tapped, the source list and the volume controller appear on the screen. You can select a source to be mixed, and also change the volume of audio output in the AppRadio Mode or the MirrorLink mode by tapping  or
or  .
.
In audio source:
Selects whether to mix the audio output of the tuner, iPod* Bluetooth audio or disc with the audio output of the application in the AppRadio Mode or the MirrorLink mode.
16 En

Basic operation
*In iPod source, the audio output of the application in the AppRadio Mode cannot be mixed when an iPhone is connected.
The icon state changes as follows.
Icons |
Conditions |
MIX ON |
Appears when the audio sourc- |
|
es are mixed. |
MIX OFF |
Appears when there is no mixa- |
|
ble source. |
When the icon is tapped, the switching list and the volume controller appear on the screen. You can switch the function between on and off, and also change the volume of audio output in the AppRadio Mode or the MirrorLink mode by tapping
 or
or  .
.
2Switches between muted and unmuted audio source.
When muted, is displayed, and when unmuted, is displayed.
3Moves to the next or previous song, file or chapter when [iPod] , [Apps], [MirrorLink], [Bluetooth] or [Disc] is selected as the source.
Moves to the next or previous preset channel when [Radio] is selected as the source.
Skips the current song by tapping |
, and |
|
disables |
when [Pandora] is selected |
|
as the source. |
|
|
When MIX is on: switches the source screen to be controlled in the Apps or
MirrorLink source.
When MIX is off: displays the Home screen in the Apps or the MirrorLink source.
This function is disabled in the other sources.
5Switches between playback and pause when [iPod], [Apps] , [MirrorLink], [Pandora], [Bluetooth] or [Disc] is selected as the source.
Switches the frequency bands when [Radio] is selected as the source.
Chapter
03
6Turns the screen off. To turn it back on, tap anywhere on the screen or press the
Home, Menu Back or Eject buttons.
When you turn the ignition switch off (ACC |
Basic |
OFF) and then turn it on again (ACC ON), |
|
these settings will be reset. |
|
|
operation |
En 17
Chapter
04 Using the radio
Starting procedure
1Press the Home button to display the Home screen.
2Tap [Radio] on the Home screen.
ÜFor details, refer to Home screen on page 14.
3Use the touch panel keys on the screen to control the radio.
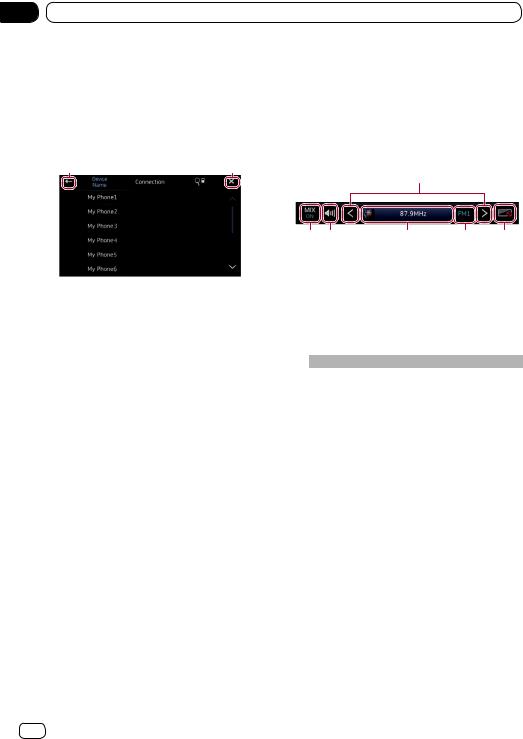
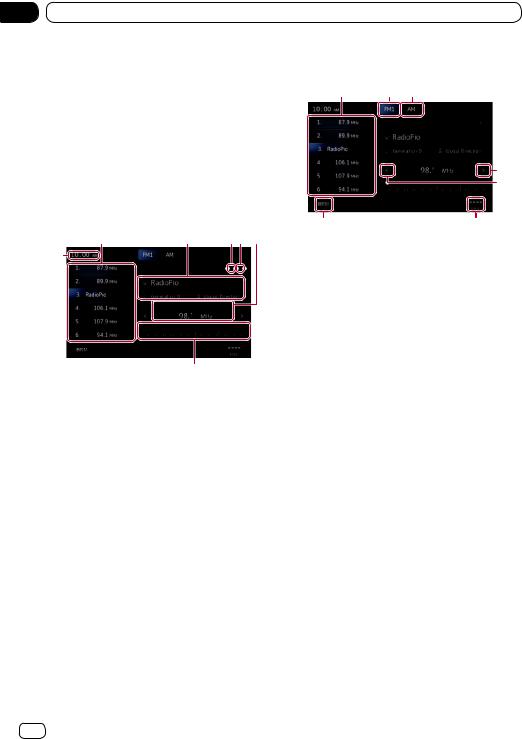
Reading the screen
|
|
|
Preset channel keys
ÜFor details, refer to Storing the strongest broadcast frequencies on page 19.
Current broadcast information
The following information is displayed:
• : Program service (PS) name
• : Song title
• : Artist name
STEREO indicator
Shows that the frequency selected is being broadcast in stereo.
Signal level indicator
Shows the signal strength of the selected frequency.
Frequency indicatorFrequency scale
Current time
Using the touch panel keys

Recalls the desired broadcast frequency. Holding down the key stores the current tuning frequency in memory.
ÜFor details, refer to Recalling broadcast frequencies on page 19.
Switches the band between FM1, FM2 and FM3. Also switches to the FM band while receiving the AM band.
Switches to the AM band while receiving the FM band.
Raises frequencies in one-step increments. Holding down the key and the tuner will scan frequencies until a broadcast strong enough for good reception is found.
Lowers frequencies in one-step increments. Holding down the key and the tuner will scan frequencies until a broadcast strong enough for good reception is found.
Switches the reception level.
ÜFor details, refer to Tuning in to strong signals on page 19.
Stores the strongest broadcast frequencies.
Ü For details, refer to Storing the strongest
broadcast frequencies on page 19.
If you touch and hold the icon, pop-up text explaining the function of the icon is displayed.
18 En

Using the radio
Using the functions
Storing the strongest broadcast frequencies
This function automatically assigns frequencies with good reception to the preset channels in the selected band.
You can update six channels in each band.
Storing broadcast frequencies may replace broadcast frequencies you have already saved.
The lowest frequency is registered for channels that could not be registered automatically.
Tap  .
.
Recalling broadcast frequencies
 Tap any frequency on the preset channel keys.
Tuning in to strong signals
Local seek tuning lets you tune in to only those radio stations with sufficiently strong signals for good reception.
Tap |
or |
to switch the reception |
|
level between the following levels: |
|||
FM: |
(OFF) |
(LEVEL1) |
(LEVEL2) |
(LEVEL3) |
(LEVEL4) |
|
|
AM: |
(OFF) |
(LEVEL1) |
(LEVEL2) |
The highest level setting allows reception of only the strongest stations, while lower levels allow the reception of weaker stations.
Chapter
04
radio the Using
En 19
Chapter
05 Playing iPod music and video
[iPod] source is enabled only when an iPod or iPhone with 30-pin connector is connected to this product. When an iPhone with Lightning connector is connected, [iPod] is disabled. Please use the CarMediaPlayer to play music or videos in the AppRadio Mode.
For details about the CarMediaPlayer, refer to the information on our website.
Starting procedure
1Set “App Connection Settings” to “Others”.
ÜFor detailed procedures, refer to Setting the type of the mobile device to be connected on page 63.
2Connect your iPod.
ÜFor details, refer to Connect your iPhone with 30-pin connector on page 11.
3Press the Home button to display the Home screen.
4Tap [iPod] on the Home screen.
ÜFor details, refer to Home screen on page 14.
5Select the song (episode) or video source you want to play, and switch the operation screen.
Ü For details, refer to Selecting song (episode) or video sources from the playlist screen on page 23.
6Use the touch panel keys on the screen to control your iPod.
ÜFor details, refer to Using the touch panel keys on page 21.
When playing music with an application installed to an iPhone, the playback information may be displayed. You may be able to operate the playback information with the touch panel keys.
Reading the screen
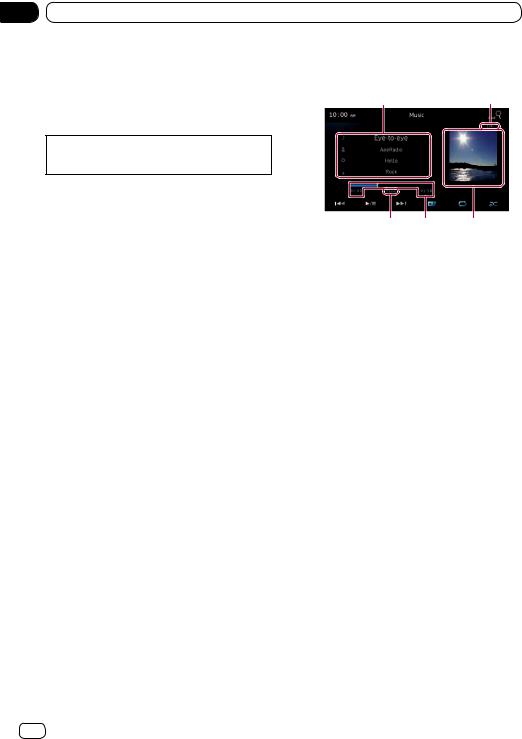
Music

Current song (episode) information
• : Song title (episode)
Shows the title of the current song. When a podcast is played, the episode is displayed (when available).
• : Artist name (podcast title)
Shows the artist name currently playing. When a podcast is played, the podcast title is displayed (when available).
• : Album title (release date)
Shows the title of the album for the song. When a podcast is played, the release date is displayed (when available).
• : Genre indicator
Shows the genre of the current song (when available).
If there is no corresponding information, the following messages are displayed.
•Artist name : No Name
•Album title : No Title
•Genre indicator : No Genre
Song number
Shows the song number and the total number of songs.
Album artwork
Album art work for the current song (episode) is displayed if it is available.
Play time
Shows the elapsed time, remaining time and time bar of the current song (episode).
Pause indicator
Appears the pause indicator while pausing playback.
Current time
20 En
Playing iPod music and video
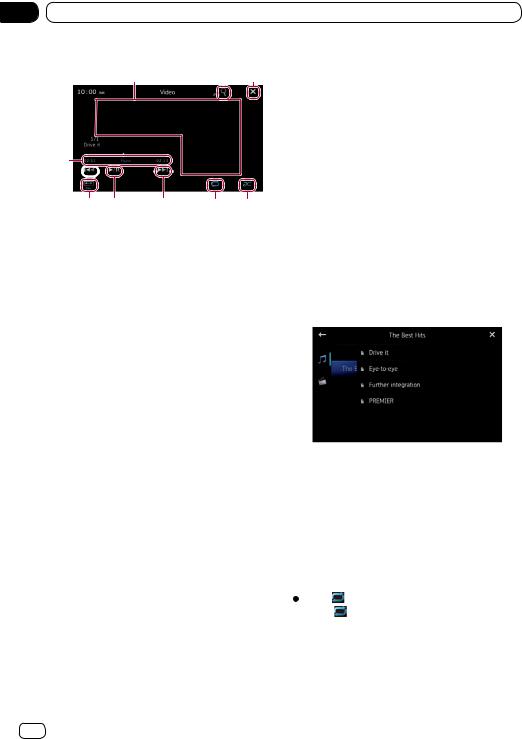
Video


Play time
Shows the elapsed time, remaining time and time bar of the current video.
Pause indicator
Appears the pause indicator while pausing playback.
Current video title
Shows the title of the current video.
If there is no corresponding information, “No Name” is displayed.
File number
Shows the file number and the total number of files.
Current time
Using the touch panel keys
Music

Displays the playlist screen.
• : Song list
Displays the songs in the connected iPod in alphabetical order.
• : Artist list
Displays a list of all artists saved in the connected iPod.
• : Album list
Displays a list of all albums saved in the connected iPod.
• : Genre list
Displays a list of all genres saved in the connected iPod.
ÜFor details, refer to Narrowing down song (episode) or video sources with the list on page 22.
Displays the album playlist.
ÜFor details, refer to Narrowing down song (episode) or video sources with the list on page 22.
Displays the playlist screen that can be used to search for song or video sources in your iPod.
ÜFor details, refer to Selecting song (episode) or video sources from the playlist screen on page 23.
Plays songs in random order.
ÜFor details, refer to Random play (shuffle) on page 23.
Selects the repeat range.
ÜFor details, refer to Repeating playback on page 22.
Changes the audiobook speed.
ÜFor details, refer to Changing the audiobook speed on page 23.
Tapping the  key skips to the start of the next song or chapter. Tapping the
  key once skips to the start of the current song
or chapter. Tapping the  key twice quickly will skip to the previous song or
chapter. Touching and holding the  key or the
  key performs fast reverse or fast
forward.
Switches between playback and pause.
Performs fast reverse or fast forward by dragging the playback point.
Chapter
05
video and music iPod Playing
En 21
Chapter
05 Playing iPod music and video
Video


Switches to full-screen mode.
Displays the playlist screen that can be used to search for song or video sources in your iPod.
ÜFor details, refer to Selecting song (episode) or video sources from the playlist screen on page 23.
Hides the touch panel keys. If you want to display the touch panel keys again, tap anywhere on the screen.
Plays videos in random order.
ÜFor details, refer to Random play (shuffle) on page 23.
Selects the repeat range.
ÜFor details, refer to Repeating playback on page 22.
Tapping the  key skips to the start of the next video or chapter. Tapping
  once skips to the start of the current video or
chapter. Tapping  twice quickly will skip to the previous video or chapter. Touching
and holding  or
or  performs fast reverse or fast forward.
Switches between playback and pause.
Changes the screen mode.
ÜFor details, refer to Changing the wide screen mode on page 24.
Performs fast reverse or fast forward by dragging the playback point.
Using the functions
Narrowing down song (episode) or video sources with the list
Tapping an item on a list allows you to search for song (episode) or video sources and play them in your iPod.
1 Tap the category list you want to search.
ÜFor details, refer to Using the touch panel keys on page 21.
■If you tap the  key, return to the playback screen.
■If you tap the  key in the playlist, the previously selected menu screen is displayed.
■If you tap a category list in the upper folder, the playlist screen changes to the selected category.
2 Search for the song (episode) you want to play from the playlist.
ÜFor details, refer to Selecting song (episode) or video sources from the playlist screen on page 23.
Repeating playback
There are two repeat play types for playback.
Tap . |
|
Tapping |
changes the setting as follows: |
• (All): Repeats all songs or videos in the selected list.
• (One): Repeats just the current song or video.
22 En
Playing iPod music and video
Random play (shuffle)
This function shuffles songs, albums or videos and plays them in random order.
Tap  .
.
Tapping  changes the setting as follows:
• (Off): Does not shuffle.
• (Songs): Plays back songs or videos in random order within the selected list.
• (Albums): Selects an album randomly, and then plays back all songs in that album in order.
Changing the audiobook speed
The playback speed can be changed while playing an audiobook.
Tap |
. |
Tapping |
changes the setting as follows: |
• (Normal): Playback in normal speed.
• (Faster): Playback faster than normal speed.
• (Slower): Playback slower than normal speed.
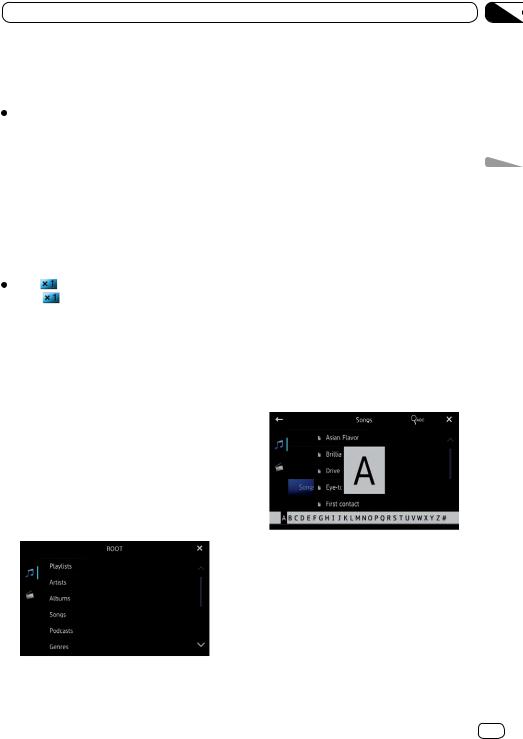
Selecting song (episode) or video sources from the playlist screen
You can search for the song (episode) or video you want to play from the playlist screen.
1Tap the  key to display the playlist screen.
2Tap  or
or  , then select the category you want to search for.
■If you tap the  key, return to the playback screen.
Category lists (for music):
•Playlists
•Artists
•Albums
•Songs
•Podcasts
•Genres
•Composers
•Audiobooks
Category lists (for video):
•Video Playlists
•Movies
•Music Videos
•TV Shows
•Video Podcasts
•Rented Movies
•Video ITunesU
Category items that do not correspond to the connected iPod are not displayed.
3 Tap the  key to display the alphabet search screen.
The  key is not displayed in the top category list or the song list.
■If you tap the  key in the playlist, the previously selected menu screen is displayed.
■If you tap a category list in the upper folder, the playlist screen changes to the selected category.
Chapter
05
video and music iPod Playing
En 23

Chapter
05 Playing iPod music and video
4 Tap the first letter of the title of the song/video you are looking for.
While searching, touch panel key operation is not available.
■To refine the search with a different letter, tap [Cancel].
5Tap the title of the list that you want to play.
Repeat this operation until you find the desired song/video.
6Start playback of the selected list.
Changing the wide screen mode
Tap  .
.
Tapping  to change the setting as follows:
•Full (full screen): A 4:3 picture is enlarged in the horizontal direction only, enabling you to enjoy a 4:3 TV picture (normal picture) without any omissions.
•Zoom (zoom): A 4:3 picture is enlarged in the same proportion both vertically and horizontally; ideal for a cinema-sized picture (wide screen picture).
•Normal (normal): A 4:3 picture is displayed normally, giving you no sense of disparity since its proportions are the same as that of the normal picture.
You cannot operate this function while driving.
When a video is viewed in a wide screen mode that does not match its original aspect ratio, it may appear different.
Remember that using the wide mode feature of this system for commercial or public viewing purposes may constitute an infringement on the author’s rights protected by Copyright Law.
The video image will appear coarser when viewed in “Zoom” mode.
24 En
Using Pandora® internet radio
 CAUTION
For safety reasons, never operate this product and mobile devices while driving. To operate this product and mobile devices, stop the vehicle in a safe place and apply the parking brake and operate them according to law.
You can experience Pandora by connecting an iPhone or Android device that has the Pandora application installed.
Before performing operations described in this chapter, be sure to read Using app-based connected content in Important Information for the Users.
Certain features of the Pandora service are not available when accessing the service through this product, including, but not limited to, creating new stations, deleting stations, emailing current stations, buying songs from iTunes or Google Play®, viewing additional text information and adjusting Cell Network Audio Quality.
Pandora internet radio is a music service not affiliated with Pioneer. More information is available at http://www.pandora.com
Pandora is a registered trademark of Pandora Media, Inc.
Starting procedure
1Connect your mobile device.
ÜFor details, refer to Connecting and disconnecting mobile devices on page 10.
2Press the Home button to display the Home screen.
3Tap [Pandora] on the Home screen.
ÜFor details, refer to Home screen on page 14.
When you use Pandora internet radio in iPhone with Lightning connector or Android device, you must make the Bluetooth connection with Serial Port Profile (SPP) from this product.
Chapter
06
4Start up the Pandora application installed on the mobile device.
The Pandora source screen appears.
Before starting up, sign-in to Pandora from your mobile device.
5Use the touch panel keys on the screen to control Pandora.
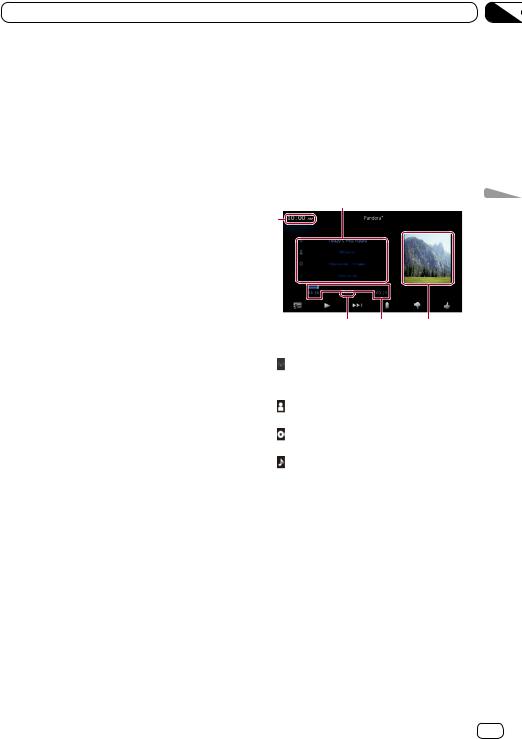
Reading the screen
|
|
|
|
|
|
®PandoraUsing |
||
|
|
|
|
|
|
|
|
|
|
|
|
|
|
|
|
|
internet |
|
|
|
|
|
|
|
|
|
|
|
|
|
|
|
|
|
|
|
|
|
|
|
|
|
|
|
|
|
|
|
|||||
Current track information |
|
|
radio |
|||||
|
Shows the Pandora station name the |
|||||||
• : Station name indicator |
|
|
|
|||||
|
tuner is currently tuned in to. |
|
|
|
||||
• |
: Artist name |
|
|
|
|
|
||
|
Shows the artist name currently playing. |
|
||||||
• |
: Album title |
|
|
|
|
|
||
|
Shows the title of the album for the track. |
|
||||||
• |
: Track title |
|
|
|
|
|
||
|
Shows the title of the current track. |
|
||||||
“-------” is displayed if there is no corresponding information.
Album artwork
Album artwork for the current track is displayed if it is available.
Play time
Shows the elapsed time, remaining time and time bar of the current track.
Pause indicator
Appears the pause indicator while pausing playback.
Current time
En 25
Chapter
06 Using Pandora® internet radio
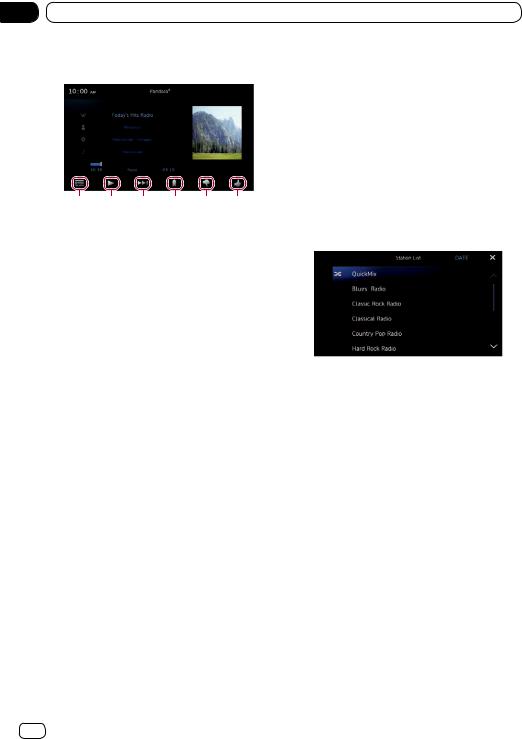
Using the touch panel keys
Gives a “Thumbs Up” to the track currently playing.
Gives a “Thumbs Down” to the track currently playing and skips to the next track.
Adds information for the track currently playing to bookmarks.
Skips to the start of the next track.
Switches between playback and pause.
Displays the list of your Pandora stations to select one of them to play.
ÜFor details, refer to Selecting a Pandora station from the list on page 26.
Using the function
Selecting a Pandora station from the list
1 Tap  .
.
The station list screen appears.
2Select the search mode.
■If you tap [A-Z], the station list can be sorted alphabetically.
■If you tap [DATE], the station list can be sorted in order of dates the items were created.
3Scroll the list by tapping  or
or  to display the item you want to select.
4Tap the item.
Tapping [QuickMix] plays only one track based on particular musical characteristics at a time from several shuffled stations.
26 En
 Loading...